Fintek PANAMA SILENT Operating manual

MADE IN ITALY
USER’S AND ISTALLATION MANUAL PANAMA HYBRIDUSER’S AND ISTALLATION MANUAL PANAMA HYBRID
PANAMA
SILENT HYBRID

CONTENTS
1. GENERAL INFORMATION
1.1 INTRODUCTION…….…………………………………………………….……3
1.2 IMPORTANT SAFETY INSTRUCTIONS……………………………...…3
1.3 RECEIVING THE GOODS…………………………………………………….4
1.4 HANDLING………………………………………………………………………..4
1.5 LIST OF ACCESSORIES…………………………………………………….….4
1.6 TECHNICAL FEATURES………………………………………………….…..5
2. INSTALLATION
2.1 POSITIONING OF THE AIR CONDITIONER…………………….….…6
2.2 PAPER TEMPLATE…………………………………………….…………..…..6
2.3 DRILLING THE WALL………………..……………………..……….…….….8
2.4 FASTENING THE BRACKET..……………………………..…………….….9
2.5 INSTALLATION OF THE PIPES……………………………….…………...9
2.6 FITTING THE AIR CONDITIONER ON BRACKET………………….10
2.7 FITTING THE GRATINGS…………………………………………………..10
3. CONTROL OPERATION AND MAINTENANCE
3.1 INSTRUCTION OF LCD ICONS………………………………………....11
3.2 REMOTE CONTROL FUNCTIONS…………………...………………..12
3.3 ON BOARD CONTROL FUNCTION………………...………………...13
3.4 HEATING MODE PROGRAM SETTING…………...………………...14
3.5 TEMPERATURE COMPENSATION SETTING……………………...14
3.6 MAINTENANCE …………………….……….……..…………………….….15
3.7 FRESH AIR SYSTEM……………….……….……...…………………….….16
3.8 PROBLEM SOLVING ………………………………………………………..16
4. ACCESSORY INSTALLATION
4.1 SILENT HYBRID WATER CONNECTION………………….………….17
4.2 SOFT GRATINGS INSTALLATION………………………………………18
2 PANAMA SILENT HYBRID

1. GENERAL INFORMATION
1.1 INTRODUCTION
PLEASE NOTE: Do not dispose of any packaging until the installation of the air conditioner is
completed.
After having removed the packing, check that all the content is intact and complete. (See list of
accessories). In the event of missing parts, contact your retailer.
This air conditioner has been designed to cool or heat the air of a room and should only be used
for this purpose.
The manufacture cannot be held liable for damage caused to property or injury to persons or
animals due to incorrect installation, regulation and maintenance or improper use.
This air conditioner contains R32 refrigerant, at the end of its life, the disposal of this air
conditioner must be in accordance with the strict regulation governing the recycling of this
product, please operate with caution during the disposal. Please contact your local authority or
regulatory advice.
Do not switch on before having totally assembled the air conditioner and before installing in its
correct operating position.
Before starting the appliance, check that it is correctly earthed, according to the legislation in force
in the country concerned.
1.2 IMPORTANT SAFETY INSTRUCTIONS
When using electrical appliances, basic safety precautions should always be followed:
Do not place objects on the product or allow objects to obstruct the inlet or outlet openings.
Extreme care should be taken when any product is used by, or near children and pets, and
whenever the product is left operating and unattended.
Please note:
Before operating the product remove the air conditioner from its packaging and check it is in good
condition.
Do not let children play with the packaging, for example plastic bags.
Do not operate any product with a damaged cord or lug, or after the air conditioner malfunctions,
has been dropped, or damaged in any manner. Return the air conditioner to an authorized service
center for examination and repair to avoid a hazard.
Do not attempt to repair or adjust any electrical or mechanical functions on this air conditioner as
this may void warranty, contact your service engineer.
Always operate the product from a power source of the same voltage, frequency and rating as
indicated on the product identification plate.
This air conditioner is not intended for use in wet or damp locations.
Do not place the air conditioner near an open flame, cooking or heating appliance, or hot surface.
Do not let the power cord hand over the edge of a table or counter. Arrange the power cord away
from an area where it may be tripped over.
Never place the power cord under a carpet or rug. Do not operate the air conditioner in areas
where petrol, paint, or other flammable liquids are used or stored.
Do not carry out any cleaning or maintenance, or access internal parts until the air conditioner has
been disconnected from the mains electricity supply.
Do not alter the safety or regulating devices without the permission and instructions of the air
conditioner manufacture.
Do not pull, remove or twist the electrical cable connected to the air conditioner, even if
disconnected from the mains electricity supply.
Avoid prolonged direct contact with the flow of the air from the air conditioner and the room
being closed with no ventilation for a long period of time.
PANAMA SILENT HYBRID 3

Repair or maintenance work must be carried out by a service engineer or by qualified technicians
in compliance with the instructions given in this booklet. Do not alter the appliance, since
hazardous situations could be created while the manufacture of the appliance will not be liable for
any damage or injury caused.
This instruction booklet is an integral part of the appliance and should therefore be carefully
preserved and always accompany the appliance in the event of transfer to another owner or user
or another installation engineer. Should the booklet be damaged or lost, please request an
additional.
1.3 RECEIVING THE GOODS
The air conditioner is delivered in a protective packaging and is accompanied by an instruction
manual.
This manual is an integral part of the air conditioner and should therefore be carefully read and
preserved. When the air conditioner is unpacked, please check that the air conditioner and the
accessory pack are complete and undamaged.
1.4 HANDLING
Be fully aware of the weight of the air conditioner before attempting to lift it. Take all necessary
precautions to avoid damaging the product or causing personal injury. It is advisable to remove
the packaging only when the air conditioner has been located in the point of installation. Carefully
remove the adhesive strips positioned on the air conditioner. Packaging components must be
disposed correctly and not left within reach of children, since they are a potential source of danger.
1.5 LIST OF ACCESSORIES(P0)
1. FASTENING BRACKET
2. REMOTE CONTROL
3. DRAINAGE PIPE
4. EXTERNAL GRATING
5. AIR PIPE FILM
6. KIT OF SCREWS
7. INSTRUCTION MANUAL
8. PAPER TEMPLATE FOR WALL DRILLING
9. 160mm ring
10. 150mm ring
IMPORTANT NOTE: Preserved the original packaging for the period of warranty of 2 years. In
the event of a fault or failure, the device must be taken to the nearest service center with its
original packaging. The return of the product without original packaging, will void the warranty
terms of 2 years.
4 PANAMA SILENT HYBRID

Panama Silent & Panama Silent Hybrid are conform to the European directives :
• Low voltage 2014/35EU and with amendments 92/31/EEC and 93/68/EEC.
• Electro-magnetic compatibility 2004/108/EC
• Use restrictions of hazardous substances in electrical and electronic equipment 2011/65/EC
(RoHS2)
• Waste electrical and electronic equipment 2002/96/ EC (WEEE).
• Energy consumption indication on the labels of energy related products 2010/30/EU
Waste electrical products should be disposed of with household waste. Please recycle
where facilities exist. Check with your local authority or retailer for recycling advice.
Do not dispose this product as unsorted municipal waste. Collection of such waste separately for
special treatment is necessary.
Any batteries used in the remote control contain materials, which are hazardous to the
environment. They must be removed from the remote control when they reach the end of their
life and disposed of responsibly.
1.6 TECHNICAL FEATURES(P1,P2)
!
!
"
"
#
#
$
$
%
%
&
&
'
'
(
(
)
)
(
(
*
*
(
(
&
&
+
+
,
,
%
%
$
$
)
)
-
-
&
&
!
!
"
"
#
#
$
$
%
%
&
&
'
'
(
(
)
)
*
*
+
+
"
"
,
,
'
'
!""#$%&'()*)($+,-'./012345'!"##$%&!'() !"##$%&!'()
67)+$%&'()*)($+,-'./012345'!"##$%&!'() !"##$%&!'()
8#7(+9$()#'47)+-'./012345'"'##$'"!#() "'##$'"!#()
6"+':)+79'()*)($+,--'./012345'
)
""%#$*###()
;)+7<'="#+)&7'/>5'./0&./0&
?@A"9@7<'*":79'$%'(""#$%&-'/.5'102&102&
?@A"9@7<'(B997%+'$%'(""#$%&-'/?5'/345& /345&
?@A"9@7<'*":79'$%'47)+$%&-'/.5'462&462&
?@A"9@7<'(B997%+'$%'47)+$%&-'/?5'/30/& /30/&
?$9'C#":'/DE345'/40& /40&
F"$A7'#7=7#'/<03?5'20&20&
G74BD$<$C$()+$"%'()*)($+,-'
/H3IJ45'
734& 734&
K*+$"%)#'+7D*79)+B97'/97D"+7'
("%+9"#5'
518/09& 518/09&
LBA7'/1EMNOH5'.20:).20:&
;7C9$&79)%+';/.);/.&
P#"@)#':)9D79'*"+7%+$)#'#/P.Q5'462)462&
G$D7%A$"%A'63.3G/(D5'--./00./1'--./00./1'
.7$&4+/R&5'<4& <6&
*The above data could be change without notice in order to improve the performances.
** Hot water temperature is 50! in/40! out.
STANDARD TEST CONDITIONS –EN 14511-
OPERATING CONDITIONS IN COOLING AND DEHUMIDIFICATION MODE:
P1
P2
PANAMA SILENT HYBRID 5

-Inside 27!"DB, 19!"WB
-Outside 35! DB, 24! WB
OPERATING CONDITIONS IN HEATING MODE:
-Inside 20!"DB
-Outside 7! DB, 6! WB
2 INSTALLATION
2.1 POSITIONING THE AIR CONDITIONER(P3)
To maintain the best performance from your air conditioner, prevent breakdowns or hazards, you
must position it correctly. Please follow the guidelines and instruction below in full, as failure to do
so could cause potential installation problems.
After determining the best place for installation as described above, please check to ensure that
the wall can be drilled in the chosen area without interfering with other structures or installation
(beams, piers, pipes, wires, etc.).
Please also ensure that there are no obstacles on the outside of the wall, which may obstruct air
circulation through the drilled holes, for example: plants and their leaves, slats or paneling, drain
pipes, overflows and gratings, etc. Any obstruction could interfere with the correct performance of
the conditioner.
2.2 PAPER TEMPLATE (P4)
P4
P3
-The air conditioner must be installed on an
exterior wall that has access to the outside
with a minimum of a meters clearance to
the outside.
-The air conditioner must be fitted leaving
room all around as illustrated in the paper
template.
-The wall on which the air conditioner is
installed must be sturdy and able to
withstand the weight of the air conditioner.
Fasten the template to the wall once the following
guidelines have been thoroughly checked.
-Do not drill any holes until you are completely
confident that there are no obstacles in the area
you wish to drill and there are no obstructions,
which could be hidden by the construction of the
wall, for example: Electrical wiring, water & gas
pipes or supporting lintels or beams.
-Ensure that a spirit level is used, as the air
conditioner must be level.
-Follow the installation instruction in full.
6 PANAMA SILENT HYBRID

PANAMA SILENT HYBRID 7

2.3 DRILLING THE WALL (P5)
Please note: If you are drilling the hole above ground floor level, please ensure that an area has
been secured and while the holes are drilled the outside area is supervised, until drilling has been
completed.
INTAKE AND OUTLET HOLES:
-This operation should be carried out using the proper tools (diamond tip or core borers drills with
high twisting torque and adjustable rotation speed).
-Fasten the template to the wall taking care to check the distance from the floor or ceiling and
keep it horizontal by using a spirit level.
-Use a pilot drill to mark the centre of each core hole to be drilled.
Use a core boring head having a diameter of 162mm to drill the two holes for intake and outlet the
air.
DRAINAGE HOLE
This air conditioner has a double drainage system to drain the condensate moisture automatically.
Before install the air conditioner, choose which one is the suitable system for your installation.
Please read carefully the following instructions.
P5
It is recommended that the holes must have
a slightly downward inclination of 3-5
degree to prevent any backflow of water
from the pipes.
System “A”: (P6,P7)
Please unplug the rubber cup from drainage
hole (P6).
Connect the drain pipe (from rubber terminal)
to the back side of air conditioner.
System “A” is more common use, and the
discharge pipe go outside where there is no
problem to connect or to discharge it, this
solution is ok for hot country and normal cold
temperature outside. With this solution, you
can drain the condensate moisture to a suitable
place, do not cause any problem to your
neighbors.
P6
P7
8 PANAMA SILENT HYBRID

2.4 FASTENING THE BRACKET (P9)
2.5 INSTALLATION OF THE PIPES (P10)
-Insert the rings into the holes.
System “B”: Atomizing system (P8)
In case of impossibility to install the
drainage pipe as showed on “A” system,
atomizing system is available for this unit.
If use system “B”, please block the black
rubber cup from system “A”.
Atomizing nozzle is fixed in the center of
grating, connect the water pipe with
atomizing nozzle first, then fix the grating
on the wall (see 2.7).
Before fitting the air conditioner on the
bracket, it is necessary to connect the
water pipe with water connector on the
unit.
-Drill the holes for anchoring the fastening
bracket to the wall using preferably the 17
holes showed in black on the paper
template.
-The anchor bolts provided require a 8mm
hole. The wall should be inspected to
determine if provided bolts are useful or if
it is necessary to use a different
anchorage. The manual facture is not
liable in case of underestimation of the
structural consistency of the anchorage
made at the time of installation.
- After drilling the holes, the plastic sheet
supplied with the air conditioner need to be
fitted through them.
- Measure the depth of the wall and cut supplied
plastic sheet.
- Roll the sheet and insert it into the hole, paying
attention to the joint line, which must be always
upper position. Remember that the sheet must
have the same inclination of the holes(min 3°).
P8
P9
P10
PANAMA SILENT HYBRID 9
2.6 FITTLING THE AIR CONDITIONER ON BRACKET(P11
,
,
P11)
The appliance shall not be installed the laundry.
The appliance must be positioned so that the plug is accessible.
The appliance shall be installed in accordance with national wiring regulations.
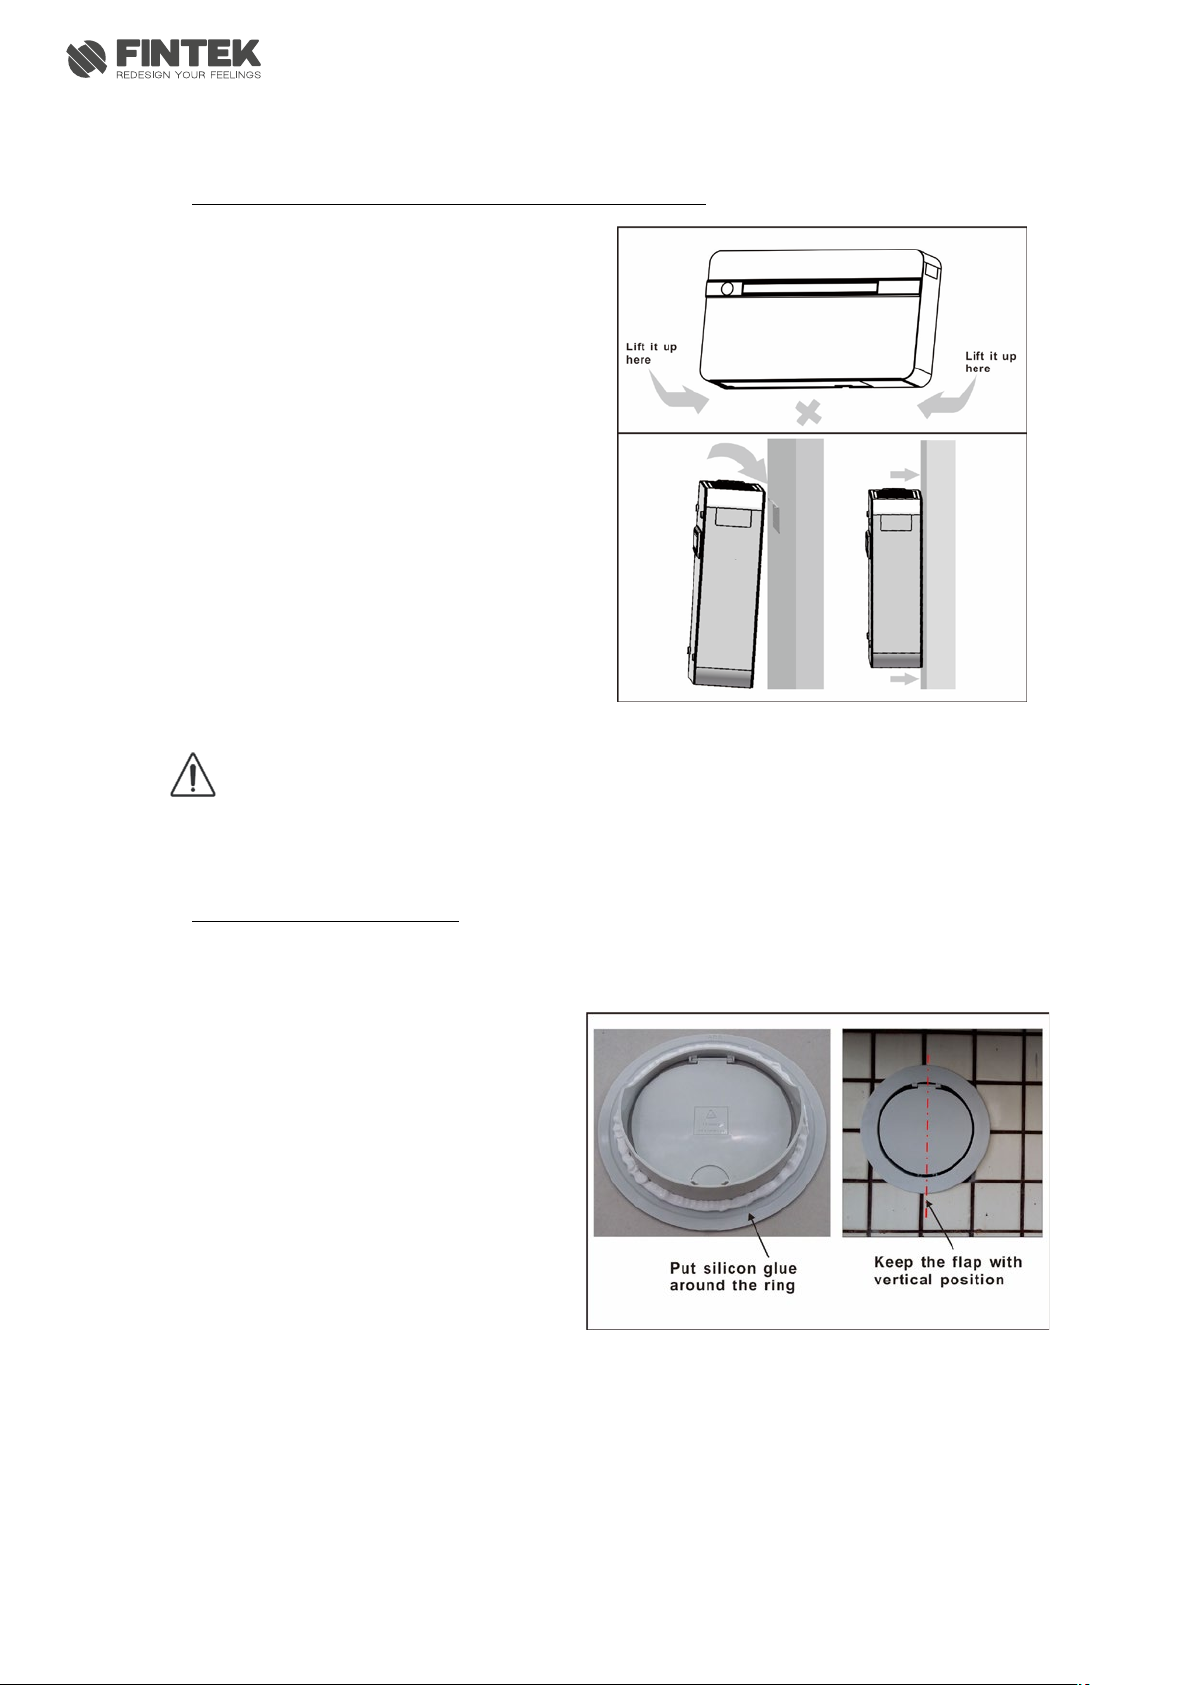
2.7 FITTLING THE GRATINGS(P13)
To fit the external two gratings, please proceed as following:
After checking again that the fastening
bracket is securely fastened to the wall, and
that any necessary preparations for electric
connection and condensate drainage (if it
needs) have been made, fasten the air
conditioner to its supporting bracket.
Lift it up by holding the sides at the bottom.
Tilt the air conditioner slightly toward you to
facilitate the operation of fastening it to the
bracket. The air conditioner can now be
pushed firmly against the wall. Inspect
carefully the installation to make sure that
the insulating back panel must fit firmly
against the wall and there are no fissures at
the back of the air conditioner.
-Put the silicon glue around the ring, and fix
the two gratings from outside.
-Pay attention the flap direction, always
keep the shaft side with upper direction.
-Try to open and close the flap, should be no
any interference.
-For gratings surface, we could paint them
like the wall if necessary.
P11
P12
P13
10 PANAMA SILENT HYBRID

3 CONTROL OPERATION AND MAINTENANCE
3.1 INTRODUCTION OF LCD ICONS
Icons Means
Auto
Cooling
Dry
Fan
Heating
Fan speed
Wind direction
Display
Electrical heat
Lock
Celsius/ Fahrenheit
ti
TIMER ON
TI
TIMER OFF
PANAMA SILENT HYBRID 11

3.2 REMOTE CONTROL FUNCTIONS
1. Celsius/Fahrenheit function “℃/℉”:
Press “℃/℉” button to switch between “Celsius” and “Fahrenheit”.
2. Timer ON/OFF:
This function can be effective only when the original remote control has timer function. After
pressing “TIMER ON” or “TIMER OFF” buttons, the timer indicator is displayed, and the A/C is
now in timer state.
3. Child Lock:
Lock: Press “ ” and “LOCK” buttons at the same time, then the “ ” icon will appear on
the display screen.
Unlock: Press “ ” and “LOCK” buttons at the same time, then the “ ” icon will disappear
from the display screen.
4. Clock:
1) Press and hold “ ” and “MODE” buttons at the same time and the remote control will
enter into a clock mode, with corresponding hour digits starting to flash.
2) Press “TEMP ” (TEMP ) button to increase (decrease) 1 hour at each press. Hold for 2
seconds to increase or decrease continuously.
3) Press “ ” button to complete setting the appropriate hour.
4) At this point, the corresponding minute digits begin to flash, use the “TEMP ” (TEMP )
button to set appropriate minutes.
5) After setting minutes, press “ ” button to quite clock settings.
5. Fast cooling and fast heating:
Fast cooling: Press “F.COOL” button to set cooling mode, 18℃,strong wind and auto wind
direction.
Fast heating: Press “F.HEAT” button to set heating mode, 30℃, strong wind and auto wind
direction.
6. Battery replacement memory:
The remote control’s chip has a built-in memory function, ensuring that there is no need to
reset for a short-term power off like battery replacement etc.
7. Backlight
The backlight covers the whole panel. Press any button to light it, and it will switch off after 10
seconds if there is no operation.
8. LED Flashlight
Press&hold the “LED ” button to switch on the LED light, release it to switch it off.
12 PANAMA SILENT HYBRID

3.3 ON BOARD CONTROL FUNCTION
1. ON/OFF button: Turn on or turn off the air conditioner.
2. MODE button: Set up the air conditioner working mode. COOLING, HEATING, FAN, DRY and
AUTO mode are for selection. When DRY mode is acted, blue LED1 and red LED1 will be ON.
3. COOLING LED: Blue LED1, LED2, LED3 show cooling state.
4. HEATING LED: Red LED1, LED2, LED3 show heating state.
5. UP button: Increase the temperature or time.
6. DOWN button: Decrease the temperature or time.
7. FAN SPEED button: Set up the fan speed, High, Middle, Low and AUTO speed are for
selection.
8. FAN SPEED LED: White LED1, LED2, LED3 relate fan speed state. LED1 ON means LOW speed;
LED1 and LED2 ON means MIDDLE speed; LED1, LED2 and LED3 ON means HIGH speed.
LED1,LED2 and LED3 flash means AUTO speed.
9. ELECTRICAL HEAT button: Turn on or Turn off the electrical heater.
10. ELECTRICAL HEAT LED: Shows the electrical heater state.
11. TEMPERATURE/TIME/MODE display window:
This window will show temperature, time, setting mode and working program.
1) Select working mode by pressing MODE button, window will show working mode signal
for 5 seconds, then will display ambient temperature for 60 seconds. See below table for
different signal indication:
Signal Co HE dE FA AU
Mode COOLING HEATING DRY FAN AUTO
2) After adjusting the setting temperature, the setting temperature will flash 15 seconds,
then window will show ambient temperature for 60 seconds. After that, the window will
be off until next operation.
PANAMA SILENT HYBRID 13

3.4 HEATING MODE PROGRAM SETTING
3.5 TEMPERATURE COMPENSATION SETTING
Unit can work with 3 different heating modes. We can change the setting by pressing the
buttons on command on board.
When unit is with standby condition, pressing both “MODE” and “FAN SPEED” buttons for 3
seconds,
If 1 beep from unit, the display will show 01 for 3 seconds, and unit will work with Program 1
heating mode. (Default setting from factory)
If 2 beep from unit, the display will show 02 for 3 seconds, and unit will work with Program 2
heating mode.
If 3 beep from unit, the display will show 03 for 3 seconds, and unit will work with Program 3
heating mode.
Program 1 is default program from factory setting. Unit will work with PTC heating for silent
operation purpose in heating. Compressor and outdoor will not work with Program 1.
Program 2: When unit works with High and Middle speed, compressor and outdoor fan will
work in heating mode. When unit works with Low speed, only PTC works in heating mode for
silent purpose.
Program 3: Unit will work with compressor in heating mode.
1. Temperature compensation setting for cooling mode:
When unit is with standby condition, pressing both “MODE” and “DOWN” buttons for 3 seconds,
the display will show “+2”. It is default setting from factory. Means, when detected temperature
is 22℃, display will show 24℃. The adjustment range is -3,-2,-1,0,+1,+2,+3. By pressing “UP”
and “DOWN” buttons, we can select the data to meet the different environment.
2. Temperature compensation setting for heating mode:
When unit is with standby condition, pressing both “MODE” and “UP” buttons for 3 seconds, the
display will show “-2”. It is default setting from factory. Means, when detected temperature is
22℃, display will show 20℃. The adjustment range is -3,-2,-1,0,+1,+2,+3. By pressing “UP” and
“DOWN” buttons, we can select the data to meet the different environment.
3. Temperature setting for outdoor motor speed alternation and defrost cycle:
When unit is with standby condition, pressing both “MODE” and “ELECTRICAL HEAT” buttons for
3 seconds, the display will show “0”. It is default setting from factory.
The adjustment range is 0, 1, 2, 3. By pressing “UP” and “DOWN” buttons, we can select the data
to meet the different environment.
“0” Means, outdoor motor speed alternation temperature is -3℃, defrost cycle temperature is -
8℃.
“1” Means, outdoor motor speed alternation temperature is -2℃, defrost cycle temperature is -
7℃.
“2” Means, outdoor motor speed alternation temperature is -1℃, defrost cycle temperature is -
6℃.
“3” Means, outdoor motor speed alternation temperature is 0℃, defrost cycle temperature is -
5℃.
14 PANAMA SILENT HYBRID

3.6 MAINTENANCE (P14,P15,)
FILTER CLEANING:
EXTERNAL CLEANING:
-Disconnect the air conditioner from the electrical supply.
-Wipe external surfaces clean with a damp cloth only.
-Do not use an abrasive cloth and/or solvents, as this may damage the surfaces.
-Do not use excessively wet cloth or sponges, as water stagnation could damage the air
conditioner and compromise safety.
The filter should be regularly cleaned to keep
the air conditioner running efficiently. Clean the
filter every two weeks.
How to proceed:
-Disconnect the air conditioner from the
electrical supply.
-Remove the top inlet grille as pic showed. (P14)
-Take out the filter as shown. (P15)
-Proceed to wash it (not use hot water) and only
when they are dried replace them in the same
way.
ATTENTION: Do not use the air conditioner
without filter as it could seriously damage the
air conditioner.
P16
P14
P15
PANAMA SILENT HYBRID 15

3.7 FRESHA AIR SYSTEM
3.7 PROBLEM SOLVING
-If the supply cord damaged, it must be replaced by manufacture or its service agent or a
similar qualified person in order to avoid a hazard.
- The unit has Auto-restart function. When electrical current is switched off during working mode,
the unit would stop working. When electrical current is switched on, unit would work with former
working mode automatically, no need to Turn ON the unit by remote control.
-The max operation temperature for the air conditioner (max cooling: outdoor DB43!/WB26!,
indoor DB32!/WB23!; min heating: outdoor DB-5!/WB-6!, indoor DB20!).
-This appliance is not intended for use by person (including children) with reduced physical,
sensory or mental capabilities, or lack of experience and knowledge, unless they have been given
supervision or instruction concerning use of the appliance by a person responsible for their safety.
-Children should be supervised to ensure that they do not play with the appliance.
When the fresh air system is open, the air
conditioner will change the room air automatically,
in this way new clean and fresh air will intake to
the room. You can open or close the fresh air
system any moment.
If the air fresh system is close, the air conditioner
performance is higher, so we suggest to maintain
the fresh air system closed and open it just a few
minutes per day.
P17
16 PANAMA SILENT HYBRID

4 ACCESSORY INSTALLATION
4.1 SILENT HYBRID WATER CONNECTION
Hot water exchanger is a useful option to
replace water radiator below the window,
improving machine performance and energy
saving for your room installation.
-To install this, you must remove the plastic
outlet frame and glass panel first. (P18)
- Be careful, do not damage the glass panel.
- Remove the 2pcs screws and plastic buckles
carefully. (P19)
- Then remove the glass panel carefully.
-Slide the side plate as arrow direction, and
take out the side plate. (P20)
-Connect inlet & outlet water pipe well. Check
carefully, if necessary, need to pass the pipes
through the side plate first. (P21, P22)
- Fix the side plate same solution like removing
it.
-Open the water system device. Open the air
purge valve to release the air inside the
exchanger. If there is no air inside the air purge
pipe, close the valve. And check the hydraulic
seal of the gasket.
- Fix the glass panel and outlet plastic frame. Be
careful, no damage the glass panel.
Plastic buckle
P18
P19
P20
P22
P21
PANAMA SILENT HYBRID 17

4.2 SOFT GRATINGS INSTALLATION
To fix the external two soft gratings, please
proceed as following:
Familiarize yourself with the fitting of the
grating to the tube before installation. Insert
the cords through the center hole of grating.
Fold the outer grating in half grasping the cord
with your free hand. Insert your arm inside the
pipe with the grating and push all the way to
the outside. Let the grating unfold and pull the
cord toward you. Both gratings fit on the inside
of the tube. With a little patience and
manipulation, the 2 gratings will fit the end of
the tubes. Grasping the cord, insert our fingers
between the fins and pull the grating toward
you until the same is properly slipped in the
pipe, keeping the fins in vertical position.
If the external grating is accessible to prevent
its removal, it is recommended to fasten it to
the wall with wall plugs and screws with a
diameter of 6mm. Tighten the cord and fasten it
to the dent on the internal flanges.
P23
P24
P25
P26
18 PANAMA SILENT HYBRID

PANAMA SILENT HYBRID 19

WWW.FINTEKSRL.COMWWW.FINTEKSRL.COM
via Tonso di Gualtiero, 46
47896 Faetano RSM
Tel +378 0549 901 950
www.finteksrl.com
Don’t miss the video presentations
of our air-conditioning units and
much more on our YouTube channel
Scopri i video di presentazione dei
nostri condizionatori e tanto altro
sul nostro canale YouTube
This manual suits for next models
1
Table of contents


