Fire Cam VL4 User manual

Oncall Body Worn Camera
User Manual VL4
o|V.1.0

©Fire Cam 2015 2
Contents
GLOSSARY OF TERMS
ONCALL BODY WORN CAMERA
3
4
4
5
5
6
6
7
8
8
8
9
Features of the Oncall Body Worn Camera -------------------------------------------------
Wearing the Oncall Body Worn Camera -----------------------------------------------------
Removing the Mounting Clip -----------------------------------------------------------------
Changing Batteries ---------------------------------------------------------------------------
Charging the Battery -------------------------------------------------------------------------
Connecting USB ------------------------------------------------------------------------------
Accessing Files -------------------------------------------------------------------------------
Camera Settings ------------------------------------------------------------------------------
Docking Station ------------------------------------------------------------------------------
Powering On and Off the Camera -----------------------------------------------------------
Recording Video -----------------------------------------------------------------------------
Pre-Event Record Mode ---------------------------------------------------------------------
Taking a Photo --------------------------------------------------------------------------------
Take an Audio Only Recording --------------------------------------------------------------
Night Vision Mode -----------------------------------------------------------------------------
Fire Cam app -----------------------------------------------------------------------------------
Contact Information ----------------------------------------------------------------------------
9
9
9
10
14
©Fire Cam 2015 3
O
ONCALL BODY WORN CAMERA
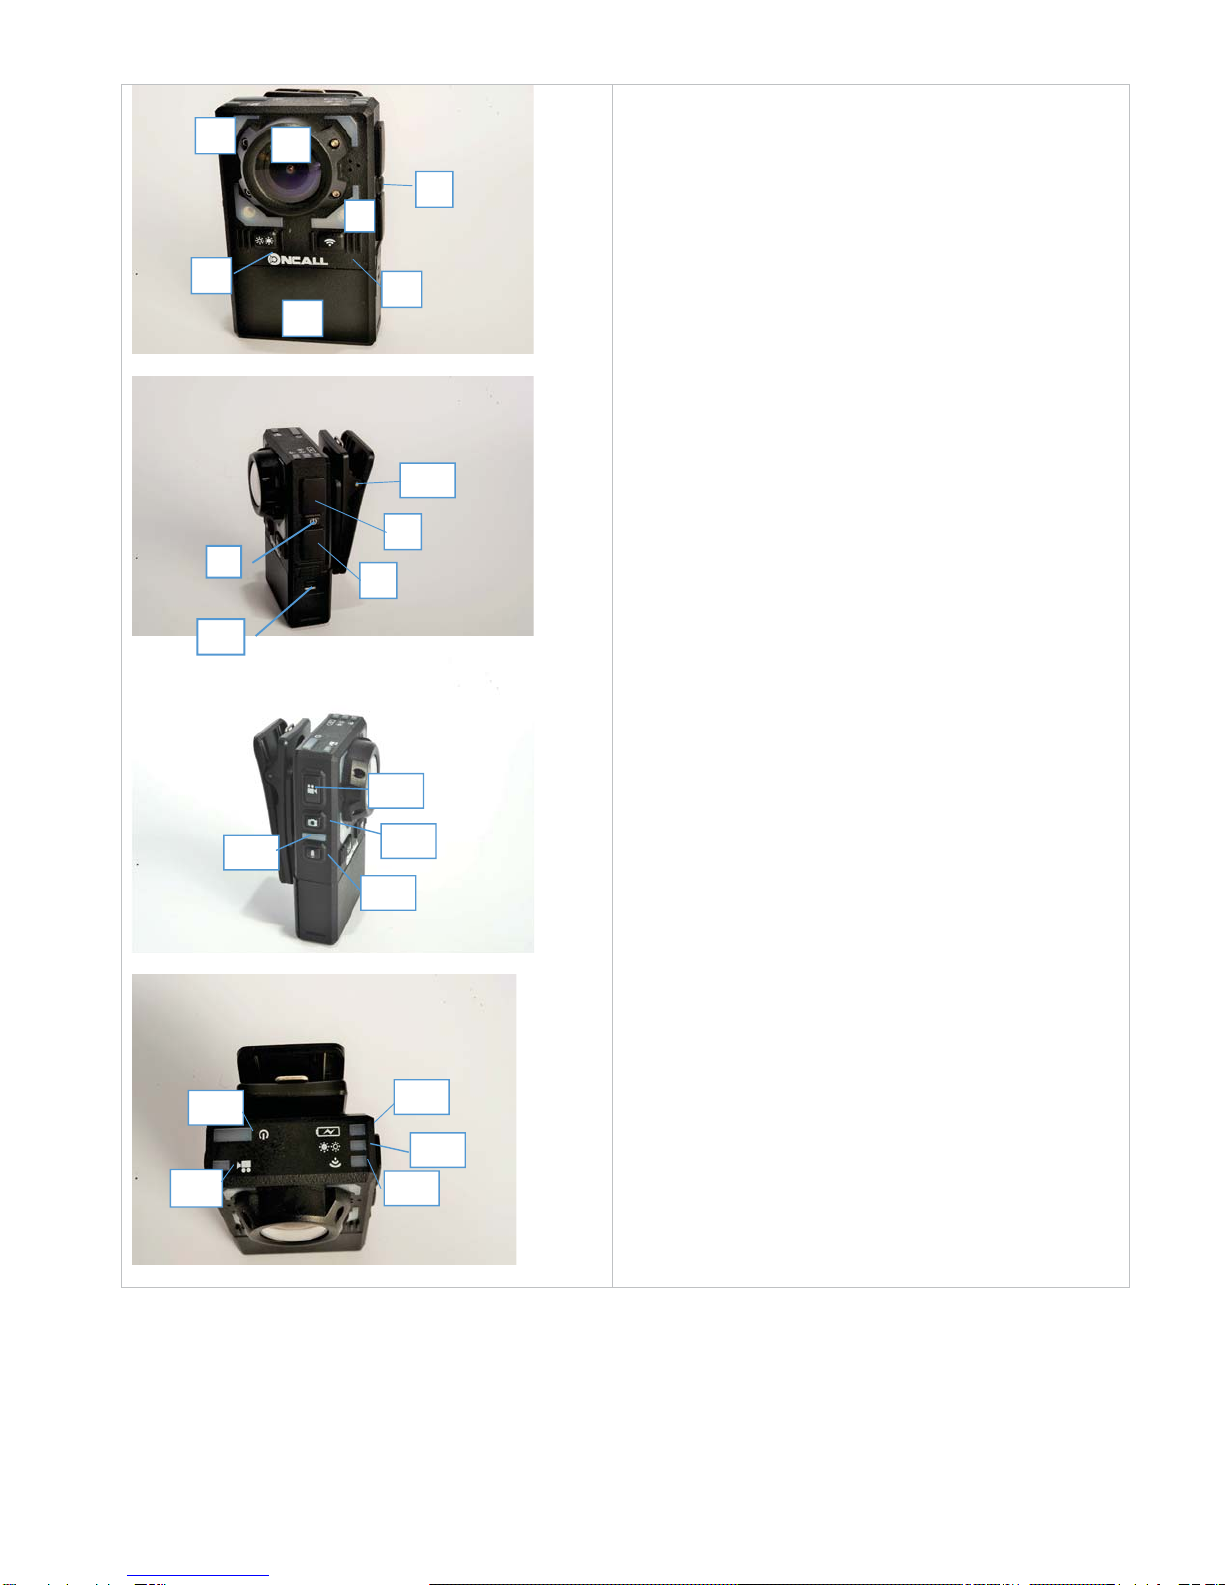
Features of the Oncall Body Worn Camera
1. Power Button
2. Lens Cover
3. IR/White Light Button
4. Record / White Light LEDs
5. IR LED
6. Wi-Fi Radio Button
7. Battery
8. HDMI Port (Not Used)
9. USB Port Cover
10. Battery Release Clip
11. Mounting Clip
12. Video Record Button
13. Photo button
14. Audio-only/Photo indicator
15. Audio-only Record button
16. Power indicator
17. Video recording indicator
18. Battery charging indicator
19. White Light/IR LED mode indicator
20. Wi-Fi indicator
2
4
1
8
9
5
36
7
11
12
13
14
15
16
17
18
19
20
1
10
©Fire Cam 2015 4
1. 2.
3.
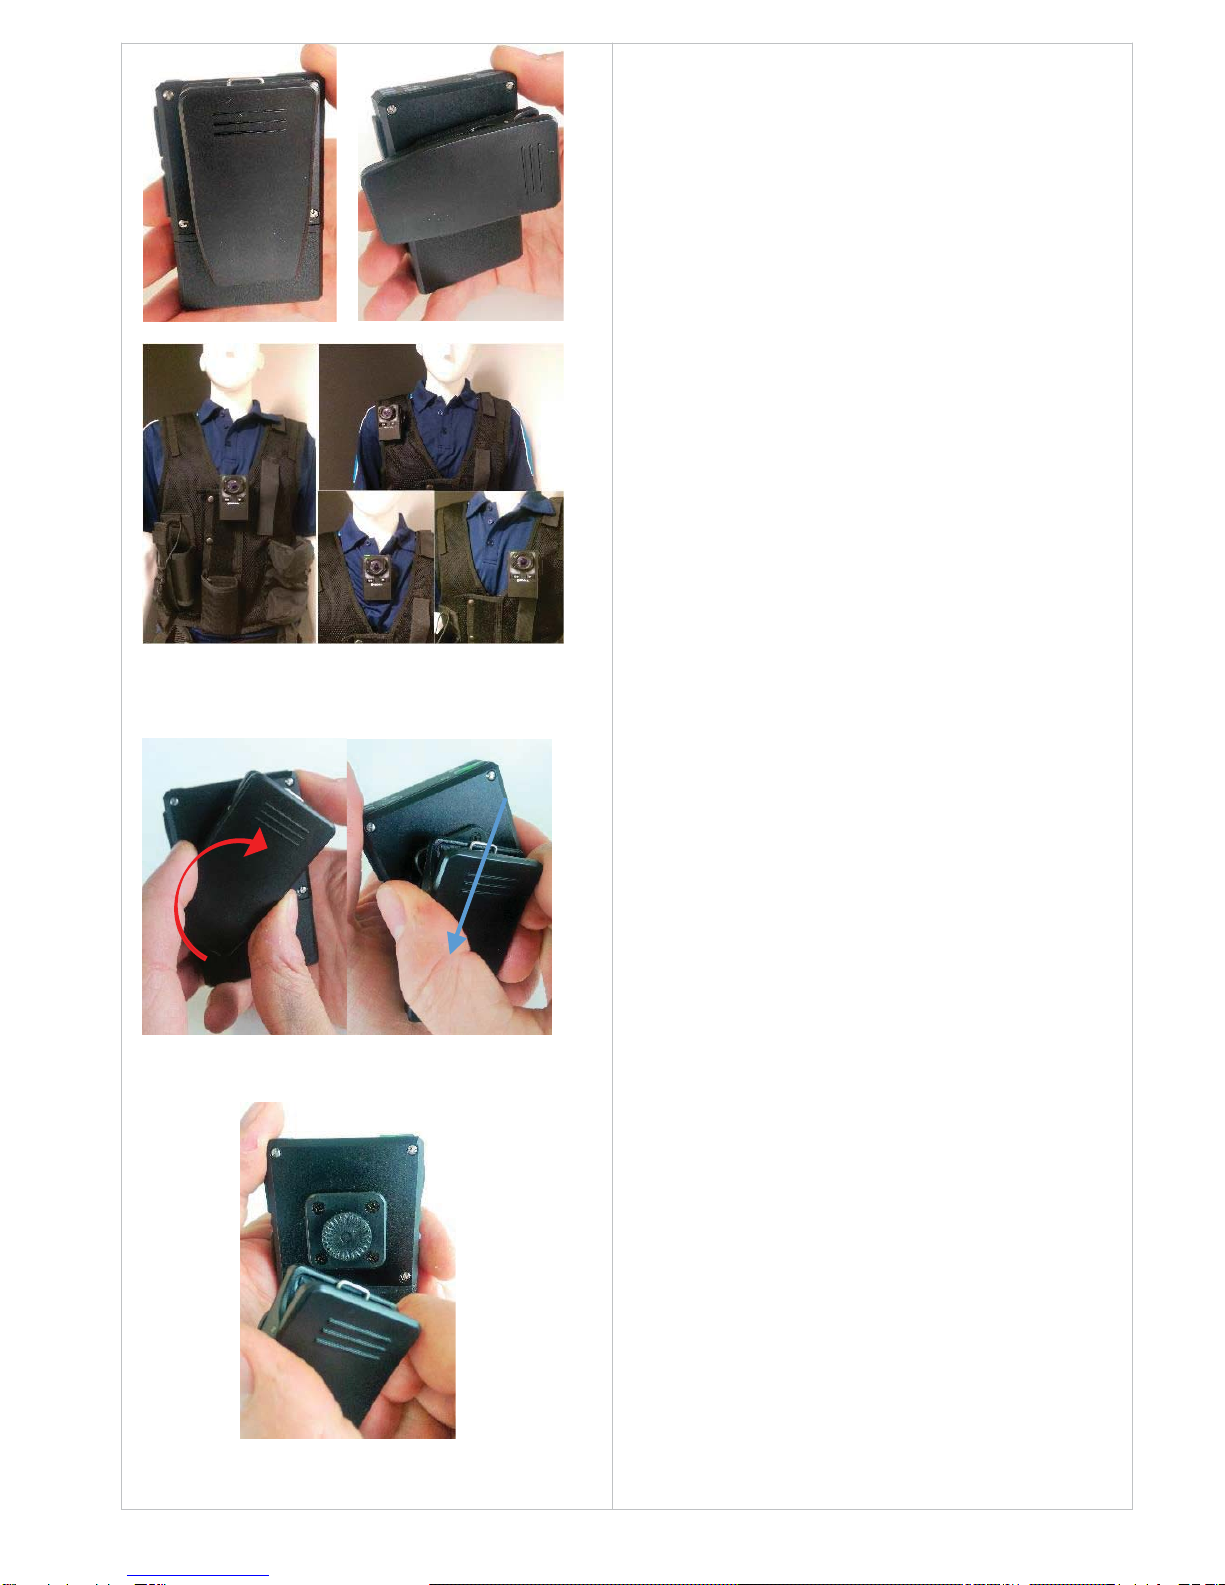
Wearing the Oncall Camera
The mounting clip supplied with the camera can be
rotated 360° to allow mounting on a variety of
garments.
It is recommended that the camera is mounted upright
for best recording result.
Examples of the flexibility of the mounting clip
Removing the Mounting Clip
1. With the back of the camera facing you, rotate the
clip clockwise so that the middle of the top of the clip
(the widest end) is lined up with the top-right corner of
the camera.
2. Slide the clip downwards in a straight line from the
top-right to the bottom left corner of the camera. The
clip should slide off its mounting stud.
3. To replace or swap the clip with a different sized
clip, simply line up the hole in the back of the new clip
against the mounting stud and reverse the movements
described above. Push the clip onto the stud until it
stops to ensure it is securely mounted.

©Fire Cam 2015 5
Changing Batteries
-Push the batter
y
release clip downwards
-Slide the battery out
-Slide the new battery in
Push the battery release clip upwards to lock the
battery in place.
Charging the Battery
-Open the USB Port cover.
-Usin
g
the su
pp
lied USB cable connect the
camera to either your PC’s USB port or the
supplied USB Wall Charger.
-The camera’s batter
y
char
g
in
g
indicator will
illuminate. The camera will automatically
cut-off the charging once full.
NOTE: Use only the supplied power supply and cable.
Using a non-approved power supply or cable may
damage the Oncall Camera and void the
manufacturer’s warranty.
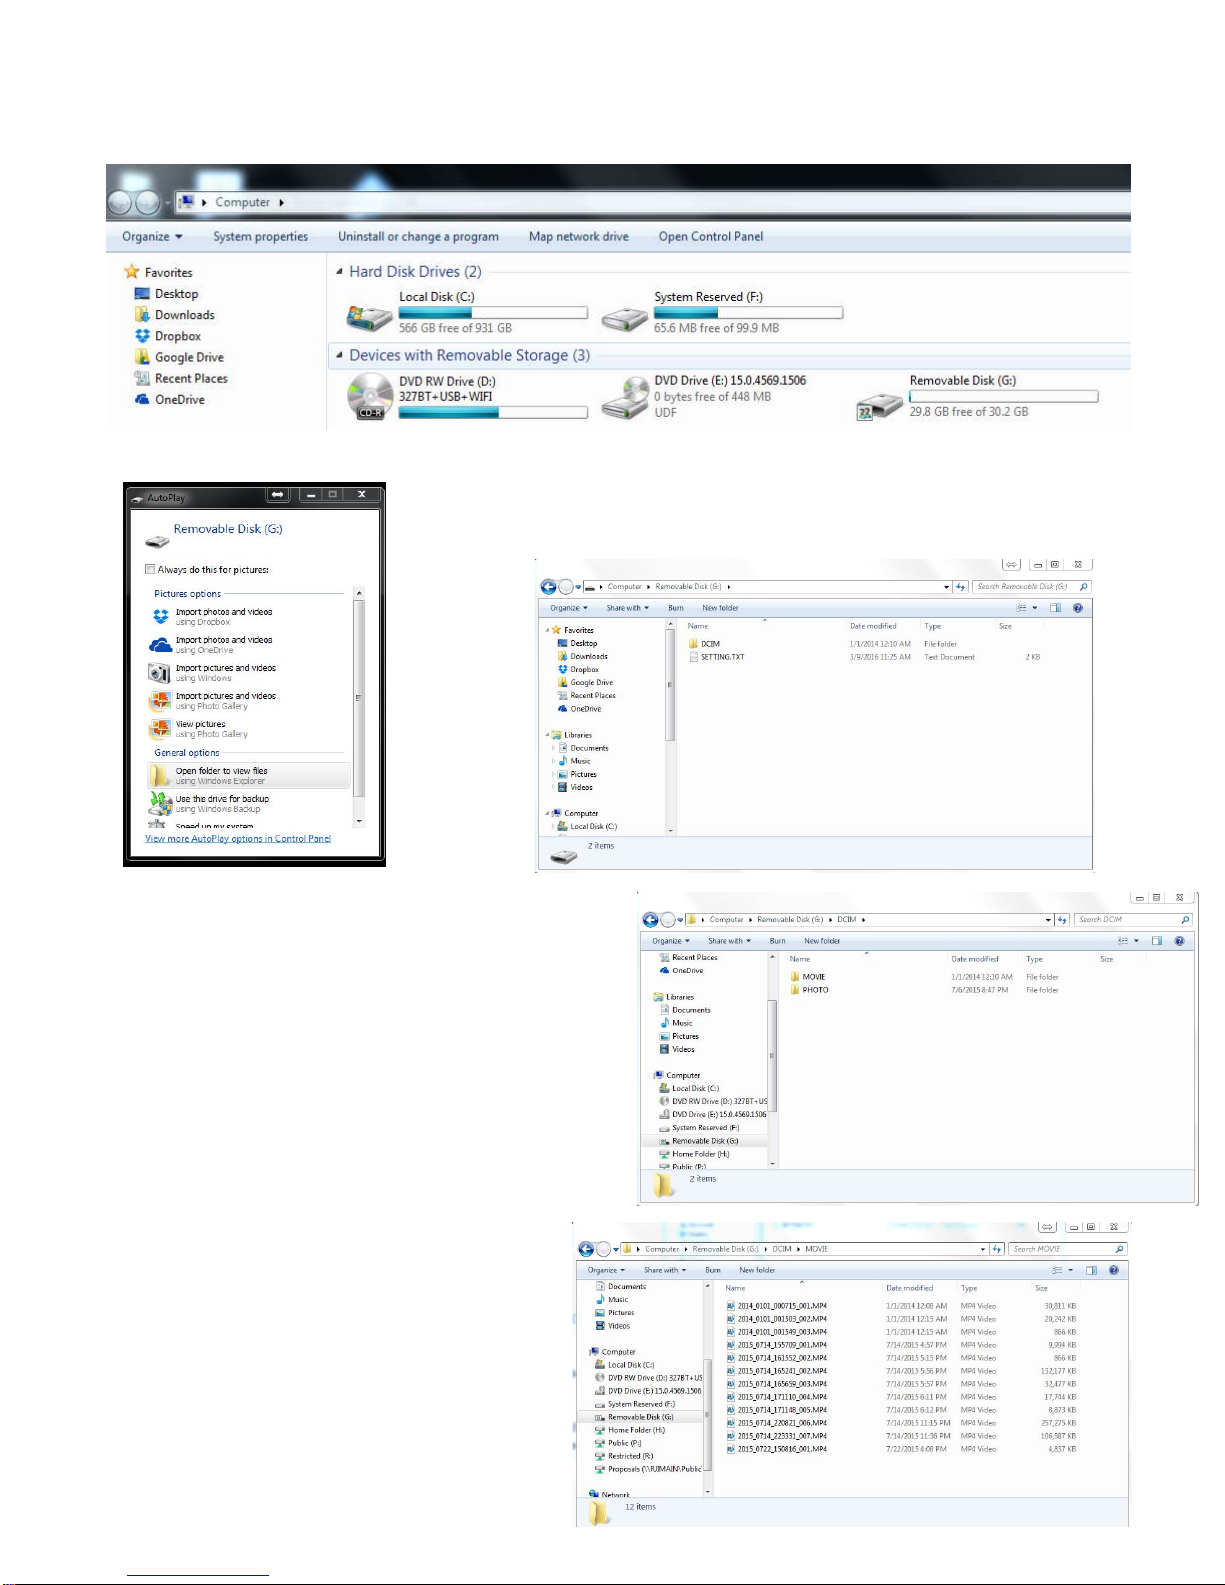
Once the PC has recognized the camera, it will appear as a removable drive in the windows file
explorer under "Computer" (Windows 7) or "This PC" (Windows 8 / 8.1 / 10)
If the AutoPlay window appears, you may select
"Open folder to view files".
Once the drive is open, you will see the DCIM
folder and the "SETTING.TXT" file.
The DCIM folder contains all of the recorded
material.
The recorded files and be reviewed by
"double-clicking" on each one. They can be
viewed on Windows Media Player, VLC
Media player, or any program that is
compatible with .MP4, .JPG, or .WAV files.
Files may also be copied or moved to any
other folder you choose.
©Fire Cam 2015 6

CAMERA SETTINGS
Upon opening the "SETTING.TXT" file you will see the following:
Settings can be adjusted by replacing the values next to each setting according to the parameters listed to
the right.
After changes are entered, you must save them to the camera by clicking on File in the menu bar at the
top of the screen, then "Save". Once this is done, remove the USB from the camera and press the power
button to activate. The settings changes should now be active.
NOTE:
- Do not change the "FUNCTION TYPE" and "PRERECORD" setting unless directed by Fire Cam. This will inhibit the
operation of the camera.
©Fire Cam 2015 4
©Fire Cam 2015 7

©Fire Cam 2015 8
Docking Station (optional)
The docking station is a high-speed charger with two
charging slots for Oncall camera batteries. Standard
size and XL batteries can both be charged.
The battery can be charged while connected to the
camera or separate from the camera as pictured.
Best practice is to dock the camera and battery while
you are downloading files to the PC via USB cable.
To dock the camera / battery:
- First, connect the dock to power using the
supplied power supply and USB cable
- Ensure the charging connector on the base of
the battery is aligned with the connector in the
bottom of the slot.
- Press the camera/battery down until it clicks
into place.
The dock will automatically stop charging when the
battery is fully charged.
NOTE: use only the supplied power supply and cable.
Using a non-approved power supply or cable may
damage the charging dock and/or the Oncall Camera
and void the manufacturer’s warranty.
Powering on and off the Camera
Power the camera on by pressing the Power Button
once. After a brief pause the camera will turn on with a
beep, vibrate, and the power indicator light will turn
green.
To Power off the camera press and hold the power
button for 3 seconds.
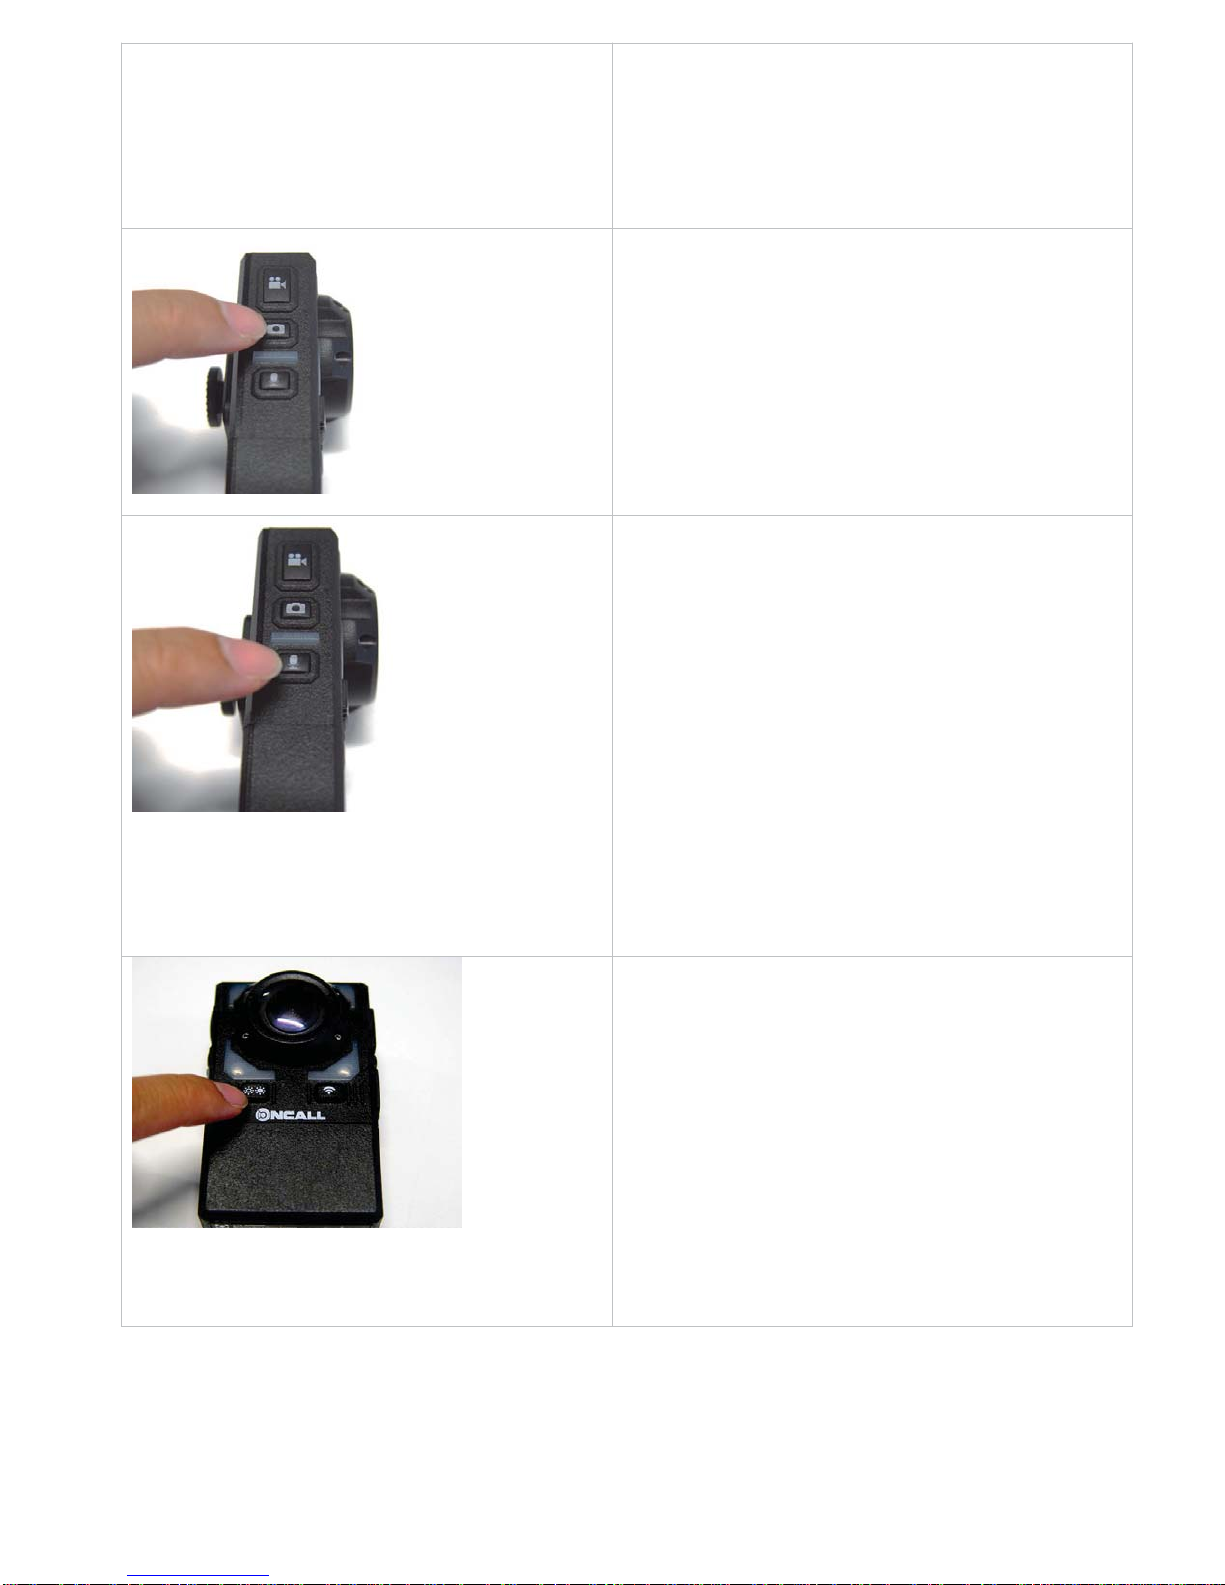
Recording Video
Press Video Record button once to start recording
Video Recording on is indicated by:
- Video indicator light will flash red
-Asin
g
le bee
p
-Onelon
g
vibration
To stop video recording:
Press and hold video button for 3 seconds.
Video Recording stopped is indicated by:
- Indicator li
g
ht sto
p
sflashin
g
- 2 short bee
p
s
- 2 short vibrations
©Fire Cam 2015 9
Pre-Event Record Mode
If Pre-Event Record mode is activated the camera will
continuously record while powered on. When the
Video Record button is pressed, the 3 minutes prior to
the button press will be captured
without audio.
Taking a Photo
Press Photo button once to take a Photo.
Photo taken is indicated by:
- Audio-onl
y
/Photo indicator li
g
ht flashes once
-Sin
g
le bee
p
-Lon
g
vibration
Take an audio only recording
Press Audio Record Button.
Audio-only recording is indicated by:
-Flashin
g
Audio/photo indicator
-Sin
g
le bee
p
-Lon
g
vibrate
Press Audio Record Button again to stop.
Audio recording stopped is indicated by:
- Audio/photo indicator stops flashin
g
- 2 short beeps
-2shortvibrates
Night-Vision Mode
- Press the White li
g
ht/IR button on the front of
the camera
- First press activates white li
g
ht
(
top ri
g
ht facin
g
LED).
-Second
p
ress switches camera to IR mode for
night vision.
-TheWhiteli
g
ht/IR Li
g
ht Indicator on to
p
of the
camera will also illuminate while either set of
lights is turned on.
-Pressa
g
aintoturnoffallli
g
hts
Hello, and welcome to how to setup your Oncall Camera with the Fire Cam app!
The connection is rather simple. If you know how to connect to a WiFi with your phone it is the same
process with the camera.
First please download the Fire Cam app from the Playstore or iOS App Store.
Let’s begin with having your Oncall Camera on and the WiFi enabled. The Wifi button is on the Right side
below the lens.
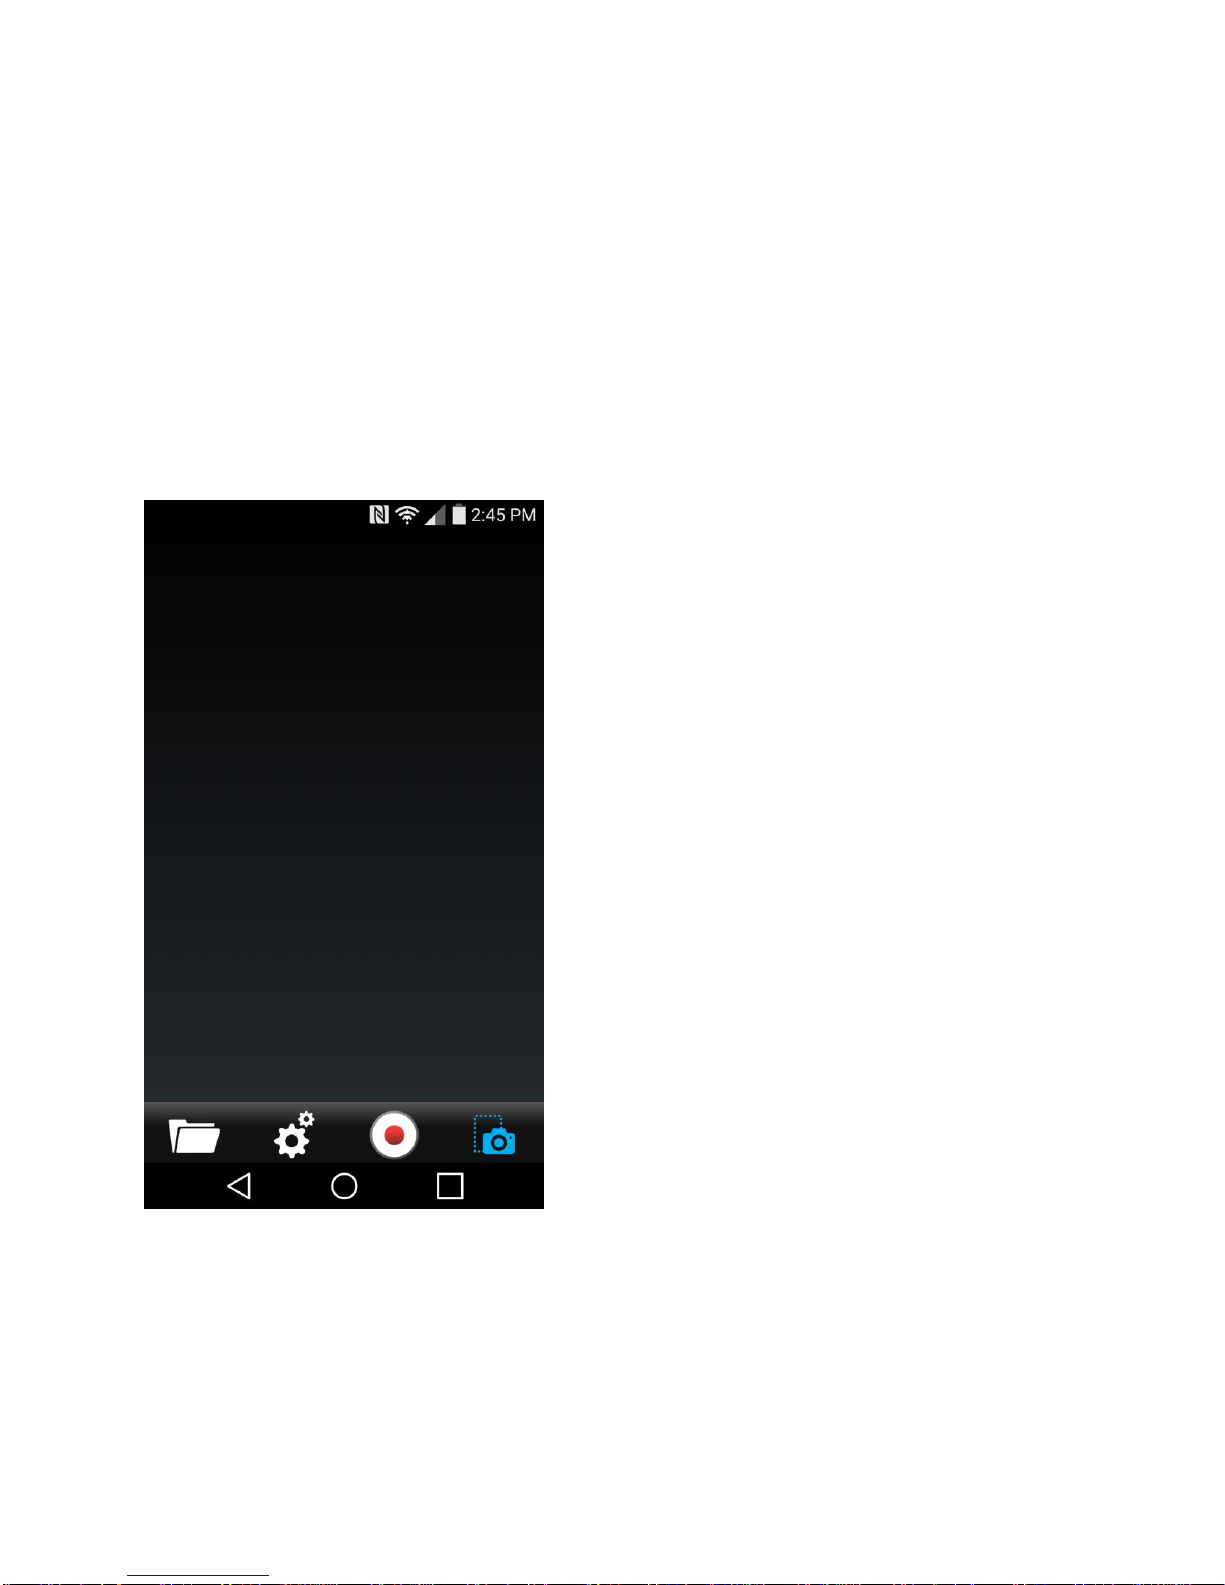
Next please open the application, it will open to this window.
Fire Cam App from Playstore or iOS App store
©Fire Cam 2015 10
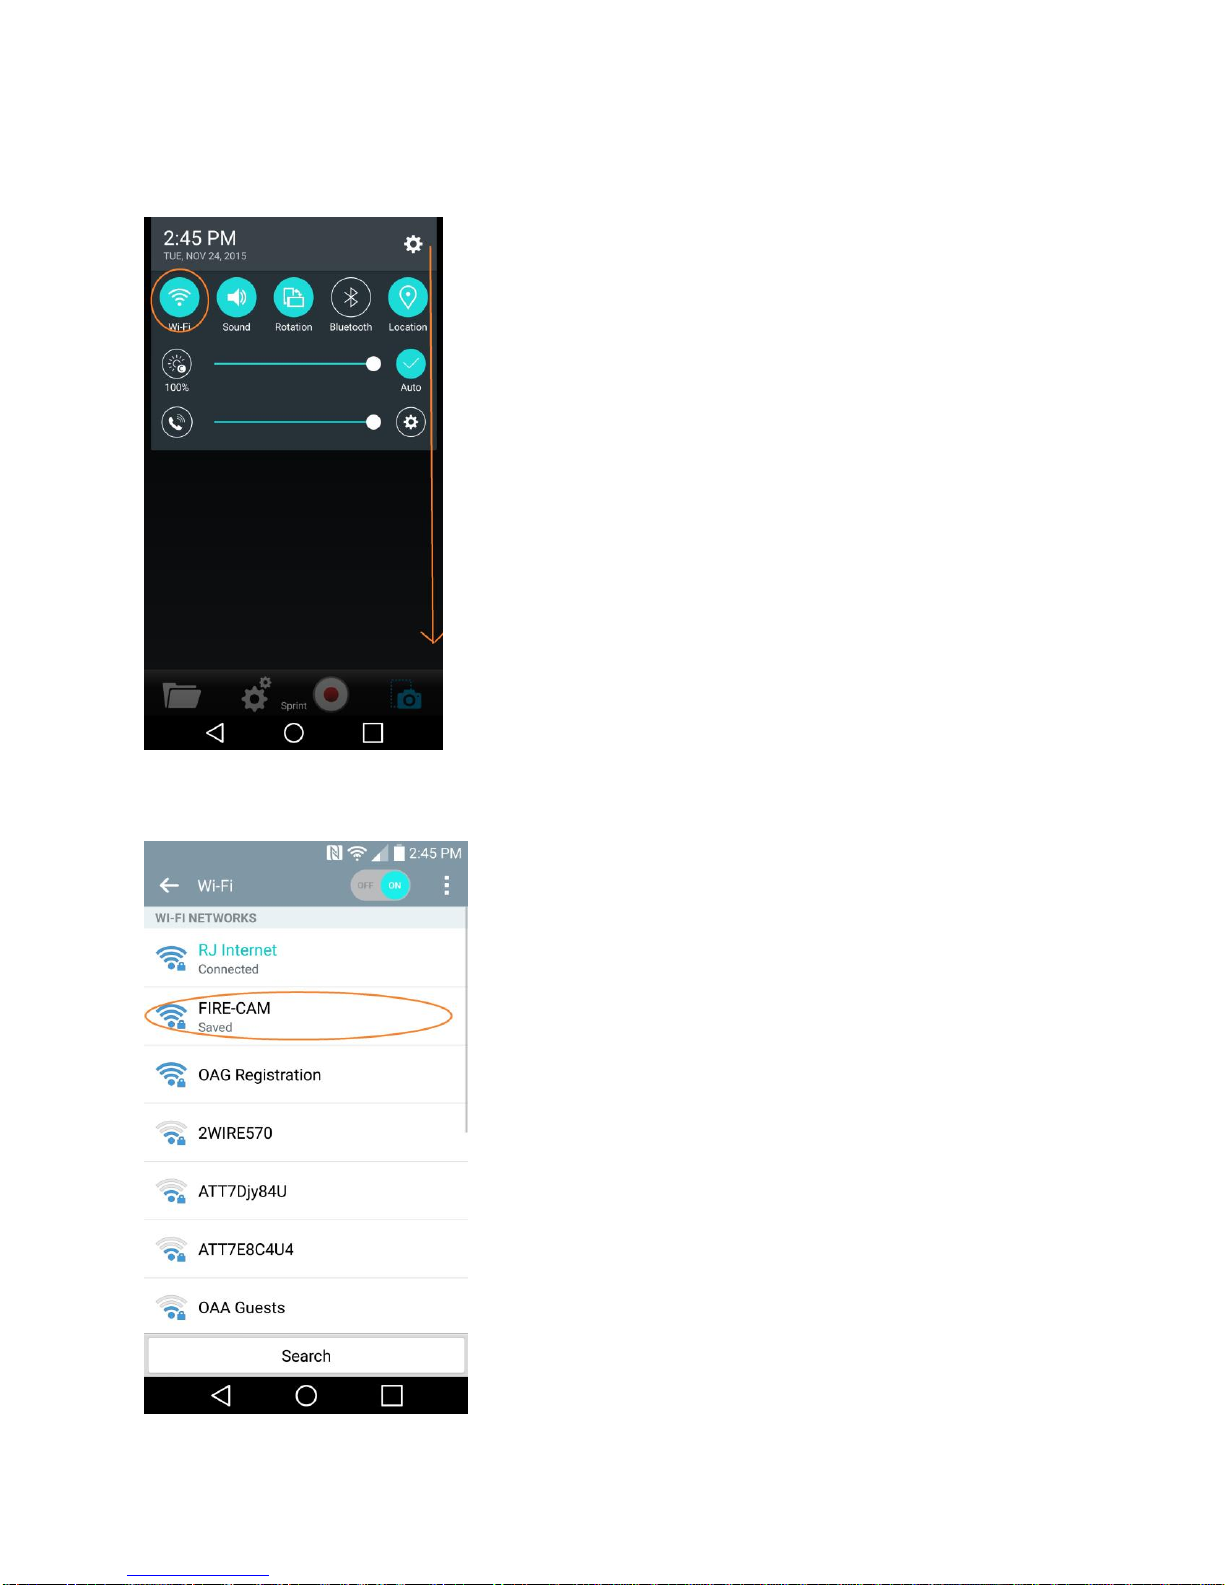
Next slide down your task bar to show your settings enabled. Please push and hold the WiFi Button to
show your WiFi settings
When doing so, will bring up your WiFi Settings. If you notice, there is already a FIRE-CAM being
discovered. Please select that connection.
©Fire Cam 2015 11
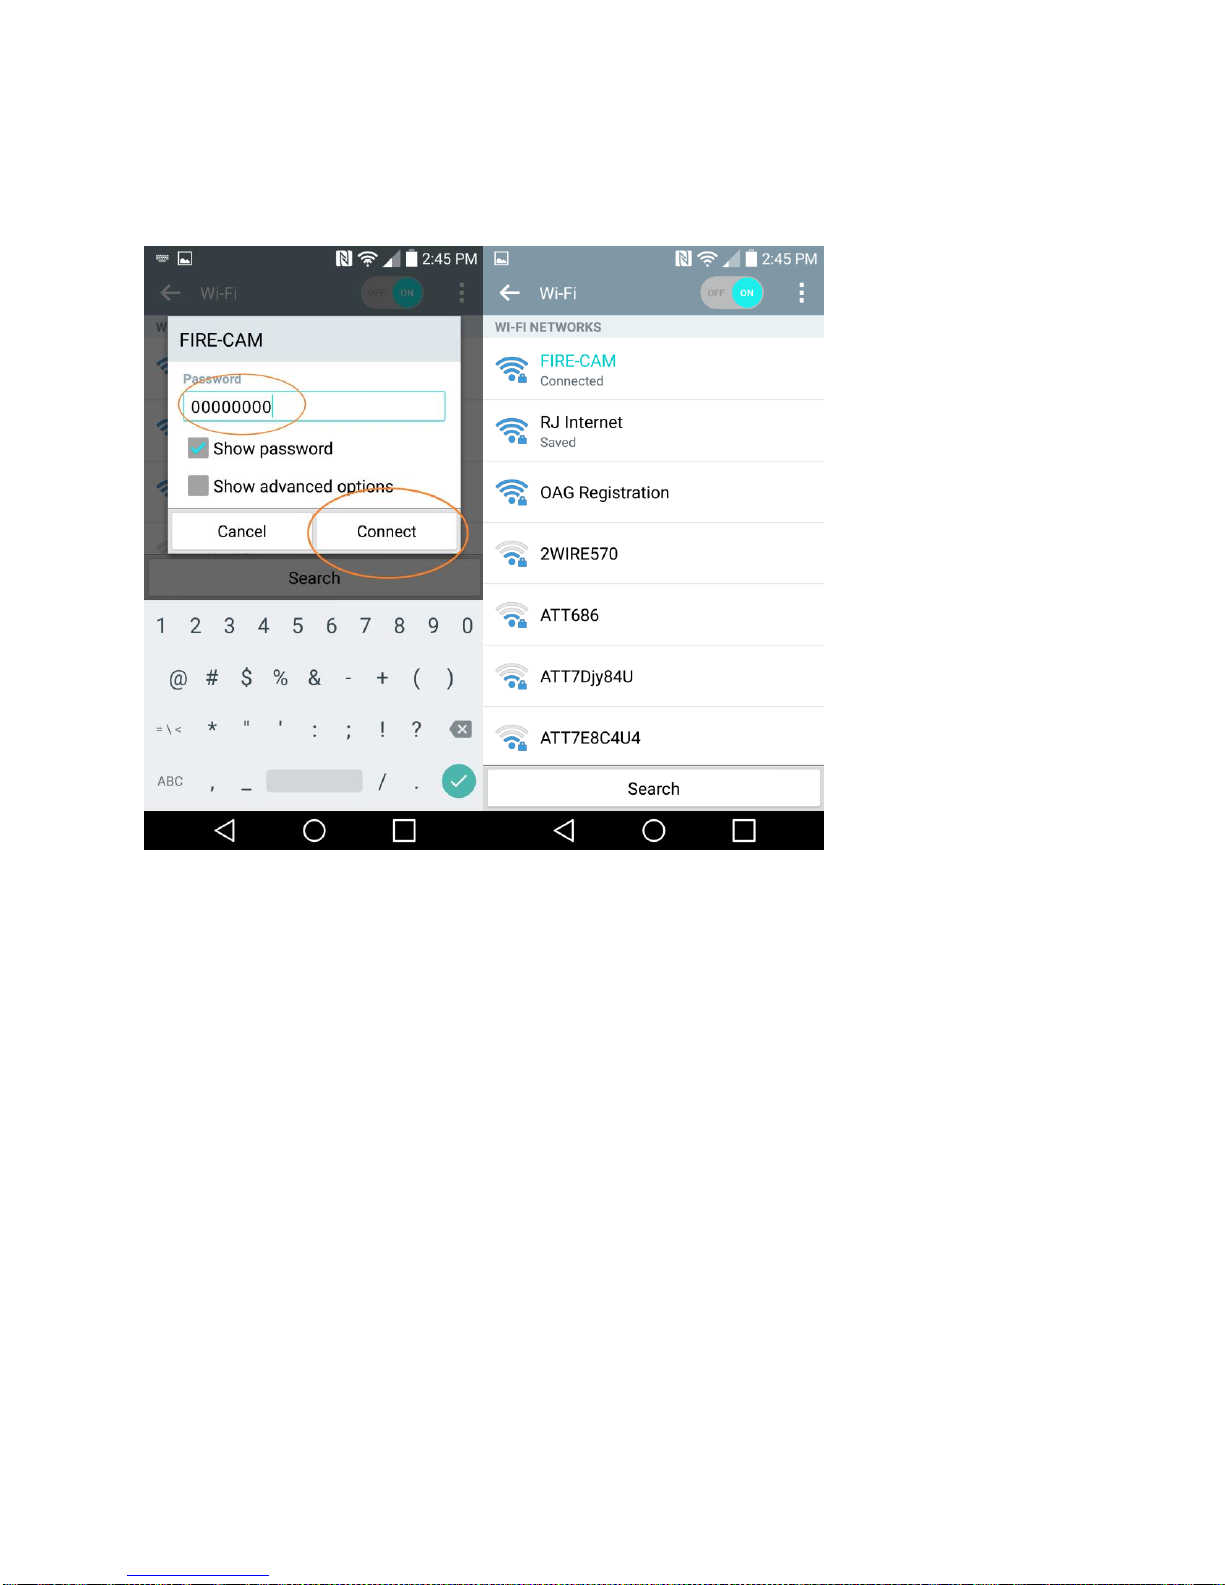
Next please input the credentials to access the camera via WiFi. The password will be 00000000. Once
that is done please select connect. The Cameras WiFi light should go full blue, indicating that its
connected. You will also see the phone has connected to the camera as well like below.
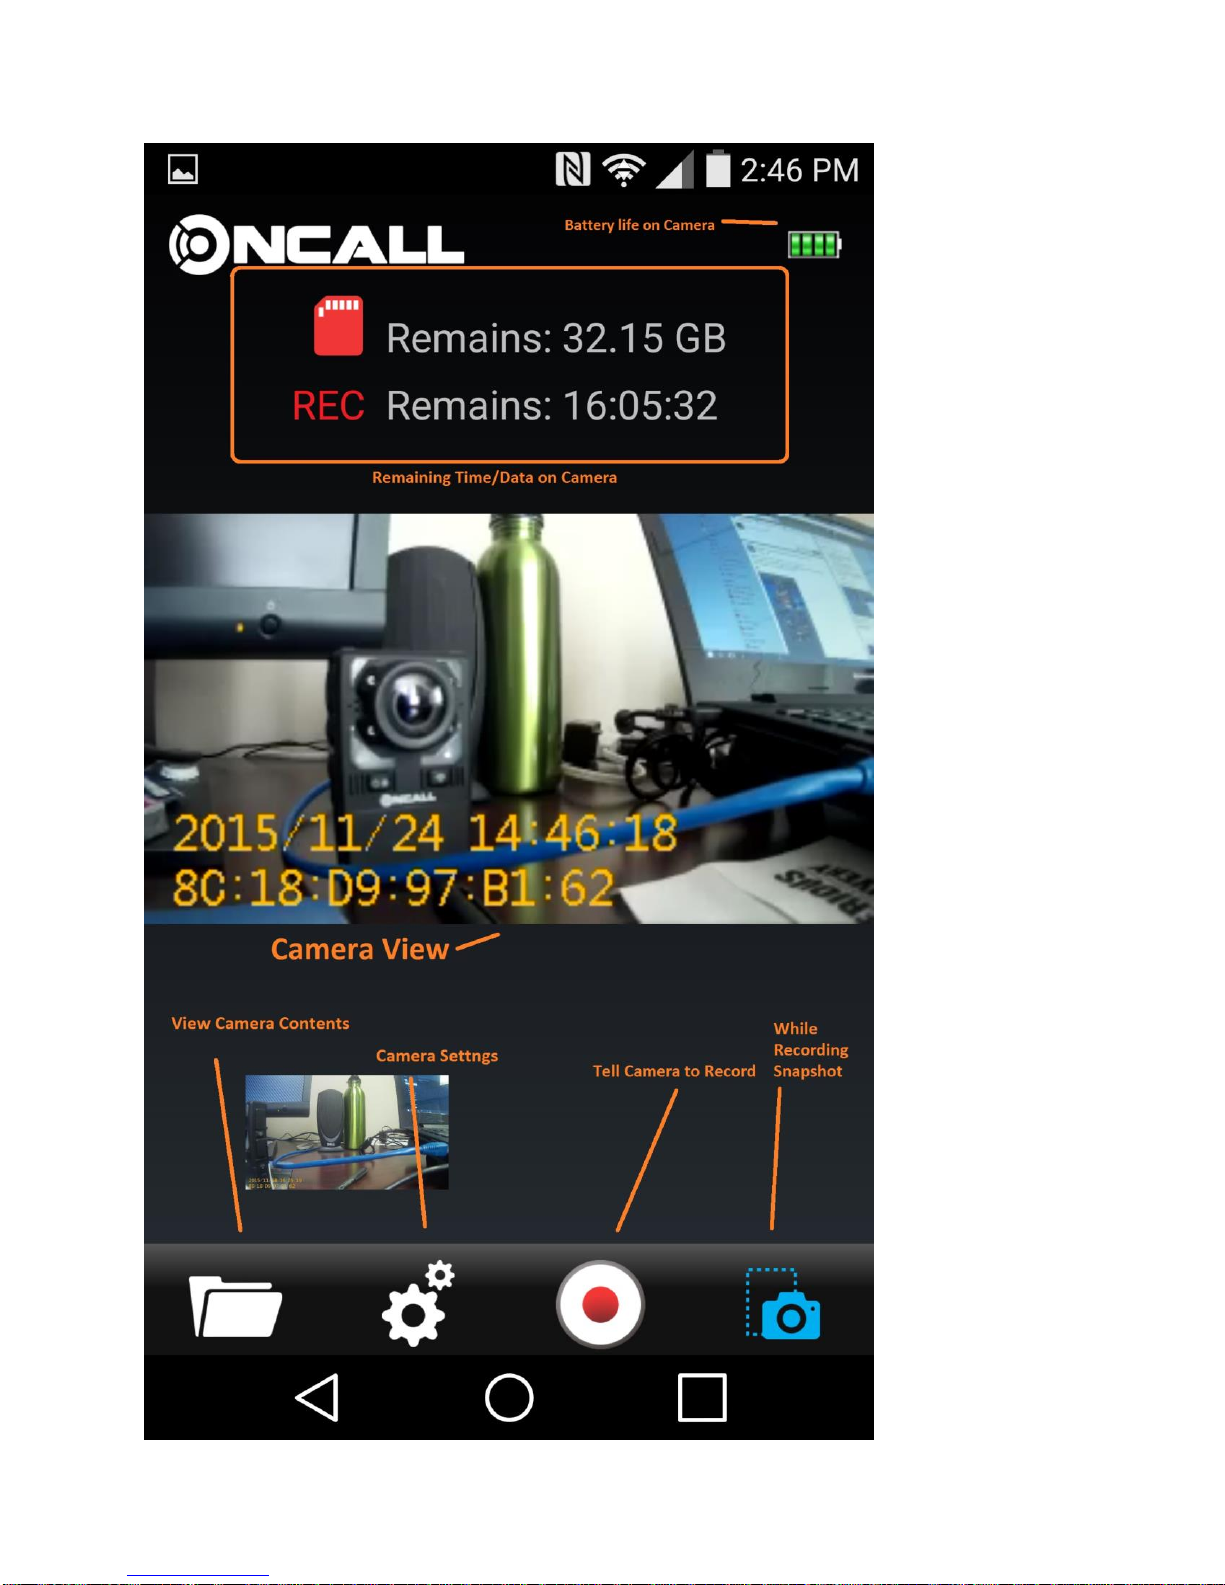
Please open the Fire Cam application again, and congratulations! You have properly connected your
Oncall Camera to your phone! Please Take a Moment to observe the Functions of the Lite Program on
the next page.
©Fire Cam 2015 12
©Fire Cam 2015 13

For Questions and Support please contact us:
Phone: 618-416-8390
Email: [email protected]
Fire Cam is open Monday - Friday 9:00 a.m. to 5:00 p.m. CST. If there
is no answer at the time to answer your call, please leave a detailed
voice message or use the contact form on the left.
©Fire Cam 2015 14
Table of contents
Other Fire Cam Action Camera manuals


