Fire Innovations COMANCHE NFPA ESCAPE BELT User manual
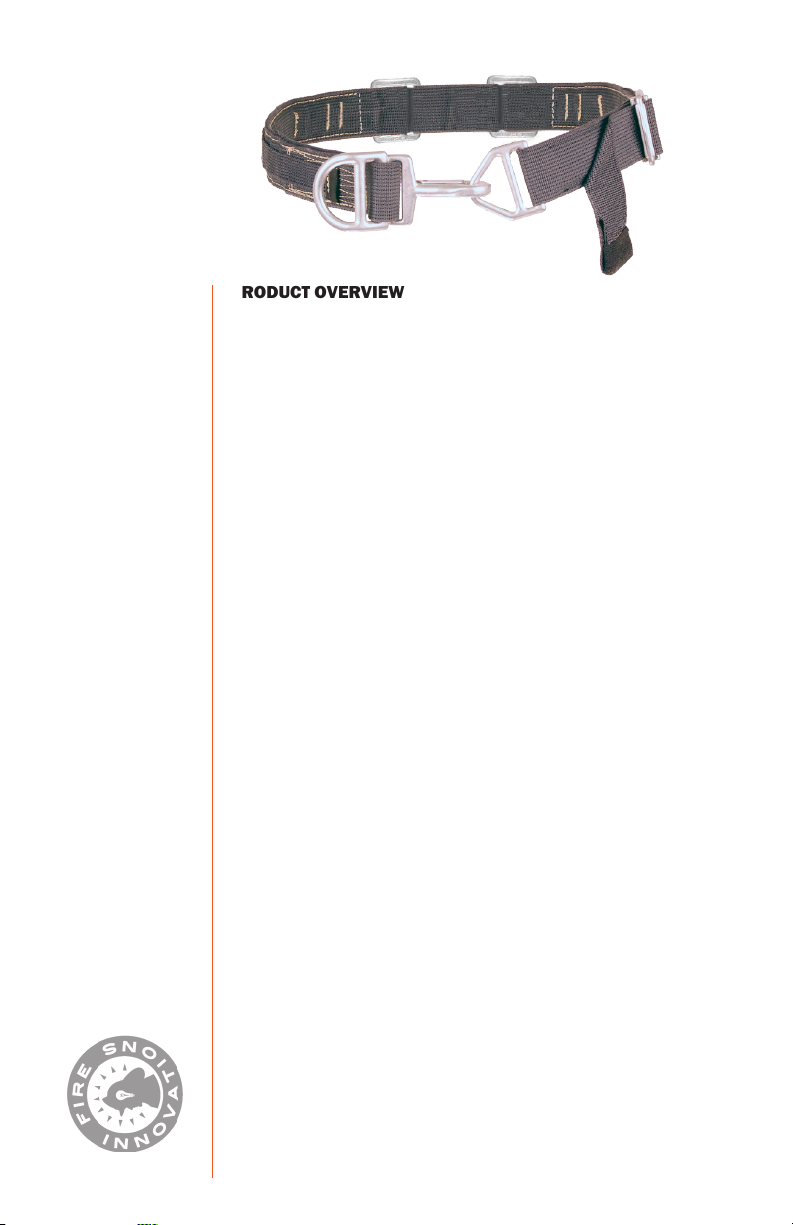
COMANCHE®
INSTRUCTION FOR USE
NFPA 1983 - 2012
FLAME RESISTANCE OPTION
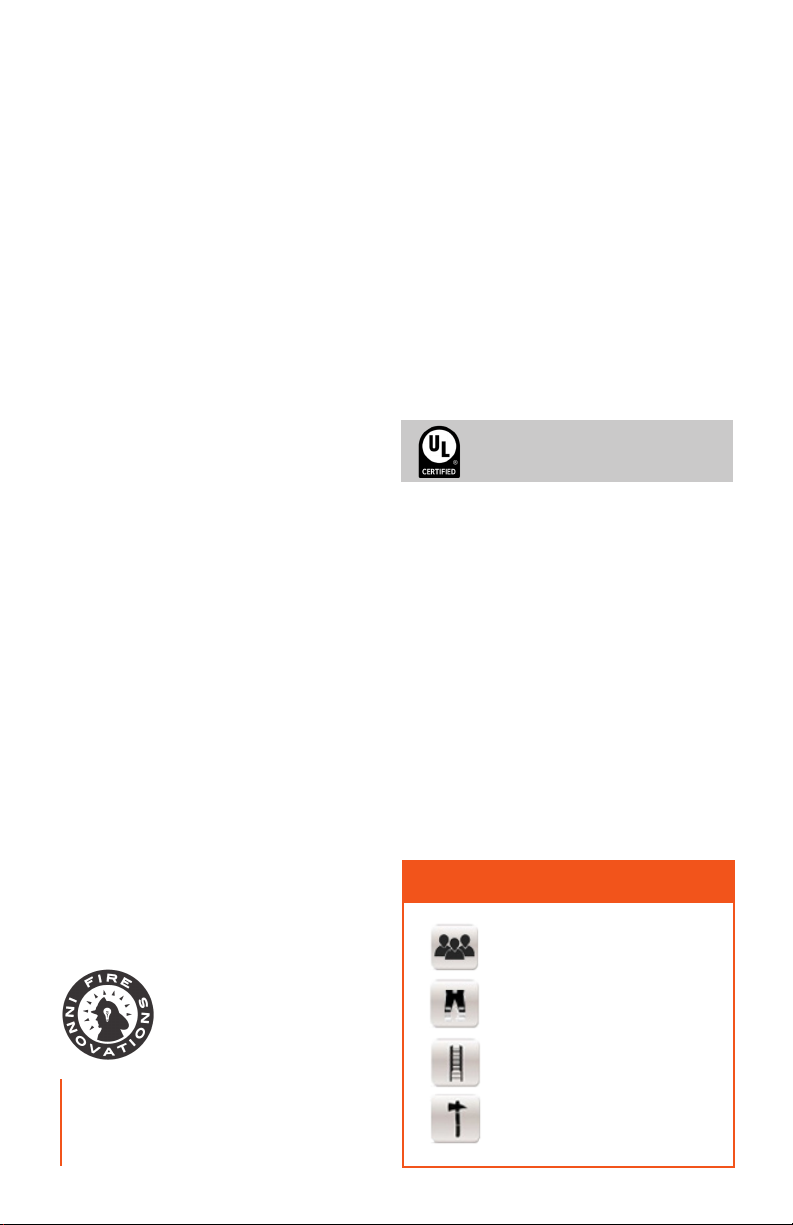
UL CERTIFIED TO
Fire Innovations
830 Petaluma Blvd N
Petaluma, California 94952
United States
www.reinnovations.com
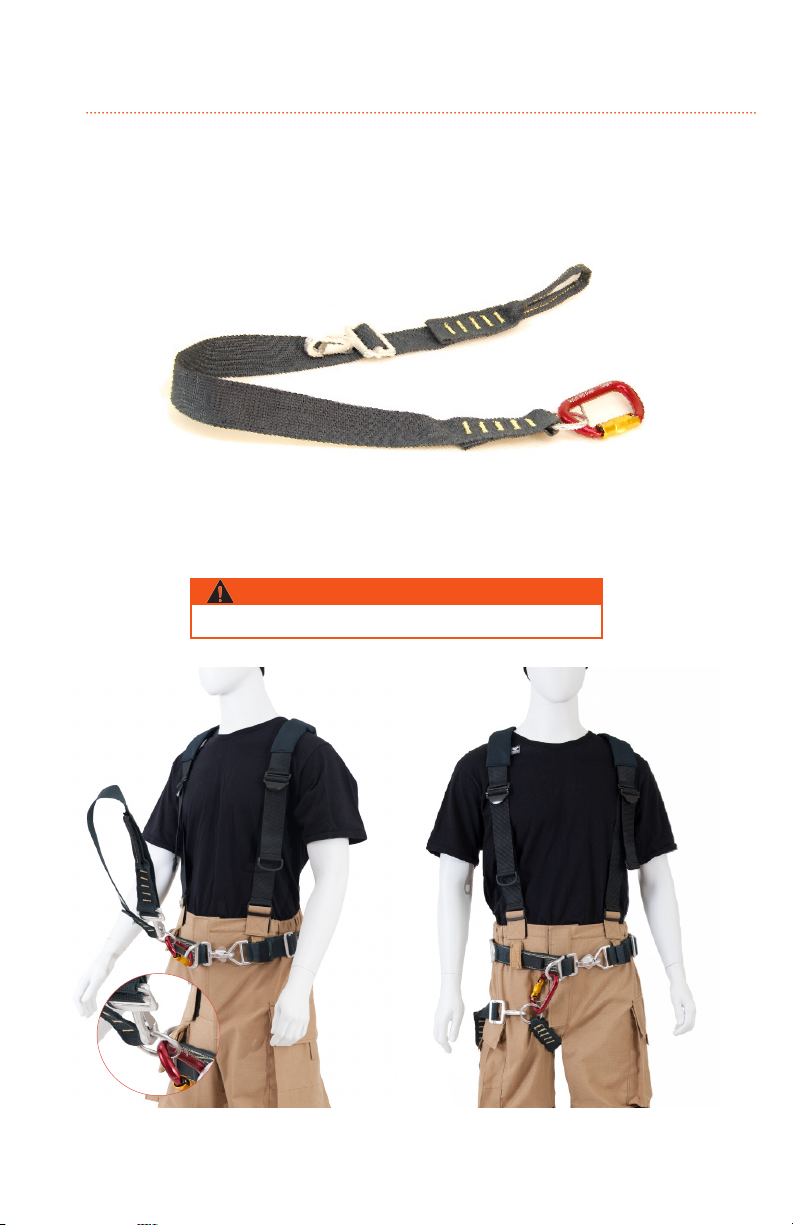
With the optional Multi-Use Strap®,
this belt is a NFPA Ladder Belt.
Three gear loops allow installation of
multiple tool holders and accessories.
BELT DESIGN FEATURES
NFPA ESCAPE BELT
NFPA LADDER BELT
Design to quickly adjust to any
reghter’s waist size.
Sized to be donned over the turnout
pants. Easy forward ne adjustment.

Activities involving the use of this equipment are inherently dangerous.
You are responsible for your own actions and decisions.
Before using this equipment, you must:
• Read and understand all instructions for use.
• Get specic training in its proper use.
• Become acquainted with its capabilities and limitations.
• Understand and accept the risks involved.
WARNING
USER INFORMATION
User information shall be provided to the user of
the product. NFPA Standard 1983 recommends
separating the user information from the
equipment and retaining it in permanent record.
The standard also recommends making a copy of
the User Information to keep with the equipment
and that the information should be referred to
before and after each use.
Additional information regarding auxiliary
equipment can be found in NFPA 1500, Standard
of Fire Department Occupational Safety and Health
Programs, and NFPA 1983, Standard on Life Safety
Rope and Equipment for Emergency Services.
INSPECTION
Inspect the belt according to your department’s
policy for inspecting life safety equipment.
Equipment should be inspected after each use by
an inspector that meets your departments’ training
standard for inspection of life safety equipment.
Each user should be trained in equipment
inspection and should do a cursory inspection
before each use.
Inspect the belt for frayed, cut or worn material.
Buckles should look uniform with no cracks, chips
or out of shape appearance. Look for excessive
chafng at the wear points; typically where the
Kevlar webbing comes into contact with the metal
buckles. Inspect the tool holders and ensure they
are fastened or sewn securely to the belt and in the
proper position.
If the Harness/Belt is impact loaded, it should be
inspected by a qualied inspector prior to being
returned to service. In some cases, a visual
inspection might not be able to determine if the
equipment has been damage. Based on the history
of the incident, if there is any doubt regarding the
safety of the equipment, it should be removed from
service and retired.
REPAIR
Fire Innovations requires that all repair work be
done by the manufacturer. All other repair work
or modications may void the warranty and shall
release Fire Innovations, LLC from all liability and
responsibility as the manufacturer.
MAINTENANCE
Clean and dry this equipment after each use to
remove any dust, debris and moisture. Do not
expose the belt to ame or high temperatures. Do
not store your Fire Innovations Fireghter belts in
direct sunlight.
SAMPLE LOG
The log below suggests records that should be
maintained by the purchaser or user of rescue
equipment.
Model: Comanche
Serial # _______________________________ Purchase Date: _____/_____/_____
EQUIPMENT INSPECTION & MAINTENANCE LOG
Date Event / Repair Inspected By Comments
Failure to follow these
instructions could result in
serious injury or death.

ESCAPE BELT • LADDER BELT
PAT. #US 6,732,834
COMANCHE®
NFPA ESCAPE BELT
NFPA LADDER BELT
“THIS BELT MEETS THE REQUIREMENTS OF
NFPA 1983, STANDARD ON LIFE SAFETY ROPE
AND EQUIPMENT FOR EMERGENCY SERVICES,
2012 EDITION, AND THE OPTIONAL FLAME
RESISTANCE REQUIREMENTS OF NFPA 1983,
TYPE ESCAPE BELT.”
“TO BE COMPLIANT WITH NFPA 1983 LADDER
BELT STANDARD AND POSITION POINT THE
FOLLOWING ADDITIONAL COMPONENTS MUST
BE USED IN CONJUNCTION WITH THIS BELT.”
COMPONENT MODEL: MULTI-USE-STRAP™ (MUS)
DIRECTIONS TO MAKE NFPA LADDER BELT:
PLEASE REFER TO COMPONENT INSTRUCTIONS.
CERTIFIED 1983, 2012 STANDARD
1. Fire Innovations part number.
2. Waist size. Belt is designed with a 8” adjustment
to allow donning on turnout pants and coat.
3. The serial number is a NFPA tracking
requirement. This number is unique for every belt
manufactured.
4. The Comanche is certied with optional buckles,
this would indicate which one is installed. (2)
Buttery (3) Inverted
5. If a Multi-Use Strap is sewn-on, then this space
will show (1).
6. Number of NFPA attachment points installed on
the belt.
7. Number of NFPA Positioning Points installed on
the belt.
8. Production date.
9. United Laboratories registration number. For
the latest information about certication on Fire
Innovations products, please refer to this number
3BFO when searching for UL registration.
10.Country of origin. Fire Innovations takes pride
of the fact that we use only US made raw goods
for our belts. Our belts are manufactured in
California, United States.
Understanding
belt label details
“EMERGENCY SERVICES LIFE SAFETY BELT IN
ACCORDANCE WITH NFPA 1983-2012” 3BF0
3BF0
COMANCHE (CO)
ESCAPE BELT
Part# 1101-0035
28-50
PRODUCT OVERVIEW
The Comanche Belt is intended to be a certied NFPA 1983:2012 Fire
Resistance (FR) Escape/Ladder* Belt (with MUS). It was design to be
assign to an individual, and be xed to either the turnout pants or placed
cover the coat. The gross adjustment allows the reghter belt to be
sized to a wide range of waist sizes (28”-50”). This adjustment feature
allows a department to reissue it to another reghter once the original
reghter leaves the department. It only takes a few minutes to adjust
the gross adjuster. The ne adjustment allows the belt to be tightened or
relaxed for a custom t. The belt is ambidextrous and can be incorporated
for use with most bailout systems. Both sides of the belt can be utilized
for equipment, such as axe loops and other various belt accessories.
One xed D-Ring (NFPA Attachment /Positioning point) is standard, with
additional sliding D-Rings (NFPA Attachment/Positioning point) available
as a customization.
HIGHLIGHTS
• NFPA Escape & Ladder Belt
• One belt ts all
• Ambidextrous design (Left or right handed)
• Forward pull ne adjustment
• 100% Kevlar construction
• Option NFPA Sliding Attachment Point (D-Ring 40degre or Straight)
VERSATILITY
The Comanche is a NFPA FR Escape Belt & Ladder Belt*, it uses an
upgradable modular design. Easily tted to individuals from 28” to 50”,
and to both, left or right hand’ers. Can be adjusted to any reghter with a
gross adjustment on the back of the belt, and Fine six inch (6”) adjust-
ment on the front of the belt.
This belt can be outtted with a variety of different bailout systems and
accessories for added versatility.
MODULAR & UPGRADABLE
The Comanche belt accessories can be added at anytime. This keeps the
cost down on the initial purchase. One only needs to buy one belt, and
then add accessories as needed to meet your requirements.
• Axe/Tool Loop
• Leather Axe Scabbard
• Chainsaw/Light Box Holder
• Accessory Pouches
• Leather Backing
• Bailout or Utility Rope Bags
• Custom Accessories
COMANCHE®
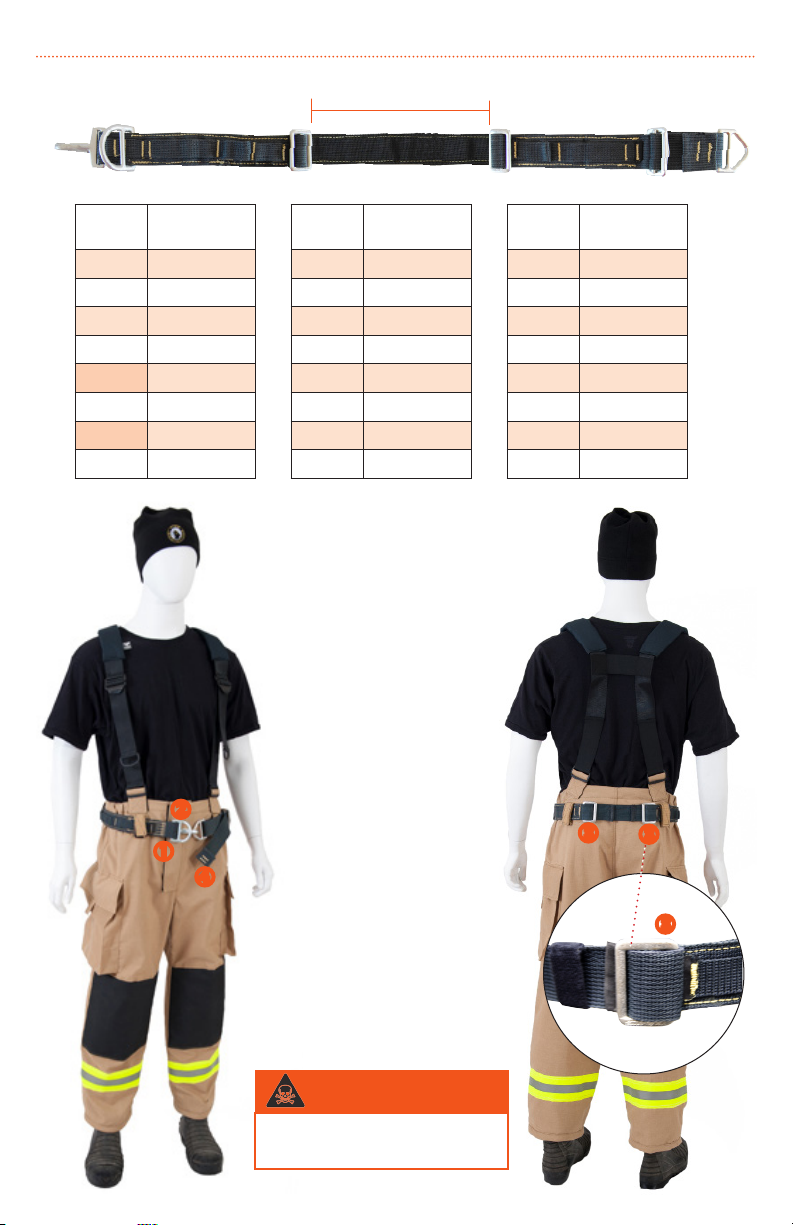
SIZING & DONNING
• Start by setting the belt
expansion strap to YOUR
NATURAL waist size.
• Position the belt around the
waist low on the hips.
• Fasten the snap buckle to
V-Ring
• The D-Ring (next to buckle)
should be placed mid line to
the body .
• Once you feel comfortable
with sizing, lock the expansion
strap by feeding it over the
adjustment buckle. Use
the elastic straps to secure
excess.
• Pull the adjustment strap
forward to tighten .The
belt should be tight but not
constrictive.
Waist Expansion
Strap Gap Waist Expansion
Strap Gap Waist Expansion
Strap Gap
28 2” 36 10” 44 18”
29 3” 37 11” 45 19”
30 4” 38 12” 46 20”
31 5” 39 13” 47 21”
32 6” 40 14” 48 22”
33 7” 41 15” 49 23”
34 8” 42 16” 50 24”
35 9” 43 17” 51 25”
Expansion Strap Gap
WARNING
The Belt Adjustment Strap MUST be locked
prior to be donned and put into service.
Failure to do so, may result in serious injury
or death.
UPGRADES
The Cheyenne Escape Belt has been tested and certied to be able to have multiple
NFPA Attachment Points. Fire Innovations recommends a maximum of three (3). The
standard belt comes with one (1). Additional NFPA attachment points can installed to allow
connectivity to bailout systems, as an example.
NFPA ATTACHMENT POINT(S)
MANUFACTURER INSTALLED
These accessories extend the belt functionality and are installed at the time of
manufacturer.
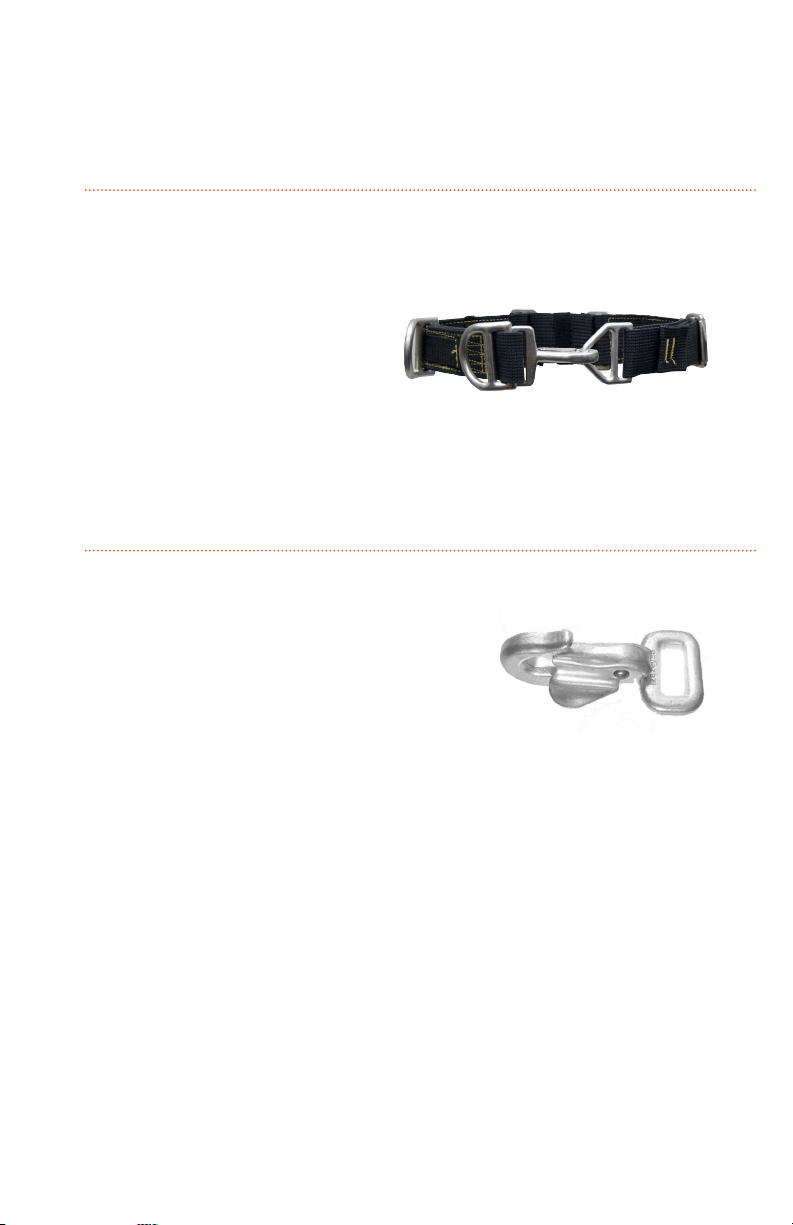
The Cheyenne Escape Belt has been tested and certied with two (2) buckle styles. The
inverted buckle is standard on this belt and highly recommended.
BUTTERFLY BUCKLE OPTION
Some of the patented features of the Multi-Use-Strap™ are the Adjustable Buckle , the
Shane Ring , and a connection point ring . The use of these components allows several
combinations for use in numerous applications.
MULTI-USE STRAP™ / NFPA LADDER STRAP
• A certied NFPA 1983:2012 Fire Resistance (FR) Ladder strap
• A one leg harness
• Used in RIT operations to drag a down reghter
• NFPA Positioning Point (Safety strap) in an aerial platform/bucket
• NFPA Positioning Point (Safety strap) in roof ladder operations
• Tethering with another reghter during search activities
• NFPA Escape anchor or change of direction strap (carabiner version)
• Place as a double leg harness
This patented Multi-Use Strap can be wrapped
around a leg for temporary storage or comfort
while rappeling.
The Multi-Use Strap is a NFPA Rated and
certied to 1983-2012 edition (FR Option)
Ladder Strap. It is also a NFPA Certied
positioning point.
IMPORTANT
Please refer to Multi-Use Strap (MUS) manual for detailed instruction of use.
This page only highlights the features of this multi-function accessory.
ACCESSORIES
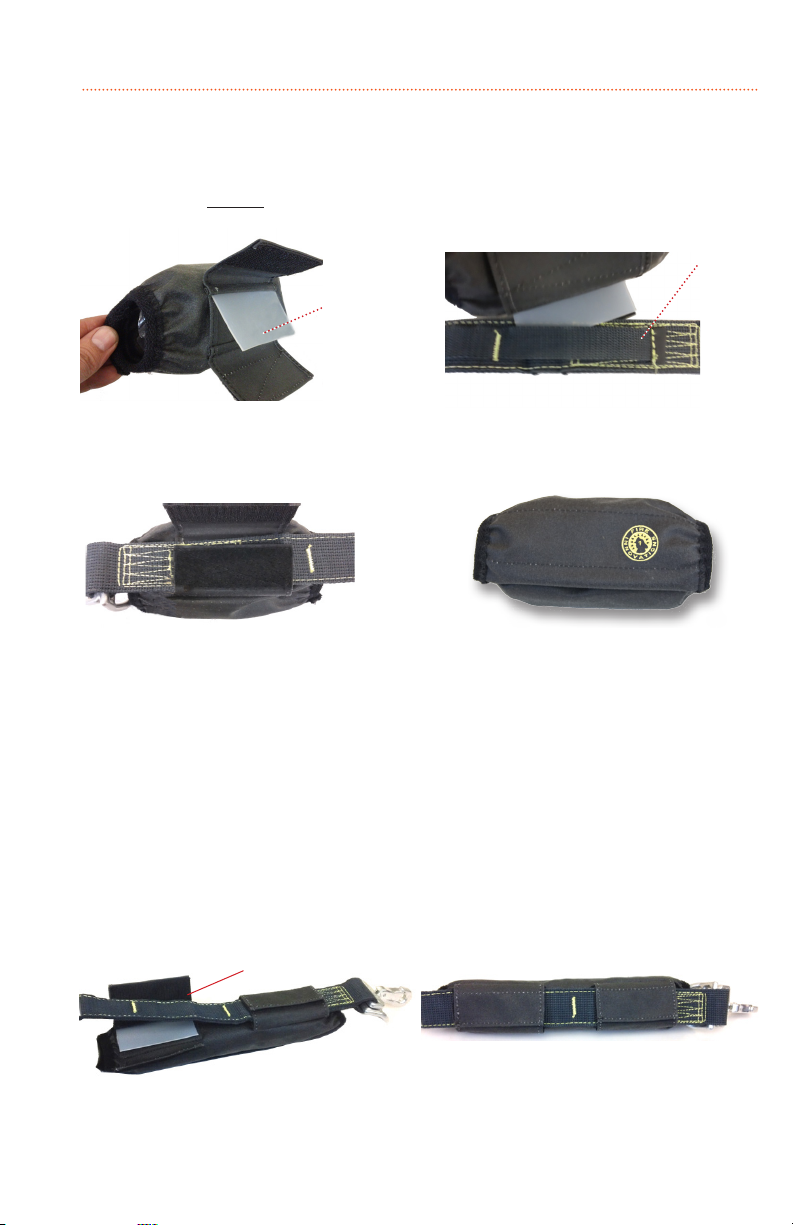
Accessory pouches allow stowage of the Multi-Use Strap as well as a multitude of reghter
accessories such as tethers, gloves, etc.
The installation procedures shown below apply to all accessory pouches. These pouches are
recommended to be installed on the closest gear loops to the xed Attachment Point (D-Ring). On
the Low Prole Pouch an additional step is required. Please note that at the end of installation, the
pouches will open upwards.
Open the Velcro aps of the Belt Holder. The
separator should have the open side down.
Slip the separator from the TOP of the belt, and
between the belt and the gear loop.
Flip the bottom ap of the Belt Holder up.
Finally, turn down the top ap of the Belt
Holder and fasten the Velcro aps securely.
LOW PROFILE ACCESSORY POUCH
This pouch has two Belt Holders to allow secured installation on either side of the belt. Follow the
procedures above for the front Belt Holder installation. Please note that it is NOT necessary to slip
the plastic ap through the gear loop of the rearward Belt Holder.
After securing the rst Belt Holder, open
the rearward Belt Holder aps and lay belt
directly on top of the plastic separator.
Close the aps to fasten Velcro aps.
Gear Loop
Separator
front view
back view
back view
Rearward
belt holder
ACCESSORY OR BAILOUT POUCH
front view
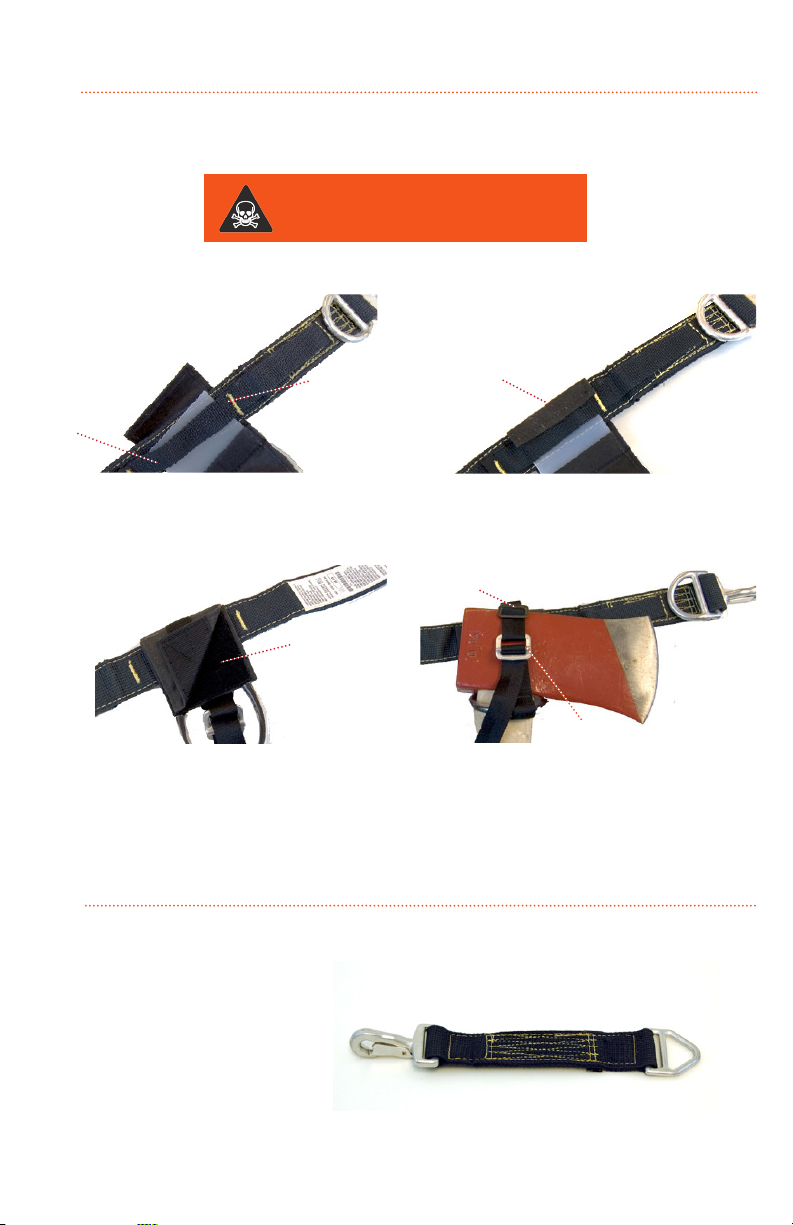
The Tool/Axe Loop can be installed on any available Gear Loop, although the recommended
installation is on the second Gear Loop from the xed Attachment Point (D-Ring).
AXE - TOOL HOLDER
Start by opening the unit and then slip the
Plastic Separator from the BOTTOM of the
belt, and between the belt and the second
gear loop.
Fold the Reinforcement Flap over the belt and
gear loop.
Proceed by turning over the belt and, align
and fasten the Velcro Flap. The Axe/Tool
Holder is now installed.
back of belt view
front of belt view
front of belt view
Separator
Reinforcement Flap
Velcro Flap
Gear Loop
Start by setting the Top Adjusting Buckle to the
outside edge of the tool. Then pull the adjusting
strap to cinch the Main Buckle down to secure
the tool.
Top Adjusting Buckle
Use caution when donning/dofng your
belt with a tool in the Axe/Tool Holder.
Tool may fall and cause serious injury.
Main Buckle
This extension adds 12” to any of our escape belts. This accessory NFPA certied and it is made
with the same hardware and webbing as our belts.
NFPA 12” BELT EXTENSION
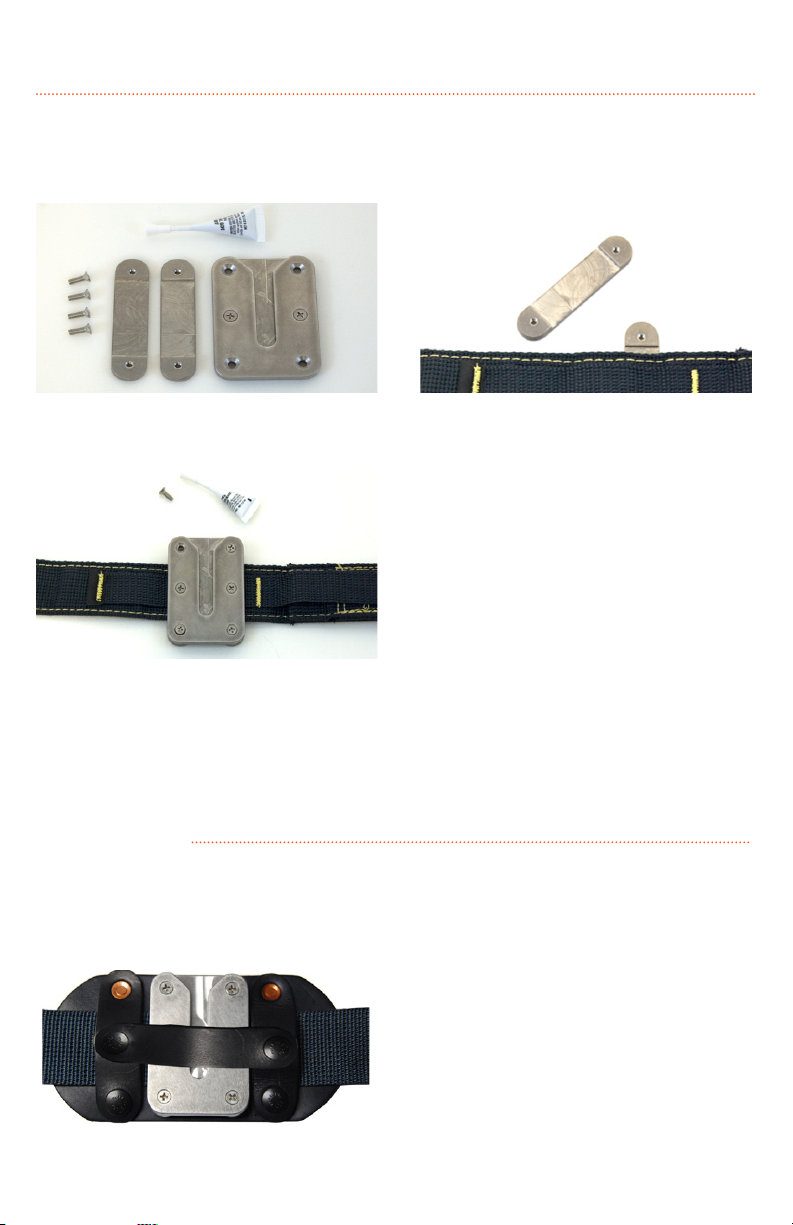
TOOL CLIP
LEATHER CLIP PROTECTOR
To secure, place the socket snap over the stud
snap, back edge rst. Then rock the snap
forward and secure.
Start by removing the corner screws from the
clip assembly. (NOTE: do not remove center
screws)
Position the clip securing brackets behind
the belt, keeping the de-bossed end towards
the belt.
Attach the clip to the securing brackets using
the supplied screws and Loctite 242. Cross
tighten the screws (Do not over tighten)
SCABBARD CLIP AKA FEMALE CLIP
The tool clip allows quick connection and disconnection of various tool holders, while retaining the
durability and exibility needed for today’s reghter. REQUIRED TOOLS: Philips screwdriver
SCABBARD CLIP PROTECTOR
The Leather Clip Protector keeps turnouts from excessive chafng against the metal axe clip, and
provides increased comfort to the wearer. Directional snaps are used to secure the leather backing to
the belt.

WARRANTY & RETURN POLICIES
THESE ARE THE SOLE AND COMPLETE WARRANTY AND RETURN POLICIES FOR ALL PRODUCTS AND SETS
FORTH THE EXCLUSIVE REMEDIES OF THE CUSTOMER. THIS WARRANTY IS GIVEN IN LIEU OF ALL OTHER
WARRANTIES, EITHER EXPRESSED OR IMPLIED. IN NO EVENT SHALL FIRE INNOVATIONS BE LIABLE FOR
DAMAGES IN EXCESS OF THE PRODUCT VALUE OR FOR ANY INCIDENTAL, SPECIAL OR CONSEQUENTIAL
DAMAGES TO PERSON OR PROPERTY ARISING OUT OF THE USE OR INABILITY TO USE OF SUCH PRODUCT;
TO THE FULL EXTENT THE APPLICABLE LAW MAY DISCLAIM SUCH DAMAGES.
RETURN POLICY
Fire Innovations allows returns or exchanges on all non-customized merchandise. Returned merchandise
must be delivered in “as delivered” condition without any “use” marks. We offer a 30 day window, following
the receipt, for these returns with no restocking or handling fee. Following that 30 day window a 10%
restocking and handling fee will be assessed. After 90 days, all returns will be issued a company credit
for the amount of invoice minus 15% restocking and handling fee. Additionally, no returns are allowed for
discontinued items over 30 days of receipt. The customer is required to obtain a RMA (Return Merchandise
Authorization) prior to returning any merchandize. The customer is fully responsible for shipping costs.
LIMITED WARRANTY
Fire Innovations warrants all its products will be free from defects in construction and workmanship for 90
days from the date of purchase. Fire Innovations at its sole option may either repair or replace a defective
product at no charge to the customer. A copy of customer purchase receipt and/or invoice may be required
for warranty.
CUSTOMER OBLIGATIONS
It is the customer’s obligation to fully understand all form, t and function of the product(s). To obtain
warranty service or return services, a customer must complete the warranty Review Request Form included
with the product or available online and fax or mail it back to Fire Innovations. Once the form is reviewed,
a RMA will be issued. The customer must return the product, shipping charges prepaid, along with the
warranty request to the provided address.
EXCLUSIONS
The warranty and return policies do not cover any product which has suffered normal wear and tear, defects
resulting from accidents, product misuse, product abuse, failure to follow product instructions, improper
product maintenance, neglect, tampering with the product, alterations, unauthorized product repairs, re,
ood, chemicals, acts of God, and damage while in transit to Fire Innovations. Further, this warranty expressly
does not cover any general or consequential damages to person or property other than the product, including
but not limited to devices used in conjunction with the product.
REPLACEMENT GUARANTEE PROGRAM
If it is determined that the failure claimed is not covered by our warranty program, you may be eligible for our
Replacement Guarantee Program. This program offers any customer that has product failure/damage within
a two year period (proof of purchase maybe required) that is not covered by our warranty, a replacement
product at a prorated discounted price.
Replacement Program Prorated Discount Schedule
0-6 months 6 months-1 year 1 year – 18 months 18 months-2 years
25% 20% 15% 10%
TOOL CLIP

Fire Innovations
830 Petaluma Blvd N
Petaluma, California 94952
United States
www.reinnovations.com
COMANCHE®
NFPA ESCAPE BELT
NFPA LADDER BELT
Other manuals for COMANCHE NFPA ESCAPE BELT
1
This manual suits for next models
1
Table of contents


