Fire Island GAD15309M User manual

OWNER’S MANUAL
Table of Contents
Important Safeguards ...........................................................Page 2
Expanded View and Hardware......................................................... 5
Assembly Instructions............................................................... 6
Installing LP Gas Tank............................................................... 9
Operating Instructions............................................................... 9
Cleaning and Care ................................................................ 10
Product Registration ............................................................... 11
Replacement Parts . . . . . . . . . . . . . . . . . . . . . . . . . . . . . . . . . . . . . . . . . . . . . . . . . . . . . . . . . . . . . . . . 11
Limited Warranty ................................................................. 11
Troubleshooting .................................................................. 12
The use and installation of this product must conform to local codes. In absence of local codes, use the
latest edition of the National Fuel Gas Code, ANSI Z223.1/NFPA 54, or International Fuel Gas Code. This
appliance, when installed, must be electrically grounded in accordance with local codes, or in the absence
of local codes with the National Electrical Code, ANSI/NFPA 70, if applicable.
For installation in Canada - these instructions, while generally acceptable, do not necessarily comply with
the Canadian installation codes, particularly with piping above and below ground. In Canada the installation
of this appliance must comply with local codes and/or standard CAN/CGA B149.1 (installation code for
propane burning appliances and equipment).
THIS INSTRUCTION BOOKLET CONTAINS IMPORTANT SAFETY INFORMATION. PLEASE READ AND KEEP
FOR FUTURE REFERENCE.
If you are assembling this unit for someone else, give this manual to them to read and save for future reference.
WARNING: This product can expose you to chemicals, including Di(2-ethylhexyl) phthalate (DEHP),
Diisononyl Phthalate (DINP), Soot, Carbon Monoxide, Lead and Lead Compounds, which are known to the
State of California to cause cancer, birth defects and other reproductive harm. For more information go to
www.P65Warnings.ca.gov.
Made from 75% Bagasse
(environmentally friendly sugar
cane pulp by-product)
Patent Pending
Manufactured in China for: Mr. Bar-B-Q Products LLC
10 Hub Dr., Ste 101, Melville, NY 11747 • 1.888.398.8643 • MrBarBQProducts.com
© Mr. Bar-B-Q Products LLC
Fire Island™ is a Registered Trademark of Mr. Bar-B-Q Products LLC GAD15309M-ES-OM-F100
CARBON MONOXIDE HAZARD
• This appliance can produce carbon monoxide which has
no odor.
• Using it in an enclosed space can kill you.
• Never use this appliance in an enclosed space such as a
camper, tent, car or home.
·DANGER
WARNING
FOR OUTDOOR USE ONLY.
WInstallation and service must be performed
by a qualified installer, service agency or
gas supplier.
WARNING
FOR YOUR SAFETY:
WIf the information in this manual is not
followed exactly, a fire or explosion may
result causing property damage, personal
injury or loss of life.
WWHAT TO DO IF YOU SMELL GAS:
• Do NOT try lighting any appliance.
• Do NOT touch any electrical switch; do
NOT use any phone in your building.
• Immediately call your gas supplier from a
neighbor’s phone.
• Follow the gas supplier’s instructions.
• If you cannot reach your gas supplier, call
the fire department.
WDo Not Use For Cooking.
WARNING
FOR YOUR SAFETY:
WINSTALLER: Leave this manual with the
appliance.
WCONSUMER: Retain this manual for future
reference.
WARNING
FOR YOUR SAFETY:
Improper installation, adjustment,
alteration, service or maintenance can
cause injury or property damage.
Read the installation, operation and
maintenance instructions thoroughly before
installing or servicing this equipment.
DANGER
FIRE OR EXPLOSION HAZARD
If you smell gas:
• Shut off gas to appliance.
• Extinguish any open flame.
• If odor continues, leave the area
immediately.
• After leaving the area, call your gas
supplier or fire department.
Failure to follow these instructions could
result in fire or explosion, which could cause
property damage, personal injury, or death.
WARNING
FOR YOUR SAFETY:
1. Do not store or use gasoline, or other
flammable vapors and liquids, in the vicinity
of this or any other appliance.
2. An LP-cylinder not connected for use shall
not be stored in the vicinity of this or any
other appliance.
DANGER
Do NOT leave this appliance unattended while
it is in operation.
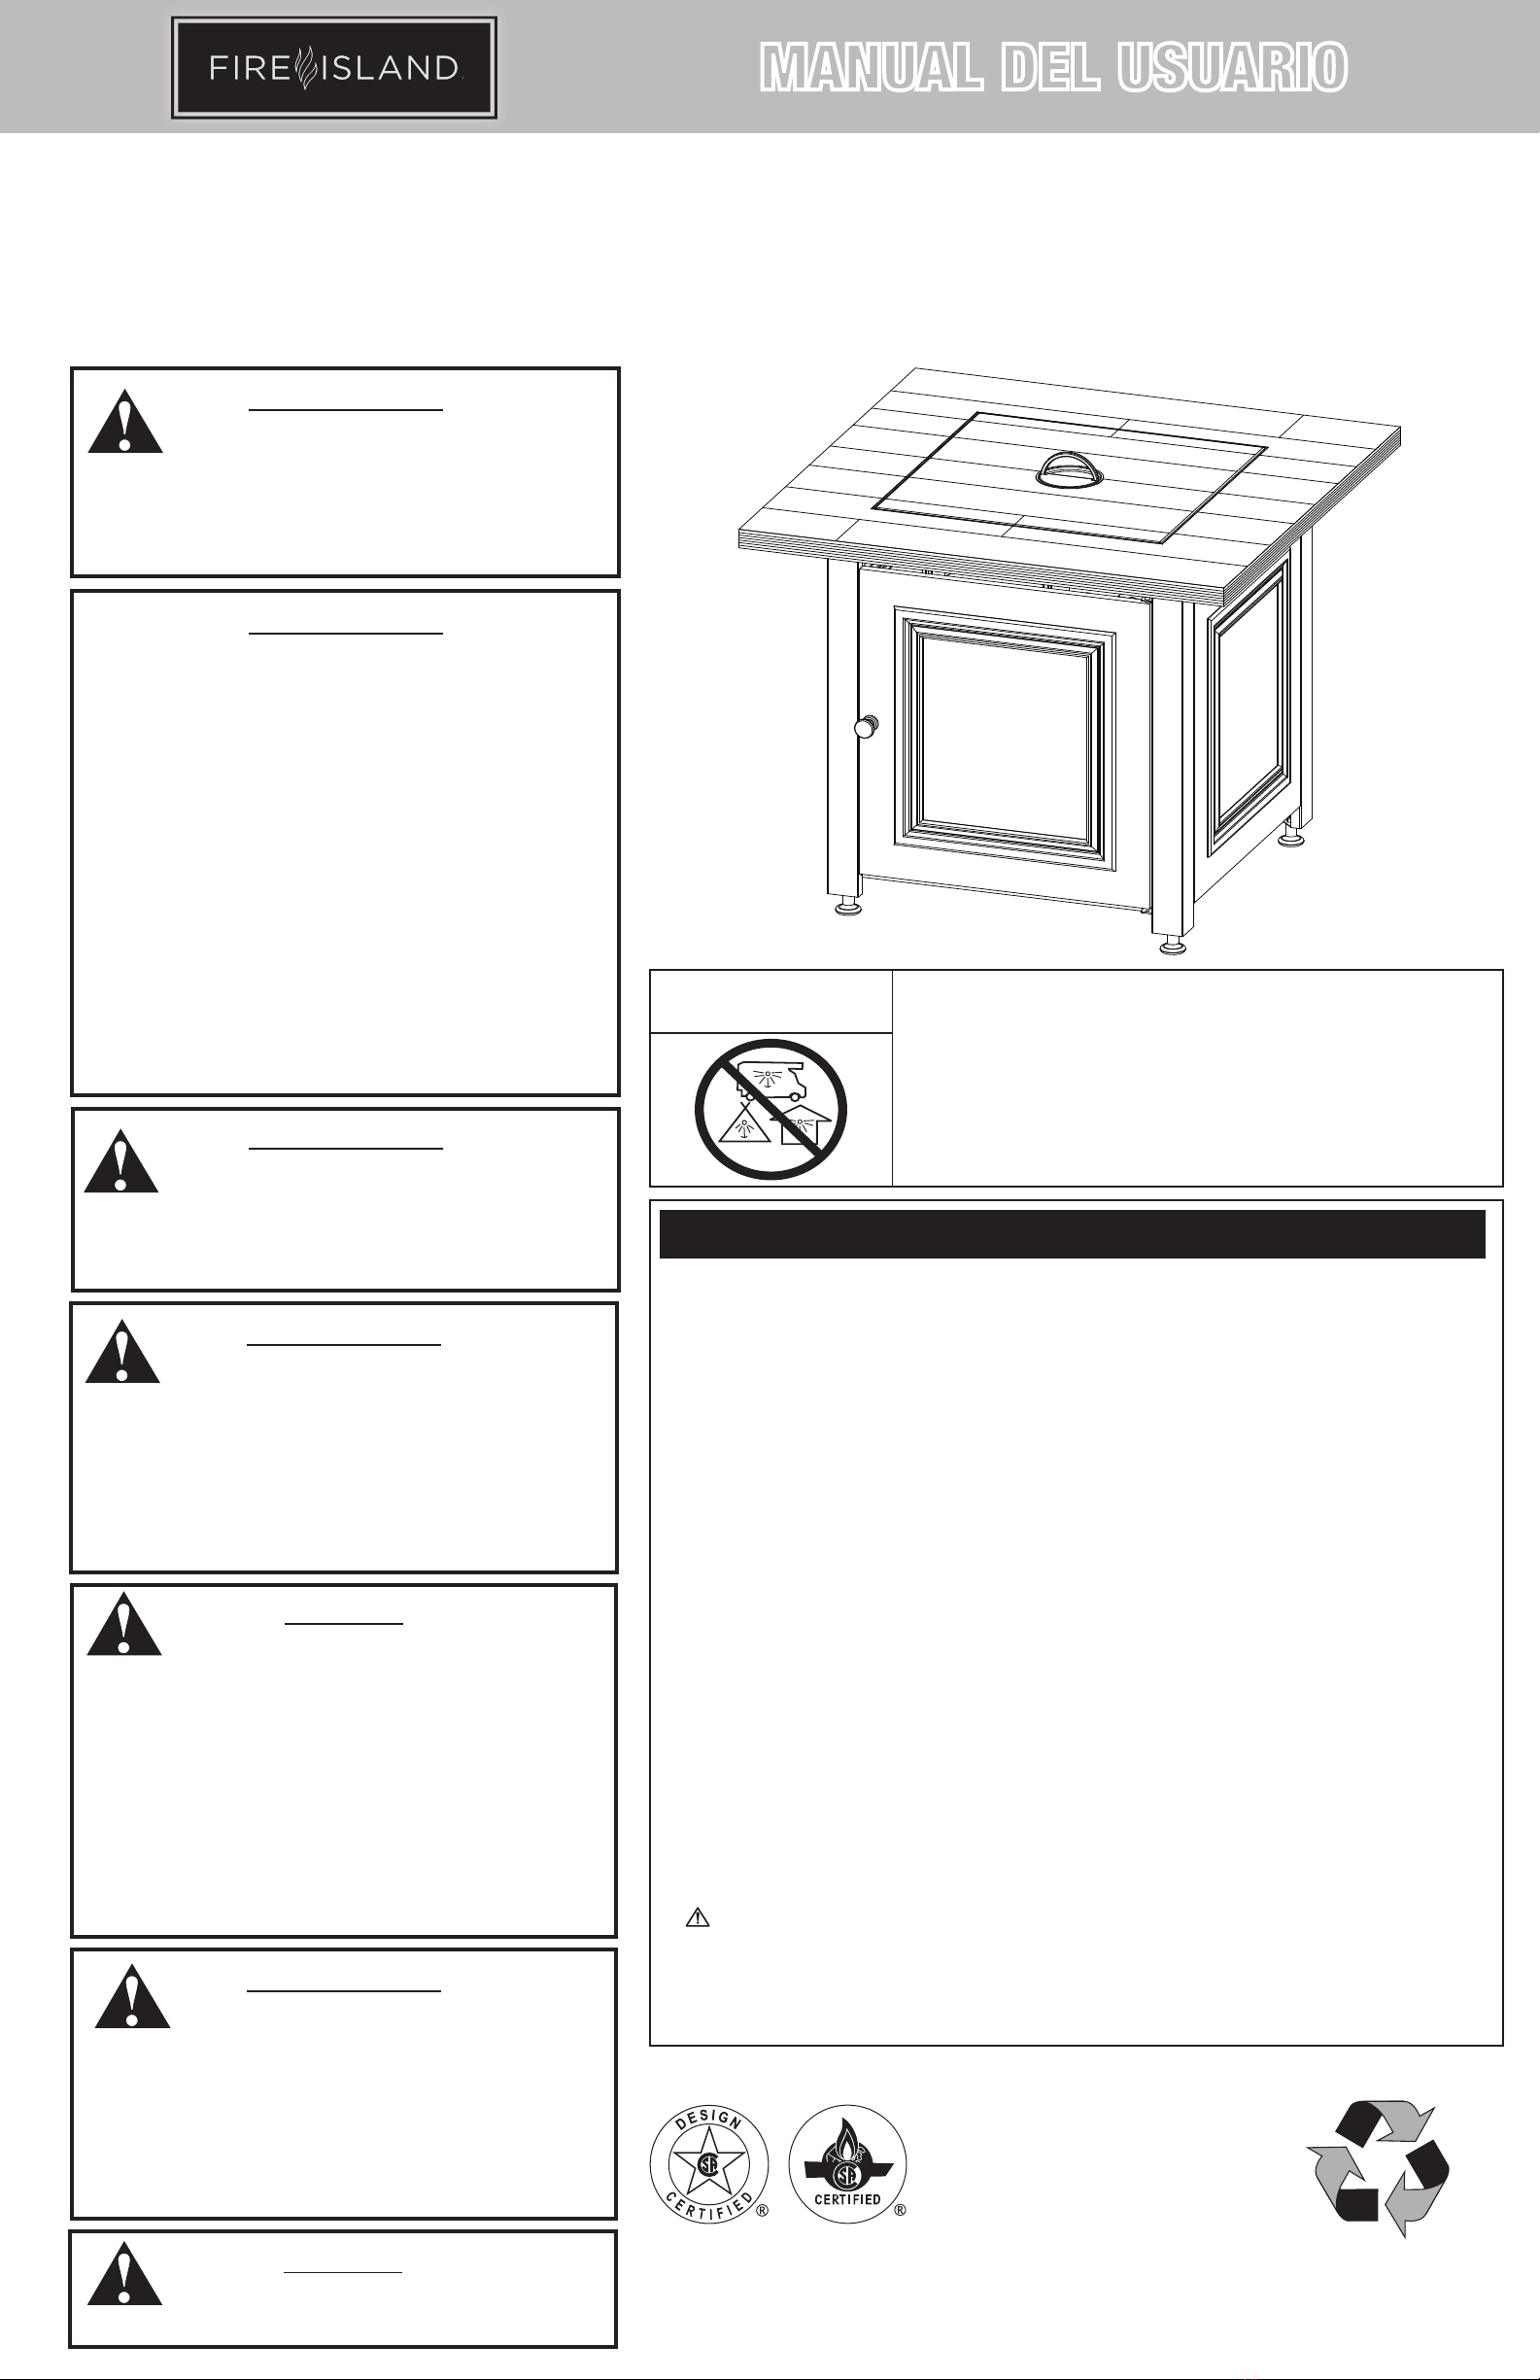
LP Gas Outdoor Fire Table
Model No. GAD15309M
Important Safeguards
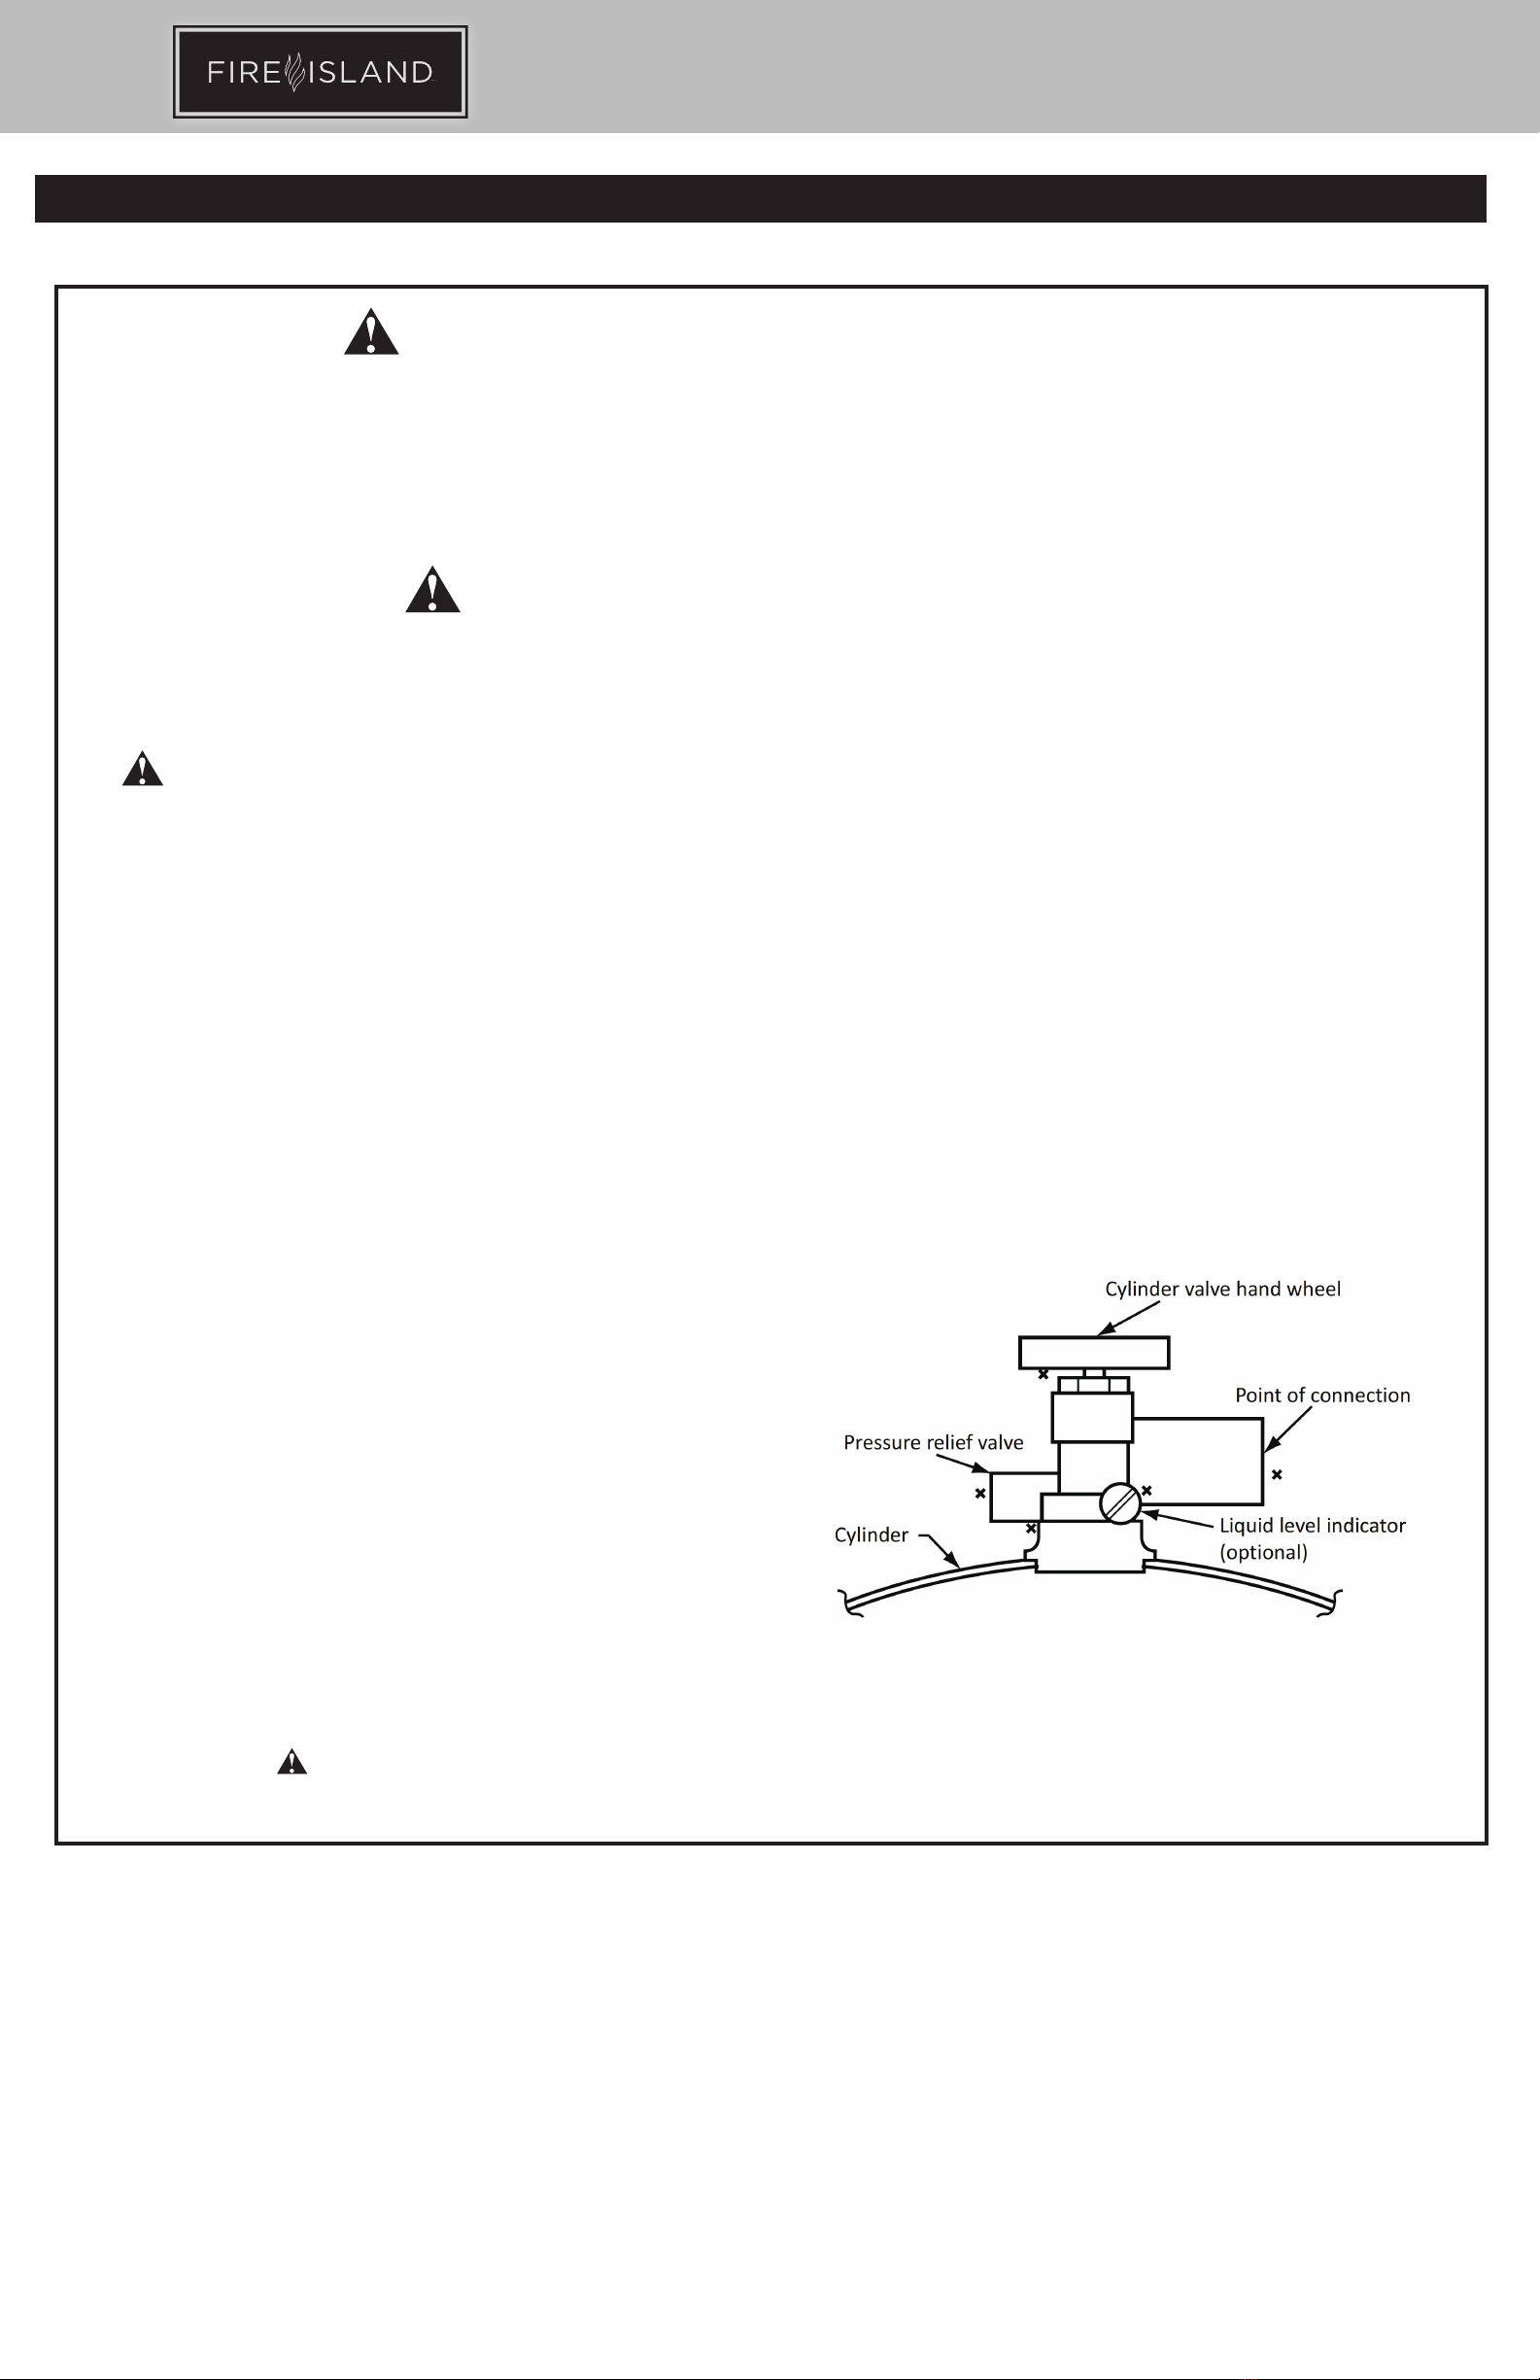
DANGER • FLAMMABLE GAS UNDER PRESSURE.
LEAKING LP-GAS MAY CAUSE A FIRE OR EXPLOSION IF IGNITED CAUSING
SERIOUS BODILY INJURY OR DEATH.
CONTACT LP GAS SUPPLIER FOR REPAIRS, OR DISPOSAL OF THIS
CYLINDER OR UNUSED LP-GAS.
WARNING • FOR OUTDOOR USE ONLY.*
DO NOT USE OR STORE CYLINDER IN A BUILDING,
GARAGE OR ENCLOSED AREA.
• Know the odor of LP-gas. If you hear, see or smell
leaking LP-gas, immediately get everyone away from
the cylinder and call the Fire Department. Do not attempt
repairs.
• Caution your LP-gas supplier to:
Be certain cylinder is purged of trapped air prior to
first filling.
Be certain not to over fill the cylinder.
Be certain cylinder requalification date is checked.
• LP-gas is heavier than air and may settle in low places
while dissipating.
• Contact with the liquid contents of cylinder will cause
freeze burns to the skin.
• Do not allow children to tamper or play with cylinder.
• When not connected for use, keep cylinder valve turned
off. Self contained appliances shall be limited to a
cylinder of 30 lb capacity or less.
• Do not use, store or transport cylinder where it would
be exposed to high temperatures. Relief valve may open
allowing a large amount of flammable gas to escape.
• When transporting, keep cylinder secured in
an upright position with cylinder valve turned off.
WHEN CONNECTING FOR USE:
• Use only in compliance with applicable codes.
• Read and follow manufacturer’s instructions.
• Consult manufacturer’s instructions concerning the
cylinder connection provided with your appliance.
• Be sure regulator vent is not pointing up.
• Turn off all valves on the appliance.
• Do not check for gas leaks with a match or open flame.
Apply soapy water at areas marked “X”. Open cylinder
valve. If bubble appears, close valve and have LP-gas
service person make needed repairs. Also, check
appliance valves and connections to make sure they do
not leak before lighting appliance.
• Light appliance(s) following manufacturer’s instructions.
• When appliance is not in use, keep the cylinder valve
closed.
WARNING:
DO NOT REMOVE, DEFACE, OR OBLITERATE THIS LABEL
*EXCEPT AS AUTHORIZED BY ANSI/NFPA 58.
DANGER. Do not store a spare LP cylinder under or near a barbecue grill, or other heat sources.
NEVER fill an LP cylinder beyond 80% full: a fire causing death or serious injury may occur.
2 LP Gas Outdoor Fire Pit
Model No. GAD15309M

WDo NOT use this outdoor fire pit without reading the entire owner’s
manual.
WThis appliance is for outdoor use only, and should NOT be used in a
building, garage or any other enclosed area.
WDo NOT operate, light or use this appliance within ten feet (3.05 m) of
walls, structures or buildings.
WFor residential use only. This outdoor fire pit is NOT for commercial use.
WDo NOT use this outdoor fire pit for indoor heating. TOXIC carbon
monoxide fumes can accumulate and cause asphyxiation.
WThis outdoor fire pit is safety certified for use in the United States
and/or Canada only. Do NOT modify for use in any other location.
Modification will result in a safety hazard and will void your warranty.
WApartment dwellers: Check with management to learn the requirements
and fire codes for using a liquid propane (LP) gas outdoor fire pit in your
apartment complex. If allowed, use outside on the ground floor with a
ten foot (3.05 m) clearance from any structure. Do NOT use on or under
balconies.
WThis outdoor fire pit, from the factory, is for use with LP gas only. The
conversion to or attempted use of natural gas in this outdoor fire pit is
dangerous, may cause bodily harm and will void your warranty.
WLP gas characteristics:
a. LP gas is flammable and hazardous if handled improperly. Become
aware of the characteristics before using any LP gas product.
b. LP gas is explosive under pressure, heavier than air, and settles/
pools in low areas.
c. LP gas in its natural state has no odor. For your safety, an odorant is
added that smells like rotten cabbage.
d. Contact with LP gas can cause freeze burns to skin.
WLP gas tank needed to operate. Only tanks marked “propane” may be
used.
a. The LP gas cylinder must be constructed and marked in accordance
with the U.S. Department of Transportation (D.O.T.) Specifications for
LP-Gas Cylinders, or the Standard for Cylinders, Spheres and Tubes
for the Transportation of Dangerous Goods and Commission, CAN/
CSA-B339 as applicable.
b. LP gas tank must be arranged for vapor withdrawal.
c. The LP gas tank must have a listed overfilling prevention device
(OPD) and a QCCI or Type I (CGA810) LP gas tank connection.
d. The LP gas tank must have a tank collar to protect the tank valve.
e. Never use an LP gas tank with a damaged body, valve, collar or
footing.
f. Dented or rusted LP gas tanks may be hazardous and should be
checked by your LP gas supplier prior to use.
g. The LP gas tank should not be dropped or handled roughly.
h. Tanks must be stored outdoors, out of the reach of children and
must not be stored in a building, garage or any other enclosed area.
Your LP gas tank must never be stored where temperatures can
reach over 125°F.
i. Do NOT insert any tool or foreign object into the valve outlet or
safety relief valve. You may damage the valve and cause a leak.
Leaking propane may result in explosion, fire, severe personal injury
or death.
j. Never keep an LP gas tank in a hot car or trunk. Heat will cause the
gas pressure to increase, which may open the relief valve and allow
gas to escape.
k. Place dust cap on cylinder valve outlet whenever the cylinder is not
in use. Only install the type of dust cap on the cylinder valve outlet
that is provided with the cylinder valve. Other types of caps or plugs
may result in leakage of propane.
l. Do NOT store a spare LP gas tank under or near this appliance.
m. Never fill the cylinder beyond 80 percent full.
n. A fire causing serious injury or damage to property may occur if the
above is not followed exactly.
WYour outdoor fire pit has been checked at all factory connections
for leaks. Recheck all connections as described in the “Operating
Instructions” section, as shipping can loosen connections.
WCheck for leaks even if your unit was assembled for you by someone
else.
WDo NOT operate if a gas leak is present. Gas leaks may cause a fire or
explosion.
WYou must follow all instructions in the “Checking for Leaks” section
before operating. To prevent a fire or explosion when testing for a leak:
a. Always perform a leak test before lighting this outdoor fire pit and
each time the tank is connected for use.
b. No smoking. Do NOT use or permit sources of ignition in the area
while conducting a leak test.
c. Conduct the leak test outdoors in a well-ventilated area.
d. Do NOT use matches, lighters or a flame to check for leaks.
e. The use of alcohol, prescription or non-prescription drugs may
impair the consumer’s ability to properly assemble or safely operate
the appliance.
f. Strong odors, colds, sinus congestion, etc. may prevent the
detection of propane. Use caution and common sense when testing
for leaks.
g. Do NOT use this outdoor fire pit until any and all leaks are corrected.
If you are unable to stop a leak, disconnect the LP gas supply. Call a
gas appliance serviceman or your local LP gas supplier.
WDo NOT store or use gasoline or other flammable liquids or vapors
within 25 feet (7.62 m) of this appliance.
WDo NOT use in an explosive atmosphere. Keep outdoor fire pit area clear
and free from combustible materials, gasoline and other flammable
vapors and liquids.
WThis outdoor fire pit is NOT to be operated by children.
WThis outdoor fire pit is NOT to be used in or on boats or recreational
vehicles.
WDo NOT connect to a remote gas supply.
WNever attempt to attach this outdoor fire pit to the self-contained LP gas
system of a camper trailer, motor home or house.
WAlways use in accordance with all applicable local, state and national
codes. Contact your local fire department for details on outdoor burning.
WWhen using this outdoor fire pit, exercise the same precautions you
would with any open fire.
WDo NOT burn solid fuels such as: wood, charcoal briquettes, lump
charcoal, manufactured logs, driftwood, trash, leaves, paper, cardboard,
plywood, painted/stained/pressure treated wood in this outdoor fire pit.
WIt is essential to keep the outdoor fire pit’s valve compartment, burners,
and circulating air passages clean. Inspect outdoor fire pit before each
use.
WDo NOT use this outdoor fire pit until it is COMPLETELY assembled and
all parts are securely fastened and tightened.
WDo NOT use this outdoor fire pit near automobiles, trucks, vans or
recreational vehicles.
WDo NOT use this outdoor fire pit under any overhang or near any
unprotected combustible constructions. Avoid using near or under
overhanging trees and shrubs.
WAlways use this outdoor fire pit on a hard, level, non-combustible
surface such as concrete, rock or stone. An asphalt or blacktop surface
may not be acceptable for this purpose.
WDo NOT use this outdoor fire pit for cooking.
WDANGER: Failure to follow the dangers, warnings and cautions in this manual may result in serious bodily injury or death, or in a fire or an explosion
causing damage to property.
WWARNINGS:
Need help? 1.888.398.8643
Do not return to place of purchase.
Replacement Parts
1.888.398.8643 3
Important Safeguards

4 LP Gas Outdoor Fire Pit
Model No. GAD15309M
Important Safeguards
WDo NOT use this appliance if any part has been under water.
Immediately call a qualified service technician to inspect the appliance
and to replace any part or control system and any gas control which
has been under water.
WDo NOT wear flammable or loose clothing when operating this outdoor
fire pit.
WDo NOT use in windy conditions.
WNever lean over this outdoor fire pit when lighting or when in use.
WDo NOT use this outdoor fire pit unless burner is securely in place.
WKeep all electrical cords away from this outdoor fire pit during use.
WCertain areas of this outdoor fire pit when in use will become too
hot to touch. To avoid burns, do NOT touch hot surfaces until the unit
has completely cooled (about 45 minutes), unless you are wearing
protective gear (such as insulated pot holders or heat-resistant gloves/
mittens).
WDo NOT leave a lit outdoor fire pit unattended, especially around children
and pets.
WChildren and adults should be alerted to the hazards of high surface
temperatures and should stay away to avoid burns or clothing ignition.
WYoung children should be carefully supervised when they are in the area
of the appliance.
WDo NOT hang or place clothing or other flammable material on or near
this appliance.
WAny guard or other protective device removed for servicing the
appliance must be replaced prior to operating the appliance.
WIf applicable, protective cover must be removed when burner is in
operation.
WDo NOT attempt to move outdoor fire pit when in use. Allow the outdoor
fire pit to cool before moving or storing.
WThis outdoor fire pit should be thoroughly cleaned and inspected on
a regular basis. Clean and inspect the hose before each use of the
appliance. If there is evidence of abrasion, wear, cuts, or leaks, the hose
must be replaced prior to the appliance being operated.
WThis outdoor fire pit should be inspected at least annually by a qualified
service person. Depending on amount of use, more frequent cleaning
may be required. Do NOT operate until all parts have been repaired or
replaced.
WUse only the regulator and hose assembly provided. Use only the
replacement regulator and hose assembly specified by Mr. Bar-B-Q
Products LLC.
WUse only Mr. Bar-B-Q Products LLC factory-authorized parts. The use of
any part that is not factory-authorized can be dangerous and will void
your warranty.
WUse only Mr. Bar-B-Q Products LLC factory-authorized lava rock/fire
glass. The use of any lava rock/fire glass that is not factory-authorized
can be dangerous and will void your warranty.
WDo NOT operate this appliance without reading “Operating Instructions”
in this manual.
WStorage of this outdoor fire pit indoors is permissible only if the tank
is disconnected, removed from the outdoor fire pit and properly stored
outdoors.
WDo NOT attempt to disconnect the gas regulator from the tank or any
gas fitting while the outdoor fire pit is in use.
WIf the outdoor fire pit is not in use, the gas must be turned off at the
supply tank.
WCAUTION: The gas pressure regulator provided with this appliance must
be used. This regulator is set for an outlet pressure of 11 inches water
column.
WThe minimum inlet gas pressure for this outdoor fire pit is 11 inches of
water column, for the purpose of input adjustment.
WThe maximum inlet gas pressure for this outdoor fire pit is 11 inches of
water column.
WBefore pressure testing, close LP gas tank valve and disconnect gas
regulator. The gas supply piping system must test at pressures equal to
or less than ½ psi (3.5 kPa).
WDo NOT sit or stand on the mantle or any part of this appliance.
WDo NOT throw anything onto the fire when the unit is in operation.
WLava rock/fire glass are very hot. Keep children or pets at a safe
distance from this appliance.
WWhen heated, lava rock/fire glass may pop.
WThe opening of the tank collar should face toward the door side for easy
access.
WDo NOT store any combustible materials in the base enclosure.
WUse protective gloves when assembling this product.
WDo NOT force parts together as this can result in personal injury or
damage to the product.
WDeath, serious injury or damage to property may occur if the above is
not followed exactly.
Need help? 1.888.398.8643
Do not return to place of purchase.
Replacement Parts
1.888.398.8643
WARNING
When heated, lava rocks may react by
breaking and throwing fragments of
rock. Be sure to season the lava rocks
at a high temperature before use
in order to avoid potential personal
injury or damage.
IMPORTANT BEFORE USE
HOW TO SEASON LAVA ROCK ON
PAGE 8.
5
How to light an electronic ignitor
https://youtu.be/aFWb1YYnRo0
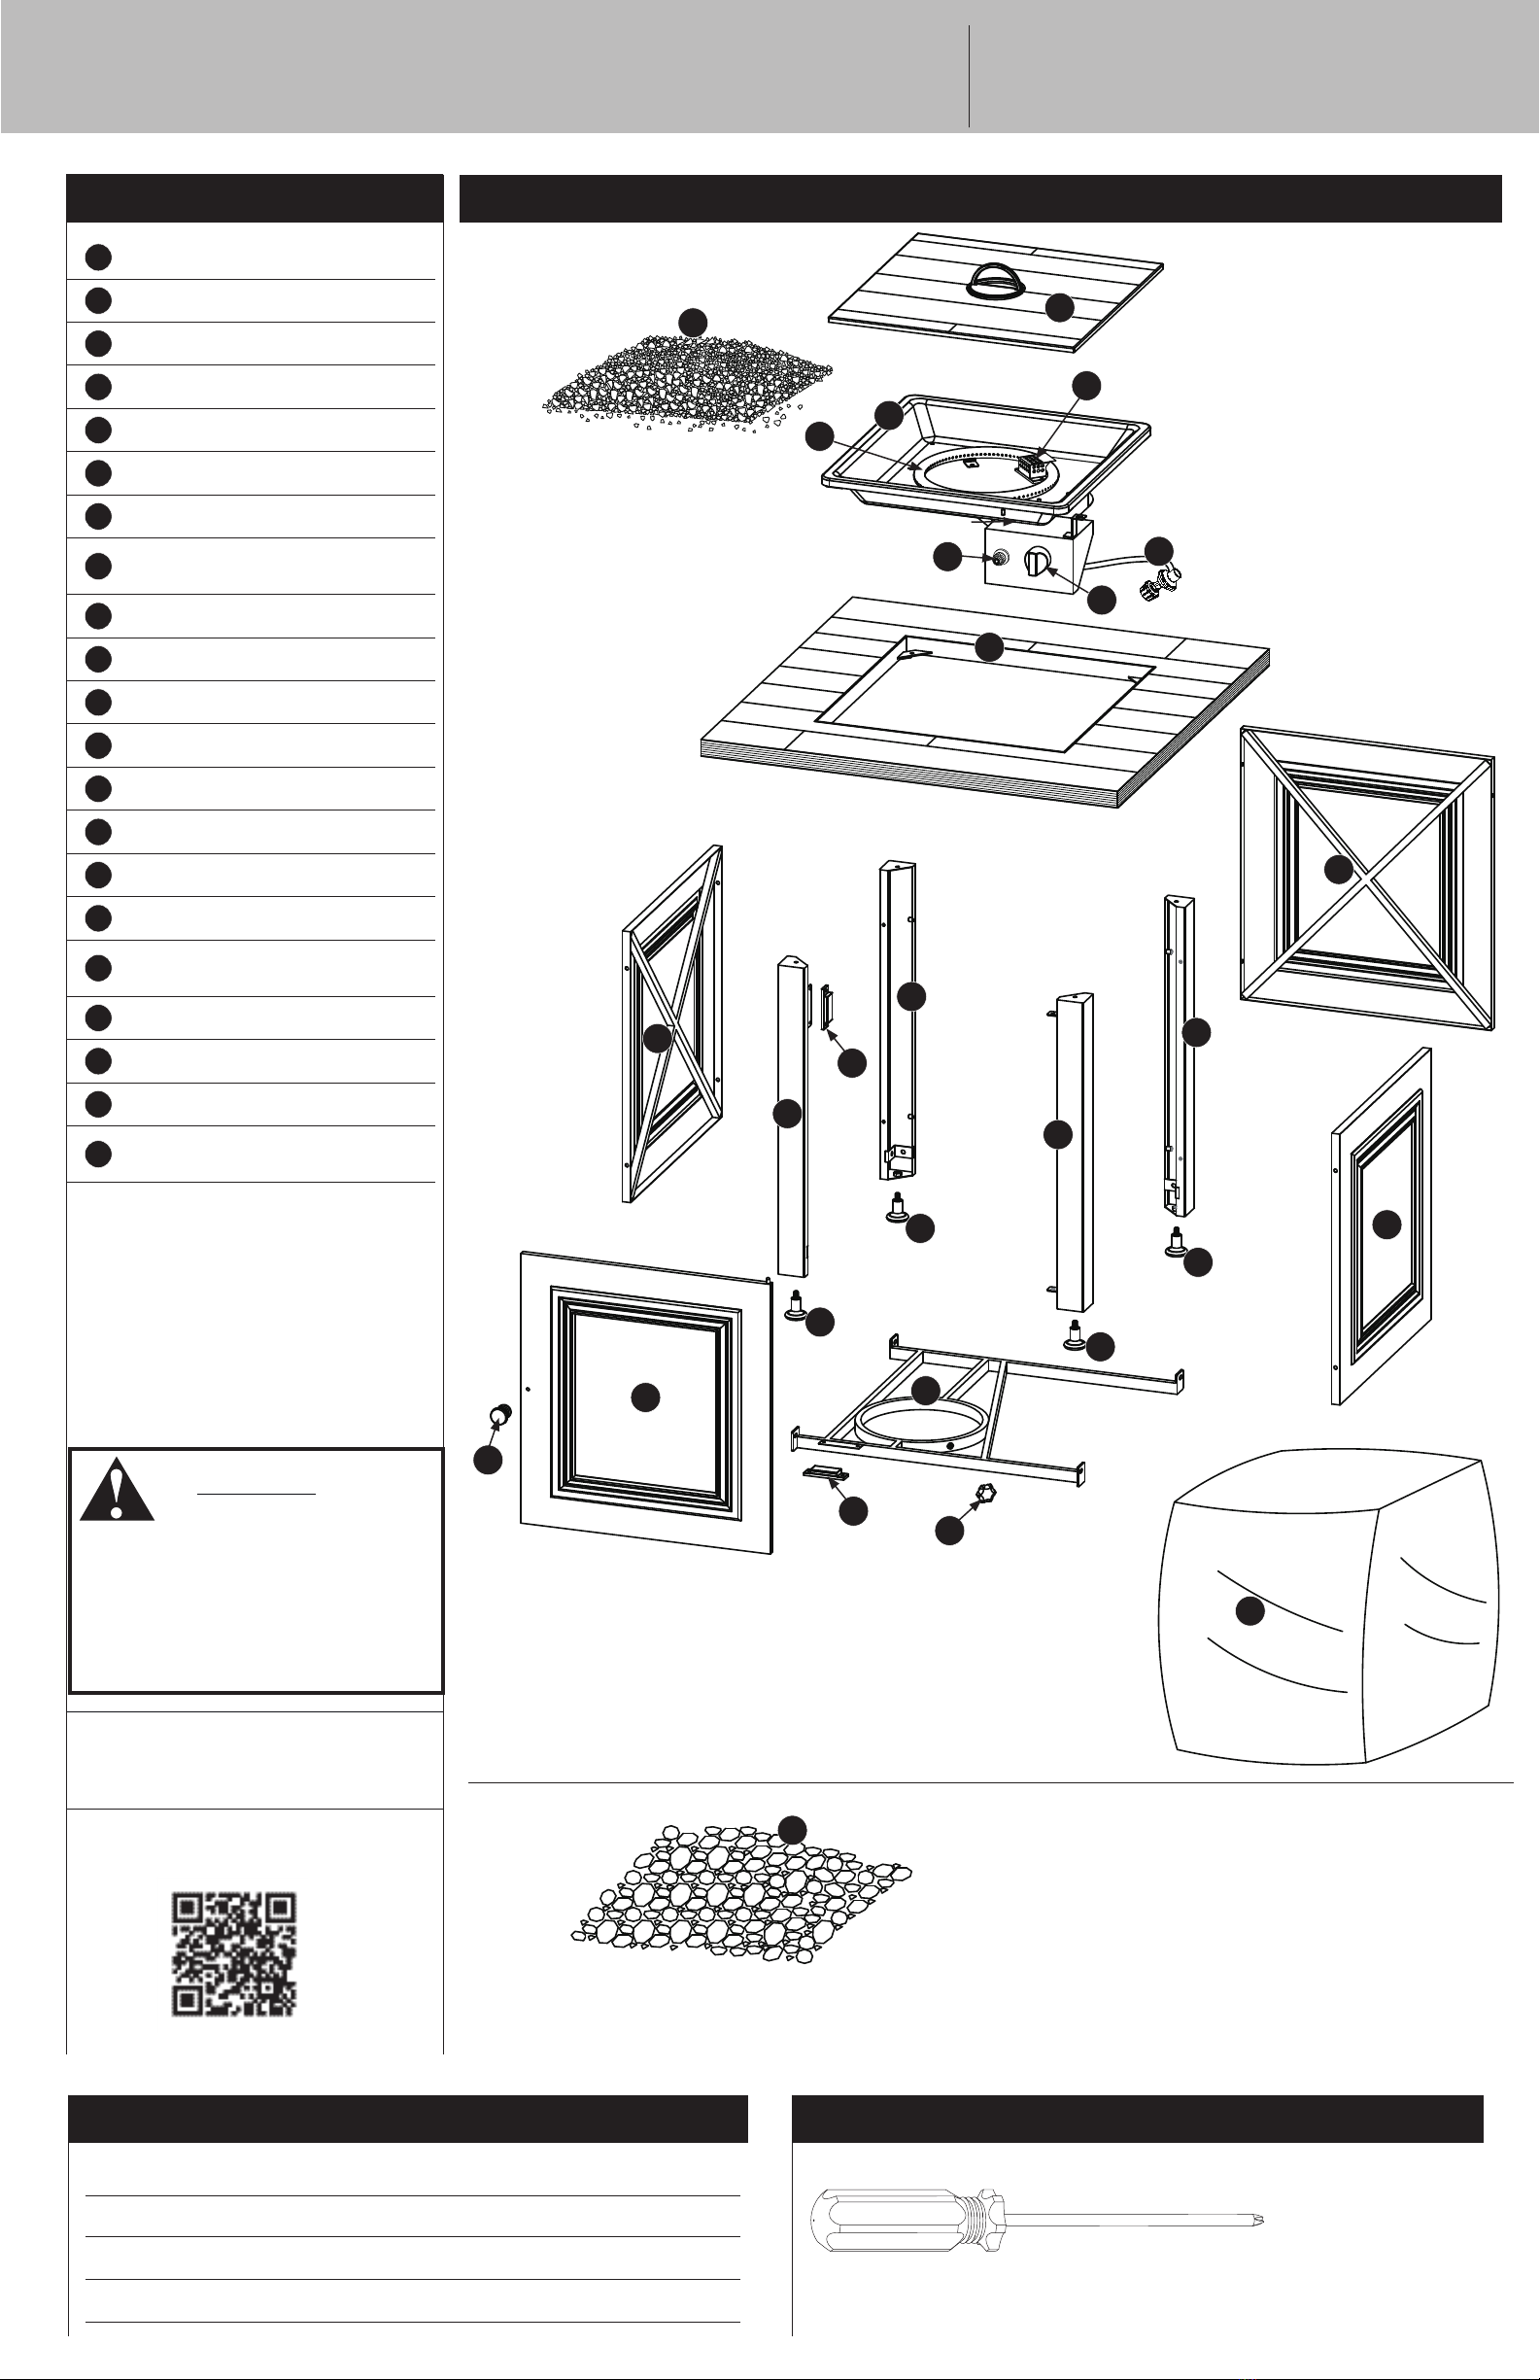
Expanded View
10
10
10
18
17
12
3
9
2
8
6
14
11
11
4
19
16
Sold Separately
20
15
15
13
5
7
1
15 15
21
13
Parts List
1Bronze Fire Glass GLS-BRZ
2Table Insert 58-24-599
3Bowl Assembly* 58-23-982
4Igniter Cover* 58-23-896
5Burner* 58-23-138
6Control Knob* 58-23-139
7Battery Cap 58-23-897
8Regulator/Hose
Assembly* 58-23-922
9Mantel 58-24-600
10 Side Panel (3) 58-24-272
11 Leg A (2) 58-24-273
12 Leg B 58-24-274
13 Magnet (2)* 58-23-145
14 Leg C 58-24-275
15 Foot (4)* 58-23-147
16 Base* 58-24-060
17 LP Gas Tank Retainer
Bolt* 58-23-149
18 Door 58-24-276
19 Door Handle* 58-24-277
20 Cover 58-23-366
21 Lava Rock (not required
and sold separately)** 55-05-833
* Pre-assembled
W**CAUTION: Use only Mr. Bar-B-Q
Products LLC factory-authorized
fire glass/lava rock. The use of
any fire glass/lava rock that is
not factory-authorized can be
dangerous and will void your
warranty.
Tools Required for Assembly (Not Included)
#2 Phillips Head Screwdriver 1 pc
Hardware Pack 58-23-862
AScrew M5x12 Black Nickel Plated Truss Head 16 pcs
BScrew M6X12 Black Nickel Plated Truss Head 4 pcs
CScrew M6X12 Black Nickel Plated Step Head 1 pc
DAA Battery 1 pc
6 LP Gas Outdoor Fire Pit
Model No. GAD15309M
1
DO NOT RETURN TO PLACE OF PURCHASE.
For assistance, call 1.888.398.8643 toll-free. Please have
your owner’s manual and model number available for
reference.
Note: The model number is printed on a label which can be found on
the inside door, back or side of the base assembly.
Assembly Tips:
1. Select an area where you will assemble this product. To
protect components, choose a smooth surface that’s free of
cracks or openings.
2. Spread out all parts.
3. Tighten all hardware connections by hand first. Then, before
completing each step, go back and fully tighten all hardware.
Be careful not to over-tighten. That could damage surfaces or
strip threads.
4. For best results, complete each step in the order presented.
To complete assembly you will need:
• (1) Leak detection solution (instructions on how to make the
solution are included in the “Operating Instructions” section of
this manual).
• (1) Precision-filled LP gas grill tank with Acme Type 1 external
threaded valve connection (standard grill size) (not included).
Typical assembly is approximately one hour.
WCAUTION: Two (2) people will be required for assembly.
WWARNING: Failure to position the parts in accordance with
these diagrams or failure to use only parts specifically
approved with this appliance may result in property damage
or personal injury.
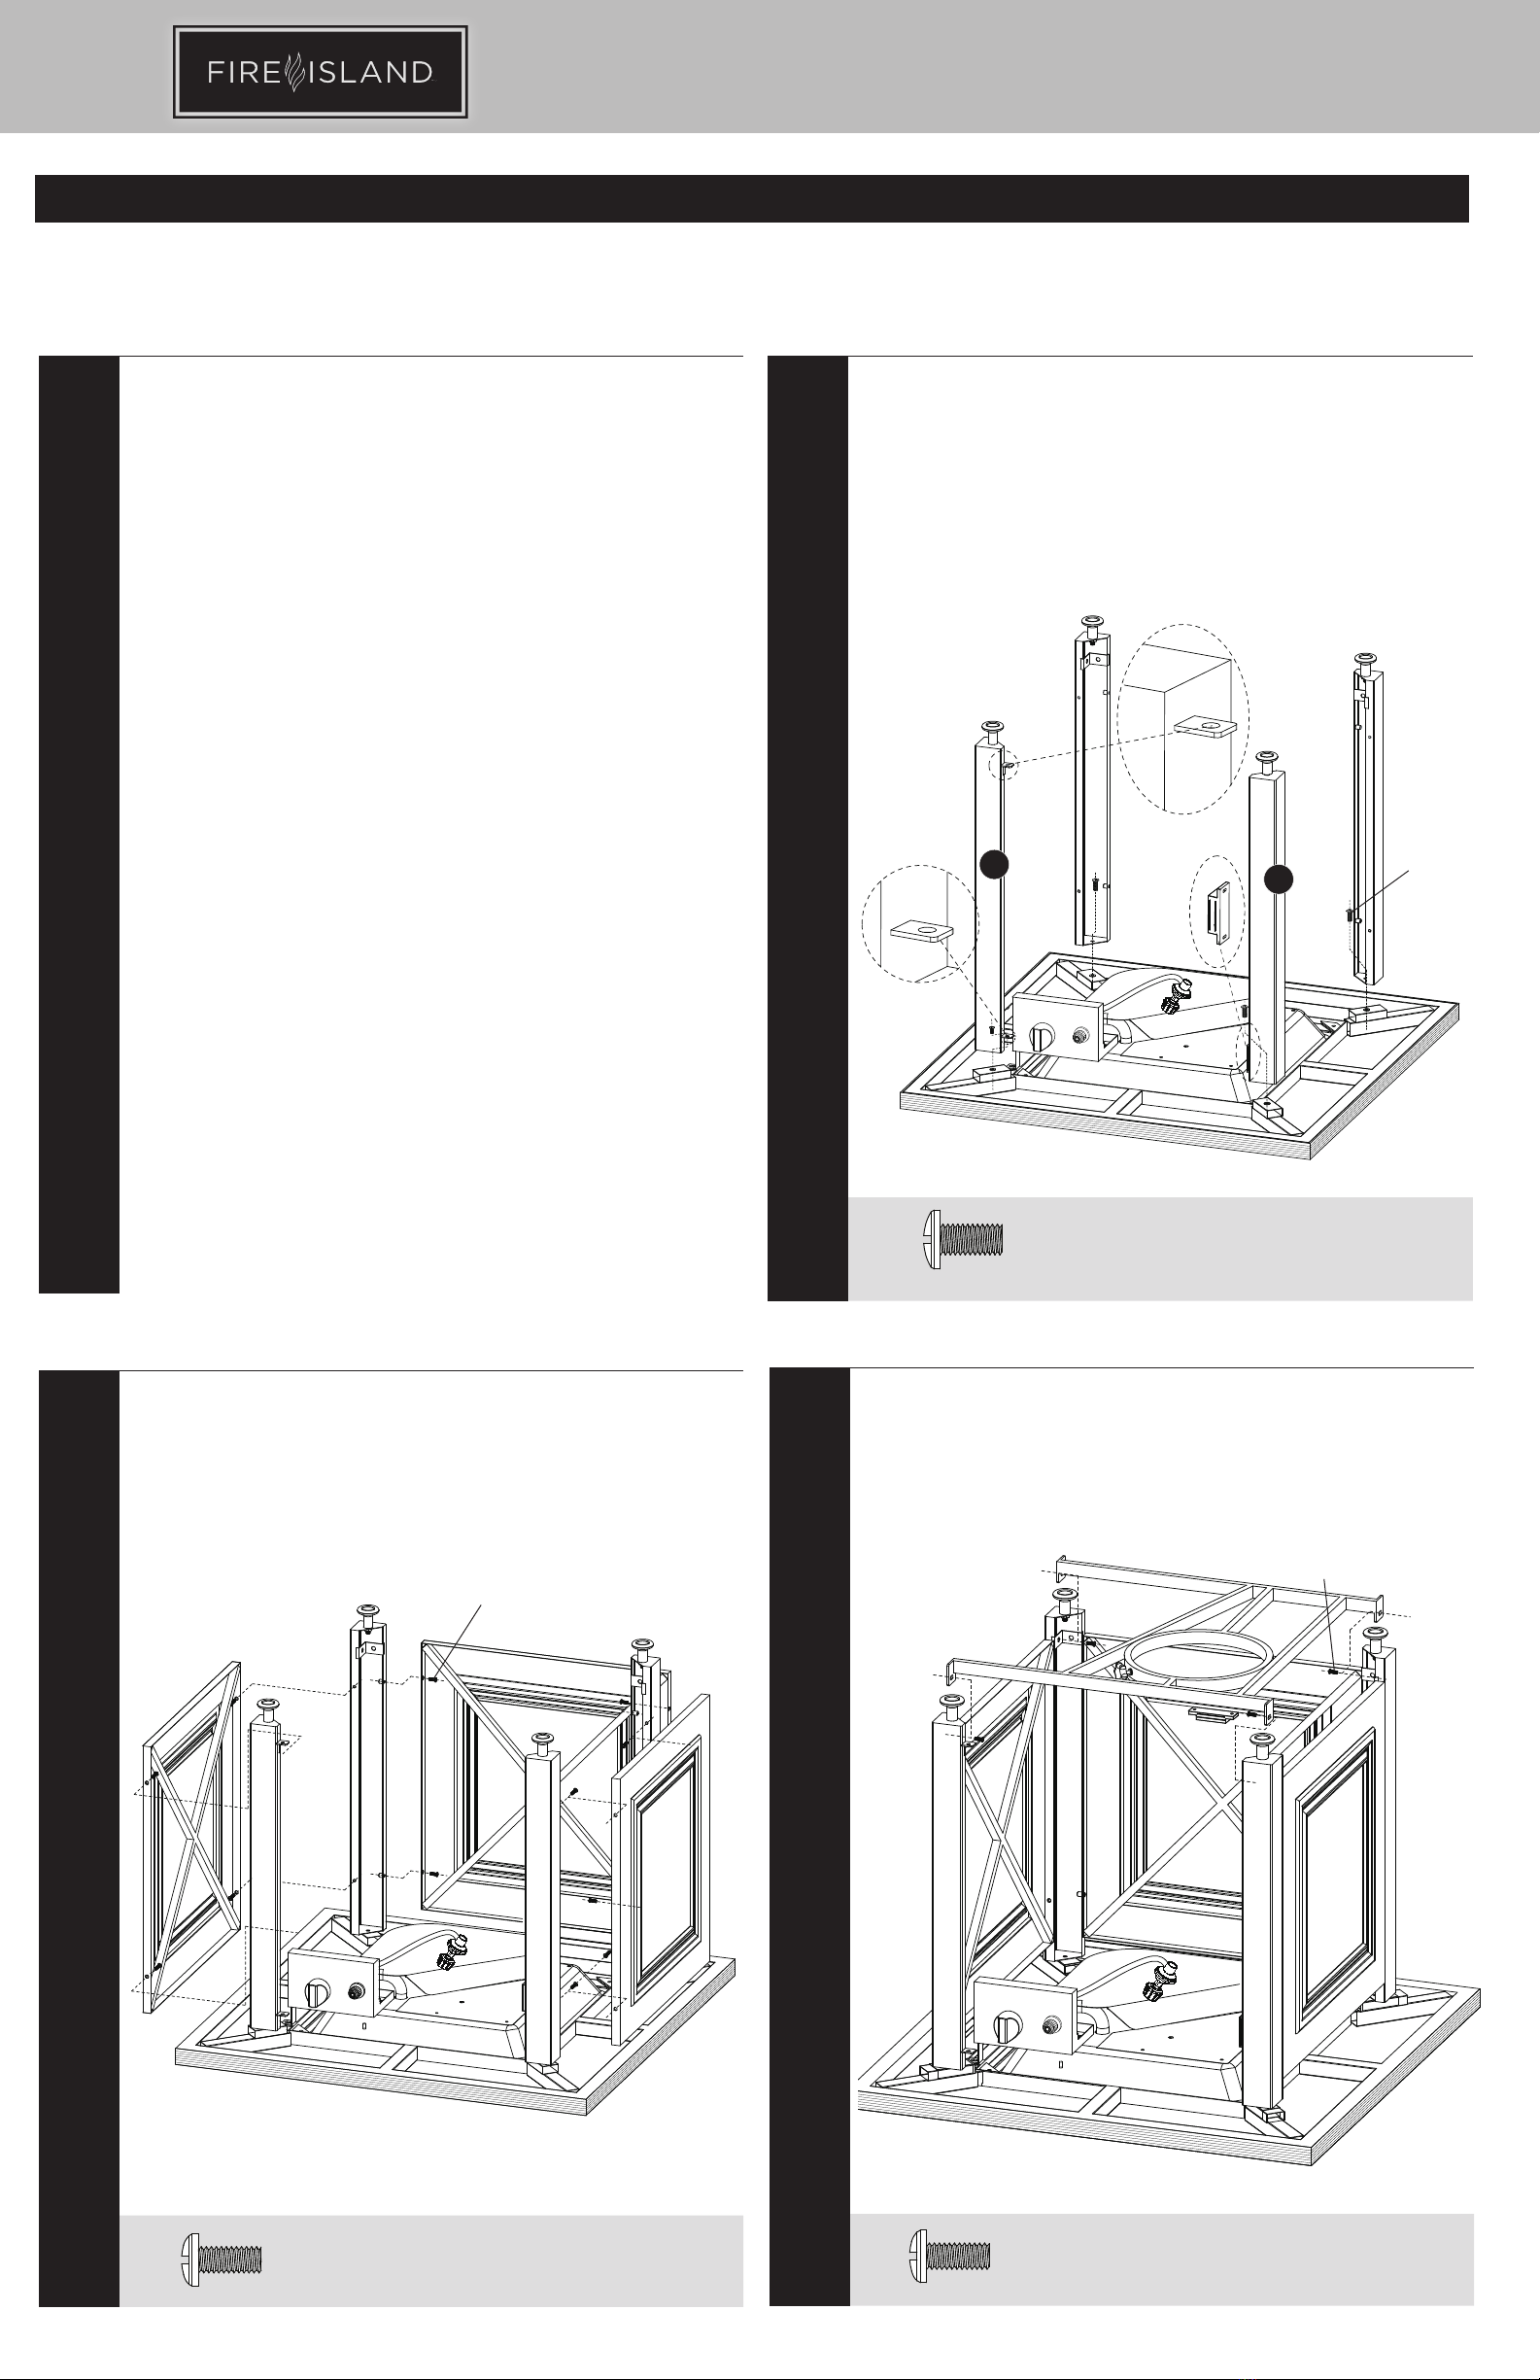
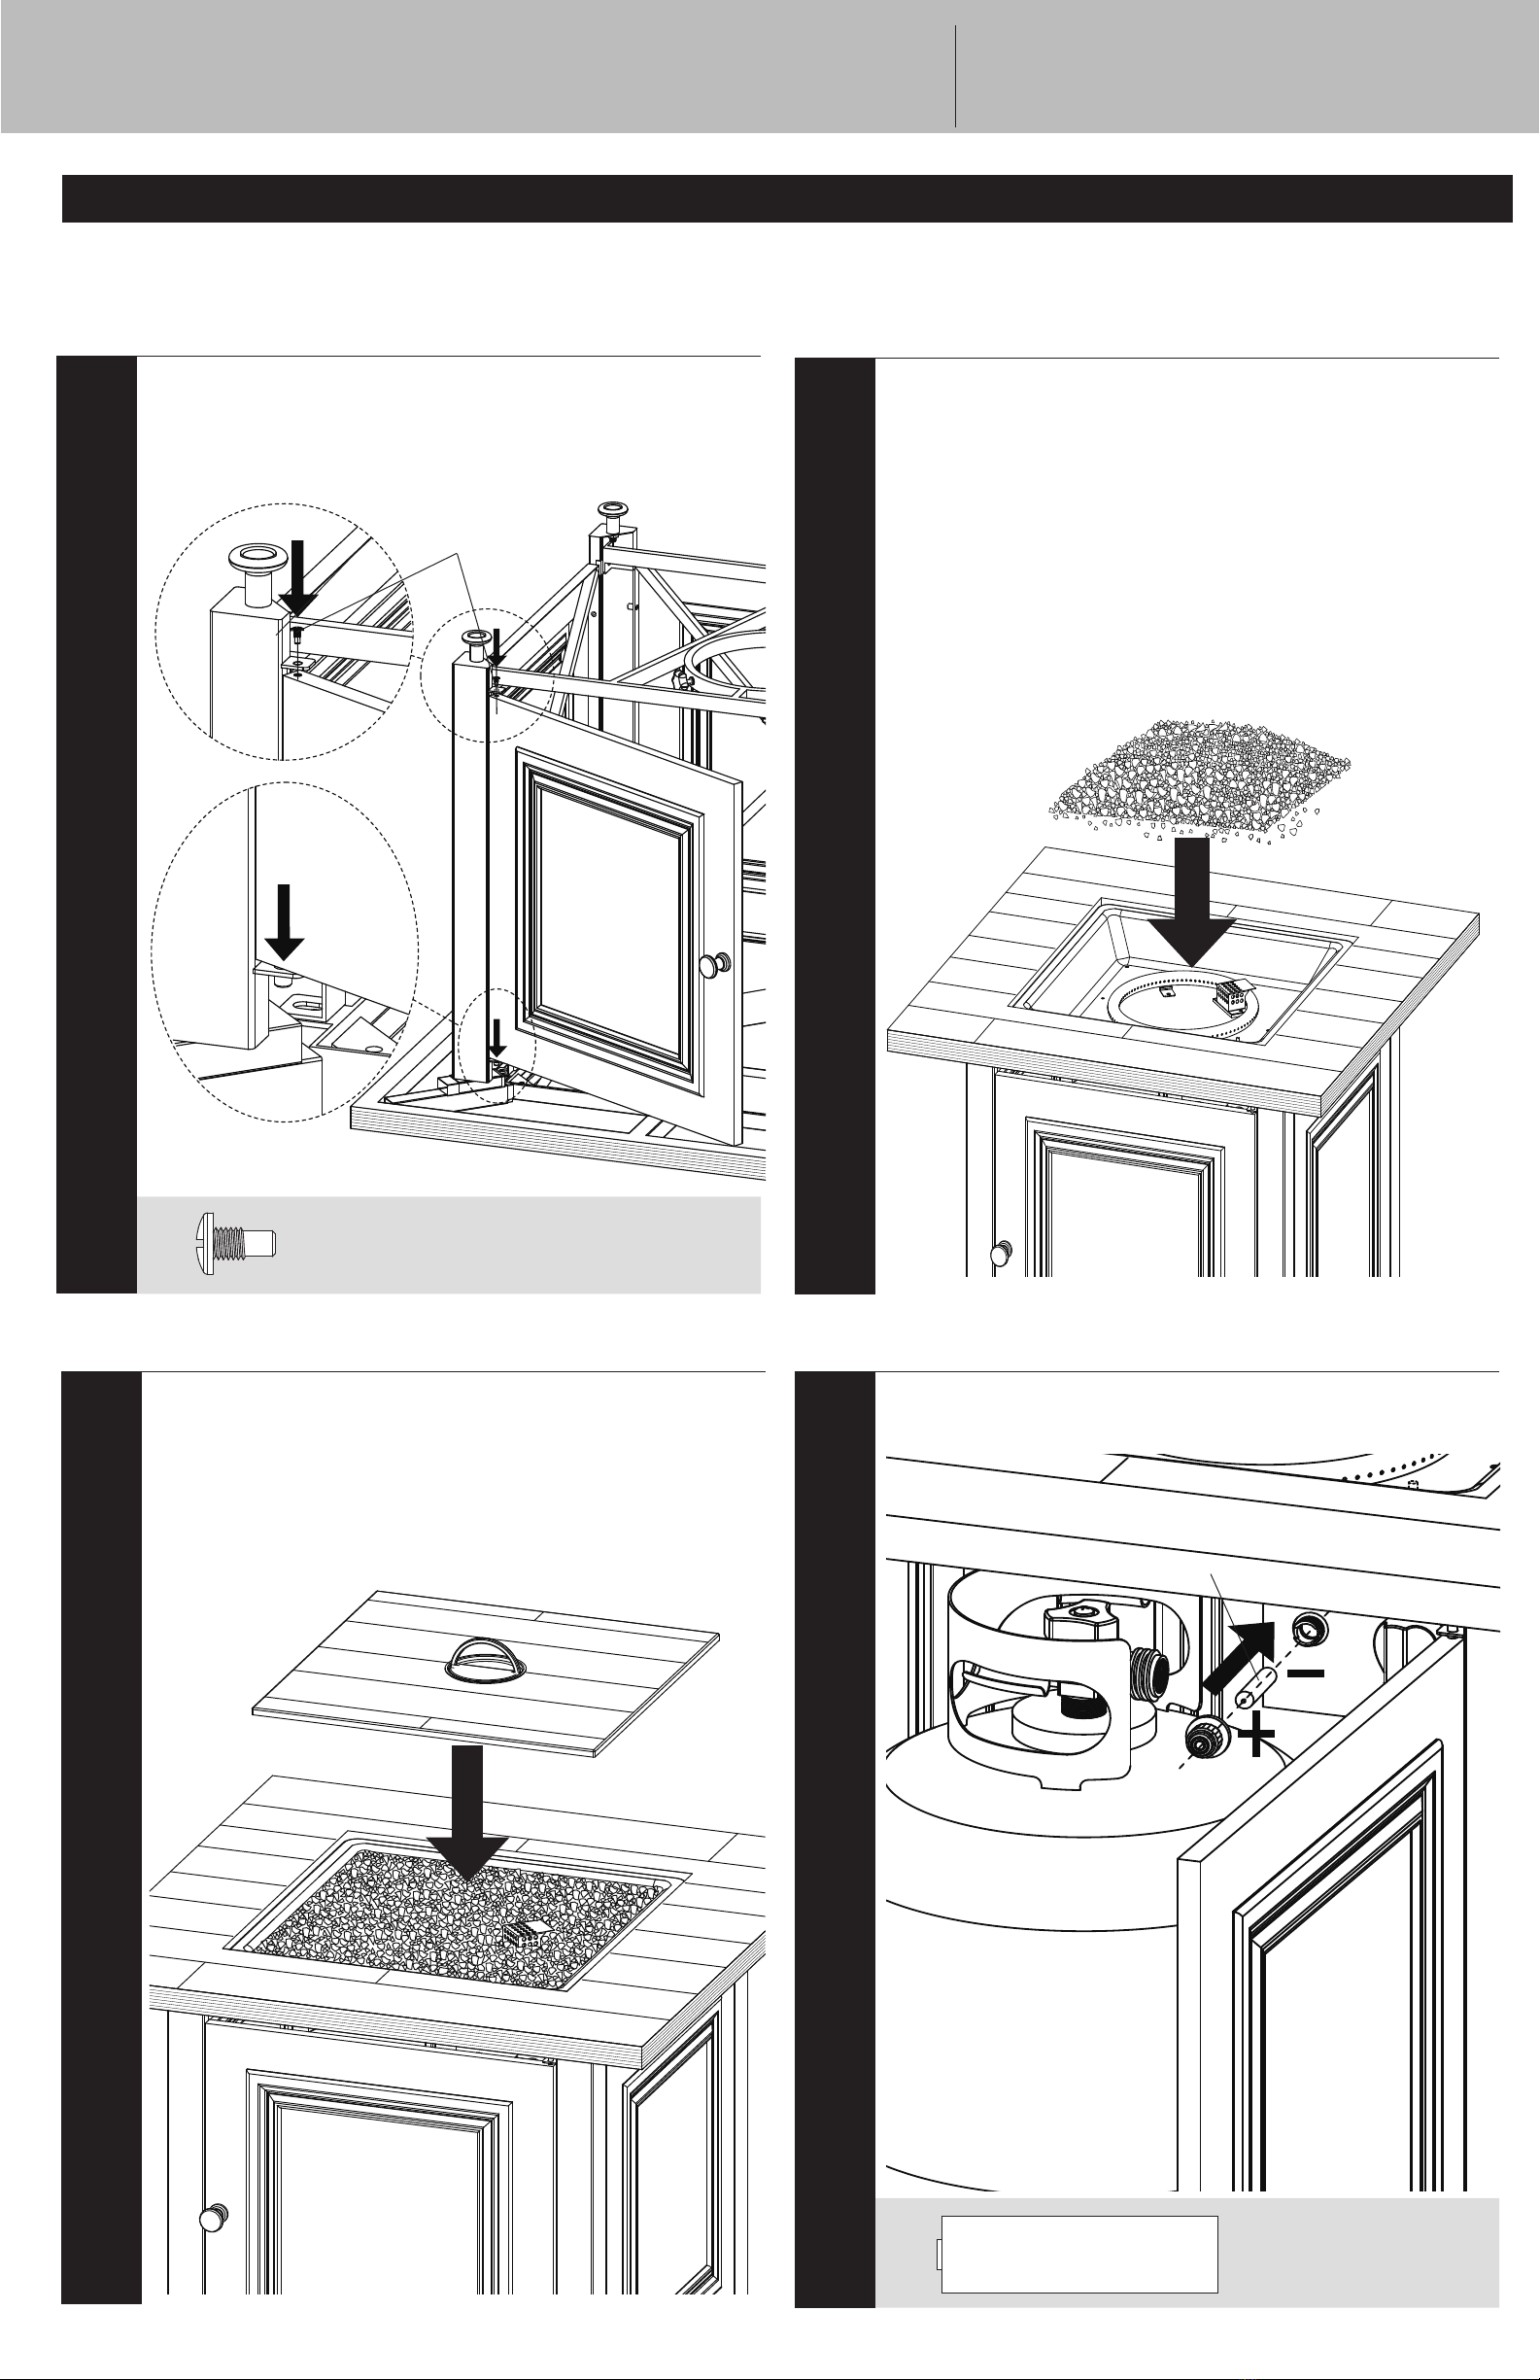
Assembly Instructions
3
Attach Side and Rear Panels
Note: Attach bottom screws before attaching top screws. Do not fully tighten srews
until step 4.
Ax 12
2
Attach Legs
WCAUTION: Two (2) people will be required to turn the outdoor
fire pit over.
WCAUTION: To avoid scratches choose a smooth surface that’s
free of cracks or openings.
Note: Do not fully tighten srews until step 4.
Bx 4
14
12
4
Attach Base
Note: Tighten all screws from steps 2-4.
Ax 4
B
AA

Assembly Instructions (continued)
Need help? 1.888.398.8643
Do not return to place of purchase.
Replacement Parts
1.888.398.8643 7
5
Attach Door and Turn Outdoor Fire Table Over
WCAUTION: Two (2) people will be required to turn the outdoor
fireplace upright on feet.
Cx 1
8
Insert Battery
Note: Remove plastic wrapper before installing battery.
+
-
Dx 1
6
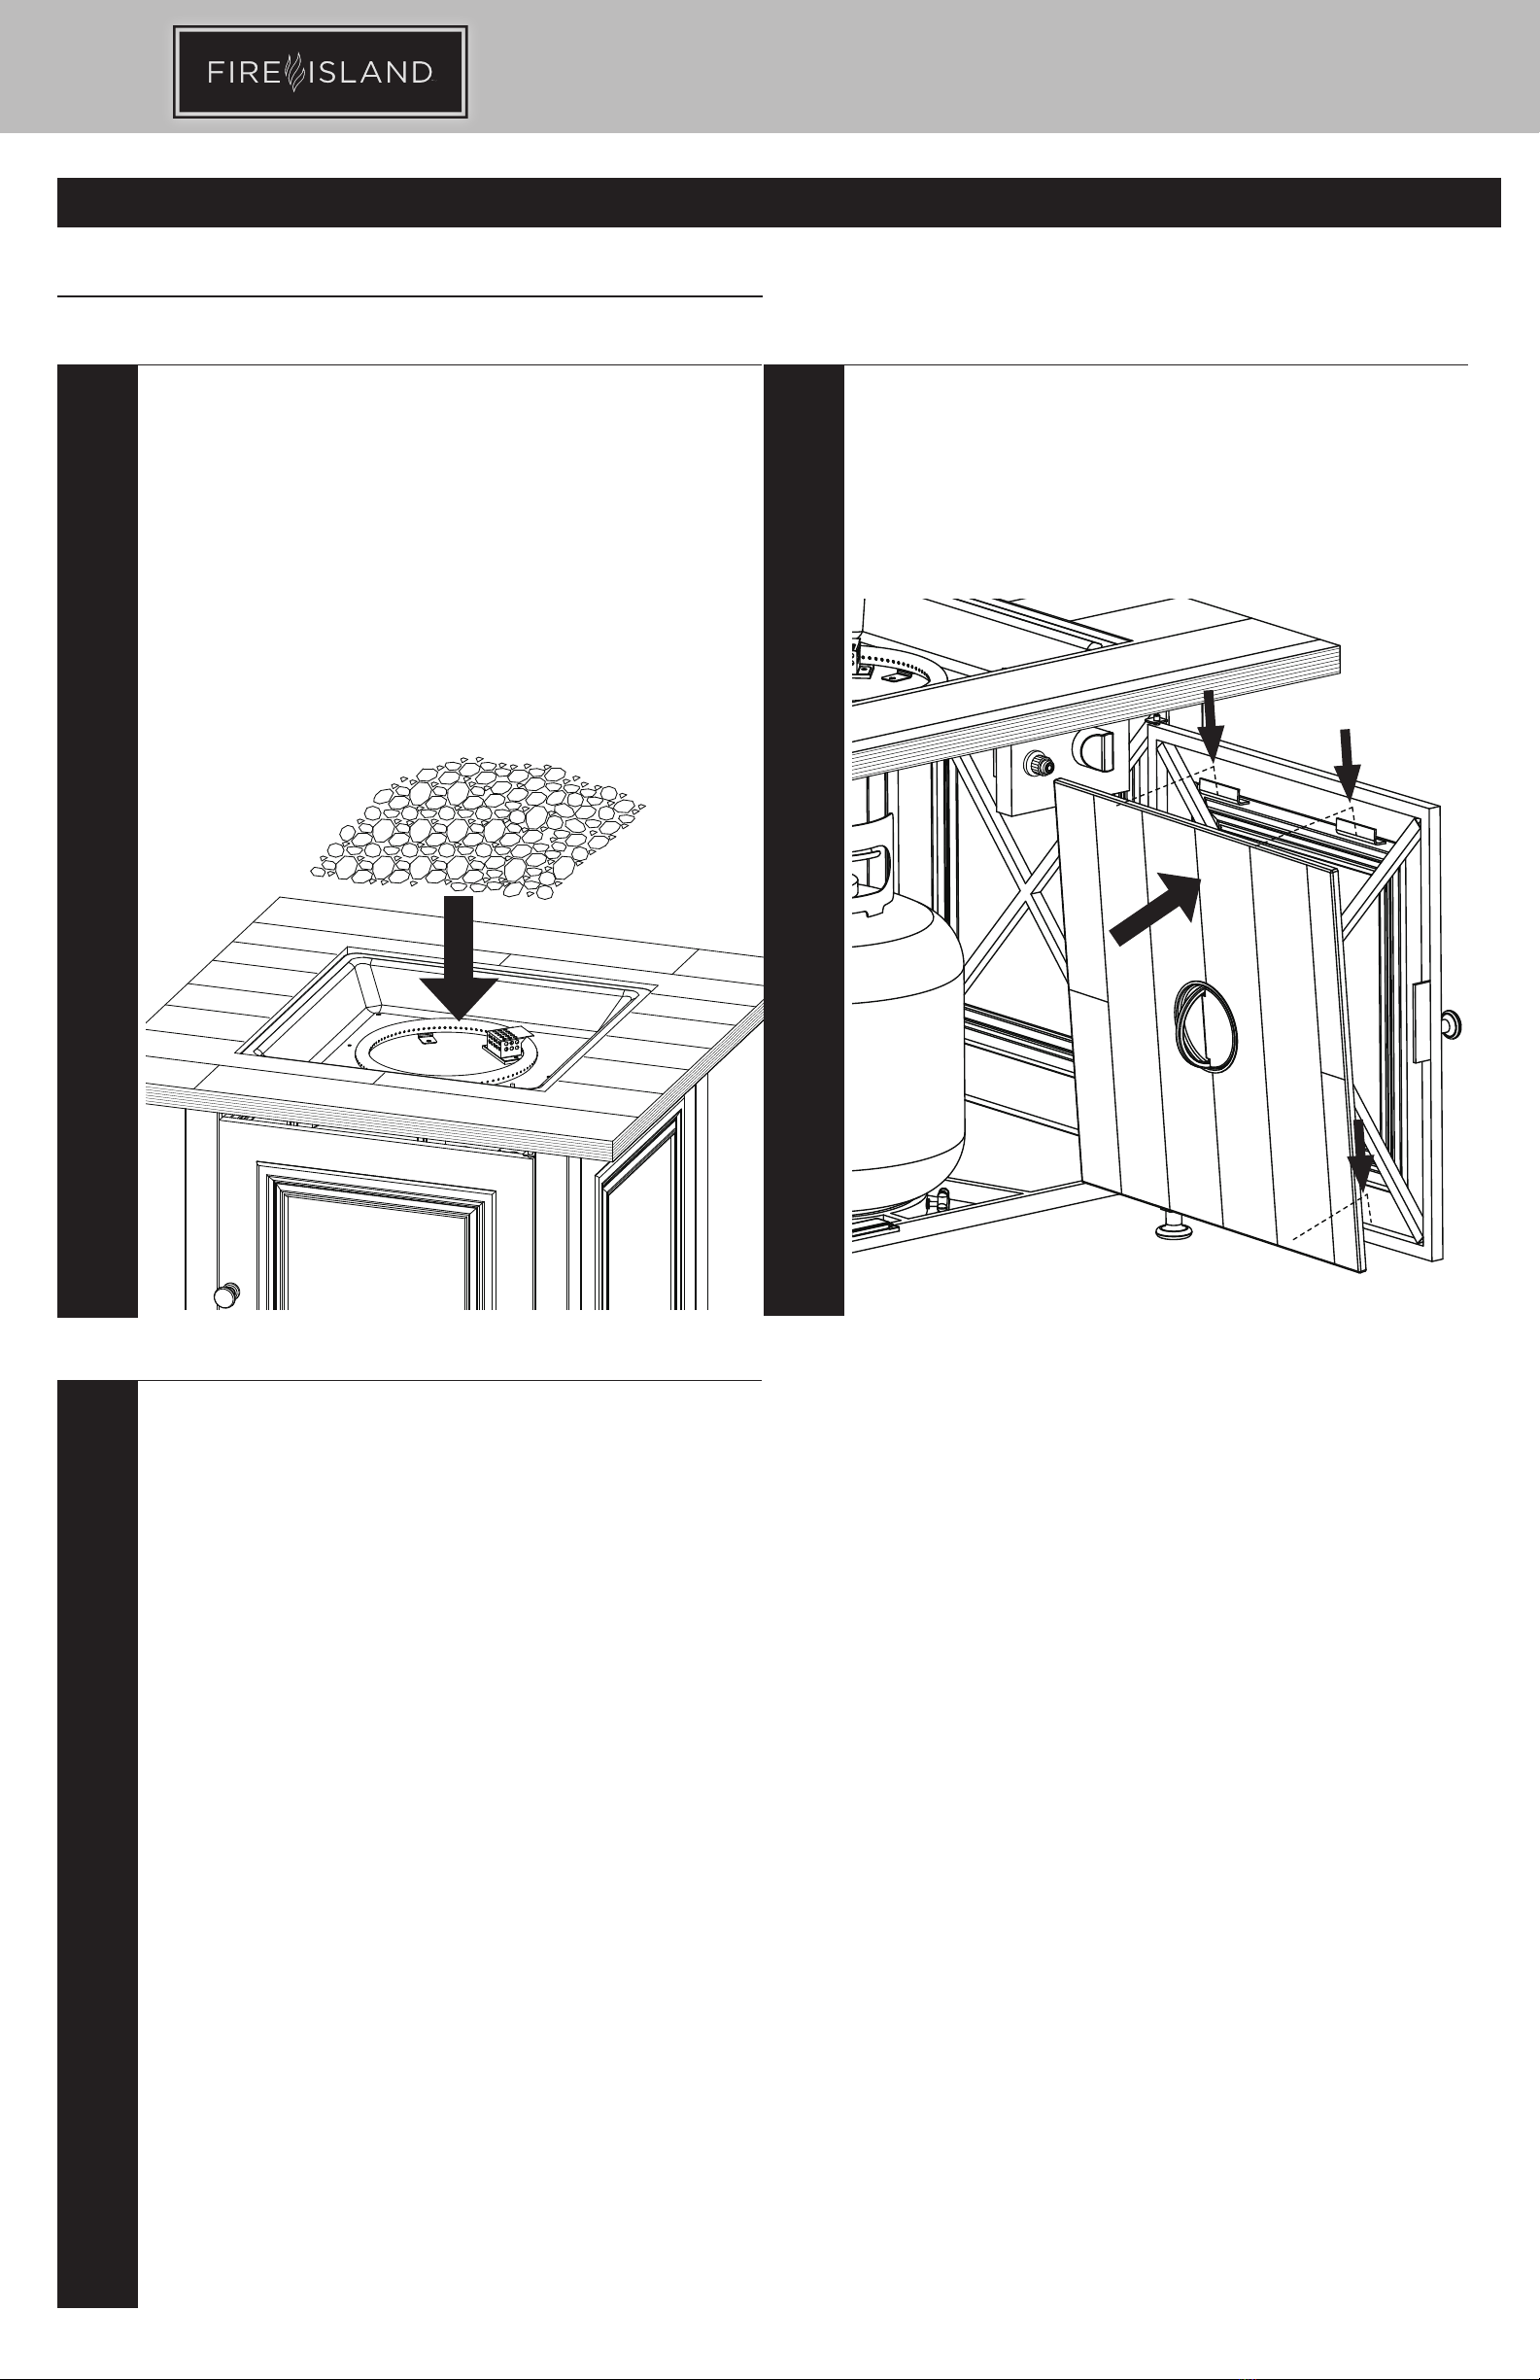
Place Fire Glass -Wear Protective Gloves
WCAUTION: Do NOT dump glass rocks out of package. Carefully
place glass rocks by hand so dust does not clog burner.
WCAUTION: Wear protective gloves.
WCAUTION: Use only Mr.Bar-B-Q Products LLC. factory-
authorized fire glass. The use of any fire glass that is not
factory-authorized can be dangerous and will void your
warranty.
WCAUTION: Do NOT cover igniter cover.
Note: Fire glass should be 0.8-1.6 in (2-4 cm) diameter. Approx. 13.2 lbs (6 kg) of
fire glass is needed.
7
Place Table Insert
WWARNING: NEVER place table insert on outdoor fire table
while in use.
WWARNING: NEVER place table insert on outdoor fire table
while the outdoor fire table is still hot.
D
C
9
Place Lava Rocks -Wear Protective Gloves
WCAUTION: When switching from fire glass, remove all fire
glass before placing lava rock.
WCAUTION: Do NOT dump lava rocks out of package. Carefully
place lava rocks by hand so dust does not clog burner.
WCAUTION: Wear protective gloves.
WCAUTION: Use only Mr. Bar-B-Q Products LLC. factory-
authorized lava rock. The use of any lava rock that is not
factory-authorized can be dangerous and will void your
warranty.
WCAUTION: Do NOT cover igniter cover.
Note: Lava rocks should be 0.8-2.0 in. (2-5 cm) diameter. Approx. 6.6 lbs. (3 kg) of
lava rocks are needed.
OPTIONAL ITEM SOLD SEPARATELY
11
IMPORTANT BEFORE USE
HOW TO SEASON LAVA ROCK
1. Place the lava rocks into the fire pit bowl before turning on.
2. Follow the lighting instructions from the owner’s manual to light the fire pit.
3. Turn the fire pit to the highest heat.
4. Allow the lava rocks to heat at the maximum temperature for 30 minutes
1111before enjoying fire pit.
5. Keep all people and any material that could burn at least 15 feet away from the
1111fire pit while the lava rocks are being seasoned.
6. Repeat the process if your fire pit has been exposed to rain or moisture.
7. Keep your fire pit covered when not in use.
8 LP Gas Outdoor Fire Pit
Model No. GAD15309M
Assembly Instructions (continued)
10
Store Table Insert
Hang the table insert on the inner side of door.
WWARNING: NEVER place table insert onto outdoor fire pit while
in use.
WWARNING: NEVER take out and place table insert onto outdoor
fire pit while the outdoor fire pit is still hot.

Installing LP Gas Tank
To operate, you will need one precision-filled standard grill LP gas
tank with external valve threads.
WCAUTION: LP gas tank must be properly
disconnected and removed prior to moving this
outdoor fire pit.
Inserting LP Gas Tank
WWARNING: Make sure LP gas tank valve is closed.
1. Open door.
2. Make sure the control knob is in the “ OFF” position (Figure 3).
3. Loosen LP gas tank retainer bolt by turning counter-clockwise.
4. Place precision-filled LP gas tank upright into hole in outdoor fire pit base so the tank valve
is facing the gas line connection.
5. Secure tank by turning LP gas tank retainer bolt clockwise until tight.
6. Close door.
Connecting LP Gas Tank
1. Make sure the control knob is in the “ OFF” position
(Figure 3).
2. Before connecting, be sure there is no debris caught in the
head of the LP gas tank, head of the regulator valve or in the
head of the burner or burner ports.
3. Connect regulator/hose assembly to tank by turning knob
clockwise until it stops.
4. Perform leak check per “Checking for Leaks” section.
Disconnecting LP Gas Tank
1. Make sure the control knob is in the “ OFF” position
(Figure 3).
2. Before disconnecting, make sure the LP gas tank valve is
“CLOSED.”
3. Disconnect regulator/hose assembly from LP gas tank by
turning knob counterclockwise until it is loose.
WCAUTION: LP gas tank must be properly
disconnected and removed prior to moving
this fire pit.
4. Place the protective cap cover on the LP tank and store the tank outdoors in a well
ventilated area out of direct sunlight.
20 lb
9 Kg
17.9 in. / 45.5 cm
12.2 in. / 31 cm
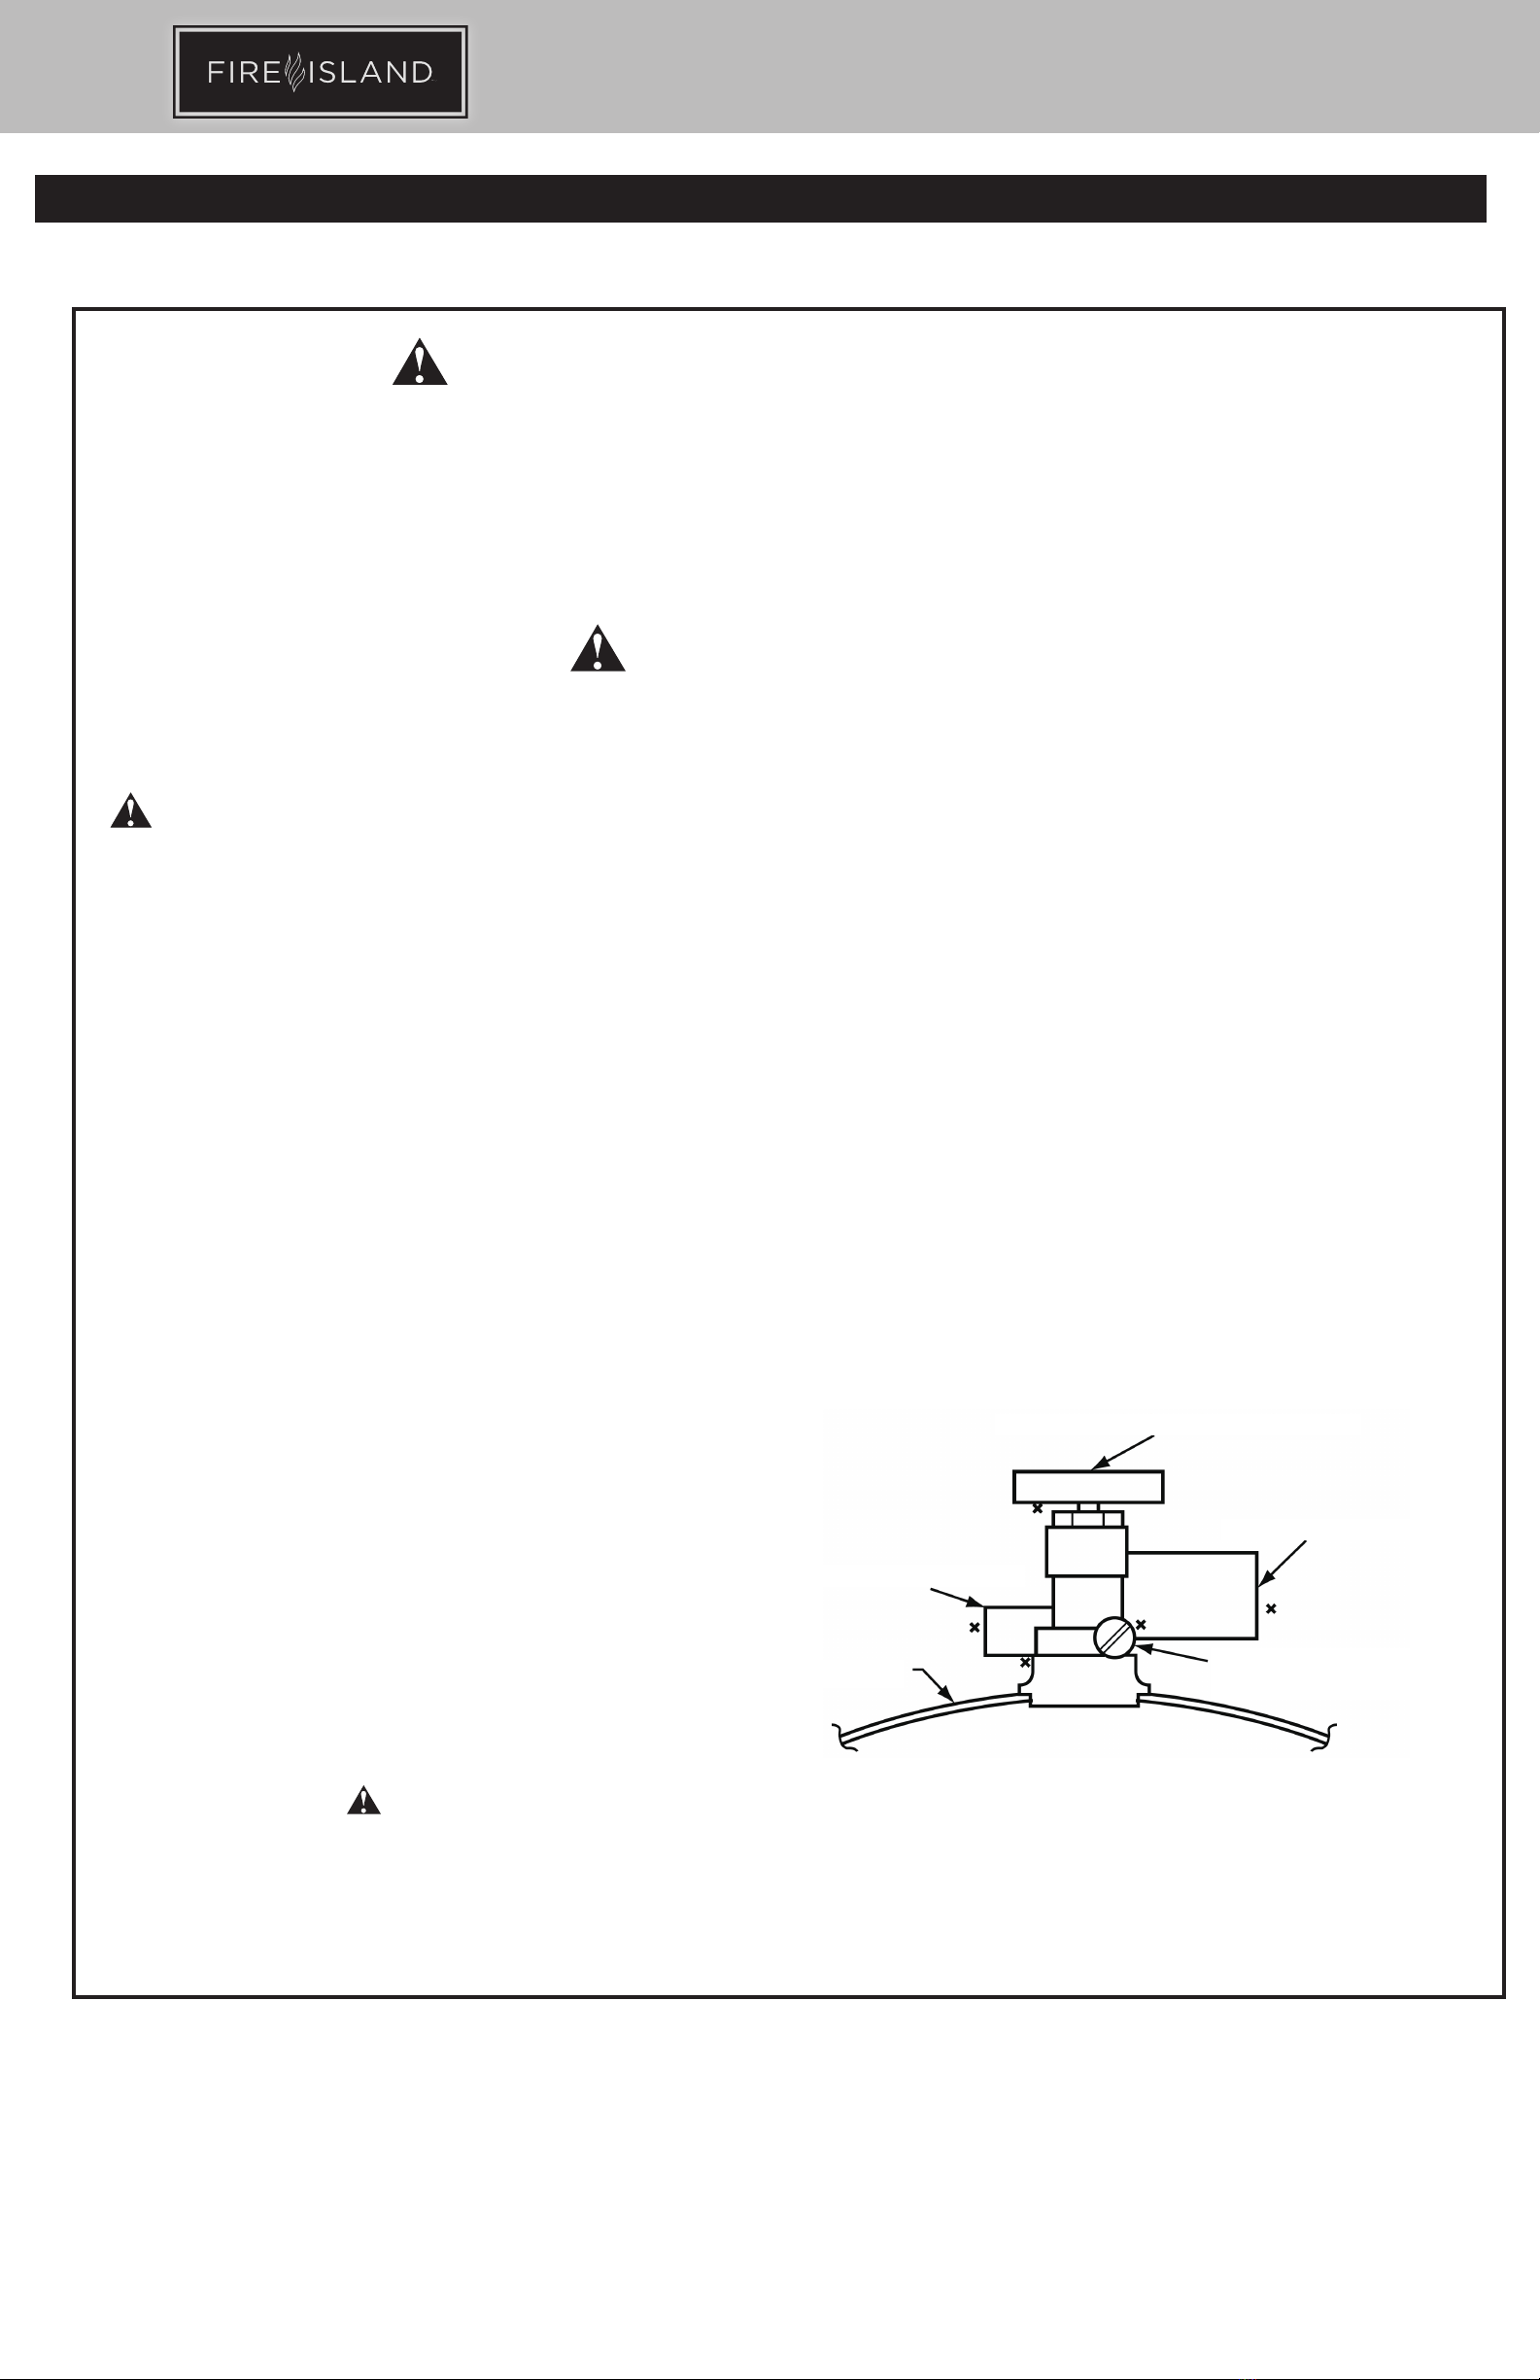
Checking for Leaks
WWARNING: Before using this outdoor
fire pit, make sure you have read,
understand and are following
all information provided in the
“Important Safeguards” section
on page 2. Failure to follow those
instructions can cause death, serious
injury or property damage.
W
WWARNING: The burner must be
replaced prior to the appliance being
put into operation if it is evident
that the burner is damaged. The
replacement burner shall be that
specified by the manufacturer.
Burner Connections
1. Make sure the regulator hose and valve
connections are securely fastened to the burner
and the tank.
2. Visually check the connection between the
burner/venturi tube and orifice.
3. Make sure the burner/venturi tube fits over the
orifice.
WWARNING: Failure to inspect
this connection or follow these
instructions could cause a fire or an
explosion which can cause death,
serious bodily injury or damage to
property.
4. Please refer to diagram for proper installation
(Figures 1 and 2).
5. If the burner/venturi tube does not rest flush
to the orifice, as shown, please contact
1.888.398.8643 for assistance.
Tank/Gas Line Connection
1. Make 2-3 oz. of leak detection solution by
mixing one part liquid dishwashing soap with
three parts water.
2. Make sure control knob is in the “ OFF”
position (Figure 3).
3. Connect LP gas tank per “Installing LP Gas
Tank” section.
4. Turn LP gas tank valve to “OPEN.”
5. Spoon several drops of solution, or use a squirt
bottle, at all “X” locations (Figures 1 and 2).
a. If any bubbles appear, turn LP gas tank valve
to “CLOSED,” reconnect and re-test.
b. If you continue to see bubbles after
several attempts, turn LP gas tank valve to
“CLOSED” and disconnect LP gas tank, per
“Disconnecting LP Gas Tank” section. Contact
1.888.398.8643 for assistance.
c. If no bubbles appear after one minute, turn
LP gas tank valve to “CLOSED,” wipe away
solution and proceed.
Lighting
WDANGER: Failure to follow these
lighting instructions may result in
serious bodily injury or death, or in a fire or an explosion causing
damage to property.
WWARNING: NEVER light the burner with the cover on the outdoor fire
pit.
WCAUTION: Keep outdoor gas appliance area clear and free from
combustible materials, gasoline and other flammable vapors and
liquids.
WCAUTION: Do NOT obstruct the flow of combustion and ventilation air.
WCAUTION: Check and clean burner/venturi tubes for insects and insect
nests. A clogged tube can lead to a fire.
1. Make sure all labels, packaging and protective films have been removed from the outdoor
fire pit.
2. Check for obstructions of airflow to the burner. Spiders, insects and webs can clog the
burner/venturi tube. A clogged burner tube can lead to a fire.
3. The control knob must be in the “ OFF” position (Figure 3).
4. Clear small area of lava rocks / fire glass away from the igniter cover (Figure 4).
Operating Instructions
Figure 1
LP Gas
Connection
LP Gas Valve
with Orifice
Figure 2
X
XX
XX
Figure 3
OFF / ARRÊT
Figure 4
Figure 5
15.75 in - 23.6 in
40 – 60 cm
K
F
AA
Need help? 1.888.398.8643
Do not return to place of purchase.
Replacement Parts
1.888.398.8643 9

5. Connect LP gas tank per “Installing LP Gas Tank” section.
6. Slowly turn LP gas tank valve 1 revolution to “OPEN.”
7. Push and turn control knob to (HIGH). Continue to hold the control knob in to light.
8. After the fire pit lights, continue to hold the control knob in for 20 seconds, you will hear
clicking as you hold the knob in for 20 seconds. This heats the thermocouple, a safety
device that stops the gas flow when a fire pit is not lit and warms it up so the gas flow will
continue.
9. After 20 seconds, release and turn control knob counterclockwise to adjust flame to
desired height.
10. After three attempts, if ignition does not occur, turn the burner control knob to “ OFF.”
11. Wait 5 minutes, fan with a newspaper or magazine, and repeat lighting procedure.
12. If igniter does not light burner:
a. Wearing heat-resistant gloves, position a lit long match or lit long butane lighter near
the igniter cover.
b. Push and turn control knob to (HIGH).
c. Remove match/lighter once burner is lit.
WCAUTION: After lighting - using a fire pit tool and heat-resistant
gloves, carefully move the fire glass/lava rock back to their proper
position, being careful to avoid the flame.
13. After lighting, observe the burner flame. Make sure all burner ports are lit and flame height
matches illustration (Figure 5).
WCAUTION: If ignition does not occur in 5 seconds, turn control knob
to “ OFF,” wait 5 minutes, fan with a newspaper or magazine, and
repeat lighting procedure.
Turning Off
1. Turn LP gas tank valve to “CLOSED.”
2. Turn control knob to the “ OFF” position.
Note: A “poof” sound is normal as the last of the LP gas is burned.
3. Disconnect LP gas tank per “Disconnecting LP Gas Tank” section.
Cleaning and Care
WCAUTION:
1. All cleaning and maintenance should be done when outdoor fire pit
is cool and with the fuel supply disconnected.
2. Do NOT clean any outdoor fire pit part in a self-cleaning oven. The
extreme heat will damage the finish.
3. Do NOT enlarge valve orifices or burner ports when cleaning the
valves or burners.
4. All components on this outdoor fire pit can become hot.
5. Do NOT clean this outdoor fire pit until all components are cool.
Notices
1. This outdoor fire pit should be thoroughly cleaned and inspected on a regular basis.
2. Abrasive cleaners will damage this product.
3. NEVER use oven cleaner to clean any part of this outdoor fire pit.
Before Each Use:
1. Keep the outdoor fire pit area clear and free from any combustible materials, gasoline, and
other flammable vapors and liquids.
2. Do NOT obstruct the flow of the combustion of LP gas and the ventilation of air.
3. Keep the ventilation opening(s) of the LP gas tank area free and clear from debris.
4. Visually check the burner flames to make sure your outdoor fire pit is working properly
(Figure 5).
5. See below for proper cleaning instructions.
6. Check all gas connections for leaks.
7. Check components for any signs of damage or rust.
8. Check for obstructions of airflow to the burner. Spiders, insects and webs can clog the
burner/venturi tube. A clogged burner/venturi tube can lead to a fire.
9. If damage to any component is detected, do NOT operate until repairs are completed.
Cleaning Surfaces
1. Wipe surfaces clean with mild dishwashing detergent or baking soda mixed with water.
2. For stubborn stains, use a citrus-based cleaner and a nylon scrubbing brush.
3. Rinse clean with water.
4. Allow to air dry.
Cleaning Burner
WWARNING: All cleaning should be done when appliance is cool and
with the fuel supply disconnected per “Disconnecting LP Gas Tank.”
1. Remove the fire glass/lava rock.
2. Remove all dirt/dust from the burner, igniter cover and venturi area with a small brush and/
or compressed air.
Operating Instructions (continued) 1.
2.
3. Visually inspect the burner for any rust or damage. If damage is found, replace necessary
parts with new from the manufacturer.
4. Clean any clogged burner ports with a stiff wire (such as an opened paper clip).
5. Carefully replace the fire glass/lava rock being cautious not to block the igniter cover.
Before Storing
1. Turn LP gas tank valve to “CLOSED.”
2. Turn control knob to the “ OFF” position.
Note: A “poof” sound is normal as the last of the gas is burned.
3. Disconnect LP gas tank per “Disconnecting LP Gas Tank” section.
4. Clean all surfaces.
5. Lightly coat the burner with cooking oil to prevent excess rusting.
WCAUTION: NEVER place cover on hot outdoor fire pit.
6. If storing the outdoor fire pit indoors, cover the outdoor fire pit and store in a cool dry
location away from children and pets.
7. If storing the outdoor fire pit outdoors, cover the outdoor fire pit with a cover for protection
from the weather.
Cleaning and Care (continued)
10 LP Gas Outdoor Fire Pit
Model No. GAD15309M

1.
Product Registration
For faster warranty service, please register your product immediately. To register, email
call 1.888.398.8643.
Replacement Parts
For replacement parts, call 1.888.398.8643.
Limited Warranty
Mr. Bar-B-Q Products LLC warrants to the original retail purchaser of this product, and to no
other person, that if this product is assembled, maintained, and operated in accordance with
the printed instructions accompanying it, then for a period of one (1) year from the date of
purchase, all parts in such product shall be free from defects in material and workmanship.
Mr. Bar-B-Q Products LLC may require reasonable proof of your date of purchase. Therefore,
you should retain your sales slip or invoice. This Limited Warranty shall be limited to the repair
or replacement of parts, which prove defective under normal use and service and which
Mr. Bar-B-Q Products LLC shall determine in its reasonable discretion upon examination to be
defective. Before returning any parts, you should contact Mr. Bar-B-Q Products LLC Customer
Care Department using the contact information listed below. If Mr. Bar-B-Q Products LLC
confirms, after examination, a defect covered by this Limited Warranty in any returned part,
and if Mr. Bar-B-Q Products LLC approves the claim, Mr. Bar-B-Q Products LLC will replace
such defective part without charge. If you return defective parts, transportation charges must
be prepaid by you. Mr. Bar-B-Q Products LLC will return replacement parts to the original retail
purchaser, freight or postage prepaid.
This Limited Warranty does not cover any failures or operating difficulties due to accident,
abuse, misuse, alteration, misapplication, improper installation or improper maintenance or
service by you or any third party, or failure to perform normal and routine maintenance on
the product as set out in this owner’s manual. In addition, the Limited Warranty does not cover
damage to the finish, such as scratches, dents, discoloration, rust or other weather damage,
after purchase.
This Limited Warranty is in lieu of all other express warranties. Mr. Bar-B-Q Products LLC
disclaims all warranties for products that are purchased from sellers other than authorized
retailers or distributors, including the warranty of merchantability or the warranty of
fitness for a particular purpose. Mr. Bar-B-Q Products LLC ALSO DISCLAIMS ANY AND ALL
IMPLIED WARRANTIES, INCLUDING WITHOUT LIMITATION THE IMPLIED WARRANTIES OF
MERCHANTABILITY AND FITNESS FOR A PARTICULAR PURPOSE. Mr. Bar-B-Q Products LLC
SHALL HAVE NO LIABILITY TO PURCHASER OR ANY THIRD PARTY FOR ANY SPECIAL, INDIRECT,
PUNITIVE, INCIDENTAL, OR CONSEQUENTIAL DAMAGES. Mr. Bar-B-Q Products LLC further
disclaims any implied or express warranty of, and assumes no responsibility for, defects in
workmanship caused by third parties.
This Limited Warranty gives the purchaser specific legal rights; a purchaser may have other
rights depending upon where he or she lives. Some jurisdictions do not allow the exclusion or
limitation of special, incidental or consequential damages, or limitations on how long a warranty
lasts, so the above exclusion and limitations may not apply to everyone.
Mr. Bar-B-Q Products LLC does not authorize any person or company to assume for it any
other obligation or liability in connection with the sale, installation, use, removal, return, or
replacement of its equipment, and no such representations are binding on
Mr. Bar-B-Q Products LLC.
Mr. Bar-B-Q Products LLC
10 Hub Dr., Ste 101, Melville, NY 11747 USA
1.888.398.8643
Need help? 1.888.398.8643
Do not return to place of purchase.
Replacement Parts
1.888.398.8643 11

Troubleshooting
Problem Possible Cause Prevention/Cure
Burner will not light using igniter
LP gas tank valve is closed Make sure regulator is securely attached to the LP gas tank per “Installing LP
Gas Tank,” then turn LP gas tank valve to “OPEN”
LP gas tank is low or empty Exchange, refill or replace LP gas tank
LP gas leak
1. Turn LP gas tank valve to “CLOSED”
2. Wait 5 minutes for gas to clear
3. Follow “Checking for Leaks” section
Battery needs to be changed Replace the “AA” battery (follow assembly step for inserting battery)
Electrode and burners are wet Wipe dry with cloth
Electrode cracked or broken - sparks at crack Replacement part(s) may be needed - contact Customer Care at 888.398.8643
Wire loose or disconnected Reconnect wire or replacement part(s) may be needed - contact Customer Care
at 888.398.8643
Wire is shorting (sparking) between igniter and electrode Replacement part(s) may be needed - contact Customer Care at 888.398.8643
Thermocouple is not operating correctly
1. Disconnect LP Gas tank per “Disconnect LP Gas Tank” section.
2. Clean area around thermocouple.
3. Connect LP gas tank per “Connect LP Gas Tank” section.
4. Relight per “Lighting” section.
5. If the outdoor fire pit is still not working, please contact Customer Care at
888.398.8643 for additional assistance.
Bad igniter Replacement part(s) may be needed - contact Customer Care at 888.398.8643
Burner will not light with match
No gas flow
Check if LP gas tank is empty
a. If empty, exchange, refill or replace LP gas tank
b. If LP gas tank is not empty, refer to “Sudden drop in gas flow or
reduced flame height” (see below)
LP gas tank is low or empty Exchange, refill or replace LP gas tank
LP gas leak
1. Turn LP gas tank valve to “CLOSED”
2. Wait 5 minutes for gas to clear
3. Follow “Checking for Leaks” section
Coupling nut and regulator not fully connected Turn the coupling nut about one-half to three-quarters additional turn until solid
stop. Tighten by hand only - do NOT use tools.
Obstruction of gas flow 1. Clear burner/venturi tube
2. Check for bent or kinked hose
Disengagement of burner to valve Re-engage burner and valve
Spider webs or insect nest in burner/venturi tube Clean burner/venturi tube
Thermocouple is not operating correctly
1. Disconnect LP Gas tank per “Disconnect LP Gas Tank” section.
2. Clean area around thermocouple.
3. Connect LP gas tank per “Connect LP Gas Tank” section.
4. Relight per “Lighting” section.
5. If the outdoor fire pit is still not working, please contact Customer Care at
888.398.8643 for additional assistance.
Burner ports clogged or blocked Clean burner ports
Sudden drop in gas flow or reduced flame height
Out of gas Exchange, refill or replace LP gas tank
Overfilling prevention device may have been activated
1. Turn control knob to “ OFF”
2. Wait 30 seconds and light outdoor fire pit per “Lighting” section
3. If flames are still too low, reset the overfilling prevention device:
a. Turn control knob “ OFF”
b. Turn LP gas tank valve to “CLOSED”
c. Disconnect LP gas tank from regulator
d. Turn control knob to (HIGH)
e. Wait two minutes
f. Turn control knob to “ OFF”
g. Reconnect LP gas tank to regulator and leak check connections, being
careful not to fully open valve
h. Light outdoor fire pit per “Lighting” section
Irregular flame pattern, flame does not run the
full length of burner Burner ports are clogged or blocked Clean burner ports
Flame is yellow or orange
New burner may have residual manufacturing oils Burn outdoor fire pit for 15 minutes and reinspect
Spider webs or insect nest in burner/venturi tube Clean burner/venturi tube
Poor alignment of valve to burner/venturi tube Ensure burner/venturi tube is properly engaged with valve
Flame goes out
High or gusting winds Do not use outdoor fire pit in high winds
Low on LP gas Exchange, refill or replace LP gas tank
Excess flow valve tripped Refer to “Sudden drop in gas flow or reduced flame height”
Thermocouple is not operating correctly
1. Disconnect LP Gas tank per “Disconnect LP Gas Tank” section.
2. Clean area around thermocouple.
3. Connect LP gas tank per “Connect LP Gas Tank” section.
4. Relight per “Lighting” section.
5. If the outdoor fire pit is still not working, please contact Customer Care at
888.398.8643 for additional assistance.
Flashback (fire in venturi/burner tube(s)) Burner and/or burner/venturi tube is blocked Clean burner and/or burner/venturi tube
Flame seems to lose heat when burning in cold
weather - temperature below 50ºF
Ice has built up on the outside of the LP gas tank
because the vaporization process is too slow
1. Turn off per “Turning Off” section
2. Replace with a spare LP gas tank
3. Reconnect LP gas tank per “Installing LP Gas Tank” section
4. Follow “Checking for Leaks” section
5. Light outdoor fire pit per “Lighting” section
For assistance, please visit us at MrBarBQProducts.com or call 1.888.398.8643.
12 LP Gas Outdoor Fire Pit
Model No. GAD15309M
Chimenea para exteriores
a gas propano
MODELO No
: GAD15309M
MANUAL DEL USUARIO
PELIGRO DE MONÓXIDO DE CARBONO
• Este producto puede producir monóxido de carbono, el cual
no emite ningún olor.
• Usarlo en espacios cerrados puede causar la muerte.
• Nunca use este producto en un espacio cerrado tal como
un campero, una carpa o en su casa.
·PELIGRO
Patente Pendiente
Fabricado en China para : Mr. Bar-B-Q Products LLC
10 Hub Dr., Ste 101, Melville, NY 11747 EE.UU. • 1.888.398.8643 • MrBarBQProducts.com
© Mr. Bar-B-Q Products LLC
Fire Island™ est une marque de registradas de Mr. Bar-B-Q Products LLC. GAD15309M-ES-OM-F100
ADVERTENCIA
PARA SU SEGURIDAD:
WSi no se siguen exactamente las instrucciones
descritas en este manual, puede causarse un
incendio o explosión, así como daños materiales,
lesiones personales o la muerte.
WQUÉ HACER SI SIENTE OLOR A GAS:
• No trate de encender ningún artefacto.
• No toque ningún interruptor eléctrico; no use el
teléfono en su edificio.
• Inmediatamente llame a su proveedor de gas
desde el teléfono de un vecino.
• Siga las instrucciones del proveedor de gas.
• Si no puede contactar a su proveedor de gas, llame
a los bomberos.
WNo usar para cocinar.
ADVERTENCIA
PARA SU SEGURIDAD:
WINSTALADOR: Deje este manual en el artefacto.
WUSUARIO : Guarde este manual para referencia
futura.
ADVERTENCIA
PARA SU SEGURIDAD:
WUna instalación, ajuste, alteración, reparación o
mantenimiento inadecuados pueden causar lesiones
o daños a la propiedad.
WLea atentamente las instrucciones de instalación,
funcionamiento y mantenimiento del equipo antes
de instalarlo, ponerlo en marcha o darle servicio.
PELIGRO
Nunca deje este artefacto encendido sin vigilancia.
ADVERTENCIA
PARA SU SEGURIDAD:
1. No almacene ni utilice gasolina ni otros vapores o
líquidos inflamables en las proximidades de éste o
cualquier otro artefacto.
2. Un cilindro de gas propano líquido que no esté
conectado no deberá almacenarse alrededor de
este ni de ningún otro artefacto.
PELIGRO
PELIGRO DE INCENDIO O EXPLOSIÓN
Si huele a gas:
•Cierre la entrada de gas al aparato.
•Apague cualquier llama activa.
•Si el olor persiste, aléjese de la zona
inmediatemente.
• Después de dejar la zona, llame a su proveedor de
gas o al departamento de bomberos.
El incumplimiento de estas instrucciones podría resultar
en un incendio o una explosión, lo cual podría causar
daños materiales, lesiones personales o la muerte.
Hecho con 75% de bagazo de caña
(subproducto de la caña de azúcar
respetuoso del medio ambiente)
Índice
Salvaguardias importantes................................................................................................ Página 2
Despiece y elementos de ferretería............................................................................................... 5
Instrucciones de armado............................................................................................................... 6
Instalación del tanque de gas propano líquido (PL)........................................................................ 9
Instrucciones de operación........................................................................................................... 9
Limpieza y cuidado..................................................................................................................... 10
Registro del producto.................................................................................................................. 11
Piezas de repuesto...................................................................................................................... 11
Garantia limitada ........................................................................................................................ 11
Resolución de problemas.............................................................................................................11
El uso e instalación de este producto ha de realizarse de acuerdo con los códigos locales. Si no
existen códigos locales, use las normas siguientes: National Fuel Gas Code (Código Nacional
de Gas Combustible), ANSI Z223.1/NFPA 54 o International Fuel Gas Code (Código Internacional
de Gas Combustible). Al instalarse este producto, la conexión eléctrica a tierra debe hacerse de
conformidad con los códigos locales o en ausencia de los códigos locales, el Código Eléctrico
Nacional, ANSI/NFPA 70, si corresponde.
Para la instalación en Canadá: Estas instrucciones, si bien son generalmente aceptables, no cumplen
necesariamente con los códigos de instalación de Canadá, particularmente en cuanto a tuberías sobre y bajo
tierra. En Canadá, la instalación de este artefacto debe cumplir con los códigos locales y/o el estándar
CAN/CGA-B149.1 (código de instalación para artefactos y equipos que funcionan con gas propano).
ESTE MANUAL DE INSTRUCCIONES CONTIENE INFORMACIÓN IMPORTANTE SOBRE LA SEGURIDAD.
POR FAVOR, LÉALO Y CONSÉRVELO PARA FUTURAS CONSULTAS.
Si está montando esta unidad para otra persona, entréguele este manual para futuras consultas.
ADVERTENCIA: Este producto puede exponerle a sustancias químicas como di(2-etilhexil)
ftalato (DEHP), ftalato de diisononilo (DINP), hollín, monóxido de carbono, plomo y compuestos de plomo
que el estado de California reconoce como causantes de cáncer, defectos de nacimiento y otros daños
al sistema reproductivo. Para obtener más información, visite www.P65Warnings.ca.gov.
ADVERTENCIA
SOLAMENTE PARA USO EN
EXTERIORES.
WLa instalación y el servicio debe realizarla un
instalador, agencia de servicio o proveedor de gas
calificado.
Salvaguardias importantes
2Chimenea para exteriores a gas propano líquido
Modelo no. : GAD15309M
PELIGRO • GAS INFLAMABLE BAJO PRESIÓN.
LAS FUGAS DE GAS PROPANO LÍQUIDO AL ENCENDERSE PUEDEN CAUSAR INCENDIO O
EXPLOSIÓN LO CUAL PUEDE PRODUCIR LESIONES CORPORALES GRAVES O LA MUERTE.
COMUNÍQUESE CON EL PROVEEDOR DE GAS PROPANO LÍQUIDO SI NECESITA REPARACIONES O
PARA DESECHAR ESTE CILINDRO O EL GAS PROPANO LÍQUIDO NO UTILIZADO.
ADVERTENCIA
• PARA USO EN EXTERIORES SOLAMENTE.*
NO USE NI ALMACENE EL CILINDRO EN UN EDIFICIO, GARAJE NI ÁREA CERRADA.
• Conozca el olor del gas propano líquido. Si escucha,
ve o huele una fuga de gas propano líquido, aleje
inmediatamente a todos del cilindro y llame al
departamento de bomberos. No intente hacer
reparaciones.
• Adviértale al proveedor de gas propano líquido que se
asegure de lo siguiente:
Se ha purgado el aire atrapado del cilindro
antes de llenarlo por primera vez.
No llenar demasiado el cilindro.
Confirmar la fecha de recalificación del
cilindro.
• El gas propano líquido es más pesado que el aire y
puede asentarse en lugares bajos al disiparse.
• El contacto con el contenido líquido del cilindro puede
causar quemaduras por congelación en la piel
• No permita que los niños manipulen o jueguen con el
cilindro.
• Cuando el cilindro no esté conectado para usarlo,
mantenga la válvula cerrada. Los artefactos autónomos
no deben utilizarse con un cilindro de más de 30 lbs de
capacidad.
• No use, almacene ni transporte el cilindro si existe la
posibilidad de que esté expuesto a altas temperatura.
La válvula de alivio podría abrirse y dejar escapar una
gran cantidad de gas inflamable.
• Al transportarlo, mantenga el cilindro asegurado en
posición vertical con la válvula cerrada.
AL CONECTAR EL CILINDRO PARA USARLO:
• Úselo solamente en cumplimiento con los códigos aplicables.
• Lea y siga las instrucciones del fabricante.
• Consulte las instrucciones del fabricante respecto a la
conexión del cilindro incluidas con el artefacto.
• Asegúrese de que el conducto de aire del regulador no esté
apuntando hacia arriba.
• Cierre todas las válvulas del artefacto.
• No revise si hay fugas de gas con un fósforo ni con fuego
directo. Aplique agua jabonosa en las áreas marcadas con
una “X”. Abra la válvula del cilindro. Si aparecen burbujas,
cierre la válvula y llame al técnico de servicio para que haga
las reparaciones necesarias. También, revise las válvulas
y conexiones del artefacto para asegurarse de que no haya
fugas antes de encender el artefacto.
• Encienda el artefacto o los artefactos siguiendo las
instrucciones del fabricante.
• Cuando el artefacto no esté en uso, mantenga la válvula del
cilindro cerrada.
ADVERTENCIA:
NO RETIRE, MUTILE, NI DESTRUYA ESTA ETIQUETA
*EXCEPTO SEGÚN LO AUTORIZADO POR LA NORMA ANSI/NFPA 58.
PELIGRO. No guarde un cilindro de gas propano líquido de repuesto debajo ni cerca de una parrilla, ni ninguna otra fuente de calor.
NUNCA llene el cilindro de gas propano líquido a más del 80% de su capacidad, ya que podría originar un incendio
y causar la muerte o graves lesiones corporales.
Indicador del nivel del
líquido (opcional)
Válvula de alivio de presión
Rueda de ajuste de la válvula del cilindro
Cilindro
Punto de conexión

¿Necesita ayuda? Llame al 1.888.398.8643.
No vuelva al lugar de compra. Para piezas de repuesto
1.888.398.8643 3
Salvaguardias importantes
WNO use esta chimenea para exteriores sin haber leído el manual del
usuario en su totalidad.
WEste artefacto es para ser usado al aire libre únicamente y NO debe
usarse dentro de un edificio, garaje o cualquier otra área cerrada.
WNO opere, encienda o use esta unidad a menos de diez (10) pies
(3,05 m) de paredes, estructuras o edificaciones.
WPara uso residencial únicamente. Esta chimenea para exteriores NO ha
sido diseñada para uso comercial.
WEsta chimenea para exteriores NO ha sido diseñada como calentador y
nunca se la debe utilizar como tal. Gases TÓXICOS pueden acumularse y
provocar la asfixia.
WEsta chimenea para exteriores cuenta con certificación de seguridad
para uso en los Estados Unidos y Canadá solamente. NO debe
modificarse para uso en ningún otro lugar. La modificación resultará en
un peligro de seguridad y anulará la garantía.
WHabitantes de apartamentos: Comuníquese con la administración
para obtener los requisitos y los códigos de incendio para uso de una
chimenea para exteriores a gas propano líquido en su complejo de
apartamentos. Si está permitido su uso, coloque la unidad en exteriores,
sobre el suelo con una distancia de diez (10) pies (3 m) de paredes o
barandas. No debe usarse en balcones ni debajo de estos.
WEsta chimenea para exteriores utiliza únicamente gas de propano
líquido como combustible. El convertir o tratar de convertir esta
chimenea para exteriores de gas propano líquido para ser usada con
gas natural es peligroso e invalidará la garantía de la unidad.
WCaracterísticas del propano líquido (PL):
a. El propano es inflamable y resulta peligroso si se manipula
inadecuadamente. Antes de utilizar cualquier producto que emplee
propano líquido, estudie detenidamente sus características.
b. El gas de propano líquido es explosivo bajo presión, más denso que
el aire, se asienta y se acumula a poca altura.
c. En su estado natural, el propano no tiene ningún olor. Para su
seguridad, se añade una esencia odorífera que huele a col podrida.
d. El contacto directo con el propano líquido puede causar
quemaduras frías en la piel.
WÚnicamente tanques marcados “Propano” pueden usarse en esta
unidad.
a. El tanque de gas propano líquido (PL) debe estar fabricado y
comercializado según las Especificaciones para tanques de gas
PL del Departamento de Transporte (DOT) de EE.UU. o del Estándar
nacional de Canadá, CAN/CSA-B339 sobre tanques, esferas y tubos
para el transporte de mercancías peligrosas si aplicable.
b. Verifique que el tanque de propano cuenta con mecanismo de
extracción de vapor.
c. El tanque de gas propano líquido debe tener un dispositivo que
evite el sobrellenado del tanque (OPD) y una conexión rápida o una
conexión Tipo I (CGA810) para tanque de gas propano.
d. No utilice nunca un tanque de propano líquido si el cuerpo no tiene
collar para proteger la válvula.
e. No utilice nunca un tanque de propano líquido si el cuerpo, la
válvula, el collar o el anillo inferior presentan algún daño.
f. Los tanques de propano líquido abollados u oxidados pueden ser
peligrosos y deberían ser revisados por su proveedor de gas PL
antes de utilizarlos.
g. No deje caer el tanque de gas propano líquido ni la maneje
bruscamente.
h. Los tanques de propano deben almacenarse en exteriores, en un
lugar al aire libre siempre fuera del alcance de los niños y nunca en
un garaje,edificio o espacio cerrado. Nunca almacene tanques de
gas en un lugar en el que la temperatura supere los 125ºF (51,5ºC).
i. NO inserte ninguna herramienta ni objeto extraño en la salida de
la válvula ni en la válvula de seguridad. Podría dañar la válvula
y causar una fuga. Una fuga de gas propano puede resultar en
explosión, incendio, lesiones personales graves o la muerte.
j. No ponga nunca un tanque de gas propano lleno en un carro o
camioneta calientes. El calor podría hacer que la presión del gas
aumentase, lo que abriría la válvula de seguridad y haría que se
escapase el gas.
k. Ponga la tapa contra el polvo en la válvula de salida del tanque
cuando no lo esté usando. Únicamente use la tapa contra el polvo
que viene con la válvula del tanque. Otros tipos de tapones o tapas
pueden crear fugas del propano.
l. Nunca guarde un tanque adicional de propano debajo o cerca de
esta chimenea para exteriores.
m. Nunca llene el tanque más allá de 80% de su capacidad.
n. El no seguir exactamente las instrucciones dadas arriba puede
producir un incendio con daños a la propiedad, lesiones serias y
hasta fatales.
WTodas las conexiones de gas de su chimenea para exteriores han sido
verificadas en fábrica en cuanto a fugas de gas. Sin embargo, vuelva
a probar la integridad de todas las conexiones como se indica en las
“Instrucciones de operación” ya que el movimiento en transporte puede
aflojar algunas de ellas.
WVerifique que no haya fugas aún si el aparato ha sido armado por otra
persona.
WNO opere la unidad si hay una fuga de gas. Las fugas de gas pueden
provocar un fuego o una explosión.
WAntes de operar esta unidad, debe observar todos los procedimientos
para verificar que no hay fugas de gas. Para evitar cualquier riesgo de
fuego o de explosión al comprobar si hay fugas:
a. Compruebe siempre si hay fugas antes de encender la chimenea
para exteriores cada vez que el tanque de gas está conectado.
b. No fume. NO use o permita fuentes de ignición en el área al
comprobar si hay fugas.
c. Siempre compruebe si hay fugas en exteriores donde hay una buena
ventilación.
d. NO use cerillas, encendedores o una llama para comprobar si hay
fugas.
e. El uso de bebidas alcohólicas, medicamentos o drogas de farmacia
puede afectar la habilidad del usuario para armar debidamente u
operar en forma segura este artefacto.
f. Los olores fuertes, los resfríos, la congestión de los senos nasales,
etc. pueden evitar la detección del gas propano. Tenga cuidado y
sentido común al hacer pruebas para detectar fugas.
g. NO use la chimenea para exteriores hasta que todas las fugas hayan
sido reparadas. Si no puede parar una fuga, desconecte el tanque de
propano. Llame a un técnico de servicio de artefactos a gas o a su
proveedor de propano local.
WNO guarde o use gasolina u otros líquidos o vapores inflamables a
menos de 25 pies (7,6 m) de esta unidad.
WNO utilice este artefacto en una atmósfera explosiva. Mantenga la
zona de la chimenea para exteriores libre de materiales combustibles,
gasolina y cualquier otro vapor o líquido inflamable.
WLos niños NO deben usar esta chimenea para exteriores.
WNO instale o utilice esta chimenea para exteriores en embarcaciones o
vehículos recreativos (RV).
WNO conecte esta unidad a un suministro de gas remoto.
WNo intente nunca acoplar esta chimenea para exteriores al sistema de
propano de un campero, de una casa móvil o de su propia casa.
WObserve siempre y use la unidad cumpliendo todos los códigos de
incendio aplicables, locales y nacionales. Obtenga de su Departamento
de Incendios local detalles en cuanto a quemas al aire libre.
WAl usar esta chimenea para exteriores, observe las mismas
precauciones que merece cualquier fuego abierto.
WNO encienda esta chimenea para exteriores sin haber leído
completamente todas las instrucciones de este manual del usuario.
WPELIGRO: El no seguir los avisos de peligro, las advertencias y las precauciones, puede ocasionar un incendio o una explosión, con sus consecuentes
daños a la propiedad, lesiones personales y hasta accidentes fatales.
WADVERTENCIAS :

¿Necesita ayuda? Llame al 1.888.398.8643.
No vuelva al lugar de compra. Para piezas de repuesto
1.888.398.8643
4
WNO queme trozos de madera, briquetas de carbón de leña, carbón,
leños de madera aglomerada, madera de deriva, basura, hojas, cartón o
pedazos de madera terciada en la chimenea para exteriores.
WEs fundamental mantener limpio el compartimiento de la válvula
de la chimenea, los quemadores y los conductos de aire circulante.
Inspeccione la chimenea para exteriores antes de cada uso.
WNO utilice la chimenea para exteriores a menos que esté
COMPLETAMENTE montada y que todas las piezas estén bien fijadas y
apretadas.
WNO use esta chimenea para exteriores cerca de automóviles, camiones,
furgones o vehículos recreativos o de recreo.
WNO use esta chimenea para exteriores debajo de aleros o cerca de
construcciones combustibles que no estén debidamente protegidas.
WEvite usar la chimenea para exteriores cerca o debajo de árboles y
arbustos.
WColoque siempre la chimenea para exteriores sobre superficies firmes y
niveladas no combustibles tales como las de hormigón, ladrillo o roca.
Una superficie de asfalto o de pavimento puede que no sea adecuada
para este propósito.
WNO utilice esta chimenea para exteriores para cocinar.
WNO use esta unidad si alguna parte ha quedado bajo agua. Llame
inmediatamente a un técnico de servicio calificado para que
inspeccione la unidad y para que reemplace cualquier parte o sistema
de control y cualquier control de gas que haya estado bajo agua.
WNO use ropa inflamable o floja cuando usa la chimenea para exteriores.
WNO utilice la chimenea si hace mucho viento.
WNO se apoye sobre la chimenea para exteriores cuando la está
encendiendo o usando.
WNO use esta chimenea para exteriores a menos que el quemador esté
seguro en su lugar.
WMantenga todos los cables eléctricos lejos de una chimenea para
exteriores caliente.
WCiertas partes de esta chimenea para exteriores se calentarán
demasiado, evite el contacto. NO toque las piezas de la chimenea para
exteriores hasta que se hayan enfriado completamente (alrededor de
45 minutos) para evitar quemaduras, a menos que usted tenga puestos
elementos de protección tales como guantes o almohadilla para las
ollas, guantes de barbacoa, etc.
WNO deje una chimenea para exteriores encendida sin vigilancia,
especialmente, mantenga los niños y las mascotas lejos de la chimenea
para exteriores en todo momento.
WSe debe informar a niños y adultos sobre los peligros de superficies
calientes y deben mantenerse alejados para evitar quemaduras y el
encendido de la ropa.
WLos niños pequeños deben ser vigilados constantemente cuando estén
cerca a la unidad.
WNO cuelgue ni coloque ropa ni otros materiales inflamables sobre ni
cerca de esta unidad.
WCualquier guarda u otro equipo protector que se haya retirado para
realizar el servicio de mantenimiento de la unidad deberá volverse a
colocar en su lugar antes de poner en funcionamiento la unidad.
WSi corresponde, la cubierta protectora debe retirarse cuando el
quemador esté funcionando.
WNO intente mover la chimenea para exteriores mientras esté encendida.
Deje que la chimenea para exteriores se enfríe antes de moverla o
guardarla.
WEsta chimenea para exteriores debe limpiarse y verificarse
completamente de manera regular. Limpie y revise la manguera antes
de cada uso del aparato. Si detecta alguna señal de abrasión, desgaste,
cortes o fugas, deberá sustituir la manguera antes poner en marcha el
aparato.
WEsta chimenea para exteriores debe ser inspeccionada por lo menos
una vez al año por una persona de servicio certificada. Según el uso,
es posible que se requiera una limpieza más frecuente. NO haga
funcionar la unidad hasta que todas las piezas hayan sido reparadas o
reemplazadas.
WUse únicamente el regulador y la manguera suministrados. Use
únicamente el regulador y la manguera de repuesto especificados por
Mr. Bar-B-Q Products LLC.
WUse únicamente piezas autorizadas de fábrica de Mr. Bar-B-Q
Products LLC. El uso de cualquier pieza no autorizada de fábrica puede
ser peligroso. Su uso invalidará su garantía.
WUse piedras de vidrio y piedras de lava autorizadas por la fábrica de
Mr. Bar-B-Q Products LLC, solamente. Usar piedras de vidrio o piedras
de lava no autorizadas por la fábrica puede ser peligroso y anulará su
garantía.
WNO encienda esta unidad sin haber leído las “Instrucciones de
operación” que se encuentran en este manual.
WEl almacenamiento en interiores de esta chimenea para exteriores sólo
está permitido si el tanque está desconectado, desmontado del aparato
y guardado como es debido al aire libre.
WNO trate de desconectar el regulador de gas del tanque, o cualquier otro
accesorio de la línea de gas, mientras esté usando la chimenea para
exteriores.
WSi la chimenea para exteriores no está en uso, debe apagarse el gas en
el tanque de suministro.
WPRECAUCIÓN: Debe usarse el regulador de presión proporcionado con
este equipo. Este regulador está fijado para una presión de salida de
columna de agua de 11 pulgadas (28 cm).
WLa presión mínima de suministro de gas para esta chimenea para
exteriores es de 11 pulgadas de columna de agua, para propósito de
ajuste de la entrada.
WLa máxima presión de gas de entrada de esta chimenea para exteriores
es una columna de agua de 11 pulgadas (28 cm).
WAntes de probar la presión, cierre la válvula del tanque de gas propano
líquido y desconecte el regulador de gas. El sistema de tubería del
suministro de gas debe probarse a una presión igual o menor de ½ psi
(3.5 kPa).
WNO se siente ni se pare sobre la repisa de la chimenea ni sobre ninguna
parte de esta unidad.
WNO arroje nada al fuego cuando la unidad esté funcionando.
WLas piedras de vidrio y lava se calientan mucho. Por lo tanto, mantenga
a los niños y las mascotas a una distancia segura del artefacto.
WCuando se calienta, el vidrio de fuego o la roca de lava puede estallar.
WLa abertura del collar del tanque debe orientarse hacia el lado de la
puerta para facilitar el acceso.
WNO guarde materiales combustibles en el compartimiento de la base.
WPor favor, use guantes de protección cuando esté armando este
producto.
WNo trate de forzar las piezas juntas pues esto puede ocasionar lesiones
o dañar el producto.
WEl no seguir exactamente las instrucciones dadas arriba puede producir
daños a la propiedad, lesiones serias y hasta fatales.
Salvaguardias importantes (continuación)
Chimenea para exteriores a gas propano líquido
Modelo no. : GAD15309M

17
¿Necesita ayuda? Llame al 1.888.398.8643.
No vuelva al lugar de compra. Para piezas de repuesto
1.888.398.8643 5
Herramientas necesarias para el armado (non incluidas)
Destornillador en cruz (Phillips) no. 2 1 pz
Paquete de Hardware 58-23-862
ATornillo Niquelado, negro, de cabeza segmentada, M5x12 16 pcs
BTornillo Niquelado, negro, de cabeza segmentada, M6x12 4 pcs
CTornillo Niquelado, negro, de cabeza escalonada,M6x12 1 pc
DPila AA 1 pc
Despiece
ADVERTENCIA
Cuando se calientan, las piedras de
lava pueden reaccionar rompiéndose
y lanzando fragmentos. Asegúrese de
preparar las piedras de lava a altas
temperaturas antes de usarlas para
evitar lesiones o daños personales
potenciales.
IMPORTANTE ANTES DE USARLAS:
CÓMO PREPARAR LAS PIEDRAS
DE LAVA EN LA PÁGINA 8.
Cómo encender un
ignitor electrónico
https://youtu.be/aFWb1YYnRo0
Vendues séparément
21
Lista de piezas
1Piedras de vidrio de
bronce GLS-BRZ
2Pieza de mesa 58-24-599
3Conjunto del crisol* 58-23-982
4Tapa del encendedor* 58-23-896
5Quemador* 58-23-138
6Perilla de control* 58-23-139
7Tapón de la pila* 58-23-897
8Conjunto de manguera y
regulador* 58-23-922
9Repisa 58-24-600
10 Panel lateral (3) 58-24-272
11 Pata A (2) 58-24-273
12 Pata B 58-24-274
13 Imán (2)* 58-23-145
14 Pata C 58-24-275
15 Pata (4)* 58-23-147
16 Base* 58-24-060
17 Perno de retención del
tanque de gas PL* 58-23-149
18 Puerta 58-24-276
19 Perilla de la puerta* 58-24-277
20 Funda 55-23-366
Piedras de lava (no se
requieren y se venden
por separado)**
55-05-833
* Viene ensamblado
W**PRECAUCIÓN: Use piedras
de vidrio y piedras de lava
autorizadas por la fábrica de Mr.
Bar-B-Q Products LLC, solamente.
Usar piedras de vidrio o piedras
de lava no autorizadas por la
fábrica puede ser peligroso y
anulará su garantía.
10
10
10
18
17
12
3
9
2
8
6
14
11
11
4
19
16
20
15
15
13
5
7
1
15 15
13
21

6Chimenea para exteriores a gas propano líquido
Modelo no. : GAD15309M
Instrucciones de armado
1
NO DEVUELVA EL PRODUCTO AL LUGAR DE COMPRA
.
Si necesita ayuda llame, sin cargo, al 1.888.398.8643. Por
favor tenga a mano su manual y el modelo número de la
unidad, para referencia.
Note: The model number is printed on a label which can be found on
the inside door, back or side of the base assembly.
Para facilitar el armado:
1. Elija el lugar en el que armará este producto. Para proteger los
componentes, elija una superficie lisa, sin fisuras ni hendijas.
2. Presente todas las piezas.
3. Ajuste todas las conexiones de los elementos de ferretería,
primero en forma manual. Luego, después de completar cada
paso, ajústelos por completo. Tenga cuidado de no ajustar
demasiado. Se podrían dañar las superficies o forzar las roscas.
4. Para obtener mejores resultados, siga todos los pasos en el
orden indicado.
Para terminar el armado de la unidad necesitará:
• una (1) solución para detección de fugas. Las instrucciones
sobre cómo preparar esta solución se encuentran en la sección
“Instrucciones de operación”.
• un (1) un tanque de gas propano líquido, para parrilla, llenado
con precisión y con rosca externa Acme Tipo 1 para conexión
de válvula (non incluidas).
El tiempo promedio para armar es aproximadamente una hora.
WPRECAUCIÓN: Se necesitarán dos (2) personas
para armar la unidad.
WADVERTENCIA: El no colocar las piezas de acuerdo
a estos diagramas o el no utilizar las piezas
específicamente aprobadas para este artefacto,
puede resultar en daños materiales o lesiones
personales.
3
Instale los paneles lateral y trasero
Nota: Coloque los tornillos inferiores antes de colocar los tornillos superiores. No
apriete completamente los tornillos hasta llegar al paso 4.
Ax 12
4
Instale la base
Nota: Apriete todos los tornillos mencionados en los pasos 2 a 4.
Ax 4
2
Fixer les pieds
WATTENTION : Il faudra deux (2) personnes pour remettre le
foyer debout.
WATTENTION : Pour éviter toute égratignure, placer l’appareil
sur une surface lisse qui ne présente pas de rayures ni de
fentes.
Remarque : Ne serrez pas les vis complètement avant l’étape 4.
Bx 4
B
14
12
AA
+
-
¿Necesita ayuda? Llame al 1.888.398.8643.
No vuelva al lugar de compra. Para piezas de repuesto
1.888.398.8643 7
Instrucciones de armado (continuación)
7
Coloque la pieza de mesa
WADVERTENCIA: NUNCA coloque la pieza de mesa sobre la
chimenea para exteriores mientras se encuentra en uso.
WADVERTENCIA: NUNCA coloque la pieza de mesa sobre
la chinenea para exteriores hasta que la unidad se haya
enfriado.
8
Inserte la pila
Nota: Retire la envoltura de plástico antes de instalar la pila.
Dx 1
B
6
Coloque las piedras de vidrio -Use guantes protectores
WPRECAUCIÓN: NO deje caer las piedras de vidrio de su bolsa.
Cuidadosamente coloque las piedras de vidrio con la mano
de manera que el polvo no atore el quemador.
WPRECAUCIÓN: Usar guantes protectores.
WPRECAUCIÓN: Use únicamente rocas de vidrio autorizadas de
fábrica de Mr. Bar-B-Q Products LLC. El uso de rocas de vidrio
no autorizadas por la fábrica puede ser peligroso. Su uso
invalidará su garantía.
WPRECAUCIÓN: NO cubra el cubierta del encendedor.
Nota: Las piedras de vidrio deben medir entre 0,8 y 1,6 pulg. (2-4 cm) de largo. Se
necesita aproximadamente 6 kg (13,2 lbs) de piedras de vidrio.
D
5
Instale la puerta y voltee la chimenea para exteriores
WPRECAUCIÓN: Se necesitarán dos (2) personas para volver a
colocar la chimenea para exteriores sobre sus patas.
Cx 1
C
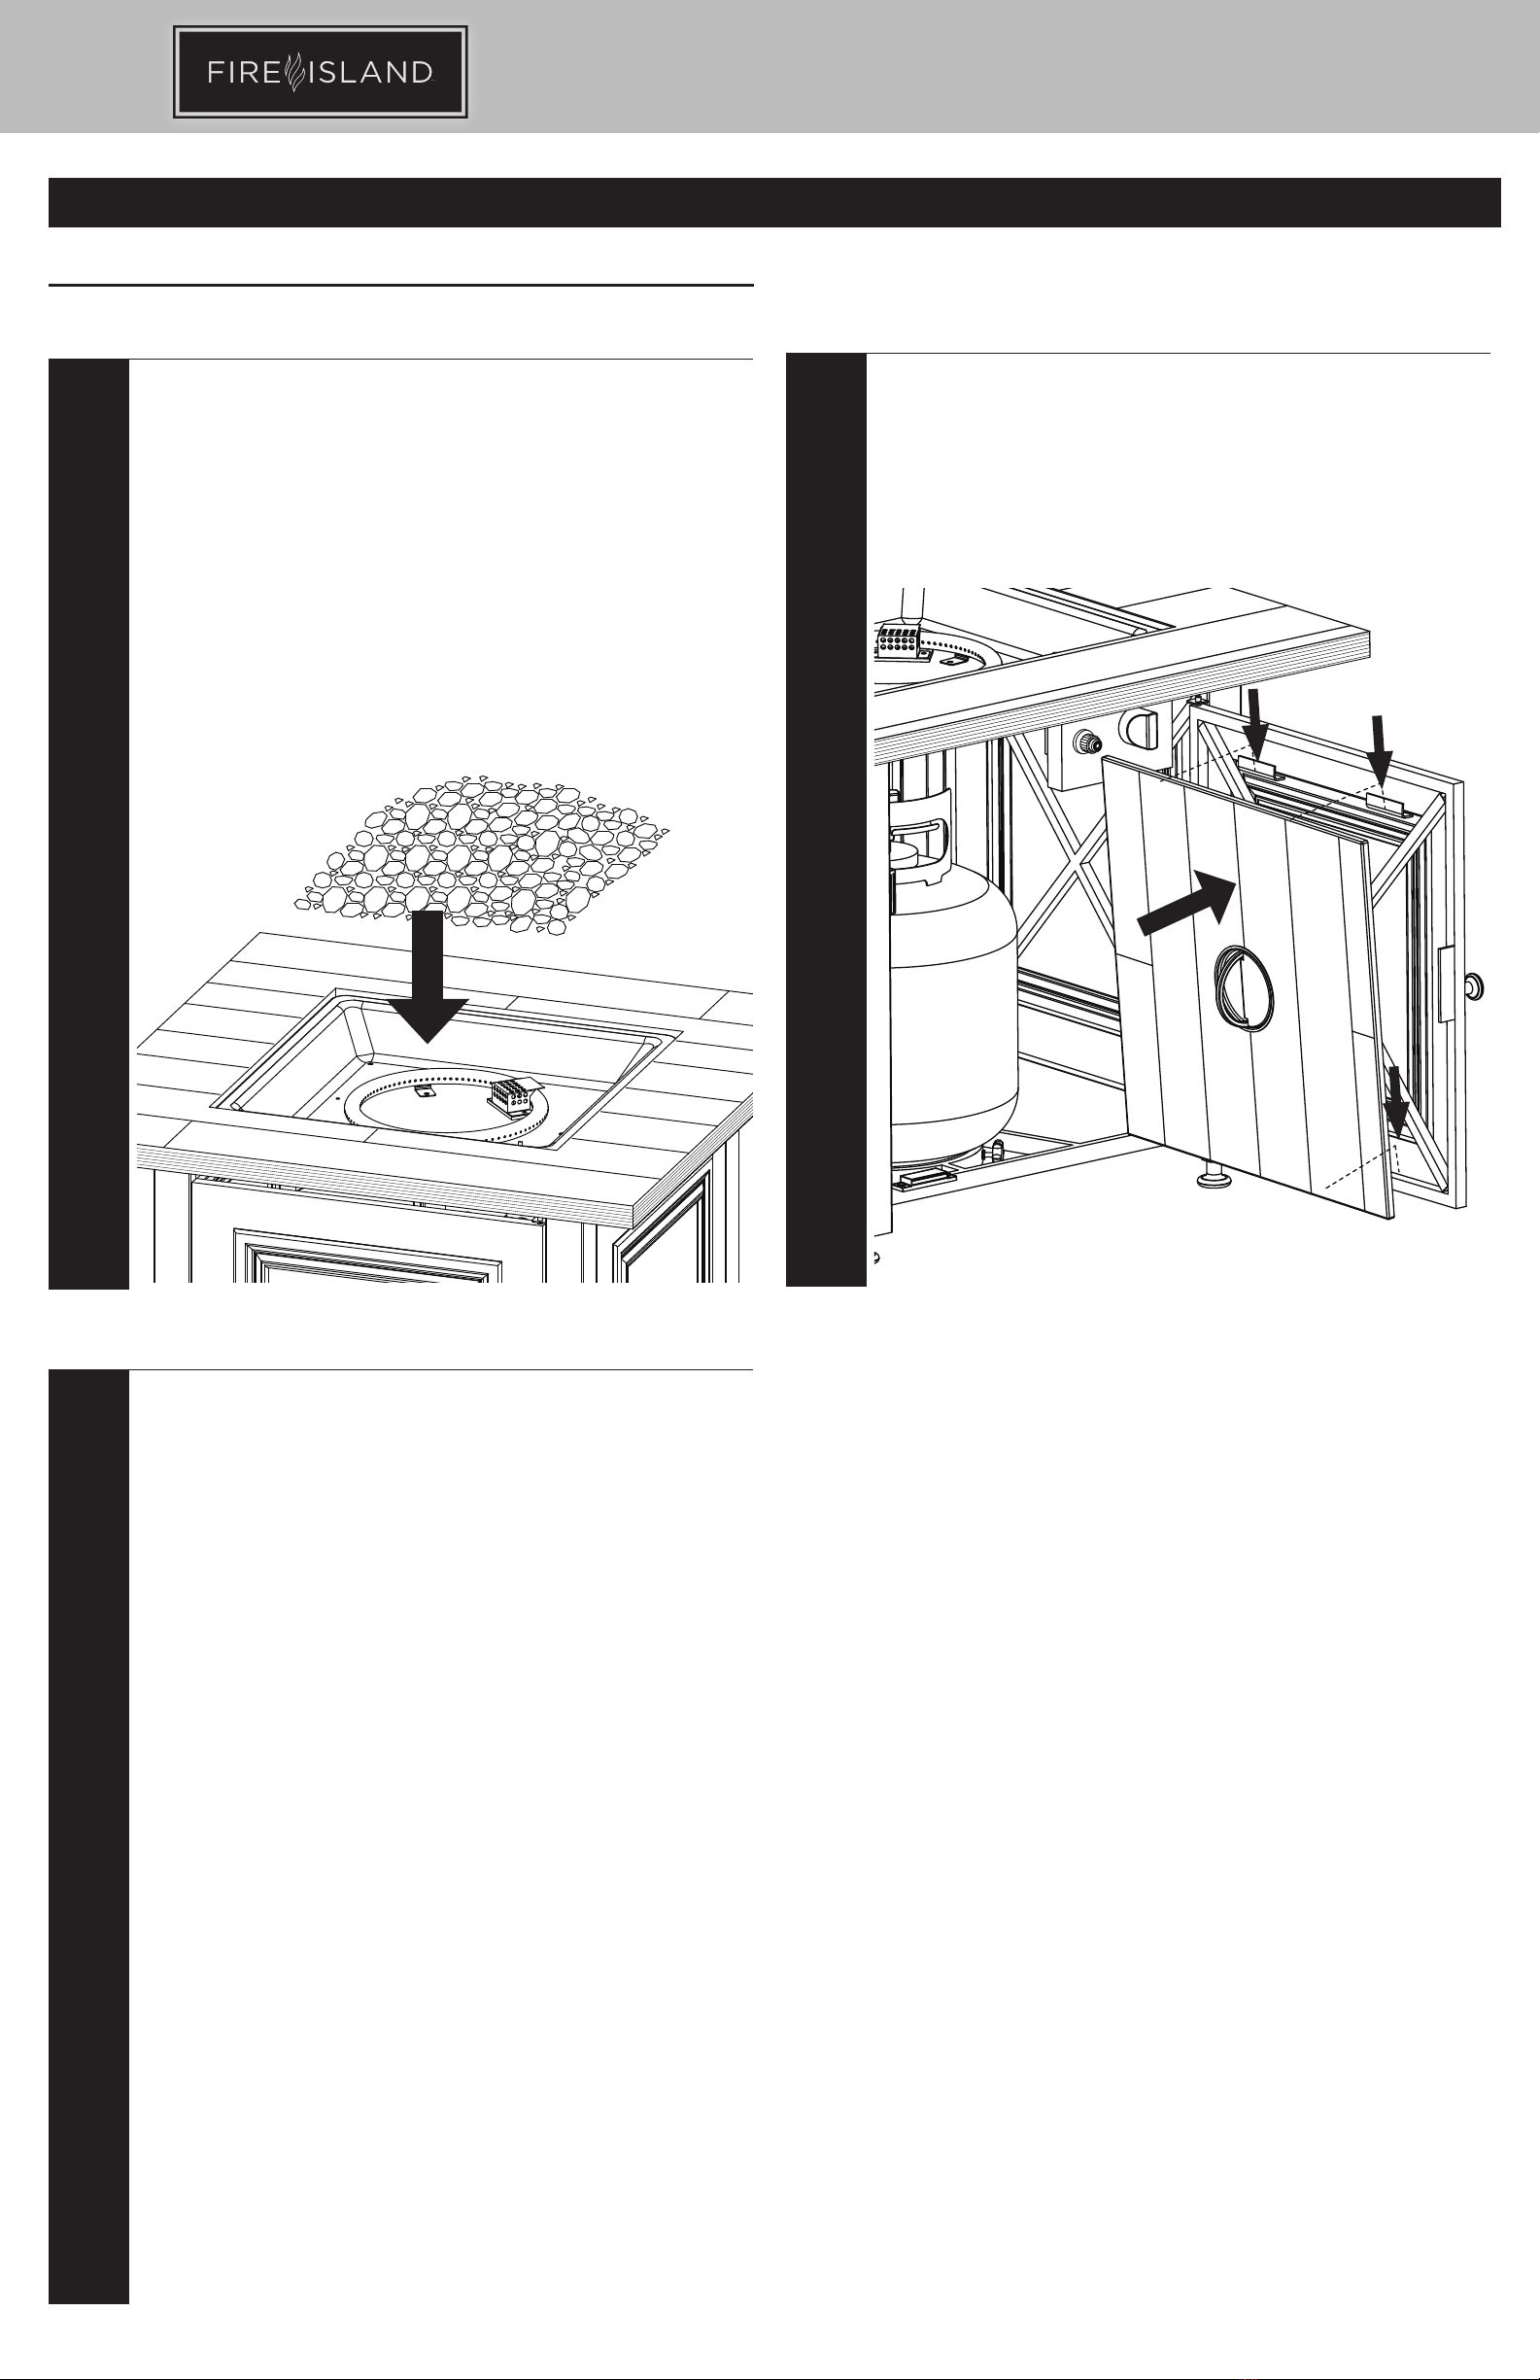
8
Instrucciones de armado (continuación)
10
Store Table Insert
Hang the table insert on the inner side of door.
WWARNING: NEVER place table insert onto outdoor fire pit while
in use.
WWARNING: NEVER take out and place table insert onto outdoor
fire pit while the outdoor fire pit is still hot.
Chimenea para exteriores a gas propano líquido
Modelo no. : GAD15309M
ARTÍCULO OPCIONAL VENDIDO POR SEPARADO
9
Coloque las rocas de lava -Use guantes protectores
WPRECAUCIÓN: Al cambiar de rocas de vidrio a rocas de lava,
retire toda las rocas de vidrio antes de colocar rocas de lava.
WPRECAUCIÓN: NO deje caer las piedras de vidrio de su bolsa.
Cuidadosamente coloque las piedras de vidrio con la mano
de manera que el polvo no atore el quemador.
WPRECAUCIÓN: Usar guantes protectores.
WPRECAUCIÓN: Use únicamente rocas de vidrio autorizadas de
fábrica de Mr. Bar-B-Q Products LLC. El uso de rocas de vidrio
no autorizadas por la fábrica puede ser peligroso. Su uso
invalidará su garantía.
WPRECAUCIÓN: NO cubra el cubierta del encendedor.
Nota: Las rocas de lava deben medir entre 0,8 y 1,6 pulg. (2-4 cm) de largo. Se
necesita aproximadamente 3,0 kg (6,6 lbs) de rocas de lava.
11
IMPORTANTE ANTES DE USARLAS
CÓMO PREPARAR LAS PIEDRAS DE LAVA
1. Coloque las piedras de lava en el recipiente de la chimenea antes de
encenderla.
2. Siga las instrucciones de encendido del manual del propietario para
encender la chimenea.
3. Encienda la chimenea al nivel más alto de calor.
4. Deje que las piedras de lava se calienten a la temperatura máxima durante
30 minutos antes de disfrutar de la chimenea.
5. Mantenga a las personas y cualquier material que pueda quemarse por lo
menos a 15 pies de distancia de la chimenea mientras las piedras de lava
están preparándose.
6. Repita el proceso si la chimenea ha estado expuesta a la lluvia o humedad.
7. Mantenga la chimenea cubierta con una funda cuando no la use.
Table of contents
Languages:
Other Fire Island Outdoor Fireplace manuals


Popular Outdoor Fireplace manuals by other brands

Coleman
Coleman 5056-707 Assembly and instruction sheet

tepro
tepro MILLBURN 1168 instruction manual

Landmann
Landmann Firedance 23870 Assembly and use instructions

Silicon Graphics
Silicon Graphics PETBLE-SBW-OP-1000A instruction manual

FLORABEST
FLORABEST 297427 Instructions for use

BRAIZ
BRAIZ LAVIOLETTE 77002703 Assembly guide


Upland
Upland GFT-31269 Assembly instructions

TRESHOLD
TRESHOLD GAD1413T-C Assembly instructions

AZ Patio Heaters
AZ Patio Heaters GS-F-PC installation guide

Kay
Kay 30275 Assembly instructions

Landmann
Landmann 28240 Assembly instructions

Home Decorators Collection
Home Decorators Collection FG-BTB5PCFC-FP Use and care guide