Firebelly FB2 DS User manual

CONTENTS
OPERATING INSTRUCTIONS
Lighting the re 2
Firebox linings and bae 2
Wood burning tips & theory 2
Running temperatures 3
Cleaning and Maintenance 3
INSTALLATION INSTRUCTIONS
Building regulations 4
Positioning and Clearances 4
Chimney 4
Flue connection 5
Problem solving 6
PRODUCT DATA
MODEL FB2 DS
WEIGHT 100KG
NOMINAL HEAT OUTPUT 12KWs
Firebelly Stoves Ltd, Unit 16, Upper Mills, Slaithwaite, Hudderseld, West Yorkshire, HD7 5HA, UK
www.rebellystoves.com sales@rebellystoves.com

Operating Instructions
Building regulations
Installation of the Firebelly woodburning stove must comply with all local building regulations, including
those referring to national and European standards. It is a good idea to consult your local chimney
sweep to check the suitability of the chinmney and ensure there is adequate updraft and suggest any
remedies to potential chimney problems. Document J of the Building Regulations contains further
information regarding the installation of solid fuel appliances and can be viewed at www.odpm.gov.uk
Lighting the stove
When lighting the stove for the rst time it should not be stoked excessively as all the materials must
be given time to adapt to the effects of heat. The paint will take some time to fully cure and during this
period some odours will be evident. It is recommended that doors or windows should be opened the
rst time the stove is red.
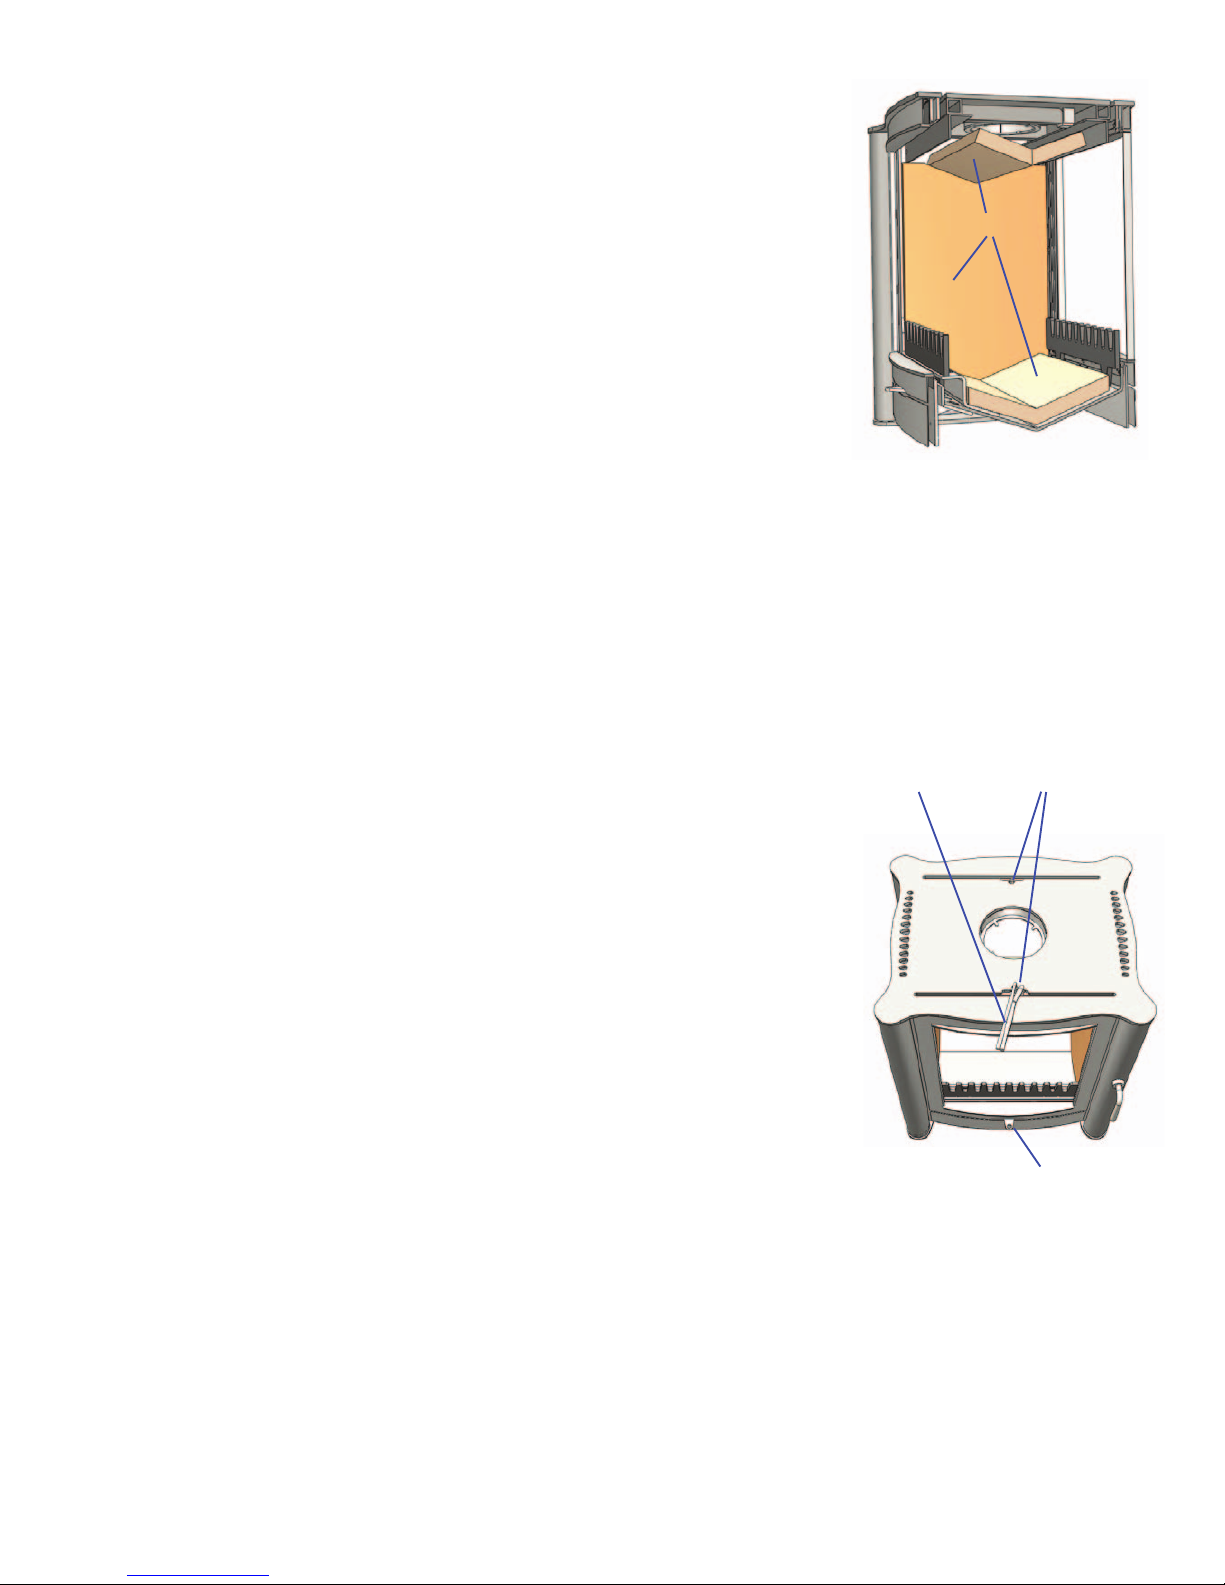
Before lighting check the rebricks and other internal components are in position gure 1 and that all
packaging has been removed.
Step 1 Open both the top air controls and bottom air control fully. gure 2
To open the top air controls use the tool supplied to move back the two sliders . The top air control
becomes hot in use and so the supplied tool should always be used. To open the bottom air control
slide the tab fully to the right.
Step 2 Place rolled up and scrunched up newspaper at the back of the stove. Put small tinder on top
of the newspaper and then a few slightly larger pieces of wood on top of this, light the newspaper and
close the door.
Step 3 Let the re burn until all the pieces of wood are alight and burning. Then more and larger
pieces of wood/logs can be added.
Step 4 Once the re is established the bottom air control can be closed so that all the air for the re
comes via the top air controls. The burning rate of the re can now be controlled by adjusting the top
air controls and by regulating the amount of wood added. The bottom air control should normally
remain closed once the stove is running. If the re has been allowed to die too low then the bottom air
control can be opened to allow air to the base of the re in an attempt to revive it.
Do not run the stove with the door open
Warning. The external surfaces of the stove become hot during operation. Use the supplied tool
to operate the air controls when the stove is running.
Tips
• The rst stage of the re, just after lighting, is usually the smokiest because the cold wood
and cold stove take heat away from the ames. During this stage, ensure both air inlets of the
stove are fully open to get a hot ame. It might appear that this initial hot burn lets too much
heat go up the chimney, but it is a necessary part of an efcient re. The extra heat “primes”
the chimney to produce a strong draft, and helps keep the ue clean by loosening creosote that
might have been deposited by the previous re. The hot initial burn also drives moisture out of
the rewood and gives an ignition source for the smoke that is released from the wood.
• Make small changes. Do not try to add too much fuel at once, the fuel should not be stacked
higher than the top of the back re brick. Adding fuel gradually will help maintain a steady
temerature and burning rate so that the stove burns efciently and cleanly. Adding a large
amount of fuel all at once will dramatically reduce the temperature inside the stove. After
adding a large piece of wood/log it is a good idea to increase the top air opening slightly more
until the new fuel begins to burn and the stove returns to temperature.
• This also applies to the air controls. Adjusting them gradually will help maintain a steady
combustion rate.
• Do not run the stove with the top air controls fully closed. The top air controls supply air for the
glass ‘air shield’ system. The further open the top air control the more effective the air shield
system.
• Use a piece of newspaper to wipe the inside of the windows before lighting the stove each time
to prevent the gradual build up of deposits.
• Small, hot res are more efcient than large slumbering res. Most of the energy in burning
wood is released as a bright ame. The turbulence in the ames creates good mixing between
the combustion air and the gases that are released from the wood as it heats up. The heat of
the re ignites and burns these gases. In contrast, the dense smoke from a slow, smouldering
re is potential heat energy that escapes up the chimney and either clings to the chimney ue
as creosote or pollutes the outdoor air. Therefore, to gain the most heat from each load of
rewood, the wood should be aming throughout the burn cycle until it is reduced to ash.
• If you do a fair bit of slow woodburning, it is good practice to burn a good, hot stove at regular
intervals to keep your chimney dry and prevent the build up of tar.
• When refueling try to place logs length ways so that any spitting from the end grain does not go
onto the glass window.
gure 1
re bricks
gure 2 Primary air control.
Slide right to open.
2
Secondary air controls.
Slide back to open.
Tool for adjusting
top and bottom air
controls

Notes on woodburning
Wood burns most efciently when the air for combustion is supplied from above the re bed
rather than below. The air supplied above the re bed provides the oxygen necessary for the
volatile gases (smoke), given off by the wood as it heats, to combust. This ensures that the
gases are burnt and used to heat the appliance instead of being wasted up the chimney or
condensing and forming tarry deposits inside the stove, the ue pipe or on the door glass.
Running the stove with only the bottom air control open will provide oxygen for the wood to
burn on the re base but will not provide air for the volatile gases above the re bed to combust,
resulting in a smoky inefcient re. With the above in mind the stove should be run with the
bottom air control closed and the top air controls open.
Slow burning
To slow the burning rate and output from the stove reduce the air entering the stove via the air
controls. The re must be well established and the stove hot before a minimum combustion
rate is atempted. Note that if the air supply is restricted too much the re will burn dirty and
inefciently. Slow overnight burning is not advised.
Ventillation
The stove requires an adequate air supply for successful operation (see Installation section of
these instructions for more details). Ensure that air bricks or grilles supplied for this purpose are
not blocked. Be aware that the operation of exhaust fans or other appliances that compete for
ventilation in the vecinity may affect the performance of the stove.OR
WOOD BURNING
Running temperature
To get the best results from your stove it is recommended that a wood stove thermometer be
tted to the ue pipe just above the stove. Most thermometers are magnetic and if attached
to the single wall ue pipe just above your stove will give a good indication of the ue gas
temperatures.
150 °C - 300°C
The ue gases should be in this temperature band for the safest, most efcient and most
economical operation of your stove.
Below 150°C
This is below the condensation point of wood gases and may cause the build up of tar in the
chimney, dirty the stove glass and result in the inefcient burning of fuel.
Above 300 °C
Too hot. Heat will be wasted up the chimney. Excess heat may damage the stove or ignite an
existing accumulation of tar resulting in a chimney re.
Over heating
If the stove is allowed to get too hot and is over heating, close all the air controls fully using the
tool, keep the re door closed and let the re burn down.
Chimney Fire
In the event of a chimney re dial 999 and ask for the Fire Service. Fully close the air controls
on the stove and keep the re door shut. Move any combustibles away from the stove and the
chimney breast. Also check other rooms that the chimney passes through and move furniture
and other combustibles away from the chimney here too.
Before using the stove again after a chimney re have the chimney cleaned and inspected by a
qualied person.
Cleaning the glass
We recommend wiping the glass after a re to prevent the build up of deposits. This is best
done using a paper towel or a piece of newspaper.
Types of fuel
Wood needs to be well seasoned before it is burnt. Different woods take varying amounts of
time to season but, as a general guide, before being used in a stove, wood should be cut to
length, split and then stacked under cover (with the sides open to the air) for at least a year.
Wood is ready for burning when radial cracks appear in the end of the logs and the water
content is no higher than 20%. It is then good practice to have it in the log basket, inside the
house, for a few days before it is actually used in the stove. The internal width of the rebox is
465mm and so rewood should be no longer than this.
Do not burn unseasoned wood in your woodburner. Do not burn particle board, lacquered,
painted or treated wood, plastics, rubber or liquid fuels. The stove is not suitable for burning
solid fuel ie. briquettes\ coal\coke\smokless fuel. The stove should not be used as an
incinerator.
gure 3
3

Ashes
The ashes should only be removed when the re is out and has been left to cool completely. The wood bar
can be removed to make access easier (gure 3). Wood burns well in it’s own ash and so a thin layer of ash
can be left in the bottom of the stove, this also helps to protect the base re bricks.
Note: The above notes on operating your stove should be taken as guidlines only. Each stove
installation is unique and the operation of each stove is subject to many variables including; the fuel
used, the size of the room, chimney performance, ventilaion. As such, the best operation of your
stove will be learned through experience only.
Maintenance & Cleaning
Any maintenance of the stove should only be carried out when it is cold. Daily maintenance is limited to
vacuum cleaning the stove externally, or brushing down with a soft brush. Never use spirits to clean the
stove, as this will remove the paint. Regularly check the ue exit from the stove to make sure there is no
build up of deposits that will restrict the exit of the ue gasses.
Note: The stove must not be modied by an unauthorised person and any replacement parts should
be as recommended by the manufacturer.
Chimney sweeping
The chimney should be swept a minimum once a year. If the stove is used regularly then the chimney should
be swept more often. Your stove should be given a preventive inspection every time the chimney is swept to
check the door rope seal, door handle, re bricks and bafe and to remove any build up of soot and ashes.
Fire bricks
The re brick insulation of the combustion chamber may, in time, become worn and damaged. Cracks in
the insulation have no effect on the efciency of the stove. The insulation only needs to be replaced if it has
deteriorated to an extent that the insulation is no longer protecting the steel of the stove from ames.
Glass
If the glass is blackened with soot, it can easily be cleaned using one of the many specialist stove glass
cleaning products available from stove shops.
Surface
The high temperature paint nish normally requires no treatment. Any damage or wear to small areas of
the paint nish may be remedied using STOVEBRIGHT’s high temperature aerosol paint (colour ‘charcoal’,
available from stove shops and from Firebelly). Make sure the stove is cold and read the instructions on the
can carefully before applying the paint.
4

Installation
Building regulations
Installation of the Firebelly woodburning stove must comply with all local building regulations, including those
referring to national and European standards. It is a good idea to consult your local chimney sweep to check
the suitability of the chinmney and ensure there is adequate updraft and suggest any remedies to potential
chimney problems. Document J of the Building Regulations contains further information regarding the
installation of solid fuel appliances and can be viewed here : www.odpm.gov.uk
Ventilation
There must be a constant supply of fresh air to the room in which the stove is to be installed. Fixed
ventilation must be provided when installing any solid fuel stove which has an output higher than 5kW. For
each kilowatt above ve, 550 sq mm (2.56 sq ins) of ventilation is required. This stove has a maximum
output of 12kW and so there should be xed ventillation of a minimum 3850 sq mm. Any airbricks or grilles
tted for this purpose should be positioned so that they are not liable to blockage. If other appliances
requiring ventilation operate in the vicinity of the stove then there must be adequate ventilation to provide for
both appliances operating simultaneously.
NOTE Extractor fans when operating in the same room or space as the stove, may cause problems.
Load-bearing capacity of the oor
Before installing the stove, you must ensure that the load-bearing capacity of the oor can withstand the
weight of the stove and any ue pipe and connections. The weight of the stove is 100KG.
Hearth
The stove should always be installed on a non-combustible hearth. The hearth should extend to a distance
of 225mm in front of the stove and 150 mm to each side measured from the door of the combustion
chamber. See document J of the building regulations for more information on hearth requirements.
Clearances
The minimum distance to combustible materials should be 150mm to the sides of the stove. Adjacent walls
should be of suitable non-combustible construction, preferably brickwork. Make sure that there is a gap
between an uninsulated ue pipe and any combustible material. This gap must be at least 3 x the outside
diameter of the ue pipe (450mm for 6” single wall ue pipe), or 1.5 x the ue diameter (225mm for 5” single
wall ue pipe) to non combustible surface. A minimum clearance of 80mm around the sides the stove is
recommended to allow for air movement and heat from the stove to enter the room.
Chimney requirements
An existing chimney or a new ue or chimney installation should be given a visual inspection to check that
it is in good order, clear of obstructions and is of a suitable size and type for the stove. It may be necessary
to sweep the ue (which should always be done anyway before tting a stove or lining a chimney) and also,
if necessary, to do a smoke test to check for gas tightness and chimney draft. The chimney or ue must not
serve any other appliance.
For nominal heat ouput:
The minimum ue draught required is 12PA.
The ue gas mass ow will be 6.6g/s.
The ue gas temperature directly down of the socket will be approximately 262 deg C.
Air damper
It is recommended that chimneys with a strong updraft be tted with a ue pipe damper or draft stabiliser
so that the chimney draught can be regulated. It is not allowed that any damper close the pipe totally. There
must always be a free area of min. 20% of the total opening of the chimney or the pipe.
Flue connection
Position the stove and seal the ue connections with re cement or a high temperature rope seal. In a typical
installation you would need:
• A register plate. - This is the plate used to seal off the throat of the replace and has a hole
for the ue pipe, access for sweeping and, if required, a bracket to support the ue pipe.
• The 6” ue pipe needed to go from the stove to the register plate.
5

6
Operational problems
Blackened glass
• The wood is too damp. Only use wood stored for at least 12 months under cover and with a moisture level not
exceeding 20% RH.
• Insufcient intake of air from the top air control. Open the top air control further. The air shield system is more efcient
the more air is allowed to run over the glass panel.
• The stove is run at too low a temperature.
Smoke in the room when opening door
• Never open the door when there are high ames on the wood.
• Poor chimney performance - consult chimney sweep.
• Check the position of any tted ue damper or stabiliser and make sure it is in the open position.
Uncontrollable combustion
• Damaged door seal. Fit new seal.
• If there is an excessive chimney draft - t a draft stabiliser in the ue pipe - consult a chimney sweep.

Warranty
This stove has a two year guarantee covering any defects arising from faulty workmanship during normal use of the stove. The
guarantee does not cover parts deemed to be replaceable in the normal usage of the stove. These include:
Glass & Door rope seal & Fire Brick linings
Firebelly Stoves Ltd, Unit 16, Upper Mills, Slaithwaite, Hudderseld, West Yorkshire, HD7 5HA, UK
www.rebellystoves.com sales@rebellystoves.com
This manual suits for next models
1
Table of contents
Other Firebelly Wood Stove manuals
Popular Wood Stove manuals by other brands

SCAN
SCAN SCAN 68 Series Assembly and instruction manual

Rizzoli
Rizzoli M Series instructions

Traditions
Traditions T150C Installation and operation manual

HASE
HASE Asmara operating instructions

BuckMaster
BuckMaster 94NC Operation & installation manual

Drolet
Drolet DB03081 Installation and operation manual

Vermont Castings
Vermont Castings Dauntless FlexBurn Catalytic owner's manual

Morsø
Morsø 7800 installation guide

HASE
HASE COMO Instructions for use

HASE
HASE LIMA Instructions for use

Palazzetti
Palazzetti MBL TERMOPALEX 78 Instructions for use & maintenance

Enerzone
Enerzone EB00002 Installation and operation manual