Firebelly FB User manual

Lee Bridge Ind. Est., Halifax, HX3 5HE, UK
www.firebellystoves.com [email protected]
PRODUCT DATA
MODEL FB
WEIGHT 50KG
NOMINAL HEAT OUTPUT 4KWs
SERIEL NO. _________________________
CONTENTS
OPERATING INSTRUCTIONS
Lighting the fire 2
Firebox linings and baffle 2
Wood burning tips & theory 2
Running temperatures 3
Cleaning and Maintenance 3
INSTALLATION INSTRUCTIONS
Building regulations 4
Positioning and Clearances 4
Chimney 4
Flue connection 5
Problem solving 5
Wood chart 7

Operating Instructions
Building regulations
Installation of the Firebelly woodburning stove must comply with all local building regulations,
including those referring to national and European standards. It is a good idea to consult your local
chimney sweep to check the suitability of the chinmney and ensure there is adequate updraft and
suggest any remedies to potential chimney problems. Document J of the Building Regulations
contains further information regarding the installation of solid fuel appliances and can be viewed here
: www.odpm.gov.uk or follow the link on the Firebelly website.
Lighting the stove
When lighting the stove for the first time it should not be stoked excessively as all the materials must
be given time to adapt to the effects of heat. The paint will take some time to fully cure and during
this period some odours will be evident. It is recommended that doors or windows should be opened
the first time the stove is fired.
Before lighting check the firebricks and other internal components are in position figure 1 and that all
packaging has been removed.
Step 1 Open the top air control and bottom air control fully. figure 2
(to open the air controls move the sliders to the right. The air controls becomes hot in use and so the
supplied tool should always be used.)
Step 2 Place rolled up and scrunched up newspaper at the back of the stove. Put small tinder on
top of the newspaper and then a few slightly larger pieces of wood on top of this, light the newspaper
and close the door.
Step 3 Let the fire burn until all the pieces of wood are alight and burning. Then more and larger
pieces of wood/logs can be added.
Step 4 Once the fire is established the bottom air control can be closed so that all the air for the fire
comes via the top air control. The burning rate of the fire can now be controlled by adjusting the top
air control and by regulating the amount of wood added. The bottom air control should normally
remain closed once the stove is running. If the fire has been allowed to die too low then the bottom
air control can be opened to allow air to the base of the fire in an attempt to revive it.
Do not run the stove with the door open
Warning. The external surfaces of the stove become hot during operation. Use
the supplied tool to operate the air controls when the stove is running.
Tips
•The first stage of the fire, just after lighting, is usually the smokiest because the cold wood
and cold stove take heat away from the flames. During this stage, ensure both air inlets of
the stove are fully open to get a hot flame. It might appear that this initial hot burn lets too
much heat go up the chimney, but it is a necessary part of an efficient fire. The extra heat
“primes” the chimney to produce a strong draft, and helps keep the flue clean by loosening
creosote that might have been deposited by the previous fire. The hot initial burn also drives
moisture out of the firewood and gives an ignition source for the smoke that is released from
the wood.
•Make small changes. Do not try to add too much fuel at once, the fuel should not be stacked
higher than the top of the back fire brick. Adding fuel gradually will help maintain a steady
temerature and burning rate so that the stove burns efficiently and cleanly.Adding a large
amount of fuel all at once will dramatically reduce the temperature inside the stove. After
adding a large piece of wood/log it is a good idea to increase the top air opening slightly
more until the new fuel begins to burn and the stove returns to temperature.
•This also applies to the air controls.Adjusting them gradually will help maintain a steady
combustion rate.
•Do not run the stove with the top air control fully closed. The top air control supplies air for the
glass ‘air shield’ system. The further open the top air control the more effective the air shield
system.
•Use a piece of newspaper to wipe the inside of the window glass before lighting the stove
each time to prevent the gradual build up of deposits.
figure 1
2
fire bricks
figure 2
primary air
control. Slide
right to open.
secondary air
control. Slide right
to open.
tool for adjusting top
and bottom air
controls, and
opening door.

•Small, hot fires are more efficient than large slumbering fires. Most of the energy in
burning wood is released as a bright flame. The turbulence in the flames creates good
mixing between the combustion air and the gases that are released from the wood as it
heats up. The heat of the fire ignites and burns these gases. In contrast, the dense
smoke from a slow, smouldering fire is potential heat energy that escapes up the
chimney and either clings to the chimney flue as creosote or pollutes the outdoor air.
Therefore, to gain the most heat from each load of firewood, the wood should be flaming
throughout the burn cycle until it is reduced to ash.
•If you do a fair bit of slow woodburning, it is good practice to burn a good, hot stove at
regular intervals to keep your chimney dry and prevent the build up of tar.
•When refueling, place wood towards the back of the stove where it will burn hotter and
more efficiently. Try to place logs length ways so that any spitting from the end grain
does not go onto the glass window. The fuel should not be stacked higher than the top
of the back fire brick. Once the stove is hot and running steady, it should be possible to
maintain the nominal output by refuelling aproximately once an hour.
Notes on woodburning
Wood burns most efficiently when the air for combustion is supplied from above the fire bed
rather than below. The air supplied above the fire bed provides the oxygen necessary for the
volatile gases (smoke), given off by the wood as it heats, to combust. This ensures that the
gases are burnt and used to heat the appliance instead of being wasted up the chimney or
condensing and forming tarry deposits inside the stove, the flue pipe or on the door glass.
Running the stove with only the bottom air control open will provide oxygen for the wood to
burn on the fire base but will not provide air for the volatile gases above the fire bed to
combust, resulting in a smoky inefficient fire. With the above in mind the stove should be run
with the bottom air control closed and the top air control open.
Slow burning
To slow the burning rate and output from the stove reduce the air entering the stove via the air
controls. The fire must be well established and the stove hot before a minimum combustion
rate is atempted. Note that if the air supply is restricted too much the fire will burn dirty and
inefficiently. Slow overnight burning is not advised.
Ventillation
The stove requires an adequate air supply for successful operation (see Installation section of
these instructions for more details). Ensure that air bricks or grilles supplied for this purpose
are not blocked. Be aware that the operation of exhaust fans or other appliances that compete
for ventilation in the vecinity may affect the performance of the stove.OR WOOD
BURNING
Running temperature
To get the best results from your stove it is recommended that a wood stove thermometer be
fitted to the flue pipe just above the stove. Most thermometers are magnetic and if attached to
the single wall flue pipe just above your stove will give a good indication of the flue gas
temperatures.
150 °C - 300°C
The flue gases should be in this temperature band for the safest, most efficient and most
economical operation of your stove.
Below 150°C
This is below the condensation point of wood gases and may cause the build up of tar in the
chimney, dirty the stove glass and result in the inefficient burning of fuel.
Above 300 °C
Too hot. Heat will be wasted up the chimney. Excess heat may damage the stove or ignite an
existing accumulation of tar resulting in a chimney fire.
Over heating
If the stove is allowed to get too hot and is over heating, close both of the air controls fully
using the tool, keep the fire door closed and let the fire burn down.
Chimney Fire
In the event of a chimney fire dial 999 and ask for the Fire Service. Fully close the air controls
on the stove and keep the fire door shut. Move any combustibles away from the stove and the
3

chimney breast. Also check other rooms that the chimney passes through and move furniture and other
combustibles away from the chimney here too.
Before using the stove again after a chimney fire have the chimney cleaned and inspected by a
qualified person.
Cleaning the glass
We recommend wiping the glass after a fire to prevent the build up of deposits. This is best done using a
paper towel or a piece of newspaper.
Types of fuel
Wood needs to be well seasoned before it is burnt. Different woods take varying amounts of time to
season but, as a general guide, before being used in a stove, wood should be cut to length, split and then
stacked under cover (with the sides open to the air) for at least a year. Wood is ready for burning when
radial cracks appear in the end of the logs and the water content is no higher than 20%. It is then good
practice to have it in the log basket, inside the house, for a few days before it is actually used in the stove.
The internal width of the firebox is 350mm and so firewood should be no longer than this.
The table at the back of these instruction outlines the characteristics for different types of wood.
Do not burn unseasoned wood in your woodburner. Do not burn particle board, lacquered, painted or
treated wood, plastics, rubber or liquid fuels. The stove is not suitable for burning solid fuel ie. briquettes\
coal\coke\smokless fuel. The stove should not be used as an incinerator.
Ashes
The ashes should only be removed when the fire is out and has been left to cool completely. Wood burns
well in it’s own ash and so a thin layer of ash can be left in the bottom of the stove, this also helps to
protect the base fire bricks.
Note: The above notes on operating your stove should be taken as guidlines only. Each stove
installation is unique and the operation of each stove is subject to many variables including; the
fuel used, the size of the room, chimney performance, ventilaion. As such, the best operation of
your stove will be learned through experience only.
Maintenance & Cleaning
Any maintenance of the stove should only be carried out when it is cold. Daily maintenance is limited to
vacuum cleaning the stove externally, or brushing down with a soft brush. Never use spirits to clean the
stove, as this will remove the paint. Regularly check the flue exit from the stove to make sure there is no
build up of deposits that will restrict the exit of the flue gasses.
Note: The stove must not be modified by an unauthorised person and any
replacement parts should be as recommended by the manufacturer.
Chimney sweeping
The chimney should be swept a minimum once a year. If the stove is used regularly then the chimney
should be swept more often. Your stove should be given a preventive inspection every time the chimney
is swept to check the door rope seal, door handle, fire bricks and baffle and to remove any build up of
soot and ashes.
Fire bricks
The fire brick insulation of the combustion chamber may, in time, become worn and damaged. Cracks in
the insulation have no effect on the efficiency of the stove. The insulation only needs to be replaced if it
has deteriorated to an extent that the insulation is no longer protecting the steel of the stove from flames.
Glass
If the glass is blackened with soot, it can easily be cleaned using one of the many specialist stove glass
cleaning products available from stove shops.
Surface
The high temperature paint finish normally requires no treatment. Any damage or wear to small areas of
the paint finish may be remedied using STOVEBRIGHT’s high temperature aerosol paint (colour
‘charcoal’, available from stove shops and from Firebelly). Make sure the stove is cold and read the
instructions on the can carefully before applying the paint.
4

Installation
Building regulations
Installation of the Firebelly woodburning stove must comply with all local building regulations, including
those referring to national and European standards. It is a good idea to consult your local chimney sweep
to check the suitability of the chinmney and ensure there is adequate updraft and suggest any remedies to
potential chimney problems. Document J of the Building Regulations contains further information
regarding the installation of solid fuel appliances and can be viewed here : www.odpm.gov.uk or follow the
link on the Firebelly website.
Ventilation
Fixed ventilation is not required for this stove as it has an output of less than 5kW, but there must be
adequate supply of fresh air to the room in which the stove is to be installed.
NOTE Extractor fans when operating in the same room or space as the stove, may cause problems.
Load-bearing capacity of the floor
Before installing the stove, you must ensure that the load-bearing capacity of the floor can withstand the
weight of the stove and any flue pipe and connections. The weight of the stove is 50KG.
Hearth
The stove should always be installed on a non-combustible hearth. The hearth should extend to a distance
of 225mm in front of the stove and 150 mm to each side measured from the door of the combustion
chamber. See document J of the building regulations for more information on hearth requirements.
Clearances
The minimum distance to combustible materials should be 500mm at the back of the stove and 150mm to
the sides of the stove. Adjacent walls should be of suitable non-combustible construction, preferably
brickwork. Make sure that there is a gap between an uninsulated flue pipe and any combustible material.
This gap must be at least 3 x the outside diameter of the flue pipe (375mm for 5” single wall flue pipe), or
1.5 x the flue diameter (375mm for 5” single wall flue pipe) to non combustible surface. A minimum
clearance of 80mm around the sides and back of the stove is recommended to allow for air movement
and heat from the stove to enter the room.
Chimney requirements
An existing chimney or a new flue or chimney installation should be given a visual inspection to check that
it is in good order, clear of obstructions and is of a suitable size and type for the stove. It may be
necessary to sweep the flue (which should always be done anyway before fitting a stove or lining a
chimney) and also, if necessary, to do a smoke test to check for gas tightness and chimney draft. The
chimney or flue must not serve any other appliance.
Air damper
It is recommended that chimneys with a strong updraft be fitted with a flue pipe damper or draft stabiliser
so that the chimney draught can be regulated. It is not allowed that any damper close the pipe totally.
There must always be a free area of min. 20% of the total opening of the chimney or the pipe.
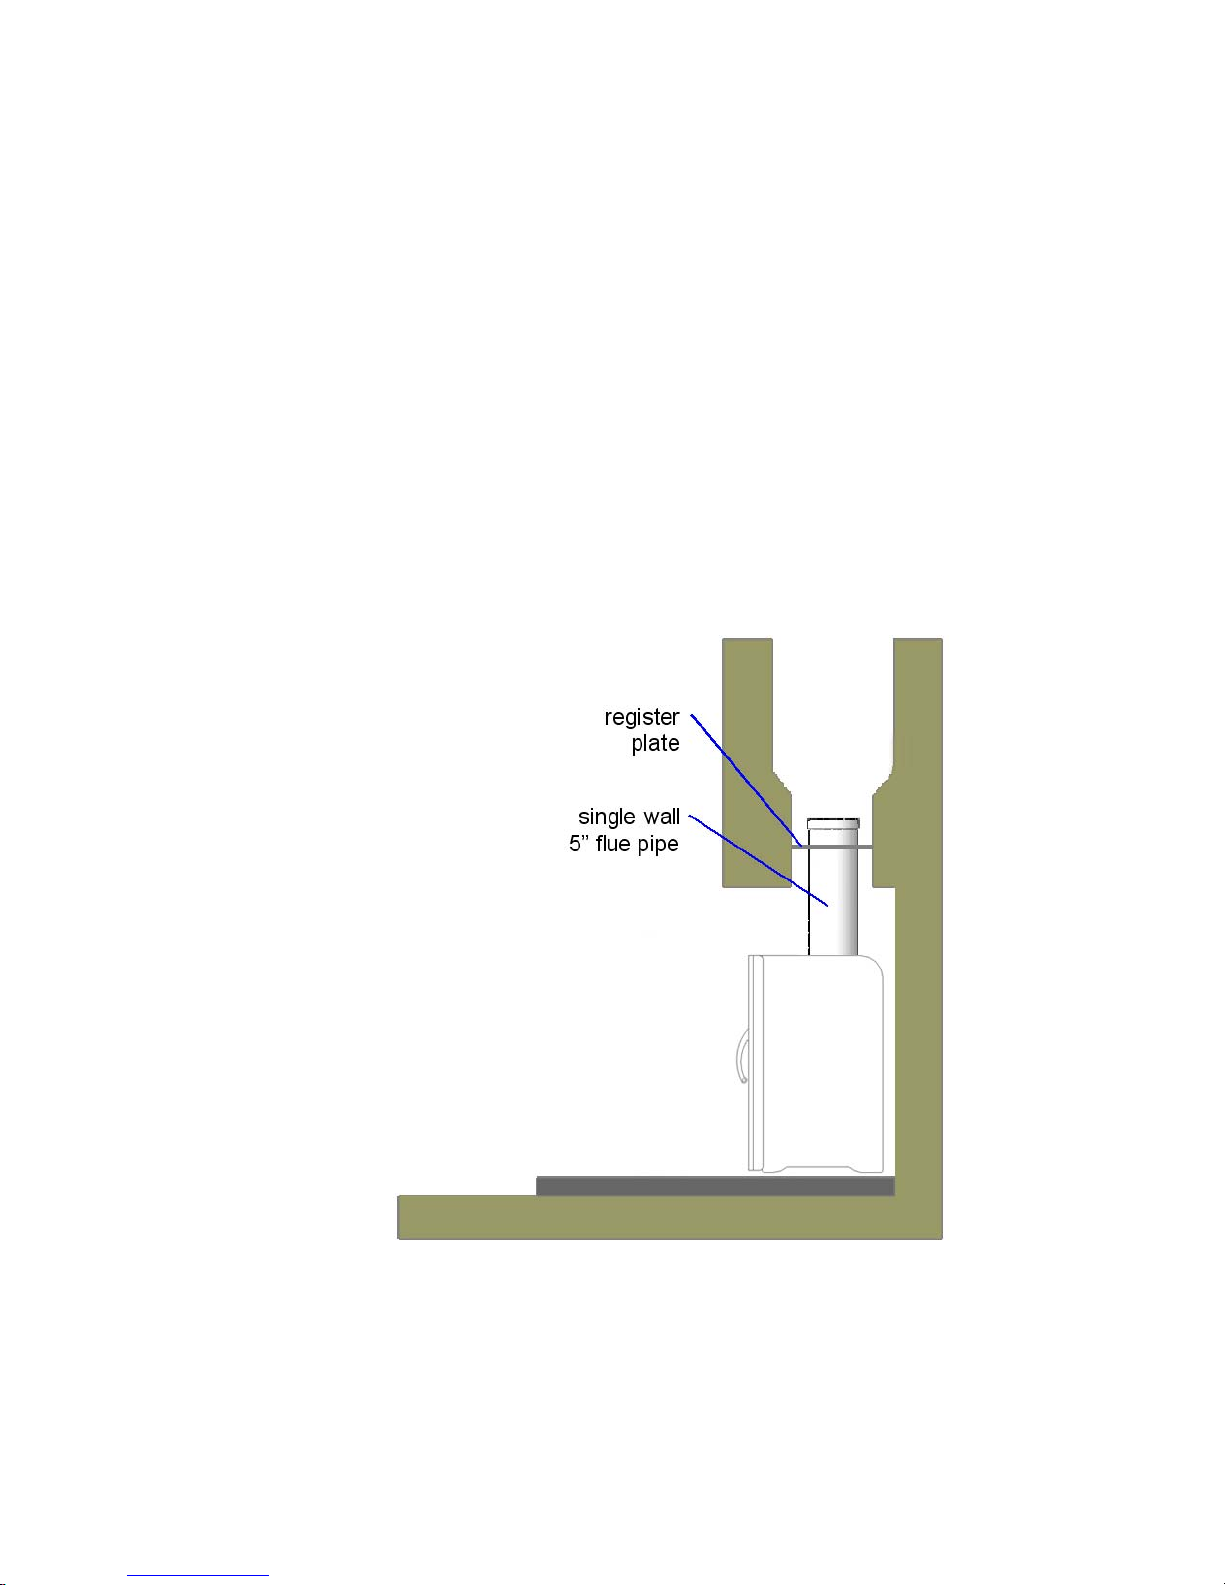
Flue connection
The stove has top flue connection only. Position the stove and seal the flue connections with fire cement or
a high temperature rope seal. Figure 3 shows a typical installation for which you would need:
•A register plate. - This is the plate used to seal off the throat of the fireplace and has a
hole for the flue pipe, access for sweeping and, if required, a bracket to support the flue
pipe.
•The 5” flue pipe needed to go from the stove to the register plate.
5
6
Operational problems
Blackened glass
•The wood is too damp. Only use wood stored for at least 12 months under cover and with a moisture level not
exceeding 20% RH.
•Insufficient intake of air from the top air control. Open the top air control further. The air shield system is more
efficient the more air is allowed to run over the glass panel.
•The stove is run at too low a temperature.
Smoke in the room when opening door
•Never open the door when there are high flames on the wood.
•Poor chimney performance - consult chimney sweep.
•Check the position of any fitted flue damper or stabiliser and make sure it is in the open position.
Uncontrollable combustion
•Damaged door seal. Fit new seal.
•If there is an excessive chimney draft - fit a draft stabiliser in the flue pipe - consult a chimney sweep.
Figure 3

Common Name Bot anic al Name Comments Grade
Alder Alnus A low quality firewood Grade: 1
Apple Malus Needs to be seasoned well. Burns well with a pleasant smell
and without sparking/spitting. Grade: 3
Ash Fraxinus low water content (approx. 50%) and can be split very easily
with an axe. It can be burned green but like all wood is best Grade: 4
Beech Fagus Beech has a high water content (approx. 90%) so only burns
well when seasoned well. Not as good as Oak. Grade: 3
Birch Betula Birch is an excellent firewood and will burn unseasoned.
However, it does burn very fast so is best mixed with slower Grade: 3-4
Cedar Cedrus
gp
off a good, lasting heat. Doesn't spit too much and small
pieces can be burned unseasoned Grade: 2
Cherry Prunus Needs to be seasoned well. Burns well with a pleasant smell
and without spitting. Grade: 2-3
Elm Ulmus
A good firewood but due to its high water content of
approximately 140% (more water than wood!) it must be
seasoned very well. It may need assistance from another
faster burning wood such as Birch to keep it burning well.
However it gives off a good, lasting heat and burns very
slowly. Dutch Elm Disease is producing a constant & plentiful
supply of small dead hedgerow Elm trees of a small diameter.
Larger pieces of wood will prove difficult to split. Grade: 2-3
Eucalyptus Eucalyptus
Allow to season well since the wood is very wet (sappy) when
fresh. Can be difficult to split due to stringy wood fibre. Best
method is to slice into rings and allow to season during the
summer, the rin
g
s will start to s
p
lit themselves. Burns fast with
a pleasant smell and without spitting. Grade: 2-3
Hawthorn Crataegus Good firewood. Burns well Grade: 3-4
Hazel Corylus Excellent firewood. Allow to season. Burns fast but without
spitting Grade: 4
Holly Ilex Can be burnt green. A good firewood Grade: 3
Hornbeam Carpinus Good firewood. Burns well Grade: 3
Horse Chestnut Aesculus A low quality firewood Grade: 2
Larch Larix Needs to be seasoned well. S
p
its excessivel
y
while it burns and
forms an oily soot within chimney's. Grade: 1
Lime Tilia A low quality firewood Grade: 2
Oak Quercus One of the best firewood's. When seasoned well, it gives off a
good, lasting heat. Burns reasonably slowly. Grade: 4
Pear Pyrus Needs to be seasoned well. Burns well with a pleasant smell
and without spitting. Grade: 3
Pine Pinus Needs to be seasoned well. Spits while it burns and forms an
oily soot within chimney's. Grade: 1
Plane Platanus A usable firewood Grade: 3
Poplar Populus Considered a poorer firewood (see comments below) Grade: 1
Rowan
Sorbus
aucuparia Good firewood. Burns well Grade: 3
Spruce Picea A low quality firewood Grade: 2

Warranty
This stove has a two year guarantee covering any defects arising from faulty workmanship
during normal use of the stove. The guarantee does not cover parts deemed to be replaceable in
the normal usage of the stove. These include:
Glass & Door rope seal & Fire Brick linings
Lee Bridge Ind. Est., Halifax, HX3 5HE, UK
www.firebellystoves.com [email protected]
Table of contents
Other Firebelly Wood Stove manuals


Popular Wood Stove manuals by other brands


RAIS
RAIS attika NEXO 100 GAS installation guide

WoodPro
WoodPro WS-TS-1500 owner's manual

Contura
Contura C 586W installation instructions

Palazzetti
Palazzetti EVA GENERAL INFORMATION - WARNINGS - INSTALLATION - MAINTENANCE

Lopi
Lopi 1250 Republic owner's manual

Panadero
Panadero CAPRI 3V Usage and maintenance instructions