FIREGAS FGS-ESH04S60AC User manual

FGS-ESH04S60AC
21
Introduction
Thank you for choosing this cooker hood.
This instruction manual is designed to provide you with all required
instructions related to the installation, use and maintenance of the
appliance.
In order to operate the unit correctly and safely, please read this
instruction manual carefully before installation and usage.
Accessible parts may become hot when used with cooking appliance.
CAUTION:
Never let the children operate the machine.
Clean the cooker hood according to the instruction manual and keep the
unit from danger of burning. There is a fire risk if cleaning is not carried
out in accordance with the instructions.
Please keep the kitchen room with good ventilation before connecting
this appliance; please check that the power supply cord is undamaged.
A damaged supply cord must be replaced by qualified service personnel
only.
Regulations concerning the discharge of air have to be fulfilled.
This appliance can be used by children aged from 8 years and above
also the persons with reduced physical, sensory or mental capabilities
or lack of experience and knowledge if they have been given supervision
or instruction concerning use of the appliance in a safe way and
understand the hazards involved. Children shall not play with the
appliance. Cleaning and user maintenance shall not be made by
children without supervision.
The cooker hood is for home use only, not suitable for barbecue,
roast shop and other commercial purpose.
If the supply cord is damaged, it must be replaced by the manufacturer,
its service agent or similarly qualified persons in order to avoid a hazard.
Electrical Shock Hazard
Only plug this unit into a properly earthed outlet.
If you have doubts, seek advice from a suitably qualified engineer.
Safety Precaution
CONTENT
................................................ ........ 2
................................... 2
...........
...................................................
...........................................................
........................................................... 5
............................. 5-6
...........................................................
Installation .........
.............. 6
...........................................................
Operation
....................................................
Introduction
Safety Precaution
Air Outlet Installation Method
................ 3-4
Installation Instructions
....
.................................................................... 3
.
.
.
.
.
.
.
.
.
.
.
.
.
.
.
.
.
.
.
.
.
.
.
.
.
.
.
.
7-8
8
.
.
.
.
.
.
.
.
.
.
.
.
.
.
.
.
.
.
.
.
.
.
.
.
.
.
.
.
.
.
.
.
.
.
.
.
.
.
.
.
.
.
.
.
.
.
.
.
.
.
.
.
.
.
.
.
.
.
.
.
.
.
.
.
.
.
.
.
.
.
.
.
.
.
.
.
.
.
.
.
.
.
.
.
.
.
.
.
.
.
.
.
.
.
.
.
.
.
.
.
.
.
.
.
.
.
.
.
.
.
.
.
.
.
.
.
.
.
Maintenance
Trouble-Shooting .............. 9
...........................................................
Environmental Protection
...........
............
...................
...........
......................
.................................................
..........................................
.................................
.................
Parts Diagram
........................................
.............. ............................................................................. 9
Specification
..................
......
..
....
....
...
.
..

St4×30
×8
φ5×φ8
×8
43
Parts Diagram
Charcoal Filters
Parts Supplied
Measuring tape
Screwdriver
Pencil Hammer
Electric drill Level Duct Tape
ToolsRequired
2. Core Unit
Dampers
1.Air Outlet
Prepare for installation:
DUCTED OPTION RECIRCULATION OPTION
If you have an outlet to the outside, your cooker hood can be connected
as above picture by means of a pipe (with an interior diameter of 150mm).
If you don’t have an outlet to the outside, you can go with recirculation
mode by using carbon filter.
Installation Instructions
Installation Requirements
Note No open flames directly approach to the range hood.
The cooker hood should be placed at a distance of 600~700mm
above the cooktop for the best effect.
600-700mm
Before installation, turn the unit off
and unplug it from the outlet.

65
Air Outlet Installation Method
Installation
Installation method for 150mm
diameter pipe: insert the one-way
-valve as the pic and fix the pipe.
Attention: The bump of the one-
way-valve must be upward.
Two ways for installation(A&B)
Way A:
To install onto the wall drill 2 holes
of Ø8mm on a suitable place according
with the centre distance of hole in the
back of the cooker hood.
Fix the cooker hood with safety
screw.
The two safety vents are positioned
on the back casing, with diameter
of 6mm.
Put the one way valve onto the
cooker hood.
Insert the nut into the holes.
Insert the screws into the nuts
and tight.
Put the cooker hood onto the
tighten screws.
1.The extensible pipe are optional accessory, not supplied.
2.Take off protection film before installation.
3.There are 2 methods for ventilation, including horizontal
ventilation and vertical ventilation. Please pay attention to the
ventilation method when installation.
Note
4.Insert the plastic wall anchors into
each holes and tighten ST4x30 screws
into the plastic wall anchors.
1.Stick the installation paper on the
bottom of cabinet.
2.Drill 4 holes according to the paper
showed.(If you need top vent, cut a
square hole according to the paper
showed.)
3.Remove the installation diagram
after drillingthe holes.
Please remove the white/blue
protective film on the range
hood.
BEFORE USE
CAUTION:
Operation
Mechanical Rocker Button
It just appear in TELESCOPIC MODEL.
Light button
On the left side of hood. Speed button
On the right side of hood.
“ ”: high speed level.
“ ”: Low speed level.
“O”: Off

87
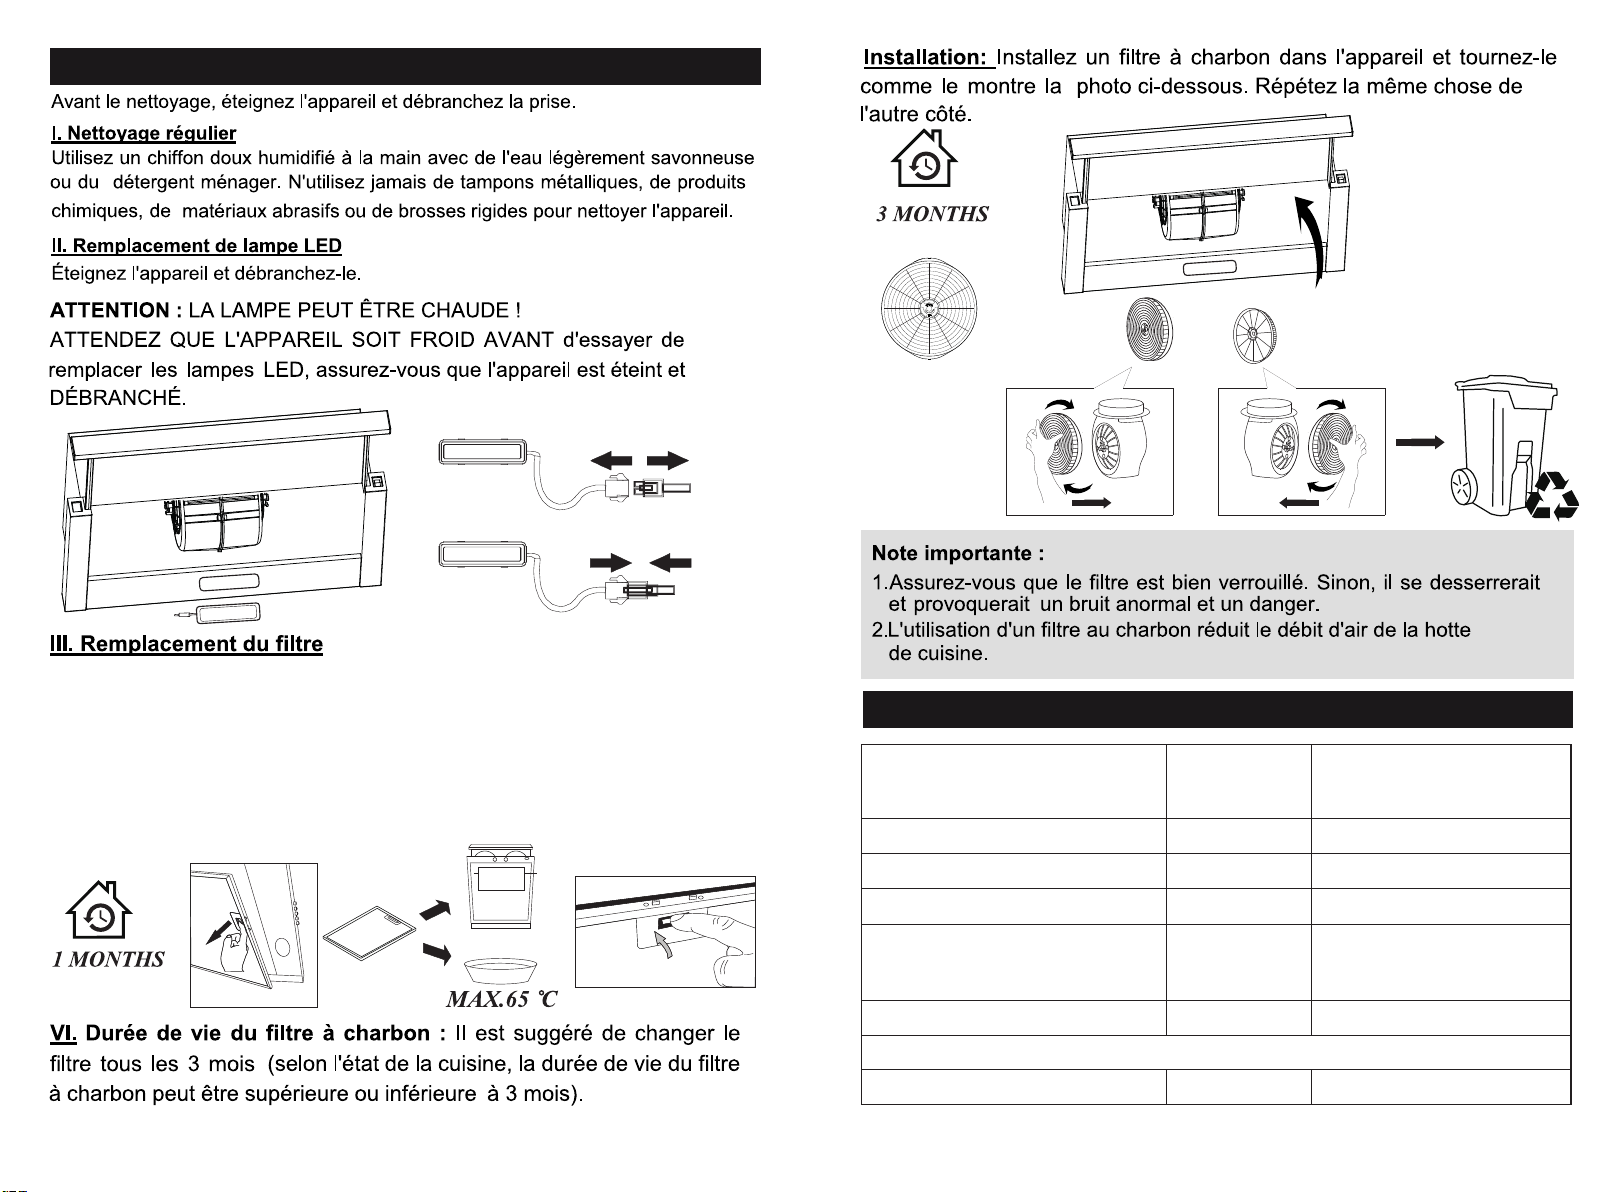
CAUTION: LAMP UNIT MAY BE HOT!
WAIT UNTIL THE UNIT IS COOL. BEFORE attempting to replace
the LED lamps make sure the unit is powered off and UNPLUGGED.
II. LED Light Replacement
Switch the unit off and unplug the appliance.
Maintenance
I. Regular Cleaning
Use a soft cloth moistened with hand-warm mildly soapy water
or household cleaning detergent. Never use metal pads, chemical,
abrasive material or stiff brush to clean the unit.
Before cleaning switch the unit off and pull out the plug.
III. Filter replacement
Clean the filters once a month by hand or in a dishwasher (30 °C).
Do not use anyacrid or corrosive detergents. Do not use any abrasive
detergents! Do not use anyalkaline dishwasher-detergents!
(pH more than 7). Do not put the filter in thedishwasher together with
tableware. Filters which are blocked with food debris do not carry a
guarantee. Dry the filters properly before you reinstall them.
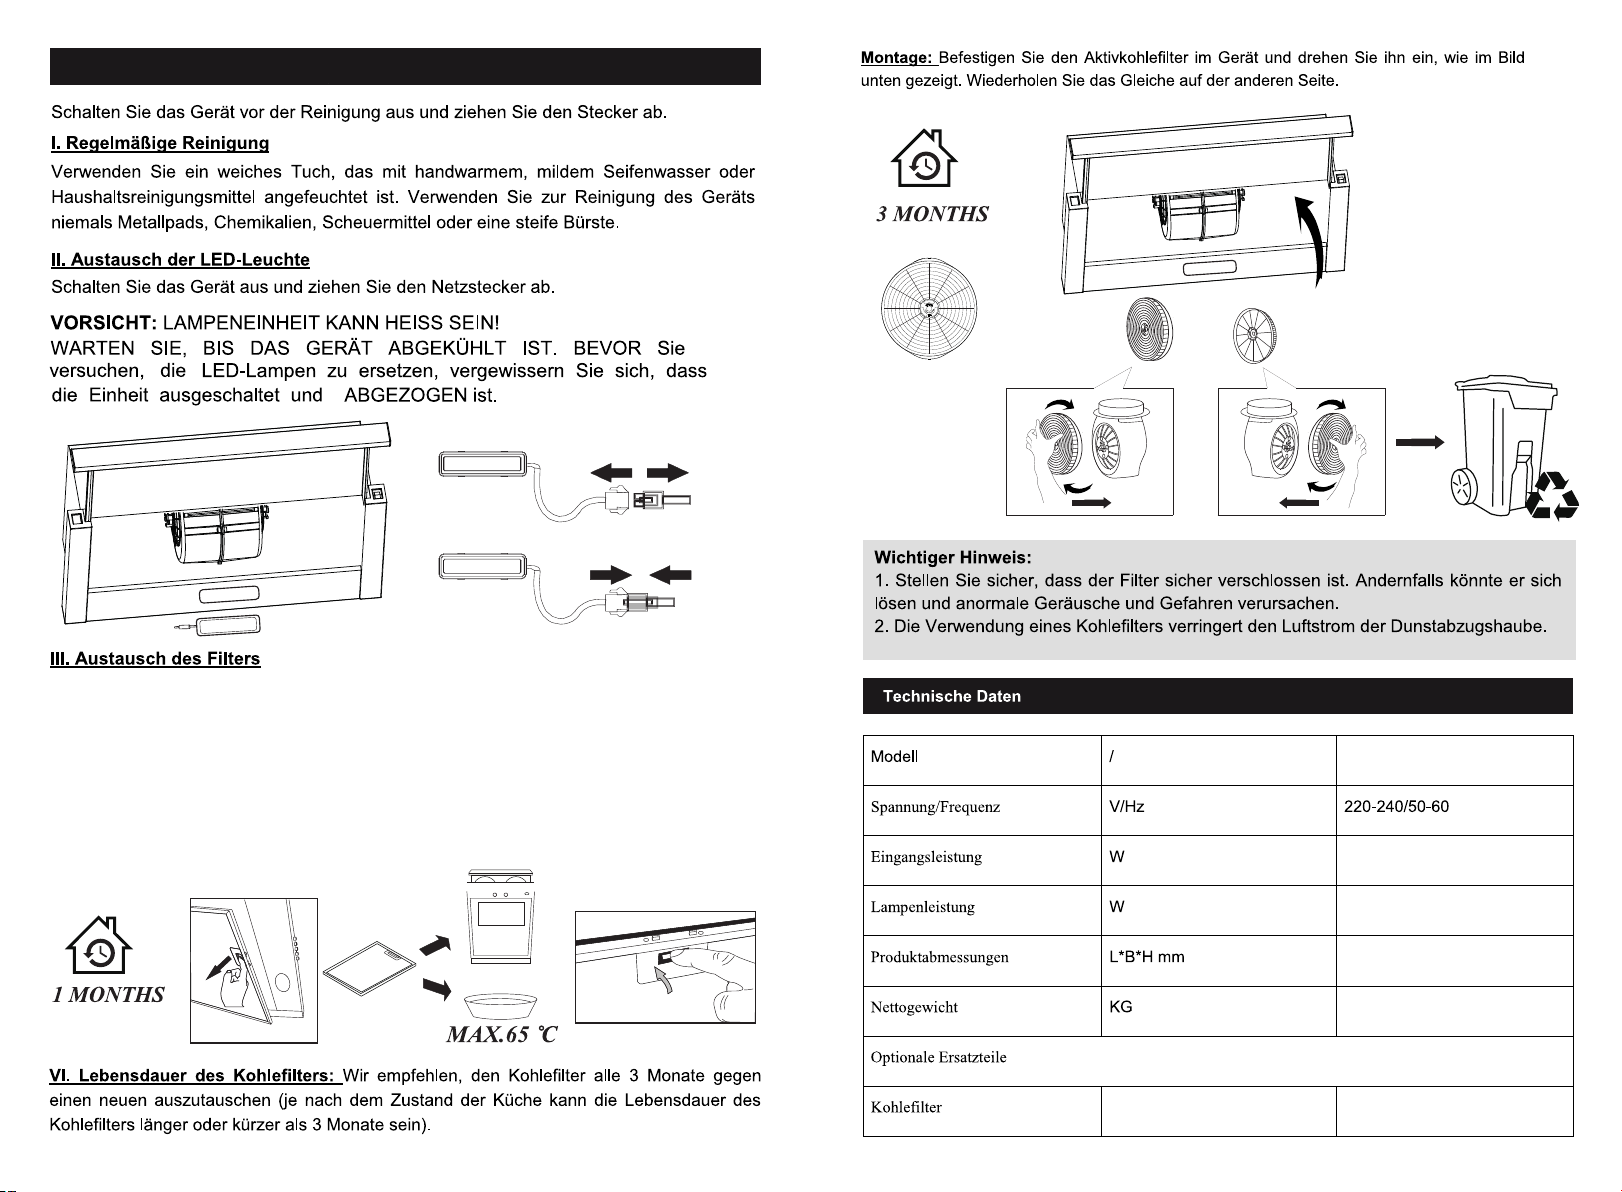
VI.Charcoal filter life time: Suggest changing to new one every 3
months (According to different kitchen condition, the life time of
charcoal filter might be longer or shorter than 3 months).
Installation: Fix carbon filter into the unit and turn it in as below
picture shows. Repeat the same on the other side.
Important Notice:
1.Make sure the filter is securely locked. Otherwise, it would loosen
and cause abnormal noise and danger.
2.Using charcoal filter would reduce the air flow of the range hood.
Specification
Model
Voltage/Frequency
Rated Input Power
Lamp Power
Product Dimension
N.W
Spares Option
Carbon Filter
Aluminum Filter
/
V/Hz
W
L*W*H mm
kg
W
FGS-ESH04S60AC
220-240/50-60
67
2
595*225*300
6.0 KG
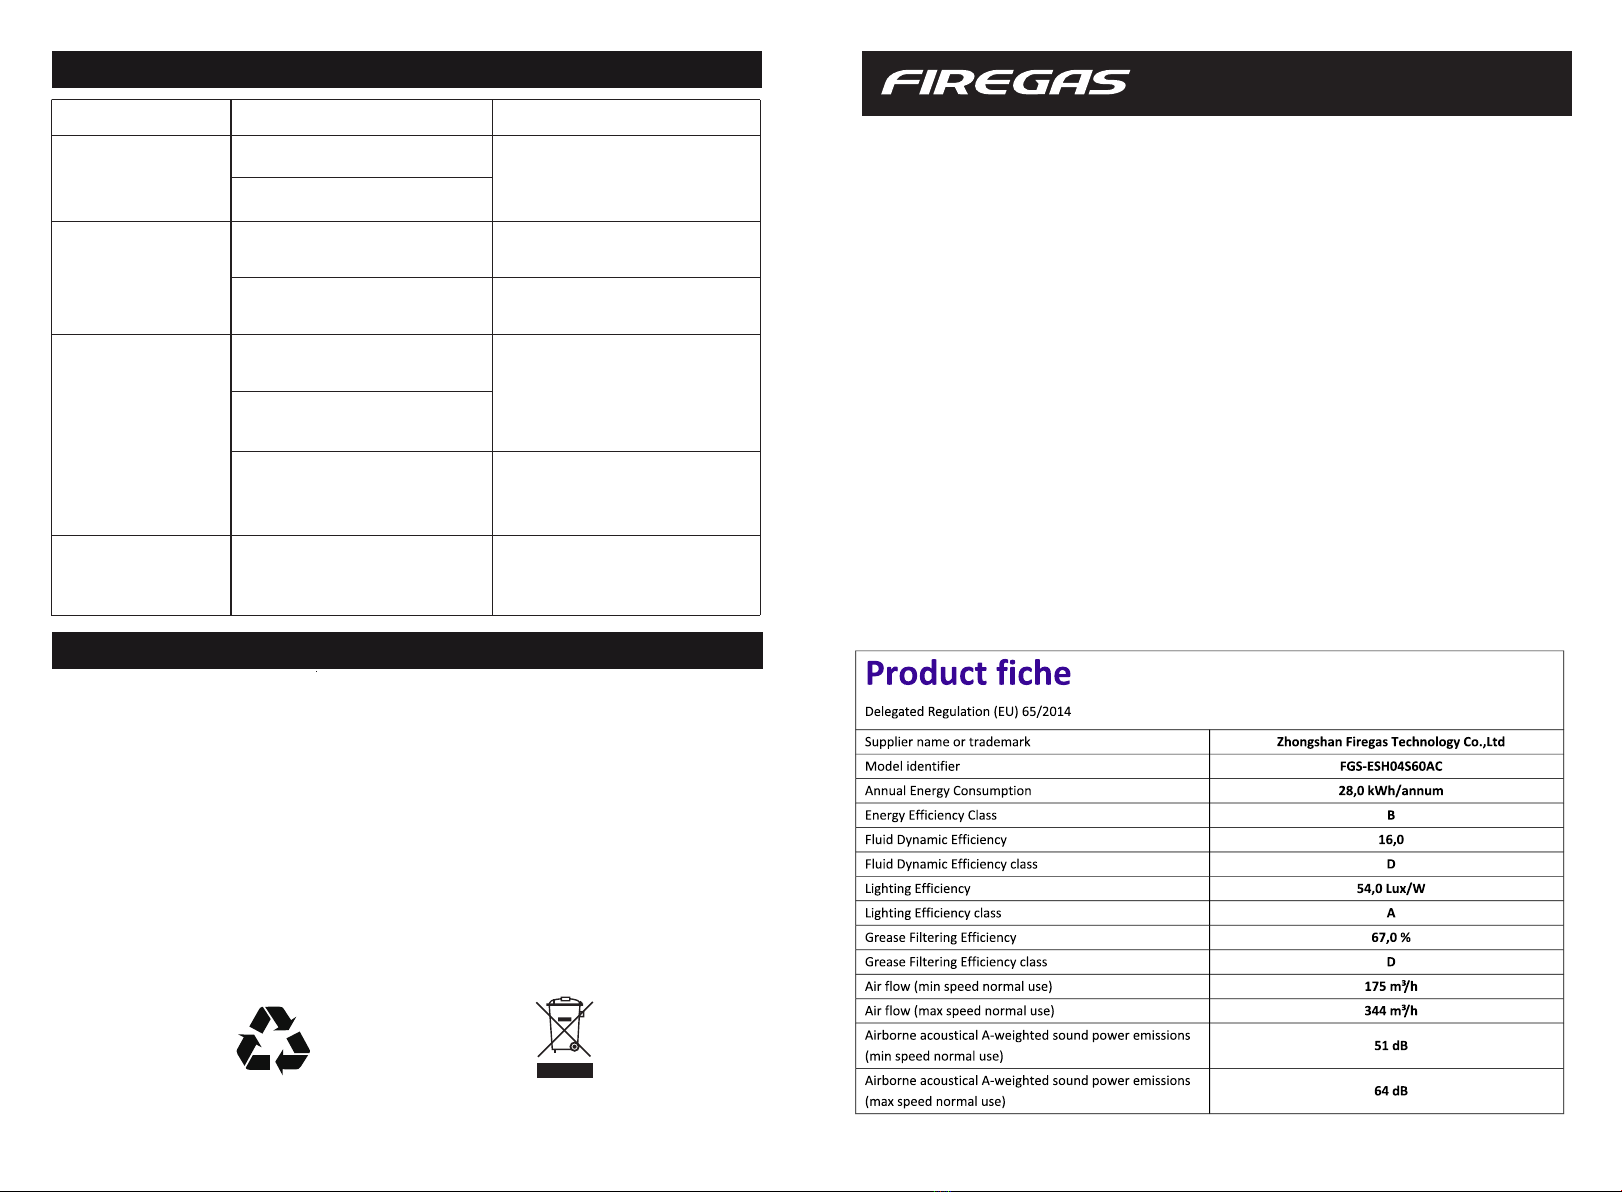
9
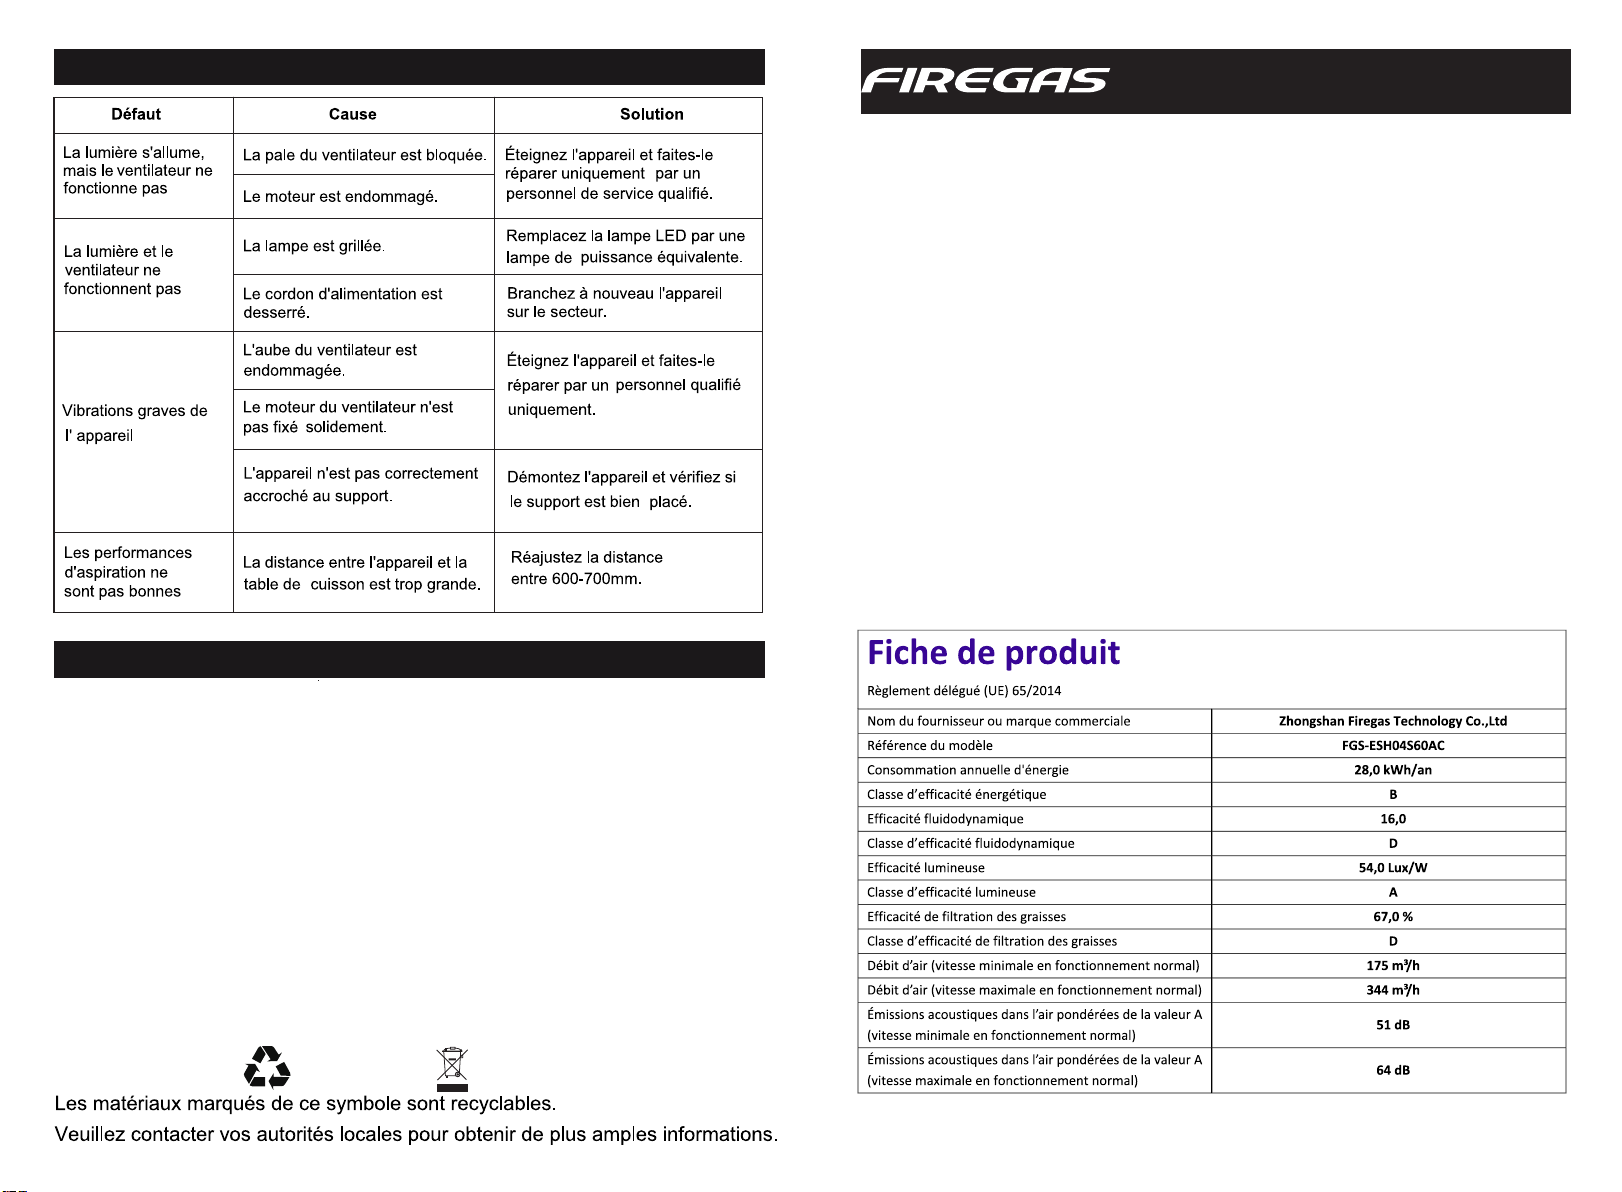
Fault Cause Solution
The fan blade is jammed.
The motor is damaged.
Light is burnt out.
Power cord is loose.
Light on,but fan
does not work
Both light and fan
do not work
Serious Vibration
of the unit
Suction
performance not
good
Too far distance
between the unit
and the cooktop.
The unit is not hung
properly on the bracket.
The fan motor is not
fixed tightly.
The fan blade is
damaged.
Switch off the unit and
repair by qualified
service personnel only.
Replace the LED light
with correct rating.
Plug into the power
supply again.
Switch off the unit and
repair by qualified
service personnel only.
Take down the unit and
check whether the bracket
is in proper location.
Readjust the distance
between 600-700mm.
Trouble-Shooting
Environmental Protection
1. While unpacking, the packaging materials (polythene bags, polystyrene
pieces,etc.) should be kept away from children. CHOKING HAZARD!
2. Old and unused appliances must be sent for disposal to the responsible
recyclingcentre. Never expose to open flames.
3. Before you dispose of an old appliance, render it inoperative. Unplug
the appliance and cut off the entire power cord. Dispose of the power
cord and the plug immediately,
4. Dispose of any paper and cardboard into the corresponding containers.
5. Dispose of any plastics into the corresponding containers.
6. If suitable containers are not available at your residential area, dispose
of these materials at a suitable municipal collection point for
waste-recycling.
7. Receive more detailed information from your retailer or your municipal
facilities.
Materials marked with this symbol are recyclable.
Please contact your local authorities toreceive further information.
Statement
Thank you for purchasing this product. FIREGAS is committed to providing
our customers with professional quality kitchen ventilation. FIREGAS cannot
assume responsibility for any consequences resulting from the use thereof.
Note
This document is designed to act as a quick reference guide for common
scenarios and questions when installing a FIREGAS Range Hood. for more
instructions and details please refer to Installation Guide from www.
firegas kitchen.com
Website: www.firegaskitchen.com Email: support01@firegaskitchen.com
Tech Support
Warranty
For full warranty details on this product please visit: www.firegaskitchen.com
Support > Warranty Registration
10

FGS-ESH04S60AC
INHALT Vorstellung
SICHERHEITSHINWEISE
21
2
2
5
5-6
6
3-4
3
7-8
8
9
9

St4×30
×8
φ5×φ8
×8
Parts Diagram
Parts Supplied
ToolsRequired 600-700mm
Montageanweisungen
Hinweis
3 4

Rocker Switch
Hinweis
150
Montagemethode des Luftauslasses
Betrieb
5 6
FGS-ESH04S60AC
Wartung
Reinigen Sie die Filter einmal im Monat von Hand oder in der
Spülmaschine (30 °C).
Verwenden Sie keine scharfen oder ätzenden Reinigungsmittel.
Verwenden Sie keine scheuernden Reinigungsmittel!
Verwenden Sie keine alkalischen Spülmaschinen-Reinigungsmittel!
(pH-Wert über 7). Den Filter nicht zusammen mit Geschirr in der
Spülmaschine waschen. Für Filter, die mit Lebensmittelresten
verstopft sind, wird keine Garantie übernommen. Trocknen Sie die
Filter richtig ab, bevor Sie sie wiedereinsetzen. 67
2
595*225*300
6.0 KG
7 8

Stellungnahme
Vielen Dank für den Kauf dieses Produkts. FIREGAS ist bestrebt, unseren
Kunden eine professionelle Küchenlüftung in professioneller Qualität zu
bieten. FIREGAS kann keine Verantwortung für Folgen übernehmen,
die sich aus deren Verwendung ergeben.
Notiz
Dieses Dokument dient als Kurzanleitung für allgemeine Szenarien und
Fragen bei der Installation einer FIREGAS-Dunstabzugshaube.
Weitere Anweisungen und Details finden Sie in der Installationsanleitung
von www.firegaskitchen.com
Technischer Support
Website: www.firegaskitchen.com E-Mail: support01@firegaskitchen.com
Garantie
Für vollständige Garantiedetails zu diesem Produkt besuchen Sie bitte:
www.firegaskitchen.com Support > Garantieregistrierung
9
FGS-ESH04S60AC

TABLE DES MATIÈRES
21
Introduction
PRÉCAUTIONS DE SÉCURITÉ
2
2
5
5-6
6
3-4
3
7-8
8
9
9

St4×30
×8
φ5×φ8
×8
600-700mm
Schéma des pièces
Instructions d’installation
ToolsRequired
43

5
Méthode d'installation de la sortie d'air
Installation
Fonctionnement
Rocker Switch
65
Nettoyez les filtres une fois par mois à la main ou dans un
lave-vaisselle (30 °C). N'utilisez pas de détergents acrides ou corrosifs.
N'utilisez pas de détergents abrasifs ! N'utilisez pas de détergents alcalins
pour lave-vaisselle ! (pH supérieur à 7). Ne mettez pas le filtre dans le
lave-vaisselle avec la vaisselle. Les filtres qui sont bloqués par des débris
alimentaires ne sont pas garantis. Faites sécher correctement les filtres
avant de les réinstaller.
87
FGS-ESH04S60AC
220-240/50-60
67
2
595*225*300
6.0 KG
Entretien
Modèle
Tension/fréquence
Puissance d'entrée nominale
Puissance de la lampe
Dimensions du produit
Poids net
Option de rechange
Filtre à charbon
/
V/Hz
W
L*W*H mm
kg
W
Spécifications
Dépannage
Protection de l'environnement
1. Lors du déballage, les matériaux d'emballage (sacs en polyéthylène,
pièces en polystyrène, etc.) doivent être tenus hors de portée des enfants.
RISQUE D'ÉTOUFFEMENT !
2. Les appareils anciens et inutilisés doivent être envoyés pour
élimination au centre de recyclage responsable. Ne jamais exposer à
des flammes nues.
3. Avant de vous débarrasser d'un vieil appareil, mettez-le hors service.
Débranchez l'appareil et coupez tout le cordon d'alimentation. Jetez le
cordon d'alimentation et la prise immédiatement,
4. Jetez le papier et le carton dans les conteneurs correspondants.
5. Jetez tout plastique dans les conteneurs correspondants.
6. S'il n'y a pas de conteneurs appropriés dans votre zone résidentielle,
jetez ces matériaux dans un point de collecte municipal approprié pour
le recyclage des déchets.
7. Vous pouvez obtenir des informations plus détaillées auprès de votre
détaillant ou de vos installations municipales.
Déclaration
Merci d'avoir acheté ce produit. FIREGAS s'engage à fournir à ses clients
une ventilation de cuisine de qualité professionnelle. FIREGAS ne peut
assumer la responsabilité des conséquences résultant de son utilisation.
Noter
Ce document est conçu pour servir de guide de référence rapide pour les
scénarios et les questions courants lors de l'installation d'une hotte de
cuisinière FIREGAS. pour plus d'instructions et de détails, veuillez vous
référer au guide d'installation sur www.firegaskitchen.com
Support technique
Site Web : www.firegaskitchen.com Courriel : support01@firegaskitchen.com
garantie
Pour plus de détails sur la garantie de ce produit, veuillez visiter :
www.firegaskitchen.com Support > Enregistrement de la garantie
9
FGS-ESH04S60AC

1 2
2
2
5
5-6
6
3-4
3
7-8
8
9
9
Table of contents
Other FIREGAS Ventilation Hood manuals


