FireWare Nebula User manual

www.FireWare.nl
FireWare Nebula
Gebruiksaanwijzing
User Manual
Gebrauchsanweisung
Mode d’emploi utilisateurs
Modo de empleo
FireWare Nebula
Nebula
elektronisch blindmasker
Mini: 025-021-003
Maxi: 025-021-004

www.FireWare.nl
FireWare Nebula
2FireWare Nebula
Nederlands 4
1. Introductie 4
2. Veiligheidsmaatregelen en waarschuwingen 4
3. Onderdelenoverzicht en technische gegevens 5
4. Ingebruikname 6
5. Uitschakelen 10
6. Storingen 11
7. Nazorg 11
8. Afvalverwijdering 11
9. Garantiebepalingen 11
10. Conformiteitsverklaring 12
11. Contact 12
English 13
1. Introduction 13
2. Safety measures and warnings 13
3. Overview of the parts and technical information 14
4. Use 15
5. Switching o 19
6. Malfunctions 19
7. Aftercare 20
8. Waste disposal 20
9. Warranty provisions 20
10. Declaration of Conformity 21
11. Contact 21
Deutsch 22
1. Einleitung 22
2. Sicherheitsmaßnahmen und Warnungen 22
3. Komponentenübersicht und technische Daten 23
4. Ingebrauchnahme 24
5. Ausschalten 28
6. Störungen 28
7. Nachsorge 29
8. Abfallbeseitigung 29
9. Garantiebedingungen 30
10. Konformitätserklärung 30
11. Kontakt
Français 31
1. Introduction 31
2. Mesures de sécurité et avertissements 31
3. Liste des pièces et données techniques 32
4. Usage 33
5. Éteindre 37
6. Pannes 37
7. Entretien 38
8. Élimination des déchets 38
9. Garantie 38
10. Déclaration de conformité 39
11. contact 39
Inhoud | Content | Inhalt | Contenu | Contenido

www.FireWare.nl 3
FireWare Nebula
FireWare Nebula
español 40
1. Introducción 40
2. Medidas de seguridad y advertencias 40
3. Vista general de las piezas e información técnica 41
4. (Primero) Uso 42
5. Apagando el set 46
6. Defects and failures 46
7. Instrucciones especiales para el almacenamiento 47
8. Eliminación 47
9. Disposiciones de garantía 47
10. Declaración de conformidad 48
11. Contacto 48

www.FireWare.nlFireWare Nebula
NL Gebruiksaanwijzing
FireWare Nebula
4
1. Introductie
2. Veiligheidsmaatregelen en waarschuwingen
!
MANUAL
Gefeliciteerd met de aankoop van uw FireWare Nebula elektronisch
blindmasker!
Het FireWare Nebula elektronisch blindmasker is ontwikkeld om rook te kunnen
simuleren op plaatsen waar oefenrook niet wenselijk is. Het apparaat is ontwikkeld
voor opleidingsdoeleinden en dient dan ook als zodanig te worden gebruikt.
Vóór gebruik dient u deze handleiding grondig door te nemen, zodat u geheel op
de hoogte bent van de toepassing, de werking en de kenmerken van het FireWare
Nebula elektronisch blindmasker.
Lees deze instructies zorgvuldig door. Volg bij het gebruik nauwkeurig de instructies en richt-
lijnen zoals deze omschreven zijn in deze handleiding. Wanneer er vragen of onduidelijkheden
zijn omtrent het gebruik van het FireWare Nebula elektronisch blindmasker, neem dan
contact op met FireWare. Wij helpen u graag.
Het apparaat dient alleen gebruikt te worden door volwassen personen die de gebruikshan-
dleiding hebben gelezen en begrepen, of van de inhoud daarvan op de hoogte zijn gesteld
door een instructeur. Het FireWare Nebula elektronisch blindmasker mag alleen door geoe-
fende personen in een professionele oefensituatie worden gebruikt.
LET OP: dit apparaat is NIET geschikt voor gebruik door kinderen.
LET OP: dit apparaat mag NIET in de buurt van water gebruikt worden.
LET OP: dit apparaat UITSLUITEND drogen met een droge doek.
Gebruik UITSLUITEND onderdelen/accessoires als aangegeven door de fabrikant.
LET OP: de geblindeerde cursist dient goed gemonitord te worden. Vermijd of attendeer de
geblindeerde persoon op onveilige situaties (trapgat) op een verdieping en vermijd onnodige
obstakels.
LET OP: wanneer het blindmasker (onbedoeld) buiten het bereik van de afstandsbediening
geraakt, verandert de stand van het masker naar vol zicht. Wees erop bedacht dat het mask-
er, eenmaal terug in het bereik van de afstandsbediening, terugspringt naar de laatst gekozen
stand op de afstandsbediening. De instructeur heeft hier geen controle over! De paniekknop
werkt dan wel op het blindmasker.

www.FireWare.nl FireWare Nebula
NL Gebruiksaanwijzing
FireWare Nebula
5
Batterij / accu
LET OP: de batterij kan NIET door de gebruiker vervangen worden.
WAARSCHUWING: de batterij kan exploderen bij verkeerd gebruik. Het apparaat NIET
demonteren of verbranden.
WAARSCHUWING: gebruik UITSLUITEND een USB-compatibele poort voor het opladen van
het apparaat! Het niet volgen van deze instructies kan resulteren in schade aan het blind-
masker of ernstig (oog)letsel.
3. Onderdelenoverzicht en technische gegevens
Het FireWare Nebula elektronisch blindmasker bestaat uit de volgende opties en onderdelen:
Maxiset
• 1 instructeursunit (Afstandsbediening, AB)
• 4 Nebula elektronische blindmaskers
• 1 oplaadhub met 5 laadkabels (USB naar micro-USB)
• 1 gebruiksaanwijzing
• 1 FireWare kunststof kist met schuiminterieur
Miniset
• 1 instructeursunit (Afstandsbediening, AB)
• 2 Nebula elektronische blindmaskers
• 1 oplaadhub met 3 laadkabels, (USB naar micro-USB)
• 1 gebruiksaanwijzing
• 1 FireWare kunststof kist met schuiminterieur, met twee extra uitsparingen voor een
eventuele uitbreiding naar Maxiset
Uitbreidingsset
• 2 Nebula elektronische blindmaskers
• 2 USB-laadkabels
Specicaties afstandsbediening:
Gewicht: 157g
Voeding: accu type: oplaadbare Lithium-ion Polymeer 3,7Vdc / 0,100A
Bedieningstemperatuur: 5⁰C tot 40⁰C
Specicaties blindmaskers
Gewicht: 155g
Voeding: accu type: oplaadbare Lithium-ion Polymeer 3,7Vdc / 0,060A
Bedieningstemperatuur: 5⁰C tot 40⁰C

www.FireWare.nlFireWare Nebula
NL Gebruiksaanwijzing
FireWare Nebula
6
Vóór het eerste gebruik moet de set volledig opgeladen worden. Het duurt ongeveer 2 uur
voordat de set volledig is opgeladen.
Batterijduur van een volledig opgeladen set is (1,5 uur).
Een nieuwe accu voor de afstandsbediening wordt door FireWare geplaatst.
Materiaal blindmaskers
Het scherm van het masker is vervaardigd uit kunststof. Het masker zelf is buigzaam en
bestaat uit rubber en een elastische, verstelbare band. De elektronica is volledig geïntegreerd
in het masker; er ontstaan geen onveilige situaties door loshangende snoeren.
Het masker kan zowel rechtstreeks op het gelaat als over het ademluchtmasker gedragen
worden, al dan niet met toevoeging van een (los te bestellen) kunststof blindmasker met
uitsparingen voor het elektronisch blindmasker om te voorkomen dat de cursist onder het
masker door kan kijken.
4. Ingebruikname
De set bestaat uit een afstandsbediening en 4 blindmaskers. Alle blindmaskers kunnen on-
afhankelijk van elkaar aan- en uitgezet worden. Vóór de eerste ingebruikname moet de set
volledig opgeladen worden.
Afstandsbediening/Instructeursunit:
• Aan/uitknop met groen indicatielampje
• STOP knop voor het gelijktijdig herstellen volledig zicht van
alle blindmaskers
• Vier knoppen (1, 2, 3, 4) voor de individuele bediening van
het zicht op de blindmaskers met een LED-lampje voor
statusindicatie (rood is actief, groen is inactief)
• Twee knoppen voor het instellen van het zicht van de blind
maskers met een numerieke display voor aanduiding van
het huidige transparantieniveau.
• Met de R-knop wordt de Randommodus geactiveerd. Groen
indicatielampje is
actieve randommodus.
• Micro-USB-aansluiting voor het opladen van de accu. Het
LED-lampje brandt oranje tijdens het opladen.
• Eén afstandsbediening kan tot vier sets aansturen, dus op 1
AB kunnen 16 maskers worden aangesloten, 4 stuks onder
elke knop.
Bediening en indicatielampjes van het blindmasker:
• Statuslampje, twee kleuren. Oranje (buiten bereik) en
groen (actief)
• Aan/uitknop (Bovenste stand is UIT)
• Indicatorlampje voor oplaadstatus
• Micro-USB-aansluiting voor het
opladen van de accu.
• Paniekknop – instant zicht

www.FireWare.nl FireWare Nebula
NL Gebruiksaanwijzing
FireWare Nebula
7
Aan- en uitzetten:
• De afstandsbediening aanzetten: druk kort op de aan/uitknop
• De afstandsbediening uitzetten: houd de aan/uitknop ingedrukt totdat alle LED-indi
catoren op de afstandsbediening uit gaan.
• Het blindmasker aan- en uitzetten: schuif de aan/uitknop naar beneden (op het
plaatje hierboven staat de schuifknop in de uitpositie). Als het blindmask
er wordt aangezet, knippert het LED-lampje oranje totdat het blindmasker contact
maakt met de afstandsbediening. Zodra de draadloze verbinding tot stand is ge
komen, brandt het lampje groen.
• Schuif de aan/uitknop omhoog om het blindmasker uit te zetten.
Bediening:
De verschillende sets
Het systeem bestaat uit 1 afstandsbediening en 4 blindmaskers (Maxiset) / 1 afstandsbe-
diening en 2 blindmaskers (Miniset) / 2 blindmaskers (Uitbreidingsset). Elk van de 2 of 4
blindmaskers in de mini- of maxiset zijn bij levering gekoppeld aan één van de vier kanalen
op de afstandsbediening. Het nummer van het bij levering aan het blindmasker gekoppelde
kanaal komt overeen met het nummer op het etiket aan de onderzijde van het blindmasker.
Alle blindmaskers functioneren volledig onafhankelijk van elkaar. Elk blindmasker kan aan
een ander kanaal worden toegewezen door de koppelingsprocedure te volgen die later in dit
document omschreven wordt.
Activeren:
Als de blindmaskers zijn geactiveerd, brandt het LED-lampje op het blindmasker eerst oranje,
en vervolgens knippert het lampje zoveel keer als het cijfer van het kanaal waaraan het blind-
masker gekoppeld is, 1, 2, 3 of 4.
Zolang er geen verbinding is met de afstandsbediening blijft het LED-lampje oranje. Zodra de
koppeling tot stand is gebracht, brandt het LED-lampje op het blindmasker groen.
Zicht regelen:
Als de afstandsbediening en de maskers geactiveerd
en met elkaar verbonden zijn, kan het zicht van de
maskers worden geregeld van helder naar geen zicht
(ondoordringbare rook tot lichte rook) door op de aan
het blindmasker gekoppelde knop op de afstandsbediening
te drukken. Met een druk op de paniekknop op de
afstandsbediening wordt het zicht van alle
blindmaskers ineens helder.
Transparantiestand:
De numerieke display aan de onderkant van de afstandsbediening geeft de huidige trans-
parantiestand weer van de blindmaskers. Er zijn 7 instelstanden, van 0 tot 6, waarbij 0 de
stand is met het helderste zicht en stand 6 het zicht volledig ontneemt. Deze stand kan bij de
geactiveerde blindmaskers naar wens aangepast worden met de +/- knoppen.
Led lampje
Aan/uit knop
Paniek knop
Blindmaskers
Transparantie
knoppen

www.FireWare.nlFireWare Nebula
NL Gebruiksaanwijzing
FireWare Nebula
8
Geen verbinding:
Als de afstandsbediening uitgeschakeld is, de draadloze verbinding verloren gaat of de cursist
buiten het bereik van de afstandsbediening raakt, gaan de blindmaskers over op helder zicht.
Het LED-lampje op het blindmasker verspringt ook van groen naar oranje totdat de verbinding
hersteld is.
Buiten bereik:
het bereik van de afstandsbediening is maximaal 50 meter. Wanneer een cursist buiten het bereik
van de AB raakt, springt het masker naar helder/maximaal zicht. Zodra de cursist zich weer
binnen het bereik van de AB bevindt, springt het masker terug naar de laatst ingestelde zichtin-
stelling op de AB. Als het masker bij buiten bereik raken op minimaal zicht stond, heeft de cursist
wederom geen zicht zodra hij weer binnen bereik is. Als de instructeur het zicht heeft gewijzigd
terwijl het masker buiten bereik was, springt het masker naar de laatst gekozen instelling.
Paniekknop:
Als de paniekknop op het blindmasker wordt ingedrukt, gaan de blindmaskers over op helder zicht
en knippert het groene LED-lampje op het blindmasker. Het blindmasker ontvangt geen opdracht-
en meer van de afstandsbediening totdat het blindmasker gereset is. Dit doet u door het knopje
van het bijbehorende kanaal op de afstandsbediening ingedrukt te houden totdat het LED-lampje
naast de knop weer groen wordt. Het is de bedoeling dat alleen de instructeur het blindmasker
kan resetten.
Paniekknop. Op de afstandsbediening zit een paniekknop
die de instructeur kan gebruiken als een cursist in paniek
raakt of wanneer er zich een no-play-situatie voordoet.
Op het masker zelf zit een paniekknop die de cursist
zelf kan indrukken.
LET OP: wanneer de cursist de paniekknop op het blindmasker heeft gebruikt, dient het masker
opnieuw aangemeld te worden bij de afstandsbediening. Om de controle over het blindmasker
weer terug te krijgen, houdt de instructeur de knop die correspondeert met het masker 1, 2, 3,
of 4 ingedrukt totdat het lampje op groen springt om het masker te resetten. Daarna drukt de
instructeur nogmaals kort op het knopje om het masker te activeren. Het masker is actief als het
lampje groen is.
Randommodus:
De blindmaskers hebben een speciale randommodus waarin het gesimuleerde rookgehalte / de
rookdichtheid van tijd tot tijd verandert.
De randommodus wordt geactiveerd door op de R-knop te drukken. Het groene LED-lampje naast
de knop geeft aan dat het systeem in randommodus staat. Deze modus is dan actief voor alle
kanalen en de verbonden blindmaskers.
Zolang de randommodus actief is, stelt u de snelheid waarmee de rookdichtheid verandert in met
de + en – knop op de afstandsbediening en geeft de display deze snelheid weer in cijfers. Het ci-
jfer 1 staat voor de snelste stand en het cijfer 9 staat voor de langzaamste stand. De blindmask-
ers moeten eerst in de stand met het minste zicht staan voordat de randommodus geactiveerd
kan worden.
Zodra de randommodus niet meer actief is, gebruikt u de + en – knop weer voor het aanpassen
van de rookdichtheid in plaats van de snelheid.
Led lampje
Aan/uit knop
Paniek knop
Paniek knop
Blindmaskers
Random modus
Aan/uit knop
Transparantie
knoppen

www.FireWare.nl FireWare Nebula
NL Gebruiksaanwijzing
FireWare Nebula
9
Koppelprocedure:
De mini en maxi set worden geleverd met een afstandsbediening die is gekoppeld aan de
maskers. De gebruiker kan de maskers ook zelf koppelen aan de afstandsbediening.
De koppelprocedure wordt gebruikt om een masker aan een ander kanaal toe te wijzen of
om een nieuw masker (van bijvoorbeeld een uitbreidingsset) te koppelen aan een bestaande
afstandsbediening.
Er kunnen meerdere blindmaskers gelijktijdig aan één afstandsbediening gekoppeld worden.
Om de koppelprocedure te starten moeten zowel de afstandsbediening als de maskers in de
“koppelmodus” gezet worden.
De afstandsbediening in koppelmodus zetten:
• Controleer of de afstandsbediening is uitgeschakeld.
• Houd de STOP knop ingedrukt terwijl u de AAN/UIT knop indrukt en blijf daarbij de
STOP knop indrukken.
• De LED-statuslampjes van alle vier de kanalen lichten rood op.
• Houd de STOP knop ingedrukt totdat de 4 LED-statuslampjes niet meer uit gaan.
• Nu toont de display een P (Pairing) en is de koppelprocedure actief.
De maskers in koppelmodus zetten:
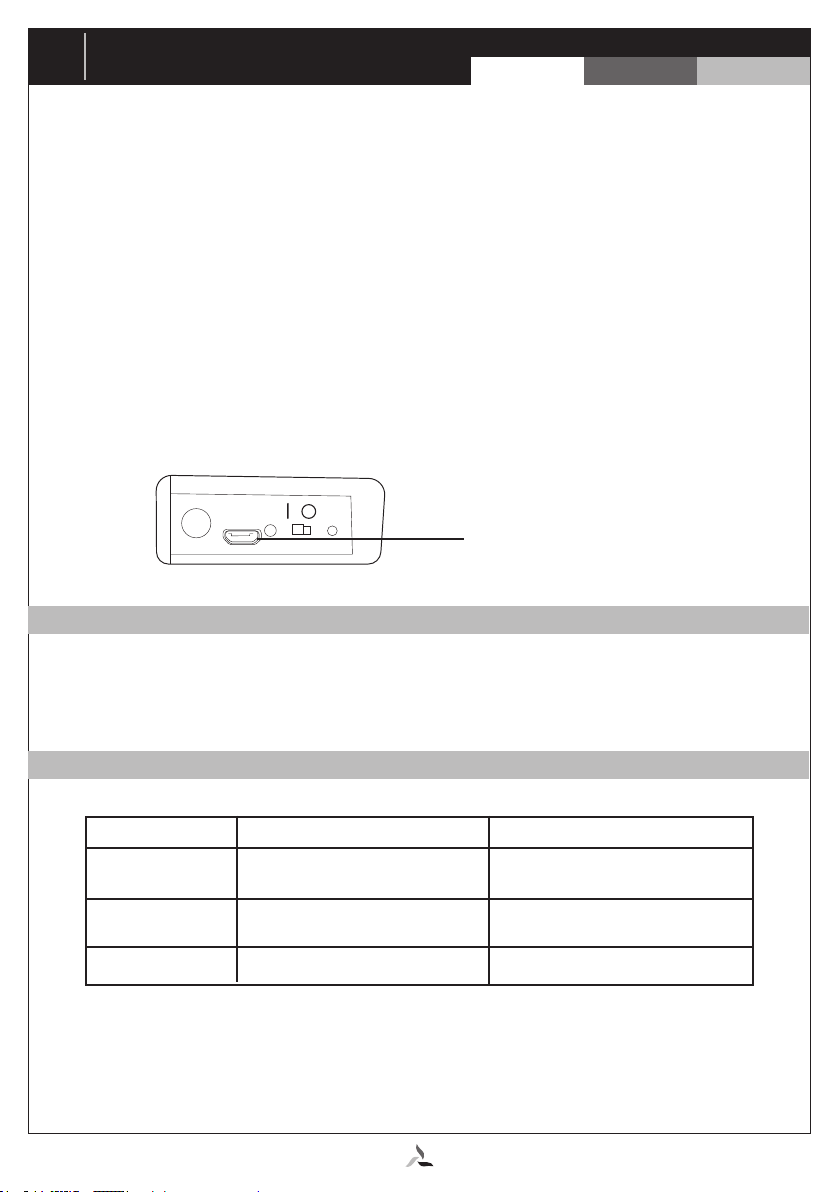
• Controleer of de maskers is/zijn uitgeschakeld.
• Houd de PANIEK knop ingedrukt terwijl u de maskers aanzet met de schuifknop en
blijf daarbij de PANIEK knop indrukken.
• De LED-statuslampjes van de maskers lichten eerst oranje en dan rood op.
• Zodra het rode LED-lampje uit gaat, kunt u de PANIEK knop loslaten.
• Het LED-lampje gaat even uit en begint vervolgens met tussenpozen rood te
knipperen. Het aantal keer dat het lampje knippert geeft aan met welk
kanaal (1, 2, 3, of 4) het blindmasker gekoppeld is.
•
De maskers kunnen nu gekoppeld worden.
Als de afstandsbediening en de maskers in koppelmodus staan,
doet u het volgende:
• Druk op één van de vier kanaalknoppen op de afstandsbediening. Het LED-lampje
van de gekozen knop gaat knipperen. De knop knippert 1 keer voor kanaalknop 1,
2 keer voor kanaalknop 2 enz. Dan stuurt de afstandsbediening het geselecteerde
kanaal naar alle blindmaskers die op dat moment in koppelmodus staan.
• De blindmaskers die de geselecteerde kanaalinformatie ontvangen, gaan met
tussenpozen groen knipperen. Het aantal keer knipperen tijdens 1 inter
val geeft aan welke informatie er op dat moment wordt ontvangen van de
afstandsbediening. De blindmaskers zijn nu nog niet gekoppeld aan een
nieuw kanaal.
• De gebruiker kan het op de afstandsbediening geselecteerde kanaal zo vaak
wijzigen als hij wil en de blindmaskers geven aan dat ze het nieuwe kanaalnummer
hebben ontvangen.
• Als de gebruiker de juiste kanalen heeft verzonden naar de blindmaskers, wordt het
kanaal bevestigd door eenmaal op de PANIEK knop te drukken.
• Daarna verlaten de blindmaskers de koppelmodus en ontvangen zij geen
koppelopdrachten meer van de afstandsbediening.
• Om de koppelprocedure af te ronden moeten zowel de afstandsbediening als de
blindmaskers een keer uit- en weer aangezet worden. Dan pas is er een
nieuw kanaal aan de blindmaskers gekoppeld.

www.FireWare.nlFireWare Nebula
NL Gebruiksaanwijzing
FireWare Nebula
10
Opladen:
De afstandsbediening en de blindmaskers worden opgeladen met een meegeleverde mi-
cro-USB-kabel. Terwijl de accu oplaadt, knippert het oranje indicatielampje. Als de accu volledig is
opgeladen, gaat het lampje uit.
Lage accuspanning:
• Als het groene LED-lampje naast de AAN/UIT knop op de afstandsbediening knippert,
moet de afstandsbediening opnieuw opgeladen worden.
• Als het LED-statuslampje op het blindmasker wisselend groen en rood wordt, moet het
blindmasker opgeladen worden.
• Als de accuspanning laag is en de blindmaskers actief zijn, wordt de lage accuspanning
ook gesignaleerd doordat het scherm van het blindmasker enkele keren kort knippert.
• LET OP: als de blindmaskers een lage accuspanning aangeven, geeft het
vLED-statuslampje de verbindingsstatus met de afstandsbediening niet langer weer.
• Het wordt sterk aangeraden de afstandsbediening en de blindmaskers zo snel
mogelijk aan de lader te leggen nadat er een lage accuspanning is aangegeven. Let er
ook op dat zowel de afstandsbediening als de blindmaskers vóór het opruimen uitgezet
worden. Dit spaart de batterij en voorkomt dat de batterij onnodige schade oploopt.
Na gebruik de afstandsbediening en blindmasker uitzetten. Dit spaart de levensduur van de bat-
terij en voorkomt onnodige schade.
Plug in poort voor oplader
5. Uitschakelen
6. Storingen
Probleem
Geen contact
Geen of minderend
contact
Elektronica
Oorzaak
Geen bereik/buiten bereik
geweest/paniekknop gebruikt
Batterij leeg van blindmasker
of AB
Oplossing
resetten
Opladen
Neem contact op met FireWare

www.FireWare.nl FireWare Nebula
NL Gebruiksaanwijzing
FireWare Nebula
11
Om optimaal gebruik te kunnen blijven maken van het FireWare Nebula elektronisch blind-
masker, is goede nazorg van groot belang.
1. Masker reinigen
a. Gebruik geen water. Een droge doek volstaat, eventueel een alcoholdoekje gebruiken
ter ontsmetting van de rubberen delen.
Let hierbij goed op: alcohol of andere oplosmiddelen kunnen de glaselementen onherstelbaar
beschadigen!
2. Masker opruimen
a. De maskers worden in de meegeleverde kunststof kist met schuimbekleding opgeruimd
voor optimale bescherming. De maskers en de AB kunnen direct na gebruik worden
gereinigd en opgeruimd.
3. Masker opladen
a. De maskers worden voor gebruik opgeladen in een schone, droge omgeving.
Elektrische apparaten, accessoires en verpakkingen dienen apart te worden ingezameld, gerecy-
cled of op een milieuvriendelijke manier te worden afgevoerd.
Op het FireWare Nebula elektronisch blindmasker zit twee jaar garantie na aankoopdatum
op product- en fabricagefouten. Schade door onzorgvuldig of incorrect handelen wordt niet ver-
goed. Reparatie vereist deskundigheid. Het wordt dan ook aangeraden om het apparaat ingeval
van defecten te retourneren aan FireWare.
De garantie vervalt indien blijkt dat het apparaat door uzelf of derden geopend is, of als uzelf of
derden modicaties of aanpassingen van ongeacht welke aard hebben aangebracht zonder daar-
toe vooraf de uitdrukkelijke, schriftelijke toestemming te hebben verkregen van de leverancier.
De garantie vervalt eveneens wanneer het apparaat gebruikt blijkt te zijn onder andere omstan-
digheden dan in de gebruiksaanwijzing aangeduid.
7. Nazorg
8. Afvalverwijdering
9. Garantie bepaling

www.FireWare.nlFireWare Nebula
NL Gebruiksaanwijzing
FireWare Nebula
12
11. Contact
10. Conformiteitsverklaring
EG Conformiteitsverklaring
Fabrikant:
FireWare bv
De Stek 5
1771 SP Wieringerwerf
Nederland
Verklaart met enige verantwoording dat het product FireWare Nebula, bestaande uit een
afstandsbediening en 2 tot 4 elektronische blindmaskers met ingebouwde elektronica voor het
simuleren van een met rook gevulde ruimte, artikelnummer 025-021-003 en 025-021-004, in
overeenstemming is met de volgende EG- richtlijn: 2011/65/EG
Het FireWare Nebula blindmasker voldoet aan de IEEE-standaard 802.15.4 voor draadloze
verbindingen. Daarnaast is het product conform de onderstaande normen en standaarden:
EN 300 328 V2.1.1
EN 301 489-1 V2.2.0
EN 301 489-17 V3.2.0
EN 303 446-1 V1.1.0
EN 62479:2010
EN 60950-1:2006 + A1 + A2 + A11 + A12
14 december 2018
Sef Hendrickx
Directeur FireWare bv
Bij vragen kunt u contact opnemen met:
FireWare bv
De Stek 5
1771 SP Wieringerwerf
Nederland
088 252 60 00
info@FireWare.nl
www.FireWare.nl

www.FireWare.nl FireWare Nebula
EN Manual
FireWare Nebula
13
2. Veiligheidsmaatregelen en waarschuwingen
!
MANUAL
Congratulations on the purchase of your FireWare Nebula Smoke Simula-
tion Goggles!
The FireWare Nebula Smoke Simulation Goggles were specially designed to simu-
late smoke in areas where the use of practice smoke is not desirable. The device
was designed for training purposes and should be used accordingly.
Prior to its rst use, please read this manual attentively, in order for you to be
fully informed of the use, operation and characteristics of the FireWare Nebula
Smoke Simulation Goggles.
Please read these instructions thoroughly. When using the device please be meticulous in
following the instructions and guidelines as presented in this user manual. For questions or
doubts as regards the use of FireWare Nebula Smoke Simulation Goggles, please contact
FireWare. We are happy to help.
Only adults who are informed of this user manual’s contents and have understood it, or who
have been properly instructed by a training facility or instructor should use this device. The
FireWare Nebula Smoke Simulation Goggles are designed for professional use in training
situations.
PLEASE NOTE: this device is NOT suitable for children.
PLEASE NOTE: this device should NOT be used in the immediate surroundings of water.
Please note: ONLY clean and dry this device with a dry cloth.
Do NOT use any parts / accessories that have not been advised by the manufacturer.
PLEASE NOTE: the blinded user should be well monitored. Avoid dangerous situations
whenever practising on a oor (stairs) or inform the participant thereof. Avoid unnecessary
obstacles.
PLEASE NOTE: whenever the smoke goggles are out of the range of the remote control
(whether intentionally or not), the goggles’ screen becomes instantly transparent. Please be
aware of the fact that the smoke goggles will assume the last chosen setting when it returns
within the remote’s range. This is beyond the instructor’s control! The panic button on the
goggles stays operational though.
1. Introduction

www.FireWare.nlFireWare Nebula
EN Manual
FireWare Nebula
14
Battery
PLEASE NOTE: the user is NOT allowed to change the battery; user may only charge the
battery.
WARNING: the battery may explode upon incorrect / careless use. Do NOT de-assemble or
burn the device.
WARNING: when charging the device, ONLY use a USB compatible port! When these in-
structions are ignored, this may result in a defect of the device (that is not covered by the
guarantee) or it may cause serious (eye) injuries.
3. Overview of the parts & technical information
The FireWare Nebula Smoke Simulation Goggles consist of the following options and parts:
Maxiset
• 1 instructor unit (remote control)
• 4 Nebula electronic smoke simulation goggles
• 1 charging hub with 5 charging cables (USB => micro-USB)
• 1 user instructions
• 1 FireWare plastic box with foam interior
Miniset
• 1 instructor unit (remote control)
• 2 Nebula electronic smoke simulation goggles
• 1 charging hub with 5 charging cables (USB => micro-USB)
• 1 user instructions
• 1 FireWare plastic box with foam interior, including two additional empty spaces for a
possible upgrade to the Maxi set
Upgrade set
• 2 Nebula electronic smoke simulation goggles
• 2 USB charging cables
Specications remote control
Weight: 157g
Power supply: battery type: rechargeable Lithium ion Polymer 3,7Vdc / 0,100A
Operation temperature: 5⁰C - 40⁰C
Specicaties blindmaskers
Weight: 155g
Power supply: battery type: rechargeable Lithium ion Polymer 3,7Vdc / 0,060A
Operation temperature: 5⁰C - 40⁰C

www.FireWare.nl FireWare Nebula
EN Manual
FireWare Nebula
15
Before its rst use, the set needs to be fully charged. It takes approximately 2 hours to fully
charge the set.
A fully charged set will be operational for approximately 1,5 hours.
New batteries for the remote control may ONLY be installed by FireWare.
Material smoke simulation goggles
The smoke simulation goggles’ screen is made of plastic. The goggles themselves are exible
and consist of rubber and an elastic, adjustable band. The electronics are fully integrated
inside the goggles; this will avoid unsafe situations because of loose cables.
The goggles are t for use directly onto the user’s face as well as over the breathing mask
of a re ghter. The latter option may be complemented by a (separately ordered) plastic
blinding mask that has holes to t the electronic smoke simulation goggles, in order to fully
blind the user.
4. Use
This set consists of a remote control and 4 Smoke Simulation Goggles. All smoke simulation
goggles can be switched on and o independently. Prior to the set’s rst use, it has to be fully
charged.
Remote control / Instructors unit:
• ON/OFF switch with green indicating LED
• STOP switch to simultaneously open all smoke simulation
goggles
• Four buttons (1, 2, 3, 4) for individual toggle of the goggles’
transparency with 2-color LED for status indication (red for
goggles ON, green for goggles OFF)
• Two buttons for operating the level of transparency of the
smoke simulation goggles with a numeric display indicating
the current level of transparency.
• Switch for activating the random mode. A green LED
indicates random mode ON.
• Micro-USB connector for charging the battery. The LED is
orange while the device is charging.
• One remote control is designed to control four sets at once.
Therefore, 16 goggles can be connected to one single re
mote control; up to 4 goggles per button 1, 2, 3, and 4.
Operation and indicators on the goggles unit:
• ON/OFF switch (Upper position = goggles OFF)
• Status LED, two colours. Orange
(out of re mote’s range) and green
(goggles switched ON)
• Charging LED indicator
• Micro-USB connector for
charging the battery.
• Panic button – instant visibility

www.FireWare.nlFireWare Nebula
EN Manual
FireWare Nebula
16
Turning the device on and o:
• Turn on the controller unit: short press on the on/o switch
• Turn o the controller unit: long press on the on/o switch until all the control LEDs
on the controller turn o
• Turn on the goggles unit: slide the on/o switch down (as it is shown on the image
above the sliding switch is in o position). Once the goggles are turned on, the
status LED will signal orange until it connects with the controller unit. As
soon as the wireless connection is established the LED turns green.
• Turn the goggles unit o: slide the switch back up.
Operating the Smoke Simulation Set:
Description of the sets
The system consists of 1 remote control and 4 smoke simulation goggles (Maxi set) / 1
remote control and 2 smoke simulation goggles (Mini set) / 2 smoke simulation goggles (Up-
grade set). Upon delivery, each of the 2 (or 4) smoke simulation goggles of the mini or maxi
set are initially paired to one of the four channels on the remote control. The initial channel is
indicated by the number on the label on the bottom of the goggles electronics housing. All the
goggles operate completely independent from each other. Each goggles unit can be assigned
to a dierent channel by following the pairing procedure explained later in this document.
Activating the goggles:
Upon activating the goggles, the LED on the goggles will rst turn orange and then blink 1, 2,
3 or 4 times, depending on the channel it is paired with.
THE LED remains orange until the connection with the remote control is established. As soon
as the goggles are paired with the remote, the LED on the Smoke Simulation Goggles turns
green, where the corresponding LED on the remote turns red.
Changing the level of transparency
When the controller and the goggles are activated and
paired, the goggles can be toggled from closed to open
state by pressing the corresponding channel button.
It only takes one touch of the panic button on the remote
to open all goggles for instant visibility.
Level of transparency:
The numeric display at the lower half of the remote shows the current transparency level of
the smoke simulation goggles. There are 7 levels, going up from 0 to 6, where 0 provides the
most visibility and level 6 completely blocks the view. The transparency level can be adjusted
by using the +/- buttons.
Led light
On/o switch
Panic button
Smoke goggles
Transparency button

www.FireWare.nl FireWare Nebula
EN Manual
FireWare Nebula
17
No connection
If the controller unit is turned o, the wireless connection gets lost, or the user wanders out of
range of the remote, the transparency level of the goggles turns to instant visibility. The LED in-
dicator on the smoke simulation goggles also turns orange until the connection is re-established,
after which the LED will turn green again.
Out of range:
The remote’s range is 50 meters at most. Whenever a user wanders out of the remote’s range,
the goggles will instantly turn to full visibility. As soon as the user returns into the remote’s range,
the goggles’ transparency level will instantly return to the last chosen settings on the remote.
If the goggles were set to minimal visibility at the time of getting out of range, the goggles will
return to no visibility upon restoring the connection. The goggles will switch to the last chosen
settings on the remote, including any changes chosen whilst the goggles were out of range.
Panic button / Reset:
Upon pressing the panic button on the smoke simulation goggles, the transparency level turns to
instant visibility and the green LED on the goggles will start to blink. The goggles will not receive
commands from the remote until the system has been reset. To reset the system, the instructor
presses the button of the channel corresponding with the goggles that are disconnected. Keep
pressing until the LED turns green again. Repress the button once. The LED on the remote will
now turn red. The connection is re-established. Only the instructor can reset the system on the
remote.
The instructor can use the panic button if the user of a
set of goggles panics or in case of a no-play situation.
The goggles themselves also dispose of a panic button
that the user can individually operate
Please note: if the user has pressed the panic button on the smoke simulation goggles, the
connection needs to be reset. In order to regain the control, the instructor holds the button that
corresponds with the interested goggles, 1, 2, 3, or 4 until the LED turns green. The reset is now
complete. To reactivate the goggles, press the button once. The LED on the goggles will turn
green. The corresponding LED on the remote will turn red.
Random mode
The smoke simulation goggles dispose of a special random mode to constantly change the trans-
parency level without the instructor inuencing this.
Pressing the R button on the remote activates the random mode. The green LED next to the
button indicates that the system is in random mode. This mode will be active for all channels and
their connected smoke simulation goggles.
As long as the random mode is active, the instructor can inuence the speed at which the trans-
parency levels change by operating the + and – button on the remote. The display shows this
speed in numbers. The numbers go from 1 to 9, where 1 stands for the highest changing speed.
To activate the random mode, the smoke simulation goggles need to be in minimum visibility lev-
el. As soon as the random mode is deactivated, the + and – buttons are reassigned to adjusting
the transparency level again.
Led light
On/O switch
Panic button
Panic button
Smoke goggles
Random mode
On/o switch
Transparency button

www.FireWare.nlFireWare Nebula
EN Manual
FireWare Nebula
18
Pairing procedure:
The mini and maxi set are delivered with a remote that is connected to the goggles. The user
can also pair the goggles with the remote himself.
The pairing procedure is used to change the channel of a goggles unit or to add new goggles
unit to an existing controller (i.e. an upgrade set).
Pairing procedure can be run between one controller unit and multiple goggles simultaneously.
To start the pairing procedure both the controller and the goggles need to be put into “Pairing
mode”.
Activate “Pairing mode” on the remote:
• Make sure the controller is turned o.
• While holding the STOP switch press the ON/OFF switch and keep holding
the STOP switch
• The LED indicators of all four channels will turn red.
• Hold the STOP switch until the 4 LED indicators stay on.
• The display will show a “P” for pairing. The pairing procedure is active now.
Activate “Pairing mode” on the goggles:
• Make sure the goggles are turned o.
• While holding the panic button, turn on the goggles unit with the sliding switch.
Don’t let go of the panic button.
• The status LED on the goggles unit will rst turn orange and then red.
• Once the red LED turns o, release the panic button.
• The LED will be o for a moment and then start blinking red in intervals.
The number of blinks corresponds with the channel (1, 2, 3, or 4) the smoke
simulation goggles are connected to.
• The goggles are now ready to pair.
When both the remote and the goggles are in pairing mode, act as follows:
• Press one of the four channel buttons on the remote. The LED of the selected
channel will blink. The button will blink once for channel 1, twice for channel two
and so on. Then, the remote will send the selected channel to the smoke simulation
goggles that are in pairing mode at that time.
• The smoke simulation goggles that receive the selected channel information
will blink green in intervals. The number of blinks during one interval corresponds
with the information received from the remote. The smoke simulation goggles are
now ready to be assigned to a channel.
• The user may change the channel selected on the remote an unlimited number
of times. The smoke simulation goggles will keep indicating which information they
have received.
• When the user has sent the correct channels to the smoke simulation goggles, the
selected channel will be conrmed by pressing the panic button once.
• Then the pairing mode is automatically deactivated on the smoke simulation
goggles.
• In order to complete the pairing mode, the remote and the smoke simulation
goggles need to be turned o and on one more time. This will conrm the new
channel selected for the smoke simulation goggles.

www.FireWare.nl FireWare Nebula
EN Manual
FireWare Nebula
19
Charging the set
The remote and the smoke simulation goggles can be charged with a micro-USB cable that is
delivered with the set. As long as the set is charging, the orange LED will be blinking. When the
battery is fully charged, the LED will turn o.
Low battery:
• When the green LED next to the ON/OFF switch on the remote is blinking, the remote
needs charging.
• When the status LED on the goggles starts alternating green and red colour, the
goggles need charging.
• If the battery is low and the goggles are turned on, this will also be indicated by a few
short blinks of the goggles’ screen.
• Please note
• When the goggles are indicating low battery, the status LED will not indicate the
connection status with the controller anymore.
• It is strongly advised that the controller and the goggles are recharged as soon as
possible after the low battery indication is observed. Also, please make sure that both
of the devices are turned o after the end of their use in order to avoid unnecessary
battery drain, which can also cause damage to the battery.
Please turn o the remote and the smoke simulation goggles after use. This will lengthen the
battery life and prevents unnecessary damage to the set.
Charger Plug in
5. Switching o
6. Malfunctions
Problem
No connection
No connection
Electronics
Cause
Out of range / no wireless
connection / panic button
activatedt
Low battery / no battery
Solution
Reset the set
Charge the set
Please contact FireWare

www.FireWare.nlFireWare Nebula
EN Manual
FireWare Nebula
20
In order to keep the FireWare Nebula Electronic Smoke Simulation Goggles in optimal con-
dition, it is essential to carefully follow these instructions for storage.
1 Cleaning of the goggles
a Do NOT use water. A dry cloth is sucient to clean the screen. The rubber parts can be
disinfected with an alcohol cloth.
Please be aware: alcohol or other solvents could permanently damage the glass elements!
2 Storage of the goggles
a The goggles have to be stored in the plastic box with foam interior that is included in
the set. This will prevent unnecessary damage to the goggles. The remote and the
goggles can be cleansed and stored immediately after use.
3 Charging of the goggles
a The goggles have to be charged prior to their use in a clean and dry environment.
Electrical devices, accessories and packages have to be disposed of separately, recycled or dis-
charged in an environmentally responsible manner.
After purchase, the FireWare Nebula Electronic Smoke Simulation Goggles have a two-year
guarantee against product and fabrication faults. Damage caused by careless or incorrect actions
is not reimbursed. Repairs require expertise. In order to preserve your guarantee, it is recom-
mended to return the device to FireWare if any defects occur.
This guarantee is cancelled if it becomes apparent that you and/or any unauthorised third party
has/have opened the device, or has/have altered or modied the device in any way without hav-
ing obtained the prior explicit and written permission thereto by the supplier. The guarantee also
becomes invalid if it appears that the device has been used under any circumstances other that
indicated in the user manual.
7. After care
8. Waste disposal
9. Warranty Provisions
This manual suits for next models
2
Table of contents
Languages:
Popular Accessories manuals by other brands

Vinotemp
Vinotemp Element EL-BWC102-02 owner's manual

SkyBitz
SkyBitz CMANA00052 install guide

IFM
IFM UIT509 operating instructions

Fire-Lite Alarms
Fire-Lite Alarms CP355 Installation and maintenance instructions

DocuPen
DocuPen DocuPen RC800 Series operating manual

Ontech
Ontech Relay 9015 quick start guide

Skipper
Skipper DL850S27DR-SB installation manual

JANE
JANE KIDS ZONE 80273 manual

Campbell
Campbell SnowVUE 10 product manual

AMALGAMATED INSTRUMENT
AMALGAMATED INSTRUMENT 03002V manual

Omega
Omega FP-5070 Series user guide

PCB Piezotronics
PCB Piezotronics IMI SENSORS D643A01 Installation and operating manual