First Data D200 User manual

1
Smart Terminal
by
Merchant Operating Guide
User guide

2
3
The Merchant Operating Guide forms part of your Merchant Agreement, so
please read it carefully and keep it in a safe place for future reference. If you
have any questions about our service or this guide, please contact us directly
on the number below.
First Data Customer Service Centre: 24/7
+372 626 4777

3
About Smart Terminal
Smart Terminal is a payment solution that makes it possible for any merchant
to accept card payments anywhere.
The solution is available for both businesses and individuals who have an
agreement with a bank for payment card acceptance services.
The Solution consists of a free app ”Smart Terminal by First Data” for your
Android device as well as the D200 Card Reader device.
What is the D200 Card Reader?
The D200 Card Reader is a pocket size, stylish designed payment card
acceptance hardware device that connects to the payment app “Smart
Terminal by First Data” which runs on the Android operating system smart
device via a Bluetooth connection.
The D200 Card Reader is in line with payment Card Security Industry (PCI)
standards and has valid Visa, MasterCard and American Express
certifications.
The D200 Card Reader accepts magnetic stripe, smart card contactless Visa,
Visa Electron, MasterCard, Maestro, and American Express debit, credit and
business card transactions. Chip transactions are verified by the customer’s
PIN entry on the D200 Card Reader keyboard.

4
The D200 Card Reader has a built-in battery that can be charging either via
USB cable or through the dock. A fully charged battery will keep the D200
Card Reader running for up to 8 hours or for up to 200 transactions.

5
Preconditions that must be met to
permit the use of Smart Terminal
You should sign an Agreement with the Bank for card acceptance and
terminal rent services;
After signing an agreement with your bank, the First Data service team will
contact you and will agree the time and date for Smart Terminal delivery
Smart Terminal account credentials from First Data will be delivered by
email and SMS, indicated in the payment card acceptance contract
You should possess an Android Smartphone or tablet with an Internet
connection and Bluetooth which will be paired with the D200 Card Reader.
You should read the chapter “General information for card payment
acceptance”at the end of this manual;

6
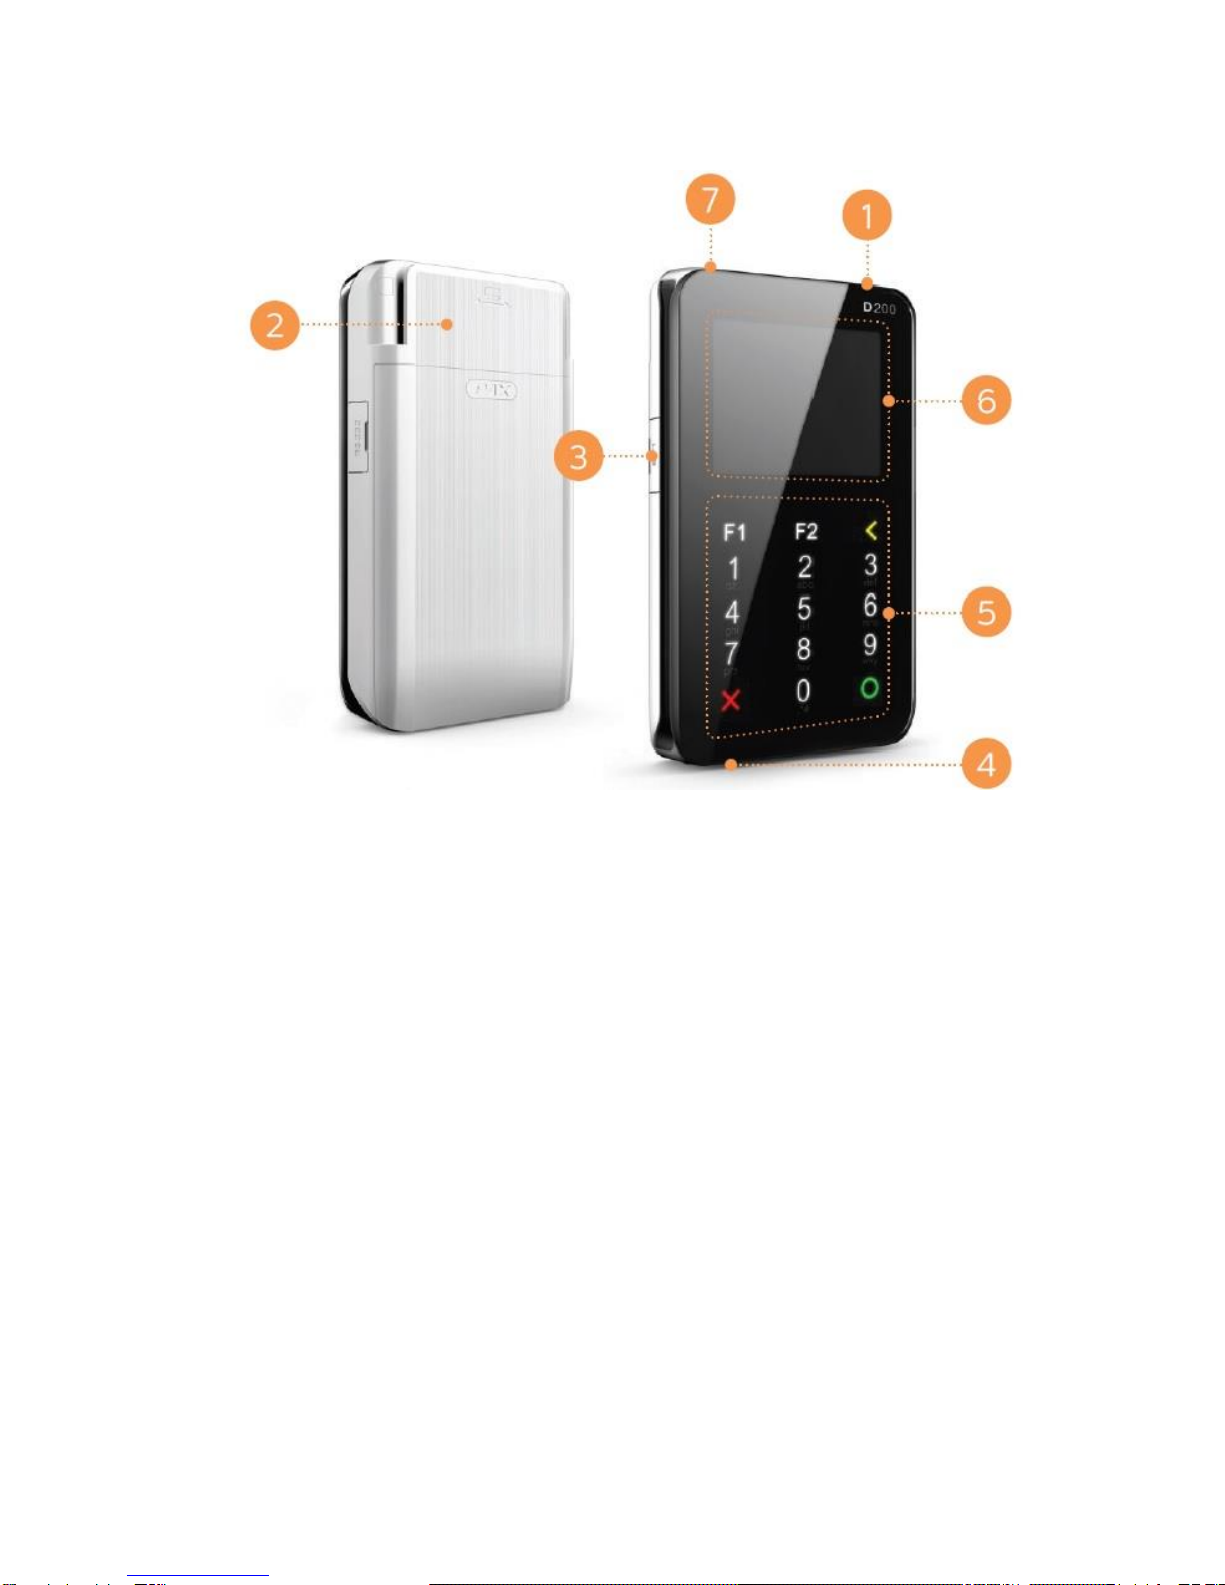
1. Turn ON/OFF button
2. Magnetic strip card reader
3. USB slot for recharge cable
4. Chip card reader
5. Keypad touch buttons
6. Display
7. Main menu button
D200 terminal keypad - touch buttons
To navigate through your D200 device, the main function buttons are:
X Cancels the entry (CANCEL button)
OApproves the entry (ENTER button)
< Deletes the entry

7
How to get started with Smart
Terminal?
1.Download the Smart Terminal app
Open Google Play application on your smartphone or tablet and search for
“Smart Terminal”:
STEP 1
Results will be presented for apps. Find First Data’s app with the
icon.
STEP 2
Tap the application and then the Install button. The Installer will prompt you
for permission, press the accept button and the installation will continue.
STEP 3
Once the download and installation are complete, you can tap the Open
button in the Play Store listing, or tap the icon from the notification tray to
open your app. Alternatively, the app will be accessible by tapping the Apps
icon at the bottom of your home screen, if an icon hasn’t already been put on
your home screen.

8
2.Charge your D200 card reader
Charge the D200 card reader by connecting the provided USB cable with a
USB source (e.g. your computer).
The D200 card reader displays the Battery Power status as a number of bars.
There are number of factors that can affect the rate of battery drainage, for
example:
The length of time off the charger
The time before sleep mode is activated
The time between transactions
Please check the battery status prior to initiating any action on the terminal.
Should it indicate 'very low' (no bars) or 'no power' you should recharge the
battery.
Do not use any other external cables other than the specified and/or supplied
ones. Ensure that the cable is properly routed to prevent damage or
accidental contact. This device is intended for use when supplied with power
from a low voltage external power supply.

9
3.Login to your Smart Terminal account
STEP 1
Log in to the app with the credentials
provided by First Data by email and SMS.
If you haven’t received any, please call
the First Data Customer Service Center.
STEP 2
During the first log in, you will be asked to
change your initial password to a new one.
Additionally the application will ask
permission to use device storage.

10
4.Connect the D200 card reader with your
smartphone
Follow your mobile phone or tablet instructions to ensure that your
smartphone or tablet is connected to a WiFi or mobile network and the mobile
data is switched on.
Follow your mobile phone or tablet instructions to switch on Bluetooth, if
necessary please turn the Bluetooth connection off and on again to refresh
nearby device list.
STEP 1
Switch on the card reader by pressing the [1] ON/OFF power button on the
top-right of the device.

11
STEP 2
D200 Card Reader will display “No link with Application”, press the top-left
button. In the opened Menu select BLUETOOTH and press the ENTER button
[O]
STEP 3
Select PAIR and press the ENTER button [O]. Check your smartphone or
tablet, the wait until the pairing request appears both on the
smartphone/tablet and on the D200 card reader screen. Check that the
pairing code on your smartphone/tablet screen matches the pairing code on
the D200 card reader screen. If the smartphone/tablet fails to find the
terminal, please repeat the searching step, sometimes restarting the
terminal and the smartphone/tablet can solve this issue.
STEP 4
Press YES on both devices to confirm the connection on both devices
STEP 5
Now open the Smart Terminal app, login and wait for 10−20 seconds until all
three connection indicators are green and the D200 Card Reader shows
“READY” on the screen. If the connection fails, please close the application
completely, after 10−15 seconds open the application and log in again.
Now you are all set and can start accepting card payments.

12

13
5.How to connect a smartphone to the D200 Card
Reader if the devices are already paired?
Simply switch on the D200 Card Reader with the top-right power button.
Open the Smart Terminal application and login.
It will take up to 20 seconds until the D200 card reader connects to your
smartphone/tablet. When the connection is completed, the D200 Card
Reader shows “READY” on the screen.

14
How to make card payments?
There are two ways to accept card payment on Smart Terminal: Quick Sales
and Basket Sales
1.How to accept payment using Quick Sales?
This is the fastest and simplest way to accept card payments with your Smart
Terminal.
Note: By using this function you will not be able to use your product Catalog,
nor create a Basket to add, calculate and review the products or services you
sell. The Quick Sales function is programmed to accept only card payments.
To perform Quick Sales follow these steps:
STEP 1
Select the Quick Sales function on the main menu
STEP 2
Enter the amount for the transaction (in EUR) on your
smartphone/tablet and tap on PAYMENT.
STEP 3
Hand over the D200 Card Reader to the customer and ask
him/her to tap the contactless device, insert the chip card
or swipe the magnetic stripe card and then enter the PIN
code.

15
When cardholder signature is required, please ask cardholder to sign on
mobile device screen. Proceed with [Continue] button and compare
signature on mobile device screen and cardholders card, press the
corresponding button [Yes]/[No].
STEP 4
Check the Smart Terminal application screen (on your
mobile or tablet) and ensure that the payment is
approved.
STEP 5
Tell the customer that a transaction receipt in digital
format is available, ask if customer wants a digital
receipt. Tap the RECEIPT button on your
smartphone/tablet. Ask the customer to provide an email
address. Enter the customer data and tap the button to send a digital receipt.
You can also print the receipt if your smartphone is
connected to an external printer that supports AirPrint.
By pressing OPEN RECEIPT and through the SAVE button
you can initiate the external Printer app.

16
A copy of the receipt will always be stored and you can open it anytime with
the TRANSACTION function on the main app Menu.

17
2.How to accept payment using Basket Sales?
Basket Sales allows you to be more organized in your daily sales operations.
With this function you can add your products from your product Catalog and
set quantities that automatically calculate the total amount for payment. It
also makes it easier to keep track of all your sales thereafter.
With Basket sales you can process both card payments and cash payments.
To accept payment with Basket Sales do the following steps:
STEP 1
Select the Basket Sales function on the main menu.
STEP 2
Tap the [+] button and choose the product the
client wants to purchase.
STEP 3
Set the product quantity and price as required.
STEP 4
Repeat steps 1 and 2 until all products are added.
The tap the START PAYMENT button.

18
STEP 5
Select the payment method your customer prefers
–Cash or Card Payment.
STEP 6
For card payments, hand over the D200 Card
Reader to the customer and ask him/her to tap the
contactless device, insert a chip card or swipe a
magnetic stripe card and then enter the PIN code.
If cardholder’s signature is required, please ask
cardholder to sign on mobile device screen. Proceed with [Continue] button
and compare signature on mobile device screen and cardholders card, press
the corresponding button [Yes]/[No]

19
STEP 7
Check the Smart Terminal application screen (on your mobile or tablet) and
ensure that the payment is approved.

20
STEP 8
Tell your customer that a transaction receipt in
digital format is available, ask if the customer
would like to receive a digital receipt. Tap the
RECEIPT button on your smartphone/tablet. Ask
customer to provide an email address. Enter the
customer data and tap the button to send a digital
receipt.
You can also print the receipt if your smartphone
is connected to an external printer that supports AirPrint. By pressing OPEN
RECEIPT and through the SAVE button you can initiate the external Printer
app.
If the customer refuses to provide an email address but still requests a
transaction receipt, please write the transaction details manually on a paper
receipt.
Table of contents
Popular Card Reader manuals by other brands

Velleman
Velleman PCUSB15 quick start guide

TeleMann
TeleMann SkyMedia-300 installation instructions

Nortech
Nortech PP1 installation guide

The Future was 8 bit
The Future was 8 bit divMMC Future user guide

ASIS Technologies
ASIS Technologies R300 series user manual

SmarTerminal
SmarTerminal Smart-R400 user manual

Farpointe Data
Farpointe Data CONEKT PCR-35L-OSDP quick start guide

PERCo
PERCo IC02.1 Assembly and operation manual

ACS
ACS ACR33U-A1 Smart Duo Reference manual

impro technologies
impro technologies XTT901-1-0-GB-00 installation manual

Vivanco
Vivanco 31951 user manual

Conrad
Conrad 97 61 37 operating instructions