FIRST LOVE E17 User manual
Please read the instructions carefully before using the appliance.
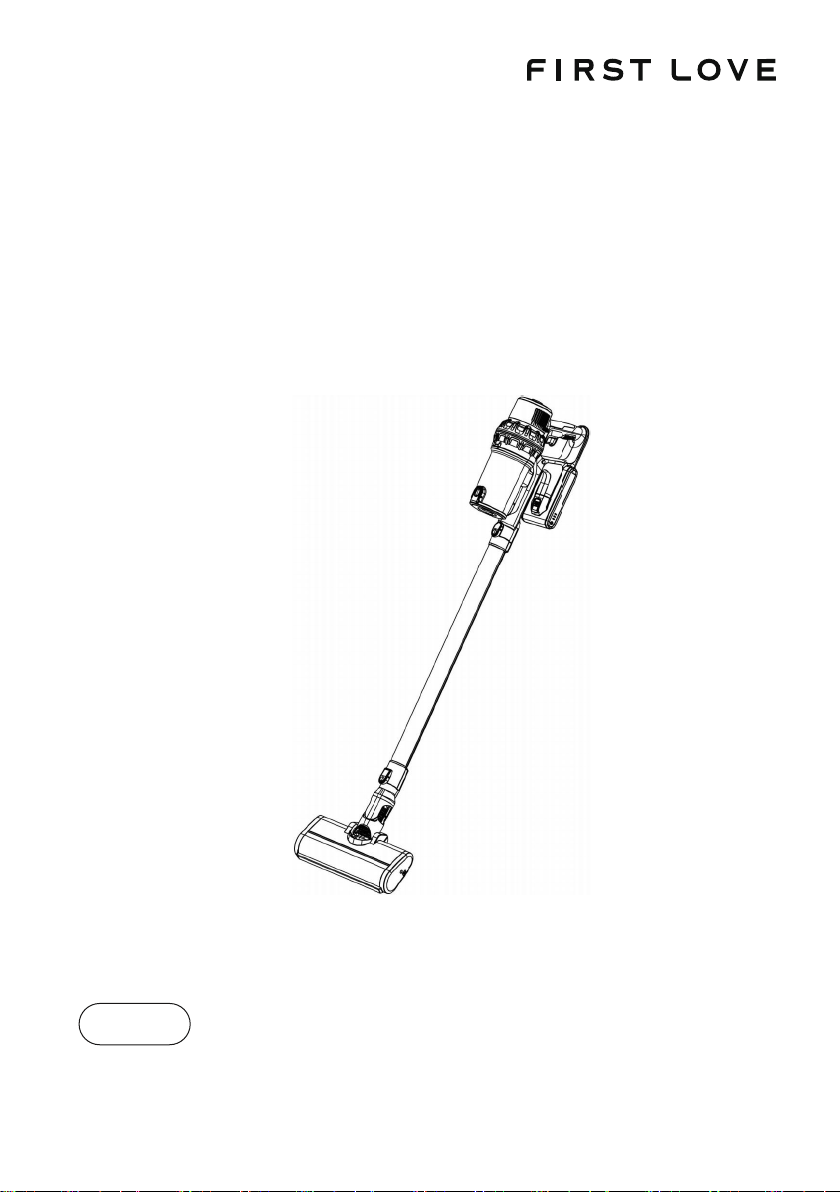
E17
Wireless Handheld Vacuum Cleaner
User Manual

Thank you for choosing this appliance, hope you will enjoy it.
This user manual involves how to use the appliance safely and correctly,please read it carefully before
using to get an ideal operating result.
This user manual is updating till printing,brand FIRST LOVE .reserves the right of revising and
explaining.We will continue to improve the appliance and the right of revising this manual without any
notice.
If there is any question and suggestion during using please be feel free to contact with our after-sell
service.
1-888-234-6666
support@firstlovehome.com
https://www.firstlovehome.com/
Preface

Contents
1. Cautions ---------------------------------------- 1
2. Parts name ---------------------------------------2
3. What's in box ------------------------------------ 2
4. Parts connection ---------------------------------- 3、4
5. How to use -------------------------------------- 4
6. Cleaning and parts replacement -----------------------5、6
7. Q&A -------------------------------------------- 7
8. Technical parameters ------------------------------- 7
9. Circuit diagram ------------------------------------ 8

1
1. Cautions
2. Parts name
Before use, carefully read all the contents in this manual book.
1. This is a dry type rechargeable handheld vacuum cleaner. It can not be used to vacuum water,
detergent, and other liquids, and wet surface articles. Liquids will damage the cleaner, such as short
current or motor burning down.
2. Big particles will result in motor burning down or tube congestion.
3. Do not use or store the vacuum cleaner in unfavorable conditions such as high temperature or low
temperature. It is recommended to use the vacuum cleaner indoors with an ambient temperature of
0-40 ° C. Store it in a cool and dry place and do not allow long-term sunshine.
4. When using a new battery or the battery for the first time after long-term storage, please fully
charge the battery. Please ensure to charge and discharge at least once every three months when the
machine is not used for a long time.
5. When your vacuum cleaner is fully charged and needs cleaning or maintenance, unplug the charger
without pulling the power cable.
6. When the battery capacity decreases and the service time of the machine becomes shorter, a new
battery pack can be purchased for replacement.
7. Waste battery pack should be safely recycled, do not throw away.
8. The lithium battery in the battery base can only be used on the unit, not for other purposes. Only
the built-in charging adapter can be used to charge. Do not remove the battery pack or contact it with
liquid to avoid damage or short circuit. Do not place the battery pack near high temperature objects or
open flames. Do not insert the battery pack with sharp objects or damage the battery pack.
9. When the vacuum cleaner fails to work or related accessories are damaged in the process of use,
in order to avoid danger, users should not disassemble or assemble by themselves. They must go to
the designated maintenance point for professional maintenance or contact our after-sales service
personnel for inspection and maintenance.
10. Do not allow children to use, play with the unit and charge the battery pack to avoid accidents.
Dust cup
Charger
Conductive
tube
Electric
brush
Brush
attachment Filter Hypa
Recharge
battery
Wall mount Manual Certificate of
Conformity
1 1 1 21+1
1 1 1 1 1
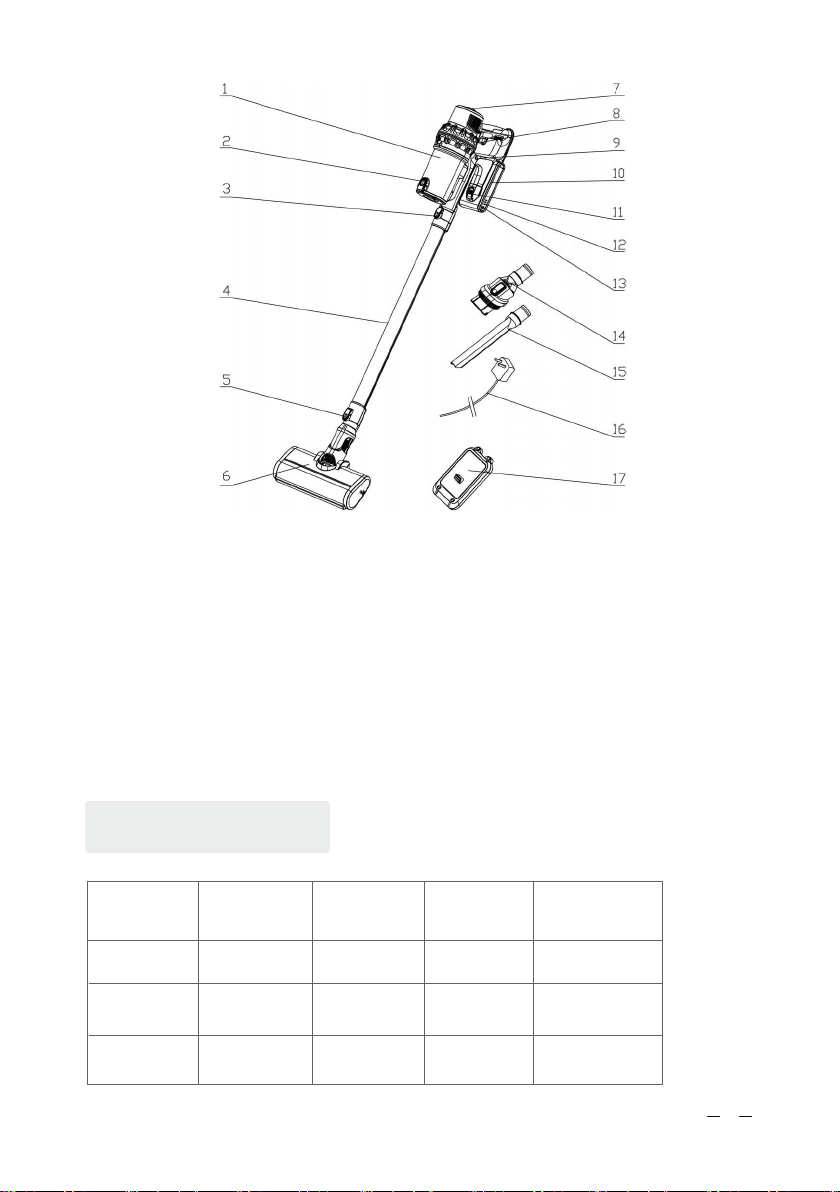
1. dust cup 2. dust cup release button 3. tube release button
4. conductive tube 5. brush release button 6. electric brush
7. motor and dust cup release button 8. trigger button 9. max speed switch
10. battery pack 11. battery pack release button 12. battery quantity indicator light
13. charging port 14. brush combo 15. crevice brush
16. charger 17. wall mount
3.What’s in box
2

4. Parts connection
4-1 Battery pack assembly
Insert the battery pack into the bottom of the
body until you hear a "click" locking sound. Pay
attention to direction (as shown) .
4-3 Connection of ground brush
to metal pipe
Insert the brush connector into the metal
connector until you hear a "click" locking sound.
(As shown in the figure)
4-5Connection of ground brush to handheld component
Insert the brush connector into the interface of the handheld component until you hear a click
locking sound. (As shown in the figure)
4-2 Motor and dust cup assembly
Clamp the hook at the bottom of the motor dust
cup assembly into the corresponding part of the
host housing, and rotate it in the direction shown
by the arrow until the locking sound of "click" is
heard. (As shown in the figure)
4-4 Connection of metal tube to
hand held component
Insert the metal connector into the interface of
the handheld component and hear the "click"
locking sound. (As shown in the figure)
3

5. How to use
4-6 Attachment connection to handheld components
Insert the attachment into the interface of the handheld component until you hear a "click" locking
sound. (As shown in the figure)
5-1 Power on (low speed), high speed, power off
Install the machine, pull the trigger and the switch in turn, can realize the recycle switch of power
on(low speed), high speed, power off .
5-2 Use of accessories (use of 2-in-1 combined brush)
1. Insert the 2-in-1 combined brush into the suction port of the main machine, and then push the brush
head forward to lock it, then you can clean furniture, home appliances, bookshelves, cabinets, combing
tables, computer keyboards and other places.
4-7 Use of wall mount
1. Take out the hanger and secure it to the wall.
2. The hook at the bottom of the handheld
component is fixed at the corresponding position
of the hanger. (As shown in the figure)
4

6. Cleaning and parts replacement
6-1 Clean after daily use
Press the release button of the lock on the top of the motor dust cup assembly to separate the motor
dust cup assembly from the body assembly, and then press the release button on the bottom cover of
the dust cup to open the bottom cover, and dust can be poured (suggestion: Dust can be poured after
each use).
2. Insert the 2-in-1 flat suction into the suction port of the host machine, and then push the brush
head back to the end to clean the bed, curtain, sofa surface and other places.
5-3 Use of accessories (use of crevice brush)
Insert the crevice brush into the suction mouth of the host machine to clean the cracks of the sofa and
the skirting line of the wall.
5-4 The use of electric floor brush
First insert the electric brush into one end of the conductive tube, and then insert the other end of the
conductive tube into the host interface to clean the floor, carpet, tile and other places.
5-5 Charging
1. This machine can only be charged with its own charger, please confirm the charger before charging.
2. Insert the plug of the charger into the power socket, and plug the output end into the charging
socket of the battery pack to charge. When charging normally, the indicator light shows "blinking blue"
, and when fully charged, the indicator light shows "blue light".
3. When the battery is low, charge it in time and unplug the charger in time after the battery is fully
charged.
4. You can charge the battery pack directly or the installed host.
5

6-2 Clean the dust cup
1. Press the release button of dust cup
bottom cover to open the dust cup bottom
cover, you can dump the garbage in the dust
cup. After dumping the garbage, close the
bottom cover of the dust cup until it is locked
(as shown in the picture)
2. Hold the dust cup with one hand and the
motor assembly with the other hand and rotate
counterclockwise until the dust cup assembly
can be removed. (As shown in the figure)
4. Pull the metal handle by hand and remove
the filter for cleaning or cleaning. (As shown in
the figure)
3. Remove the filter in the direction of the
arrow and clean or replace the filter. (As shown
in the figure)
5. After cleaning the filter, please put it in a
ventilated place to dry and then use it
fully(soak the filter with soapy water first and
then rinse it with clean water. Do not rub it
repeatedly to avoid damaging the internal
structure of the filter). (As shown in the figure)
6

Fault Possible causes Solution
Motor stalling
Suction reduction
Roller stuck
Battery dead Charge the vacuum cleaner
Pour the dust out of the
dust cup
7. Q&A
6-3 Clean the electric floor brush
1. Push down the left slide button of the ground brush and lift the roller brush handle to remove the
roller brush. (As shown in the figure)
2. Remove and clean the roller brush, and then assemble it in the opposite order to disassemble it.
Reset the handle of the roller brush.
Please check the following points before consulting the maintenance
department.
——Note: After a long time of use, the rollers of the brush may be entangled with long floccule
such as hair, which needs to be cleaned in time so that the vacuum cleaner can work more
effectively.
Dust cup is full
Clean or replace the dust
cup filter
Clean up the garbage inside
the electric brush
Roll brush block
Dust cup filter plate
accumulated dust electric
brush air duct blocked
Insufficient charging time
Inhalation of excessive
volume of foreign body
Intertwining excessive hair
and fibers
Battery aging
The charging connector
is not fully inserted into
the charging port of the
battery pack
The charging
indicator light is
dead when
charging
Insufficient use
time after
charging
Insert the charging
connector completely into
the charging port of the
battery pack
Charge according to
standard time
Purchase new batteries at
designated repair points
Clean the roller brush and
restart the machine
7
Model
Rated voltage
Rated input power
Battery capacity
E17
22.2Vdc
200W
2200mAh
Working time 20-40 min
Vacuum 25Kpa
8. Technical parameters
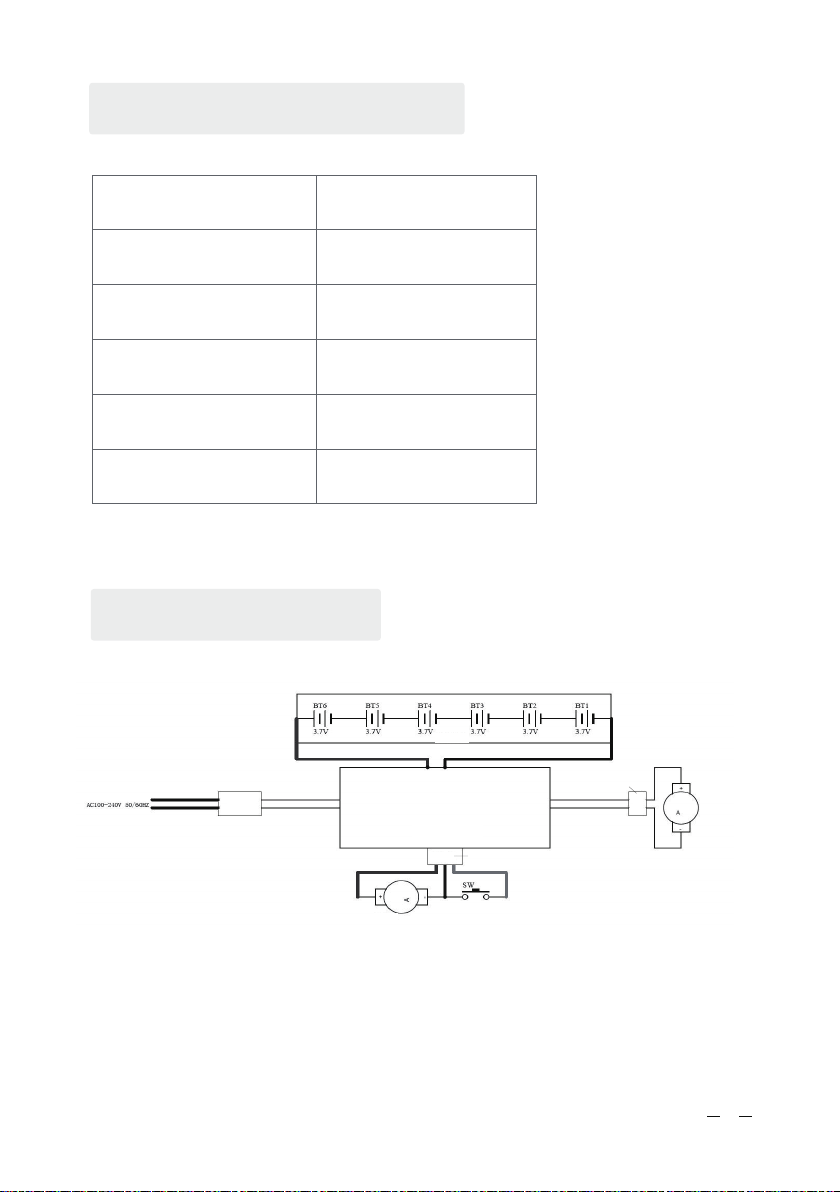
9. Circuit diagram
Battery
pack
Adapter
Motor
Electric
brush motor
Coupling
seat
Coupling
seat
Charge and discharge motherboard
8
Table of contents


