FirstBIKE Basic User manual


4
ASSEMBLY INSTRUCTIONS
FIRSTBIKE “BASIC,” “STREET AND CROSS” MODELS
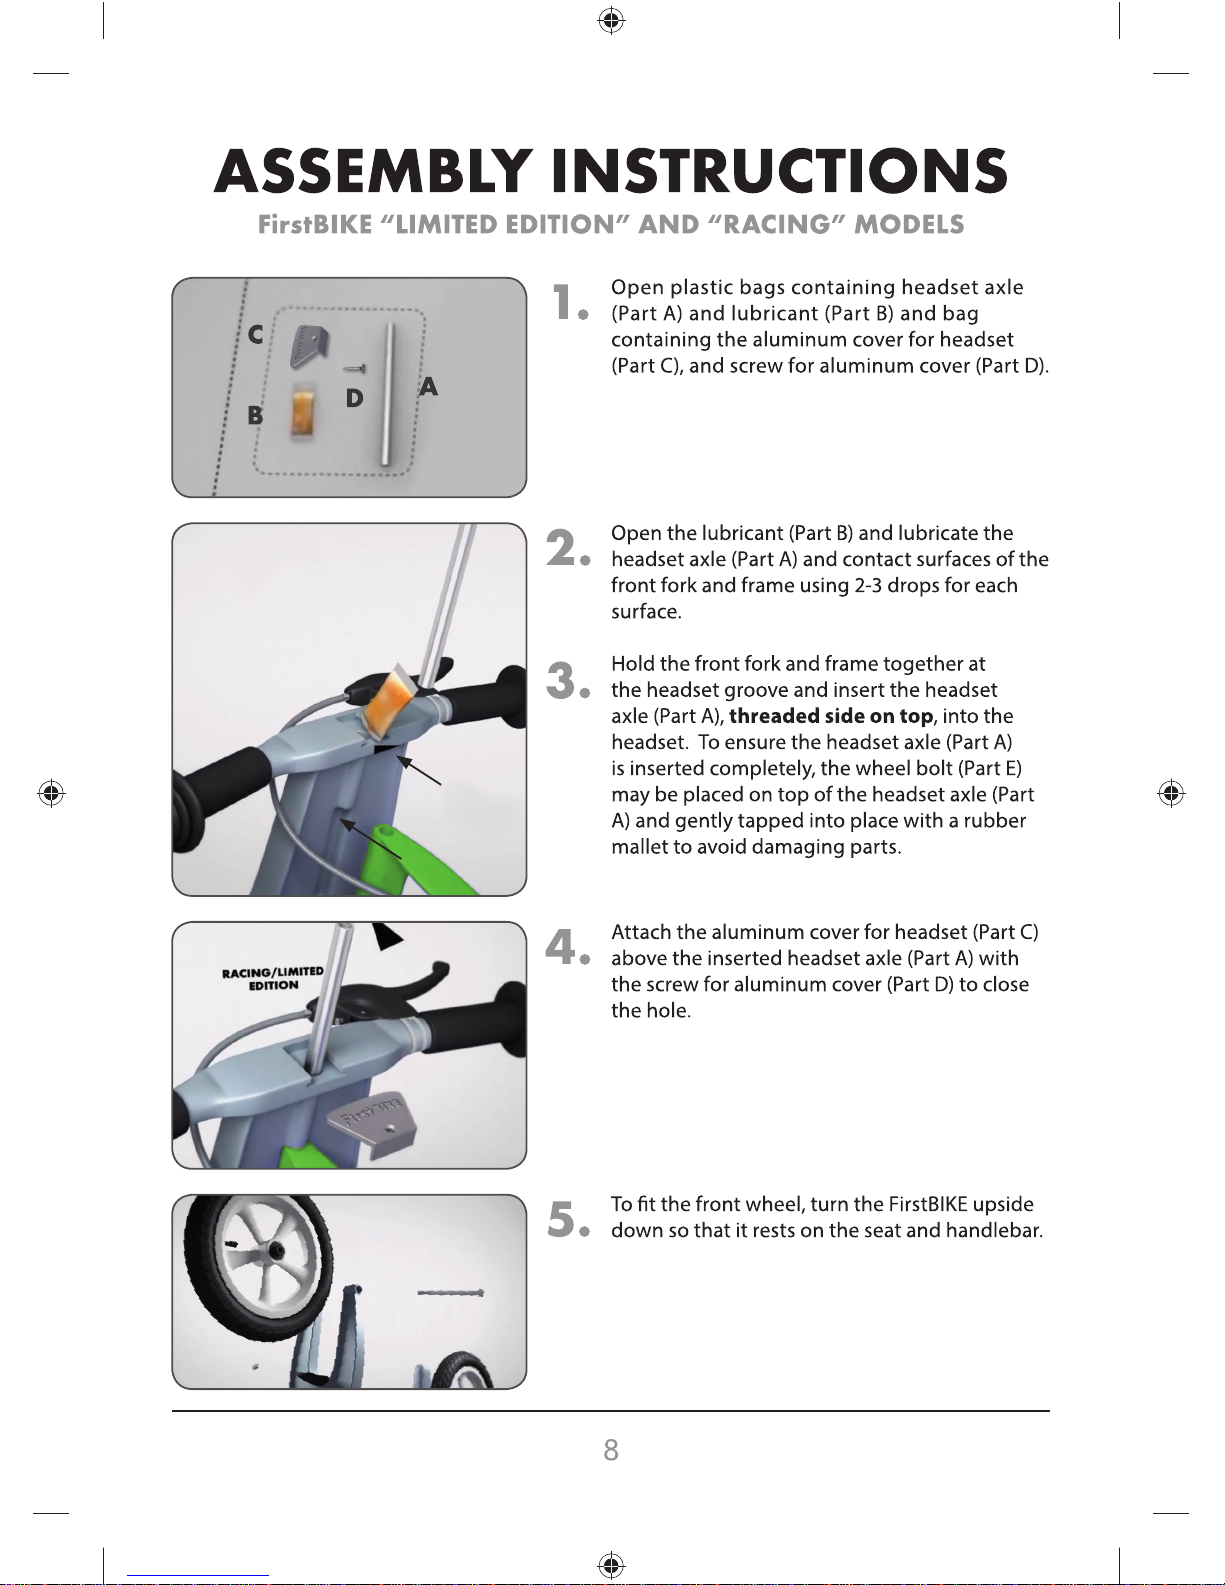
1.
2.
3.
4.
5.
Open plastic bags containing headset axle
(Part A), lubricant (Part B), and plastic cover
(Part C).
Open the lubricant (Part B) and lubricate the
headset axle (Part A) and contact surfaces of the
front fork and frame using 2-3 drops for each
surface.
Hold the front fork and frame together at
the headset groove and insert the headset
axle (Part A), threaded side on top, into the
headset. To ensure the headset axle (Part A)
is inserted completely, the wheel bolt (Part D)
may be placed on top of the headset axle (Part
A) and gently tapped into place with a rubber
mallet to avoid damaging parts.
Insert the plastic cover (Part C) into the groove
above the inserted headset axle (Part A) to
close the hole. To ensure the plastic cover (Part
C) is completely inserted, you may gently tap
the plastic cover with a rubber mallet to avoid
damaging parts.
To t the front wheel, turn the FirstBIKE upside
down so that it rests on the seat and handlebar.
A
B
C

5
6.
7.
8.
Align the front tire between the front fork
ensuring that the tire rotation direction matches
the rear tire and directional arrow on the tire.
The recommended / maximum tire ination
pressure is 2,5 bar. DO NOT OVER-INFLATE!
Insert the self-locking nut (Part E) into the
hexagonal hole on the left side of the fork
and insert and tighten the wheel bolt (Part D)
from the right side using the hexagon (“Allen”)
wrench (Part F).
For FirstBIKE models with brakes, the distance
between the handlebar and the brake lever
can be adjusted by tightening or loosening the
brake lever screw.
If necessary, adjust the brake cable tension with
the adjustment screw located at the end of the
brake cable by the rear wheel to ensure the
brake does not rub or engage when the brake is
not applied.

6
9.
10.
Apply adhesive stickers (Part G) according to the
included Sticker Position photos. Note that the
adhesive sticker for handlebar should be placed
over the plastic cover (Part C).
If you purchased the optional “LowKit” Lowering Kit for FirstBIKE, please refer to the
assembly instructions included with the “LowKit” to properly install.
NOTE:
Please keep the tires inated according to
the recommended tire pressure indicated
on the wheel rim. DO NOT OVER-INFLATE!

7
FIRSTBIKE ASSEMBLY
CONTENTS
FOR FirstBIKE “LIMITED EDITION” AND “RACING” MODELS
Part Qty. Description
A 1 pc. Headset axle
B 1 pc. Lubricant for headset axle
C 1 pc. Aluminum cover for headset
D 1 pc. Screw for aluminum cover
E 1 pc. Wheel bolt (front) M 8 X 120mm
F 1 pc. Self-locking nut M 8
G 1 pc. Hexagon (“Allen”) wrench 6mm (for the wheel bolt)
H 2 pcs. Adhesive reective sticker sets
A
B
C
D
FE
G
H


12
The following important safety instructions
must be observed and followed when using
FirstBIKE.
Please read thoroughly before using
FirstBIKE:
FirstBIKE complies with the strictest toy test-
ing standards of the EU and US, in that mini-
mal risk is associated with the correct use of
this toy.
Before a child uses FirstBIKE, always make
sure that the bike is in fully functional riding
condition and that no parts are damaged.
Regularly check and tighten all nuts and
bolts and make sure that tires are correctly
inflated. The valve caps on the wheels must
be tightened securely with an appropriate
tool. If small parts can be loosened from the
bike, there is a danger of unscrewed parts
being swallowed by small children.
If a defect is found, the bike must not be
ridden until the defect has been properly
repaired. Contact your local dealer or distrib-
utor immediately regarding any defects or
damage.
The product must only be used by one child at
atime. The maximum weight load is 35 kg/77 lb.
The child must never use/ride FirstBIKE with-
out adult supervision.
SAFETY WARNINGS
AND PRECAUTIONS
YOUR CHILD SHOULD ALWAYS:
WEAR A HELMET, SAFETY VEST, AND APPROPRIATE FOOTWEAR
AT ALL TIMES WHILE RIDING FirstBIKE
RIDE FirstBIKE WHILE SUPERVISED BY AN ADULT
RIDE FirstBIKE IN A SAFE ENVIRONMENT FREE FROM TRAFFIC
AND DANGEROUS TERRAIN

13
The FirstBIKE balance bike is designed for
children from 22 months to 5 years old (note:
the optional “LowKit” Lowering Kit is neces-
sary for children from 22 to 30 months old).
The height of the seat is easily adjustable,
without tools, to the size of the little rider.
The adjustment of the seat height is as fol-
lows:
Without “LowKit” Lowering Kit:
34.5 cm to 44.5 cm/13.5 in to 17.5 in
With “LowKit” Lowering Kit:
30.5 cm to 40.5 cm/12.0 in to 15.9 in
After each seat height adjustment, the
“black star” knob used for fastening the seat
post must be tightened securely so that the
seat post cannot slip while in use. Use both
hands if necessary. The seat height must
always be adjusted precisely to the size of
the rider: when the child is seated, both
feet must be flat on the ground with knees
slightly bent.
FirstBIKE is constructed with an “anti-jack-
knife” “Steering Limiter,” which prevents
the handlebar from making afull turn (rota-
tion). This safety feature reduces the possi-
bility of falling, but cannot entirely prevent
it. However, it must be noted that children’s
temperament and urge for physical activity
may create unforeseen situations and riding
behavior, for which the manufacturer cannot
be held responsible.
Because the FirstBIKE frame is made of light-
weight polyamide with 30% glass fiberglass,
the bike is very light. Without the brake, it
weighs only 3.5 kg/7.7 lb. and with the brake
only 3.9 kg/8.6 lb.
The child must be able to control their speed
at all times. In order to avoid accidents, prac-
tice braking with feet and teach the child
how to safely handle the bike. For FirstBIKE
models with rear-drum braking system, it is
very important to practice braking with the
child.
For FirstBIKE models with brakes, the
“SafetyStop” rear wheel drum-brake system
is suitable for use at approximately 2 1/2
years. Please note that your child, depend-
ing on their stage of development, will not
be able to operate the brake effectively and
consciously until approximately the age of
2 1/2 years. Mastering the use of the brake
in any given hazardous situation is necessary
for the brake to be efficient.
An adult should teach the child how to use
the brake and monitor their progress until
the child has acquired the appropriate brak-
ing skills. Different surfaces and traction,
and varying hazardous situations require
the controlled application of braking pow-
er. The early mastering of braking tech-
niques will be agreat advantage when pro-
gressing to apedal cycle. The brake should
be checked regularly and adjusted as nec-
essary (see Assembly Instructions Step 8).
Donot apply oil to the brake cable as it has
aTeflon housing.
Avoid riding FirstBIKE near roads and other
dangerous areas (e.g. swimming pools or
open water, areas with stairs, etc.)! FirstBIKE
must not be ridden on steep terrain or down-
ward slopes. Ride only in sufficient daylight
under the supervision of at least one adult.
While riding, the child must always wear
asafety helmet, safety vest, and appropriate
footwear.


This manual suits for next models
4
Table of contents
Other FirstBIKE Bicycle manuals