FirstSing iPush2TV FS910347 User manual

www.firstsing.com
Rev.:V5
iPush2TV
User Manual
Model:FS910347

Important Safety Precautions.....................1
Product Features........................................3
Specifications.............................................5
Package Contents......................................6
Description of Each Part............................7
Preparations Before Application............... 10
Software Installation...................................12
Connection................................................14
Setup and Application..............................16
Other Setups...........................................23
Q&A..........................................................30
◎Please read the user manual before
use the product.
◎To avoid any risk of electric shock or
other injury, never disassemble or
reassemble this product.
◎To avoid any risk of fire, electric sh-
ock or device failure, never use this
product in humid environments.
◎Never use this product at the temp-
erature higher than 35 C(95 F) or
lower than 5 C(41 F).
◎To avoid placing this product near
the heating equipment, strong mag-
netic field, violent shaking environ-
ment or under the sun exposure dir-
ectly.
◎Keep the product away from any me-
tal or liquid to avoid short circuit or
risk of fire.
◎Never block the ventilation holes.
◎Never over bend, step on or clip the
cable and the HDMI connector com-
1
Important Safety Precautions
lndex

◎Only clean the product with a dry cl-
oth.
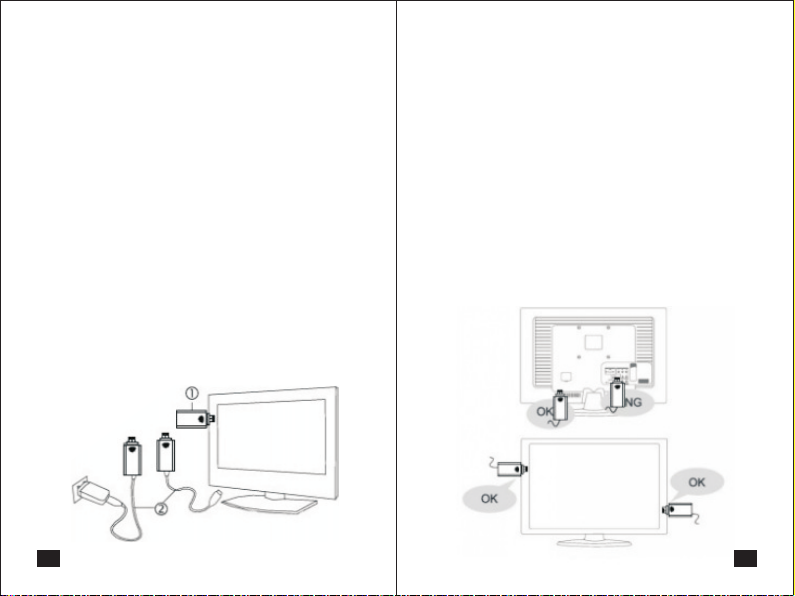
◎Unplug the product from the power
(Micro USB port) if it's not used for
along time or under the lightning and
thunder.
◎Only use the accessories recomm-
ended by the manufacturer.
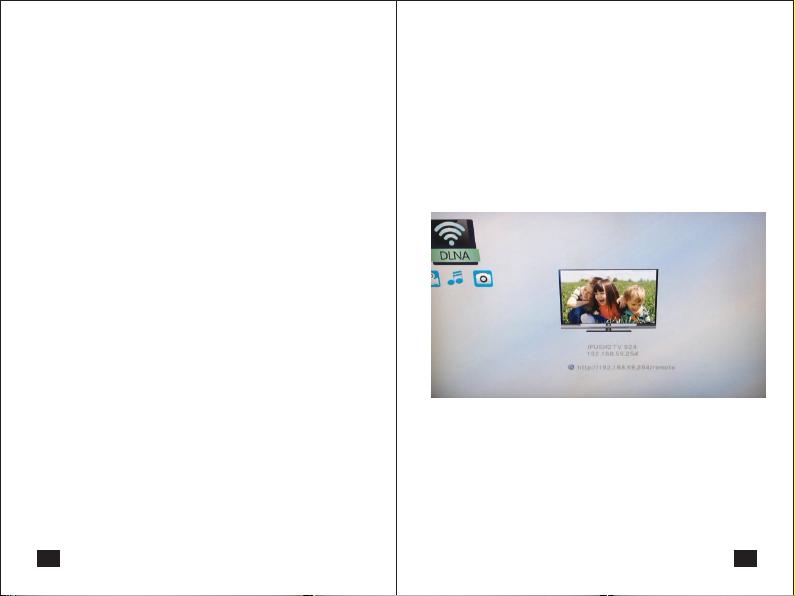
iPush2TV V5, is a cutting edge high-
tech product designed Specifically ta-
rgeting at high-end mobile and porta-
ble devices, it can fast and wirelessly
beaming the display contents from yo-
ur Miracast supported devices (such -
as smartphone, Tablet, laptop) to your
big screen devices (such as TV, mon-
itor and projector).To achieve this, yo-
u just need a simple operation to the
built in feature of your source device,
no wire required, no installation & se-
tup of complex APP software. It can
especially meet the needs of report
presentation when have meeting wit-
h clients, company conference, train-
ing and other business purposes.
In addition, with easy application
of the free JoyLink APP, you can eas-
ily share photo, music and video fro-
m your smartphone, tablet and
32
Important Safety Precautions Product Features

puter to the TV, monitor or projector
with HDMI port. You can enjoy strea-
ming High definition multimedia con-
tent quickly and relaxed to share with
your family and friends.
Under the Bridge to wireless mod-
e, you can stream web video and bro-
adcast live TV programs from major
websites (such as PPTV, QQLive) on
TV, monitor or projector. Meanwhile,
you can also use your device for other
purposes, so when you share special
moments with your family you would
not miss any internet messages, imp-
ortant phone calls and phone messa-
ges.
WIFI 802.11 b/g/n
MPEG 1/2/4, FLV, RV-4,
MJPEG, H.264, WMV9,
VC-1, MOV, AVI, MinusVR,
ASF, FLV, MKV, RM, RMVB,
TS, DAT, MPG, VOB, AVS,
3GP, OGM
MP3, M4A, WAV, MKA,
AAC, AIF, AIFF, OGG,
LPCM, ADPCM
JPEG, BMP,PNG, GIF
HDMIx1 ; Micro USBx1
85.0(L)X36.5(W)X9.0(H)mm
29g
5V 500mA
Almost 2.5W
Wi-Fi Standards
Supported Video
Formats
Supported Audio
Formats
Supported Photo
Formats
Input/Output
port
Dimensions
Weight
Power
Consumption
4 5
Product Features Specifications

◎ iPush2TV V5
◎ Micro USB cable
◎ HDMI cable (option)
◎ User Manual
76
Package Contents
① Button M: short press and long pr-
ess for two functions:
●Short Press:
These are THREE modes are swit-
ched with cycle by short pressing the
button. The factory default setting is
"DLNA mode" and then followed with
"Miracast PBC mode" and "Miracast
PIN Mode". Short pressing button on-
e time will switch to "Miracast PBC
ode". The screen will show "Press ag-
ain to switch to Miracast PBC mode ".
Description of Each Part

98
Please follow the instruction to press
the button one more time for reconfir-
mation to switch Miracast PBC mode.
Keep pressing the button if you need
to switch the mode by following the in-
formation shown on the screen.
● Long Press :
Recover to factory default setting.
Press M button for 5 seconds until it
appears "Factory Default" on the top
left corner of the screen. Once the de-
fault setting is completed, iPush2TV
will restart.
Note: Resetting will delete all yo-
ur saved network connection data ,
so this function is not suggested to
use unless in need.
② Button R: To shut down and restart
the application in the iPush2TV V5
Note: If errors occur during app-
lication, press R button to quit and
restart.
③ Micro USB Port: For power supply
from the USB cable.
④ HDMI connector: For connection
to TV, projector and HDMI compatible
display.
⑤ LED Indicator: Yellow led for active
status
Description of Each PartDescription of Each Part

10
Preparations Before Application
compatible with HDMI.
5. If your TV, monitor or projector does
not support USB device, please pre-
pare a 5V/ 0.5A AC adapter with USB
port for power supply.
◎ Device Preparation:
1. Smartphone, tablet or laptop com-
puter
Note: hardware must capably su-
pport wireless network, 802.11b/g/n.
For computer, the OS must be Win-
dows 7 or above.
2. Wi-Fi Router
Note: a) Please use WiFi-router
which capably supports 802.11 b/g
/n and 300Mbps above for better co-
nnection.
b) To make sure your smartphone,
tablet, laptop and iPush2TV are clo-
ser enough to the WiFi-router. Plea-
se try to avoid areas that have a lot
of noise or interruption from surro-
unding wireless signals.
3. Micro USB cable
4. TV, monitor or projector which are
Preparations Before Application
11

12
1.Under DLNA mode before using iP-
ush2TV, please install the free JoyLink
APP. There are two versions of softw-
are for installation on Windows 7 and
Android OS. Please refer to the corre-
ct software according to your OS.
a)You may download
from Google Play by
searching JoyLink A-
PP. Please refer to the
QR Code to the right.
b)Or go to our website
www.firstsing.com
to download software
for installation, please
refer to the QR Code
to the right.
Software Installation
Note: If the smartphone or tablet in-
stalled IOS system (such as iphone
or ipad), do not need to install any
software before using iPush2TV.
2.Under Miracast mode, do not need
to install any software before using iPu
sh2TV.
13
Software Installation

③ Select correct HDMI input from the
TV, monitor or projector.
④ The screen will show a video and
then enter to the main page.
Note: Please parallel plug iPush-
2TV into the TV, monitor or projector.
Vertical direction of iPush2TV to the
TV, monitor or projector will lead to
shielding effect and cause the poor
Wi-Fi signal and connection.
15
Connection
14
① Connection of devices
Plug iPush2TV into the HDMI port of
TV,monitor or projector, or connect wi-
th HDMI connector.
② Power connection
Please take out the Micro USB ca-
ble from the package, plug the Micro
USB connector into iPush2TV. Then,
plug the other side of USB connector
into the USB port of the TV, monitor or
projector. If your TV, monitor or proje-
ctor does not have a USB port, please
prepare a 5V power adapter with USB
port for power supply.
Connection

Once your device (smartphone, tabl-
et and computer) is connected to iPu-
sh2TV, the setup is done, open your
JoyLink APP, then you can start to st-
ream multimedia content from your
device to TV, monitor or projector.
Note: Suggestions on the selecti-
on of the mode of "Virtual AP only"
of video sharing, because the better
transmission performance.
b) Miracast PBC operation interface:
17
Setup and Application
16
◎Setup: Please turn on the Wi-Fi on
your device (smart phone, tablet and
computer) before start setting. Click
"iPush2TV*** " to start connection.
There are two modes of connection:
a) Virtual AP only Mode: To share mu-
ltimedia content from your smartpho-
ne, tablet and laptop to the TV, monit-
or or projector without home network.
b) Bridge to wireless Mode: In this mo-
de, you can share web videos or TV
program on a larger display; meanwh-
ile, your smartphone, tablet and lapt-
op can be used to do other things.
● Virtual AP only mode setup:
a) DLNA operate interface:
Setup and Application

.com". Comparing with Miracast
PBC, Miracast PIN has an extra pas-
sword settings, other settings in the
same way.
● Bridge to Wireless Mode Setup:
This setup must be under DLNA ope-
rate interface, and there are two ways
for setup.One is through the Web bro-
wser; Another is through JoyLink APP.
Setup as follows:
a) Please double ch-
eck your device (sma-
rtphone, tablet and la-
ptop) to make sure it's
connected to iPush2TV,
then open the web bro
wser and type the IP address "http://
192.168.59.254/remote" which is sh-
own on the main page. Please see ri-
ght side the QR Code. Or by JoyLink
19
Setup and Application
you just need to launch Miracast feat-
ure which is under Wi-Fi setup on yo-
ur device, then you can mirror what is
on your smartphone or tablet screen
to big screen of the TV, monitor or pr-
ojector.
Note: the function of screen mirr-
oring only available to mobile, port-
able devices which support WIFI CE-
RTIFIED Miracast. The brands info-
rmation of which will be regularly
updated on website “www.firstsing
18
Setup and Application

●How to Playback
1. Under DLNA mode and Android OS:
select the photo, music or video which
you want to play from your device, th-
en tap "Menu" for options of "Play
now", "Add to queue",“Select all" or
"Unselect all". If you choose "Play
now", the selected multimedia conte-
nt will be streamed and played direct-
ly on TV, monitor or projector.
21
Setup and Application
APP to access a virtual remote contr-
oller, click【Setup】button for Settin-
gs.
b) It appears a Virtual Remote Contr-
oller on the screen, please click 【Wi-
fi setup】at the bottom right corner,
access "Wireless LAN setup" and then
choose your router. If you can't find
out the router you want, click "Re-Sc-
an AP" to research. Choose correct
router to enter the password of Wifi
router and then tab "submit" for setup
successfully.
c) The iPush2TV will quit automatically,
restart and then connect to the Wifi ro-
uter. The main page will show the con-
nection to the router is ready. Which
means product has been entered to
"Bridge to Wireless Mode".
20
Setup and Application

23
Other Setups
Please open the web
browser with DLNA
operate interface and
tape in “http://192.168.
59.254/remote”which
is shown on the main page. Please
see on the right side the QR Code;Or
by JoyLink APP to access a virtual re-
mote controller, click【Setup】button
for settings:
◎ Network Setup: There are four op-
tions under Network "Device name",
" Virtual AP Bridge ", "Wireless LAN
Setup", "Virtual AP Setup “
●【Device Name】: The default de-
vice name can be renamed with the
keyboard on screen.
●【Virtual AP Bridge】: Option for
"Virtual AP only" Mode or "Bridge to
wireless" Mode.
2.Under DLNA mode and Windows 7
OS: You can drag PC's photo, music
or video to the location of the JoyLink
playback folder "Photo/Music" or "Vi-
deo". By accessing folder and choos-
ing "Play now", the selected files will
be streamed and played directly on
TV, monitor or projector.
22
Setup and Application

Note: commonly there are two en-
cryption methods that most routers
support: WPA and WEP, for WPA, aft-
er access the selected route, the pa-
ssword login box will appear, for
WEP there will be options for Hex Co-
de and Ascl after access the selected
route, the default Mode is Hex Code.
●【Virtual AP Setup】:As this setup
require password entering each time
of connections and using of this prod-
uct. So we do not recommend you to
use.
a) Click to select【Wireless Security】,
access options for 【Open System】
and【WPA Key】, click【WPA Key】,
【Password】, enter the password of
wireless AP and click OK .
b) Access【Region】, select protect-
ed region.
c) Click【Save Change】iPush2TV will
quit automatically, restart and reconn-
25
Other Setups
cause the disconnection of Wi-Fi
and restart. Please quit the setting
page and JoyLink re-connect iPush
2TV and proceed with setup and pla-
yback.
●【Wireless LAN Setup 】: Please
choose【 Virtual AP Bridge 】from
"Bridge to wireless" before processi-
ng setup.
a) click【Wireless LAN Setup】, ac-
cess the selected wireless route, it w-
ill appear the password login box.
b) Enter the password with the remo-
ter controller on the main page, click
OK to finish setup. The iPush2TV will
test network connection automatically,
and the image of "wireless LAN test
success" will appear on the screen.
c) After the iPush2TV reboot automati-
cally, the main page will show conne-
ction to router is ready.
Note: Any change of Setup will
24
Other Setups

●【HDMI A/V Synchronization】: the
unit of measurement is millisecond.
◎【Video Setup】: There are 4 opti-
ons for "Aspect Ratio", "TV system",
"Scale Video Output to 90%", "1080P
24Hz". Setting can be made according
to actual device and demand.
● 【Aspect Ratio】: Select the best
display ratio for your TV, monitor or
projector. The default aspect is 16:9
wide screen.
a) Pan Scan 4:3: Trim the original
16:9 screen, retrieve the middle part
and play on a 4:3 screen. It's recomm-
ended to choose this proportion if use
a standard 4:3 display.
b) Letter Box 4:3: without any retrieve
of screen, but just compress the width
of screen. It's recommended to choose
27
Other Setups
ect then the password is set.
◎ Audio Setup: There are 3 options
for Audio setting, "Night Mode", "HD-
MI Output", "Lip Sync(HDMI A/V Sy-
nc)". The setting can be made accor-
ding to the device and demand.
●【Night Mode】: To control the an-
noying volume.
●【HDMI Output】: Setting correct
HDMI audio output according to your
device.
a) HDMI LPCM: Decoding audio, out-
put digital analogy of 2 channels.
b) HDMI RAW: To stream the Original
bit stream with audio output to the co-
nnected HDMI device. The HDMI dev-
ice must have the decode ability, suc-
h as A / V amplifier, in order to have the
right sound.
c) HDMI AUTO: factory default setting.
26
Other Setups

for【Language setting】,【Factory
Default】,【VersionInfo】, 【Online
Upgrade】, 【USB Upgrade】. Se-
tting can be made according to the de-
vice andemand.
●【Language】: To select the lan-
guage for operation.
●【Factory Default】: To return ori-
ginal default.
●【Version Info】: To show the rela-
ted information of iPush2TV.
●【Online Upgrade】: To get the so-
ftware and upgrade by network.
●【USB upgrade】: To get the soft-
ware and upgrade by USB Device
Note: You have to change to "Br-
idge to wireless Mode" when updat-
ing online. It takesabout 5 minutes
to upgrade. Please don't switch off
the power when upgrading online.
After the upgrade is finished, the sy-
stem will reboot to the main menu.
29
Other Setups
this proportion if use a standard 4:3
TV.
c) 16:9: It's recommended to use this
ratio of use 16:9 wide screen TV.
d) 16:10:It's recommended to choose
this proportion if you have a 16:10 wi-
de TV.
●【TV System】: Select the suitable
resolution based on the display ability
of your TV, monitor or projector.
●【Scale Video Output to 90%】: Se-
lect to enable screen shrinking.
●【1080P 24Hz】: Use this function
to select the resolution of display. If yo-
ur image is1080P 24Hz, it's recomme-
nded to open this function and it will pr-
ovide the best display resolution.
◎ System Setup: There are 5options
28
Other Setups

31
Q: Can't playback the content to the
TV, monitor or projector in real time on
Bridge to wireless Mode?
A: It takes more time to stream the lar-
ge content and please wait for few se-
conds. Please check if your Internet
bandwidth is smooth and wireless de-
vice is not interfered by the environm-
ent or other wireless devices.
Q: Some media file formats can't be
played?
A: Some multimedia content formats
are not supported and please refer the
specifications.
Q: iPush2TV DMR is not be found on the
device list?
A: To make sure the iPush2TV and your
smartphone, tablet and laptop is con-
nected in same network area. Or ple-
ase close the Wi-Fi and restart WiFi
again.
Q&A
30
If you have any problem when using iPush
2TV, the following steps will help
to solve the problem.
Q: A black screen if the iPush2TV is co-
nnected to TV?
A: Please do the following:
1.Check if the yellow LED on iPush2TV
is on or not. If not, check the conn-
ection status of the Micro USB cable.
2. Check if the HDMI cable is well co-
nnected to devices and display.
3. Check if the HDMI input setting is
correct.
Q: Cannot find the device you want to
play with JoyLink APP?
A: Please check if iPush2TV in smartp-
hone, tablet and computer is selected
and connected to iPush2TV.
Q&A

33
Q: iPush2TV keeps repetitive starting
when powered on?
A: Please check if the USB cable was
recommonded by the manufacturer,
there is some cable (usually slender)
in the market is not qualified, it's with
larger resistance and cause iPush2TV
can not reach the starting voltage, th-
en it appears repetitive starting.
Q&A
Q: It's suddenly stopped at playing
movie?
A: iPush2TV has better performance
with strong Wi-Fi signal. When the si-
gnal is not good or be disturbed, the
screen display "Worse Wireless Env-
ironment Stop Playback", the playing
will be stopped for about 5 seconds
and then return to the main menu. The
performance of iPush2TV depends on
the environment. To get the best co-
nnection performance, make sure yo-
ur devices are closer enough to the wi-
reless routes In addition, please also
try to avoid areas that have a lot of
noise or interruption from surroundi-
ng wireless signals.
32
Q&A
Table of contents