FISCHBEIN C Series User manual

MODEL
C
CATALOG
NO.
960
DAVE
FISCHBEIN
MFG.
COMPANY
2720-30TH
AVE.
SO.
• MINNEAPOLIS
6,
MINN., U.S.A.
From the library of: Superior Sewing Machine & Supply LLC

m
INDEX
Paragraph
Suggestions I
Service 2
Guarantee 3
Thread
Oiling
Installation
Cleaning ..
GENERAL CARE
OF
MACHINE
Cold Weather Operation g
Tension
9
Threading
Inserting New Needle
||
Changing
Looper
|2
Needle
Bar
Adjustment
|3
HOW
TO
CLOSE A
BAG
Proper Operating
Position
Closing
Procedure
14-15-16
How
to
Close
a Paper
Bag
17
How
To
Close
A
Bag
With
Two
Heavy
Seams
18
Cutting
Chain
|g.y^
Attaching Tag 19
To
Close
Bag
After
Rethreading
20
Tangling
of
Thread
21
MECHANICAL ADJUSTMENTS
Stitch
Length
22
If
Machine
Stops
Chaining
23
If
Machine
Skips
Stitches
or
Breaks
Thread
24
Parts
Inventory
25
Excessive
Needle
Breakage
26
Motor Instructions 27
Do's
28
Don'ts 29
PARTS
Detail
Assembly
Drawings
Illustrations
and
Part Number.
From the library of: Superior Sewing Machine & Supply LLC
SUGGESTIONS
i.
To
insure
successful
operation
of
machine,
study
following
instruc
tions
with
care.
Machine
is
shipped
with
sample
of
sewing.
Check
sample
for
stitch
and
chain
appearance.
After
studying
the
instructions,
practice
sewing
on
the
sample
or
an
empty
bag
until
control
of
machine
is
mastered.
Then
proceed
to
close
filied
bags.
SERVICE
2.
Prompt
repair
service,
parts,
thread,
and
supplies
are
available
from
the
Dave
Fischbein
Company
or
authorized
representatives.
Service
machines
immediately
available
at
nominal
rental,
plus
transportation charges.
GUARANTEE
3.
This
machine
is
unconditionally
guaranteed
for
thirty
(30)
days
from
date
of
invoice
against
defective
parts,
and
workmanship;
and
if
handled
according
to
instructions,
to
operate
satisfactorily.
Page
Four
INDEX
Paragraph
Suggestions
|
Service
2
Guarantee 3
Thread
Oiling
Installation
Cleaning ..
GENERAl CARE
OF
RUCHINE
Cold
Weather
Opm'ation
g
Tension
9
Threading
|q
Inserting
New
Needle
||
Changing
Looper
|2
Needle
Bar
Adfustment
13
HOW
TO
CLOSE A
BAG
Proper
Operating
Position
Closing
Procedure
I4-I5-16
How
to
Close
a
Paper
Bag
17
How
To
Close
A
Bag
With
Two
Heavy
Seams
IB
Cutting
Chain
Attaching
Tag
19
To
Close
Bag
After
Rethreading
20
Tangling
of
Thread
21
MECHANICAL ADJUSTMENTS
Page
4
4
4
5
5
5
5
6
6
7
7
8
9
ID
11-12
12
13
13
13
13-14
14
Do's
Detail
Assembly
Drawings
illustrations and Part Number
PARTS
IS
IS
.24
16
16
16
17
.28
18
.29
18
20-23
24-40
From the library of: Superior Sewing Machine & Supply LLC
SUGGESTIONS
I.
To
insure
successful
operation
of
machine,
study
following
instruc
tions
with
care.
Machine
is
shipped
with
sample
of
sewing.
Check
sample
for
stitch and chainappearance.
Aftw
studying
the
instructions,
practice
sewing
on
the
sample
or
an
empty
bag
until
control
of
machine
is
mastered.
Then
proceed
to
dose
fiHed
bags.
SERVICE
2.
Prompt
repair
service,
parts,
thread,
and
supplies
are
available
from
the
Dave
Fischbein
Company
or
authorized
representatives.
Service
machines
immediately
available
at
nominal
rental,
plus
transportation charges.
GUARANTEE
3.
This
machine
is
unconditionally
guaranteed
for
thirty
(30)
days
from
dateof
invoice
against
defective
parts
and
workmanship;
and
if
handled
according
to
instructions,
to operate
satisfactorily.
Paga
Four
GENERAL CARE
OF
MACHINE
4.
The
machine
uses
a
number
12,
4-ply
thread,
wound
on
4-oz.
cones.
The
Dave
Fischbein
Company,
or
authoriz^
representatives,
can
supply
this
thread
in
cartons
of
12
or
24
cones,
or
cases
of
50
cones.
Each
cone
will
close
about
200
normal
size
lOO-lb.
bags.
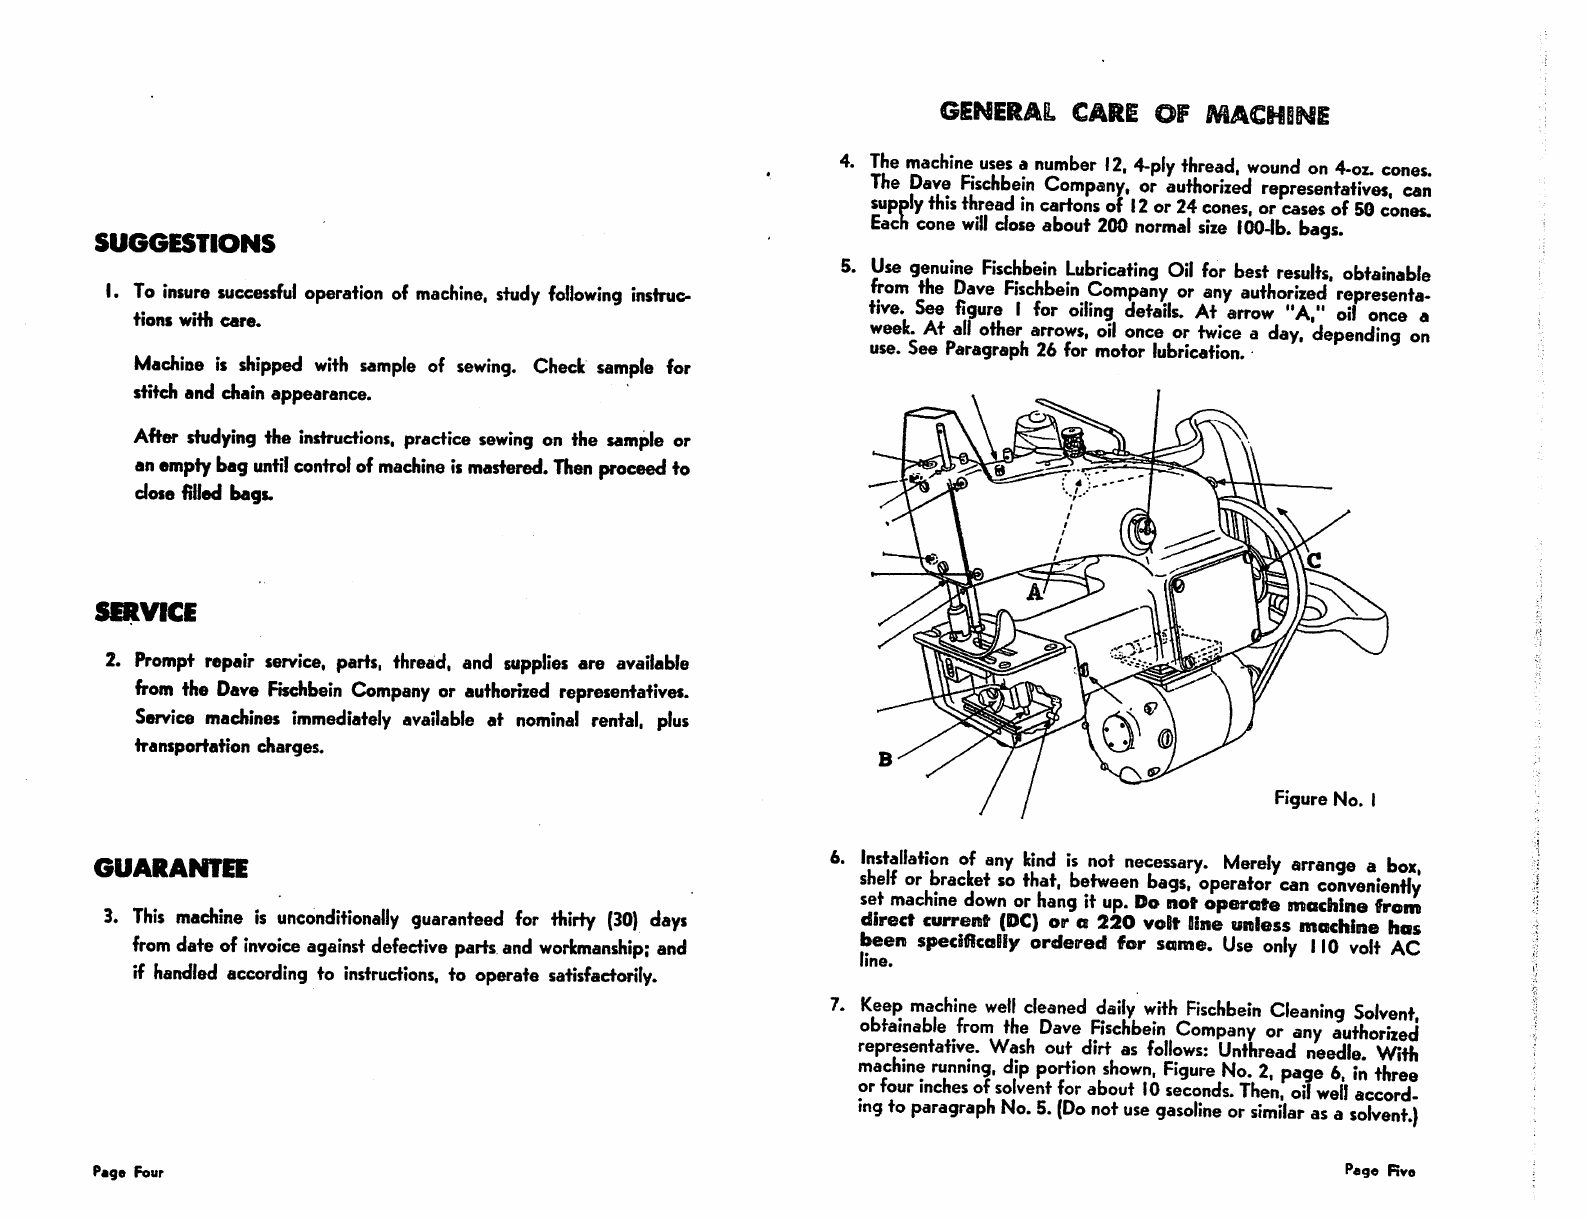
Use
genuine
Fischbein
Lubricating
Oil
for
best
results,
obtainable
from
the
Dave
Fischbein
Company
or
any
authorized
representa
tive.
See
figure
I
for
oiling
details.
At
arrow
"A,"
oil
once
a
week.
At
all
other
arrows,
oil
once
or
twice
a
day,
depending
on
use. See Paragraph 26 for motor lubrication.•
5.
6.
7.
Figure No. I
Installation
of
any
kind
is
not
necessary.
Merely
arrange
a
box,
shelf
or
bracket
so
that,
between
bags,
operator
can
conveniently
set
machine
down
or
hang
it
up.
Do
not operate machine from
direct current
(DC)
or a
220
voBt
Bine
unless machine has
been
specifically
ordered for
some.
Use
only
110
volt
AC
line.
Keep
machine
well
cleaned
daily
with
Fischbein
Cleaning
Solvent,
obtainable
from
the
Dave
Fischbein
Company
or
any
authorized
representative.
Wash
out dirt as
follows:
Unthread
needle.
With
machine
running,
dip
portion
shown.
Figure
No.
2,
page
6,
in
three
or
four
inches
of
solvent
for
about
ID
seconds.
Then,
oil
well
accord
ing
to
paragraph
No.
5.
(Do
not
use
gasoline
or
similar
as
a
solvent.)
Pag«
Rvo
From the library of: Superior Sewing Machine & Supply LLC
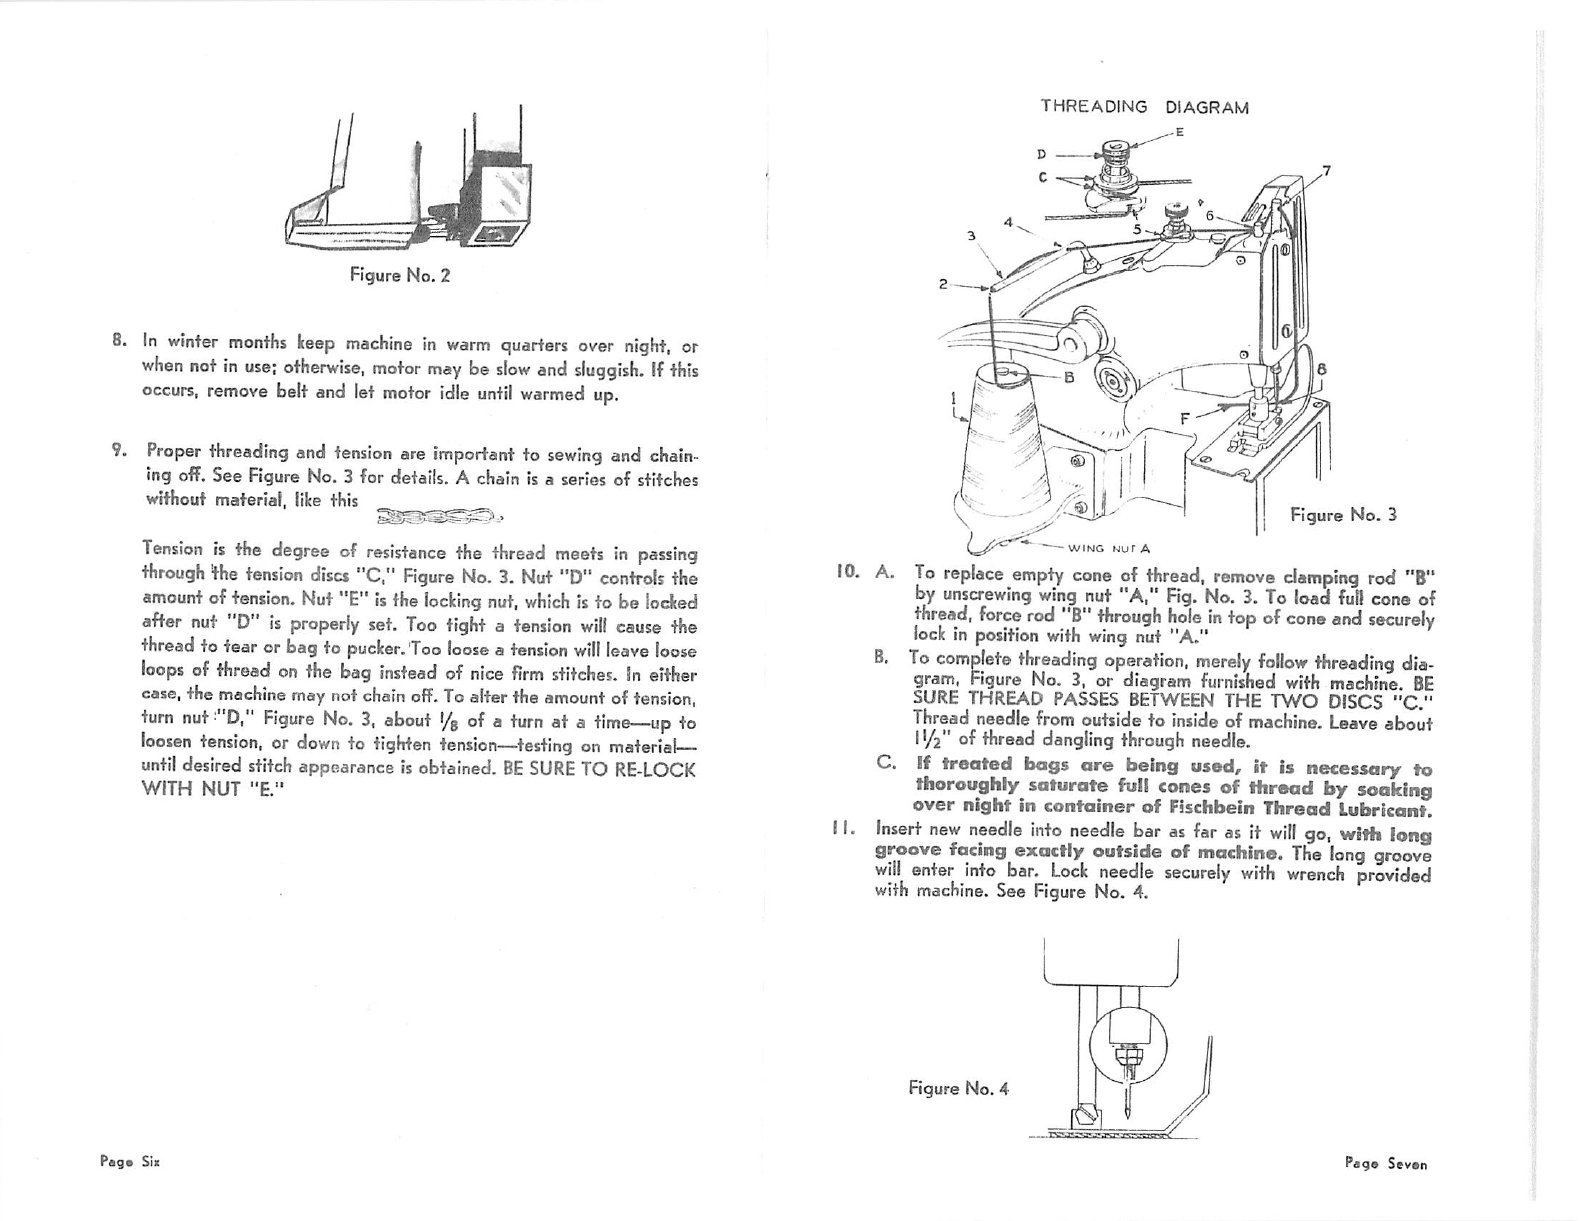
Figure No. 2
8.
In
winter
months
keep
machine
in
warm
quarters
over
night,
or
when
not
in
use;
otherwise,
motor
may
be
slow
and
sluggish.
If
this
occurs,
remove
belt
and
let
motor
idle
until
warmed
up.
9.
Proper
threading
and
tension
are
important
to
sewing
and
chain
ing off. See Figure No. 3 for details. A chain
Is
a series of stitches
without material,
like
this
Tension
is
the
degree
of
resistance
the
thread
meets
in
passing
through
'the
tension
discs
"C."
Figure
No.
3.
Nut
"D"
controls
the
amount
of
tension.
Nut"E"
Is
the
locking
nut,
which
Is
to be
locked
after
nut
D
is
properly
set.
Too
tight
a
tension
will
cause
the
thread
to tear or bagto
pucker.
Too
loose
a
tension
will
leave
loose
loops
of
thread
on
the bag
instead
of
nice
firm
stitches.
In
either
case,
the
machine
may
not
chain
off-
To
alterthe
amount
of
tension,
turn
nut'"D,"
Figure
No.
3,
about
'/g
ofa
turn
at a
time—up
to
loosen
tension,
or
down
to
tighten
tension—testing
on
material
until
desired stitch appearance is obtained.
BE
SURE
TO
RE-LOCK
WITH
NUT
"E."
Paq*
Six
THREADING
DIAGRAM
Figure
No.
3
'
WING
Nur
A
10.
A.
To
replace
empty
cone
of
thread,
remove
clamping
rod
"B"
by
unscrewing
wing
nut "A,"
Fig.
No.
3.
To
load
full
cone
of
thread,
force
rod
B"
through
hole
In
top
of
cone
and
securely
lock
in
position
with
wing
nut "A."
B.
To
complete
threading
operation,
merely
follow
threading
dia
gram,
Figure
No.
3,
or
diagram
furnished
with
machine.
BE
SURE
THREAD
PASSES
BETWEEN
THE
TWO
DISCS
"C."
Thread
needle
from
outside
to
Inside
of
machine.
Leave
about
11/2"
of thread dangling through needle.
C. If treated bags are being used, it is necessary to
thoroughly soturate
full
cones
of thread by soaking
over
night
in
container
of Fischbein
Threod
Lubricant.
11.
Insert
new
needle
into
needle
bar
as
far
as
it
will
go,
with
long
groove facing exactly outside of machine.
The
long
groove
will
enter
into
bar.
Lock
needle
securely
with
wrench
provided
with
machine.
See Figure No. 4.
Figure No. 4
Pag«
Sevan
From the library of: Superior Sewing Machine & Supply LLC
12. To change iooper "B," Rgure No. I,
follow
instrucfions below very
carefully.
Machine
will
not
sew
or
chain
properly
unless
Iooper
is set exactly right and according to these instructions:
A. Unthread needle and remove presser foot, throat plate, and
feed
dog.
B.
C.
F.
Turn
machine
pulley
by hand
until
holes in main shaft cam and
feed dog carrier line up, see line A-A, Figure No. 5. Insert
wrenchNo. I-I47C and loosenIooper set screw.No. 1-152.
Pull
out old Iooper.
InsertnewIooper,withflat on
shank
upright, so that set
screw.
No.
1-152,
will
lock
on the flat and bring Iooper automatically
into time. Tighten set screw only slightly.
Turn
machine
pulley
about a
half
a turn.
This
will
bring
Iooper
and
needle
into
crossing
position.
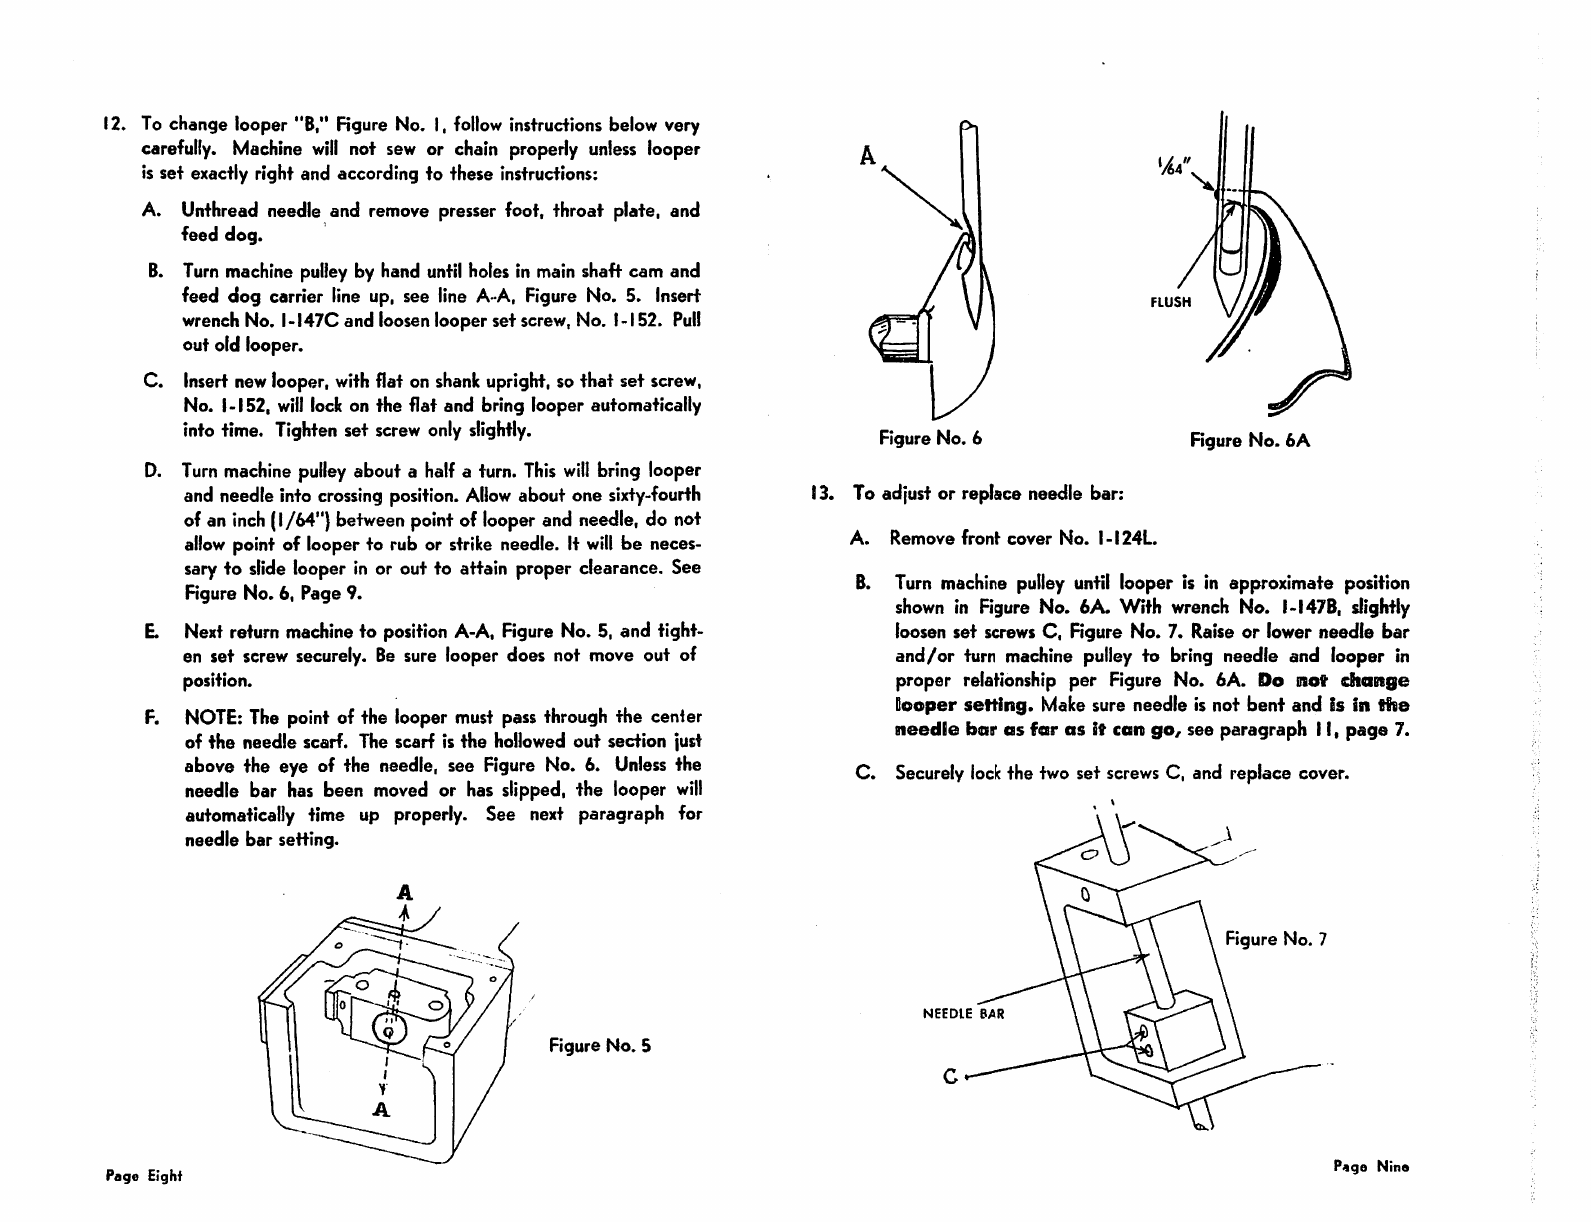
Allow
about one
sixty-fourth
of an
inch
(1/64")
between
pointof
Iooper
and
needle,
do not
allow
point of Iooperto rub or
strike
needle. It
will
be neces
sary to slide Iooper in or out to attain proper clearance. See
Figure No. 6, Page 9.
Next return machine to position A-A, Figure No. 5, and tight
en set screw securely. Be sure Iooper does not move out of
position.
NOTE:
The point of the iooper
must
pass through the center
of
the
needle scarf. The scarf is
the
hollowed
out
section just
above the eye of the
needle,
see
Figure
No. 6.
Unless
the
needle bar has been
moved
or has slipped, the Iooper
will
automatically time up properly. See next paragraph for
needle
bar
setting.
Figure
No.
5
Page Eight
FLUSH
Figure No. 6
Rgure
No. 6A
13. To adjust or replace needle bar:
A.
Remove
front
cover
No.
I-I24L
B.
Turn
machine
pulley
until
Iooper is in approximate position
shown
in
Figure
No. 6A. With
wrench
No. I-1478, slightly
loosen set screws C, Rgure No. 7. Raise or lower needle bar
and/or turn
machine
pulley
to bring needle and Iooper in
proper relationship per Figure No. 6A. Do
not
change
Booper
setting.
Make sure needle is not bent and is in
the
needle
bar
as
far
os it
can
go,
see paragraph 11,page 7.
C. Securely
lock
the two set
screws
C, and replace cover.
Figure No. 7
NEEDLE
BAR
Page
Nine
From the library of: Superior Sewing Machine & Supply LLC
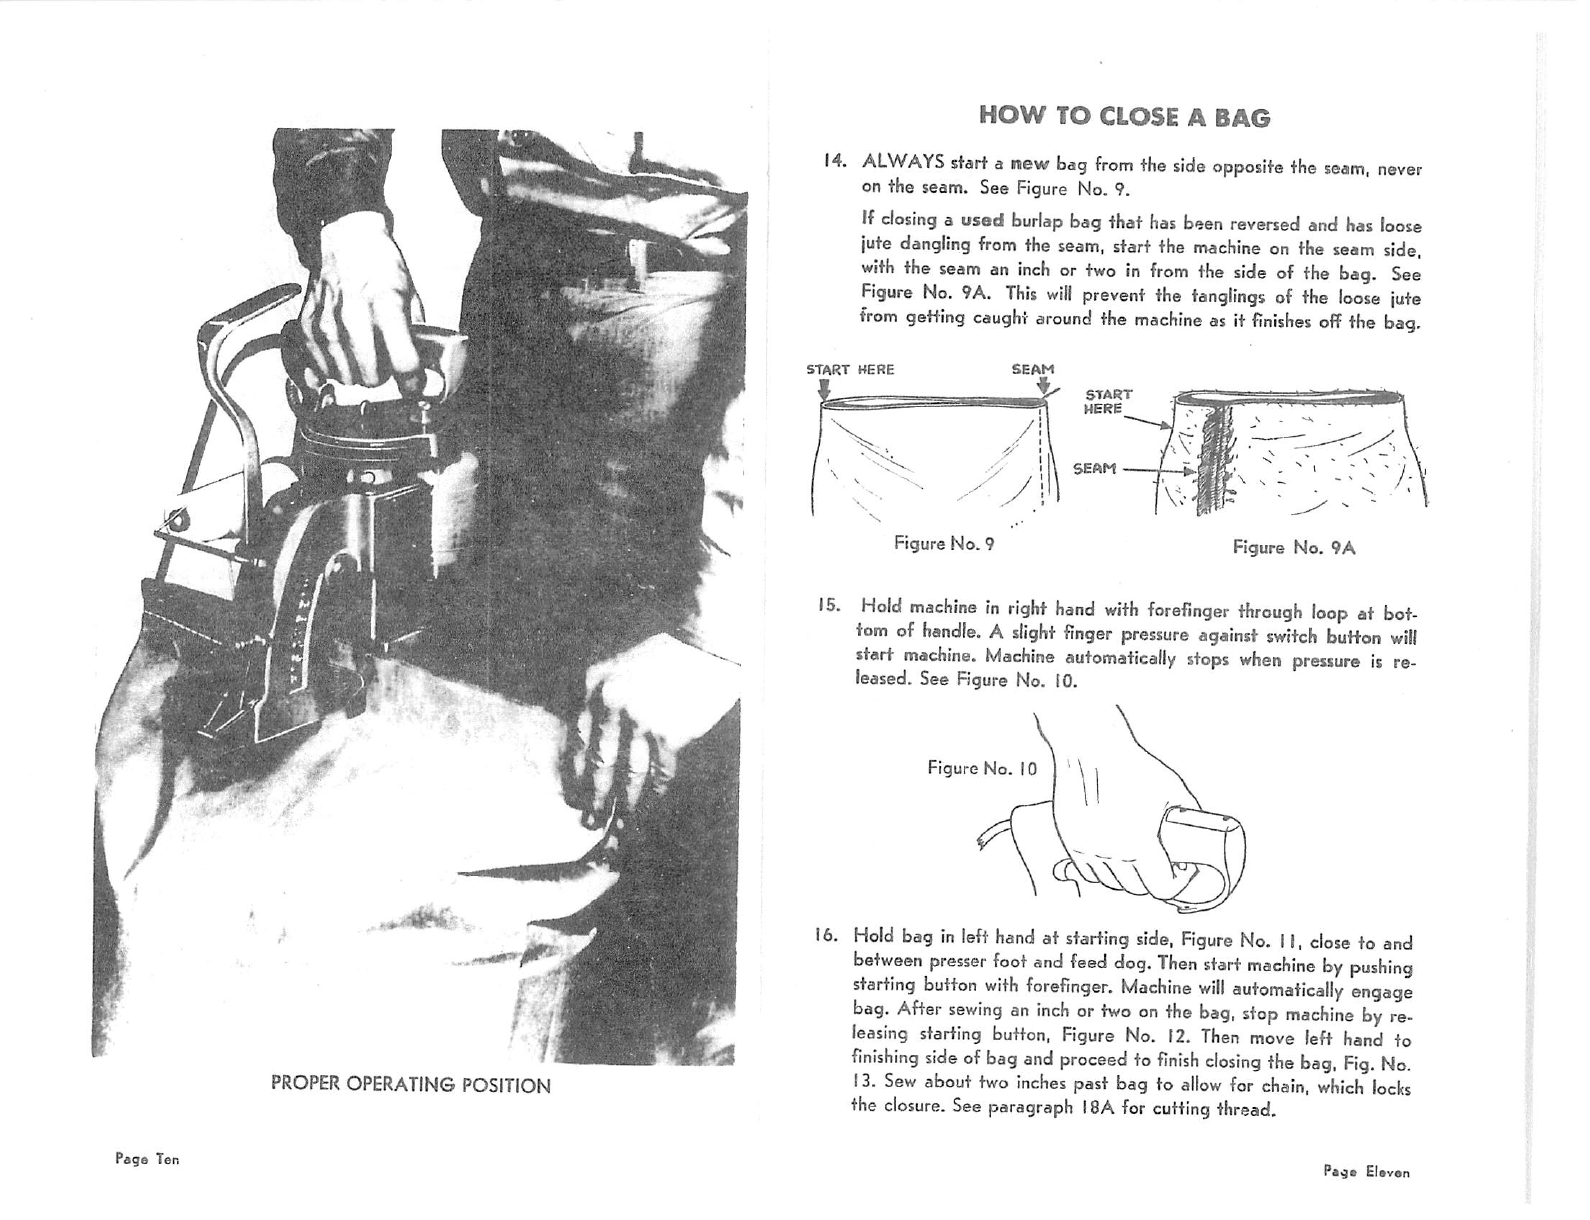
PROPER
OPERATING POSITION
Page
Ten
HOW
TO
CLOSE
A
BAG
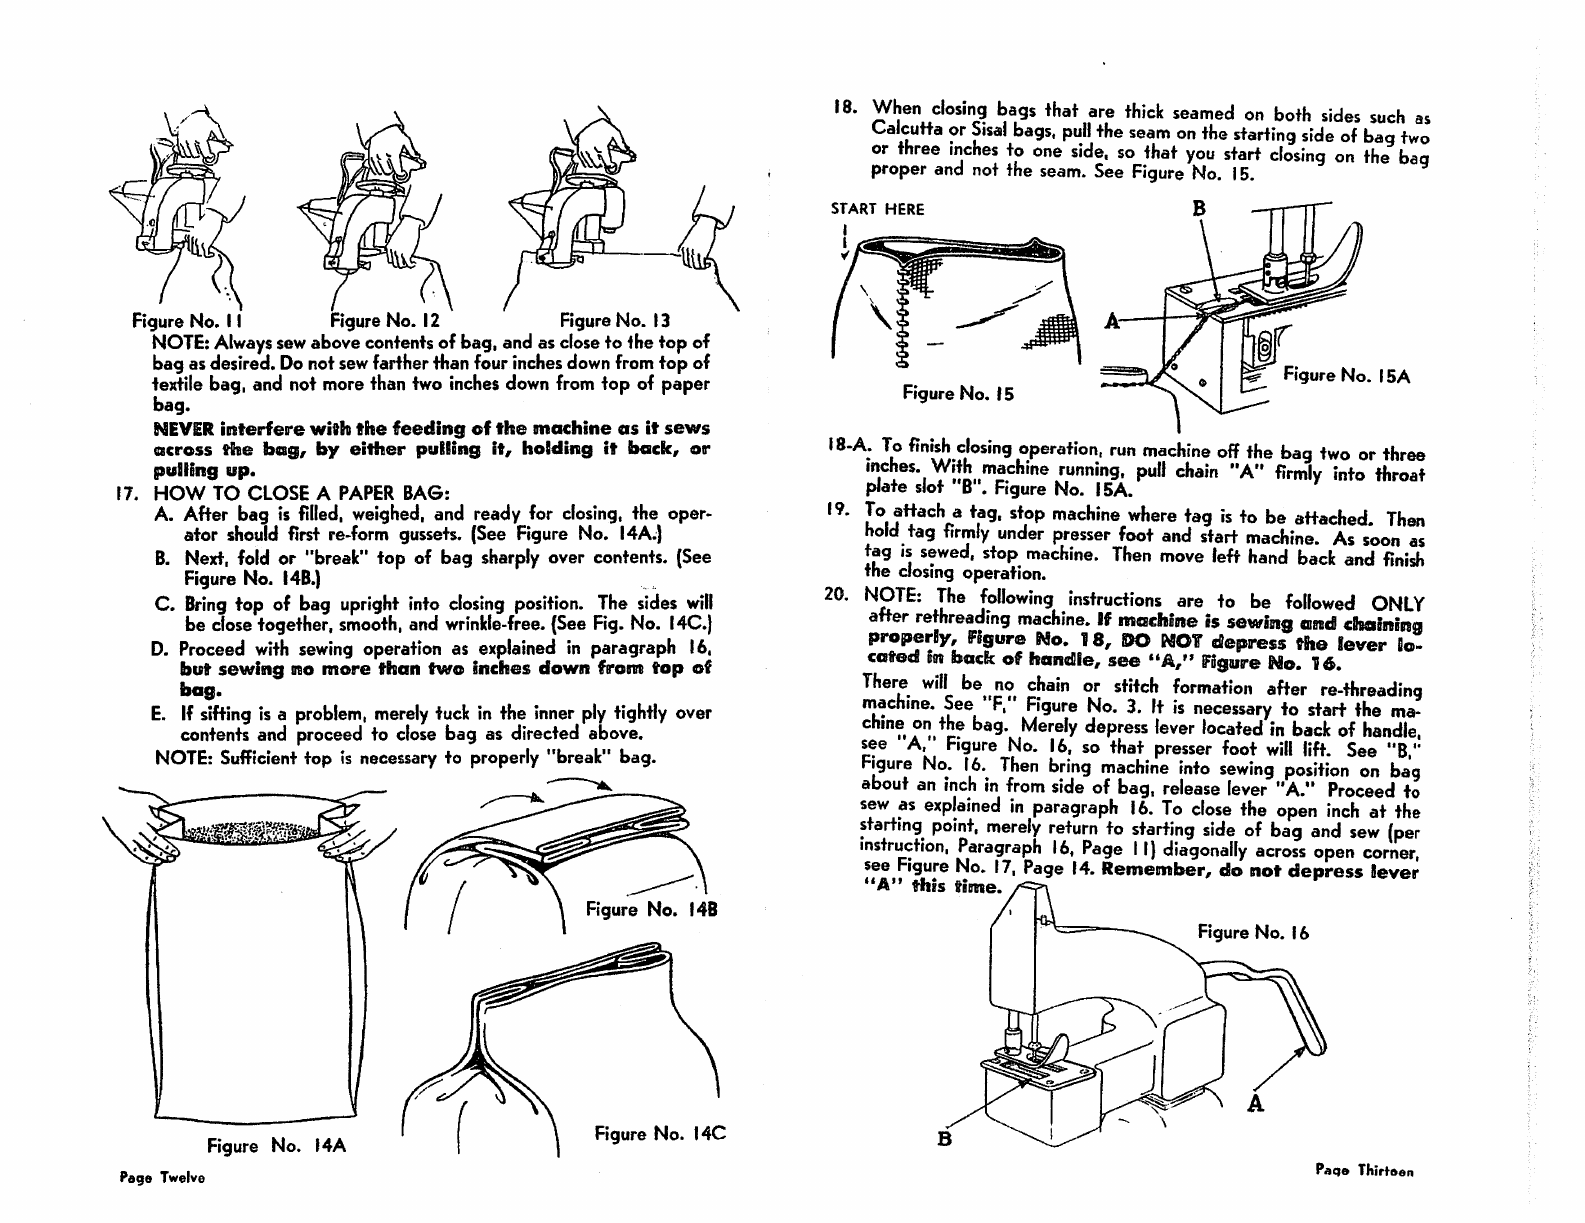
14.
ALWAYS
sfart
a new
bag
from
ihe
side
opposite
the
seam,
never
on the
seam.
See
Figure
No. 9.
If
closing
a used
burlap
bag that
has
been
reversed
and
has
loose
jute
dangling
from
the
seam,
start
the
rrwchine
on
the
seam
side,
with
the
seam
an
inch
or
two
in
from
the
side
of
the
bag.
See
Figure
No,
9A.
This
will
prevent
the
tanglings
of
the
loose
jute
from
getting
caught
around
the
machine
as
it
finishes
off
the
bag.
START
HERE
Figure No. 9
START
HERE
Figure
No.
9A
IS.
Hold
machine
in
right
hand
with
forefinger
through
loop
at
bot-
torn
of
handle.
A
slight
finger
pressure
against
switch
button
will
start
machine.
Machine
automatically
stops
when
pressure
is
re
leased. See Figure No. 10.
Figure
No.
10
16,
Hold
bag
In
left
hand
at
starting
side,
Figure
No.
II,
close
to
and
between
presser
foot
and
feed
dog.
Then
start
machine
by
pushing
starting
button
with
forefinger.
Machine
will
automatically
engage
bag.
After
sewing
an
inch
or
two
on
the
bag,
stop
machine
by
re
leasing
starting
button.
Figure
No,
12.
Then
move
left
hand
to
finishing
side
of
bag
and
proceed
to
finish
closing
the
bag.
Fig.
No.
13.
Sew
about
two
inches
past bag to
allow
for
chain,
which
locks
the
closure.
See
paragraph
18A
for
cutting
thread.
Peg*
Eleven
From the library of: Superior Sewing Machine & Supply LLC
Pago Twelve
Figure No.
11
Figure No. 12 Figure No. 13
NOTE:
Always
sew
abovecontentsof bag, and as
close
to the top of
bag as desired. Do not sewfarther than four inchesdownfrom
top
of
textile bag, and not more than two inchesdownfrom top of paper
bag.
NEVER
interfeire
vfith
the
feeding
of
the
machine
as
it
sews
across
the
bag,
by
either
pulling
it,
holding
it
back,
or
pulling
up.
17.
HOW
TO
CLOSE
A
PAPER
BAG:
A. After bag is
filled,
weighed, and ready for closing, the oper
ator should first re-form gussets. (See Figure No. I4A.)
B.
Next, fold or "break" top of bag sharply over contents. (See
Figure No.
I4B.)
C.
Bring
top of bag
upright
into
closing
position.
The
sides
will
be closetogether,
smooth,
and
wrinkle-free.
(See Fig. No.
140.}
D.
Proceed
with
sewing
operation as explained in paragraph 16.
but
sewing
no
more
than
two
inches
down
from
top
of
bag.
E.
If
sifting
is a
problem,
merely
tuck in the
inner
ply tightly over
contents and proceed to
close
bag as directed
above.
NOTE:
Sufficient top is necessary to properly "break" bag.
140
18.
When
closing
bags
that
are
thick
seamed
on
both
sides
such
as
Calcutta
or
Sisal
bags,
pull
the
seam
on
the
starting
side
of
bag
two
or
three
inches
to
one
side,
so
that
you
start
closing
on
the
baq
proper
and
not the
seam.
See
Figure
No.
15.
START
HERE
Figure No. IS Figure
No.
15A
18-A.
To
finish
closing
operation,
run
machine
off
the
bag
two
or
three
inches.
With
machine
running,
pull
chain
"A"
firmly
into
throat
plate slot "B".
Figure
No. ISA.
To
attach
a
tag,
stop
machine
where
tag
is
to
be
attached.
Then
hold
tag
firmly
under
presser
foot and start
machine.
As
soon
as
tag
IS
sewed,
stop
machine.
Then
move
left
hand
back
and
finish
the
closing operation.
^2^^'
following
instructions
are
to
be
followed
ONLY
after
rethreading
marine.
Iff
maebine
is
sewing
and
cbaining
properly. Figure No.
18,
DO
MOT
depress the lever
So-
caffod
in back
off
handle,
see
"A," Figure No. 16.
There
will
be
no
chain
or
stitch
formation
after
re-threading
njachine.
See
"F."
Figure
No.
3.
It
is
necessary
to
start
the
ma-
chine
on
the
bag.
Merely
depress
lever
located
in
back
of
handle,
see
A,
Figure
No.
16,
so that
presser
foot
will
lift.
See
"B."
Figure
No.
16.^
Then
bring
machine
into
sewing
position
on
bag
about an
inch
in
from
side
of bag,
release
lever
"A."
Proceed
to
sew
as
explained
in
paragraph
16.
To
close
the
open
inch
at
the
starting
point,
merely
return
to
starting
side
of
bag
and
sew
(per
instruction.
Paragraph
16,
Page
11)
diagonally
across
open
corner,
see
Figure
No.
17,
Page
14.
Remember, do
not
depress
lever
"A"
this
time.
19.
20
Page
Thirteen
From the library of: Superior Sewing Machine & Supply LLC
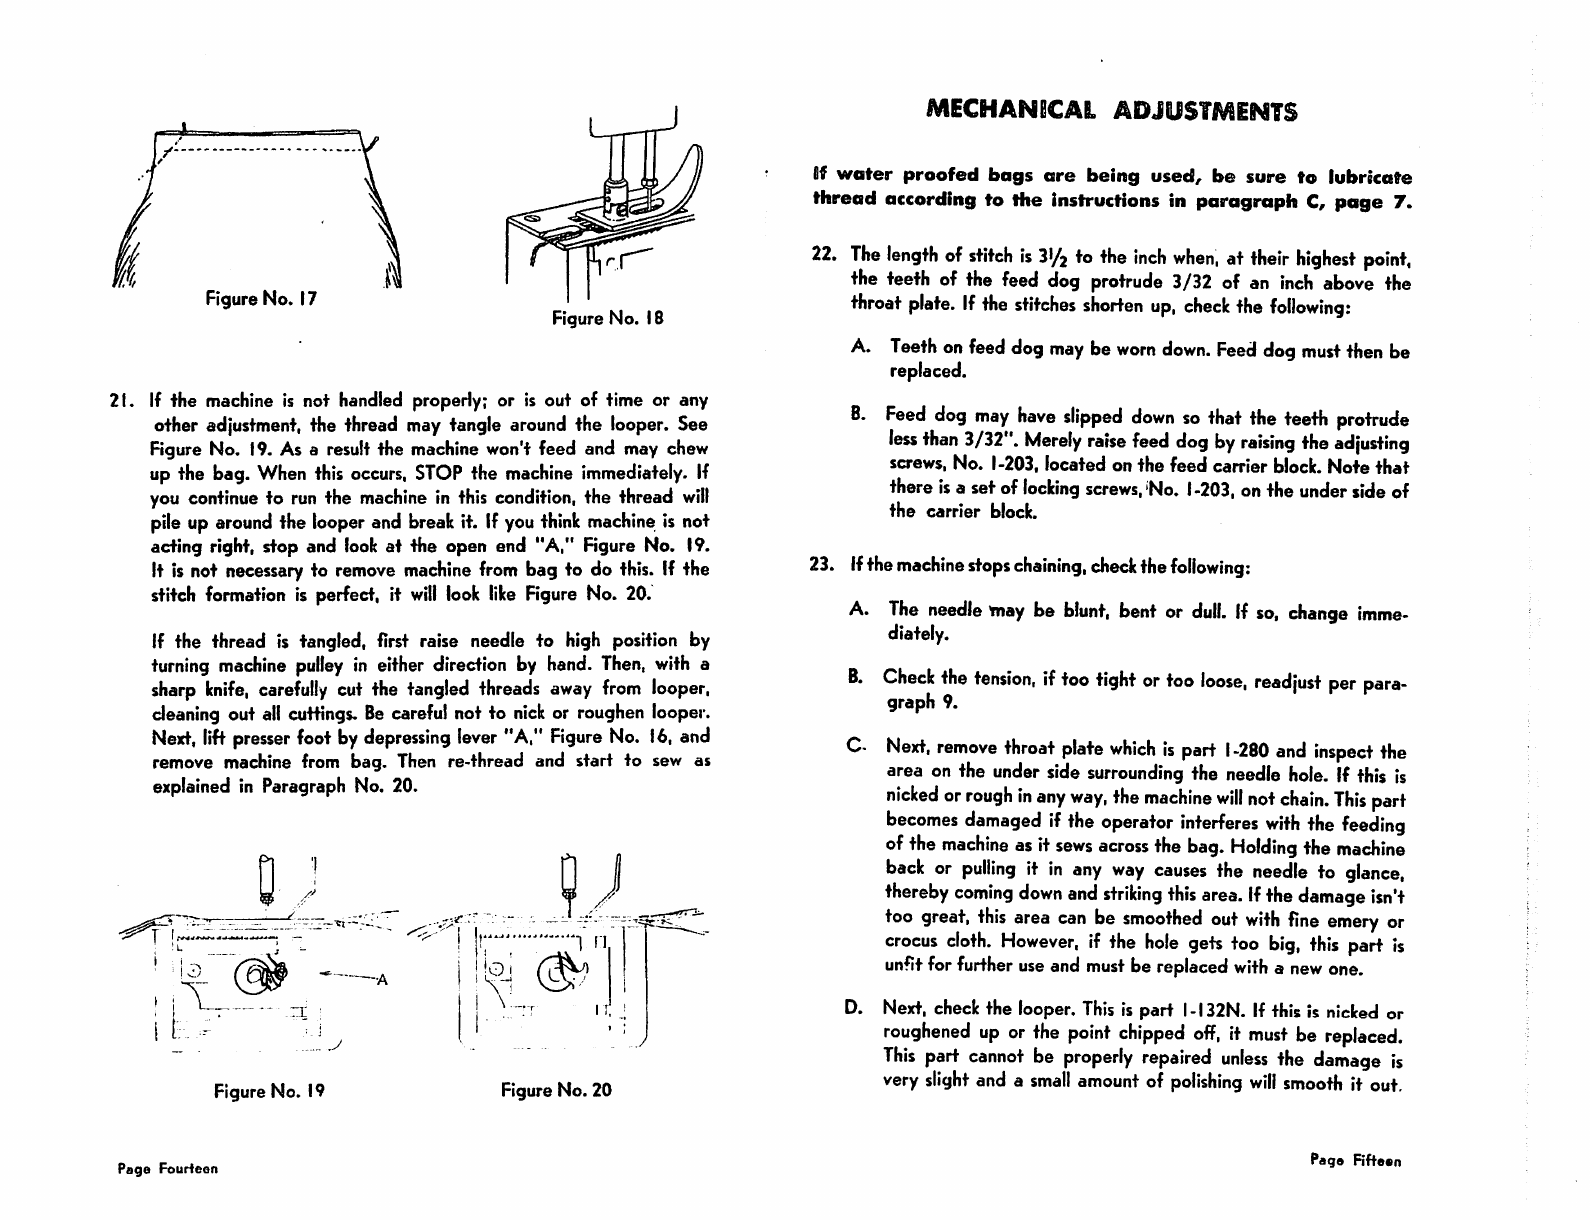
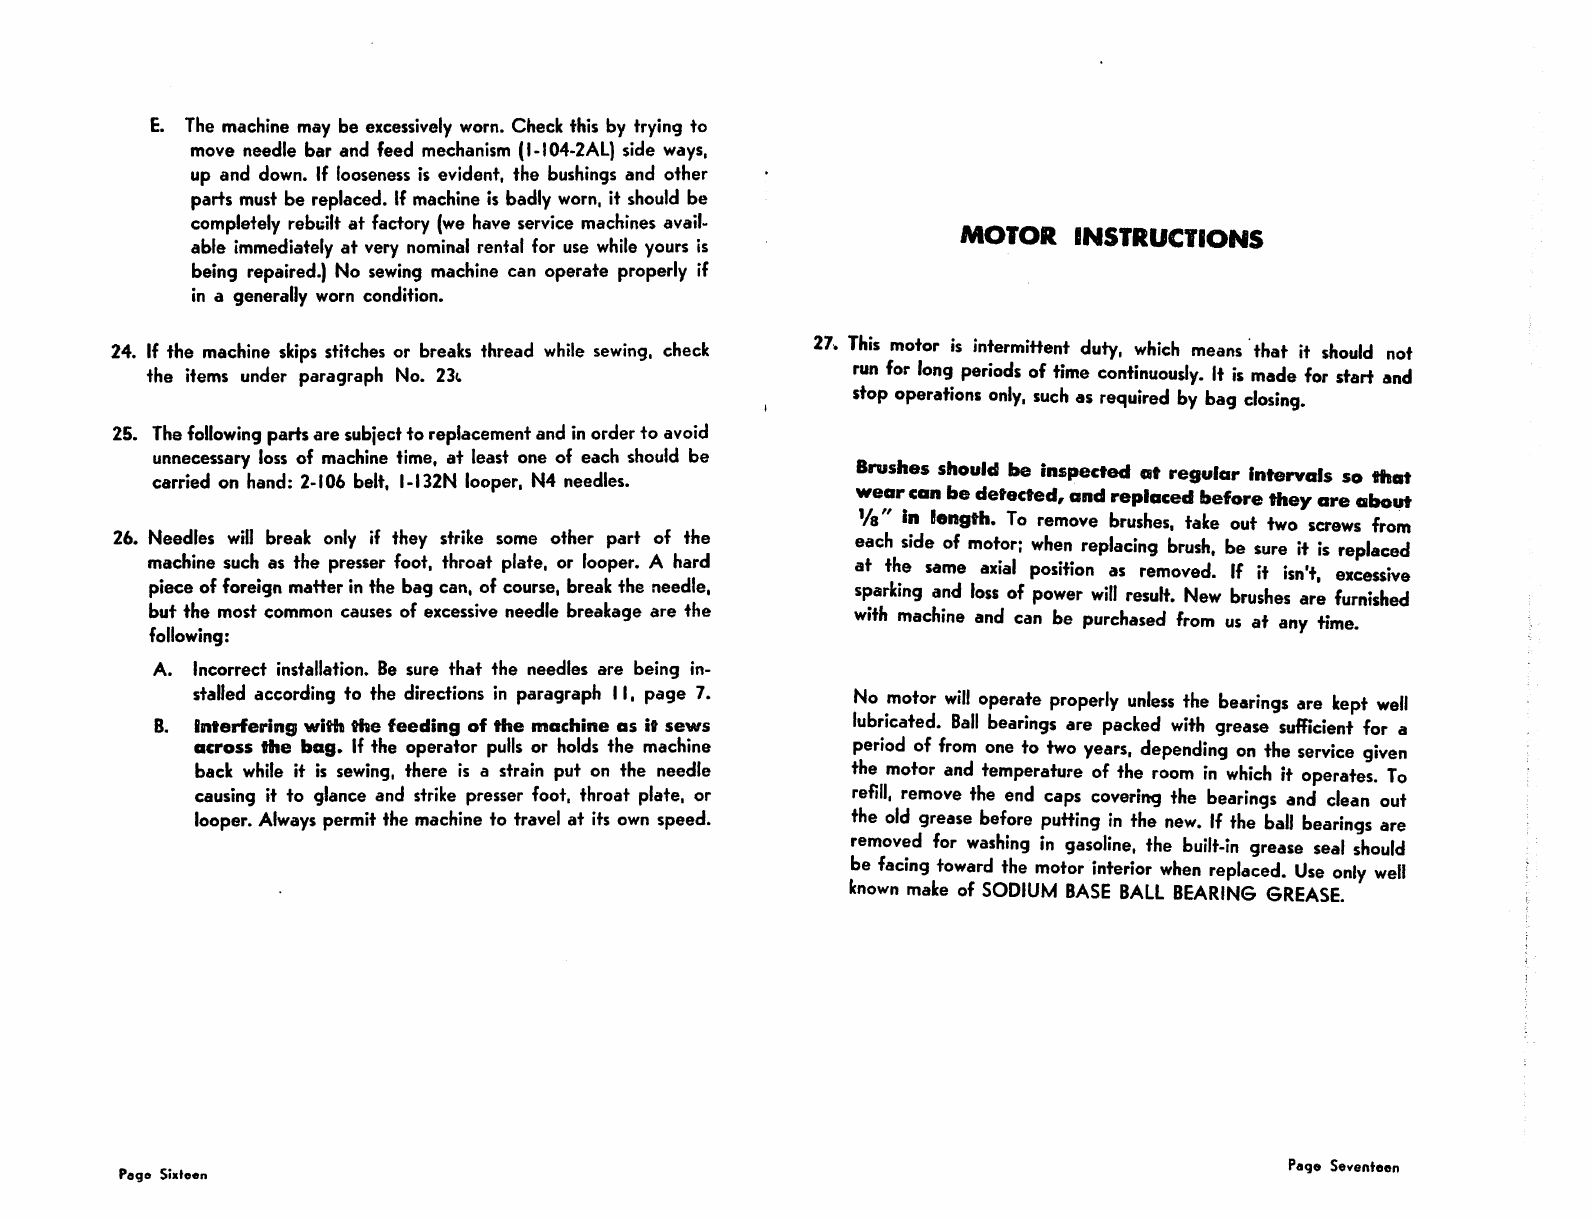
Figure No. 17 Figure No. 18
21. If the machine is not
handlleol
properly; or is out of time or any
other adjustment, the thread may tangle around the looper. See
Figure No. 19. As a result the machine won't feed and may chew
up the bag. When this
occurs,
STOP
the
machine
immediately, if
you continue to run the
machine
in this condition, the thread
will
pileup
around
the looperand breakit. If
you
think
machine
is not
acting right, stop and
look
at the open end "A," Figure No. 19.
It is not
necessary
to
remove
machine
from
bag to do this. If the
stitch formation is perfect, it
will
look
like
Figure No. 20.
If the thread is tangled, first raise needle to high position by
turning
machine
pulley
in
either direction by
hand.
Then,
with
a
sharp
knife,
carefully
cut the
tangled
threads
away
from
looper,
cleaning
out
all
cuttings.
Be
careful
not to
nick
or
roughen
looper.
Next,
lift
presser
foot by
depressing
lever
"A,"
Figure
No.
16,
and
remove machine from bag. Then re-thread and start to sew as
explained in Paragraph No. 20.
Figure No. 19 Figure No. 20
Page
Fourteen
MECHANICAL
ADJUSTMENTS
ilf
water
proofed
bags
are
being
used,
be
sure
to
lubricote
thread
according to the instructions in
paragraph
C,
page
7.
22.
The
length
of
stitch
is
3'/2
fo
fhe
inch
when,
at
their
highest
point,
the
teeth
of the
feed
dog
protrude
3/32
of an
inch
above
the
throat
plate.
If
the
stitches
shorten
up,
check
the
following:
A.
Teeth
on
feed
dog
may
be
worn
down.
Feed
dog
must
then
be
replaced.
B.
Feed
dog
may
have
slipped
down
so
that
the
teeth
protrude
less
than
3/32".
Merely
raise
feed
dog
by
raising
the
adjusting
screws. No.
1-203,
located on the feed carrier block. Note
that
there isa set of
locking
screws,'No.
1-203,
onthe underside of
the
carrier
block.
23.
Ifthe
machine
stops
chaining,
check
the
following:
A.
The
needle
Tnay
be
blunt,
bent
or
dull.
If
so,
change
imme
diately.
B.
D.
Check
the
tension,
iftoo
tight
or
too
loose,
readjust
per
para
graph 9.
Next,
remove
throat
plate
which
is
part
I
-280
and
inspect
the
area on the
under
side
surrounding
the
needle
hole.
If
this
is
nicked
or
rough
in
any
way,
the
machine
will
not
chain.
This
part
becomes
damaged
if
the
operator
interferes
with
the
feeding
ofthe
machine
asit
sews
across
the
bag.
Holding
the
machine
back
or
pulling
it
in
any
way
causes
the
needle
to
glance,
thereby
coming
down
and
striking
this
area.
If
the
damage
isn't
too
great,
this
area
can
be
smoothed
out
with
fine
emery
or
crocus
cloth.
However,
if
the
hole
gets
too
big,
this
part
is
unfit
forfurther
use
and
must
be replaced
with
a
new
one.
Next,
check
the
looper.
This
ispart I-I32N. Ifthisis
nicked
or
roughened
up
or
the
point
chipped
off,
it
must
be
replaced.
This
part
cannot
be
properly
repaired
unless
the
damage
is
very
slight
and a
small
amount
of
polishing
will
smooth
it out.
Pag®
Rftsan
From the library of: Superior Sewing Machine & Supply LLC
E.
The
machine
may be
excessively
worn.
Check this by trying to
move needle bar and feed
mechanism
(l-i04-2AL) side
ways,
up and
down.
If
looseness
is evident, the
bushings
and other
parts
must
be replaced. If
machine
is badly
worn,
it
should
be
completely rebuilt at factory
(we
have
service
machines
avail
able immediately at
very
nominal
rental for use
while
yours is
being
repaired.)
No
sewing
machine
can operate
properly
if
in a generally
worn
condition.
24. If the
machine
skips
stitches or
breaks
thread
while
sewing,
check
the items under paragraph No.
23(.
25.
The
following
partsare
subject
to replacement andinorderto
avoid
unnecessary
loss
of
machine
time, at least one of each
should
be
carried on hand:
2-106
belt, I-I32N looper, N4 needles.
26. Needles
will
break only if they strike some other part of the
machine such as the presser foot, throat plate, or looper. A hard
piece of foreign matter inthe bag can, of course, break the needle,
but
the
most common causes of excessive needle breakage
are
the
following:
A. Incorrect installation. Be sure
that
the needles are being in
stalled according to the directions in paragraph 11, page 7.
B.
Interfering
with
the
feeding
of
the
machine
as
it
sews
across
the
bag.
If the operator
pulls
or
holds
the machine
back
while
it is
sewing,
there is a strain put on the needle
causing it to glance and
strike
presser foot, throat plate, or
looper.
Always
permit the
machine
to travel at its
own
speed.
Page
Sixteen
MOTOR
INSTRUCTIONS
27.
This
motor
is
intermittent
duty,
which
means
that it
should
not
run
for
long
periods
of
time
continuously.
It
is
made
for
start
and
stop
operations
only,
such
as
required
by
bag
closing.
Brashes
should
be inspected
at
regular intervals so that
wearcan be detected, and replaced before they are about
Vs"
in length.
To
remove
brushes,
take
out
two
screws
from
each
side
of
motor;
when
replacing
brush,
be
sure
it
Is
replaced
at
the
same
axial
position
as
removed.
If
it
isn't,
excessive
sparking
and
loss
of
power
will
result.
New
brushes
are
furnished
with
machine
and
can
be
purchased
from
us
at
any
time.
No
motor
will
operate
properly
unless
the
bearings
are
kept
well
lubricated.
Ball
bearings
are
packed
with
grease
sufFicient
for
a
period
of
from
one
to
two
years,
depending
on
the
service
given
the
motor
and
temperature
of
the
room
in
which
it
operates.
To
refill,
remove
the
end
caps
covering
the
bearings
and
clean
out
the
old
grease
before
putting
in
the
new.
If
the
ball
bearings
are
removed
for
washing
In
gasoline,
the
built-in
grease
seal
should
be
facing
toward
the
motor
interior
when
replaced.
Use
only
well
known
make
of
SODIUM
BASE
BALL
BEARING
GREASE.
Page
Sevenfeen
From the library of: Superior Sewing Machine & Supply LLC
DO'S
28. A. Oil
machine
accordingto Paragraph No. 5.
B.
Clean
machine
according to Paragraph No. 7.
C. Hold
machine
above contents of bag
when
sewing.
D. Start to close
new
bag on side opposite seam. If
closing
used
burlap bag, start on seam side with seam inch or two In from
side.
E. Lubricate thread if bags are treated
DON'TS
29. A. At no time lift presser foot if machine is sewing and chaining
fH-cperly.
B. Don't lift presser foot to start closing bag if machine is sew
ing and chaining properly.
C. Machine feeds automatically. Don't
pull
or hold it back as it
feeds across the bag.
D. Don't try to operate machine with bent or blunt needle.
E. Don't run machine if thread is tangled around looper.
F.
Don't
disturb
feed eccentric, part I-I2IL plate 2, located
inside machine. It
Is
timed and set
at
factory.
Page Eighteen
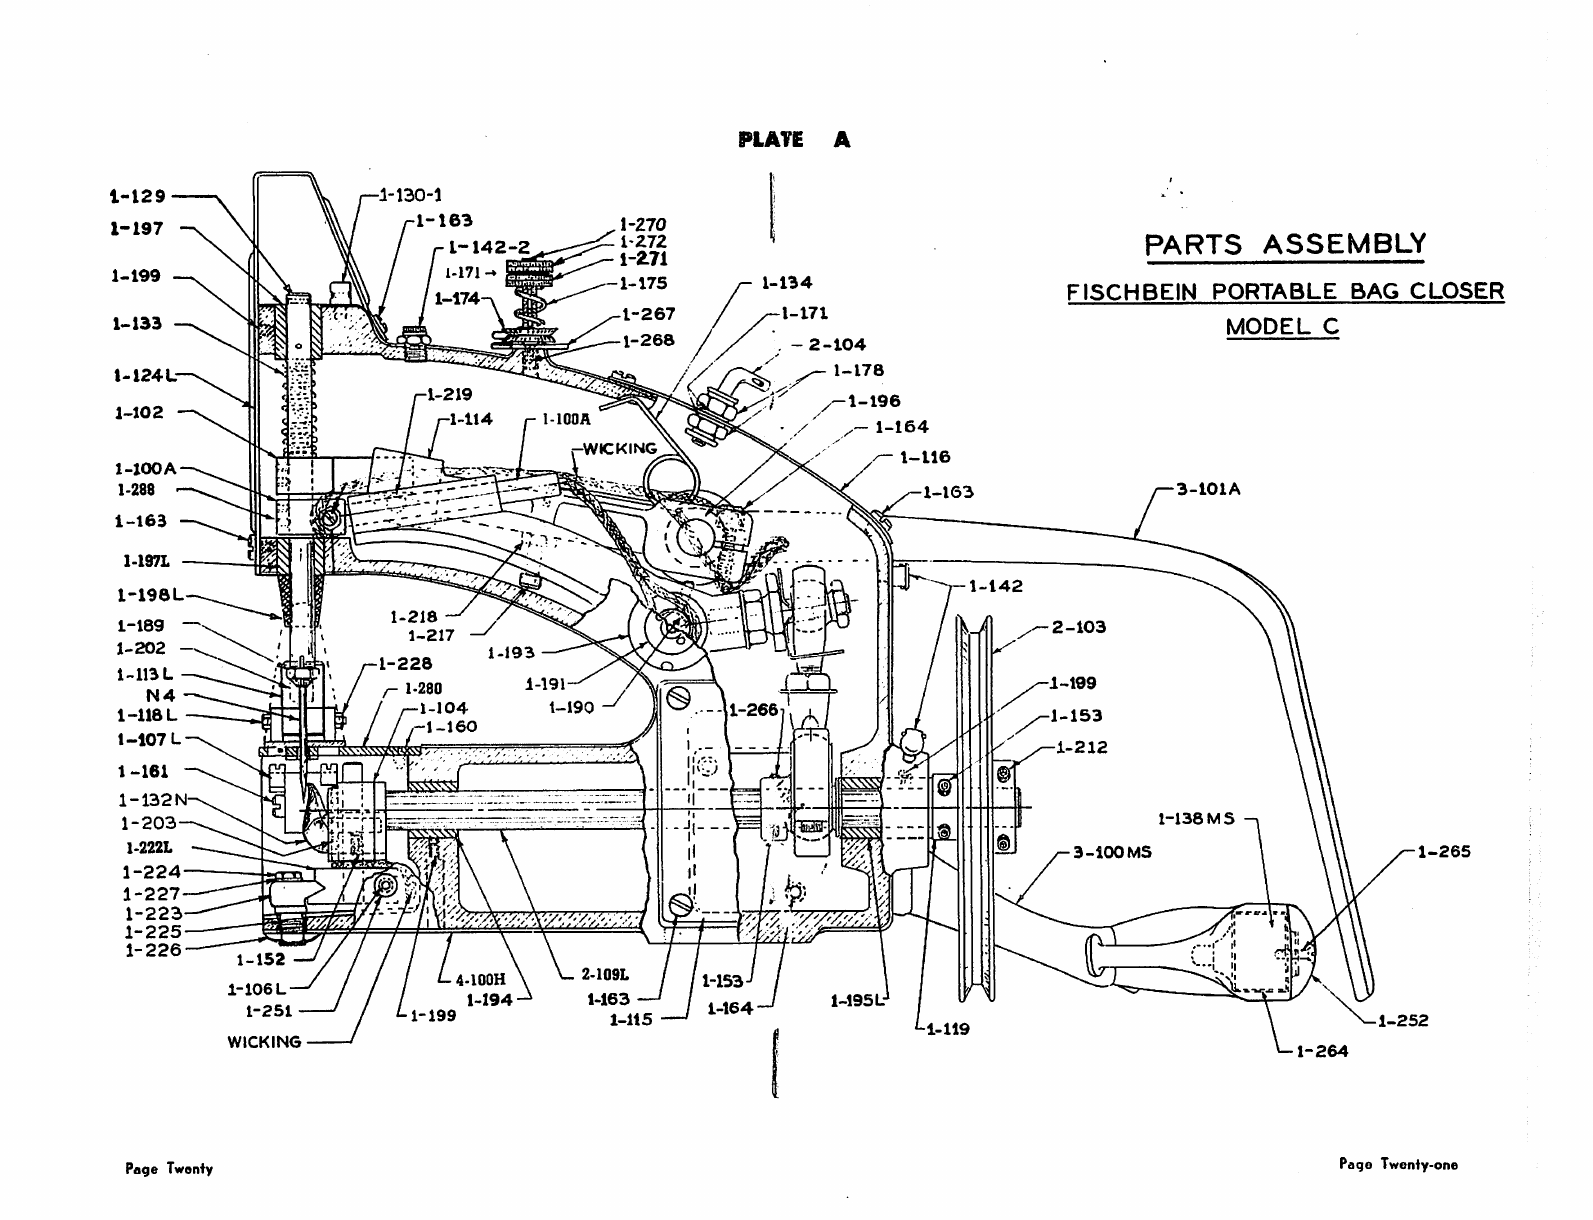
PARTS
LIST
PLEASE
ORDER
BY
NUMBER
AND
INCLUDE
SERIAL
NUMBER
OF
YOUR
MACHINE.
Page
Nineteen
From the library of: Superior Sewing Machine & Supply LLC
1-129
1-197
1-199
1-133
1-124L
1-102
1-100
A
1-288
1-163
1-197L
—
1-196L
1-189
—
1-202
-
1-113
L
N4
1-U8L
1-107L
1-161
1-132N
1-203
1-222L
1-224
1-227
1-223
1-225
1-226
Page Twenty
106
L
WICKING
1-130-1
1-163
1-217
104
-160
tssss^
i-193
1-194
1-270
1-272
i-Z71
1-175
1-267
1-268
WICKING
t-190
2-1091
1-163
1-115
PLATE
A
1-134
1-171
2-104
1-178
-1-196
-
1-164
1-116
©
1-164
1-195
L
1-119
PARTS
ASSEMBLY
FISCHBEIN
PORTABLE
BAG
CLOSER
MODEL
C
3-lOlA
100
MS
•1-265
C
1-252
1-264
Page Twenty-one
From the library of: Superior Sewing Machine & Supply LLC
100
L
1-200
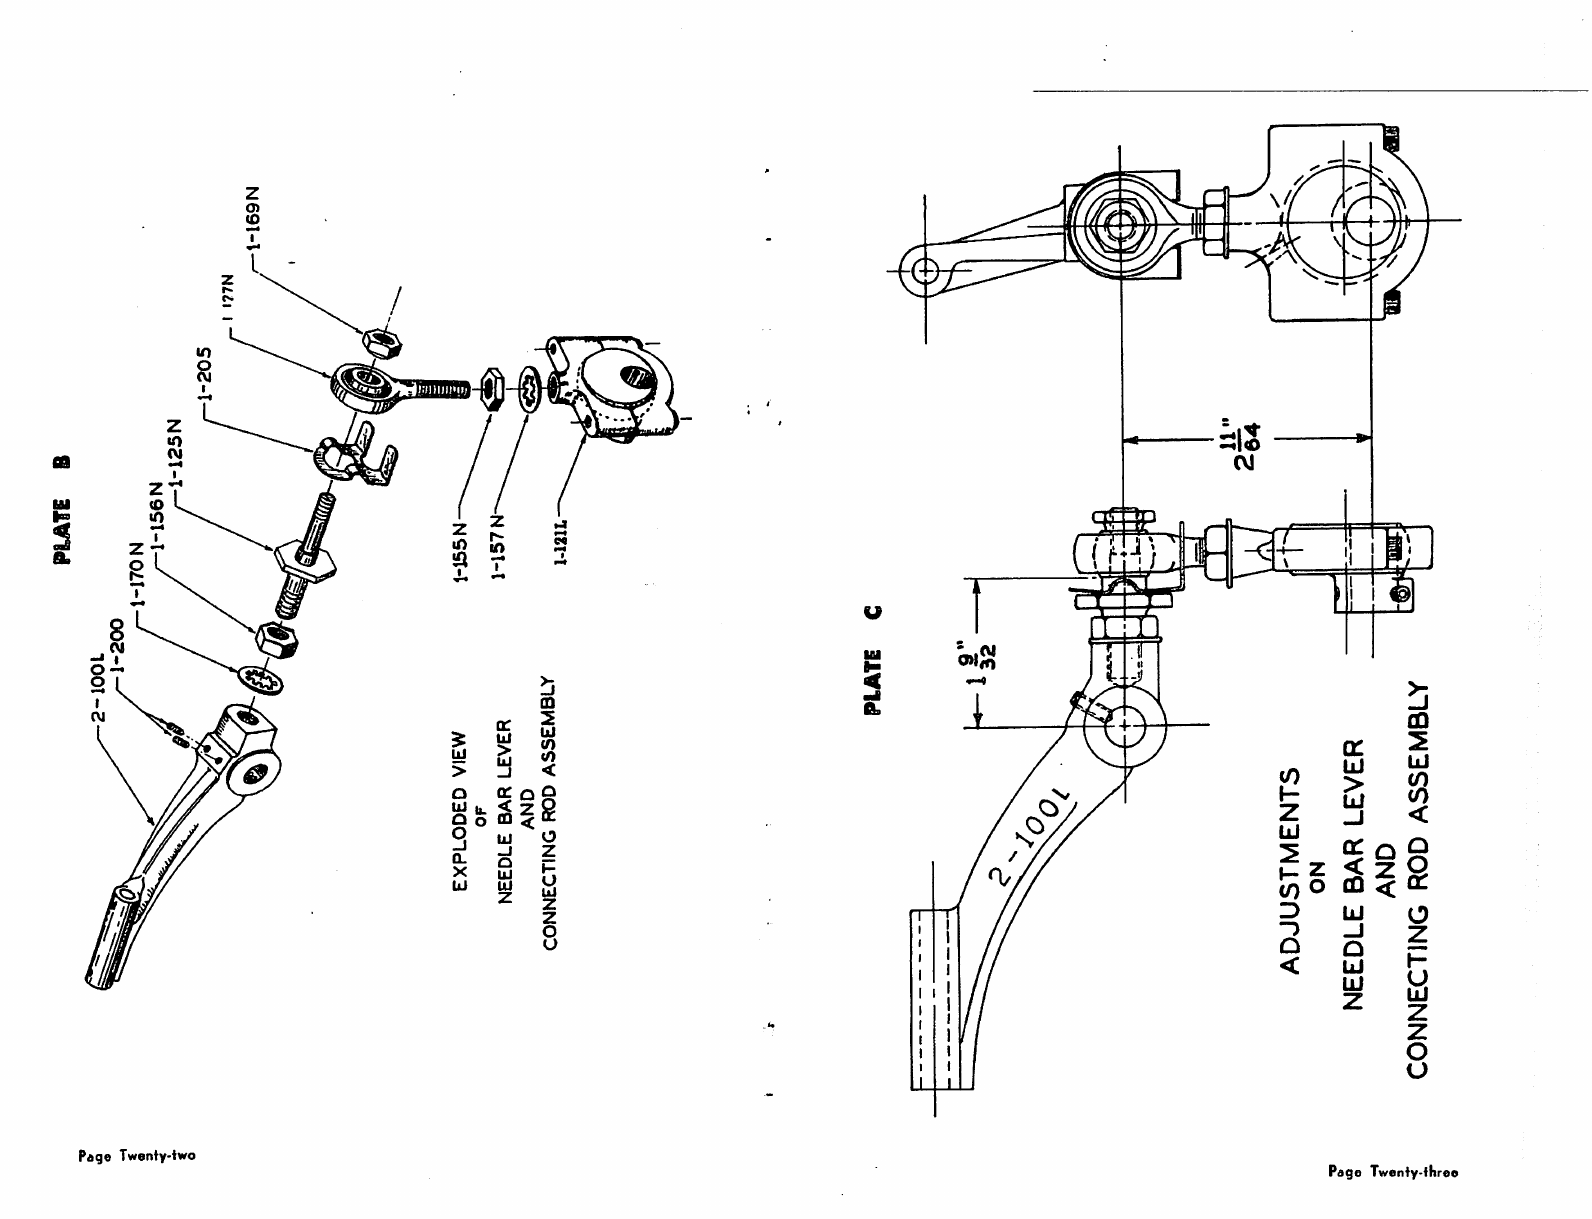
EXPLODED
VIEW
OF
NEEDLE
BAR
LEVER
AND
CONNECTING
ROD
ASSEMBLY
PIATE
B
1-170
N
1-156N
1-125N
1-155
N
1-157
N
1-12IL
PLATE
C
ADJUSTMENTS
ON
NEEDLE
BAR
LEVER
AND
CONNECTING
ROD
ASSEMBLY
-mm
pll"
^64
1-205
I
I77N
•1-169N
From the library of: Superior Sewing Machine & Supply LLC

Pag* Twenty-four
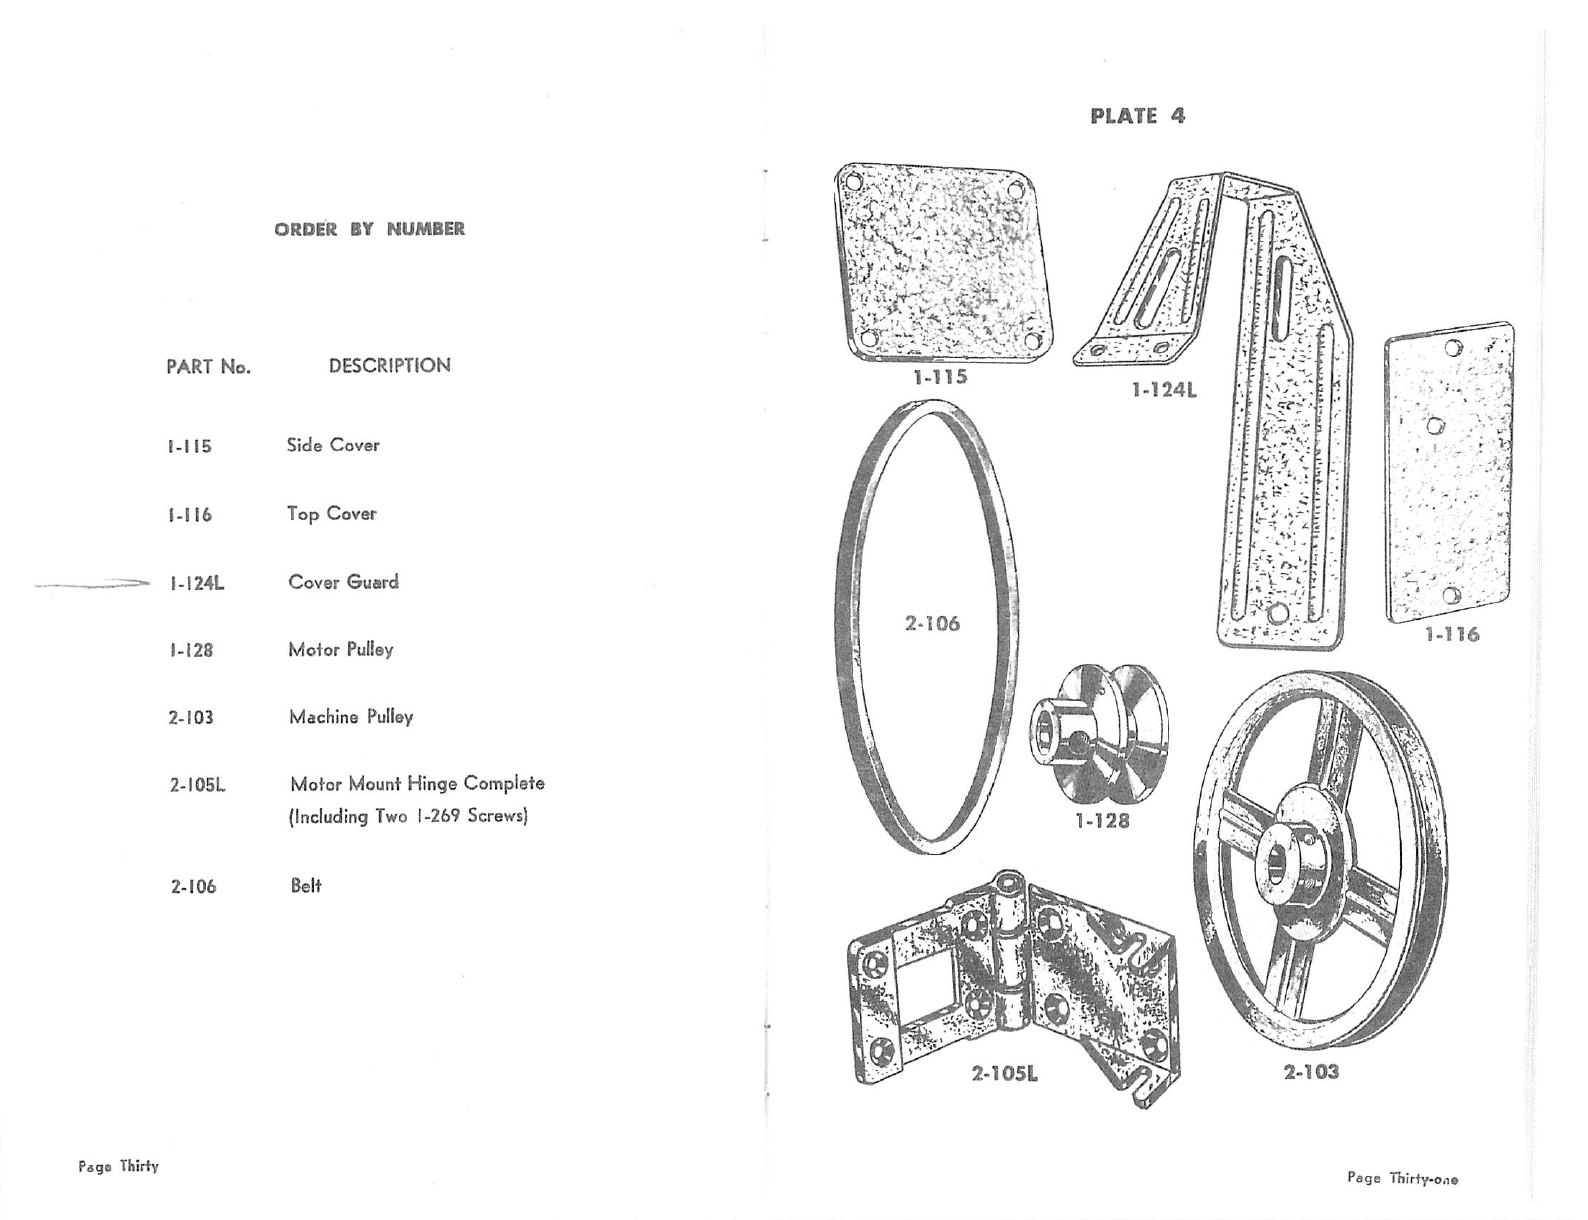
ORDER
BY
NUMBER
DESCRIPTION
Needle
(Minimum
Order: 2
Dozen)
Feed Dog Carrier
Block
and
Slide—Complete
Feed Dog
Pressure
Foot
Needle
Bar
Switch
(ForDC order I-I38MS-DC)
Looper
Adjusting
Slide
Block
Switch
Insulation
Throat
Plate
Blade
Support
Bracket
Blade
(Moving)
Blade(Stationary)
Spring Support
Screw
for
I
-281
Screw
for
1-283
and
1-284
Lock
Washer
for
1-286
1-280
1-1131
1.132N
1-285 1-286
1-287
M38MS
PLATE
1
1-104-2AL
1-283
1-281
1-223
1-264
1-284
1-129
Page
Twenty-five
From the library of: Superior Sewing Machine & Supply LLC

lvvV»\mt>i»»v„.'
\
*
From the library of: Superior Sewing Machine & Supply LLC

Page
Twanfy-elghJ
ORDER
BY
NUMBER
DESCRIPTION
Main Shaft Retaining Collar
Presser Bar Spring
Spring for I-114
Thread Clamping Rod
Tension
Disc
Tension Spring
Front Main Shaft Bushing
Rear Main Shaft
Bushing
Bushing
for l-l 10
Upper
Bushing
for
Presser
Barand Needle
Bar
Lower
Bushing
for Needle
Bar
Lower
Bushing
for Presser Bar
Presser
Bar
Thread
Guide
Base
Tension
Assembly
Complete
Tension
Stud
Tension
Nut,
Lower
Tension Nut, Upper
Thread
Guide
Rod
Main
Shaft
1-174
1-175
1-272
1-270
1.271
1-134
1-133
1-119
PLATE
3
1-267
1-270A
1-202
2-104
1.198L
1-196
1-194
1-195L
2-109L
Rag®
Twenty-nine
From the library of: Superior Sewing Machine & Supply LLC
15
Sid
16
To|
24L
Co
28
03
Mi
I05L
Mt
(Ini
106
Bel
(Including '
ige
Com
269
Sere
From the library of: Superior Sewing Machine & Supply LLC
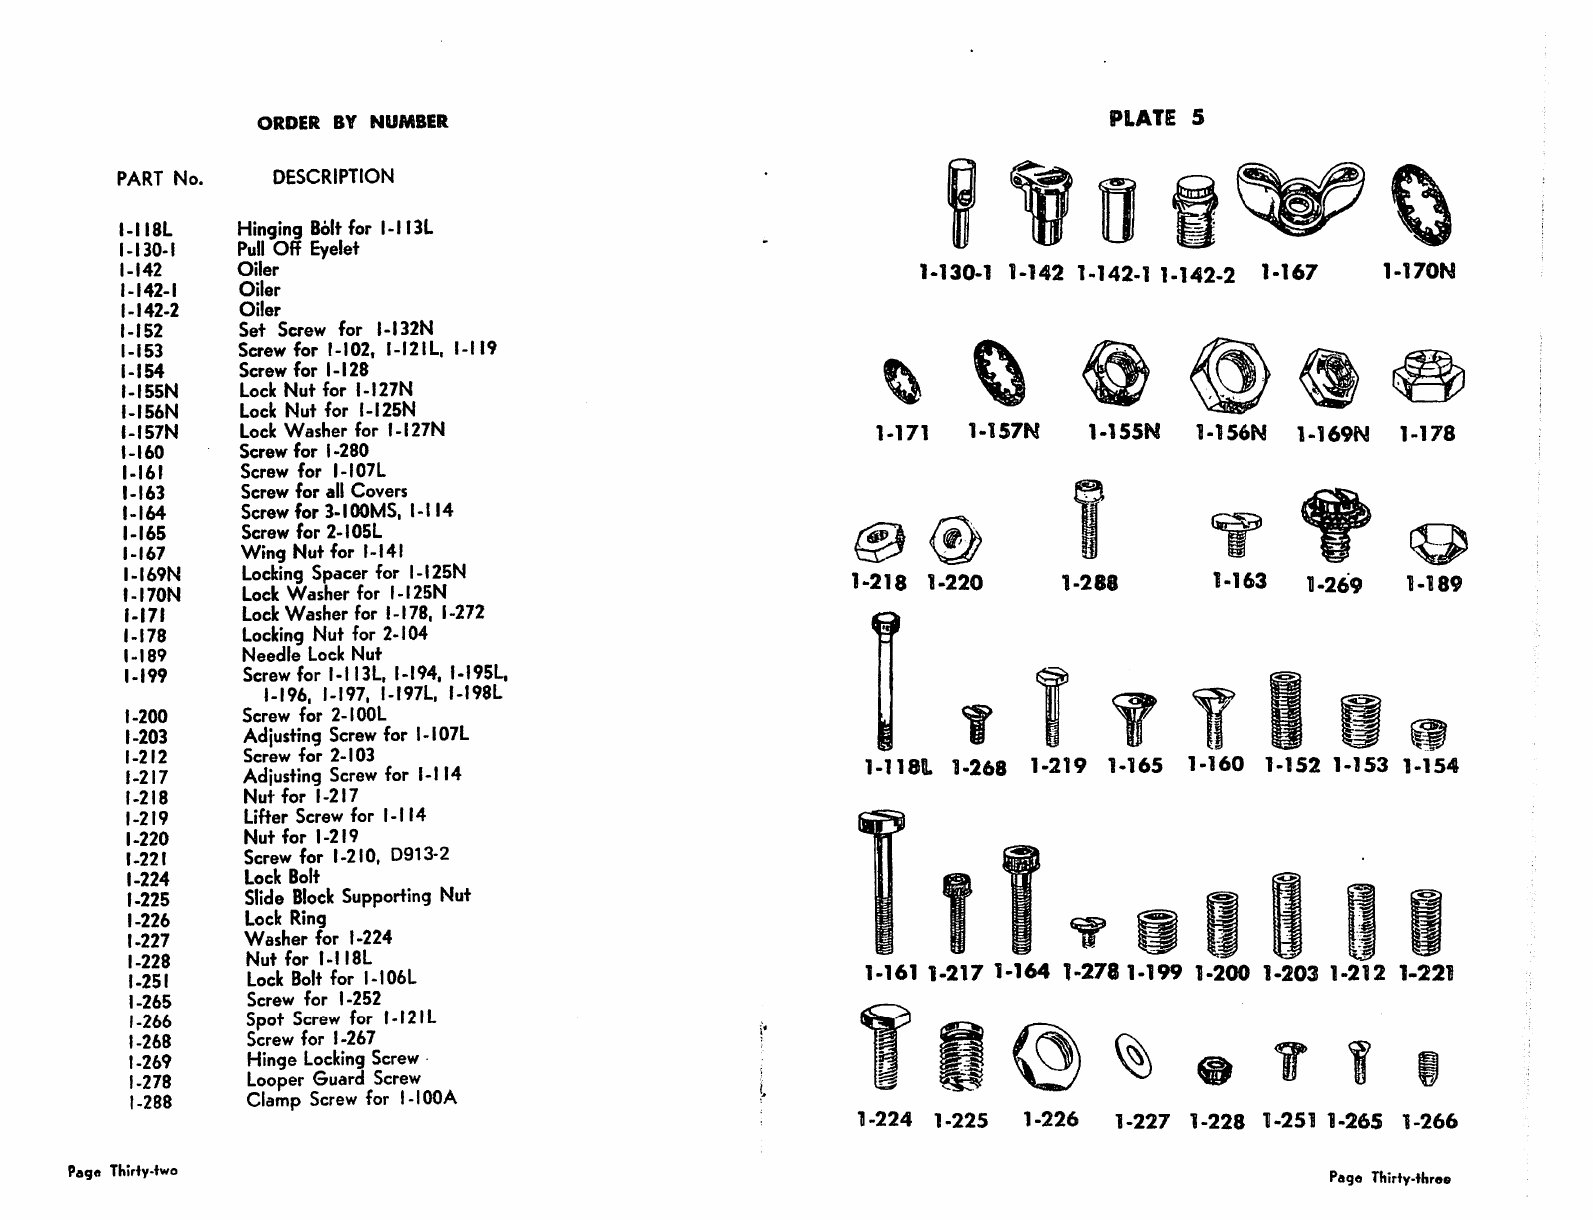
ORDER
BY
NUMBER
PART
No.
DESCRIPTION
I-II8L
Hinging
Bolt
for l-l I3L
1-130-1
Pull
Off Eyelet
1-142
Oiler
1-142-1
Oiler
1-142-2
Oiler
1-152
Set
Screw
for
I-I32N
1-153
Screw
for
1-102,
I-I2IL.
I-M9
1-154
Screw
for
1-128
i-l55N
Lock
Nut
for
I-I27N
i-l56N
Lock
Nut
for
I-I25N
I-I57N
Lock
Washer
for
I-I27N
1-160
Screw
for
1
-280
1-161
Screw
for
I-I07L
1-163
Screw
for
all
Covers
1-164
Screw
for
3-IOOMS,
l-l
14
1-165
Screw
for
2-I05L
i-167
Wing Nut for l-l41
I-I69N
Locking
Spacer for l-i25N
I-I70N
Lock
Washer
for
I-I25N
I-I7I
Lock
Washer
for 1-178, 1-272
1-178
Locking
Nut for 2-104
I-I89
Needle
Lock
Nut
1-199
Screw for I-II3L, 1-194, I-I95L,
1-196,
1-197,
I-I97L, I-I98L
1-200
Screw
for
2-IOOL
1-203
Adjusting
Screw
for
I-I07L
1-212
Screw
for
2-103
1-217
Adjusting
Screw
for l-l 14
1-218
Nut
for
1-217
1-219
Lifter
Screw
for
l-l
14
1-220
Nut
for
1-219
1-221
Screw for 1-210, D913-2
1-224
Lock Bolt
1-225
Slide
Block
Supporting Nut
1-226
Lock Ring
1-227
Washer
for
1-224
1-228
Nut
for
I-II8L
1-251
Lock Bolt
for
I-I06L
1-265
Screw
for
1-252
1-266
Spot
Screw
for I-I2IL
1-268
Screw
for
1-267
1-269
Hinge
Locking
Screw
1-278
Looper
Guard
Screw
t-288
Clanrtp
Screw
for l-l00A
Pag« Thiriy-two
PLATE
5
1-130-1
1-142
1-142-1
1-142-2
M
67
1-170N
1-171
1-157N 1-155N
1-156N
1-169N
1-178
1-218
1-220
1-288
1-163
11-269
1-189
1-118L
1-268
1-219
1-165
1-160
1-152 1-153
1-154
5:^
I
1-161
1-217 1-164
1-2781-199
1-200
1-203 1-212
1-221
1-224
1-225
1-226 1-227 1-228
1-251
1-265
1-266
Pago Thlrly-three
From the library of: Superior Sewing Machine & Supply LLC
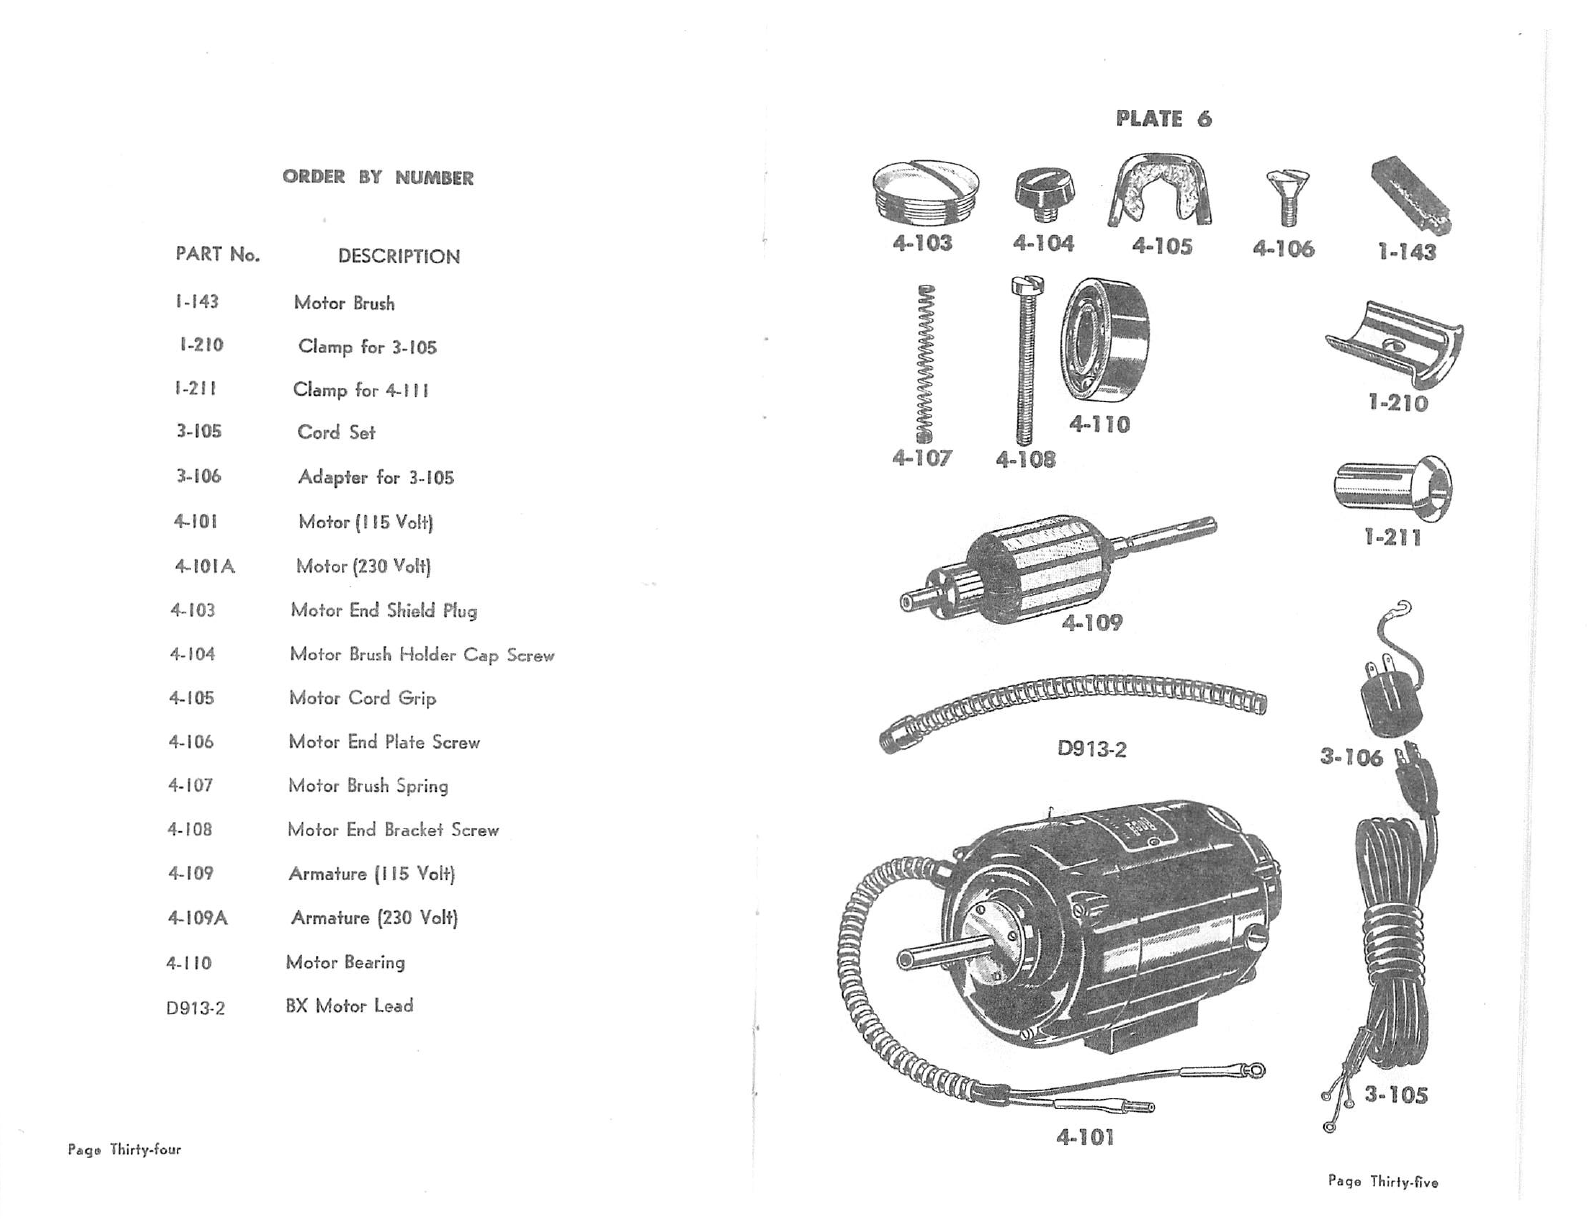
ORDER
BY
NUMBER
PART
No.
DESCRIPTION
M43
Motor
Brush
1-2
to
Clamp for 3-105
I-2II
Clamp for
4-111
3-105
Cord
Set
3-106
Adapter for
3-105
4-101
Motor (115
Volt)
4-IOIA
Motor (230
Volt)
4-103
Motor
End
Shield Plug
4-104
Motor
Brush
Holder
Cap
Screw
4-105
Motor Cord Grip
4-106
Motor
End
Plate
Screw
4-107
Motor
Brush
Spring
4-108
Motor
End
Bracket
Screw
4-109
Armature (115
Volt)
4-I09A
Armature (230
Volt)
4-110
Motor
Bearing
D913-2
BX
Motor
Lead
P«g» Thirty-four
PLATE
6
4-103 4-104 4-105 4-106 1-143
4-110
1-210
4-107
4-108
1-211
4-109
D913-2
3-106
3-105
4-101
Page Thiriy-f!ve
From the library of: Superior Sewing Machine & Supply LLC

PART
No.
I-I47A
I.I47B
ORDER
BY
NUMBER
DESCRIPTION
Complefe Set of
Wrenches,
I-I47A,
M47B. 1-1470. I-I47E. and 1-188
Wrench for 1-165, 1-217
Wrench for
1-153, 1-154,
1-212.
1-251
I-I47C Wrench for
1-152.
M99,
1-200.
1-221
I-I47D
Wrench
for
1-203
Screw
I-I47E
Wrench
for
1-164
1-188
Wrench
for
Needle
Lock
Nut
(1-189)
1-216
Screw
Driver
2-108
Oil
Can
5-100
One Quart
Lubricating
Oil
5-101
One Gallon Cleaning Solvent
5-102
One
Gallon Thread Lubricant
P«ge ThHy-six
PLATE
7
1-147E 1-147A 1-147B 1-147C 1-147D
"*85
1-147
5-100
5-102
5-101
2-108
1-216
Pag« Thirty-savan
From the library of: Superior Sewing Machine & Supply LLC
This manual suits for next models
1
Table of contents
Other FISCHBEIN Sewing Machine manuals


