FiSHAW UB600 User manual

UB600
ASSEMBLY INSTRUCTIONS

1
Your FiSHAW bike box should arrive in reasonable
condition if the box is excessively damaged check to
make sure that the bike is not damaged before
accepting delivery.
Find an area to assemble the bike with plenty of
space and have the box facing the correct way up.
With a box cutter, cut the tape around the box with
out damaging the box. Store the box in case you
need to return your FiSHAW bike to us. Store the box
somewhere dry and out of the way eg. Under your
bed.

2
Remove the bike out of the box using a friend to lift
it. Place the bike somewhere, where there is plenty
of space to assemble the bike.
Remove all other contents/ accessories from the box

3
Remove zip ties with a pair of wire cutters and all
packaging.
Take care when cutting zip ties not to
cut brake/electrical cables on the bike
Box with accessories and front bicycle skewer with
quick release which is zip tied to the front wheel.

4
Contents of accessories box as shown.
Provided tool kit to assemble the bike

5
Front wheel skewer with quick release
Rotate the stem 180 degrees as shown by the
arrows so that it faces the opposite position it
wasǁŚĞŶ in. The correct direction of rotation is
the one where all brake cables are free and not
wrapped around the forks.

6
Undo the 2 allen head screws from the stem with
the correct sized allen key provide out of the tool kit
and put to one side.
Put aside the 2 allen head screws, washes and
other half of the stem head.

7
Place the handle bars into the stem head, make sure
that all brake, gear shifter and electrical cables are
not twisted around the handle bars and are free.
Place the other half of the stem head with the 4
allen head screws slightly tighten.
Adjust the handle bars centered left and right as
pictured and adjust up or down for personnel
preference.
Turn the bike upside down to attach the front wheel.

8
Remove the plastic forks bar protector
Remove the plastic brake pad wedge from the
caliper, this is used to keep a space open between
the brake pads to make it easier for the brake disc
to insert between the brake pads when installing
the the front wheel to the forks.

9
Place the front wheel between the forks making
sure the disc brake is inserted between the brake
pads of the caliper.
1. Quick release
2. V shaped spring
3. Skewer (axle)
4. V shaped spring
5. Skewer nut

10
With the V shaped spring(4) and the skewer
nut(5) removed. Insert the skewer with the V
shaped spring(2) with the small end of the spring
pointing towards the wheel. Push the skewer all
the way through to the other side.
On the other side from where the skewer was
inserted, add the other V shaped spring (4) with
the smaller end of the spring facing the wheel
Now screw on the skewer nut (5) tighten until it is
touching the fork.
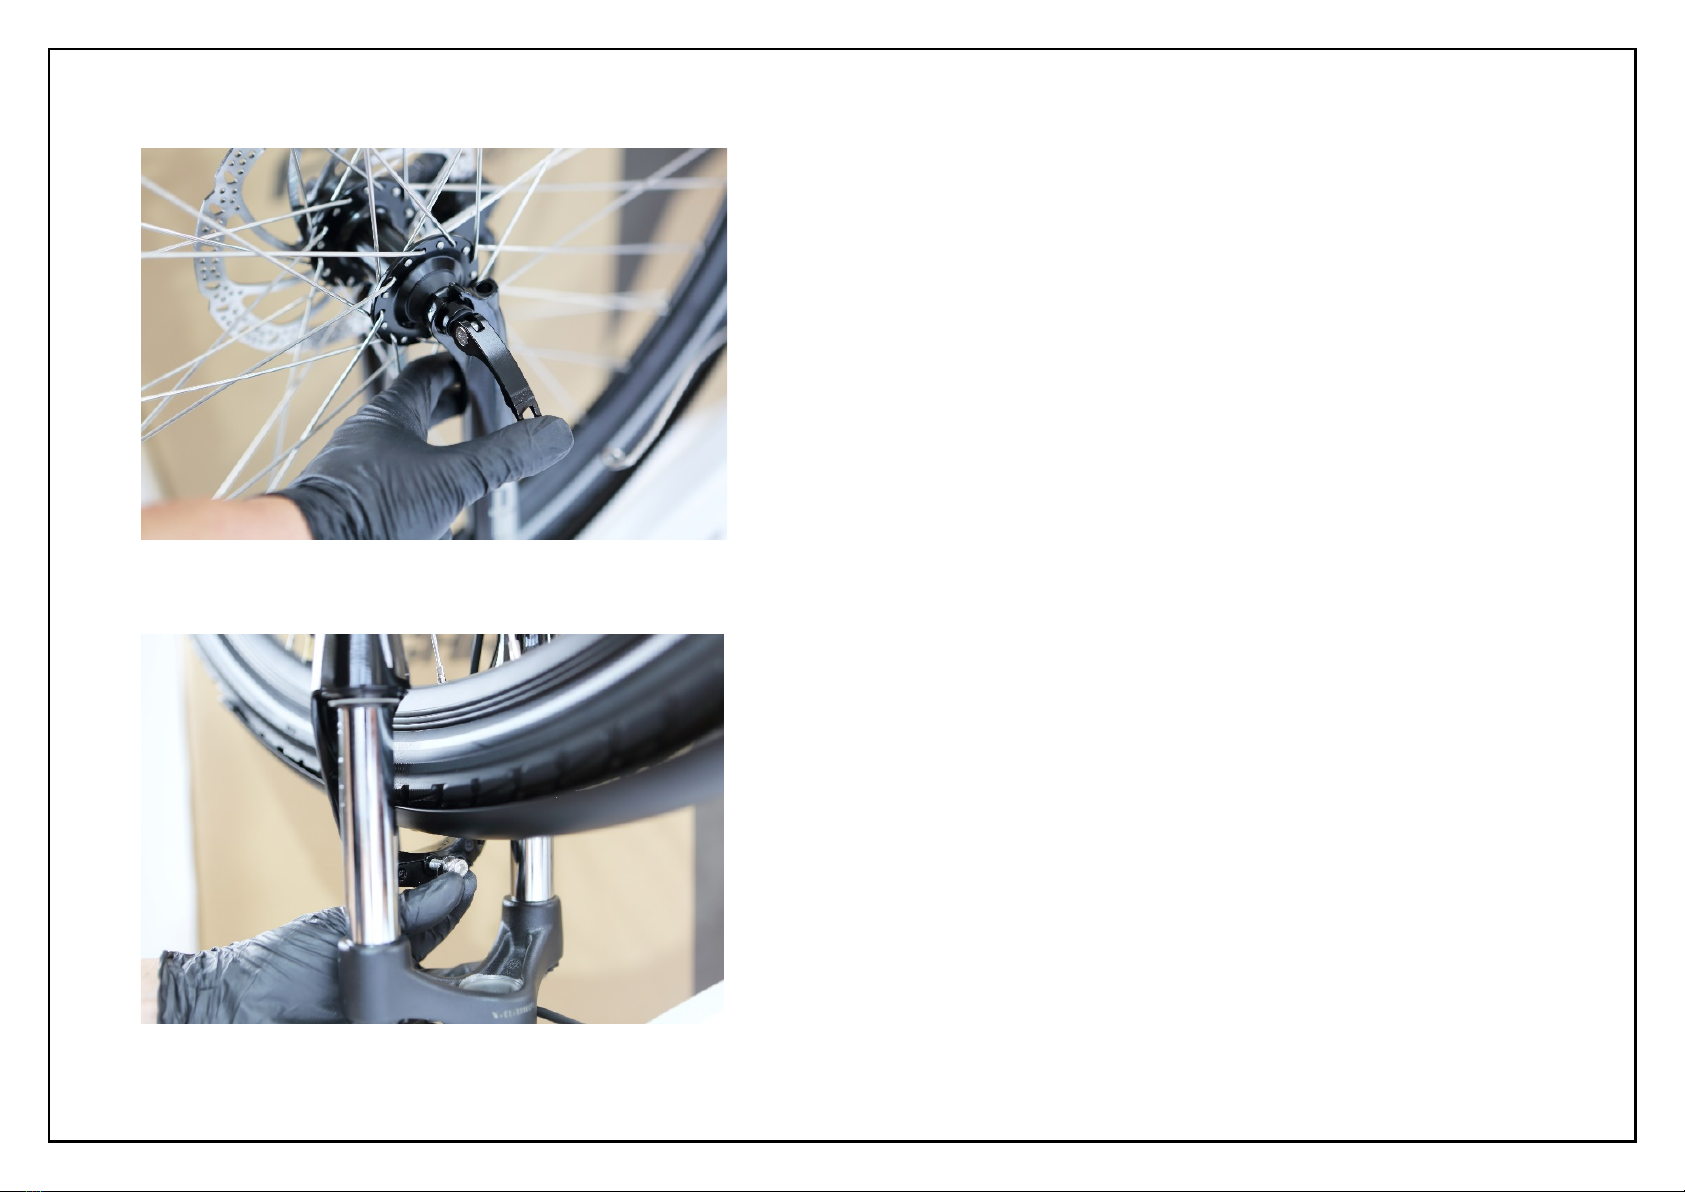
11
On the quick release (1) side. lock the release by
pushing it down towards the forks. This will
require a little force, if it is too easy, tighten the
skewer nut (5) and repeat until the quick release
requires a small amount of force to lock. If
unable to push the quick release into lock
position, this will require the skewer nut to be
loosened off slightly, repeat until the release is
able to be locked down with a small amount of
force
Remove the allen key head screw and washer
from the front forks with supplied allen key.

12
Take the front wheel mudguard, thread through the
front of the forks starting from (2) till the top clip of
the mudguard (1) is in front of the fork arch.
Place the stem (3) of the front headlight in front of
the mud guard clip (1) and the fork arch. Take the
allen key head screw and washer, previously
removed and and screw into the fork arch as
pictured.

13
Remove the allen head screw and washer (2) from
the front fork with the supplied allen key. Place the
mudguard stem eye-lite (1) in position where the
allen head screw was removed.
Return the allen key head screw and washer (2)
through the eye-lite of the mudguard stem(1) and
tighten with supplied allen key.

14
With the male end from the light and the female
end from the bike.
Aligning the internal components and push
together.

15
Insert the correct peddle marked left or right into
the crank arm and screw into the crank arm using
your fingers at first.
Caution should be taken not to cross
thread while screwing the peddle into
place
Once you have threaded the peddle on with your
fingers, tighten with the correct size spanner supplied
in your tool kit. Repeat the process for the other
peddle.
Loosen off the nut on the bike rack as pictured

16
Undo the allen head screw with the correct allen
key supplied.
Pull the bike rack arm (1) out and line up with the
screw hole and screw the allen head screw back in
place

17
Before riding, it is important to
completely check over the bike that
everything is fitted correctly, that all
cables are free by turning the handle bars
left and right. Check the front wheel is
sturdily in place and will not dislodge
from the front forks. Tyres will need to
be pumped up to 38psi.
Push the bike rack forward or back till you find it
siting level. Once level, tighten off the nut on the
bike rack

18


