flakt woods RoomMaster ABR-2 Guide

RoomMaster ABR-2
Commissioning

Fläkt Woods 8061 GB 2009.05 2 Specifications are subject to alteration without further notice.
RoomMaster ABR-2 COMMISSIONING
GENERAL
Locking of operating mode keys ..............................................................................................................3
Control panel ...............................................................................................................................................3
Function of operating mode keys, operating menu...............................................................................3
Activation of setting keys ..........................................................................................................................4
Locking of setting keys...............................................................................................................................4
Setting menu structure...............................................................................................................................4
Function of setting keys .............................................................................................................................4
START-UP
Factory settings on delivery ......................................................................................................................5
Calibration of unit.......................................................................................................................................3
Interrupted calibration ...............................................................................................................................5
Unit self-test.................................................................................................................................................5
Alarm ............................................................................................................................................................5
Selecting operating mode STOP................................................................................................................5
Example: Changing standard flow...........................................................................................................5
Program version..........................................................................................................................................6
Checking prior to commissioning ............................................................................................................6
Commissioning applicable to program version R2d .............................................................................6
PROCEDURE - SETTING
Setting of temperature regulation of desired value for temperature ..................................................7
Setting of exhaust air flow, standard and reduced flow
and supply air/exhaust air flow ratio......................................................................................................8
Reading actual values (Window 20).........................................................................................................8
Setting operating times and operating mode in weekly rhythm (Window 30) .................................9
Setting operating times and operating mode in weekly rhythm (Window 40) ...............................10
Setting clock (Window 50) ....................................................................................................................... 11
Activation of summer night-time cooling (Window 60) .....................................................................12
Calibration of unit (Window 71b)...........................................................................................................13
Self-test of unit (Window 71a).................................................................................................................13
Reset default values (Window 71c) ........................................................................................................14
Activation (blocking) of operating mode keys .....................................................................................15
Activation of electric coil and cooling coil ............................................................................................15
Program version (Window 77) ................................................................................................................16
PRESENCE SENSOR Setting operating times and operating mode in annual rhythm .................16
Alarm and fault-finding...........................................................................................................................17
Menu Structure..........................................................................................................................................18
List of parameters .....................................................................................................................................19
Content
Fläkt Woods 8061 GB 2009.05 3 Specifications are subject to alteration without further notice.
RoomMaster ABR-2 COMMISSIONING
Fig. 20
STOP
OVERTIME
(h:m)3:00
AIRING
(min) 15
AUTOMATIC
Calibration
AUTO
AUTOMATIC
Weekly rhythm Std flow
AUTOMATIC
Annual rhythm Std flow
" Red.flow " Red.flow " Red.flow
Stop " Stop " Stop
AUTOMATIC
Presence Std flow
AUTOMATIC
Demand control
AUTOMATIC
Self-test Heat exchanger
AUTOMATIC
Calibration
" Electric coil
Filter
AUTOMATIC
Central clock Std flow
AUTOMATIC
Night-time cooling
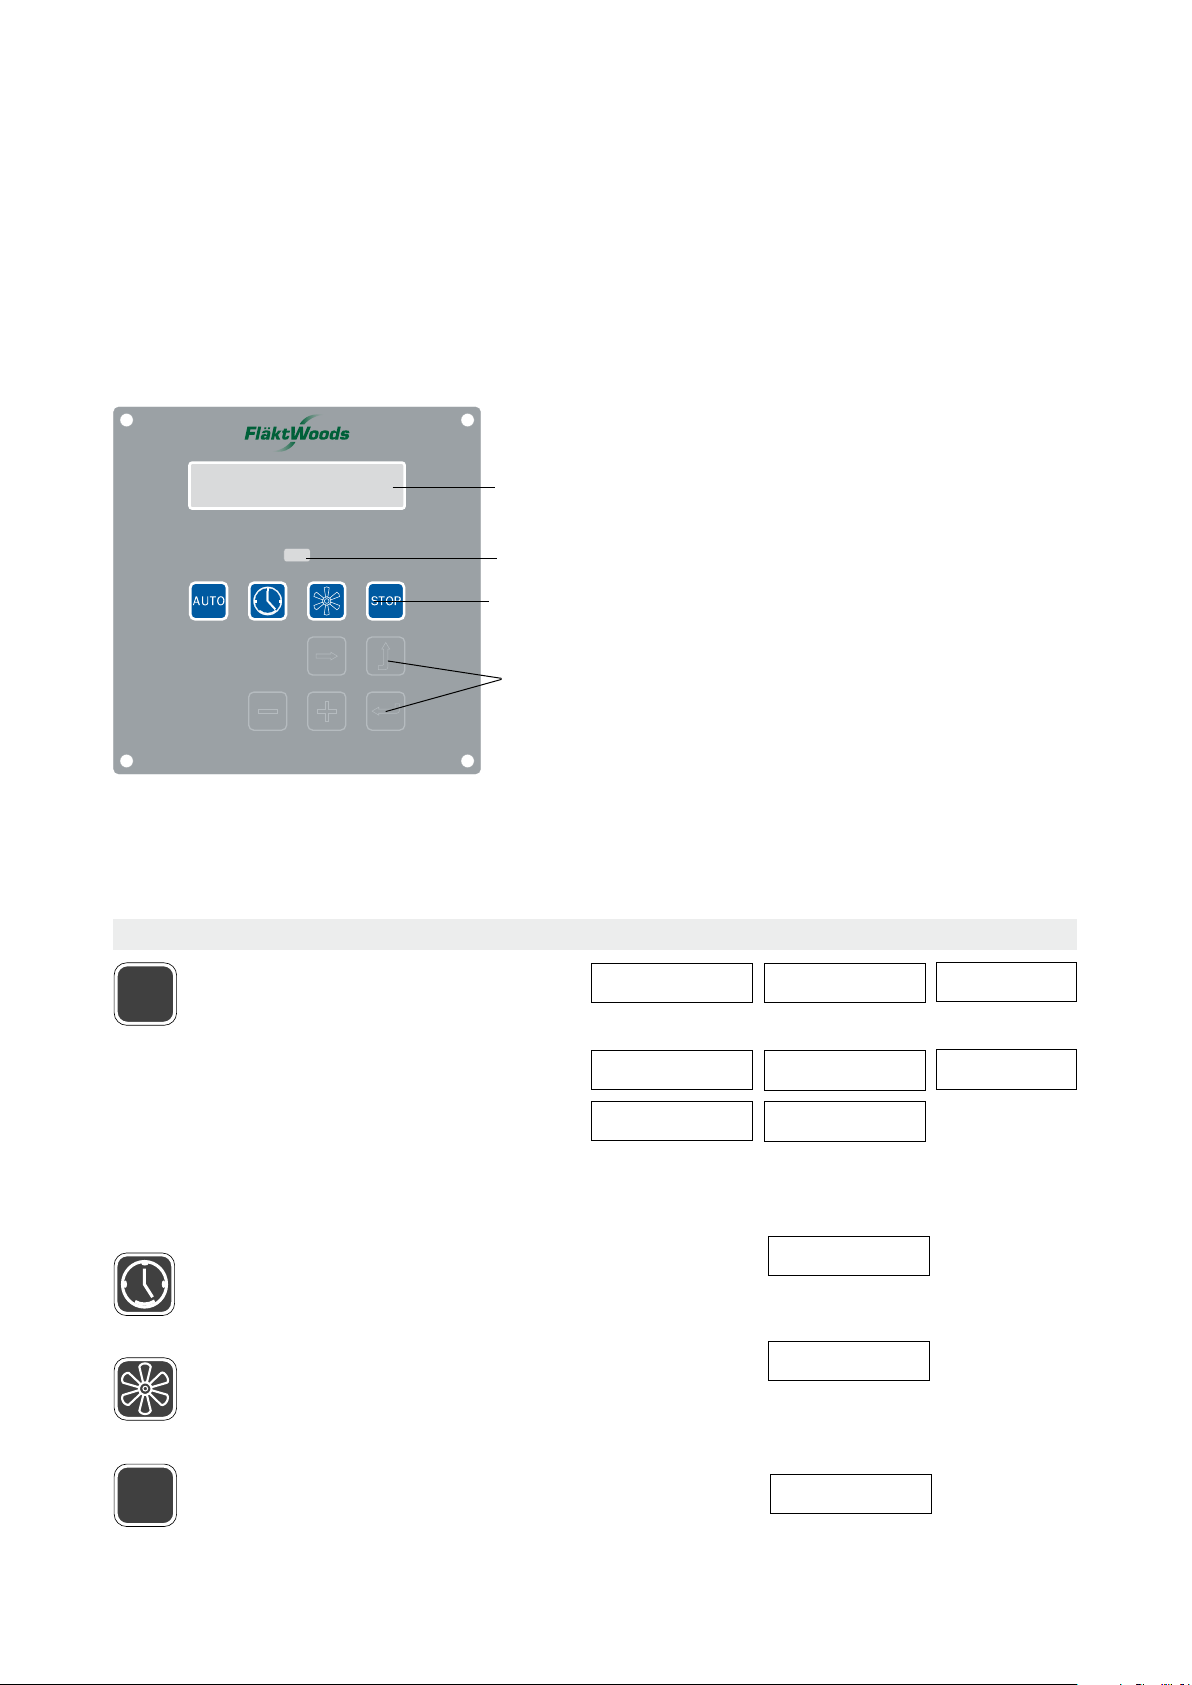
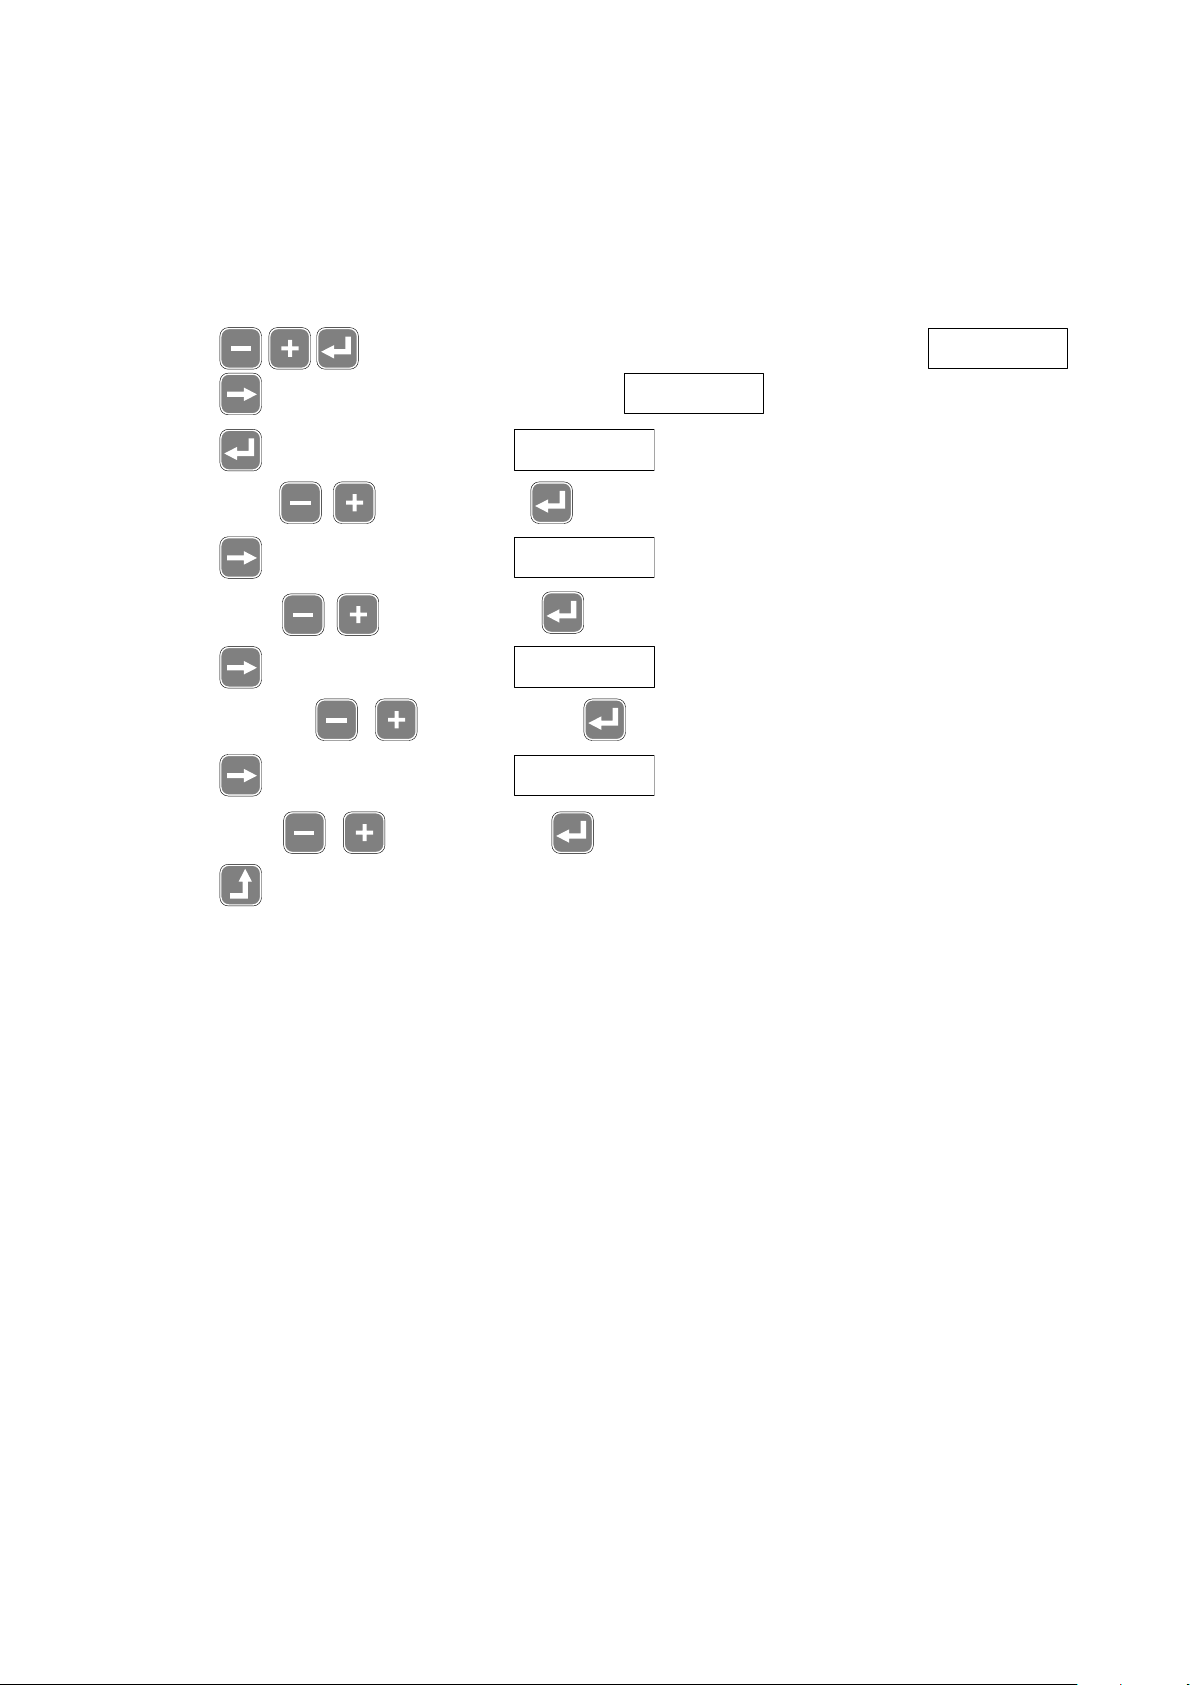
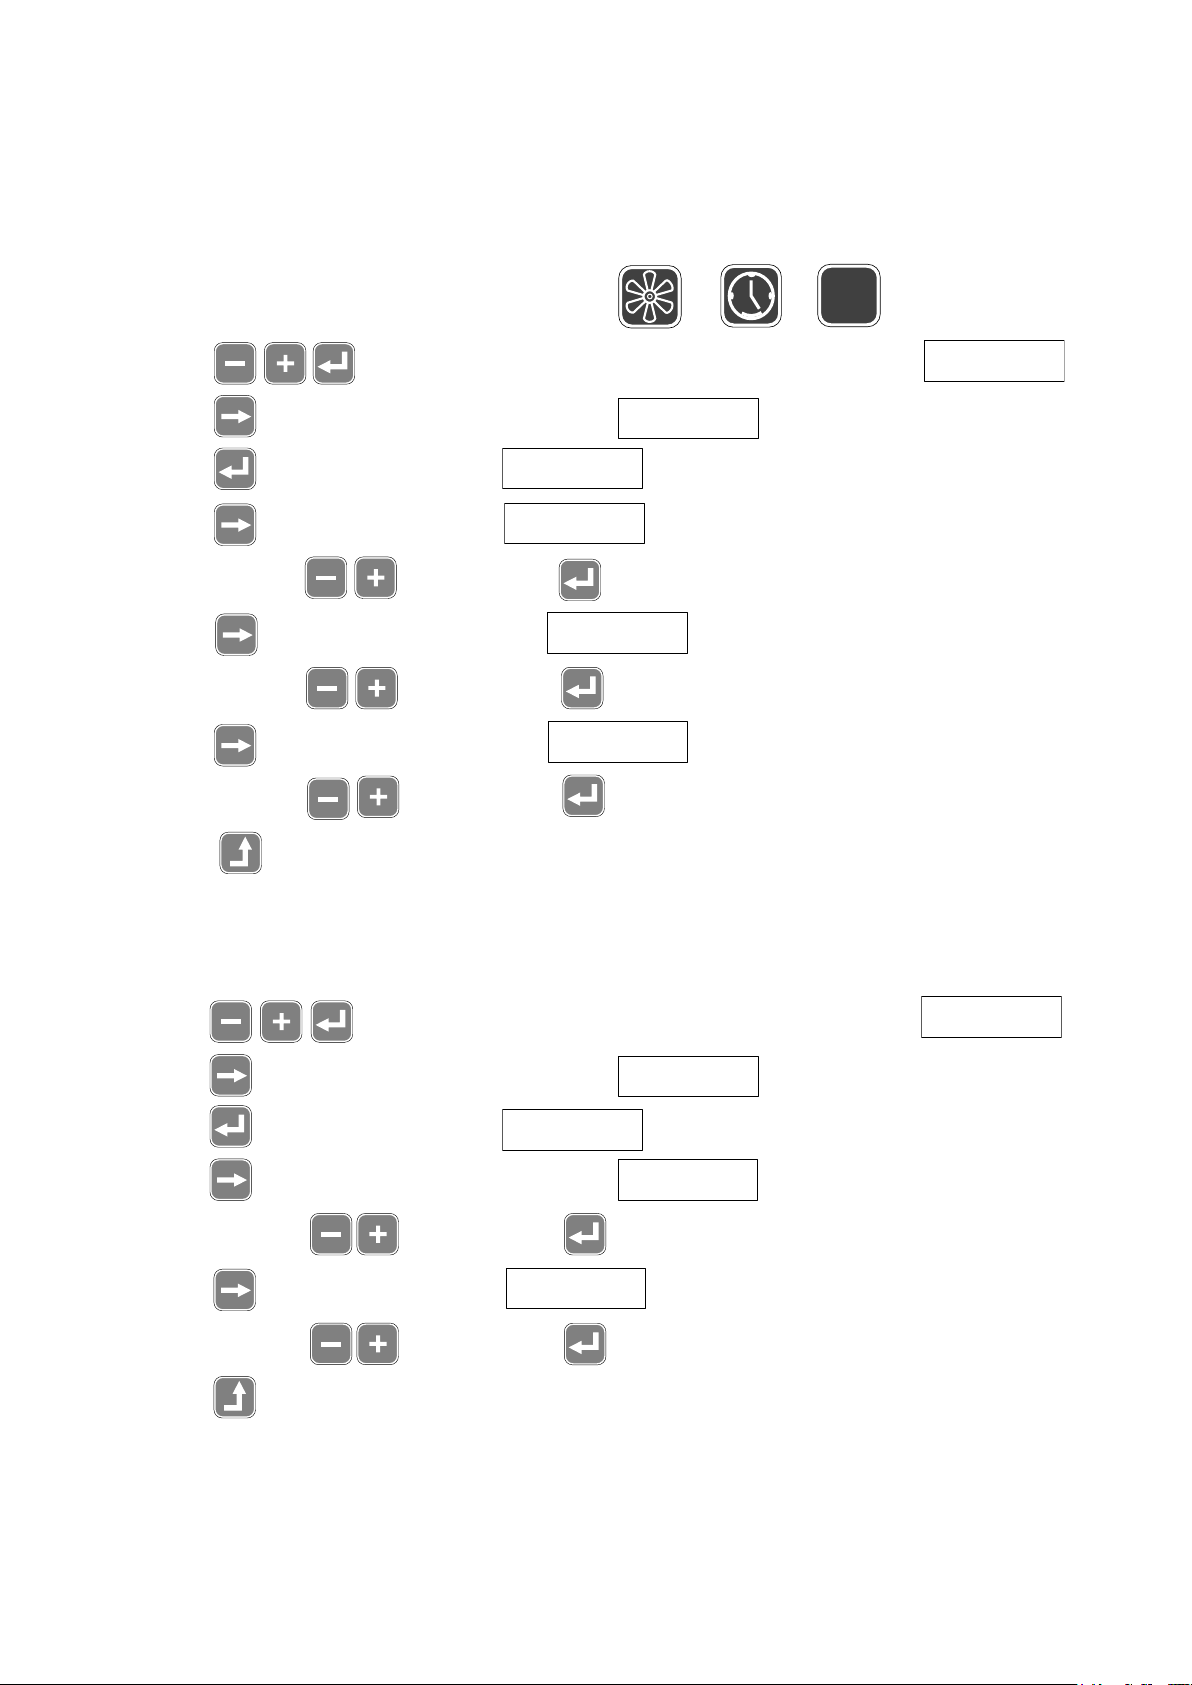
Locking of operating mode keys
The operating mode keys “Overtime operation“, “Ven-
tilation“ and “Stop“ can be blocked individually, if re-
quired; see also page 13, “Activation (blocking) of operat-
ing mode keys“.
Control panel
The control panel is equipped with a 2 x 20 character
window of the LED backlight type, where the operating
status, air flow, temperatures and other setting values
and parameters are displayed in clear text; see Fig. 20.
Four operating mode keys are used to select the de-
sired operating status. The current operating status is
shown in the operating menu in the window.
Each operating status can be interrupted at any time
for a new operating status by pressing the appropriate
operating mode key.
Five setting keys are provided to set and read the air
flows and temperatures, etc., to increase and reduce the
values, and to move around in the menu structure. The
values are displayed in the setting menu on the window.
The red LED on the panel will flash in the event of
a fault function. The fault function is displayed in the
alarm menu in the window.
Function of operating mode keys, operating menu
Symbol Function Operating menu
Locking and function of operating mode keys
Window
Alarm
Operating
mode
keys (4)
Setting
keys (5)
Automatic mode, in which the unit is control-
led by the following alternatives:
* Internal annual clock (weekly rhythm,
annual rhythm)
* Presence sensor, CO2 sensor
* Night-time cooling
* Self-test or Calibration
Menu shows the current operating mode for
the unit.
Possible operating modes are: Standard flow;
Reduced flow; Variable flow; Shut-down unit;
Night-time cooling and Self-test.
Overtime operation; the unit operates for 3
hours outside ordinary operating time. Op-
erating status is standard flow. Menu shows
remaining time.
Ventilation; the unit is forced to max. flow
(max. controlled voltage) for 15 minutes. The
desired value for the supply air temperature is
always 15ºC. Menu shows remaining time.
Stop; the unit stops.
Fläkt Woods 8061 GB 2009.05 4 Specifications are subject to alteration without further notice.
RoomMaster ABR-2 COMMISSIONING
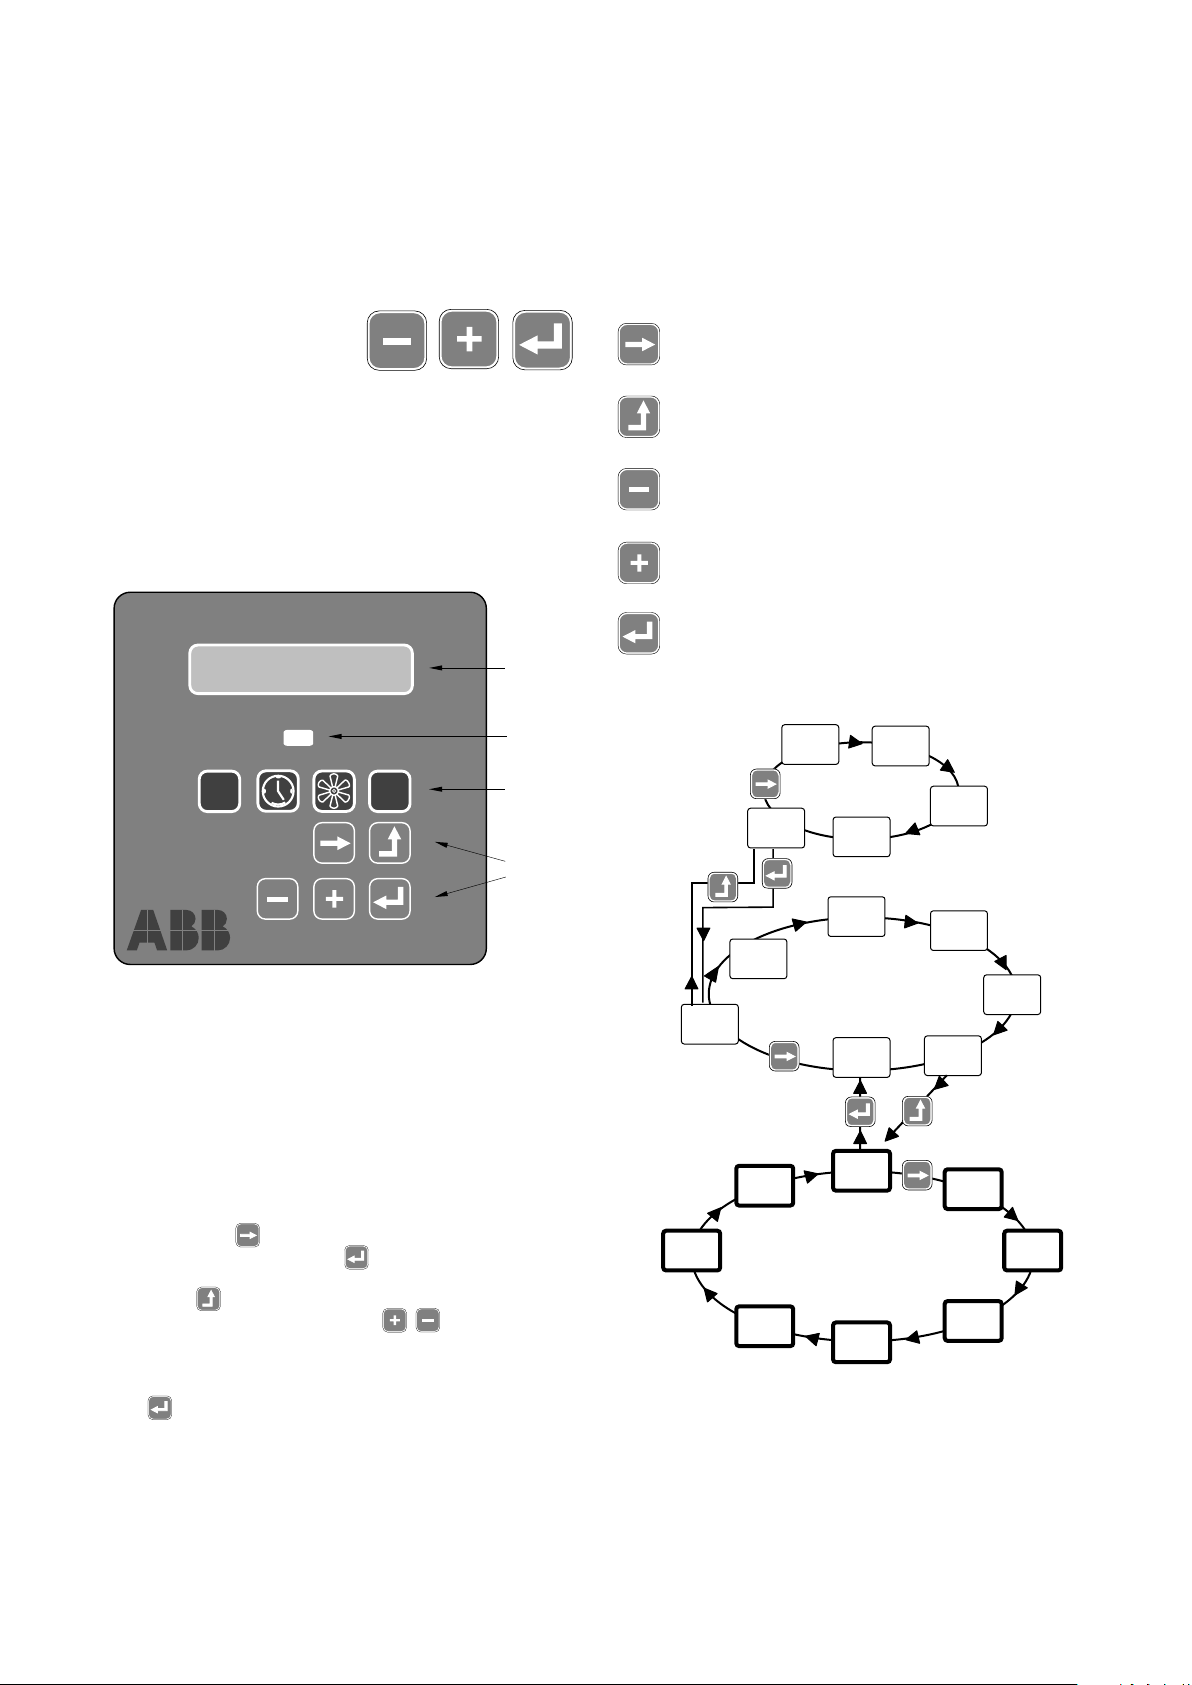
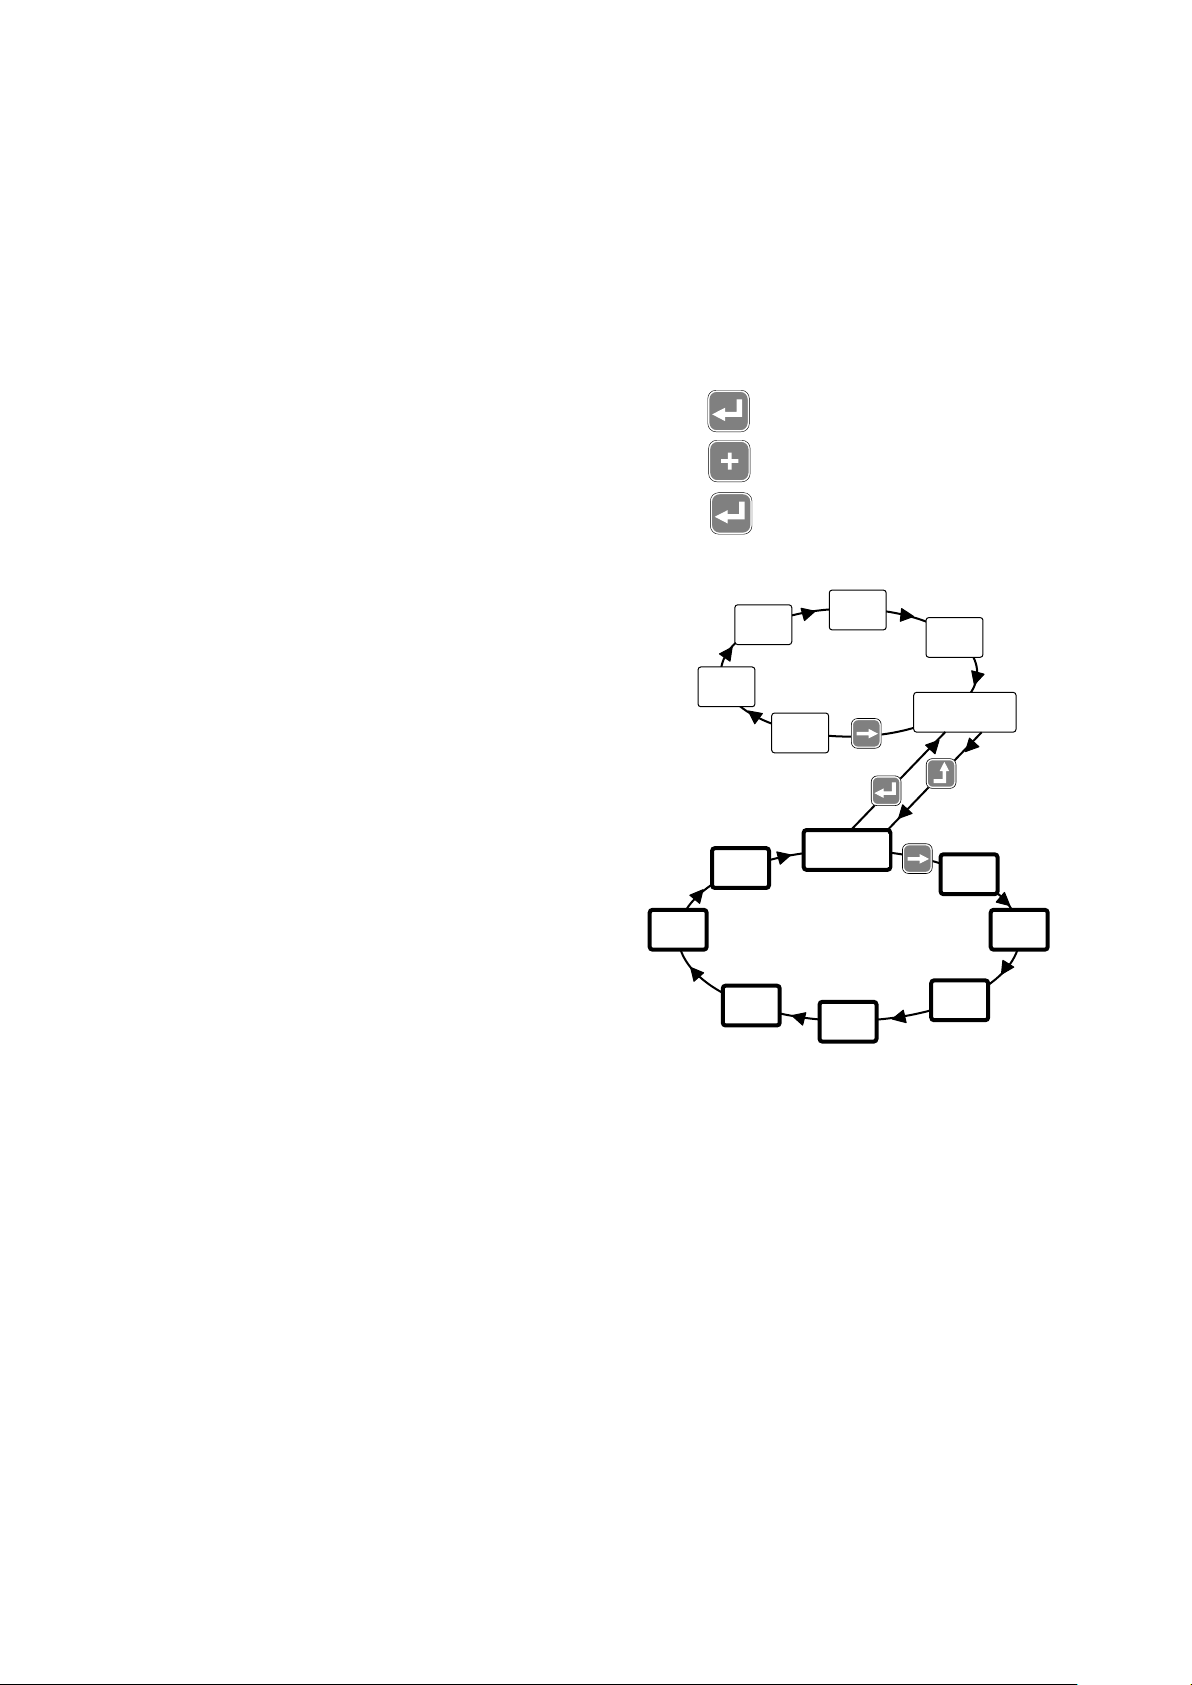
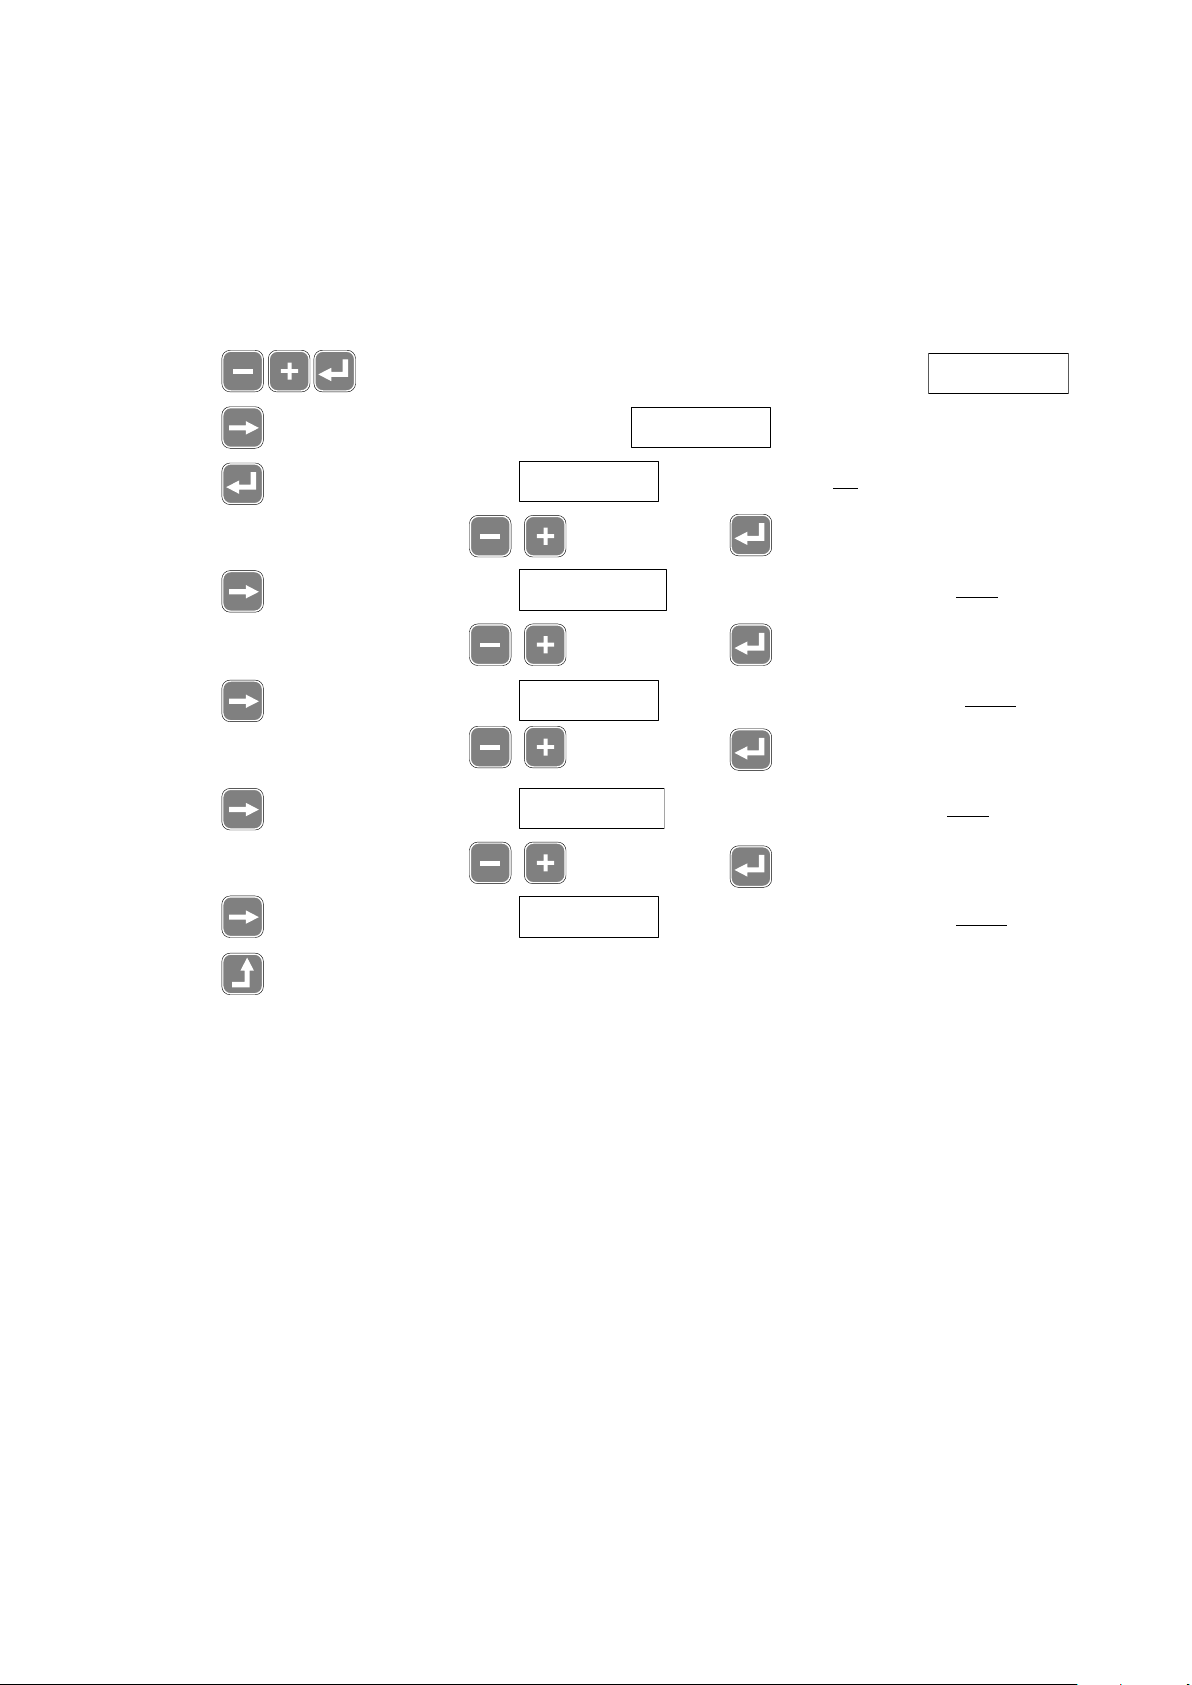
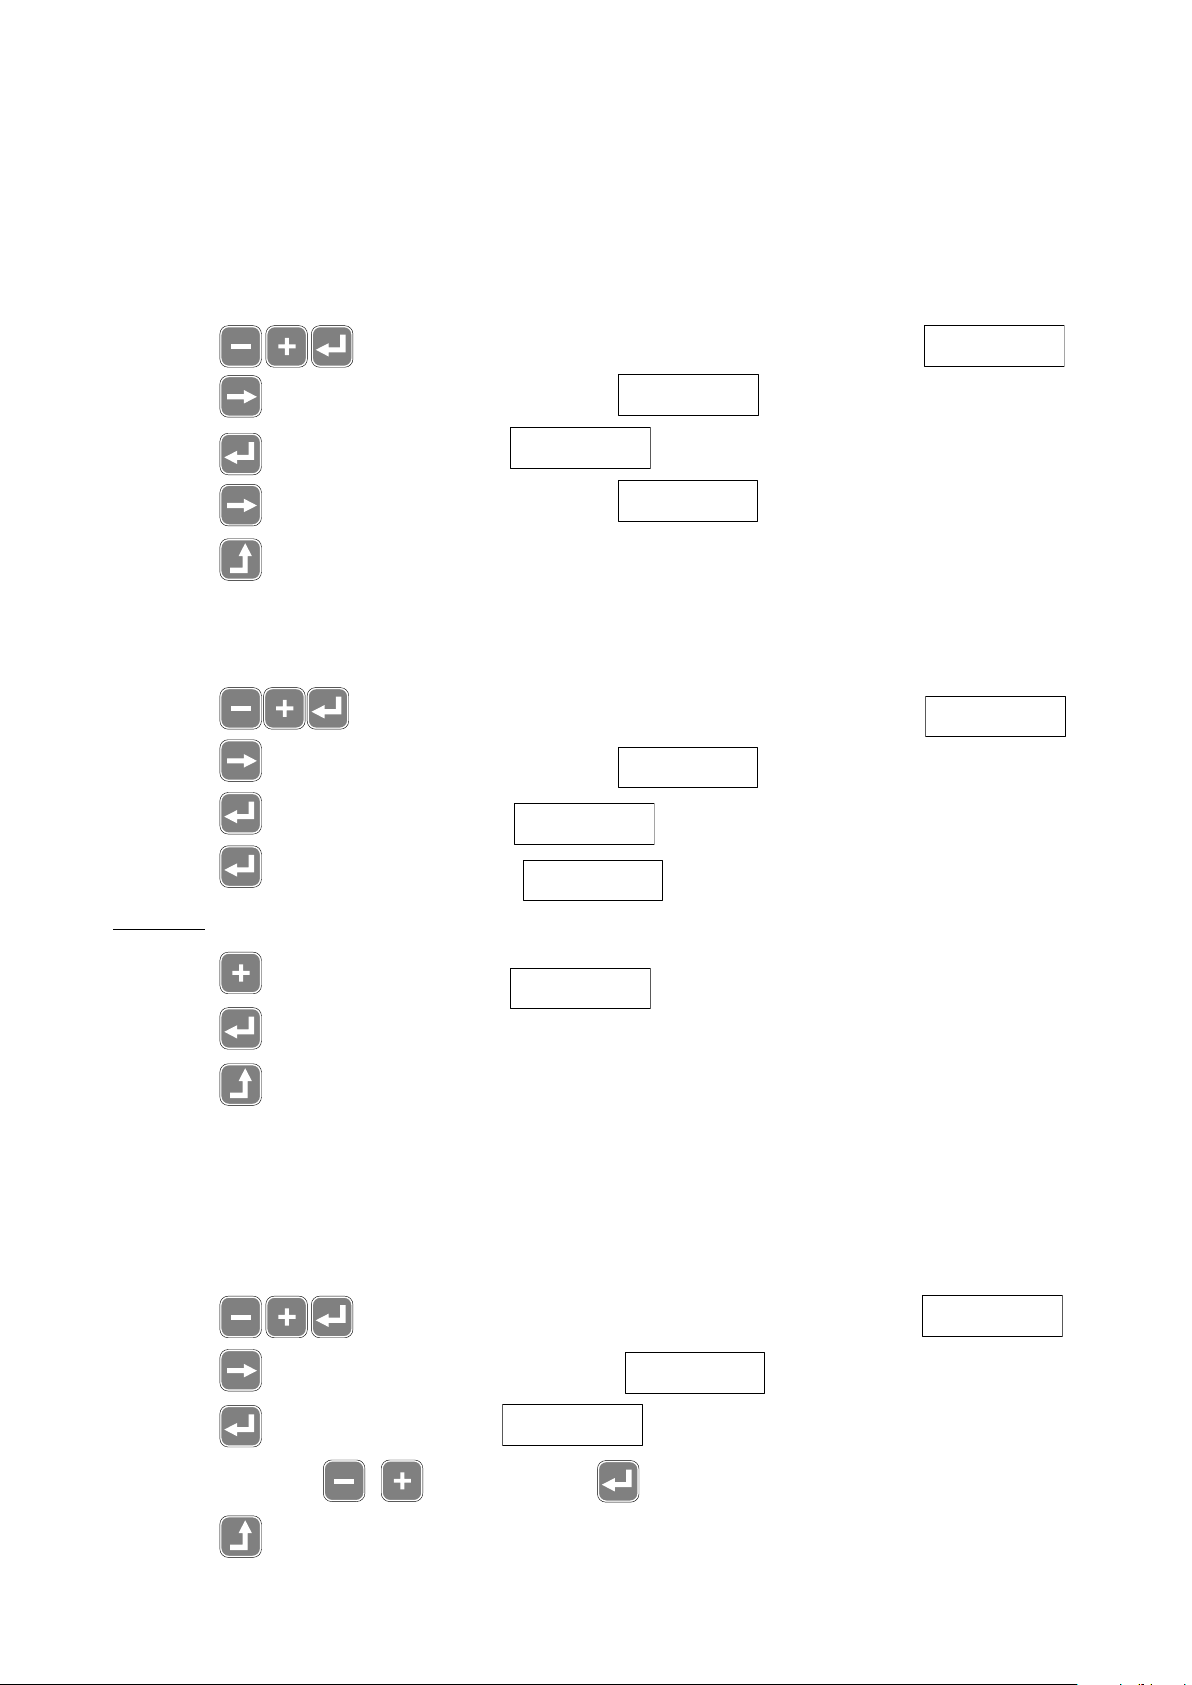
Setting menu structure
The menu structure has 3 levels: a main menu plus sub-
menus 1 and 2. The main menu is numbered in tens - 10,
20, etc., and the windows in sub-menu 1 beneath window
10 in the main menu are numbered singly - 11, 12, etc. Cer-
tain sub-menus also include a sub-menu 2. The windows
in sub-menu 2 under window 12 in sub-menu 1 are identi-
fied with a letter in addition to the number - 12a, 12b, etc.
Moving around in the same menu level is done with
the “Next“ key . Moving down one step to a sub-menu
is done with the “Enter“ key . Moving up one step, e.g.
from a sub-menu to the main menu, is done with the “Es-
cape“ key .
The “Plus“ and “Minus“ keys are used to
change a numerical or text parameter. The parameter val-
ue then begins to flash at the same time as it is changed.
Acknowledgement of the value is done with the “Enter“
key . The parameter value then stops flashing.
Fig. 21
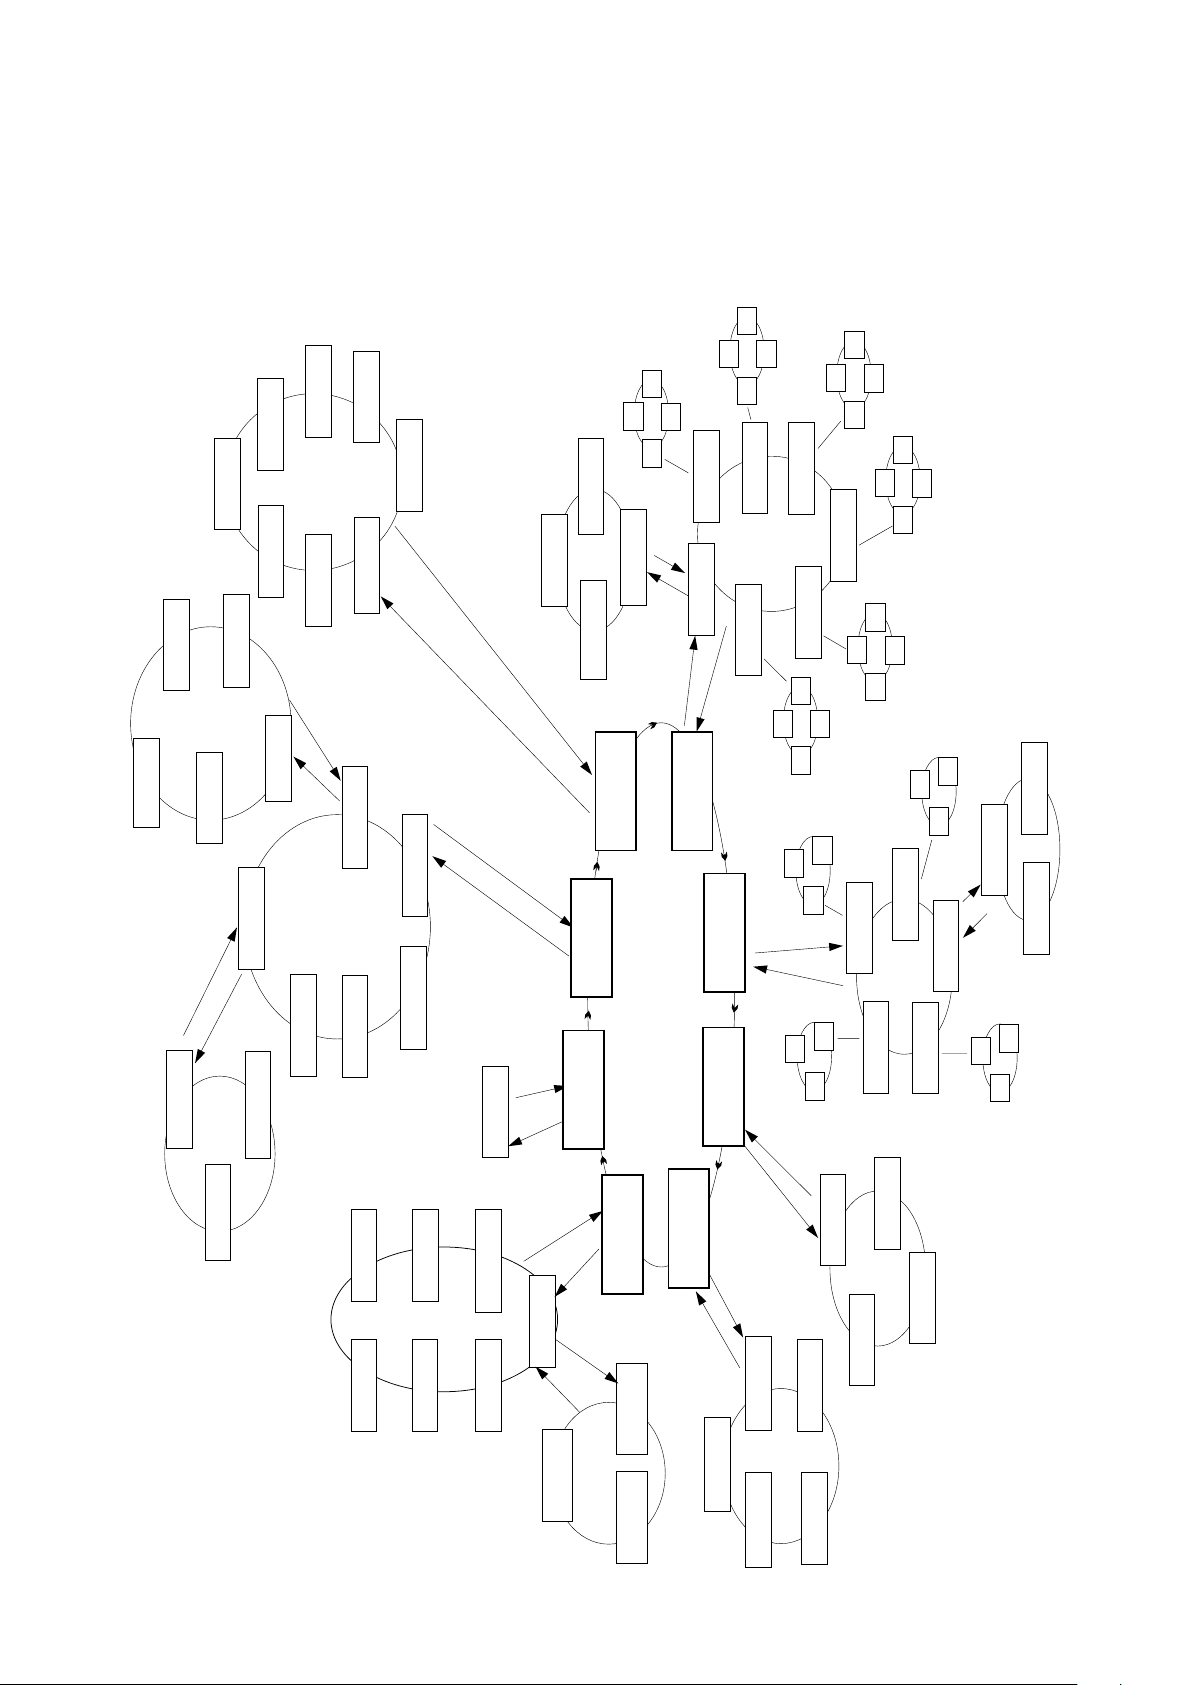
10
50
20
40
80
60
3070
11
14
12
17
13
15
12d
Huvudmeny
Undermeny 1
Undermeny 2
12e
12b
12a
12c
16
Function of setting keys
Sub-menu 2
Sub-menu 1
Main menu
Fig. 22. Main menu and sub-menu.
Next. Used to move to the next window at the
same menu level.
Escape. Used to escape from a current measure
and to move up one level in the menu.
Minus. Used to reduce and change the value of
numerical and text parameters.
Plus. Used to increase and change the value of
numerical and text parameters.
Enter. Used to enter the content of the current
window, or to initiate the measure described in
the window.
AUTO
AUTOMATIC
Weekly rhythm Std.flow
STOP
Window
Alarm
Operating
mode
keys (4)
Setting
keys(5)
Activation of setting keys
Press down the setting keys
simultaneously for 5 seconds.
Activation is confirmed by a new text and a number ap-
pearing in the display. The window contains the number
10 and the text “Set desired value“. It is now possible to
change the desired value and operating times, etc.
Locking of setting keys
The setting keys can be blocked via a terminal on the
control card. The lock is activated by jumping terminals
23 and 24.
Activation, locking and function of setting keys
Fläkt Woods 8061 GB 2009.05 5 Specifications are subject to alteration without further notice.
RoomMaster ABR-2 COMMISSIONING
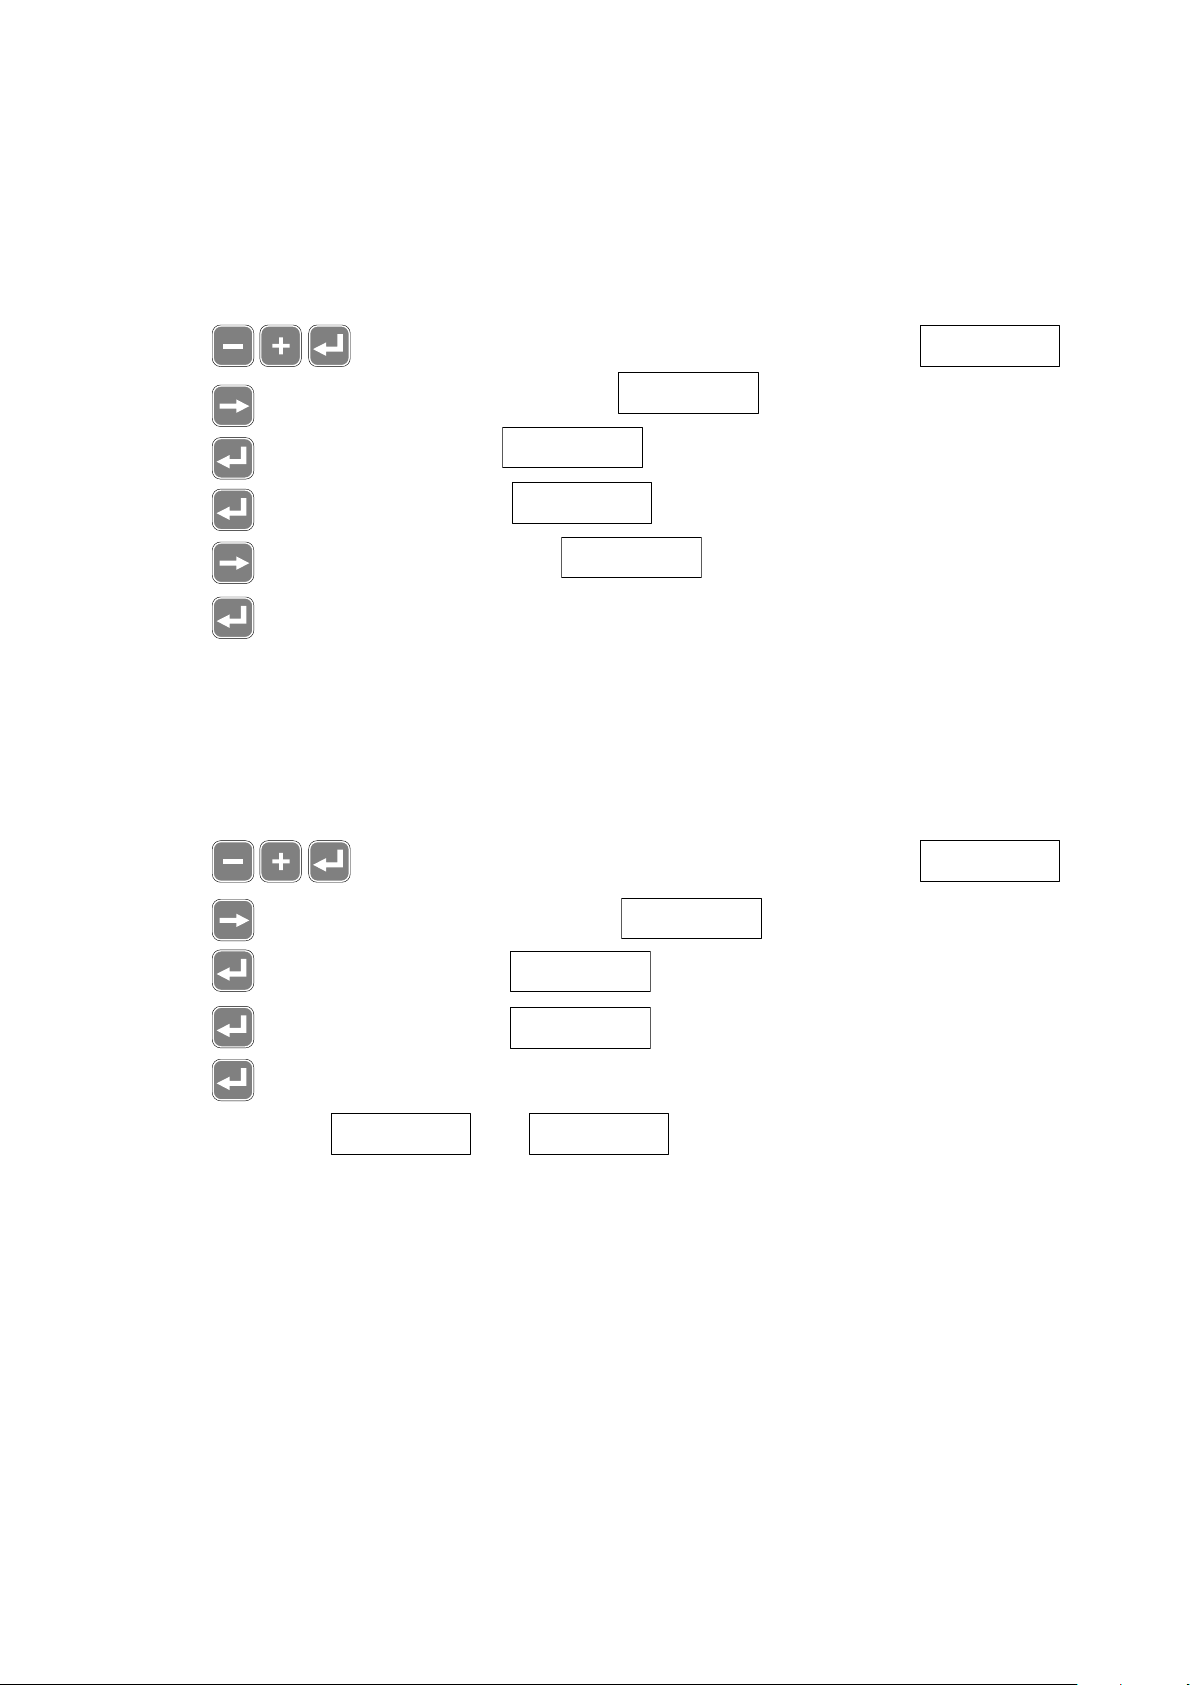
Example: Changing standard flow
The standard flow must be changed from 200 l/s to 220
l/s. Activation of the setting keys brings you automati-
cally into the main menu with window number 10.
Press key to show window 11
Press key until 220 l/s is displayed
Press key to confirm
Factory settings on delivery
Self-test and Calibration are always carried out prior to
delivery from the factory. Setting and checking the func-
tion are adapted to suit the ordered variant and the speci-
fied accessories.
The following functions/accessories influence the setting:
❒Electric coil installed
❒Cooling installed
❒Presence sensor as an accessory
Calibration of unit
The unit must always be calibrated for a new installation.
The calibration time is approx. 5 minutes.
During calibration the control unit checks the prevail-
ing operating condition and adapts the operating point of
thefans to the selected setting data.
Interrupted calibration
In the event of a power supply failure or other operating
breakdown which interrupts calibration before it is com-
plete the calibration procedure must be repeated.
Unit self-test
Self-test is intended to be used for checking important
components in the unit during service and after correct-
ing any faults.
The self-test time is approx. 20 minutes.
Alarm
In the event of an alarm, the response should be as in-
dicated in the alarm message (see also PROCEDURE -
Alarm and fault-finding).
Activate self-test by pressing “AUTO“ twice.
The unit switches automatically to automatic mode once
self-test is complete. The self-test time depends on the
type of fault.
Selecting operating mode STOP
It is recommended that the unit is operated continuously
for normal air treatment. In order to be able to select the
STOP operating mode, dampers are required in the out-
door air and the extract air duct. The absence of a damper
will allow impurities to enter the unit by “the back way“,
and the room and the unit will be cooled down during
cold times of the year. Cooling of the room leads to in-
creased heating costs and increases the risk of operating
breakdowns with the unit.
10 Ställ in
börvärde
50
20
40
80
60
30
70
15
12
11 Normalflöde:
200 l/s
13
14 16
Huvudmeny
Undermeny 1
Fig. 23. Example: Changing standard flow.
Sub-menu 1
Main menu
11 Standard
flow: 200 l/s
10 Set desi-
red value
Commissioning - start-up

Fläkt Woods 8061 GB 2009.05 6 Specifications are subject to alteration without further notice.
RoomMaster ABR-2 COMMISSIONING
Program version
These instructions are applicable to program version 1.0.
Information about the type of program version in a unit
can be found in window 77 and/or on the control card.
Checking prior to commissioning
In order to obtain a functionally reliable system, a simple
check is necessary in conjunction with commissioning a
new unit and modifying a previously selected setting. See
also Commissioning below.
Choice of language in text window
The program contains three different languages to be
chosen between with keys on the control panel.
See further page 16, window 81.
Commissioning applicable to program version 1.0
What to do?
See page
Window
number
See PROCEDURE - SETTING if other settings and operating data are required.
What must always be done/checked ?
1. Check that the installation is correctly executed
2. Open the unit and check that nothing has been left lying inside the unit
3. Push the plug into an earthed wall socket
4. Activate the setting keys 3
5. Choice of language in text window 14 81
6. Perform setting of: Standard flow and Reduced flow 7 11 and 12
7. Perform setting of: Operating time per weekday, weekly rhythm 8 30
(without presence sensor)
8. If a presence sensor is fitted, set annual rhythm period 1 14 41
9. Check year, date, weekday and time 10 51,52,53,54
10. Select summer night-time cooling 11 60
11. Check/select electric heater and cooling coil 14 75 and 76
12. Start calibration. N.B. THIS MUST ALWAYS BE DONE 12 71b
13. Select AUTO operating mode (after completed calibration)
Are there any other settings that may be changed, if required ?
14. Choice of temperature control (change to supply air regulation) 6 14
15. Setting of room temperature for room control (default value 20ºC) 6 15a
16. Setting of lowest supply air temperature for room control (default value 19ºC) 6 15b
17. Setting of supply air temperature for supply air control (default value 19ºC) 6 15c
18. Locking (blocking) of “Overtime“,“Ventilation“ and “Stop“operating mode keys 14 72,73,74
19. Locking of setting keys (parameter lock) 3
Commissioning - start-up

Fläkt Woods 8061 GB 2009.05 7 Specifications are subject to alteration without further notice.
RoomMaster ABR-2 COMMISSIONING
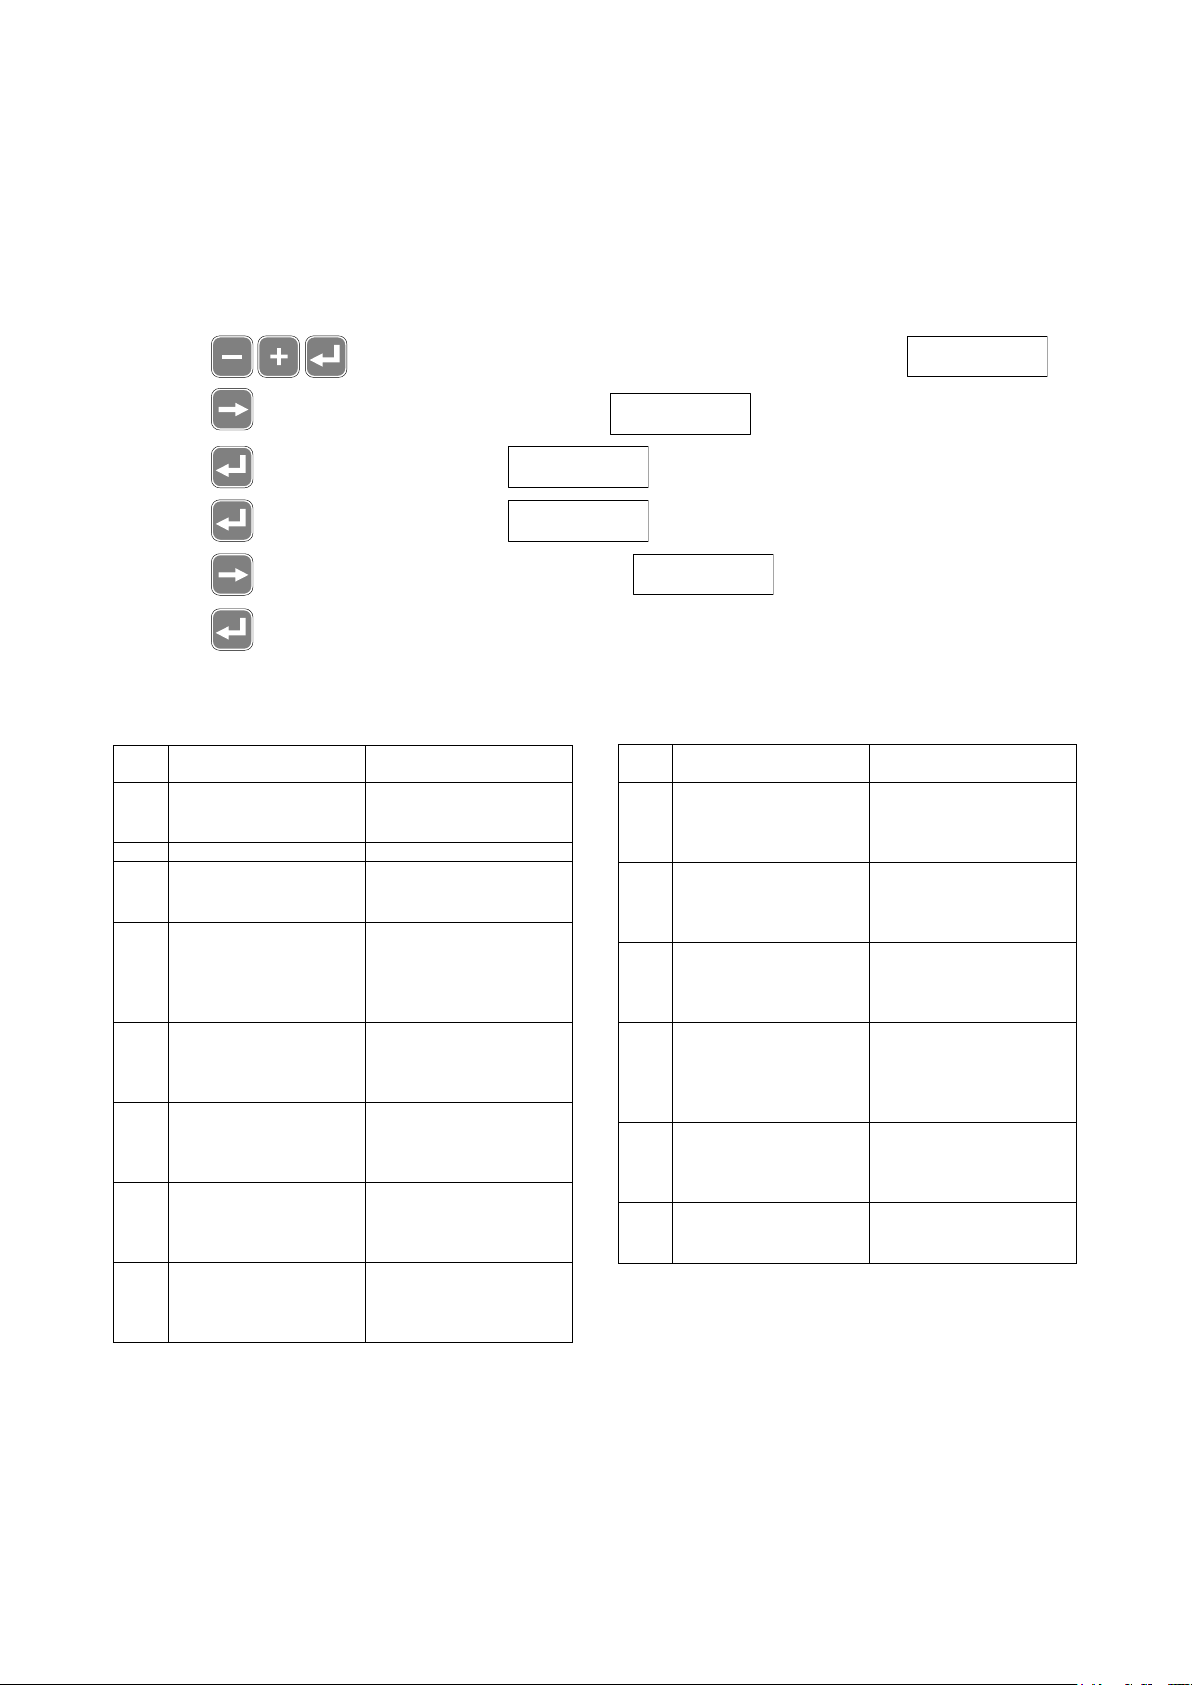
Setting temperature regulation and desired temperature value
The setting ranges are shown after the current window. The default value is underlined.
1. Press the keys at the same time for approx. 5 seconds. Window 10 is displayed
2. Press the key. Window 11 is displayed
3. Press the key 3 times until window 14 is displayed Room regulation - Supply air regulation
4. Select Room regulation or Supply air regulation with , and confirm with (cursor stops flashing)
5. Press the key. Window 15 is displayed
6. Press the key. Window 15a is displayed 10.0 <–> 30.0ºC 20.0ºC
7. Change to the desired value with , and confirm with (cursor stops flashing)
8. Press the key. Window 15b is displayed 15.0 <–> 25.0ºC 19.0ºC
9. Change to the desired value with , and confirm with (cursor stops flashing)
10. Press the key. Window 15c is displayed 10.0 <–> 30.0ºC 19.0ºC
11. Change to the desired value with and confirm with (cursor stops flashing)
12. Press the key 3 times to return to the operating window.
13. The unit will now operate with the new set values.
10
Set desired value
11 Standard flow
exhaust air: 200 l/s
14 Temperature
regulation: Room reg.
15b Min supp.air.tem.
(Room reg.) 19,0oC
15a Room temp.
(room.reg. 19oC
15
Set temperature
15c Suppl. air temp.
(suppl air reg)19,0oC
Procedure - setting
Fläkt Woods 8061 GB 2009.05 8 Specifications are subject to alteration without further notice.
RoomMaster ABR-2 COMMISSIONING
Setting of exhaust air flow, standard and reduced flow and supply air/exhaust air flow ratio
The setting ranges are shown after the current window. The default value is underlined.
1. Press the keys at the same time for approx. 5 seconds. Window 10 is displayed
2. Press the key. Window 11 is displayed 150 <-> 300 l/s 200 l/s
3. Change to the desired standard flow with , and confirm with (cursor stops flashing)
4. Press the key. Window 12 is displayed 75 <-> 150 l/s 100 l/s
5. Change to the desired standard flow with , and confirm with (cursor stops flashing)
6. Press the key. Window 13 is displayed 0.7 <-> 1.3 1.0
7. Change to the desired standard flow with , and confirm with (cursor stops flashing)
8. Press the key 2 times to return to the operating window.
9. The unit will now operate with the new set values.
Reading actual values (Window 20)
1. Press the keys at the same time for approx. 5 seconds. Window 10 is displayed
2. Press the key. Window 20 is displayed
3. Press the key. Window 21 is displayed current exhaust air temperature can be read
4. Press the key. Window 22 is displayed current supply air temperature can be read
5. Press the key. Window 23 is displayed current outdoor air temperature can be read
6. Press the key. Window 24 is displayed current exhaust air flow can be read
7. Press the key. Window 25 is displayed current supply air flow can be read
8. Press the key. Window 26 is displayed current speed of heat exchanger rotor can be read
9. Press the key. Window 27 is displayed current power output from the electric coil can be read
10. Press the key. Window 28 is displayed current output signal can be read
Press the key 2 times to return to the operating window.
10
Set desired value
11 Standard flow
exhaust air: 200 l/s
12 Red.flow exhaust
air: 100 l/s
13 Supply air/exhaust
air ratio: 1,0
10
Set desired value
20
Read actual values
21 Exhaust air temp.
= 21,5 oC
22 Supply air temp.
= 19,5 oC
23 Outdoor air
temp. = 59,0 oC
24 Exhaust air flow
= 245 l/s
25 Supply air flow
= 245 l/s
26 Heat exchanger
rotor speed= 9,2 rpm
27 Output of
electric coil = 50 %
28 Control voltage
for cooling coil=10,0V
Procedure - setting

Fläkt Woods 8061 GB 2009.05 9 Specifications are subject to alteration without further notice.
RoomMaster ABR-2 COMMISSIONING
Setting operating times and operating mode in weekly rhythm (Window 30)
The setting ranges are shown after the current window. The default value is underlined.
1. Press the keys at the same time for approx. 5 seconds. Window 10 is displayed
2. Press the key (2 times) until window 30 is displayed
3. Press the key. Window 31 is displayed
4. Press the key. Window 31a is displayed Setting of hour and minute 8.00
5. Change to the desired change-over time 1 with , and confirm with (cursor stops flashing)
6. Press the key. Window 31b is displayed Standard flow - Reduced flow - Stop
7. Change to the desired activity 1 with , and confirm with (cursor stops flashing)
8. Press the key. Window 31c is displayed Setting of hour and minute 17.00
9. Change to the desired change-over time 2 with , and confirm with (cursor stops flashing)
10. Press the key. Window 31d is displayed Standard flow - Reduced flow - Stop
11. Change to desired activity 2 with , and confirm with (cursor stops flashing)
12. Press the key. Window 31 is displayed
13. Press the key. Window 32 is displayed
14. Repeat the above procedure to set the desired operating times and operating modes for the other days of the week.
15. Press the key 3 times to return to the operating window.
The default values for Tuesday to Friday are the same as for Monday.
The default values for Saturday and Sunday are:
Change-over time 1 = 8.00 Activity 1 = Reduced flow
Change-over time 2 = 17.00 Activity 2 = Reduced flow
N.B. For normal air handling, it is recommended that the unit is operated continuously. In order to be able to select the
“Stop“ activity, i.e. if the unit is stopped during the night, dampers are required in the outdoor air and the extract air duct.
10
Set desired value
30
Set weekly rhythm
31 Set time/activity
for Monday
31a Change-over
screen1 Mon: 8:00
31b Activity1 Monday
Standard flow
31c Change-over
time 2 Monday:17:00
31d Activity 2 Monday
Reduced flow
31 Set time/activity
for Monday
32 Set time/activity
for Tuesday
Procedure - setting

Fläkt Woods 8061 GB 2009.05 10 Specifications are subject to alteration without further notice.
RoomMaster ABR-2 COMMISSIONING
Setting operating times and operating mode in weekly rhythm (Window 40)
The setting ranges are shown after the current window. The default value is underlined.
1. Press the keys at the same time for approx. 5 seconds. Window 10 is displayed
2. Press the key (3 times) until window 40 is displayed
3. Press the key. Window 41 is displayed
4. Press the key. Window 41a is displayed No effect - Standard flow - Reduced flow - Stop
5. Change to the desired activity with , and confirm with (cursor stops flashing)
6. Press the key. Window 41b is displayed Setting of month and day
7. Change to the desired starting time for period 1 with , and confirm with (cursor stops flashing)
8. Press the key. Window 41c is displayed Setting of month and day
9. Change to the desired stop time for period 1 with , and confirm with (cursor stops flashing)
10. Press the key. Window 41 is displayed
11. Press the key. Window 42 is displayed
12. Repeat the above procedure to set the desired operating times and operating modes for periods 2, 3, 4 and 5.
13. Press the key 3 times to return to the operating window.
Periods 2, 3, 4 and 5 have the same default value as period 1.
N.B. For normal air handling, it is recommended that the unit is operated continuously. In order to be able to select the “Stop“
activity, i.e. if the unit is stopped during the night, dampers are required in the outdoor air and the extract air duct.
Presence sensor (accessory)
The following settings should be made for period 1 when connecting a presence sensor.
See also PRESENCE SENSOR on page 16.
10
Set desired value
40
Set annual rhythm
41 Set time/activity
for period 1
41a Activity period 1:
Reduced flow
41b Starting time
period 1: 01-01
41c Finishing time
period 1: 01-01
41 Set time/activity
for period 1
42 Set time/activity
for period 2
41a Activity period 1:
Reduced flow
41b Starting time
period 1: 01-01
41c Finishing time
period 1: 01-01
Procedure - setting
Fläkt Woods 8061 GB 2009.05 11 Specifications are subject to alteration without further notice.
RoomMaster ABR-2 COMMISSIONING
Setting clock (Window 50)
1. Press the keys at the same time for approx. 5 seconds. Window 10 is displayed
2. Press the key (4 times) until window 50 is displayed
3. Press the key. Window 51 is displayed Year
4. Set the year with , and confirm with (cursor stops flashing)
5. Press the key. Window 52 is displayed Month - Day
6. Set the date with , and confirm with (cursor stops flashing)
7. Press the key. Window 53 is displayed Weekday
8. Set the weekday with , and confirm with (cursor stops flashing)
9. Press the key. Window 54 is displayed Hours - Minutes
10. Set the time with , and confirm with (cursor stops flashing)
11. Press the key 2 times to return to the operating window.
10
Set desired value
50
Set clock
51 Set year
1996
52 Set date
2-10 (m-d)
53 Set weekday:
Friday
54 Set time:
16:19 (h:m)
Procedure - setting
Fläkt Woods 8061 GB 2009.05 12 Specifications are subject to alteration without further notice.
RoomMaster ABR-2 COMMISSIONING
Activation of summer night-time cooling (Window 60)
The setting ranges are shown after the current window. The default value is underlined
1. Press the keys at the same time for approx. 5 seconds. Window 10 is displayed
2. Press the key (5 times) until window 60 is displayed
3. Press the key. Window 61 is displayed No - Yes
4. Activate summer night-time cooling with , and confirm with (cursor stops flashing)
5. Press the key. Window 62 is displayed 0.0 <-> 10.0ºC 5.0ºC
6. Change to the desired temperature with , and confirm with (cursor stops flashing)
7. Press the key. Window 63 is displayed 16.0 <-> 32.0ºC 22.0ºC
8. Change to the desired temperature with , and confirm with cursor stops flashing)
9. Press the key. Window 64 is displayed 2.0 <-> 5.0ºC 2.0ºC
10. Change to the desired temperature with , and confirm with (cursor stops flashing)
11. Press the key. Window 65 is displayed 5.0 <-> 20.0ºC 12.0ºC
12. Press the key 2 times to return to the operating window.
Windows 62, 63, 64 and 65 have no effect if summer night-time cooling is not activated in window 61
10
Set desired value
60 Set summer
night-time cooling
61 Summer night-
time cooling: Yes
62 Exhaust air temp.
outd.air temp>=:5,0oC
63 Exhaust air temp
greater than: 22,0oC
64 Temp reduction
in the room: 2,0oC
65 Outdoor temp.
not below: 12,0oC
Procedure - setting
Fläkt Woods 8061 GB 2009.05 13 Specifications are subject to alteration without further notice.
RoomMaster ABR-2 COMMISSIONING
Calibration of unit (Window 71b)
1. Press the keys at the same time for approx. 5 seconds. Window 10 is displayed
2. Press the key (6 times) until window 70 is displayed
3. Press the key. Window 71 is displayed
4. Press the key. Window 71a is displayed
5. Press the key, once. Window 71b is displayed
6. Press the key Calibration is activated
Calibration is complete when the ‘calibration‘ text disappears from the operating window.
The time required for calibration is approx. 5 minutes.
Self-test of unit (Window 71a)
1. Press the keys at the same time for approx. 5 seconds. Window 10 is displayed
2. Press the key (6 times) until window 70 is displayed
3. Press the key. Window 71 is displayed
4. Press the key. Window 71a is displayed
5. Press the key. Self-test is activated
6. The operating windows and will be displayed during the self-test.
The self-test is complete when the ‘self-test‘ and ‘filter test‘ text disappears.
The time required for the self-test is approx. 20 minutes.
10
Set desired value
70 Test /Default value
/ Configuration
71a Self-test
71 Test /Calibration
/ Default value
71b Calibration
10
Set desired value
70 Test /Default value
/ Configuration
71 Test /Calibration
/ Default value
71a Self-test
Automatic
Filter test
Automatic
Self-test
Procedure - setting
Fläkt Woods 8061 GB 2009.05 14 Specifications are subject to alteration without further notice.
RoomMaster ABR-2 COMMISSIONING
Reset default values (Window 71c)
1. Press the keys at the same time for approx. 5 seconds. Window 10 is displayed
2. Press the key (6 times) until window 70 is displayed
3. Press the key. Window 71 is displayed
4. Press the key. Window 71a is displayed
5. Press the key, (2 times). Until window 71c is displayed
6. Press the key the values are reset to default values according to the list below.
Window Description Default value
No.
11 Standard flow: Exhaust air 200 l/s
12 Reduced flow: Exhaust air 100 l/s
13 Ratio: Supply air/Exhaust air 1
14 Temperature regulation Room regulation
15a Room temperature (Room reg.) 20 oC (Room reg.)
15b Min supply air tem. (Room reg.) 19 oC "
15c Supply air tem. (Supply air reg.) 19 oC (Suuply air reg.)
16a Temp.reg. P-band 1,0 oC
16b Temp.regl. I-time 5,0 min
16c Compensation factor k1 4,2 (Room regl.)
16d Compensation factor k2 3,2 "
16e Compensation factor k3 0,3 "
31a Change-over time 1 Monday 8,00 (Weekly rhythm)
31b Activity1 Monday Standard flow "
31c Change-over time 2 Monday 17.00 "
31d Activity2 Monday Reduced flow "
32a Change-over time 1 Tuesday 8,00 "
32b Activity 1 Tuesday Standard flow "
32c Change-over time 2 Tuesday 17.00 "
32d Activity2 Tuesday Reduced flow "
33a Change-over time 1 Wedn.day 8,00 "
33b Activity 1 Wednesday Standard flow "
33c Change-over time 2 Wedn.day 17.00 "
33d Activity 2 Wednesday Reduced flow "
34a Change-over time 1 Thursday 8.00 "
34b Activity 1 Thursday Standard flow "
34c Change-over time 2 Thursday 17.00 "
34d Activity 2 Thursday Reduced flow "
Window Description Default value
No.
35a Change-over time 1 Friday 8.00 (Weekly rhythm)
35b Activity 1 Friday Standard flow "
35c Change-over time 2 Friday 17.00 "
35d Activity 2 Friday Reduced flow "
36a Change-over time 1 Saturday 8,00 (Weekly rhythm)
36b Activity 1 Saturday Reduced flow "
36c Change-over time 2 Saturday 17.00 "
36d Activity 2 Saturday Reduced flow "
37a Change-over time 1 Sunday 8,00 "
37b Activity 1 Sunday Reduced flow "
37c Change-over time 2 Sunday 17.00 "
37d Activity 2 Sunday Standard flow "
41a Activity period 1 No effect (Annual rhythm)
42a Activity period 2 No effect "
43a Activity period 3 No effect "
44a Activity period 4 No effect "
45a Activity period 5 No effect "
61 Summer night-time cooling No
62 Exhaust air temp.-outd. temp. 5,0 oC (Summer cooling)
63 Exhaust aur temp.greater than 22,0 oC "
64 Temp. reduction in room 2,0 oC "
65 Outdoor temp. not below 12,0 oC "
75 Electric coil installed Yes
77 Program version R2d ABR2 SV
N.B. This setting is used only if it is wished to revert to the default data of the control and regulation system necessary in
order to be able to run the unit. The default values are stored in an erasable programmable read only memory (EPROM) and
CANNOT be changed via the control panel.
Settings (system-dependent data) that are made via the control panel on delivery from the factory and in conjunction with
installation are stored in a RAM with battery back-up and a real time clock (annual clock).
10
Set desired value
70 Test /Default value
/ Configuration
71 Test /Calibration
/ Default value
71a Self-test
71c Calibration
Procedure - setting
Fläkt Woods 8061 GB 2009.05 15 Specifications are subject to alteration without further notice.
RoomMaster ABR-2 COMMISSIONING
Activation (blocking) of operating mode keys
1. Press the keys at the same time for approx. 5 seconds. Window 10 is displayed
2. Press the key (6 times) until window 70 is displayed
3. Press the key. Window 71 is displayed
4. Press the key. Window 72 is displayed No - Yes
5. Select Yes or No with , and confirm with (cursor stops flashing)
6. Press the key, once. Window 73 is displayed No - Yes
7. Select Yes or No with , and confirm with (cursor stops flashing)
8. Press the key, once. Window 74 is displayed No - Yes
9. Select Yes or No with , and confirm with (cursor stops flashing)
10. Press the key twice to return to the operating window.
Activation of electric coil and cooling coil
1. Press the keys at the same time for approx. 5 seconds. Window 10 is displayed
2. Press the key (6 times) until window 70 is displayed
3. Press the key. Window 71 is displayed No - Yes
4. Press the key (4 times) until window 75 is displayed No - Yes
5. Select Yes or No with , and confirm with (cursor stops flashing)
6. Press the key. Window 76 is displayed No - Recycling - Cooling coil/recycling
7. Select Yes or No with , and confirm with (cursor stops flashing)
8. Press the key twice to return to the operating window.
STOP
10
Set desired value
70 Test /Default value
/ Configuration
71 Test /Calibration
/ Default value
72 Overtime button
activated Yes
73 Ventilation button
activated Yes
74 Stop button
activated Yes
10
Set desired value
70 Test /Default value
/ Configuration
71 Test /Calibration
/ Default value
75 Electrical coil
installed Yes
76 Cooling
No
Procedure - setting
Fläkt Woods 8061 GB 2009.05 16 Specifications are subject to alteration without further notice.
RoomMaster ABR-2 COMMISSIONING
Program version (Window 77)
1. Press the keys at the same time for approx. 5 seconds. Window 10 is displayed
2. Press th key (6 times) until window 70 is displayed
3. Press the key. Window 71 is displayed
4. Press the key (6 times) until window 77 is displayed
5. Press the key twice to return to the operating window.
PRESENCE SENSOR Setting operating times and operating mode in annual rhythm
The setting ranges are shown after the current window. The default value is underlined
1. Press the keys at the same time for approx. 5 seconds. Window 10 is displayed
2. Press the key (3 times) until window 40 is displayed
3. Press the key. Window 41 is displayed
4. Press the key. Window 41a is displayed
No effect - Standard flow - Reduced flow - Stop
5. Press the key until window 41a shows
6. Press the key to confirm
Press the key twice to return to the operating window.
Function: The unit operates at reduced flow when the presence sensor does NOT sense any movement in the room.
N.B.
For normal air handling, it is recommended that the unit is operated continuously. In order to be able to select the “Stop“
activity, i.e. if the unit is stopped during the night, dampers are required in the outdoor air and the extract air duct.
10
Set desired value
70 Test /Default value
/ Configuration
71 Test /Calibration
/ Default value
77 Program version
1.0
10
Set desired value
40
Set annual rhythm
41 Set time/activity
for period 1
41a Activity period 1:
Reduced flow
41a Activity period 1:
Reduced flow
Choice of language (Window 81)
1. Press the keys at the same time for approx. 5 seconds. Window 10 is displayed
2. Press the key (7 times) until window 80 is displayed
3. Press the key. Window 81 is displayed English, German, French
4. Choose language with and confirm with (cursor stops flashing)
5. Press the key twice to return to the operating window.
10
Set desired value
80
Choose language
81 Language:
English
Procedure - setting
Fläkt Woods 8061 GB 2009.05 17 Specifications are subject to alteration without further notice.
RoomMaster ABR-2 COMMISSIONING
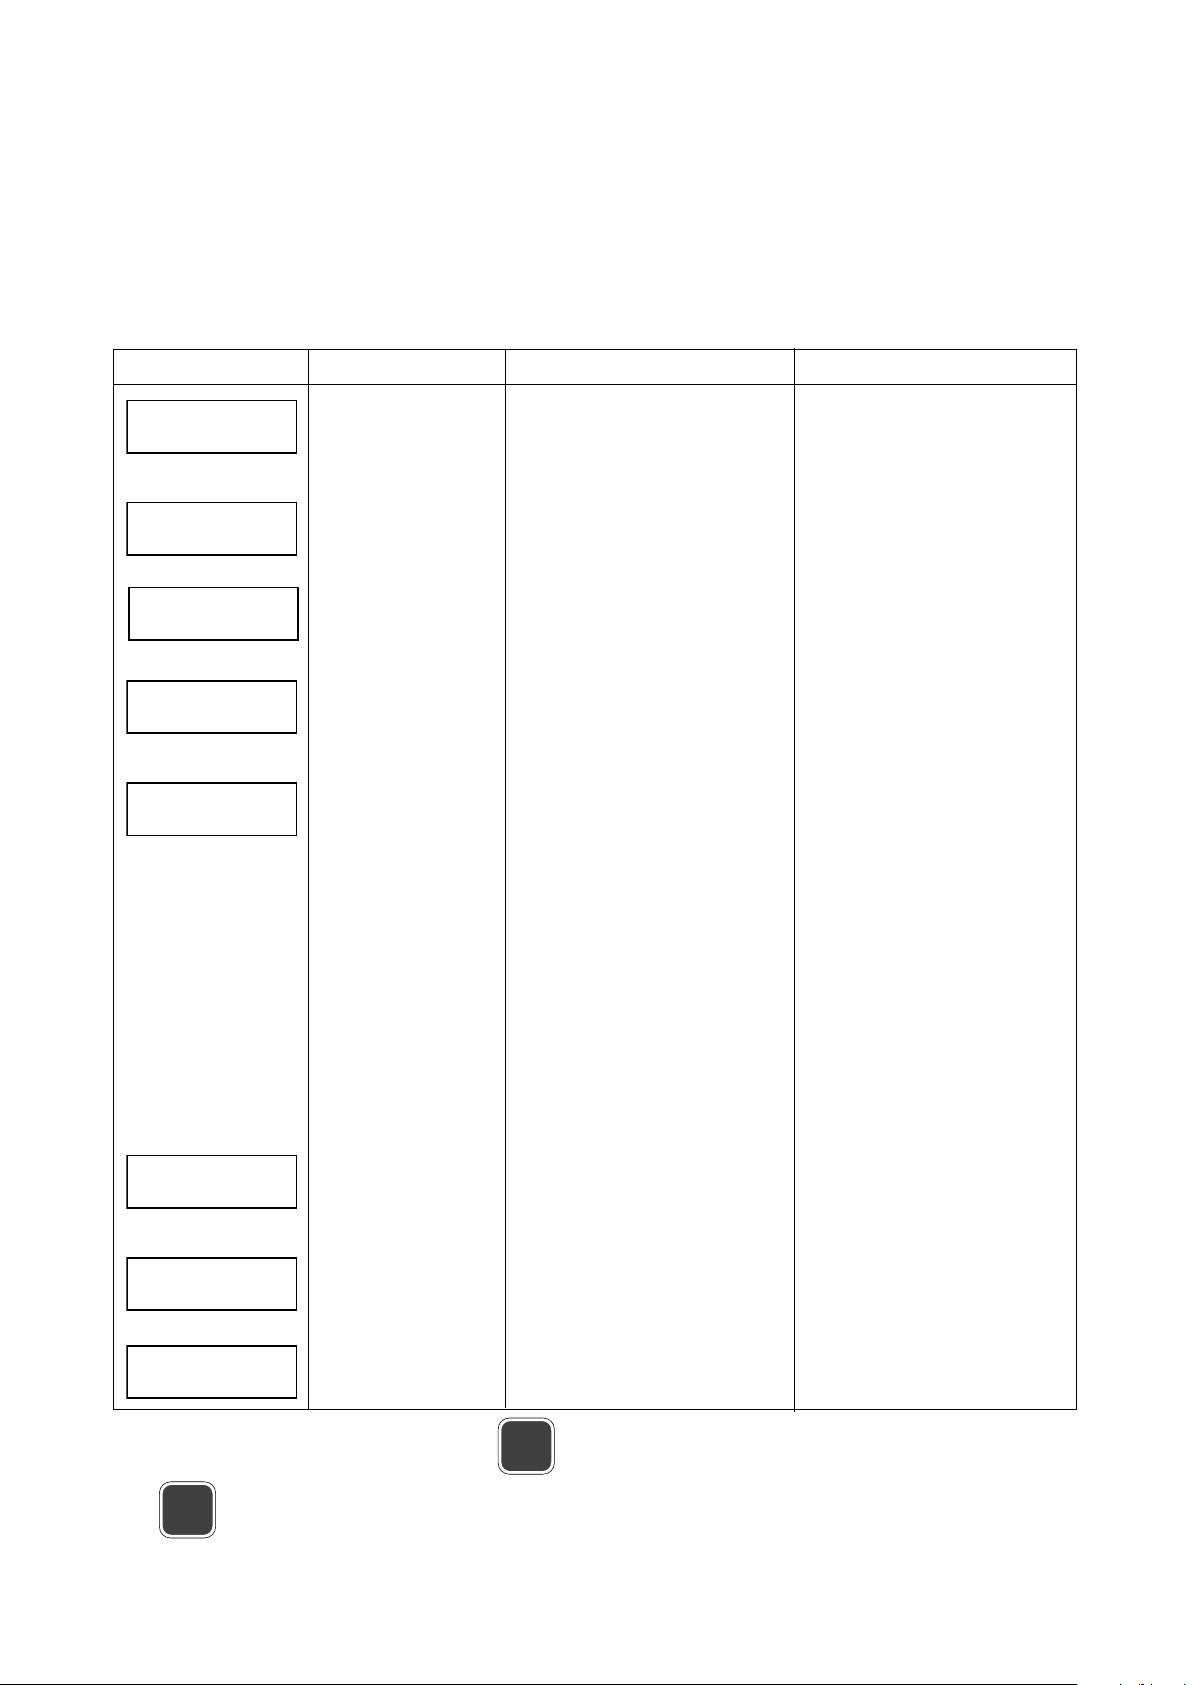
Alarm and fault-finding
The alarm message is displayed in the window in clear text at the same time as a red LED flashes on the control panel.
Alarm message Operation Cause Remedy
Unit stops Power supply to motor interrupted. Contact a service engineer. Check
the motor connections, any integral overheating protection and the
motor.
Unit stops Power supply to motor interrupted. Contact a service engineer. Check
themotor connections, any integral overheating protection and the
rotor.
Unit stops Sensor signal to control card Contact a service engineer to check
interrupted or unacceptable. the sensors.
Unit in operation Sensor signal to control card Contact a service engineer to check
Room regulation interrupted or unacceptable. the sensors.
switched automatically
to supply air regulation
Unit stops Supply air temperature has fallen Check the exhaust air temperature
below the set desired value by 10 (see window 21).
degrees for more than 15 minutes. Check the setting of the lowest
This may occur if there is a fault in: supply air temperature
heat exchanger, electric coil. 15c). (see windows 15b or
It may also be due to low room Check the heat exchanger and electric
temperature and setting of operating coil (see Alarm, heat exchanger and
data, such as: stopping the unit electric coil).
without a damper, lowest supply air Check that an electric coil is installed
temp. too high, electric heater not (see window 75).
connected. Check setting of operating mode (see
If a presence sensor is fitted, the windows 30 and 40).
unit will stop if the "no effect" Check whether a damper is fitted in
activity is selected for period 1 the outdoor air duct, and setting of
(see window 41a) activity.
Unit in operation No output or low efficiency from Check that the heat exchanger drive
heat exchanger. belt is sound and fully tensioned.
Unit in operation Power supply interrupted. Check the electric coil connections
Overheating protection tripped. and overheating protection.
Reset the overheating protection
on the electric coil.
Unit in operation Block filters. Replace the filter and re-calibrate.
An alarm with clean filters indicates
that calibration was NOT carried out
during installation.
Acknowledgement of alarm text is done by pressing once; the alarm text disappears, and the LED continues to flash.
Press once more to activate selftest.
AUTO
AUTO
ALARM
Fan, supply air
ALARM
Fan, exhaust air
ALARM
Temp.sensor supp air
ALARM
Temp.sensor exh. air
ALARM
Low supply air temp.
ALARM
HE- rotor not work.
ALARM
Elec.Coil not working
ALARM
Replace air filter
Procedure - setting
Fläkt Woods 8061 GB 2009.05 18 Specifications are subject to alteration without further notice.
RoomMaster ABR-2 COMMISSIONING
AUTO
11 Standard flow
exhaust airt: 200 l/s
12 Reduced flow
exhaust air 100 l/s
14 Temperature regulation
Room regulation
13 Supply air/exhaust air
ratio: 1,0
15
Set temperature
15c Supply air
temperature 19,0 C
21 Exhaust air
temperature = 21,5 C
16 Set regulation
parameters supply air
22 Supply air
temperature = 19,5 C
16aTemp.reg.
P-band: 1,0 C
23 Outdoor air
temperature = –59,0 C
24 Exhaust air flow
= 200 l/s
25 Supply air flow
= 200 l/s
16b Temp.reg.
I-time: 5,0 min
16c Compensation
factor k1: 4,2
26 Heat exchanger
rotor speed= 9,2 rpm
16d Compensation
factor k2: 3,2
27 Output of electric
coil = 50 %
28 Control voltage for
cooling coil= 10.0 V
32 Set time/activity
Tuesday
33 Set time/activity
Wednesday
34 Set time/activity
Thursday
35 Set time/activity
Friday
36 Set time/activity
Saturday
37 Set time/activity
Sunday
41 Set time/activity
period 1
51 Set year:
1996
75 Electric coil
installed Yes
76 Cooling
No
81 Language:
English
64 Temp. reduction
in the room: 2.0 C
42 Set time/activity
period 2
52 Set date:
4-19 (m-d)
72 Overtime button
activated: Yes
73 Ventilation button
activated Yes
74 Stop button
activated Yes
77 Program version
= R2c ABR2 SV
62 Exhaust air.temp.-
outdoor air temp.: >=5 C
61 Summer night-time
cooling No
65 Outdoor temperature
not below: 12.0 C
43 Set time/activity
period 3
53 Set weekday:
Monday
54 Set time:
14:34 (h:m)
71a Self-test
71 Test/Calibration
Default value
71c Reset to
default values
71b Calibration
63 Exhaust air temp
greater than: 22.0 C
44 Set time/activity
period 4
45 Set time/activity
period 5
31 Set time/activity
Monday
31a Change-over
time 1 Monday
43b Starting time
period 3
43c Stopping time
period 3
31c Change-over
time 2 Monday
43a Activity period 3:
31b Activity 1 Monday
Standard flow
31d Activity 2 Monday
Reduced flow
16e Compensation
factor k3: 0,3
15a Room temperaturer
20,0 C
15b Min. Supply air
temperature 19,0 C
Next
Next
Next
Next
Next
Next Next
Next
Next
Next Next
Next
Next
Next
Next
Next
Next
Next
Next
Next
Next
Next
Enter
Enter
Enter
Enter
Escape
Escape
Escape
Escape
Escape
Escape
Escape
Escape
Escape
Escape
Escape
Escape
Escape
Enter
Next
Next
Next
Next
Next
Next
Next
Next
Next
Next
Next
Next
Next
Enter
Enter
Enter
Enter
Enter
Enter
Enter
Enter Enter
Next
Next
Next
Next
Next
Next
Next
Next Next
Next
Next Next
Next
Next
Next
Next
Next
Next
Next
Next
Next
Next
Next
Next
Next
Next
Next
Next
Next
Next
Next
Next
32a
41a
42a
44c
45b
33a
34a
35a
36d
37c
32d
33d
34d
35d
36c
37b
32c
41c
42c
44b
45a
33c
34c
35c
36b
37a
32b
41b
42b
44a
45c
33b
34b
35b
36a
37d
No effect
.
60 Setting of summer
night cooling
70 Test/Default
Configuration
80 Select language 10 Set desired
value
50 Setting clock 40 Set annual
rhythm
30 Set weekly
rhythm
20 Read actual
values
Program version 1.0
Menu Structure
Procedure - setting

Fläkt Woods 8061 GB 2009.05 19 Specifications are subject to alteration without further notice.
RoomMaster ABR-2 COMMISSIONING
Wind. Description Default Own
No. value setting
36 Set time/activity Saturday
36a Change-over time 1 Saturday 8:00
36b Activity 1 Saturday Standard flow
36c Change-over time 2 Saturday 17:00
36d Activity 2 Saturday Reduced flow
37 Set time/activity Sunday
37a Change-over time 1 Sunday 8:00
37b Activity 1 Sunday Reduced flow
37c Change-over time 2 Sunday 17:00
37d Activity 2 Sunday Reduced flow
Annual rhythm
40 Main menu Set annual rhythm
41 Set time/activity period 1
41a Activity period 1 No effect
41b Starting time period 1 01-01
41c Stopping time period 1 01-01
42 Set time/activity period 2
42a Activity period 2 No effect
42b Starting time period 2 01-01
42c Stopping time period 2 01-01
43 Set time/activity period 3
43a Activity period 3 No effect
43b Starting time period 3 01-01
43c Stopping time period 3 01-01
44 Set time/activity period 4
44a Activity period 4 No effect
44b Starting time period 4 01-01
44c Stopping time period 4 01-01
45 Set time/activity period 5
45a Activity period 5 No effect
45b Starting time period 5 01-01
45c Stopping time period 5 01-01
Clock
50 Main menu Set clock
51 Set year Current year
52 Set date Current date
53 Set weekday Current day
54 Set time Current time
Summer night-time cooling
60 Main menu Set summer night-time cooling
61 Summer night-time cooling No
62 Exhaust air temp. - outd.temp. 5,0oC
63 Exhaust air temp. greater than 22,0oC
64 Temp.reduction in room 2,0oC
65 Outdoor temp. not below 12,0oC
Test / Calibration / Default values
70 Main menu Test/Default
71 Self-test
72 Calibration
73 Set default values
75 Electric coil installed No
76 Cooling coil installed No
77 Program version 1.0
Language
80 Main menu Select language
81 Language English
Procedure - setting
Wind. Description Default Own
No. value setting
Air flow
10 Main menu Set desired value
11 Standard flow: exhaust air 200 l/s
12 Reduced flow: exhaust air 100 l/s
13 Ratio: Supply/Exhaust 1.0
Temperature regulation
14 Temperature regulation Room regul.
15 Set room temperature
15a Room temperature (room regul.) 20oC
15b Loweat supply air temp. (room reg.) 19°C
15c Supply air temp (supply air regul.) 19°C
16 Set supply air regulation parameters
146a Temp.reg. P-band 1,0oC
16b Temp.reg. I-time 5,0 Min.
16c Compensation factor k1 4,2
16d Compensation factor k2 3,2
16e Compensation factor k3 0,3
Actual values
20 Main menu Read actual values Value read off
21 Temperature, exhaust air (oC) "
22 Temperautre, supply air (oC) "
23 Air flow, exhaust air (l/a) "
24 Air flow, supply air (l/a) "
25 Heat exch. rotor speed(U/min) "
26 Electric coil output (%) "
27 Control for cooling coil (V) "
Weekly rhythm
30 Main menu Set weekly rhythm
31 Set time/activity Monday
31a Change-over time 1 Monday 8:00
31b Activity 1 Monday Standard flow
31c Change-over time 2 Monday 17:00
31d Activity 2 Monday Reduced flow
32 Set time/activity Tuesday
32a Change-over time 1 Tuesday 8:00
32b Activity 1 Tuesday Standard flow
32c Change-over time 2 Tuesday 17:00
32d Activity 2 Tuesday Reduced flow
33 Set time/activity Wednesday
33a Change-over time 1 Wednesday 8:00
33b Activity 1 Wednesday Standard flow
33c Change-over time 2 Wednesday 17:00
33d Activity 2 Wednesday Reduced flow
34 Set time/activity Thursday
34a Change-over time 1 Thursday 8:00
34b Activity 1 Thursday Standard flow
34c Change-over time Thursday 17:00
34d Activity 2 Thursday Reduced flow
35 Set time/activity Friday
35a Change-over time 1 Friday 8:00
35b Activity 1 Friday Standard flow
35c Change-over time 2 Friday 17:00
35d Activity 2 Friday Reduced flow
List of parameters

Fläkt Woods AB 551 84 Jönköping
t036 - 19 30 00 f036 - 19 36 20
wwww.flaktwoods.com
FWG_AHU_ABR2 Technical instruction_2009.05_GB_8061 Condesign Info Productions AB ABF5533
Other manuals for RoomMaster ABR-2
1
Table of contents
Other flakt woods Air Conditioner manuals


