Flame boss 300 User manual

Version 2.1 | Download latest at FlameBoss.com/manuals
FLAMEBOSS 300 MANUAL

2
www.FlameBoss.com
WARNING: Important Safety Instructions
It is important for the safety of persons to follow these instructions. Save
these instructions. Follow all instructions, as incorrect installation and
use can lead to injury or property damage.
Flame Boss®300 is intended for use only in dry, outdoor locations.
Store the unit indoors in a dry location. If you know or suspect that the
Flame Boss controller or power adapter has been exposed to excessive
moisture or rain or was submerged in water, do not use the unit.
The 12 V DC power to the unit shall be supplied by a properly certied
power adapter with SELV / LPS output.
Use only the power adapter provided with the unit.
Do not allow children to play with a Flame Boss 300. Keep away from
children.
Flame Boss 300 is not to be used by persons with reduced physical,
sensory, or mental capabilities, or lack of experience and knowledge.
Do not place or mount a Flame Boss 300 where it is exposed to
excessive heat from the grill or smoker.

3
www.FlameBoss.com
04 Kamado - Blower Installation
06 Weber Smokey Mountain - Blower Installation
08 Pipe Thread Universal - Blower Installation
11 Connecting Your Flame Boss
12 Using Flame Boss / Main Menu
14 Setting up WiFi
18 TCP/IP/MAC Menu / Other Menu
- Flame Boss®smoker controller
- 110-240 volt AC power adapter
- Pit Temperature probe
- Meat Temperature probe
CONTENTS
WHAT’S INCLUDED
- Blower
- 3 blower adapters (Kamado kit only)
- Blower manifold with fasteners
(Universal kit only)

4
www.FlameBoss.com
KAMADO - BLOWER INSTALLATION
1
2
3

5
www.FlameBoss.com
4
5
6
KAMADO - BLOWER INSTALLATION

6
www.FlameBoss.com
WEBER SMOKEY MOUNTAIN - BLOWER INSTALLATION
1
2
3

7
www.FlameBoss.com
4
5
WEBER SMOKEY MOUNTAIN - BLOWER INSTALLATION
8
www.FlameBoss.com
PIPE THREAD UNIVERSAL - BLOWER INSTALLATION
1
2
3

9
www.FlameBoss.com
4
5
USING 3/4” BUSHING (NOT INCLUDED)

10
www.FlameBoss.com
TOP VENT ALMOST CLOSED

11
www.FlameBoss.com
1
2
3
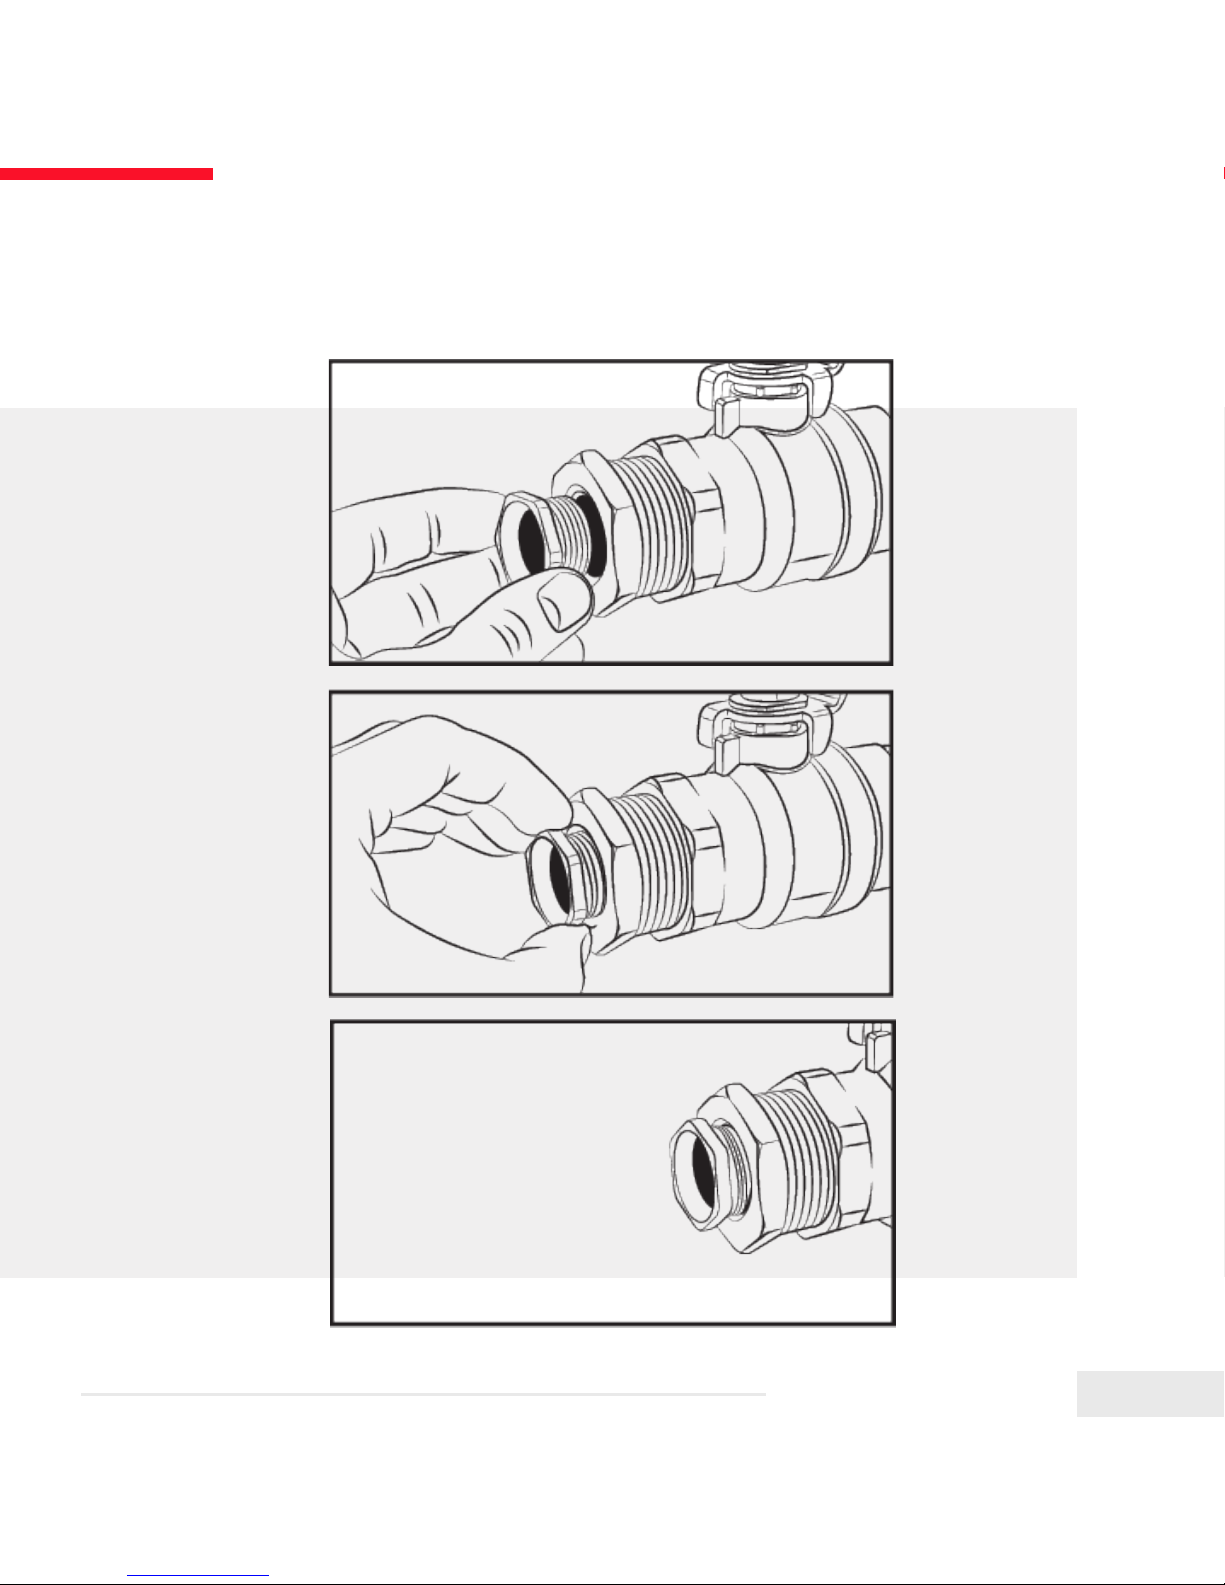
CONNECTING YOUR FLAME BOSS®

12
www.FlameBoss.com
USING FLAME BOSS®
Flame Boss WiFi enabled devices will automatically install any updated rmware when
connected to the Internet. To nd an updated manual that might include new features,
go to www.FlameBoss.com/manuals.
Set Pit Fan Meat
225 230 0 184
Set Temperature is the desired cooking
temperature for your smoker or grill.
To change the Set Temperature press the
Uppor Downqbutton.
The main screen shows the Set Temperature, Pit Temperature, Fan Speed, and Meat
Temperature. With optional Y-cables and additional meat probes, you can monitor
up to three different foods with your 300. Your Meat Temperatures will be shown in a
rotating display and be identied by Mt1, Mt2, and Mt3 (switching every few seconds).
Pressing MENU several times will bring you back to this main screen. Flame Boss will
also go back to the main screen after 15 seconds of inactivity. On each screen just press
the por qbuttons to change the setting; press MENU to save your setting and go to
the next screen.

13
www.FlameBoss.com
MAIN MENU
Timer Set
[0:05:00] Off
Timer Start/Stop
0:05:00 [Off]
Meat Alarm [1]
Off
Meat Alarm #
[Off]
Pit Temp Alarm
[On] +/- 20
WiFi Menu
[Skip]
TCP/IP/MAC Menu
[Skip]
qor pchanges the timer.
qor pturns timer On or Off.
qor p selects the meat probe you want to congure.
qor pturns alarm mode to Off, On, or On & Keep Warm.
qor psets the desired Meat Temperature. Only shown
when Meat Alarm is set to On or On & Keep Warm.
qor pchanges the Set Temperature to keep food warm
after it reaches the Meat Done Temp. Only shown when
Meat Alarm is set to On & Keep Warm.
qor pturns Pit Temp Alarm On or Off.
qor psets the Pit Temperature Alarm range. If the
Pit Temperature goes outside this range from the Set
Temperature, the Pit Temp Alarm will trigger.
Other Menu
[Skip]
qor pcycles through [Skip] and [Enter]. Pressing MENU executes your choice.
Pg.14
Pg.18
Pg.19
Pit Temp Alarm
On [+/- 20]
Meat Done Temp
[200]
Keep Warm Temp
[200]

14
www.FlameBoss.com
SETTING UP WIFI
Flame Boss App
[Access Point]
Web Browser
[Access Point]
Flame Boss Device
[Station]
Getting Started
Enter the WiFi Menu and ensure that WiFi is set to On. Press MENU once to see your
WiFi status (examples below).
MyFlameBoss.com
ID:12345 P:4321
Downloading ## %
fb 2.02.001
WiFi Status
AP Mode FB-#####
Device is successfully
connected if you see
your ID and Pin.
Device is downloading
a rmware update.
Device is in Access Point
Mode. (##### is your
controller’s device ID)

15
www.FlameBoss.com
WiFi Mode
[Access Point]
Press qor p to cycle between Access Point (AP) mode and
Station mode. Press MENU to choose an option.
WiFi Mode
Press MENU once more to view WiFi Mode. See the images on pg 14 to determine the
correct mode for you.
WiFi Setup / Flame Boss App
Open the Flame Boss app on your smartphone, tap on the Controllers tab, then tap on
Connect in the upper left corner. Follow the steps shown.
SETTING UP WIFI

16
www.FlameBoss.com
SETTING UP WIFI
WiFi Setup / Web Browser
(Computer or Mobile Device)
1. With your Flame Boss device set to Access Point Mode, go to the WiFi settings on
your computer or phone and select FB-##### (controller’s device ID) as the network.
2. Open your browser and go to http://192.168.4.1/
3. Enter your SSID and Password on the form shown and click Submit. Your browser
should show this message: Great! You changed WiFi settings and your controller
switched to station mode. Look for it on MyFlameBoss.com.
Your controller will switch to Station mode and use the WiFi network you congured to get
online. Your computer or mobile device will disconnect from the Flame Boss access point and
re-connect to a previously remembered WiFi network. If it does not you may need to connect to
your old WiFi network again explicitly.

17
www.FlameBoss.com
WiFi Name (SSID)
Network Names
Entering Your Password:
If your WiFi network is using WEP security, you will
enter the key in hex.
- Press qor pto select a character.
- Press MENU to enter a character and move to
the next position.
- Repeat until all characters of your password are
entered, then press MENU.
- Select the g (Enter), then press MENU.
- Wait for the controller to connect and show
your ID and Pin.
If you make an error, select the f(Backspace), then press MENU to remove
the incorrect entry.
SETTING UP WIFI
WiFi Setup / Flame Boss Device
With your Flame Boss device set to Station Mode, press MENU to view Hide PIN?
screen (press qor p to change this setting). Press MENU to continue.
Press qor pto show available WiFi Names detected
by the controller. Press MENU to select your WiFi name
and proceed.
Character Order:
g (Enter)
a,A - z,Z
0 - 9
~ - ?
(Space)
f (Backspace)

18
www.FlameBoss.com
IP Addr Method
[Auto (DHCP)]
This screen shows the
controller’s IP address.
This address will be blank
if controller is not joined
to a WiFi network.
WiFi MAC Address
xxxx:xx:xx:xx:xx
IP Address
111.222.333.444
IP Address
[192.168.001.002
Network Mask
[255.255.255.000
Network Gateway
[192.168.001.001
TCP/IP/MAC MENU
Use the TCP/IP/MAC Menu to change advanced network settings. Press MENU to go
to the next screen, and press the por qbuttons to change the setting.
IP Addr Method
[Static IP]
Controller’s station MAC Address
por qchanges each byte.
MENU moves to next byte.
MENU on last byte moves to next screen.
or
por qcycles between
Auto (DHCP) and Static IP.

19
www.FlameBoss.com
OTHER MENU
Use the Other Menu to change the settings below. Press MENU to go to the next
screen, and press the por qbuttons to change the setting.
Sound
[Chirps & Alarm]
LCD Contrast
[35]
Temp Scale
[Fahrenheit]
Factory Reset
Press Up 3 Times
Version
2.01.001
qor pchanges the amount of sound from the controller.
qor pchanges the LCD contrast.
qor pchanges the scale between Celsius and Fahrenheit.
Pressing pthree times will erase and restore all settings to
their factory defaults, including WiFi information.
Display shows the current version of the installed rmware.
If you’re hungry for more details about the rmware
updates, visit myameboss.com/fw_releases.

20
www.FlameBoss.com
This product contains ee_printf which includes the following notice:
Copyright © 2002 Michael Ringgaard. All rights reserved.
Redistribution and use in source and binary forms, with or without
modication, are permitted provided that the following conditions are met:
1. Redistributions of source code must retain the above copyright notice,
this list of conditions and the following disclaimer.
2. Redistributions in binary form must reproduce the above copyright
notice, this list of conditions and the following disclaimer in the
documentation and/or other materials provided with the distribution.
3. Neither the name of the project nor the names of its contributors may
be used to endorse or promote products derived from this software
without specic prior written permission.
THIS SOFTWARE IS PROVIDED BY THE COPYRIGHT HOLDERS AND
CONTRIBUTORS “AS IS” AND ANY EXPRESS OR IMPLIED WARRANTIES,
INCLUDING, BUT NOT LIMITED TO, THE IMPLIED WARRANTIES OF
MERCHANTABILITY AND FITNESS FOR A PARTICULAR PURPOSE ARE
DISCLAIMED. IN NO EVENT SHALL THE COPYRIGHT OWNER OR
CONTRIBUTORS BE LIABLE FOR ANY DIRECT, INDIRECT, INCIDENTAL,
SPECIAL, EXEMPLARY, OR CONSEQUENTIAL DAMAGES (INCLUDING, BUT
NOT LIMITED TO, PROCUREMENT OF SUBSTITUTE GOODS OR SERVICES;
LOSS OF USE, DATA, OR PROFITS; OR BUSINESS INTERRUPTION)
HOWEVER CAUSED AND ON ANY THEORY OF LIABILITY, WHETHER IN
CONTRACT, STRICT LIABILITY, OR TORT (INCLUDING NEGLIGENCE OR
OTHERWISE) ARISING IN ANY WAY OUT OF THE USE OF THIS SOFTWARE,
EVEN IF ADVISED OF THE POSSIBILITY OF SUCH DAMAGE.
Table of contents
Popular Blower manuals by other brands


Nilfisk-Advance
Nilfisk-Advance HydroDry 56259042 Instructions for use and parts list

Nilfisk-ALTO
Nilfisk-ALTO SWEEPER R 680 P user manual

Makita
Makita BHX2500 manual
 Handling instructions")
Hitachi Koki
Hitachi Koki RB24E (SV) Handling instructions

EZsmart tools
EZsmart tools GC18-1 user guide

Clemas & Co
Clemas & Co 512 Operator's manual