Fleischmann 6460 User manual
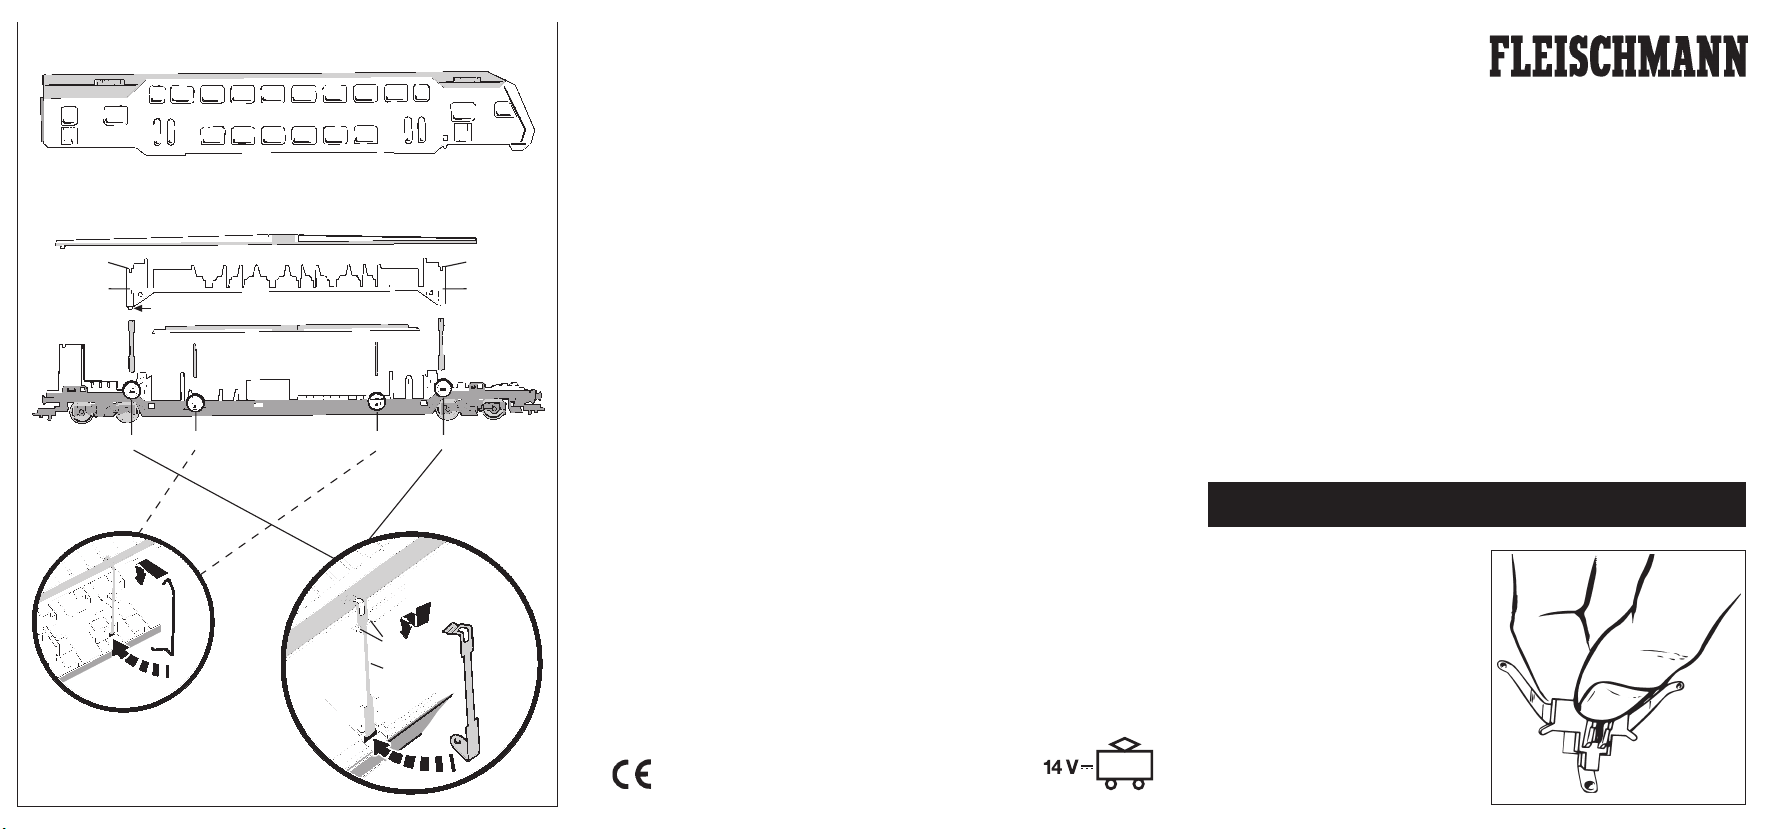
Mit Daumen und Zeigefinger die Radkontaktfeder
am Kunststoffteil ergreifen. Dabei die Kunststoff-
klammern mit dem Daumen leicht andrücken.
Using thumb and forefinger, hold the wheel con-
tact spring by the plastic part, slightly pressing
the plastic clips with the thumb.
Prendre les contacts de roues, au moyen du
pouce et de l’index, par la matière plastique,
en écrasant légèrement les clames de fixation.
a
l
o o
n n
b
LL
K K fe
e
h hm m
k
hK
L
m
o
n
Obere Inneneinrichtung von den Schnappbügeln elösen und abnehmen. Kleinen Lichtleiter bso auf
die untere Inneneinrichtung legen, dass der Zapfen fin die Aussparung gdes Lichtleiters eingreift. Die
Kontaktbügel Kin hlose einführen, oben über die Kante des Lichtleiters einhängen und abschließend
in hfest einrasten. Der Kontaktbügel muss senkrecht stehen. Auf diese Weise alle vier Kontaktbügel
montieren. Obere Inneneinrichtung an den Schnappbügeln eeinrasten lassen. Achtung: Auf Markierung
kachten! Großen Lichtleiter aso auf die obere Inneneinrichtung legen, dass der Steg lden Lichtleiter
gegen Verschieben in Längsrichtung sichert. Den Kontaktbügel Lin meinführen, an den Noppen n
einhängen und in den Schlitz oeinrasten. Auf diese Weise alle vier Kontaktbügel montieren.
Gehäuse seitenrichtig aufstecken. Achtung: An einer Wagenseite befinden sich neben den Puffern die
Nase pund am Wagengehäuse die Aussparung q!
Lift off the upper interior fitting by loosening from the snap clip e. Lay the small light leader bonto the
lower interior fittings so that the lug ffits into the slot gof the light leader. Gently insert the contact
clips Kinto h, hook over the bevel of the light leader an then firmly clip into h. The contact clip should
ly vertically. In this way, mount all the four contact clips. Replace the upper interior fittings snapping
into position on clip e. Attention: Watch out for indication k!Lay the large light leader aon the upper
interior fittings so that the protruding log lof the light leader secures the light leader against longitudinal
movement. Insert the contact clips Linto m, hook over the nodules n, and clip into slits o. In this way,
mount all the four contact clips.
Replace the coach body, making sure that it is the right way round. Please note: On one end of the
coach chassis, near the buffers, you will find a locating lug pwhich fits into the slot qof the coach body!
Enlever l’aménagement intérieur supérieur en retirant les étriers e. Déposer la petite rampe bsur
l’aménagement intérieur inférieur, en veillant à ce que le tenon fs’engage dans l’évidement gde la
rampe lumineuse. Engagez l’étrier de contact K, librement, en h, laissez pendre, en haut, sur le côté
de la rampe lumineuse, et, enfin, engager à fond en h. L’étrier doit se trouver en position verticale.
Procéder de la même façon pour les trois autres étriers. Bloquer l’aménagement supérieur par les étriers
à déclic e. Attention: Veiller au marquage k. Poser la grande rampe asur l’aménagement supérieur de
telle façon que la nervure lempêche le glissement en long de la rampe. Engager les étriers Len m,
accrocher en net verrouiller dans la rainure o.
Presenter la carrosserie avec la bonne orientation. Attention : A un côté du châssis, à côté des
butoirs, se trouve le nez pet, à la carrosserie, l’evidement q ! Procéder de la même façon pour les
quatre autres étriers.
Achtung: Vor dem Einbau der Innenbeleuchtung die Betriebsanleitung genau durchlesen!
Attention: Please read the instructions carefully before installing the interior lighting!
Attention: Avant le montage de l’éclairage interieur lire soigneusement le mode d’emploi!
Innenbeleuchtung für Doppelstockwagen • Interior ligh t ing unit for double-decker
coa ches • Garniture d’éclairage pour voitures à éta ge.
9.0 DM 21/6460-0102
GEBR. FLEISCHMANN GMBH & CO. KG
D-91560 Heilsbronn, Germany
www.fleischmann.de
D A CH Nicht für Kinder unter 3 Jahren geeignet wegen funktions- und modellbedingter scharfer Kanten und
Spitzen, Verschluckungsgefahr. Betriebsanleitung aufbewahren! GB Not suitable for children under 3 years of
age due to the functional sharp edges and points required in this model. Danger of swallowing. Retain opera-
ting instructions! FNe convient pas pour des enfants de moins de 3 ans, en raison des fonctions d’utilisation
et des formes à arêtes tranchantes du modèle. Danger d’apsorption. Gardez l'instructions de service ! NL Niet
geschikt voor kinderen onder de 3 jaar vanwege funktionele en/of modelgewenste scherpe randen en punten.
Verslikkingsgevaar. Gebruiksanwijzing bewaren! INon adatto ai bambini di età minore di 3 anni a causa degli
spigoli e delle parti sporgenti. Pericolo di soffocamento. Ritenere l'istruzione per l'uso! ENo apropriado para
niños de menos de 3 años, debido a que este modelo requiere cantos y puntos funcionales agudos. Peligro
de que sea ingerido. ¡Conserve instucciones de servicio! DK Er ikke egnet til børn under 3 år, p. g. a. funktions-
og modelbetingede skarpe kanter og spidser, - kan slugos. Gem vejledning! P
Não conveniente para crianças
sob 3 anos devido às bordas agudas funcionais e pontos exigiram neste modelo assim como perigo de engolir.
GR ΠΡОΣΟΧΗ. Τά πεχνιδια. αύτâ δέν επητρέποναι σέ παιδιά κάτο τών З χρόνων διότη ε´Ιναι κοφτερα καί εχμηρά καί κùνδηνος νά τά καταπιουν
SF Ei
sovellu tukehtumisvaaran vuoksi alle 3-vuotiaille lapsille. Sisältää toimivuuden ja muotoilun kannalta oleellisia
teräviä reunoja ja piikkejä. S
Inte ägnat för barn under 3 år därför att där finns spetsor och vassa kanter och fara
för sväljning.
CZ
Nevhodné pro dĕti do 3 let: funkční díly mají ostré hrany a špičky, nebezpečíspolknutí malých
součástek a dílů.Uchovávejte a dodržujte toto upozornĕní.
PL
Zabawka ze wzgledu na cechy dzialania, budowe
modelu z ostrymi krawedziami oraz mozliwoscia polkniecia mniejszych czesci nie jest przystosowana dla dzieci
ponizej 3 lat.
SLO
Ni primerno za otroke do 3. leta starosti zaradi funkcionalno ostrih robov in konic, kot tudi
nevarnosti pozrtja.
Inhalt: 4 Radkontaktfedern 1 großer Lichtleiter 1 kleiner Lichtleiter
1 Glühlampe mit Steckfassung 6535 1 Glühlampe mit Drähten 9530
4 Kontaktbügel (Draht) 4 Kontaktbügel (Blech) 2 Isolierfolien
4 Alufolien
Contents: 4 wheel contact springs 1 large light leader 1 small light leader
1 bayonet fixing bulb 6535 1 bulb with wires 9530 4 contact clips (wire)
4 contact clips (metal strip) 2 insulating foils 2 aluminium foils
Contenu : 4 contacts de roue 1 grande rampe lumineuse 1 petite rampe lumineuse
1 lampe avec socket 6535 1 lampe avec 2 fils 9530 2 feuilles isolantes
4 étriers de contact (en fil) 4 étriers de contact (en tôle) 2 bandes alu
1
9
Betriebsanleitung
Innenbeleuchtung 6460
Operating Instruction
Interior lighting 6460
Instructions de service
Eclairage intérieur 6460
H0

Die Radkontaktfeder in die Drehgestellöffnung einführen und durch Festdrücken einrasten lassen.
Darauf achten, dass die beiden Radkontakte an den Radinnenseiten anliegen. Auf diese Weise alle
vier Radkontaktfedern montieren.
Insert the wheel contact spring into the opening in the bogie and click firmly into position. Please
make sure that both the wheel contacts are resting against the inner sides of the wheels. Mount all
four wheel contact springs in this way.
Engager les contactes des roues dans les logements des bogies, et pousser jusqu’à verrouillage.
Veillez, au cours de ce montage, à ce que les contacts posent bien sur les faces intérieures des roues.
Monter les quatre contacts de la même façon.
2
6
Glühlampe mit Steckfassung in den kleinen Lichtleiter beinsetzen.
Insert the bulb with bayonet fixing into the small light leader b.
Engager la lampe à socket dans la petite rampe lumineuse b.
4
b
Glühlampe mit Drähten in den großen Lichtleiter aeinsetzen. Dazu Glaskörper der Glühlampe unter die
Aussparung der Haltenase clegen. Drahtenden an den beiden Klemmkontakten festklemmen. Freie
Drahtenden um den Lichtleiter legen.
Insert the bulb with wires into the large light leader a. The glass body of the bulb should ly in the slot
of the holding lugs c. Securely clip each end of the wires into the retaining clips. Free wire ends to be
wrapped round the light leader.
Placer la lampe avec le fils dans la grande rampe lumineuse aen logeant le globe de verre de la
lampe dans l’évidement c. Fixez les deux fils aux bornes de connexions, et disposer les bouts de fils
autour de la rampe.
a
a
7
8
Zuerst große weiße Isolierfolie, dann Alufolie (60 mm lang) um den Lichtleiter akleben (vorher Schutz-
papier von der Klebeseite entfernen).
Firstly wrap the big white insulating foil (60 mm long) around the light leader aand then the aluminium
foil. (Remove the protective backing from the glued sides).
Coller d’abord la feuille isolante grande (longeur 60 mm), ensuite la bande alu autour de la rampe a
(enlever, bien sûr, les protections de l’adhésif).
Die zwei 120 mm langen weißen Alufolien ins Dach einkleben (vorher Schutzpapier von der Klebeseite
entfernen).
Stick the two white aluminium foil (120 mm long) strips into the roof (remove the backing paper from
the sticky side first).
Coller les deux blances feuilles d´alu (longeur 120 mm) dans le toit (éloigné auparavant le papier
de protection de la partie collée).
3
Mit den Fingernägeln neben das Drehgestell zwischen Wagenkasten und Wagenboden greifen und
den Wagenkasten aufspreizen. Der Wagenkasten löst sich vom Wagenboden und kann nach oben
abgehoben werden.
Insert your fingernails between the coach body and coach chassis near the bogie, and prise open the
coach body. The coach body will loosen itself from the chassis and can be lifted off upwards.
Appuyer, avec les ongles des doigts, et à côté des bogies, entre la carrosserie et le châssis, pour écarter
celle-ci. La carrosserie se sépare du châssis et peut être enlevée en la soulevant.
5
Zuerst kleine weiße Isolierfolie von unten, dann Alufolie (60 mm lang) von oben um den kleinen Licht-
leiter bkleben (vorher Schutzpapier von der Klebeseite entfernen).
Firstly wrap the little white insulating foil around the small light leader bfrom below, and then the alu-
minium foil (60 mm long) from above. (Remove the protective backing from the glued sides).
D’abord coller petite la bande isolante blanche sur le dessous, ensuite la bande aluminium (longeur 60
mm) sur le dessus de la petite rampe b(enlever, bien sûr, les protections de l’adhésif).
c
b
9.0 DM 21/6460-0102
Popular Outdoor Light manuals by other brands

Malibu Boats
Malibu Boats 8401-9303-01 Instructions for Assembling and Installing

B-K lighting
B-K lighting Litestick STANDARD INSTALLATION

Safavieh
Safavieh LIT4176A quick start guide

LIGMAN
LIGMAN BA-10633 installation manual

CALI
CALI alumLEDs ALS500T-RMW-MI installation instructions

Above All
Above All STANDARD LED BOLLARD instruction manual


