FLINTAB 47-11 User manual

WE MAKE IT EASY.
WEIGHTINDICATOR
47-11
USER MANUAL
Document number: 4-56020
Edition 1.0 – 2019-02-11

CONTENT
1. Introduction 3
1.1. Features
2. Installation 5
3. Internal graphic LCD with panel touch buttons 6
3.1. Touch- and navigation-buttons 7
3.2. Standard layout 8
3.2.1. Integrated capacity nameplate Integrated capacity name-plate 9
4. Start-up sequence 10
5. Weighing functions 11
5.1. Zero setting 12
5.2. Semi-automatic tare 13
5.3 Manual tare entry (PT) 14
5.4 Printing (single) 15
5.5 Printing (totalizing) 16
5.6 Parts counting 17
6. Connections 19
6.1. Load cell / scale connection 20
6.2 Power supply 20
7. Status/error indications 21
7.1. Weighing faults indications 22
7.2. Status indications 23
7.2.1. Status, wait for power on zero 23
8. Specifications 24
8.1 Dimensioner 25
8.2. Operation conditions 26
9. Manufacturers declaration of conformity 27
10. Revisions 28

3
FLINTAB – WE MAKE IT EASY
Weightindicator 47-11
1. INTRODUCTION
MAIN OFFICE
Flintab AB
Kabelvägen 4
553 02 JÖNKÖPING
SWEDEN
+46 36-31 42 00
E-mail: info@flintab.se
Web: www.flintab.se
Local oce Sweden
• Malmö
• Göteborg
• Eskilstuna
• Sundsvall
• Stockholm
Finland
• Kotka
FLINTAB
Develops and markets scales and weighing systems for industrial use. With a wide array
of products, from small bench scales to large truck scales, load cells, weight indicators
and computer systems adapted for rugged industrial use. We strive to offer a safe and
trouble free ownership of highly advanced weighing systems. High accessibility is our
keyword.
Thank you for choosing a weight indicator from Flintab.
Flintab scales and indicators combine weighing functions and customizations to offer a
flexible, user-friendly interface and reliable hardware.
This manual covers the daily use of the 47-11 weight indicator. For more detailed
instructions, interface and installation information, consult our 47-11 technical manual
(Dokument: 4-55424 Weightindicator 47-11 Instruction )

4FLINTAB – WE MAKE IT EASY
Weightindicator 47-11
Weight indicator 47-11 is a modern, purpose built, Flintab weighing instrument, making
it suitable for both industrial and consumer weighing applications. The fully digital design
enables ease of use and provides exceptional flexibility.
Main features:
• Compact and rugged construction for industrial or consumer applications
• 10/100 Mbit Ethernet interface (TCP/IP)
• Dual serial interfaces, 2x RS232 or 1xRs485 (2w) and 1x RS232 or 1x RS485(4w)
• External weigh display with push-buttons for user
• operation/configuration
• Optional internal high-contrast graphics LCD-display with large easy-to-read
digits and indications
• Dual universal scale/load cell interface suitable for most ratio metric
transducers
• Optional multiplexed quad load cell interface with automatic corner
adjustment
•
Options:
• Optional alibi memory (non-volatile, data storage device DSD)
• 4-channel wave interface with digital corner adjustment
• External backlit segment-based LCD
• External (8/8, 2/0, 0/2) I / O card for setpoints or control
1.1 Features

5
FLINTAB – WE MAKE IT EASY
Peripheral
or
Y
Serial :1
Serial:2
Ethernet
Display
kg
Power
Scale
Weightindicator 47-11
If the weight indicator is supplied as part of a complete scale, then it is usually calibrated
and setup in accordance with the order specification. Installation in this case only require
the connection of peripheral equipment as per schematics below:
2. INSTALLATION

6FLINTAB – WE MAKE IT EASY
Weightindicator 47-11
The 47-11 indicator can be fitted with an optional internal graphics LCD with integrated
touch-button panel.
Depending on configuration, the display can use different basic layouts for displaying
weight and related information. Relevant weighing functions will be shown on the display
next to a touch-button.
3. INTERNAL GRAPHIC
LCD WITH PANEL TOUCH
BUTTONS

7
FLINTAB – WE MAKE IT EASY
Weightindicator 47-11
The internal graphic LCD uses on screen touch-buttons for weighing and related
functions and navigation buttons for menu- and input-control.
The touch-buttons will display weighing functions depending on current configuration
and layout.
.. Touch- and
navigation-buttons
Touch-buttons
Max. 7 + 7 (shifted)
Back/Cancel/Exit
Abort Power-On
Nav. Up
Nex digit
(during entry)
Enter/Select
Nav. down
Increase/cycle digit
(during entry)
Shift
(alternate
touch-buttons)
8FLINTAB – WE MAKE IT EASY
Weightindicator 47-11
.. Standard layout
Status
indications Weightvalue Weight unit
Capacity
name-plate
Touch-
buttons Navigation-
buttons
Net weight Unstable Calibration mode
High-resolutionSymbol
indicates
instrument
running on b
attery power
Power - on = POW
Error = ERR,
Sensor error = SEN/TMP
Interval/Range = 1,2 or 3
Disconnected -
Connected -
Ethernet status:
Status indications:
9
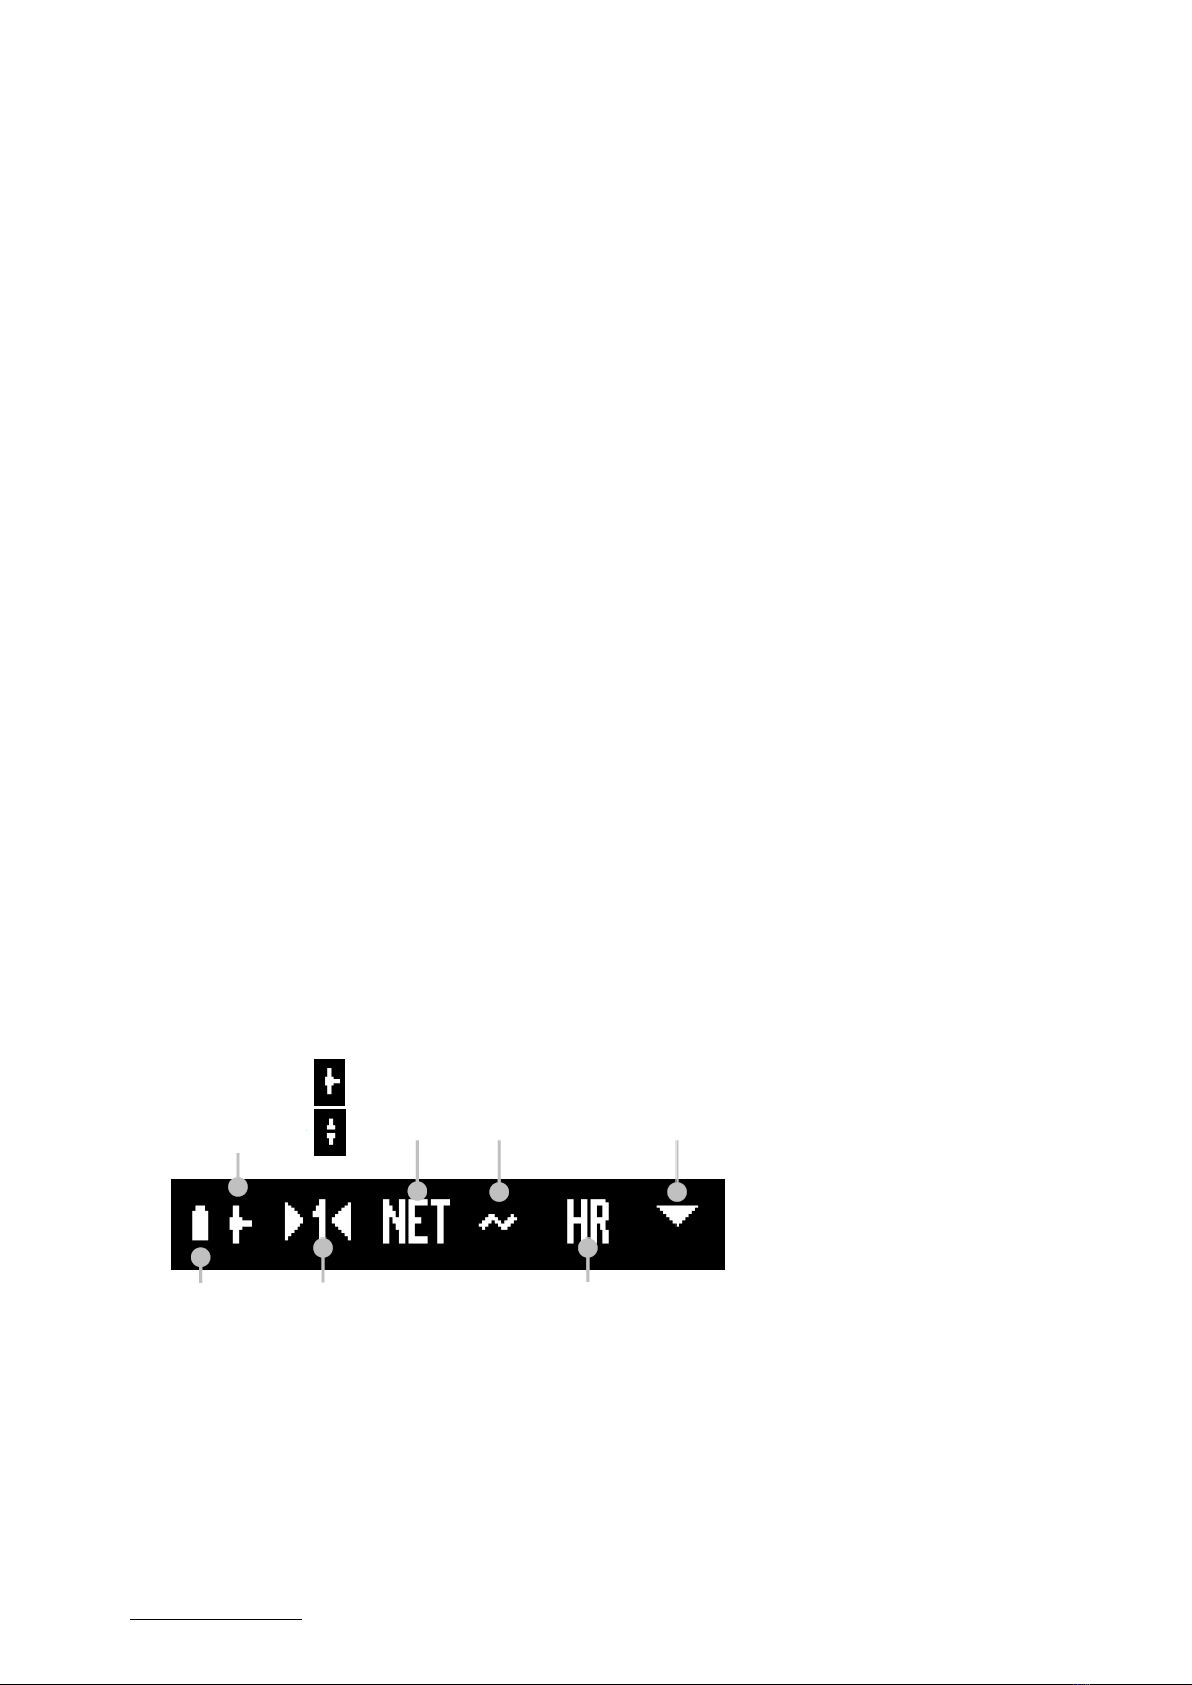
FLINTAB – WE MAKE IT EASY
Weightindicator 47-11
The internal graphic LCD will as default display a capacity name-plate automatically
generated from current configuration (only exception is when used for direct sales with
price computing layout, where the capacity name-plate is instead a separate sticker).
The name-plate will show the maximum and minimum weight and scale interval/
division. IN the case of multiple-interval or multiple-range operation, each interval/range
will be detailed.
3.2.1. Integrated capacity
nameplate Integrated
capacity name-plate
Single interval
Triple interval
Triple range
See examples below:

10 FLINTAB – WE MAKE IT EASY
Weightindicator 47-11
At power-on all displays will show the following sequence steps, where each step is
approximately 2 seconds:
4. START-UP SEQUENCE
• All segments and digits on.
• All segments and digits off.
• Display indicator type 47-11
• Display program version in the format ‘Px M.nn’ where M is major and nn is
minor revision, x- designates custom factory default settings.
• Display of OIML mode (if activated).
• Display of alibi status (when applicable and enabled).
• Display of maximum capacity plus one scale interval (d), in the case of multiple
interval/range configuration, each interval and corresponding scale interval is
displayed.
The indicator then prepares for normal operation:
• Checks if power on zero is enabled, if enabled weight display will flash and no
weighing functions are available until power-on zero criteria’s are meet or the
operator chooses to abort by pressing the <Abort>/<Back> button

11
FLINTAB – WE MAKE IT EASY
Weightindicator 47-11
The indicator has facilities for adjusting zero, use the tare and printing. However the
available weighing functions depends on if the indicator is in non-automatic or automatic
mode and installation requirements.
Note: As the weight indicator can be adapted to a larger number of different weighing
applications, some functions may be disabled for a particular scale. In such cases the
function will remain inoperable but displays ‘-OFF-‘when requested to be activated.
5. WEIGHING FUNCTIONS

12 FLINTAB – WE MAKE IT EASY
Weightindicator 47-11
A scale may as a result of external conditions indicate a value other than exact ”0.000”,
even when the scale has no load. The zero can, however, be acquired to ensure that any
new weighing always starts at zero. The zero setting is only allowed to be carried out
when the scale is stable and within a limited range. If the scale cannot be zeroed even
when stable, it means that the range has been exceeded. It is important to verify that the
scale is empty before operating the zero setting function.
5.1. Zero setting
• Scale with no load does not show exact zero
(e.g. residue material from last weighing).
See below examples:
• Press the <Zero> key and the
zero is acquired and ” ZERO ”
appears on the display.
• The display reverts to show weight.
Note: When the weight value is within ± 0.25 scale
intervals of true zero, the sign ’o’ appears on the
display before the zero weight value, this is also
called ‘absolute zero’.

13
FLINTAB – WE MAKE IT EASY
Weightindicator 47-11
The weight of a container can be tared to enable the net weight of material put in the
container to be displayed. Tare will only operate with stable scale and weight above zero.
A typical tare operation is shown below:
5.2. Semi-automatic tare
A typical tare handling is shown below:
• An empty container is placed on the scale and
the weight of it is displayed.
• Press <Tare> key and the display
switches to show net weight.
This mode is highlighted by the
appearance of the ”NET” indication.
• Press the <Tare> key again to return to gross weight display.

14 FLINTAB – WE MAKE IT EASY
Weightindicator 47-11
5.3. Manual tare entry (PT)
It is also possible to manually key in an arbitrary tare value with touch/push-buttons.
Se example below:
• An (empty) container is placed on the scale,
and the weight of it is displayed.
• By pressing, and holding, the
<Tare> button for >3seconds or
pressing the dedicated manual
tare button <PTare> the display
will shift to manual tare entry.
• The latest entered tare value will be shown on the
display, if this value is to be used, then press the <Enter>
key. Else enter a new value, see section 3.1 Touch- and
navigation-buttons for instructions for input. When the
value is saved it will be automatically used as current
tare value.
• As soon as the tare value is saved or selected it will
be put into operation and the scale switched over
to net weight.
• To remove the effect of the tare and return to gross
weight display, briefly press the <Tare> key again.
15
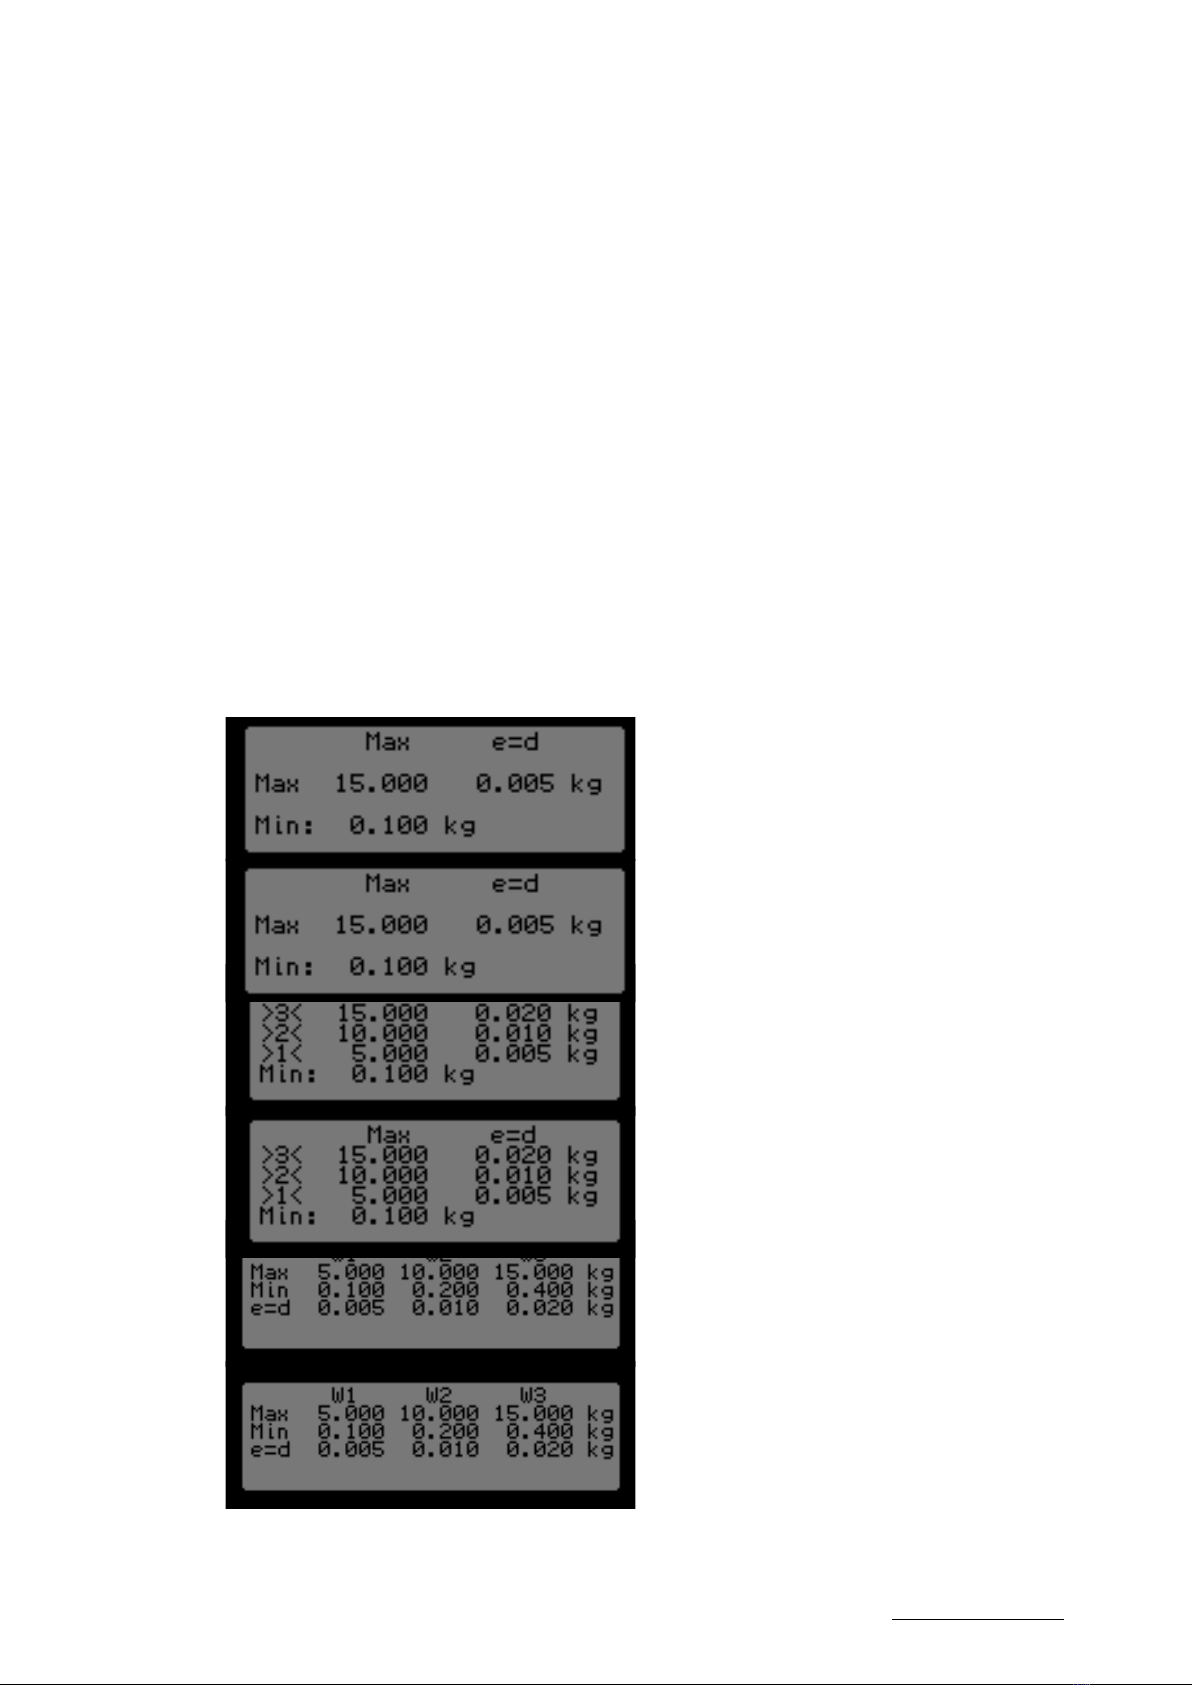
FLINTAB – WE MAKE IT EASY
Weightindicator 47-11
‘Simple’ printouts use no totalizing, e.g. each printout will print current weight reading
with related data and thereafter return to normal weighing. The next printout will
contain no data from the previous weighing.
Printouts are only possible at stable equilibrium and positive gross weight. Repeated
print-outs require that the weight must be changed between each print-out command.
5.4. Printing (single)
See example below:
• Display shows current weight and is stable.
• By pressing, and holding, the <Print>
button the current weight reading
and associated data is transmitted on
communication ports using the ‘print’
protocol and ”PRINT” appears on the
display. Transmission is according to
settings for the PRINT-protocol.
• After printing the display reverts to show normal weight.
16 FLINTAB – WE MAKE IT EASY
Weightindicator 47-11
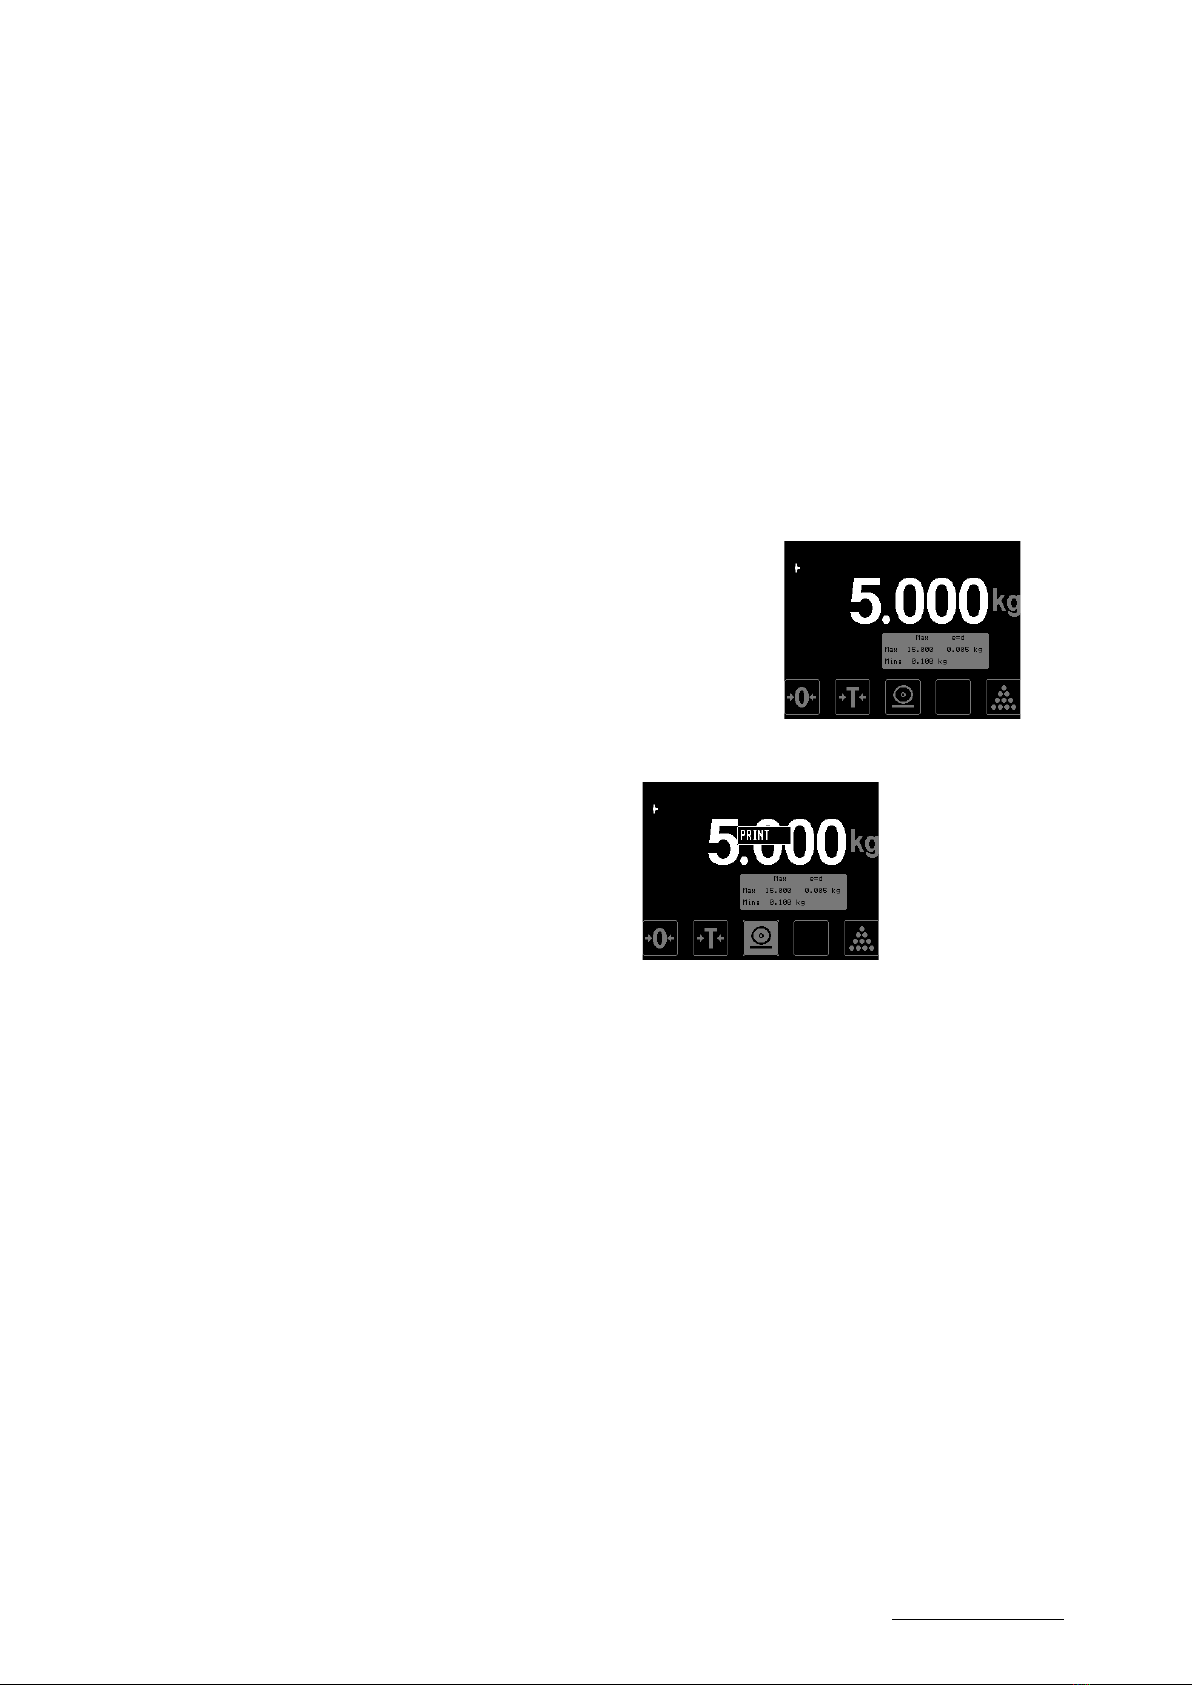
5.5. Printing (totalizing)
Summing printouts uses totalizing, e.g. each <ADD> printout will print current weight and
also add to an accumulating sum. When finished totalizing, the operator can use the <SUM>
printout to print the accumulated sum (which is then also automatically cleared).
Printouts are only possible at stable equilibrium and positive gross weight. Repeated print-outs
require that the weight must be changed between each print-out command.
See example below:
• Display shows current weight and is stable.
• By pressing the <ADD> touch-
button, current weight will be
added to the accumulating sum.
• By pressing the <SUM> touch-button,
current accumulated sum will be
printed then, after printout, the sum
will be automatically cleared.

17
FLINTAB – WE MAKE IT EASY
Weightindicator 47-11
The weight indicator can be used to count discreet weights (components, pieces, parts),
displaying number of items rather than weight. The counting feature can be used both
when adding parts (positive number) or subtracting parts (negative number). Both types
of counting use the following steps:
• Place and tare the empty container on the scale (if applicable).
• Place a number of the item to be weighed in the container.
• Enable calculation of reference weight for piece weighing.
• Piece weighing is used to count the number of items.
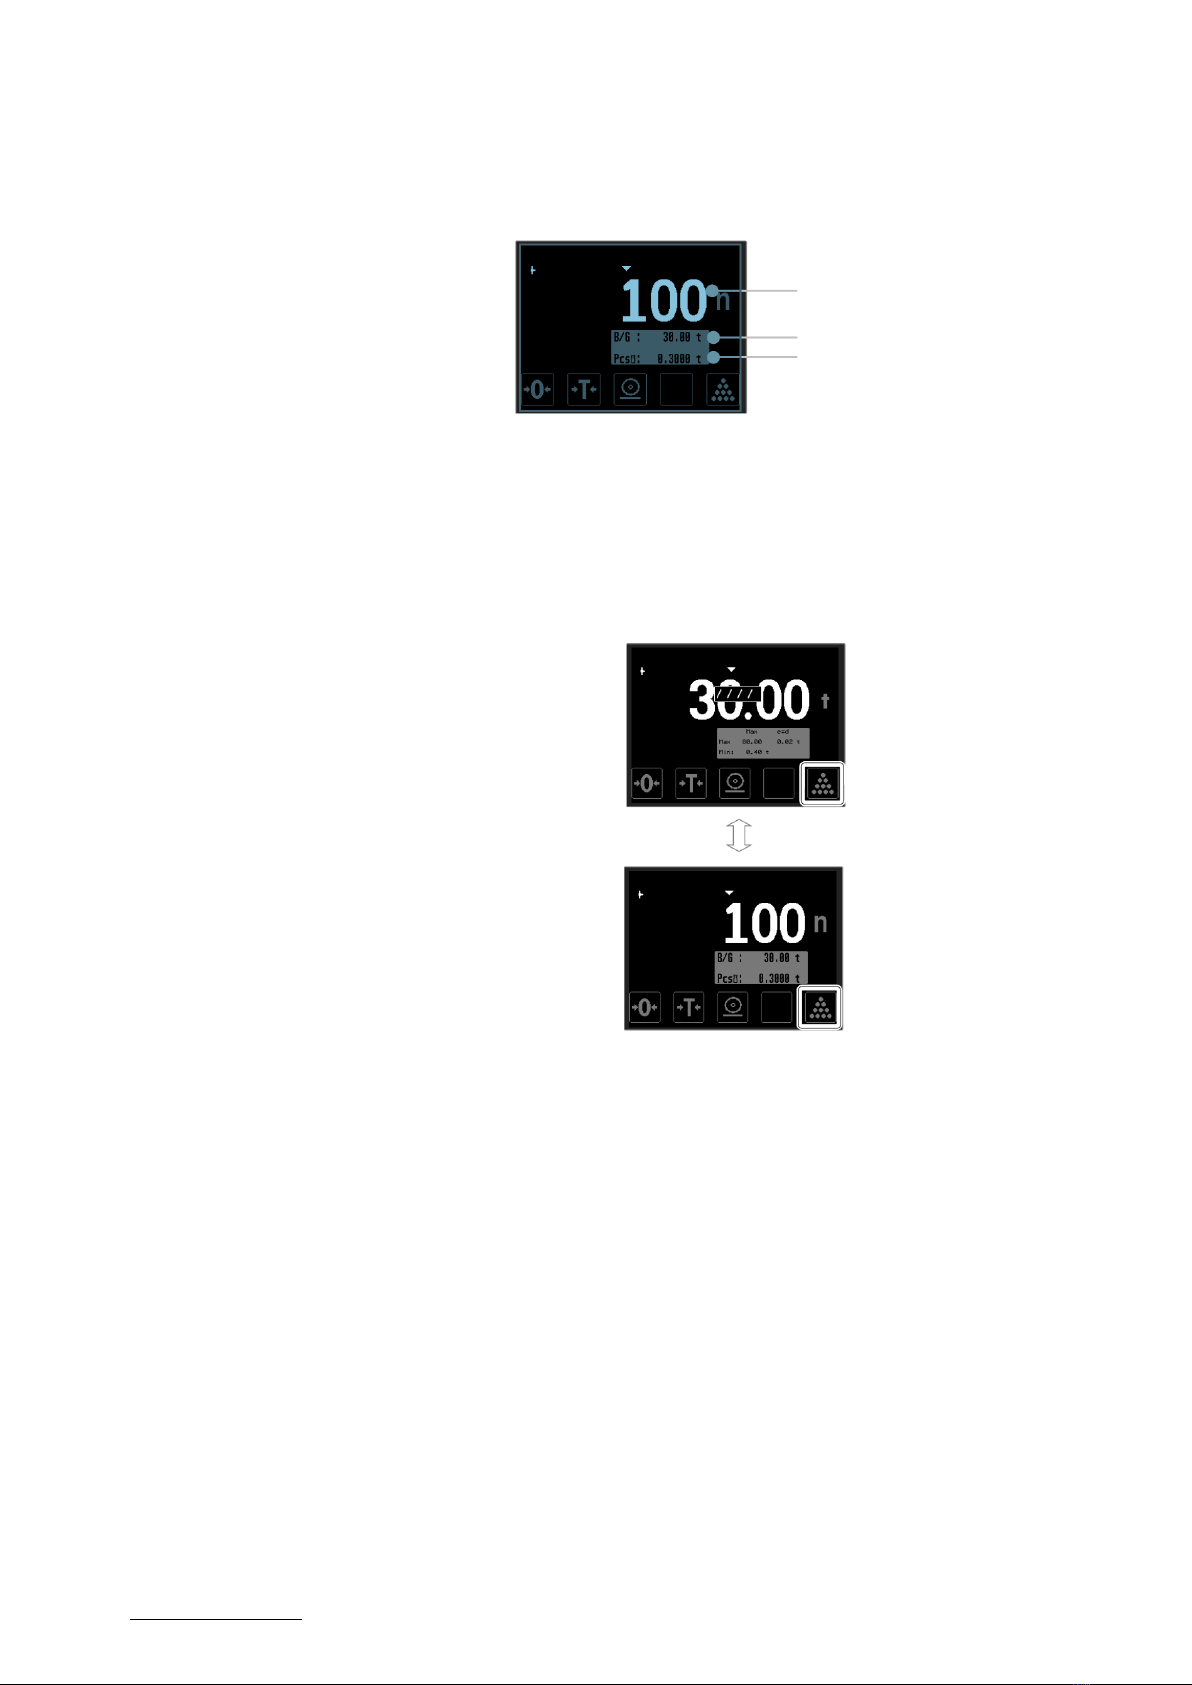
5.6. Parts counting
To calculate a new reference weight, see example below::
• Place several items/parts on the scale, the
greater the number the more accurate the
calculation of the item-weight will be. Minimum
recommended number of items are 10.
• Then press, and keep
depressed, the <COUNT>
touch-button for more
than 3 seconds, the
indicator will now acquire
a high-resolution weight-
sample for the item-
weight calculation.
• After the weight sample has been acquired, input
number of items on the scale and confirm by
pressing <Enter>.
18 FLINTAB – WE MAKE IT EASY
Weightindicator 47-11
• After the weight sample has
been acquired, input number
of items on the scale and
confirm by pressing <Enter>.
How to use a previously calculated item-weight:
• Once a item-weight has been
calculated, weighing- and count-mode
can be alternated by briefly pressing
the <COUNT> button. The previously
calculated item-weight is stored until
the indicator is powered-off or until a
new item-weight is calculated.
Number of items/parts
Current weight
Item/part weight

19
FLINTAB – WE MAKE IT EASY
Weightindicator 47-11
6. CONNECTIONS
The indicator utilizes industrial standard RJ45 connectors for connecting to most
peripheral equipment. However care must be taken as the pin outs are not exchangeable
and might interfere with external equipment in case of incorrect/unsupported
connections.
See section 2 Installation for location of the connectors.
For a more detailed description, pin-out and connection diagram for the interfaces
consult the 4-55424 Weight indicator 47-11 Instruction manual

20 FLINTAB – WE MAKE IT EASY
Weightindicator 47-11
6.1. Load cell / scale connection
The load cell/scale connector is a standard shielded RJ45 plug, located furthest from the
DC-plug.
To ensure proper operation and best signal integrity the scale and indicator should be
grounded to a common point:
6.2 Power supply
Viktindikatorn behöver en strömförsörjning med specifikationen 10-24VDC ±20% 5W.
Strömadaptern är normalt inkluderad med viktindikatorn.
Strömanslutningen sker via en DC-plugg med 2.0mm center pinne. Centerpinne är
positiv.
Other manuals for 47-11
1
Table of contents
Other FLINTAB Accessories manuals


