Floorex Products GALAXY 250 Generation3 Series User manual

GALAXY Generation3
SAFETY & OPERATORS MANUAL
CAUTION: Read the instruction manual before using the appliance.
211020119

Page1 GALAXY 250 Generation3
Floorex Products www.floorex.com.au 1800 356 673
Contents
Specifications........................................................................................................................................................ 2
Safety instructions ................................................................................................................................................ 3
Safety instructions ................................................................................................................................................ 4
Operating Instructions........................................................................................................................................... 5
Operating Instructions........................................................................................................................................... 6
Tooling position .................................................................................................................................................... 7
Axle height adjustment.......................................................................................................................................... 8
Electrical safety..................................................................................................................................................... 9
Problem solving .................................................................................................................................................. 10
E1 Wiring Diagram .............................................................................................................................................. 11
E3 Wiring Diagram –Control Panel ...................................................................................................................... 12
E3 Wiring Diagram –Contactor Box ..................................................................................................................... 13
Parts Listing –P9 ................................................................................................................................................ 14
Parts Listing –P5 ................................................................................................................................................ 15
Parts Listing –E1 ................................................................................................................................................ 16
Parts Listing –E3 ................................................................................................................................................ 17
Parts Listing –P9 Bearing Assembly ..................................................................................................................... 18
Parts Listing –P5 & E3 Bearing Assembly ............................................................................................................. 19
Parts Listing –E1 Bearing Assembly ..................................................................................................................... 20
Parts Listing –Bearing Housing Assembly............................................................................................................. 21
Parts Listing –Coupling Assembly ........................................................................................................................ 22
Parts Listing –Throttle Assembly ......................................................................................................................... 23
Parts Listing –Axle Assembly............................................................................................................................... 24
Parts Listing –E3 Electrical Assembly ................................................................................................................... 25
Parts Listing –Bushammer Head (accessory)........................................................................................................ 26
Warranty ............................................................................................................................................................ 27
Galaxy 250 G3
Website

GALAXY 250 Generation3 Page 2
1800 356 673 www.floorex.com.au Floorex Products
Specifications
GALAXY
Model
E1
E3
P5
P9
Weight
118 kg
124 kg
120 kg
125 kg
Head Pressure
90 kg
96 kg
96 kg
98 kg
Dimensions
603 x 1050 x 959 (Width x Height x Length)
Rated Voltage
230 VAC
430 VAC
-
-
Phases
3
2
-
-
Rated Watts
2200
4000
-
-
Hp
2
5.5
5
9
Grinding Path
250
250
250
250

Page3 GALAXY 250 Generation3
Floorex Products www.floorex.com.au 1800 356 673
Safety instructions
1. Read and understand the instructions on the machine and in this manual and engine manual (if applicable).
Different models may have different parts and controls.
2. Equipment should only be operated by trained personnel, in good physical condition and mental health (not
fatigued). The operator and maintenance personnel must physically be able to handle the bulk weight and
power of this machine.
3. The GALAXY must only be used according to the instructions given in this manual. Any other work methods or
practices could result in injury or death
4. This is a one person machine. Maintain a safe operating distance to other personnel. Remember ‘one
machine, one operator’.
5. This equipment is intended for commercial use.
6. For the operators’ safety and the safety of others, always keep all guards and shrouds in place.
7. Never start or run machine when it is unattended.
8. Check for loose retaining bolts and nuts 3 hours of use
9. This machine is only intended for use on floor surfaces such as concrete, terrazzo and other hard floor
surfaces.
10. Never start or run machine disk(s) are not in contact with the surface.
11. Do not lend or rent machine without the operating and safety instructions for the machine (and the engine, if
applicable).
12. Wear clothing suitable for the job and for the work place including, safety shoes, hard hat, hearing protection,
non-fogging vented safety goggles, and dust mask suitable for dust.
13. Keep body parts or any loose clothing away from moving parts. Failure to comply could result in bodily injury.
14. Do not modify machine in any way. Only use genuine GALAXY parts and accessories.
15. Repairs should be performed by qualified persons only.
16. Ensure parts have stopped moving and disconnect power or spark plug when servicing or changing blades or
accessories.
17. Never operate machine in rain or if heavy moisture is present.
18. Petrol is extremely flammable and poisonous. Petrol should only be dispensed in well ventilated areas, and
only when engine is cool.
19. WARNING! POISONOUS EXHAUST GASES. Do not operate petrol powered equipment, including generators,
without adequate ventilation. Carbon monoxide is and invisible odourless gas that can harm or can kill.

GALAXY 250 Generation3 Page 4
1800 356 673 www.floorex.com.au Floorex Products
Safety instructions
20. Do not operate GALAXY with any covers or doors removed or open.
21. The GALAXY can produce sound pressure levels greater than 85db. The operator must wear approved safety
ear protection.
22. Do not allow the supply cord to come in contact with the cutting blade/head or other moving parts of this
machine.
23. WARNING! As with any diamond tooling, breathable silica or other hazardous dusts may be generated by use
and maintenance of this machine. The dust can cause severe and permanent lung damage, cancer, and or
other serious diseases. Do not breathe the dust. Do not rely on your sight or smell to determine if dust is in
the air. Silica may be in the air without a visible dust cloud. If air monitoring for silica is not provided by your
employer at your work site, you must wear appropriate respiratory protection when operating or maintaining
this equipment. Consult your employer for proper respiratory protection.

Page5 GALAXY 250 Generation3
Floorex Products www.floorex.com.au 1800 356 673
Operating Instructions
24. Wear clothes suitable for the job and for the work place including, safety shoes, hard hat, hearing protection,
non-fogging vented safety goggles, and dust respirator suitable for dust.
25. The GALAXY must only be used according to the instructions given in this manual. Any other work methods or
practices could result in injury or death
26. WARNING! Disconnect power before lifting the head off the surface.
27. WARNING! POISONOUS EXHAUST GASES. Do not operate petrol powered equipment, including generators,
without adequate ventilation. Carbon monoxide is and invisible odourless gas that can harm or can kill.
28. Be sure all equipment is tested and tagged prior to use on any job as applicable.
29. Inspect entire area to be ground before grinding and remove any bolts or concrete nails (etc) that could
damage tooling or the machine and which could cause a hazardous situation.
30. Ensure there are no obstacles or existing structures that could present a hazard to the operator. If so, take
necessary action to eliminate the hazard.
31. Tilt machine back so handle is resting along the floor. See Section ‘Tooling Removal’
32. Install appropriate diamond tooling or other available tooling into the machine. Only use genuine Floorex
tooling. Failure to comply could result in bodily injury. See section ‘Tooling Removal’ for illustrations on how to
remove and install tooling.
33. Tilt machine back onto the disk.
34. If the machine is electric version, connect machine to suitable power outlet. Only use heavy duty power lead
suitable for high current use (preferably 2.5mm² cable), no longer than 15 meters.
35. If no power is available within the specified distance, have a qualified person install a suitable power outlet
closer to your work. Alternatively use 4mm² cable for up to 40 meters.
36. Connect a suitable dust extractor to the machine via a 38 or 50mm flexible hose. The machine is designed to
take the standard 50mm hose ends to make connection of dust extractors easy and hassle free. A water
connection for wet grinding is also supplied if this is not practical. In the case of wet grinding, a dust collector
is not needed.
37. Keep machine clear of drainage pits, grates, steps or major lips or such hazard. Failure to comply could result
in bodily injury and or could damage the machine or property.
38. Ensure machine is on a level surface.
39. This machine is designed to operate with the wheels in contact with the floor at all times. Do not operate with
wheels off the floor.

GALAXY 250 Generation3 Page 6
1800 356 673 www.floorex.com.au Floorex Products
Operating Instructions
40. The GALAXY has axle height adjustment to level the machine and also assists ergonomics of the machine so
as to cause less fatigue on the operator. To set axle height, place the machine on a level surface and adjust
the axle height lever until the level bubble is somewhat in the centre. After initial operation the axle can be
adjusted to fine tune the results.
41. Switch on the dust extractor or turn on the water tap so a small amount of water is spraying on the tool.
42. Hold the handles firmly and
a. For electric machines; switch the machine on by pushing the green button.
b. For Petrol Machines; Put the throttle lever in the choke position (fully towards operator) and pull start
the engine. Note; some machines have auto choke and the Idle position is adequate for starting.
Caution!! When Starting the machine in the full choke (when Cold) the machine clutch could engage
for a short period until machine it taken back to idle. Be aware of this and have a second operator
hole the handle to ensure the machine is kept controlled.
c. As soon as the engine is started, move the lever to the idle position. And when ready move the lever
to the full throttle position.
43. On electric machines, the controls on the GALAXY include an over load device. It is there to protect the
controls and motor from irreparable damage. If it trips it indicates a problem. (i.e.; undersize power lead or
poor power to your power supply). Refer earlier in this section for recommendations on power leads. Rectify
the problem or decrease load on the GALAXY by using tooling with more surface area.
44. Continuing to use the GALAXY when constant tripping occurs, VOIDS THE WARRANTY.
45. Do not attempt to make any adjustments while the machine is in operation. Any adjustments must only be
performed when machine is stopped and power or spark plug disconnected.
46. In the event of the machine pulling to one side all the time; adjust the axle height to obtain the best result.
(See section ‘Axle Height’). This machine is designed to operate with the wheels in contact with the floor at all
times. Do not operate with wheels off the floor.
47. After a few minutes of grinding check the wear of the diamond tooling. This will pay handsomely if the
diamonds are wearing out fast due to soft concrete / abrasive concrete. There is a wide range of diamonds
available to suit every need. See Section ‘Diamond Tooling Selection Guide’.
48. See Section ‘Problem Solving’ for tips on how to grind faster on tough concrete and how other problems can
be rectified.
49. WARNING! As with any diamond tooling, breathable silica or other hazardous dusts may be generated by use
and maintenance of this machine. The dust can cause severe and permanent lung damage, cancer, and or
other serious diseases. Do not breathe the dust. Do not rely on your sight or smell to determine if dust is in
the air. Silica may be in the air without a visible dust cloud. If air monitoring for silica is not provided by your
employer at your work site, you must wear appropriate respiratory protection when operating or maintaining
this equipment. Consult your employer for proper respiratory protection.

Page7 GALAXY 250 Generation3
Floorex Products www.floorex.com.au 1800 356 673
Tooling position
50. To remove tooling from the GALAXY, Tilt the machine to the tooling position as shown below.
51. Remove HD Discs by undoing the 4 M10 Countersunk Screws using the supplied 6mm Allen key
52. When using a Bushammer, the blade mount must be removed as below
53.

GALAXY 250 Generation3 Page 8
1800 356 673 www.floorex.com.au Floorex Products
Axle height adjustment
54. This machine is designed to operate with the wheels in contact with the floor at all times. Do not operate with
wheels off the floor.
55. There is a level bubble provided (located behind the motor) for levelling the machine for best user experience
and coupling life. It does not change the grinding results in any way.
56. The axle lever should be set so the bubble is up to the forward line on the spirit level. This assures the
longevity of the coupling life and gives the nicest position for ease of use. (Assuming the floor is level)
Level Bubble
Axle Lever

Page9 GALAXY 250 Generation3
Floorex Products www.floorex.com.au 1800 356 673
Electrical safety
57. All electrical maintenance and repairs are to be carried out by qualified persons only.
58. CAUTION - Line terminals may be alive when main switch is in the off position. Disconnect the machine
completely before performing any maintenance or repairs.
59. WARNING - DO NOT operate the machine with any electrical panels open.
60. WARNING - The controls on the GALAXY include an over load device. It is there to protect the controls and
motor from irreparable damage. If it trips it indicates a problem. (i.e.; undersize power lead or poor power to
your power supply). Refer earlier in this manual for recommendations on power leads. Rectify the problem or
decrease load on the GALAXY by using tooling with more surface area, or place weights supplied on the
brackets on handle for this purpose.
61. Continuing to use the GALAXY when constant tripping occurs, VOIDS THE WARRANTY!
62. Never operate machine in the rain or if heavy moisture is present.
63. The overload is there to protect you and the machine from harm. DO NOT bypass or adjust the over load in
any way. If it is faulty, only replace with original part that is identical to the faulty one.
64. Never bypass over current devices in this machine.
65. Never connect or disconnect power cables with voltage present or while under load.
66. Disconnect all power connections and observe lock out / tag out procedures before attempting to carry out
any maintenance or repair on any equipment.
67. Avoid any contact with any rotating parts or driven parts.
68. Never use equipment that has not been tested and tagged (including cords).
69. Before connecting the machine to power, check the condition of all power leads and cables on, or used in
conjunction with the machine. DO NOT USE it if any faults, cuts, wear marks, etc… Get qualified persons to
repair and re-tag it as required by regulations in your country.
70. Connect machine to suitable power outlet. Only use heavy duty power lead suitable for high current use
(preferably 2.5 mm2 cable), no longer than 15 meters.
71. If no power is available within the specified distance have a qualified person install a suitable power outlet
closer to your work. Alternatively use 4 mm² cable for up to 40 meters.
72. Do not operate GALAXY with any covers or doors removed or open.
GALAXY 250 Generation3 Page 10
1800 356 673 www.floorex.com.au Floorex Products
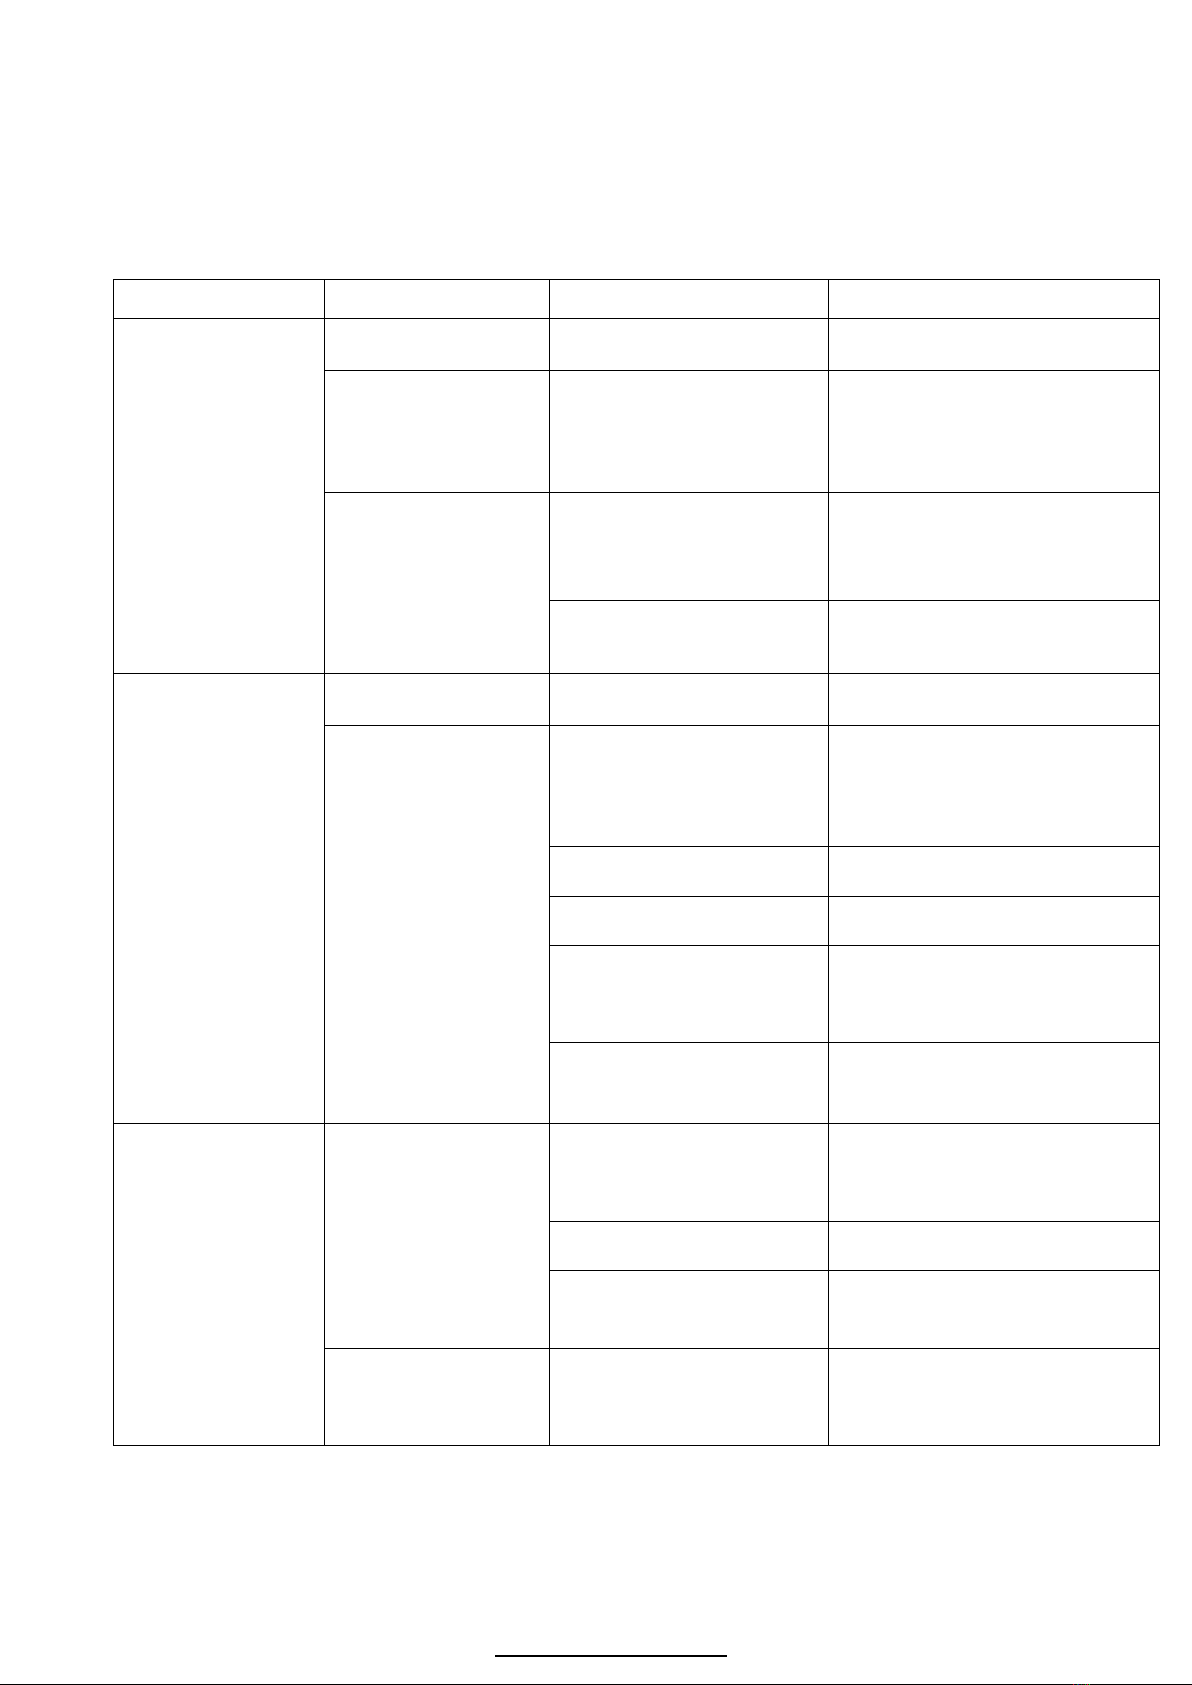
Problem solving
74. Diamond Grinding has many variables. When you understand some of these, you can solve a lot of problems
without a lot of bother and expense.
NOTE: THIS IS A GUIDE ONLY
PROBLEM
CAUSE
REMEDY
EXPLAINATION
Machine will not start
/ run.
No power is present at
cable end.
Check the power is present
with another tool.
Using another tool confirms power
is present
Machine is trying to
start on glue or other
sticky substance.
Clear a patch with a scraper
and grind into the glue a
little at a time.
This means it only tackles a small
amount of glue at a time and
keeps the glue residue coated with
dust, preventing glue sticking and
building up on the diamonds.
Power lead is too small
in capacity or too long.
Upgrade the power lead to
2.5mm² (15meters max) or
4mm² (40 meters max).
The long / small capacity cable is
too restrictive and can’t allow
enough power through for the
machine to start / run properly.
Use weight on the handle.
The weight on the handle reduces
the load on the machine thus
reducing the current.
Machine is not
grinding at all.
No blades /
accessories in unit.
Fit blades. Note; check wear
on machine.
Very hard concrete or
glazed topping on
concrete.
Turn dust extractor down /
restrict flow. Only just
control the dust from
escaping.
The extra dust accumulating on
the floor acts as an abrasive
between the segments and the
floor thus exposing the diamonds
better.
Place river sand or cement
on the floor.
The sand is an abrasive as
described above.
Use softer grade of diamond
tooling.
The softer grade will expose the
diamonds better.
Use coarser diamond
tooling.
The coarser diamond tooling can
get through hard toppings without
wearing out the diamonds too
fast.
Reverse the rotation of the
machine (switch on the
bottom of the motor box)
The tooling exposes the diamonds
when reversed. This works best
when using plugs.
The diamonds are
wearing out too fast.
The concrete is:
*Soft
*Abrasive
*Rain Damaged
*A rough finish
(Scarified or shot
blasted).
Use a powerful dust
extractor to remove as much
dust as possible.
The dust, as described acts as an
abrasive between the segments
exposing the diamonds
prematurely, wasting them.
Use harder diamond matrix.
The harder segments don’t expose
as easily.
Use tooling with more
segments or area² of
segment.
The tooling with more segments
or area² doesn’t have the same
weight on them, reducing wear.
The diamonds are too
soft or too few.
Use weights on the handle
This reduces the weight on the
diamonds thus reducing the wear
on them.


This manual suits for next models
4
Table of contents
Other Floorex Products Floor Machine manuals

Popular Floor Machine manuals by other brands

Green Machines
Green Machines 400 Series Operator's manual

Clarke
Clarke CLARKE380B Instructions for use

Nilfisk-Advance
Nilfisk-Advance SC351 Instructions for use

HAKO
HAKO Hakomatic B115R operating manual

Renown
Renown REN08026-VP Operator's manual

U.S. Products
U.S. Products PEX 500 Information and operating instructions


