Fluance Elite Series User manual


Speaker Basics ................................................................................................... 3
5.1 & 7.1 Surround Sound Speaker Setup................................................4
Wiring Guide........................................................................................................ 5
Bi-Amp Connection .........................................................................................6
Bi-Wire Connection.......................................................................................... 7
Turntable Passive Speaker Setup..............................................................8
Wall Mounting Recommendations ...........................................................9
Care & Maintenance....................................................................................... 10
Troubleshooting.................................................................................................11
FAQs .......................................................................................................................12
Videos....................................................................................................................13
Knowledge ..........................................................................................................13
Fluance Warranty.............................................................................................15
Table of Contents
Introduction
Thank you for your purchase of your Fluance product. We hope you enjoy
your experience. If you have any questions please visit us at:
www.uance.com/support
Fluance believes everyone should experience audio in its truest form,
recreating the performance the way the artist intended. Utilizing only superior
components and expert audio engineering, their products are a testament to
the performance that can be achieved when a passion for music takes center
stage. The perfect complement to any audiophile’s lifestyle, you’ll be enjoying
live performances in your home for years to come.
Online Resources
For videos on the full setup and conguration of your speakers visit us at:
www.uance.com/resources

Serious Performance™ 3
Speaker Basics
Subwoofer
A separate subwoofer is designed
to accurately and dynamically
reproduce low bass frequencies.
It creates a better sound experience
in the entire system whether
listening to movie soundtracks
or musical recordings.
Bipolar Speakers
Utilizing a distinctive
driver conguration
these speakers create
omni-directional
acoustics for an
enveloping movie
theater experience.
Center Speaker
A center speaker is usually
placed centered, above or below
the visual device. It must also be
timbre matched with the other
speaker products in the system.
Surround Speakers
The surround speakers in a home
theatre system are used to create
atmosphere and a sense of space.
Surround speakers can be placed to
the side and rear of the listener.
Front Speakers
In home theater, the front left and right speakers provide a wide
soundstage that blends with the video or music to create a more
realistic and exciting experience.
Serious Performance™ 4
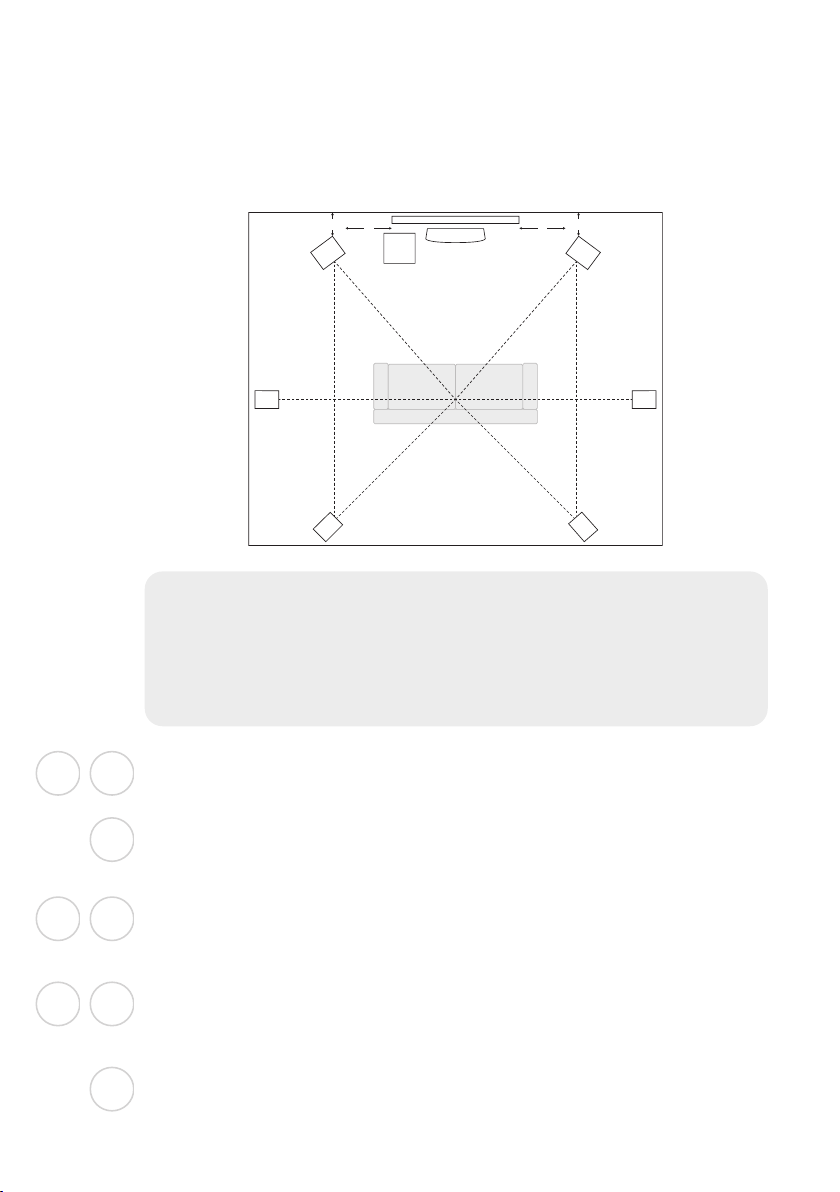
5.1 & 7.1 Surround Sound Speaker Setup
Speaker placement is the most important part of any Home Theater setup.
The proper placement will optimize surround sound and performance of
your Fluance speaker system.
Front Left & Right Speakers:
Place your front speakers 3 feet away from the TV on each side rotated at
22°-30° towards the main seating position, for optimal listening.
Center Channel Speaker:
Place your center channel speaker center with your TV. Above or below the
TV but more importantly at ear level.
Surround Left & Right Speakers:
Place the surround left & surround right speakers between 90° to 110°
directly to the sides of your seating position two feet or higher from the
ground.
Surround Back Left & Right Speakers:
Mount the back left and right surround sound speakers behind the seating
position at ear level in line with the front speakers 135° to 150° towards the
main seating position.
Subwoofer:
The location and angle of the subwoofer is not important as it will radiate
sound evenly throughout the room. Do not place in a corner or it will create
muddy undesirable bass.
FR
FL
C
SR
SL
SBR
SBL
SUB
SUB
C
SCREEN
FL
SBL SBR
SL SR
FR
3'3'
1.5' 1.5'
5.1 Surround System
Five audio channels: Front Left, Front Right, Center, Left Surround, Right
Surround and the Subwoofer.
7.1 Surround System
Seven audio channels: Front Left, Front Right, Center, Left Surround, Right
Surround, Back Left & Right Speakers, and the Subwoofer.
Serious Performance™ 5
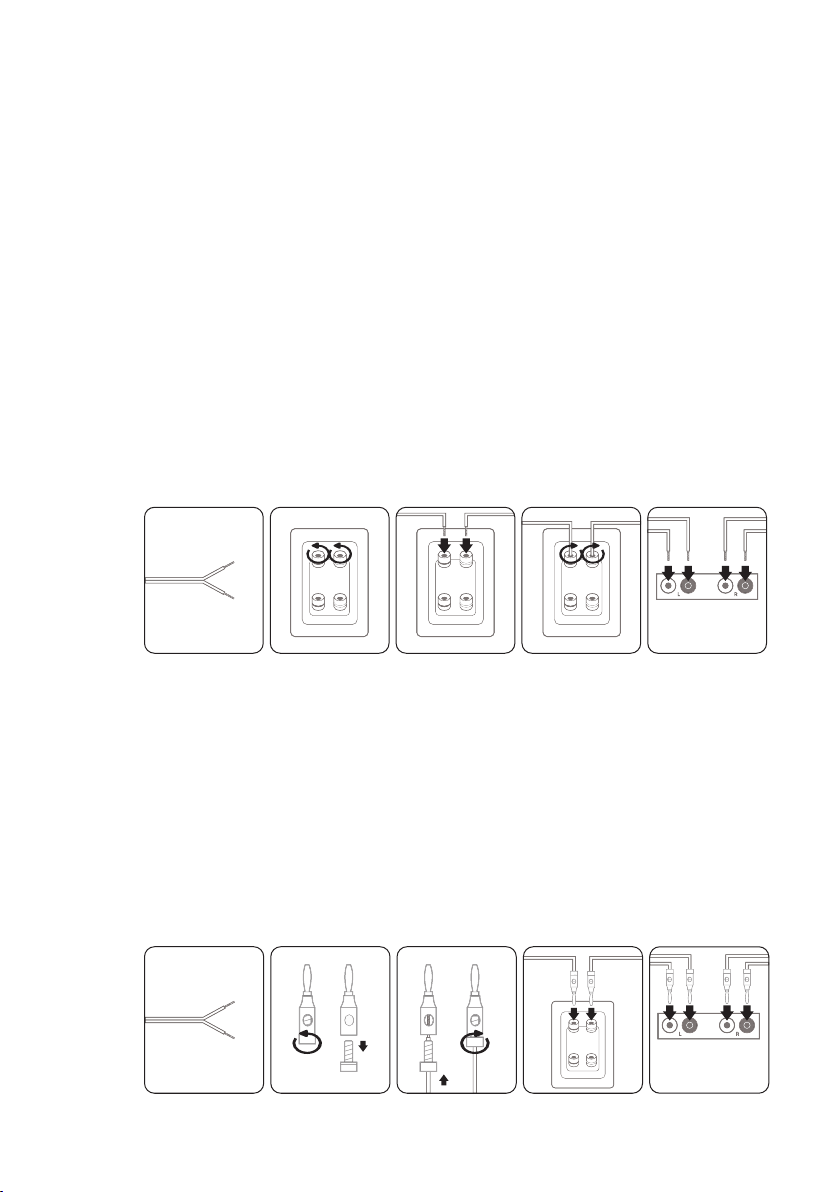
Wiring Guide
Setting up a home theater system requires proper wiring and wire manage-
ment. Depending on the system you set up, the size of the wires and the prop-
er type of wiring you need may vary. Fluance recommends 18 gauge or better
wire for optimal sound quality.
Standard Method:
1. Cut insulation of lead wire to reveal 0.39 - 0.78 inches (1-2cm) of
exposed wire on both ends.
2. Rotate the positive and negative terminal on the back of the speaker
counter clockwise to unlock.
3. Insert positive/negative end of exposed wire into unlocked positive/
negative terminal of speaker.
4. Rotate positive and negative terminals clockwise to lock exposed wire
into terminal.
5. Insert positive/negative exposed wire of other end into positive/negative
terminal of receiver amplier.
AMPLIFIER
Banana Plug Method:
1. Cut insulation of lead wire to reveal 0.39 - 0.78 inches (1-2cm) of
exposed wire on both ends.
2. Rotate the positive and negative ends on the back of banana plug
counter clockwise to unlock.
3. Insert positive/negative end of exposed wire into now unlocked middle
bracket of banana plug and rotate clockwise to lock.
4. Insert positive/negative front ends of banana plug into positive/negative
speaker terminals.
5. Insert positive/negative exposed wire of other end into positive/negative
terminal of receiver amplier.
AMPLIFIER
Note: Do not let the positive and negative ends of the exposed speaker wire touch

Serious Performance™ 6
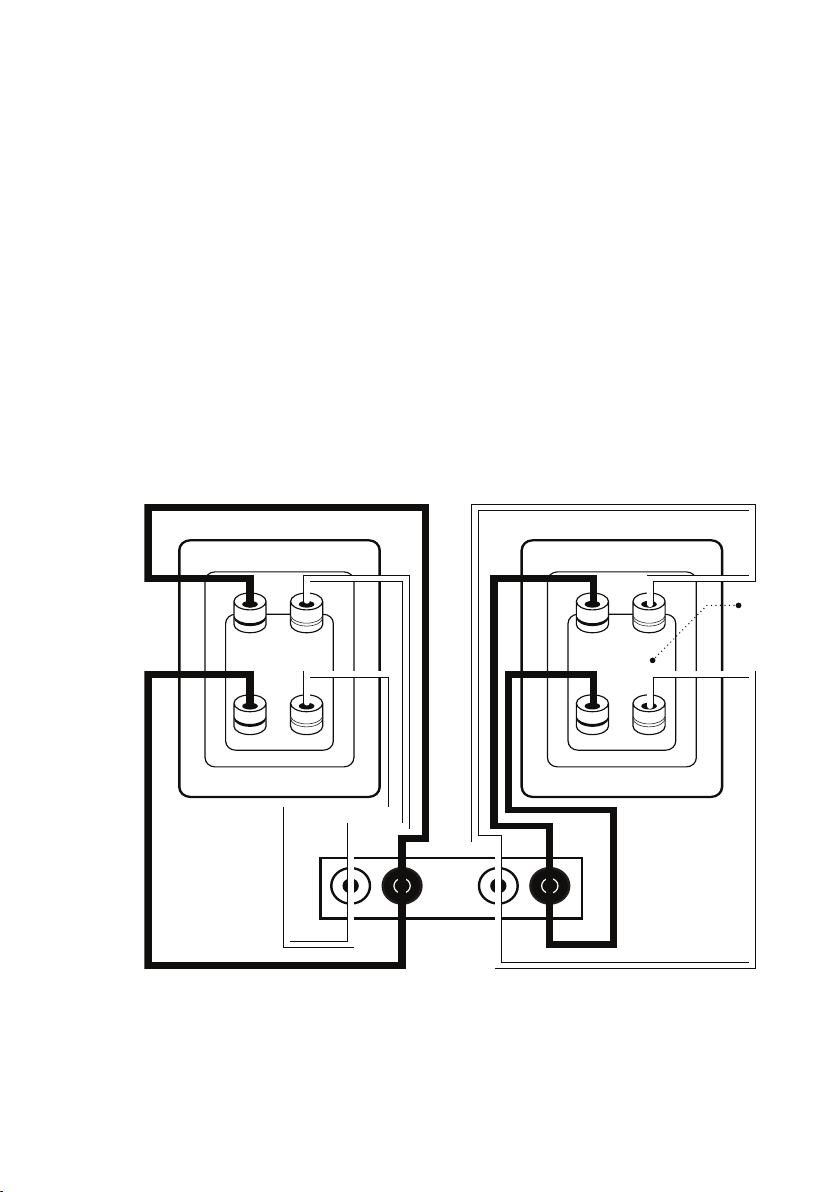
Bi-Amp Connection
Bi-amping
Bi-amping involves the use of two separate amplier channels per speaker,
one to connect to each pair of binding posts. It is only possible when speakers
have two or more sets of binding posts. Benets include: transients are less
likely to cause amplier overload (clipping) and/or speaker damage, reduced
distortion, and better matching of the power amplier to speaker drivers.
Here are the steps to connect speakers in the bi-amplification mode:
• Ensure that your system is powered OFF.
• Remove the bi-wire bridges from each speaker (this separates the low
pass lter & high pass lter crossovers).
• Connect each amplier channel to its respective speaker section as
shown.
• Set the level controls on the ampliers such that the signal will arrive at
all speaker terminals at the same power-volume level. If your ampliers
are identical, it is usually sufcient to set all the amplier level controls
the same. The speaker’s built-in crossovers are designed to match the
efciency of all the individual drivers (tweeters, midranges, and woofers)
When using the bi-amplier connection you must directly deal with
some of these issues by adjusting levels according to your listening
preference.
LR
LR
LEFT SPEAKER RIGHT SPEAKER
AMPLIFIER
HIGH
BRIDGES REMOVED
LOW
AMPLIFIER
Serious Performance™ 7
Bi-Wire Connection
Bi-wiring
In bi-wiring, each loudspeaker has two pairs of connectors and two cables are
run from the same amplier output to the speaker cabinet – one for the high
frequency or tweeter driver and one for the low frequency driver (through two
separated crossover lters). The purported advantage of this split is that it
reduces magnetic interaction in the cable, resulting in a better soundstage.
How to connect speakers in the bi-wire mode:
• Ensure that your system is powered OFF.
• Remove the bi-wire bridges from each speaker (this separates the low
pass lter & high pass lter crossovers).
• Connect each amplier channel to its respective speaker section as
shown.
LR
LEFT SPEAKER
AMPLIFIER
RIGHT SPEAKER
BRIDGES
REMOVED
Take care to maintain the correct polarity when connecting (+ or RED) to (+ or RED) and (- or BLACK) to (- or BLACK).
Before attempting the connection make sure that your amplier’s speaker wire connectors will accept a second set of
cables and that the equipment is turned OFF while you make the connections.
Serious Performance™ 8
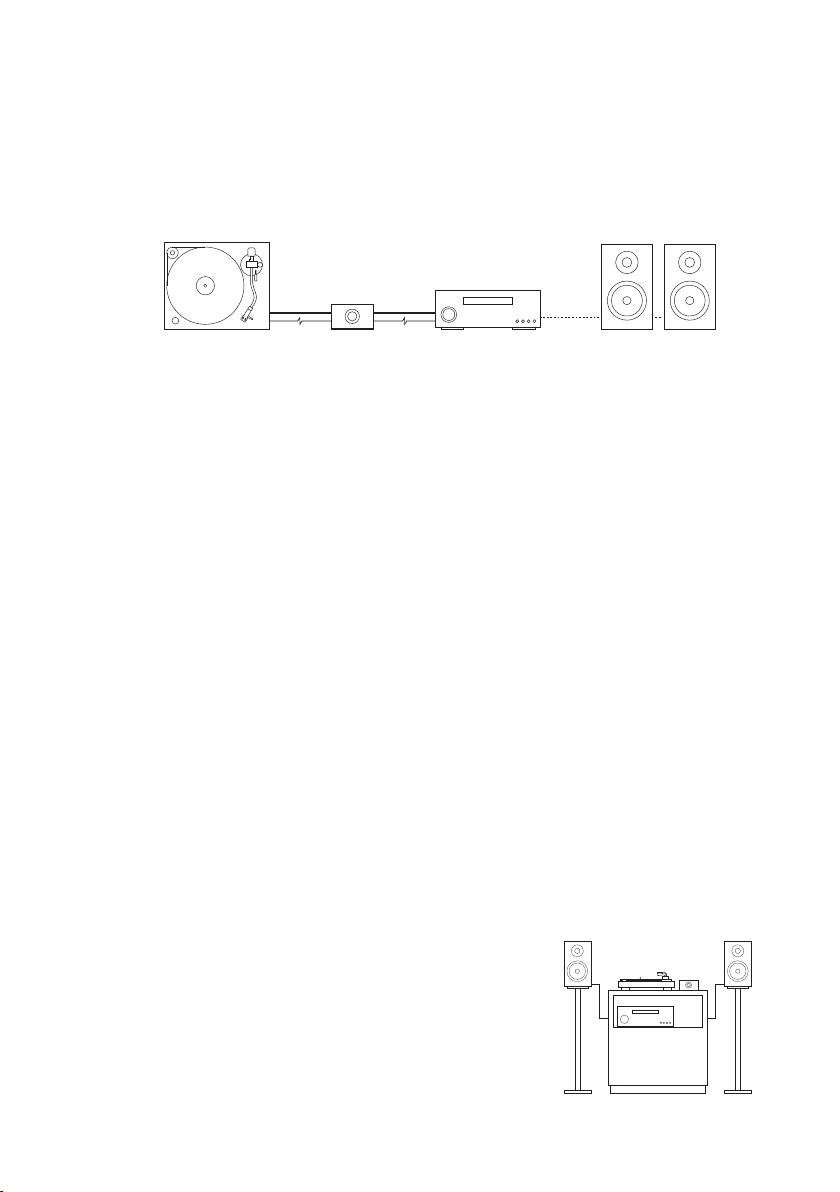
Turntable and Passive Speaker Setup
To connect passive speakers to a turntable additional electronics are needed.
The standard conguration includes the turntable, a phono preamplier, an
amplier, and a pair of passive speakers.
Amplifier
An amplier is the most important electronic when using passive speakers. The
amplier provides the power to drive the speakers. Some integrated ampliers
have a Phono input that uses a built-in preamplier. An AV Receiver, with a
built-in amplier, can also be used.
Phono Preamplifier
A preamplier boosts a small electrical signal to a normal line level, preparing
the signal for further amplication. A phono preamplier is specically
designed to amplify the signal from a turntable.
Turntable
The connected turntable may feature an internal preamplier. The built-in
preamplier should be disabled or bypassed if using an external preamplier
or a receiver with a built-in preamplier.
IMPORTANT! Only one preamplier should be used in a turntable setup. If
your turntable/amp features an internal preamplier you must not use a second
preamplier. Using more than one preamplier can damage any connected devices.
Grounding
All components in a turntable setup should be properly grounded. Connect
a ground wire from your turntable to your preamplier and then to your
amplier. This will prevent unwanted interference or humming during playback.
Placement
Incorrect speaker placement can cause unwanted
feedback on turntable setups. To avoid feedback
follow the below recommendations:
• Bookshelf speakers should not be on
the same surface as the turntable.
• The speakers can also be placed on
speaker stands or speaker isolation pads.
• The turntable should be on a solid
and sturdy surface.
Turntable + Preamp + A/V Receiver + Passive Speakers
TURNTABLE PREAMPLIFIER
RCA SPEAKER
WIRE
GRND
AMPLIFIER SPEAKERS
Serious Performance™ 9
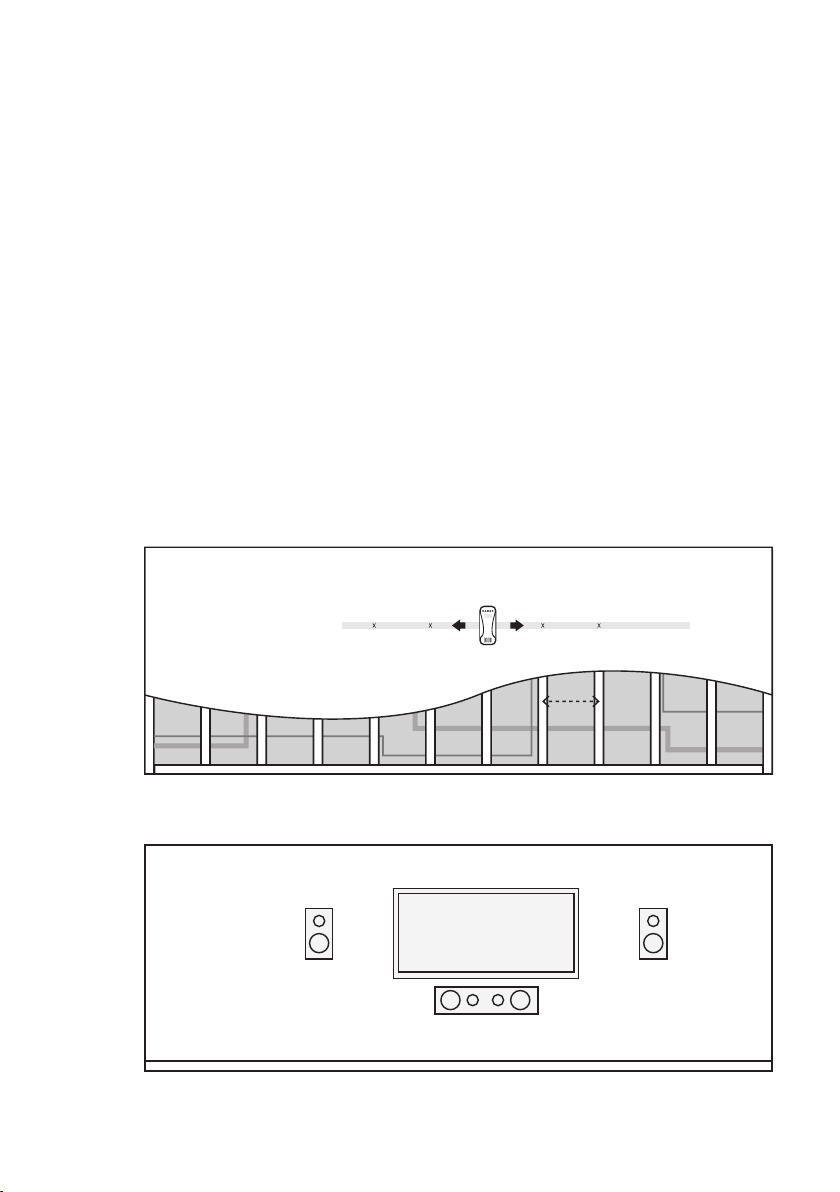
Wall Mounting Recommendations
Whether you are mounting a TV, speaker, or on-wall shelving, it’s always best
to anchor into a stud. Drywall anchors can work well, but you never really
know the quality of drywall. There may be cracks hidden under paint and
texture. There may have been water damage, or it may simply pull off the
wall if poorly installed. Because of these potential problems, it’s safest to hit
a stud.
Stud Finding Tips
• Most homes are built with 16" on-center studs, which means there should
be a stud every 16". If you have trouble nding studs on a wall, verify
how far apart they are in the home by locating and measuring them on
another wall.
• When using a stud nder, use painters’ tape to mark out at least three
studs in a row, then measure the distances between the studs. If the
studs are equidistant apart, you can be sure the stud nder actually
marked studs, as opposed to some other object in the wall.
16"
After wall mounting installation
Before wall mounting installation

Serious Performance™ 10
Care & Maintenance
• Refrain from touching the tweeter dome; if the tweeter is pushed in
the sound quality will be affected tremendously. The dispersion and
response of the tweeter is dependent on its shape.
• Ensure positive/negative speaker wire does not touch; this can lead to
blowing a fuse or shorting out your amplier/home theater receiver.
• Refrain from dragging oor-standing speakers across the oor when
oor spikes are attached as it is possible that surfaces can be scratched
and/or damaged.
• Clean your speakers regularly with a dry microber cloth and do not use
any liquid cleaners or they might cause damage to the ampliers.
• Do not keep speakers on metals conducive to magnetism; you can use
wooden materials to stand them on, or any non-magnetic one. Do not
keep it near any magnetic source or the built-in electromagnet may be
damaged.
• Static electricity is one of the hazards that can affect your electrical
systems. Please take necessary steps to avoid your speakers coming into
contact with static electricity.
• Keep speakers away from direct sun rays.
• If there is a port/vent on the speaker, avoid blocking the ventilation.
It is recommended to keep the speakers 2-3 feet away from any
obstructions.
• It is recommended that the amplier is connected to a functional clean
power outlet or surge protector.
• Avoid running speaker wire parallel to electrical lines to avoid
interference.

Serious Performance™ 11
Troubleshooting
Audio Distorted
• Too much or too little power from amplier/receiver.
• Lower the volume and adjust equalizer settings to avoid excessive bass.
Buzzing/Crackling
• Check cable connections at the receiver and speaker binding posts.
• Plug the receiver directly into a wall. Where possible use a different
outlet.
• Try different audio sources (TV, Smartphone, Gaming Console, Blu-ray/
DVD player).
Muddy/Muffled Bass
• Speakers are not broken in. Allow a minimum 10 hours of regular use for
proper break-in.
• Speakers/Subwoofer too close to walls. Allow 2-3 feet behind speakers
for proper airow.
• Adjust equalizer settings on the receiver.
No or Limited Bass
• Check cable connections at the receiver and speaker binding posts.
• Tower speakers with two sets of binding posts use bridge pins or plates
to connect the top and bottom posts when you are not bi-amping. If
these are missing, only one set of drivers will work.
• Change channel settings on the receiver. If a subwoofer is enabled on
the receiver without one connected, the bass frequencies will not come
through the front speakers.
General Speaker Troubleshooting
• Conrm the speaker wires are connected to the matching binding posts
(Black to Black, Red to Red).
• Check that the speaker wire is in good condition.
• Speaker wire should be 18 AWG (American Wire Gauge) or better.
• Ensure the binding posts are fully tightened.
• If using speakers with multiple binding posts on back, conrm the metal
bridge pins/plates are in place.
• Compare the amplier power output to the speaker power handling to
ensure they match.
• Eliminate any audio equalizers or lters that may affect audio output.
If you continue to experience any issues or questions additional resources are
available at www.uance.com/resources.

Serious Performance™ 12
FAQs
What is the break-in period for Fluance speakers?
The break-in period for our speakers is a minimum 10-12 hours of playing
time at normal listening volumes. After this period the drivers will have had
enough movement to perform at their peak level.
Do I need Banana Plugs for my Fluance speakers?
No, banana plugs are not required. However they can provide the following
benets: They provide a stronger connection and it is more convenient
to plug and unplug a banana plug than to screw or clamp bare wire into
the binding posts. Check out our Home Audio Accessories section for the
banana plugs you may want in addition to your new speaker system.
Why is 18-Gauge Speaker Wire recommended?
At Fluance, we recommend that you use 18-gauge speaker wire when
setting up your Home Theater System. We recommend 18-gauge because
the larger amount of copper provides less resistance for electricity. A larger
gauge (a thinner wire with less copper) can result in power loss, which in turn
means lower sound quality and lesser performance from your Home Theater
System.
What Receiver should I use with Fluance speakers?
In order to get truly Serious Performance™ from your Fluance Speakers,
they must be paired up with a Home Theater Receiver capable of equally
Serious Performance. With that in mind, the brand names most often used by
Fluance customers are: Denon, Marantz, Onkyo, Yamaha.
What are Sound Isolation Floor Spikes?
Sound isolation oor spikes eliminate vibration absorption to aid in
eradicating distortion. Floor spikes will isolate sound that is transmitted
through the oor by reducing the speaker surface area in direct contact with
the oor. In return the speakers will produce a clearer more dened sound.
What are Sound Isolation Pads?
Sound isolation pads ensure your speakers are isolated from their supported
surface, decreasing unwanted vibrations and delivering a tighter bass
response and increased clarity. Some isolation pads can also be used to angle
the speakers to the ideal listening position.

Serious Performance™ 13
Do I have to bi-amp or bi-wire my connections with your speakers?
Some of our models have speaker wire connections to allow for bi-amping
or bi-wiring. This is for your benet and can be used to enhance the
performance of your system. Connection of a basic audio system, where
there is only one connection from the amplier, is very simple and bi-amp
or bi-wire is not necessary. You can connect your speakers using the
regular left and right speaker wire connections and ignore the second set
of terminals. There are gold-plated bridges connecting the two sets of
terminals that allow the speaker to be connected as a traditional loudspeaker.
Only remove these bridges if you plan to bi-wire or bi-amp your speakers.
See the Bi-Amp Connection and Bi-Wire Connection sections of this manual
for more information.
How do I register my speakers?
Your warranty registration is automatic and is processed by us when you
place your order directly with us (no additional paperwork required beyond
a copy of your invoice). All returns require a return authorization and you will
receive complete instructions with the authorization.
For more frequently asked questions, please visit:
www.uance.com/faq.html
Videos
Knowledge
Fluance creates videos on many subjects related to our products. If you wish
to learn more about choosing a home audio receiver or setting up your home
theatre speakers, you can watch these videos and more at:
www.uance.com/videos
Fluance’s Support Center is designed with you in mind. These tips and
articles have been written by Fluance industry experts to help you optimize
your home theater system.
Visit us online to learn more:
blog.uance.com/knowledge
The Ultimate Guide to Home Theater Setup
Achieving great sound in a home entertainment system is inherently more
complex than with stereo systems, because there are six to twelve (or
more) speakers to set up, rather than just two. No matter what speaker
conguration you choose, our guide to home theater surround sound setup
will help you place and congure your speakers for the best possible sound.
Guide: blog.uance.com/home-theater-setup-guide

Serious Performance™ 14
How to Set the Phase and Crossover Frequency on Your Subwoofer
Setting your bass management on processors, receivers, and the subwoofer
is critical if you hope to get the best performance out of your audio system.
Check out our guide on conguring your subwoofer for the best performance.
Guide: blog.uance.com/set-phase-crossover-frequency-on-subwoofer
Matching Speaker and Receiver Power
It is best to have an amplier that slightly exceeds the power of the speakers
that are connected to it. For example, a 30 watt RMS rated amplier at high
volume will cause clipping and distortion when connected to a speaker
with 100 watt RMS. This will produce harmful electronic signals that will
potentially damage your speakers. It is also important that your amplier not
be too much higher than the power of the speakers. Use the guide below to
learn more about power ratings, impedance, and sensitivity.
Guide: blog.uance.com/matching-speaker-and-receiver-power
Medium-density fibreboard (MDF) vs Natural Wood
Have you ever heard of the expression “no two snowakes are alike”? Well
the same can be said for natural wood speakers. Natural wood often has
organic characteristics like knots, rings and lines which can affect the way a
speaker system looks and sounds. There are 3 main benets of MDF wood:
1. Producing great sound in solid construction
2. Speakers designed with beautiful nishes
3. A lower cost in construction that saves you money
Guide: blog.uance.com/mdf-wood-speaker-cabinets

Serious Performance™ 15
Fluance gives the following warranty to the original customer of each new
Fluance product purchased from a dealer authorized by Fluance. Fluance
warrants that each new product, under normal use, is free from defects,
subject to the terms and conditions set forth. If a defect should occur within
the warranty period, repairs will be made free of charge for parts and labor
when such defects are determined by us to be attributable to faulty materials
or workmanship at time of manufacture.
Warranty Period
The Fluance products listed below are warranted for parts and labor for the
stated period from the date of original purchase and are subject to the terms
and conditions of the warranty.
Home Audio Passive Speakers: Lifetime Warranty
Active/Powered Speakers: 2 Year Warranty
HiFi Turntables: 2 Year Warranty
Warranty Exclusions
• Products purchased from a dealer not authorized by Fluance.
• Products with the serial number defaced, altered or missing.
• Defects resulting from disaster, accident, abuse, misuse, lightning, power
surges, neglect, unauthorized modication or water damage.
• Defects or damage as a result of repairs performed by a person or party
not authorized by Fluance.
• Defects or damage occurring during shipping (claims should be made
with the shipping company).
• Defect or damage as a result of connecting a product to an outlet
with the incorrect voltage. Voltage converters must be used where
applicable.
To Obtain Warranty Service
Should your Fluance product require warranty service, please contact your
Fluance Authorized Dealer and send your product fully insured and freight
prepaid to the nearest Fluance authorized service center. Before sending
to Fluance, you will be required to get a Return Authorization Number from
your dealer.
Products shipped without a valid Return Authorization Number will be
refused. To avoid possible shipping damage, make sure the product is
properly packaged and well protected. Include a copy of your original bill of
sale as proof of warranty along with your name, home and/or work telephone
number(s), a complete return address and a detailed description of the faults.
Products repaired within warranty will be returned freight prepaid. This
warranty in itself is not considered a valid proof of purchase. When applying
for warranty repairs, you must present the original copy of your bill of sale as
proof of warranty.
Warranty Information

This manual suits for next models
2
Table of contents
Other Fluance Speakers manuals

Fluance
Fluance Ai41 User manual

Fluance
Fluance Serious Performance Ai40 User manual

Fluance
Fluance AB40 User manual

Fluance
Fluance Serious Performance User manual

Fluance
Fluance Ai60 User manual

Fluance
Fluance Serious Performance Ai61 User manual

Fluance
Fluance Ai41 User manual

Fluance
Fluance Fi20 User manual

Fluance
Fluance Ai81 User manual

Fluance
Fluance HFF User manual


