Fluid BID1000W User manual
fluid bidet seat
Product Handbook & Instructions
BID1000W

01-02
03
04
05
06
07
07
08
09
10-11
12
13
14
Important Safety Instructions
Components
Main Unit Controller Instructions
Technical Specifications
What’s in the box?
Product Size & Installation Preparation
Installation of Main Unit
Installation of Main Unit Continued...
Preparation for Start-up
Cleaning & Maintenance
Removal and Installation of Clamp
Troubleshooting Guide
Warranty
Table of Contents

Important Safety Instructions
DANGER – To reduce the risk of electrocution:
1. Do not use while bathing.
2. Do not place or store product where it can fall or be pulled into a tub or sink.
3. Do not place in or drop into water or other liquid.
4. Do not reach for a product that has fallen into water. Unplug immediately.
5. Do not wash the main unit or electrical plug with excess amounts of water or detergent. Always unplug
the unit before cleaning or maintaining and do not plug back in unless completely dry.
6. Do not handle the electrical plug with wet hands.
7. Never block the air dryer, (with hands or other obstructions).
8. Never disassemble or modify this product as such actions will void the warranty and could cause injury.
9. During installation and maintenance of the product, the electrical plug must be unplugged and water
supply must be shut off.
WARNING – To reduce the risk of burns, electrocution, fire, or injury:
1. Close supervision is necessary when this product is used by, on, or near children.
2. Use this product only for its intended use as described in this manual. Do not use attachments not
recommended by the manufacturer.
3. Never operate this product if the cord or plug are damaged, if it is not working properly, or if it has
been dropped or damaged, or dropped into water.
4. Keep the electrical cord away from heated surfaces.
5. Never use while sleeping or drowsy.
6. Never drop or insert any foreighn objects into any product openings or hose.
7. Do not use outdoors or operate where aerosol, (spray,) products are being used, or where oxygen is
being administered.
8. Connect this product to a properly grounded outlet only. (See Grounding Instructions).
9. Do not throw cigarettes or other burning materials into the toilet. This may create a fire hazard.
10.This product is an electrical appliance, so it must be placed far away from water. Be careful not to
drench with urine or other liquids.
11. Do not lay the product on its side or upside down while plugged in or connected to water.
12. Do not plug other electrical appliances into the same electrical socket being utilized by the product.
13. Do not use a power extension cord or an unstable loose power outlet.
14. Never connect the product to an aging or worn water supply hose. This could cause leaking, a fire or
electrical shock. Installation of the bidet seat should include specified components and a new water
supply hose.
READ ALL INSTRUCTIONS BEFORE USING
When using electrical products, especially when children are present, basic safety precautions
should always be followed, including the following:
1. The product is not to be used by persons, (including children), with reduced physical, sensory or
mental capabilities, or lack of experience and understanding, unless they are given adequate
supervision and instruction.
2. Young children should be supervised at all times and are not to play with the product.
1

Important Safety Instructions Continued...
CAUTION – Failure to follow these instructions may cause bodily injury or property damage.
Grounding Instructions
DANGER – Improper use of the grounding plug can result in a risk of electric shock.
SAVE THESE INSTRUCTIONS
This product must be grounded. In the event of an electrical short circuit, grounding reduces the risk of
electric shock by providing an escape wire for the electric current. This product is equipped with a cord
with a grounding wire and grounding plug. The plug must be plugged into an outlet that is properly
installed and grounded.
1. Do not install or use the product in wet environments such as steam rooms, wet shower rooms etc.
2. It is recommended that a water-proof electrical outlet be used, and that the outlet should be installed in a
location not exposed to spraying water or wetness.
3. This product should be used with 110V-120V,50/60Hz electrical current only, load current is at least 15A.
Power plug must be equipped with a ground fault circuit interrupter or ground fault electrical leakage protector
or a similar highly sensitive, rapid type leakage switch (Rated sensitive current under 6mA).
4. During lightning storms it is strongly recommended that the product be unplugged.
5. Do not stand on product unit, seat or seat cover.
6. Do not lean against the seat cover when using the product, to avoid damage.
7. This product is equipped with a soft-closing seat cover. Do not force the seat closed or you may
damage the hinges.
8. Use only a mild detergent and soft cloth to clean this product. Do not use paint thinner, bleach, abrasive
cleansers or hard scrubbing brushes as they will damage the product.
9. Exposure to direct sunlight for extended periods may damage or discolour the plastic.
10. Only use tap water or potable water in this product.
11. Do not connect water supply to a heated water source. Inlet water temperature should be 3~35 ℃ /
37.4~95 F
12. Ensure that the room temperature is maintained above freezing. If the room temperature is freezing
or below freezing , turn off the unit, disconnect from the water supply and empty and dry, to avoid freezing
and damage.
13. If moving the product from a cold or wet environment into normal room temperature, wait for at least 2
hours to allow any condensation to evaporate. To avoid electrical short-circuit, this product should not be
plugged in until all condensation has been allowed to dry.
14. If the product malfunctions, unplug and disconnect from the water supply immediately.
2

Leakage protection plug
Complete product
Power cord
Infrared receiver
Nozzle baffle
Nozzle
Remote control
Bumper
Lid
Components
Seat
Release button
Drying
baffle
Water supply pipe
Front cleaning
Rear cleaning
3
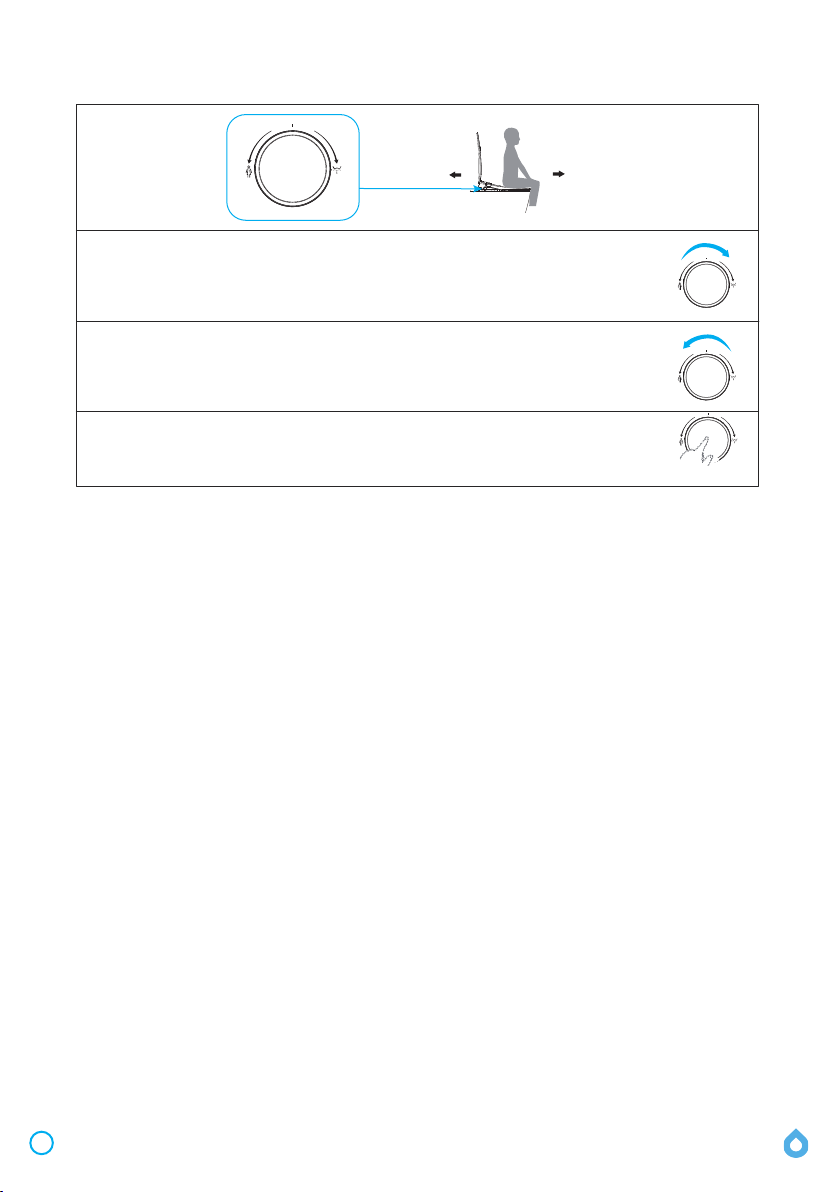
Main Unit Controller Instructions
Front Back
Rear
Cleaning
Front
Cleaning
Stop Press the controller inward, (push toward toilet bowl) to stop whatever
function is currently in progress: rear cleaning, front cleaning, drying or
nozzle cleaning function.
1. While seated, turn the controller forward to start the rear
cleaning function.
2. During rear cleaning, turn the controller forward or backward incrementally
to slightly adjust the nozzle position forward or backward.
1. While seated, turn the controller backward to start front (feminine)
cleaning function..
2. During front cleaning, turn the controller forward or backward incrementally to
slightly adjust the nozzle position forward or backward.
4

960W
1400W (120V)
Rear cleaning / oscillating cleaning, Front cleaning / oscillating cleaning
110-120V50/60Hz
Rated voltage
Rated power
Water pressure
range
The minimum necessary pressure is 0.08MPa (hydrostatic pressure),
the maximum water pressure is 0.8MPa (hydrostatic pressure)
6-level water temperature adjustment
Power Cord Length is about 1.2m
Heating power
Water
temperature
Water volume 5-level adjustment
Cleaning mode
Main Unit
Technical Specifications
50W
Anti-syphon device, Anti-backflow device, Filter device
The water temperature sensor, Anti-burning apparatus, Thermostat,
Temperature fuse, Ground fault protection, Leakage protection ,
Anti-freeze cracking device
Nozzle position
Water pressure
protector
Anti-siphon
device
Safety device
Pressure stabilizer, Automatic pressure discharging device
Cleaning
Device
200W
High temperature preventer, thermal fuse
6-level adjustment
Over 0.2m³/min
Warm dry speed
Warm dry
temperature
Heating power
Safety device
Drying
device
Automatic deodorizer, (choice of on/off)
6- level adjustment
Deodorization
Deodorization
Surface
temperature
Heating power
Quick Release, soft-close
The beeper is discontinued at night to ensure a quiet environment
Quiet setting
Heated seat Open and close
device
Prevent low
temperature burn
Safety device
Convenience
Choice of three modes: Smart, Always on, Always off
Night light
After 10 minutes of use, the seat temperature will automatically drop
slowly to a low level
Seat sensor,Temperature senor, Bimetal thermostat, Thermal fuse
Antibacterial
position Seat, Nozzle
5-level adjustment
5

What’s in the Box:
Tee - joint (1)
2. Screws (2)
Screws
1. Base plate
Base Plate
1. Remote control
2. Remote
control holder
3. Expansion
screws (2)
3. Rectangular
fixing pieces (2)
Rectangular
Fixing Plate
Expansion
screws (2)
Expansion nut
4. Expansion
nut (2)
Manual
Remote control
Remote
control
holder
Remote
control
assembly
Base plate
assembly
Filter
assembly
Mounting
Cardboard
Mounting
Cardboard
Manual
Main unit
Manual,
Mounting
Cardboard
Tee - joint
6
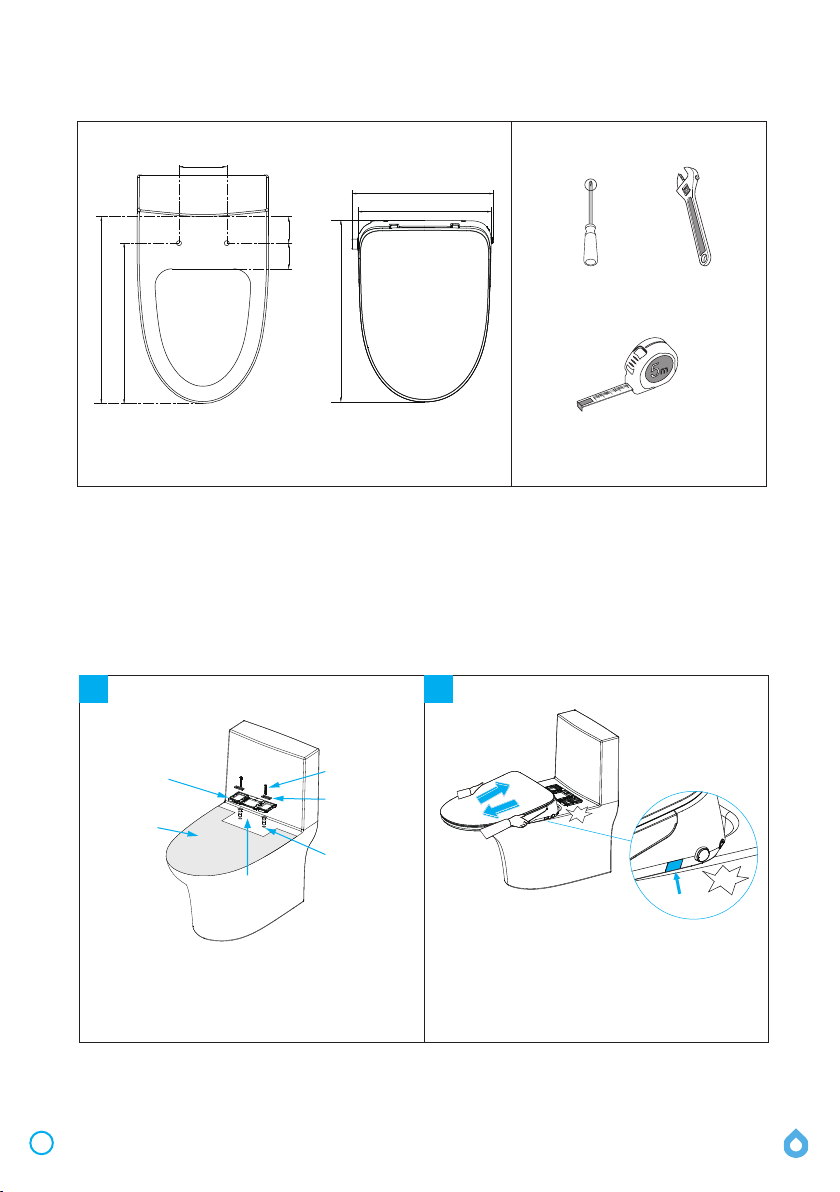
Installation of Main Unit
Product Dimensions and Installation Preparation
403mm
380mm
130-190mm
517mm
434-493mm
>490mm
>25<90
WrenchPhillips screwdriver
Tape measure
1 2
4. Screws
3. Rectangular
fixing plate
1. Expansion nut
Installation of base Installation and Removal of Main Unit
* This product has been tested for water flow before leaving the factory. There may be a small amount of
residual water in the product upon opening. This is normal and does not indicate that the product is used
or malfuntioning in any way.
* Do not install this product in a ‘wet’ bathroom, where there is no division betwen shower and toilet.
2. Install
base plate
Toilet mounting
holes
Install
mounting
cardboard
The black latch faces
forward, groove up
Place the mounting cardboard on the bowl to guide the base
plate installation. Install the expansion nuts into the toilet
mounting holes first, and then install the base plate, the
rectangular fixing plate and then attach with the screws.
Attach the base plate loosely until the final positioning of the
seat is determined, and then tighten.
Disassemble
Click
click
* Important: Please ensure that this seat will fit the toilet bowl
before proceeding with installation.
Installation of Main Unit: Align main unit to base plate and push it
into the base plate. A “click” sound means that the main unit is
installed in place. Removal of Main Unit: Press the "Quick Release
button", and pull out the main unit when a "click" sound is heard.
* Once the “Quick Release button” has been depressed, you don’t
have to continue to hold it in to remove the seat.
7
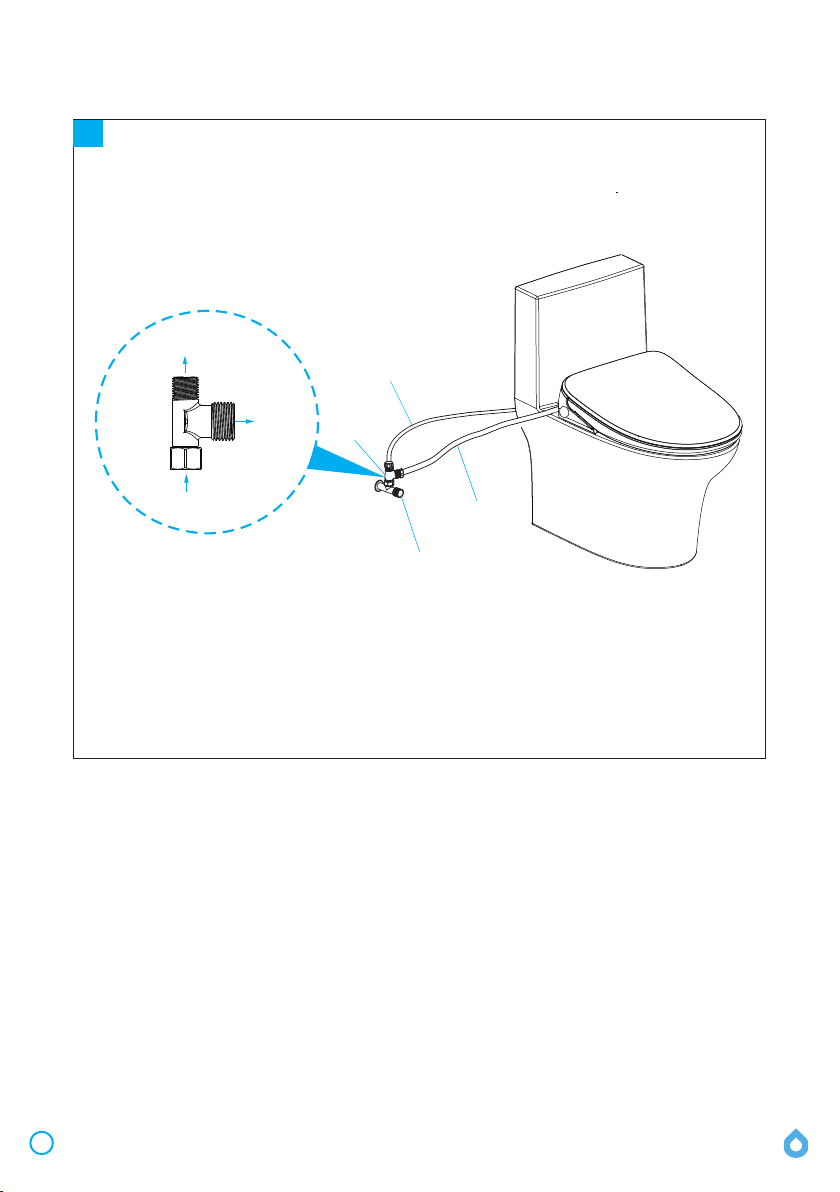
3Installation of Water inlet pipe and Tee-joint
Angle supply valve
Tee-Joint
Water inlet pipe
to main unit
Current toilet water supply pipe
Connect to the
angle supply valve
Connect to
main unit
➀Connect Tee-joint to angle supply valve; (The originalTee-joint should be removed);
➁Connect the inlet end of water supply pipe to theTee-joint as shown in the above illustration;
➂Connect main unit to Tee-joint as shown the above illustration.
Connect to toilet
water supply pipe
8
Installation of Main Unit Continued...

1. The main unit will beep once, and the controller (button) starts a self-test after the white light flashes.
2. The main unit will beep again, indicating that the self-test is completed. The controller (button) will light
up in white;
3. The function mode is then turned on and in normal use.
Preparation for Start-Up
1. Turn on the angle supply valve
3. Safety self-test
Check the tightness of the threaded connection to ensure that there is no water leakage.
Turn the angle supply valve counterclockwise to adjust the opening to the maximum.
(Tip: when the valve is opened for the first time, the angle supply valve handle will be tight.)
2. Power Connection
Insert the power line leakage protection plug into the power socket. Press the reset switch. The plug
indicator should turn on, indicating that the power is on.
Tip:
Press electric leakage test button prior to use.
The reset switch should pop up, indicating that the leakage
protection function is normal.
Angle supply valve
Electric leakage
test button
Reset switch
Indicator light
Press theTESTbutton (then the RESET button) every
month to ensure proper operation.
9
Neutral cleaner
When there is dirt or debris on the nozzle, clean as follows:
1. While seat is unused, turn the controller forward, (or press Rear Cleaning Button on the remote
control), and the nozzle rod will be extended. Manually clean with a soft cloth or soft brush.
2. Nozzle can be removed and cleaned separately. (Hold the nozzle rod in one hand and gently pull the
nozzle out with the other hand)
3. Replace the nozzle into the nozzle rod, and then press the controller, (stop button) on the main unit
or the "Stop" button on the remote control. The nozzle rod should retract back in.
Filter washer Maintenance
Tip: Do not pull the nozzle rod to prevent
damage to the nozzle rod and motor.
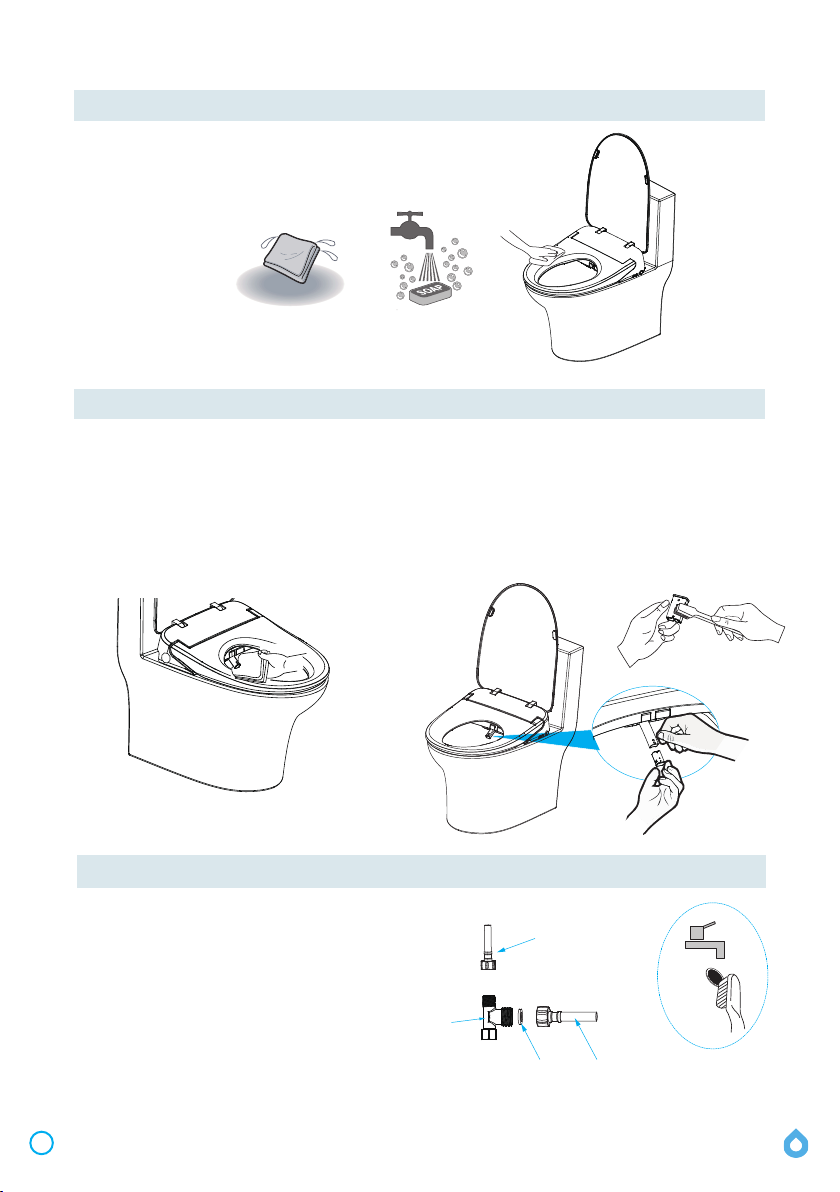
Cleaning the Main Unit
Cleaning & Maintenance
1. Turn off the power during and cleaning or maintenance of this product.
2. Wipe seat with a soft, damp cloth and mild, non abrasive detergent.
3. After wiping, please turn the power back on.
Tip: Do not rinse the surface of the product
directly with water during maintenance.
Maintenance of the Nozzle
If there is decreased water sprayer pressure,
the filter washer may need cleaning.
1. Turn off the angle supply valve.
2. Unscrew the inlet pipe connection to
the bidet seat.
3. Take out the filter washer
4. Gently brush the filter washer with a soft
toothbrush and rinse with cold water.
5. Re-install the filter washer, then re-connect
the water inlet pipe to the bidet seat. Turn the
angle supply valve back on.
3-way
connector
Filter
washer
Connect to toilet
water supply pipe
Connect to seat water
inlet pipe
10
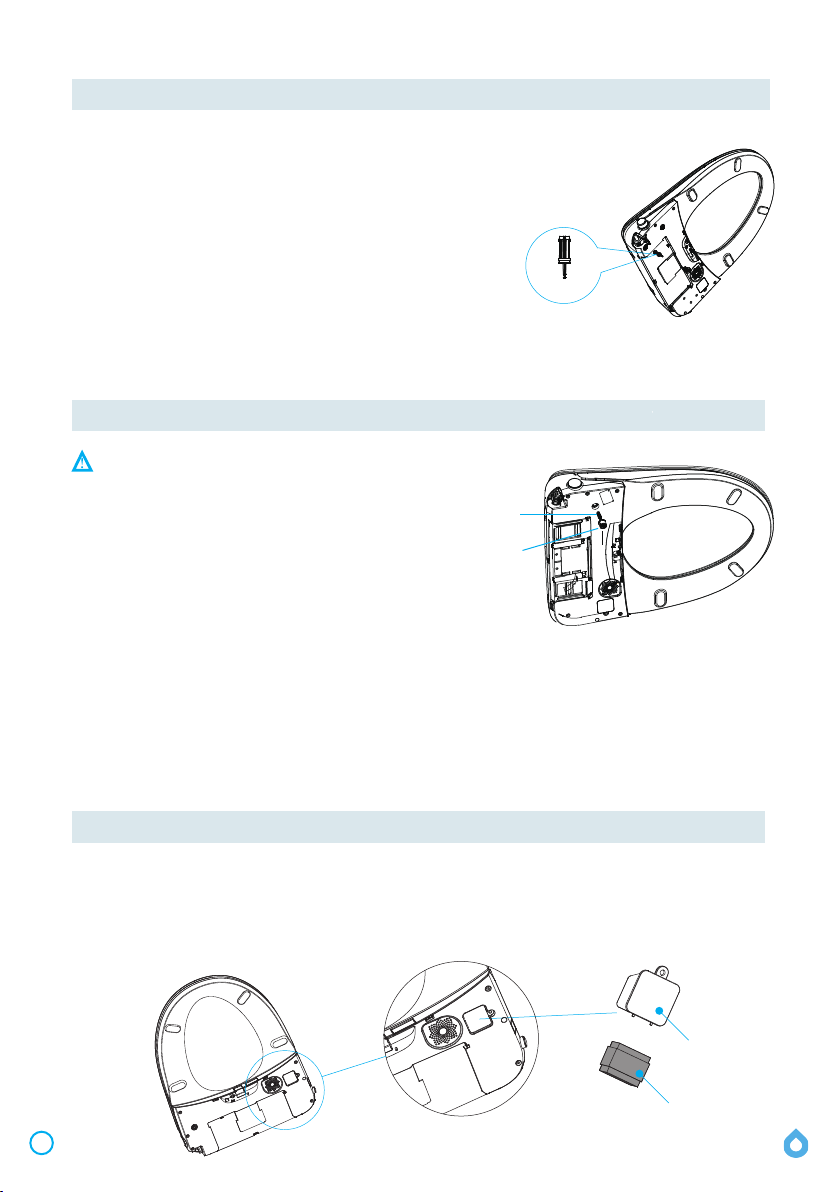
Note: Cut off power prior to discharging the water.
Self-cleaning waterway maintenance:
Self-cleaning Waterway Maintenance
If the self-cleaning waterway is blocked,
no water will come out during the
self-cleaning process.
Flow-limiting nut
Flow-limiting shaft
Deodorizer Maintenance
Unscrew the screws, take out the deodorizing cartridge, and replace the deodorizing filter.
→ It is recommended that the deodorizing filter be changed approximately every 3 years (the specific life
span depends on the environment).
→ To purchase a new deodorizing filter, please contact fluid at 1-800-460-7019
1. Turn off the angle supply valve.
2. Unplug product to cut off power
3. Remove the seat, press flow-limiting shaft in the middle with a flat head screwdriver, then reinstall
the seat, and open the inlet valve.
4. If there is still no water coming out after pressing the flow-limiting shaft, use a flat head
screwdriver to unscrew the flow-limiting nut, remove flow-limiting shaft, and clean it with a
toothbrush or small brush. After cleaning, replace flow -limiting nut and flow-limiting shaft to the
restrictor In the device, then reinstall the seat, and open the inlet valve.
Deodorizing
cartridge
Deodorizing Filter
Filter cleaning for pressure-maintaining valve
1. Turn off water at the angle supply valve.
2. Unplug product to cut off power
3. Remove the seat and unscrew the filter connector
with a screwdriver
4. Take out the filter assembly with needle nose pliers.
5. Brush the filter assembly with a toothbrush and rinse the filter
with clean water to remove sediment.
6. After cleaning, replace the filter assembly and filter connector
back to the original position and tighten with a screwdriver.
Tip: When cleaning, do not lose or damage the sealing ring on the filter
assembly and the filter connector, otherwise it will cause water leakage.
Filter
11
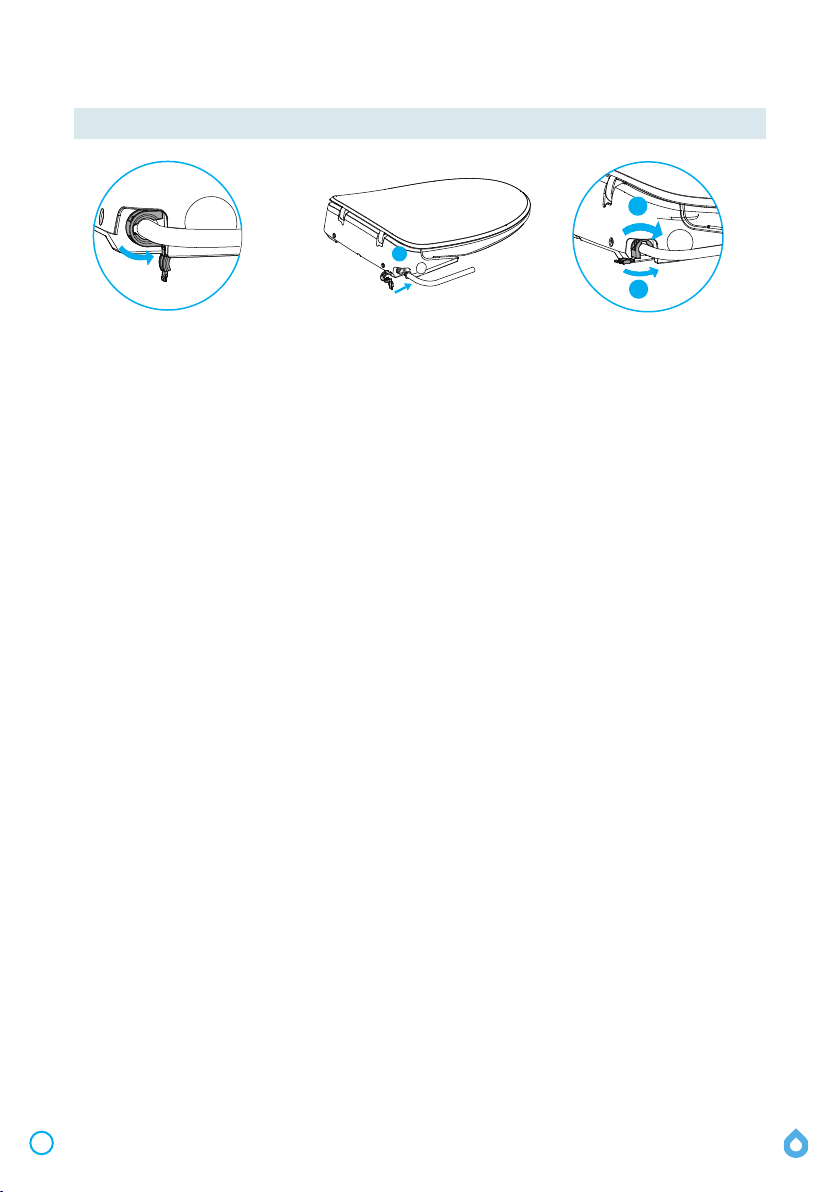
a
b
c
Removal and Installation of Clamp
Removal: Open the clamp cover,
rotate it counterclockwise, and
use a flat-head screwdriver to
carefully pry the clamp out of
the slot.
Installation: Install the
quick-released connector of the
water inlet pipe into the main unit,
and clip the clamp into the slot.
b. Rotate the clamp until the
opening faces downward.
c. Close the clamp cover.
12

Troubleshooting Guide
Issue Cause
No water
from nozzle
Water inlet hose is bent, causing
a blockage
Inlet valve is turned off
Water supply is cut off
Weak water
cleaning
Water inlet hose is bent, causing
partial blocking
Water inlet valve is not fully open
Inlet filter is blocked
Low water
temperature
The water temperature is set in
normal temperature level
Low seat
temperature
The seat temperature is set in
normal temperature level
In standby mode
Solution
Gently straighten out the water
inlet hose.
Turn on the inlet valve
Connect water supply
Gently Straighten the water
inlet valve.
Turn on the inlet valve fully
Clean the filter
Reset the water temperature
Reset the seat temperature
Switch to operating mode and use
it after 3 minutes
Low dryer
temperature
Dryer doesn’t turn on
Nozzle rod cannot
retract
Nozzle rod cannot
extend
Remote control
display is off
Malfunction of
deodorization
Caution
The dryer temperature is set in
normal temperature level
In standby mode or power
saving mode
Power off
Dirt or debris impedes movement
Power off
Person is not sitting in sensing area
Remote control batteries are dead
or installed incorrectly.
Person is not sitting in the
sensing area
Deodorizer function
keeps working after user
leaves
If the above problems aren’t corrected by the trouble shooting suggestions, please turn off the unit and disconnect
from water supply.
If the power leakage protection switch continously trips, it means that the
product is leaking. Please turn off the power, and contact fluid
at 1-800-460-7019.
Note: it is normal that a new machine or a machine unused for a long time may produce an odour during drying
function. This is normal and will stop after usage.
It's a normal for the deodorizer
function to continue working
after the user leaves to
ensure complete odour elimination
Sit squarely on the seat
Replace or reload the batteries
Sit squarely on the seat
Turn the power on
Clean the nozzle and nozzle rod
Gently push back the nozzle rod
and turn the power on
Shift to operating mode to use
the dryer function
Reset the dryer temperature
13
Deodorizer function is turned off Turn deodorizer function on

Product Limited Warranty
14
2 Year Warranty
April 2022
fluid™ warrants its BID1000W to be free from manufacturing defects in material and
workmanship for two years from purchase. This warranty applies only to original
installation locations. If a defect is found in normal residential use, fluid™ will, at its election,
repair, provide a replacement part or product, or make the appropriate adjustment.
fluid™ reserves the right to examine the product in question and its installation prior to
replacement. This may require submission of digital photographs or video to demonstrate
the issue. This warranty is limited to replacement of defective parts only. Damage to a
product caused by accident, improper installation, misuse or abuse, improper care of
finishes, hard water or mineral deposits, potassium or salt-based water softener systems
or exposure to corrosive materials is not covered by this warranty. Improper care and
cleaning will void the warranty**. Dated proof of purchase must accompany all warranty
claims. This warranty applies only to fluid™ bidet seats installed in the United States of
America, Canada or Mexico (North America).
fluid™ recommends using a certified plumber for bidet installations and repair. Incidental
and consequential damages, labor charges, repair or replacement costs are expressly
excluded. In no event shall the liability of fluid™ exceed the purchase price of the bidet seat.
Some states and provinces do not allow the exclusion or limitation of incidental or
consequential damages, so the above limitation may not apply to you. This warranty gives
you specific legal rights which vary from state/province to state/province. If you find any
such problem with your product, please immediately contact your nearest fluid™ dealer or
sales representative.
** Never use cleaners containing abrasive cleansers, ammonia, bleach, acids, waxes, alcohol,
solvents or other products not recommended for surface finish. This will void the warranty.
1 Year Limited Warranty on all Commercial, Industrial and Business use.
Questions? +1 800 460 7019 or [email protected]
Other manuals for BID1000W
2
Table of contents
Popular Bathroom Fixture manuals by other brands

aquabrass
aquabrass Xround X75N83 installation guide

JSG Oceana
JSG Oceana 007-307 Series quick guide

Unique Automation
Unique Automation Bathomatic Basic installation guide

Grohe
Grohe BAUEDGE 20 290 quick start guide

VIGO
VIGO VG030002 installation manual

Hans Grohe
Hans Grohe Raindance Select S 150 28587 Series Assembly instructions


newform
newform 682 instructions

Spectrum Brands
Spectrum Brands Pfister Tenet R89-1TNT Maintenance & Care Guide

rba
rba RBA4157-777-005 Installation, operation and maintenance instructions

Uberhaus
Uberhaus 80465028 Operator's manual

Pipishell
Pipishell PIBTC03 instruction manual

KWC
KWC RODAN RODX619 Installation and operating instructions