Fluid Mosquito User manual

Mosquito User Manual
Read this manual carefully
BEFORE operating your scooter!

2
Congratulations on your new fluid Mosquito Electric
Scooter! And thank you for purchasing it at
fluidfreeride.com or at one of our retail partners.
Follow us on Instagram and
tag us to be featured on our page!
@fluidfreeride
3
DO NOT RETURN TO PLACE OF PURCHASE
Please contact us at
fluidfreeride.com/contact for any
assistance.
Check out our support library at
support.fluidfreeride.com for
common concerns.
PLEASE REGISTER YOUR SCOOTER
Get 12 months Warranty and
Lifetime Service from fluidfreeride
after registering your scooter. Scan
the QR code or head over to
fluidfreeride.com/register.

4
BEFORE YOU START
It is important to read through, understand, and adhere to all instructions
and safety warnings before charging and operating this scooter.
Upon receiving and opening your box, please inspect the contents for signs
of damage or loose screws from transport. If something doesn’t look or
feel right, please take a few pictures and contact your place of purchase
immediately.
YOUR SCOOTER COMES WITH A LIMITED WARRANTY AGAINST
MANUFACTURING DEFECTS AS DESCRIBED AT fluidfreeride.com/warranty.
THIS LIMITED WARRANTY IS AVAILABLE TO THE ORIGINAL PURCHASER ONLY
AND CERTAIN ACTIONS OR OMISSIONS MAY VOID THE LIMITED WARRANTY.
IN CASE OF ANY ISSUES EXCEPT FROM THE LIMITED WARRANTY, THERE ARE
NO OTHER WARRANTIES, WHETHER EXPRESS OR IMPLIED, INCLUDING
WARRANTIES OF FITNESS FOR A PARTICULAR PURPOSE, TITLE,
MERCHANTABILITY OR NON-INFRINGEMENT, AND ALL OTHER WARRANTIES
ARE EXPRESSLY DISCLAIMED.
Make sure you understand and adhere to all local laws, rules, ordinances,
and regulations applicable to riding scooters. Riding an electric scooter
comes with inherent risks and hazards. To minimize the risk of falling,
being injured, or injuring others, make sure you understand how to safely
operate and control this scooter. ALWAYS USE GOOD JUDGEMENT,
COMMON SENSE AND PROTECTIVE GEAR.
LEITMOTIF SERVICES LLC (the operator of fluidfreeride.com), or any of its
retail partners or affiliates (collectively, “Leitmotif Parties”) shall not be
liable for any financial losses, physical injuries or deaths, accidents,
disputes, or other claims related to the purchase or operation of this
scooter. TO THE MAXIMUM EXTENT PERMITTED BY LAW (i) NO LEITMOTIF
PARTIES WILL BE LIABLE FOR ANY SPECIAL, EXEMPLARY, PUNITIVE,
INDIRECT, CONSEQUENTIAL, OR INCIDENTAL DAMAGES (INCLUDING LOSS
OF USE, REVENUE, PROFIT, BUSINESS OPPORTUNITY OR GOODWILL)
CAUSED BY THE USE OR MISUSE OF OUR PRODUCTS. THE USER AGREES TO
ACCEPT FULL RESPONSIBILITY FOR ALL SUCH RISKS AND TO RELEASE
LEITMOTIF SERVICES PARTIES THEREFROM; AND (ii) THE LEITMOTIF
PARTIES’ MAXIMUM LIABILITY FOR DAMAGES SHALL NOT EXCEED THE
PURCHASE PRICE PAID FOR THE SCOOTER.

5
TABLE OF CONTENTS
BEFORE YOU START 4
TABLE OF CONTENTS 5
IMPORTANT SAFETY WARNINGS 6
SAFETY CHECKLIST 7
MOSQUITO OVERVIEW 8
What’s in the Box 8
Technical Specifications 8
Key Components 9
UNFOLDING & FOLDING 10
Unfolding 10
Folding 11
OPERATION AND RIDING 12
Basic Controls 12
Riding 13
Braking 13
Speed Limit Setting 14
Advanced Settings 14
Battery Charge Indicator 15
CHARGING AND BATTERY SAFETY 16
Charging the fluid Mosquito 16
Battery Maintenance and Storage 16
Battery Disposal 17
Charging and Battery Safety Warnings 17
SCOOTER MAINTENANCE & TRANSPORT 19
DECLARATION OF CONFORMITY 20

6
IMPORTANT SAFETY WARNINGS
• Always wear a helmet and protective safety equipment. Wear closed
shoes without heels and ensure your laces are tied.
• Do not ride with more than one rider or exceed the weight limit of
120kg/265lbs in any other way.
• Keep the scooter away from children. It is not a toy. 16+ riders only.
• Check your scooter for any loose parts or screws, signs of damage or
excessive wear before every ride. Stop operation immediately and
contact fluidfreeride if something does not feel or look right.
• Always slow down when riding over bumps or on rough or wet road
conditions.
• Only use your scooter in line with its intended purpose.
• Do not use your electric scooter in heavy rain, on surfaces covered by
more than ½ inch of water. Do not submerge the scooter in liquid or let
any liquid near the battery or electrical components.
• Do not lend your scooter to anybody unfamiliar with its operation.
Ensure any new riders are familiar with the instructions and warnings in
this manual and are wearing proper safety gear.
• Ride your scooter in smooth and flat grounds only. No off-roading.
• Do not use the scooter on excessive slopes >15%.
• The scooter may slip on slippery surfaces leading to subsequent injuries
to the rider. Pay special attention crossing train tracks and when it is
wet.
• You must follow all local traffic rules and regulations.
• Once riding in public space, you are subject to the risks faced by all
traffic participants just like when you're riding a bike. Other traffic
participants may not obey traffic regulations or ride carelessly.
• Always use caution, adapt your speed to road/traffic conditions and
keep distance from other traffic participants.
• Watch out for pedestrians. Do not use your scooter in any way that
could harm pedestrians. Slow down when you are passing them to avoid
accidents.
• The scooter is not intended for use at elevations greater than 6,500 ft
(2,000m) above sea level.

7
SAFETY CHECKLIST
General
• Your scooter should feel stable without much play or wobble.
• If something does not feel or look right, please contact
fluidfreeride.
Wheels
• Check the main lateral wheel nuts for firmness regularly and after
your first 50 miles of riding. Re-tighten if necessary.
Throttle
• Before riding, check if the throttle sits firmly on the handlebar and
is returning to its original position when released.
Brakes
• Check the rear drum brake for proper tension and effectiveness
regularly and prior to using the scooter for the first time.
Folding mechanism
• Check that the folding mechanism is locked into place and secured
with the safety lever.
• Check that the height adjustment knob, the handle grip folding
mechanism, and the quick release lever are in properly secured
position.
CAUTION
Wear protective gear like helmet, gloves,
knee, and elbow pads at all times during use.
8
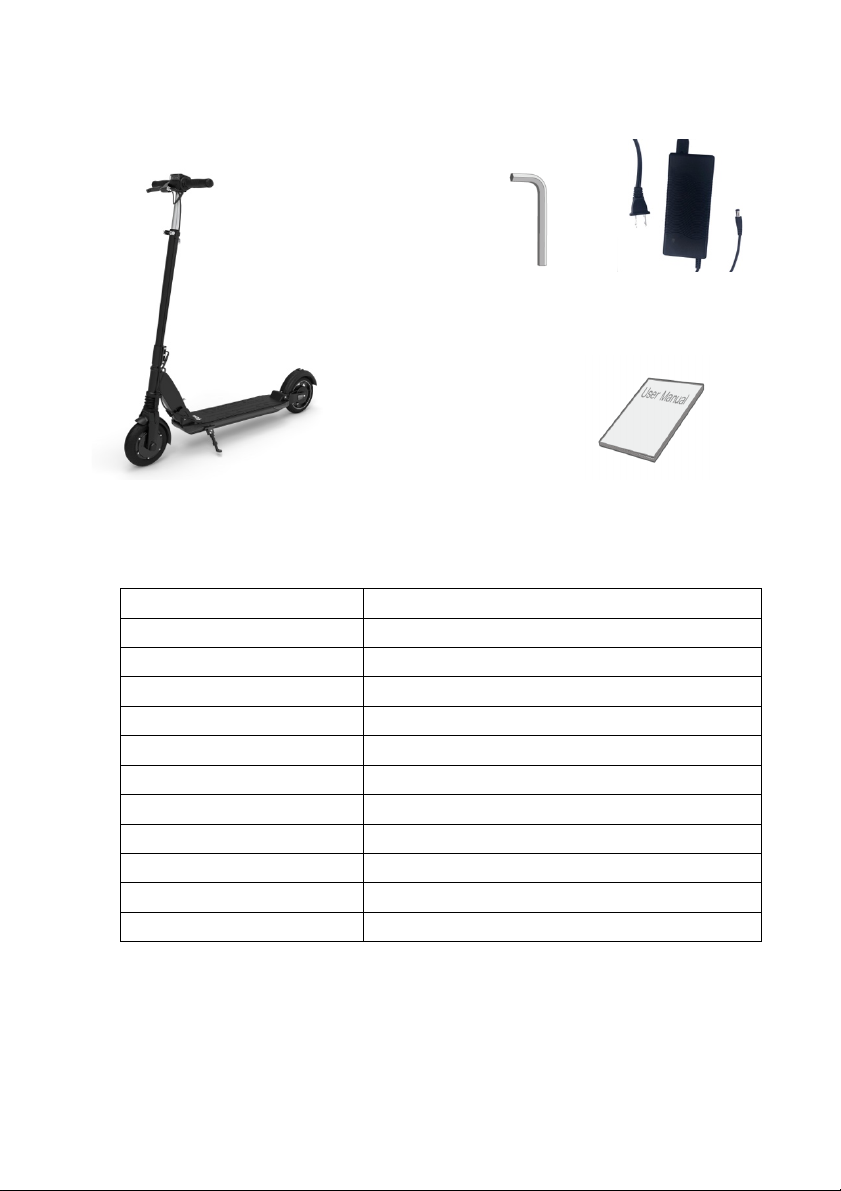
MOSQUITO OVERVIEW
What’s in the Box
Tools UL charger
fluid Mosquito
Technical Specifications
Motor
Brushless DC - 500W nominal / 700W peak
Battery
48V 9.6Ah Li-Ion
Top speed
25+ mph
Range
22 miles (165 lb rider, 15mph constant speed)
Brakes
rear drum + rear foot + regen throttle brake
Tire Size
8” x 2” (Solid)
Waterproof rating
IP x4
Scooter Weight
29 lbs
Weight Limit
265 lbs
Charger input/output
110-220V / DC 54.6V-2A
Dimensions – Opened
42.3x 15.0 x 44.6 inches
Dimensions – Folded
13.0 x 6.0 x 41.7 inches
Manual

9
Key Components
Electric
Brake
Taillight
Mud Guard +
Rear Step On
Brake
Board with Silicone
Cover (battery inside)
Rear Drum
Brake
Kick Stand
Rear Suspension
(under board)
Folding
Mechanism
Charging Port
Front Motor +
Solid Tire
Front
Suspension
Rear Drum
Brake Lever
Handle Grip
Throttle
Folding Hook to clamp into rear
mudguard for carrying your scooter
OK to hang a light bag while riding
Handle Grip
Headlight
(front facing)
Display
Control Buttons
Neck (controller
inside)
Quick Release for adjusting
handlebar height
Folding Button
to collapse
Handle
10
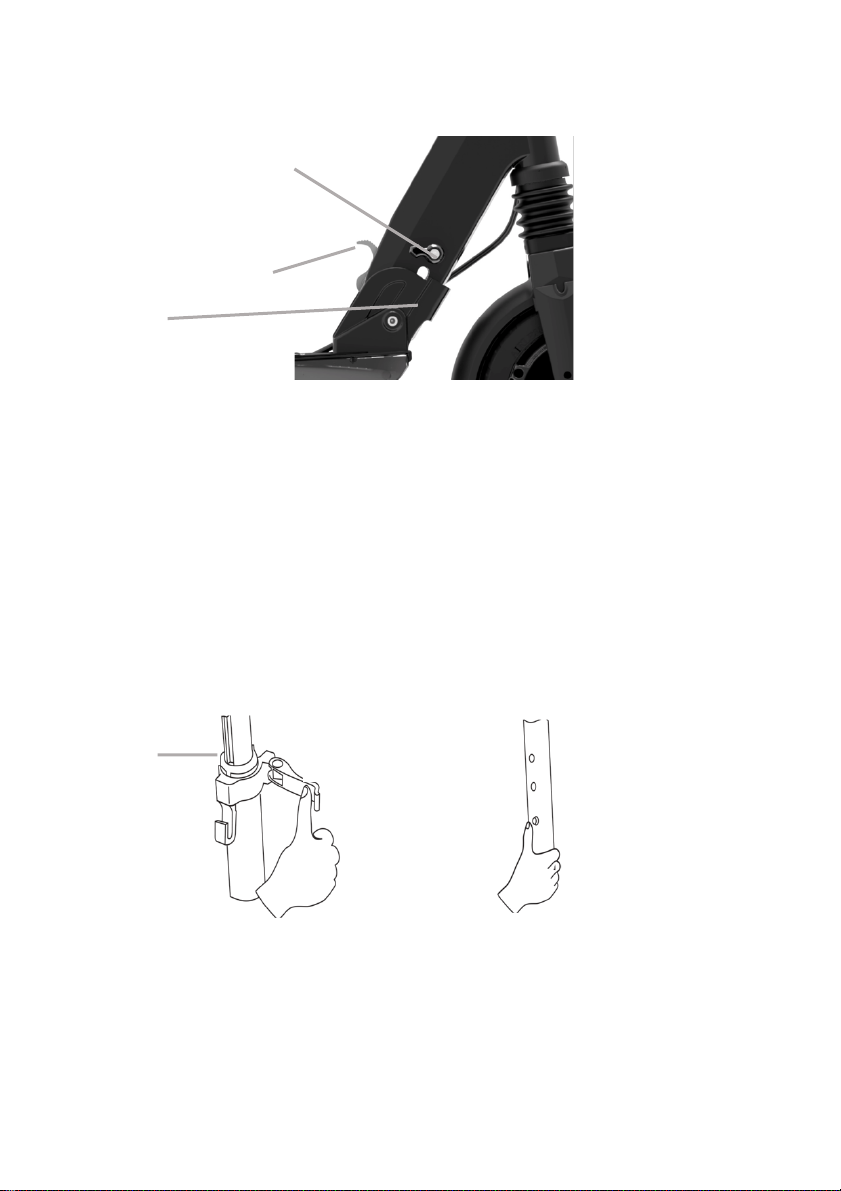
UNFOLDING & FOLDING
Unfolding
1. Press the rear mud guard to release the hook and move the stem
upward into riding position.
2. You should hear a click when the bolt snaps into place.
3. Pull the safety lever outward and move it over the bolt so that the
scooter cannot fold when accidentally pushing the folding lever.
4. Open the Quick Release Lever below the handlebar and pull the
handlebar upwards. It will lock into the first height setting.
5. To increase handlebar height, press in the height button and move
the handlebar higher.
6. Close the quick release lever and ensure it sits tight. Adjust tightness
with the quick release screw if necessary.
7. Move the handle grips into upward position. They will snap into place.
Folding Lever
Safety Lever
(shown in open
position
Bolt
(behind cover)
Quick Release Lever
Height Button to
adjust handlebar
height
Quick
Release
Screw
Quick Release Lever

11
Folding
1. Start with lowering the handlebar height to a minimum. Open the
quick release lever, then press the height button while pushing the
handlebar downward.
2. Press the buttons on the handle grips, move the grips outward and
fold grips downwards.
(Steps 1 & 2 are optional and can be omitted for fast folding)
3. Open the safety lever next to the main folding lever (pull outwards
and move so it is pointing towards the deck.
4. Press the main folding lever with your foot while slightly pushing the
front stem forward to alleviate pressure on the folding mechanism.
5. Move the front stem downwards and latch the folding hook into the
rear mudguard.
You can now pick up the scooter and carry
it in one hand.
We recommend the handle strap
accessory that will facilitate carrying
the scooter in one hand as it is
positioned to perfectly balance the
weight of your scooter.
2 - Fold Handlebar
4 - Fold Scooter
12
OPERATION AND RIDING
*Controller temperature may show lower than rom temperature when turning your scooter,
it will show accurate temperature once riding your scooter.
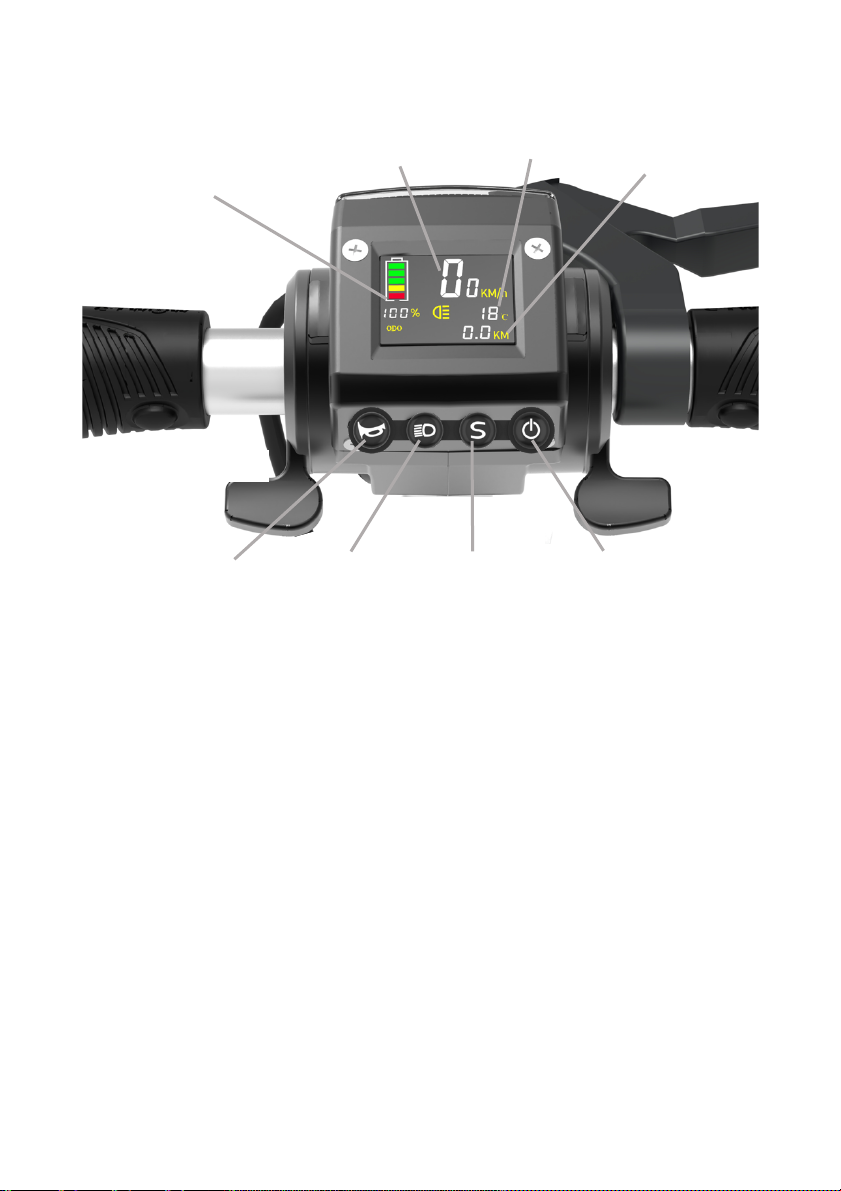
Basic Controls
Press the power button for 3 seconds, the scooter will turn on and the
display lights up. While the display is starting up, you will see current
battery voltage displayed in the bottom right corner.
Press the power button again for 3 seconds to turn off your scooter.
Press the horn button to sound a horn sound while the scooter is turned
on. Hold the button to sound multiple horn sounds.
Press the light button to turn on the head- and taillights. If lights are off,
the taillight will only light up when the brake is activated.
Press the settings button to toggle between TRIP mileage and total
ODOmeter mileage. The trip mileage resets to zero with each power off.
Battery Charge Indicator
Speed Indicator
Controller
Temperature*
Odometer or
Trip Mileage
Electric Brake Lever
Throttle Lever
Horn Button Light Button Settings Button Power Button

13
Riding
Before using your scooter, make sure to visually inspect it for any signs of
damage or loose parts or screws. Every scooter is individually tested before
shipping from the factory, but we recognize that it has travelled far and in
rare cases, it can get damaged during transport. If something does not feel
or look right, reach out to fluidfreeride.
Always wear protective gear such as helmet, knee and elbow pads.
Start slowly to familiarize yourself with the behavior of your scooter. Press
the throttle gently for a slow take off. Always slow down when riding over
bumps or on rough or wet road conditions. The faster you ride your
scooter, the longer it will take you to stop.
• Ensure you have sufficient runway ahead of you. Do not use the
scooter indoors.
• Put both of your hands on the handlebar.
• Step with one foot on the scooter, kick it lightly with your other foot to
bring it slightly in motion.
• Step with your second foot onto the board, hold on tight and push the
accelerator gently.
Braking
Your scooter is equipped with an electric brake, a rear drum brake and a
rear step on brake. It is up to you which one you prefer using.
To slow down during normal operations, release the throttle and press the
electric brake lever lightly. The more you press this lever, the harder you
will brake. The slower you are, the more responsive the electric brake will
be. At higher speeds, this brake is less effective.
The drum brake is operated by pulling front brake lever while the rear step
on brake is operated with your foot, simply stepping onto the mudguard,
and pushing it down towards the rear tire.
At higher speeds, and in emergency brake situations we recommend you
press both the electric brake lever, and you pull the drum brake lever.
The scooter is also equipped with a regenerative braking system.
Whenever you use the electric brake lever, the controller will use the

14
electric front motor to brake which at the same time recovers energy to
charge your battery and extend your range.
Speed Limit Setting
Your scooter is equipped with 5 speed modes that can be set depending on
your desired speed limit. L4 is set by default.
1. Turn the scooter off. Press the electric brake lever and hold during
the entire operation.
2. Turn the scooter on. The display will show “SET” and L1,2,3,4, or 5.
3. Press the settings button to switch between the different speed
limit levels:
L1 = 5mph, L2 = 10mph, L3 = 16mph, L4 = 24 mph, L5 = no limit
4. Release the brake lever to complete operation.
Advanced Settings
Your scooter allows for advanced settings. Experienced riders only!
To configure advanced settings, follow these steps:
1. Turn the scooter on. Press the electric brake lever and hold during
the entire operation.
2. Press the power button. P0 will show in the display
3. Press the light or settings button to cycle through the P-setting
functions.
4. To select a P-setting for configuration, press the power button until
you hear a beep.
5. Change the P-setting with the light or settings button.
6. To save your setting, release the electric brake lever.
P0 – Non-Zero Start (turned ON by default – P0 = 1):
If it is turned ON, you must bring the scooter into motion before the
throttle will work. If turned OFF, you can start the scooter from “zero”,
without being in motion.
WARNING: Non-Zero Start turned ON is an important safety function so
you do not accidentally hit the throttle while you are not riding. Turn
this off at your own risk.
P1 – EBS (set to P1=5 by default):

15
This setting sets the intensity of the electric brake. You can choose from
0 (lowest electric braking strength) to 5 (highest electric braking
strength).
P2 – Motor Lock (off by default – P2=0):
Turn this on if you would like to lock the front motor so that you cannot
move or operate the scooter without picking it up.
P3 – Cruise Control (off by default – P3 =0):
If turned on, once you maintain a speed for 5 seconds, your scooter will
automatically hold this speed, even if you let go of the throttle. You can
easily deactivate the cruise control speed by pressing the throttle or the
electric brake lever.
WARNING: Only use cruise control once you are fully mastering riding
the scooter. It can be surprising if the scooter does not slow down
when you release the throttle.
Switch from miles to kilometers
By default, the scooter is set to show miles and Fahrenheit. You can
switch the display to kilometers and Celsius instead: Turn the scooter on,
Press and hold the electric brake lever, then press the settings button.
Release the brake lever.
Battery Charge Indicator
There are five battery bars and a charge percentage on the display. As the
battery is drained, the bars will diminish, and the percentage value will
reduce. Keep an eye on your charge to ensure you do not get stranded.
Note that if you request a lot of power (e.g. by riding uphill), the battery
charge indicator may fluctuate downwards due to temporary voltage
reduction when the motor needs more power.
When you turn on the scooter you will see the current battery voltage
displayed in the lower right corner of the display. A fully charged battery
shows >54V.

16
CHARGING AND BATTERY SAFETY
Charging the fluid Mosquito
Charge your scooter before its first use.
1. Turn your scooter off
2. Connect the charger to the wall power outlet
3. Locate the charging port
4. Open the charging port cover
5. Connect the charger to the scooter.
The LED on the charger will turn red while charging and turn green when
the scooter is ready for use. Remove the charger and cover the charging
port. Charging time with the included charger will be around 5 hours when
the scooter is empty.
Battery Maintenance and Storage
• We recommend charging your scooter after every use. This is not
required.
• A lithium-ion battery is a consumable device. Please replace it with a
new battery once capacity drops below 50% of what you experienced
initially. Contact fluidfreeride for a replacement.
• Make sure the battery is charged and that the scooter is turned off
before storing your scooter for extended periods at a time.
• Store your scooter indoors in a dry and cool place over 32°F (0°C) and
under 104°F (40°C). Do not keep it outdoors or in outdoor sheds for
extended periods of time as excessive cold, heat, sunlight, rain, or
other environmental conditions may damage the enclosure materials,
impact safe operation, and reduce the scooter’s lifespan.
• Charge your battery at minimum every 3 months to prevent it from
running completely empty. Once the battery runs completely empty
due to slow discharge while in storage, it may have to be replaced.
• Batteries perform poorly at low temperatures. For instance, if the
temperature is around 0°F (-18°C), battery capacity reduces by 50%.
Capacity will restore to normal when temperatures rise.

17
• Battery life and riding ranges will vary depending on usage, climate,
conditions, rider weight, and/or riding style, proper care, and
maintenance.
Battery Disposal
• Do not dispose of your battery by way of landfilling, incineration, or
household trash.
• We recommend disposing through a local recycling program suitable
for lithium-ion batteries. Contact your local waste management
service for more information.
• Mishandling of used batteries may do tremendous harm to the
environment. You must abide by local laws and regulations to
properly dispose of used batteries and assume all liabilities resulting
therefrom.
Charging and Battery Safety Warnings
• Use caution when using outlets to prevent electric shock.
• Do not leave the charger plugged in for extended periods (>24 hours).
• Only charge your scooter in a safe, clean, and dry environment. Keep
the charger and scooter away from inflammable materials as they may
get hot.
• Only use the original battery packs and the original charger supplied
with your electric scooter. Contact fluidfreeride if you need a
replacement. Use of other models or brands may not be safe and is
not recommended.
• Do not touch any part of the charging prongs and keep them away
from metal objects to prevent short circuit which may result in battery
damage or physical injuries and death.
• Do not place the battery in direct contact with heat or near high
temperatures. Do not expose the battery to direct sunlight. Do not
leave the scooter in a car where the battery might get hot.
• Do not pierce the battery with sharp objects. Do not subject it to
impact or force.

18
• Stop charging if the battery fails to recharge within the approximate
charging time. This will prevent the battery from overheating,
rupturing, or igniting.
• Do not charge the battery in temperatures below 32°F (0°C) or above
104°F (40°C) as this can hamper performance, result in breaking,
overheating, rupturing, or igniting and could cause personal injury or
property damage.
• Do not charge your scooter if the charging port on the scooter is
damaged or wet. Do not charge if there is excessive heat, odor or
leakage coming from the battery or it looks abnormal in any way.
• If the battery leaks and you accidentally get in touch with the liquid,
rinse thoroughly with water and then seek medical care.
• Never attempt to disassemble, modify, or perform repairs or
maintenance on the battery. You run the risk of damaging the
protective and safety components that prevent incidents, personal
injury, or property damage. Professionals only!
• Mishandling or misuse of the battery can result in lower performance,
shorter lifespan, rupturing, igniting, or other incidents and could
increase the risk of serious personal injury.
• Do not discharge the battery using any other product than the scooter
it comes with. Doing so could result in damage to the other product or
the battery and reduced lifespan. The battery could overheat, rupture,
or ignite and cause personal injury or property damage.

19
SCOOTER MAINTENANCE & TRANSPORT
• The Mosquito is essentially maintenance free. Apart from monitoring.
tire and brake wear, and occasional re-greasing of moving parts, you
should be good to go.
• Once the tire is significantly worn or the brakes loose tension, contact
fluidfreeride.
• Every few hundred miles, or when you hear squeaking, use a silicone
based grease spray to lightly lubricate moving parts (see images below)
• Never perform maintenance on this product while the unit is powered
on or charging. Always power off before performing maintenance.
• Unless otherwise provided or instructed, do not attempt to perform
repairs, or modify the scooter but contact your place of purchase or
refer to a professional repair facility. You understand and agree that
any repairs, modifications, or maintenance which you perform or have
performed are at your sole and exclusive risk.
• Clean stains on your scooter’s body with a damp cloth. Do not use
alcohol, gasoline, kerosene or other corrosive and volatile chemicals. Do
not wash with high pressure cleaners. Make sure the scooter is turned
off and unplugged during cleaning and ensure no moisture enters the
charging port.
• When transporting your scooter, please consider that it contains
lithium-ion batteries that are considered a hazardous material.
• Always exercise caution and follow applicable rules and regulations
when transporting your scooter. It is very likely that you will not be
allowed to take your scooter including battery on a plane.
Please contact us at fluidfreeride.com/contact for any
assistance with maintenance.

20
DECLARATION OF CONFORMITY
This product complies with Part 15 of the FCC Rules. Operation is subject to
the following two conditions:
(1) This product may not cause harmful interference, and (2) this product
must accept any interference received, including interference that may
cause undesired operation.
FCC RELATED INFORMATION:
This product has been tested and found to comply with the limits for a
Class B digital product, pursuant to Part 15 of the FCC Rules. These limits
are designed to provide reasonable protection against harmful
interference in a residential installation. This product generates, uses, and
can radiate radio frequency energy and, if not installed and used in
accordance with the instructions, may cause harmful interference to radio
communications. However, there is no guarantee that interference will not
occur in a particular installation. If this product does cause harmful
interference to radio or television reception, which can be determined by
turning the product off and on, the user is encouraged to try to correct the
interference by one or more of the following measures:
• Reorient or relocate the receiving antenna.
• Increase the separation between the product and receiver.
• Connect the product into an outlet on a circuit different from that to
which the receiver is connected.
• Consult your place of purchase or an experienced radio/TV technician
for assistance.
NOTE: INFORMATION, SPECIFICATIONS, WARNINGS AND ALL OTHER
DETAILS INCLUDED IN THIS MANUAL ARE SUBJECT TO CHANGE AT ANY
TIME, WITHOUT PRIOR WRITTEN NOTICE.
This manual suits for next models
1
Table of contents
Other Fluid Scooter manuals


