Fluid Kaabo Wolf Warrior 11 User manual
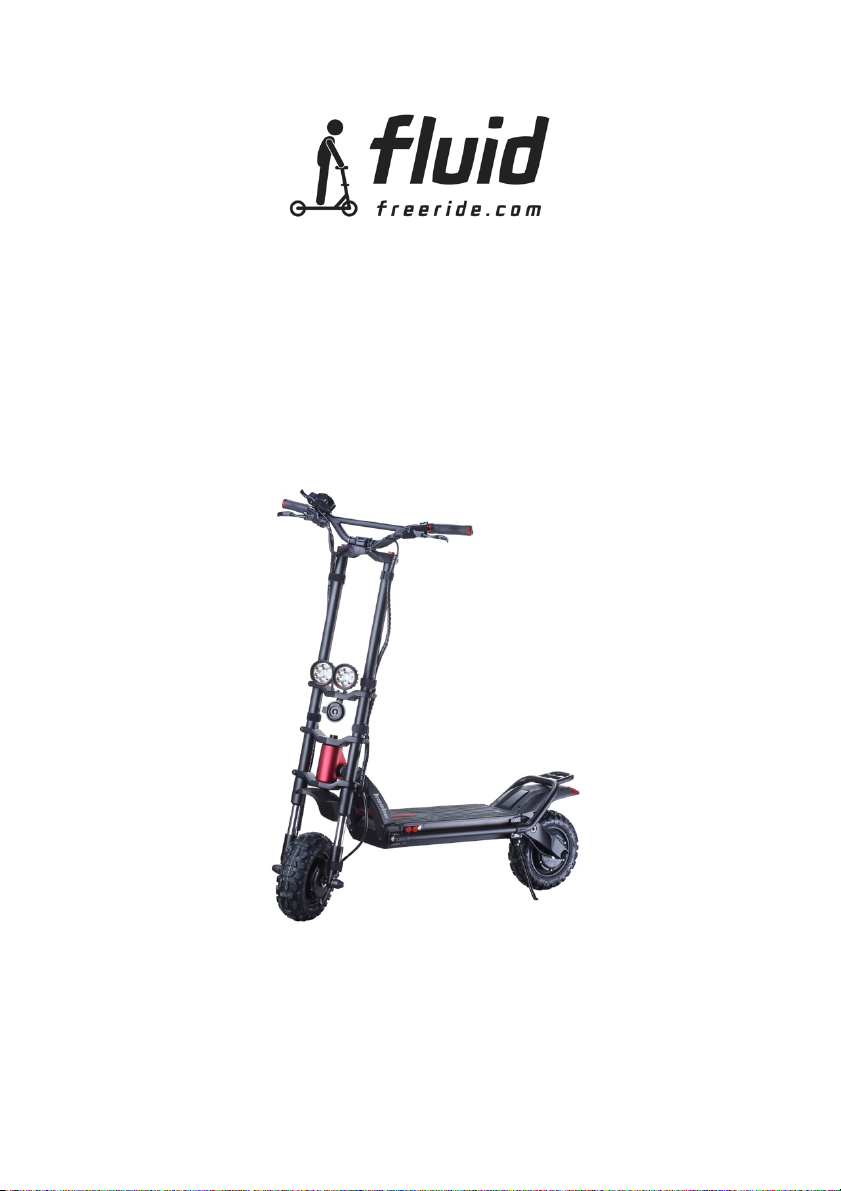
Kaabo Wolf Warrior 11
Electric Scooter
User Manual
Read this manual carefully
BEFORE operating your scooter!

2
Congratulations on your new Kaabo Wolf Warrior electric
scooter and thank you for purchasing it at
fluidfreeride.com or at one of our retail partners.
Follow us on Instagram and
tag us to be featured on our page!
@fluidfreeride
Check out our support library at
support.fluidfreeride.com

3
BEFORE YOU START
It is important to read through, understand, and adhere to all instructions
and safety warnings before charging and operating this scooter.
Upon receiving and opening your box, please inspect the contents for signs
of damage or loose screws from transport. If something doesn’t feel right,
please take a few pictures and contact your place of purchase immediately.
Your scooter comes with a 180-day limited warranty against manufacturing
defects. In case of any issues beyond this time frame we will still help you
out but may decide to charge a fee for spare parts or repairs.
If you have purchased your scooter from a dealer other than
fluidfreeride.com, please contact them first in case of any issues. If you still
need help or you have purchased directly from fluidfreeride.com, please
feel free to contact us with any questions or concerns.
Make sure you understand and adhere to local rules and regulations for
riding electric scooters. Riding an electric scooter comes with inherent risks
and hazards. To minimize risk of falling or being injured, make sure you
understand how to safely operate and control this scooter.
Always use good judgement, common sense and protective gear.
LEITMOTIF SERVICES LLC (the operator of fluidfreeride.com), Kaabo (the
manufacturer) or any of our retail partners cannot be held liable for any
financial losses, physical injuries, accidents, death, legal disputes and other
interest conflicts resulting from the purchase or operation of this electric
scooter.

4
TABLE OF CONTENTS
BEFORE YOU START 3
TABLE OF CONTENTS 4
GENERAL SAFETY WARNINGS 5
WOLF OVERVIEW 6
What’s in the Box 6
Technical Specifications 6
Key Components 7
CHARGING AND BATTERY SAFETY 7
Charging the Wolf 7
Battery Maintenance 8
Battery Disposal 8
Charging and Battery Safety Warnings 9
SET UP, UNFOLDING & FOLDING 11
Folding Mechanism Introduction 11
Unboxing and Set up 11
Unfolding and Folding 12
OPERATION 13
Driving Mode Selection 13
Display Settings 13
Riding 15
Braking 16
BATTERY VOLTAGE AND CHARGING STATUS 16
SCOOTER MAINTENANCE & TRANSPORT 18
Disc Brake Maintenance 18
DECLARATION OF CONFORMITY 20

5
GENERAL SAFETY WARNINGS
• Always wear a helmet and protective safety equipment.
• Wear closed shoes without heels and ensure your laces are tied.
• Do not ride with more than one rider or exceed the weight limit of
150kg/330lbs in any other way.
• Only use your scooter in line with its intended purpose.
• Check your scooter for any loose parts or screws, flat tires, signs of
damage or excessive wear before every ride. Stop operation immediately
and contact your place of purchase if something does not feel right.
• Start riding slowly to familiarize yourself with the behavior of your
scooter. Start in first gear and slowly try out the brakes. Always slow
down when riding over bumps or on rough road conditions.
• Keep the scooter away from children. It is not a toy. Adult riders only.
• Do not use your electric scooter in heavy rain, on surfaces covered by
more than ½ inch of water. Do not submerge the scooter in liquid or let
any liquid near the battery or electrical components.
• Do not lend your scooter to anybody unfamiliar with its operation. Ensure
any new riders are familiar with these instructions and are wearing
proper safety gear.
• Once riding in public space, you are subject to the risks faced by all traffic
participants just like when you're riding a bike.
o Other traffic participants may not obey traffic regulations or ride
carelessly.
o The faster you ride your scooter, the longer it will take you to stop.
o The scooter may slip on slippery surfaces leading to subsequent
injuries to the rider. Pay special attention crossing train tracks and
when it is wet.
o Always use caution, adapt your speed to road/traffic conditions and
keep distance from other traffic participants.
o Watch out for pedestrians. Do not use your scooter in any way that
could harm pedestrians. Slow down when you are passing them to
avoid accidents.
• You must follow all local traffic rules and regulations.

6
WOLF OVERVIEW
What’s in the Box
Wolf Electric Scooter
(with detached handle bar)
Technical Specifications
Configuration
Wolf 35Ah
Motor
2x 1200W
Battery
60V 35 Ah (LG)
Top speed
50 mph (80 kmh)
Range (eco mode)
70 miles (112 kilometers)
Brakes
Front and rear hydraulic disk brake
Suspension
Front hydraulic, rear dual springs
Tire Size
11” Tubeless
Weight – Scooter
101 lbs (45 kg)
Weight – Rider limit
330 lbs (150 kg)
Charger input/output
110-240V / 2A
Dimensions – Opened
49.2 x 24.6 x 49.2 inch (125cm x 62cm x 125cm)
Dimensions – Folded
59 x 11 x 19 inch (149cm x 27cm x 48cm)
Certified chargers
Manual Set of tools
7
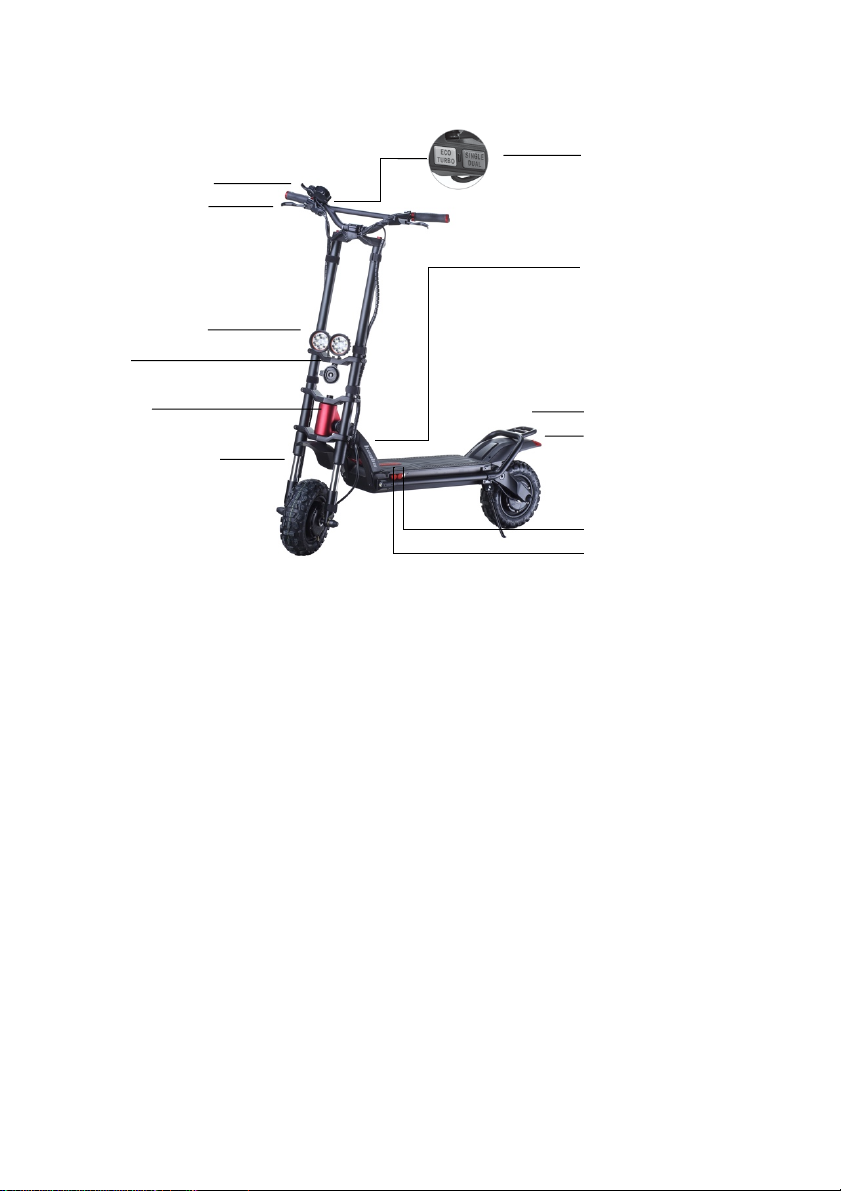
Key Components
CHARGING AND BATTERY SAFETY
Charging the Wolf
1. Turn your scooter off
2. Locate the charging port
3. Open the charging port cover
4. Connect the charger to the wall power outlet
5. Connect the charger to the scooter
The LED on the charger will turn red while charging and turn green when the
scooter is ready for use. Remove the charger and cover the plug. Charging
time with the included 2A chargers is approx. 7-10 hours when using both
charging ports. A fast charger with 5A is available at fluidfreeride.com. The
battery can be charged with a maximum of 10A, so you can use two fast
chargers or a combination of fast charger and regular charger to even further
reduce your charging time.
Display & Throttle
Hydraulic Brakes
Headlight Beams
Horn
Headset
Suspension Tubes
Single/Dual Motor &
Eco/Turbo Switch
Folding Lever
Protective Frame
Taillight
Deck Light Switch
Dual Charging Port

8
Battery Maintenance
• We recommend to charge your scooter after every use. This is not
required.
• A lithium-ion battery is a consumable device. Please replace with a new
battery once capacity drops below 50% of what you experienced
initially. Contact your place of purchase for a replacement.
• Make sure the battery is charged and that the scooter is turned off
before storing your scooter for extended periods at a time.
• Store your scooter in a dry and cool place. Do not keep it outdoors or in
outdoor sheds for extended periods of time as excessive cold, heat,
sunlight, rain, or other environmental conditions may impact safe
operation and reduce the scooter’s lifespan.
• Charge your battery at minimum every 3 months to prevent it from
running completely empty. Once the battery runs completely empty
due to slow discharge while in storage, it may have to be replaced.
• Batteries perform poorly at low temperatures. For instance, if the
temperature is around 0°F (-18°C), battery capacity reduces by 50%.
Capacity will restore to normal when temperatures rise.
• Battery life and riding ranges will vary depending on usage, climate,
conditions, rider weight, and/or riding style, proper care and
maintenance.
Battery Disposal
• Do not dispose of your battery by way of landfilling, incineration or
household trash.
• We recommend disposing through a local recycling program suitable for
lithium-ion batteries. Contact your local waste management service for
more information.
• Mishandling of used batteries may do tremendous harm to the
environment. You must abide by local laws and regulations to properly
dispose of used batteries.

9
Charging and Battery Safety Warnings
• Use caution when using outlets to prevent electric shock.
• Do not leave the charger plugged in for extended period of times (>24
hours).
• Only charge your scooter in a safe, clean, and dry environment. Keep
the charger and scooter away from inflammable materials as they may
get hot.
• Only use the original battery packs and the original charger supplied
with your electric scooter. Contact your place of purchase if you need a
replacement. Use of other models or brands may not be safe.
• Do not touch any part of the charging prongs and keep them away from
metal objects to prevent short circuit which may result in battery
damage or physical injuries and death.
• Do not place the battery in direct contact with heat or near high
temperatures. Do not expose the battery to direct sunlight. Do not leave
the scooter in a car where the battery might get hot.
• Do not pierce the battery with sharp objects. Do not subject it to impact
or force.
• Stop charging if the battery fails to recharge within the approximate
charging time. This will prevent the battery from overheating, rupturing,
or igniting.
• Do not charge the battery in temperatures below 32°F (0°C) or above
104°F (40°C) as this can hamper performance, result in breaking,
overheating, rupturing, or igniting and could cause personal injury or
property damage.
• Do not charge your scooter if the charging port on the scooter is
damaged or wet. Do not charge if there is excessive heat, odor or
leakage coming from the battery or it looks abnormal in any way.
• If the battery leaks and you accidentally get in touch with the liquid,
rinse thoroughly with water and then seek medical care.
• Never attempt to disassemble, modify, perform repairs or maintenance
on the battery. You run the risk of damaging the protective and safety
components that prevent incidents, personal injury or property
damage. Professionals only!

10
• Mishandling or misuse of the battery can result in lower performance,
shorter lifespan, rupturing, igniting, or other incidents and could
increase the risk of serious personal injury.
• Do not discharge the battery using any other product than the scooter
it comes with. Doing so could result in damage to the other product or
the battery and reduced lifespan. The battery could overheat, rupture,
or ignite and cause personal injury or property damage.
11
SET UP, UNFOLDING & FOLDING
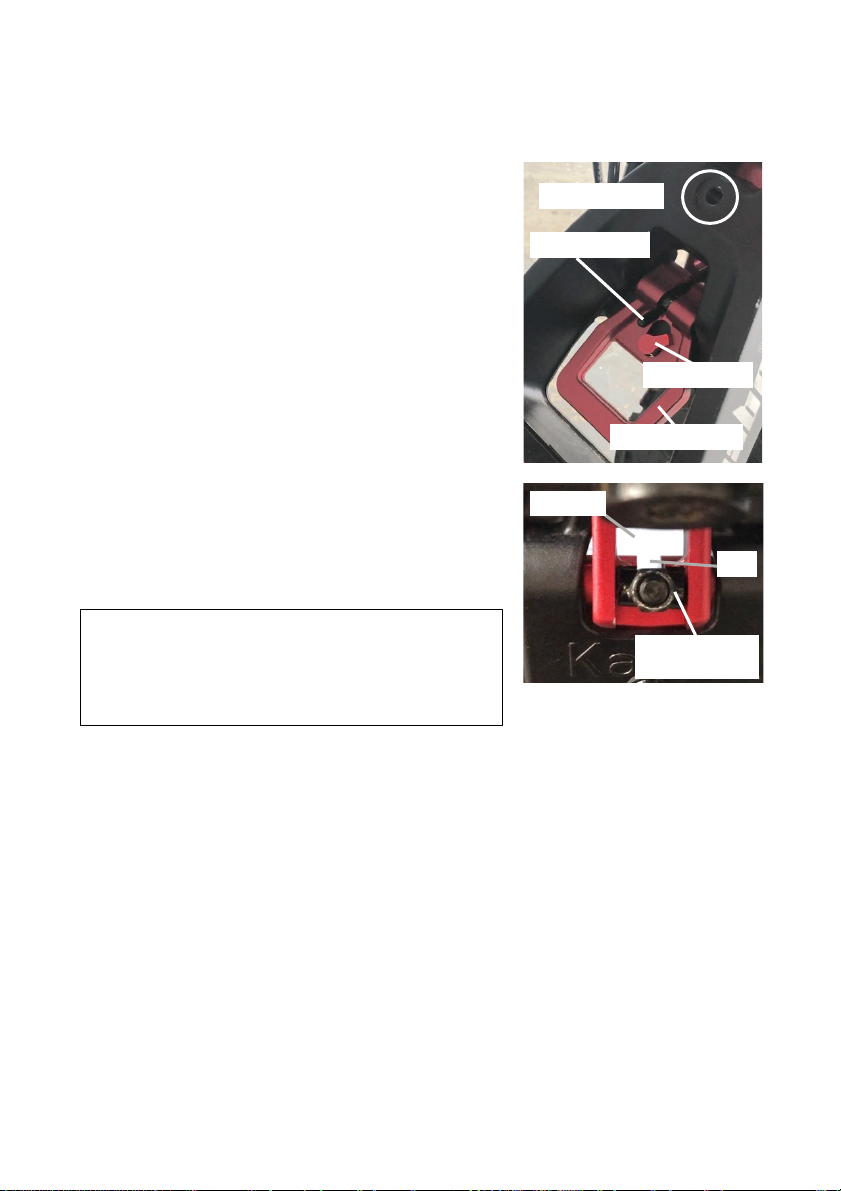
Folding Mechanism Introduction
The Wolf is equipped with an advanced folding
mechanism that will be very durable and tight if
set up correctly. It should have been properly
adjusted at the factory, but you should verify
this during your initial set up.
When properly configured there should be NO
stem play or wobble.
Please note the terminology on the right.
The Folding Shaft is outfitted with a Cylinder
and a Lock Nut facing the front wheel. It
extends through an Opening in the front stem
and slides down a Slot holding it in place when
the Folding Lever is pushed downwards.
Make sure that the Cylinder is always in
horizontal position as depicted on the right.
Unboxing and Set up
Carefully open the box and take the scooter out with both hands. We
recommend you get two additional hands as the scooter is large and heavy.
Pay attention as the handlebar is not yet fixed to the front stem but only
loosely connected via the cable work.
For the first unfolding and set up, it is easiest if you place the scooter on a
box or pedestal so that it balances and both wheels are in the air.
After you unfolded the scooter, attach the handlebar with the included
headset plate and the four Allen bolts.
Safety Pin Slot
Folding Shaft
Folding Lock
Folding Lever
View from
front wheel
Cylinder with
Lock Nut
We highly recommend you have a look at our
video with folding and adjustment
instructions: go to support.fluidfreeride.com
and search for Wolf folding.
Opening
Slot
12
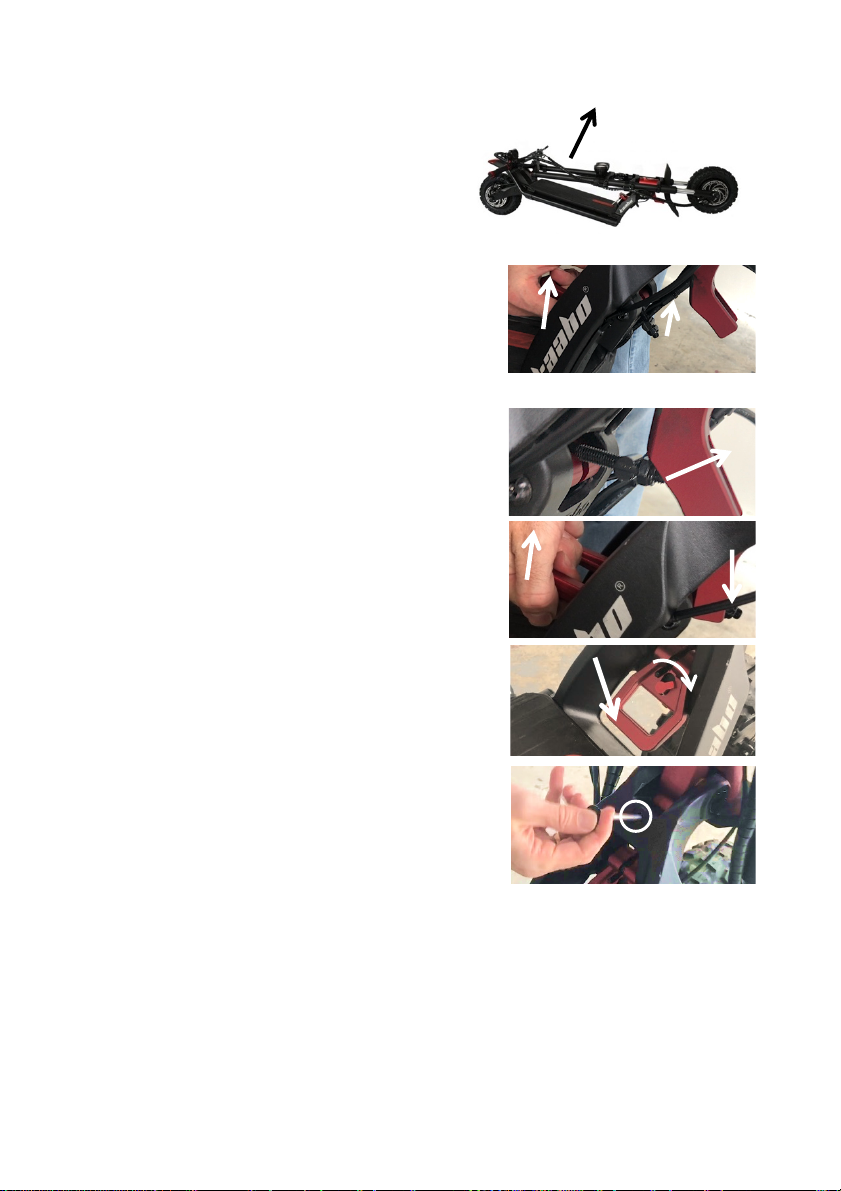
Unfolding and Folding
1. Lift up the front stem
2. Lift up the Folding Lever and push the
Folding Shaft downward with your thumb.
The other side of the Folding Shaft will
move upward.
3. Slowly bring the front stem in a vertical
position while ensuring the Cylinder enters
through the Opening.
4. Push the front stem forward at the
handlebar and pull the Folding Lever
upwards so the Folding Shaft moves all the
way down into the Slot.
5. Push the Folding Lever down – you will feel
some resistance. Secure the locking
mechanism with the Folding Lock.
6. Insert the safety pin into the Safety Pin
Hole. The safety pin carries no load, but it
will prevent the Folding Lever from opening
when inserted.
7. Wiggle the front stem to confirm there is no play. If there is play, or the
Folding Shaft does not move downwards into its Slot, you need to adjust
the position of the Cylinder and Lock Nut on the Folding Shaft. Please
have a look at the above referenced video.
In order to fold your scooter, follow these steps in reverse order.
v
13
OPERATION
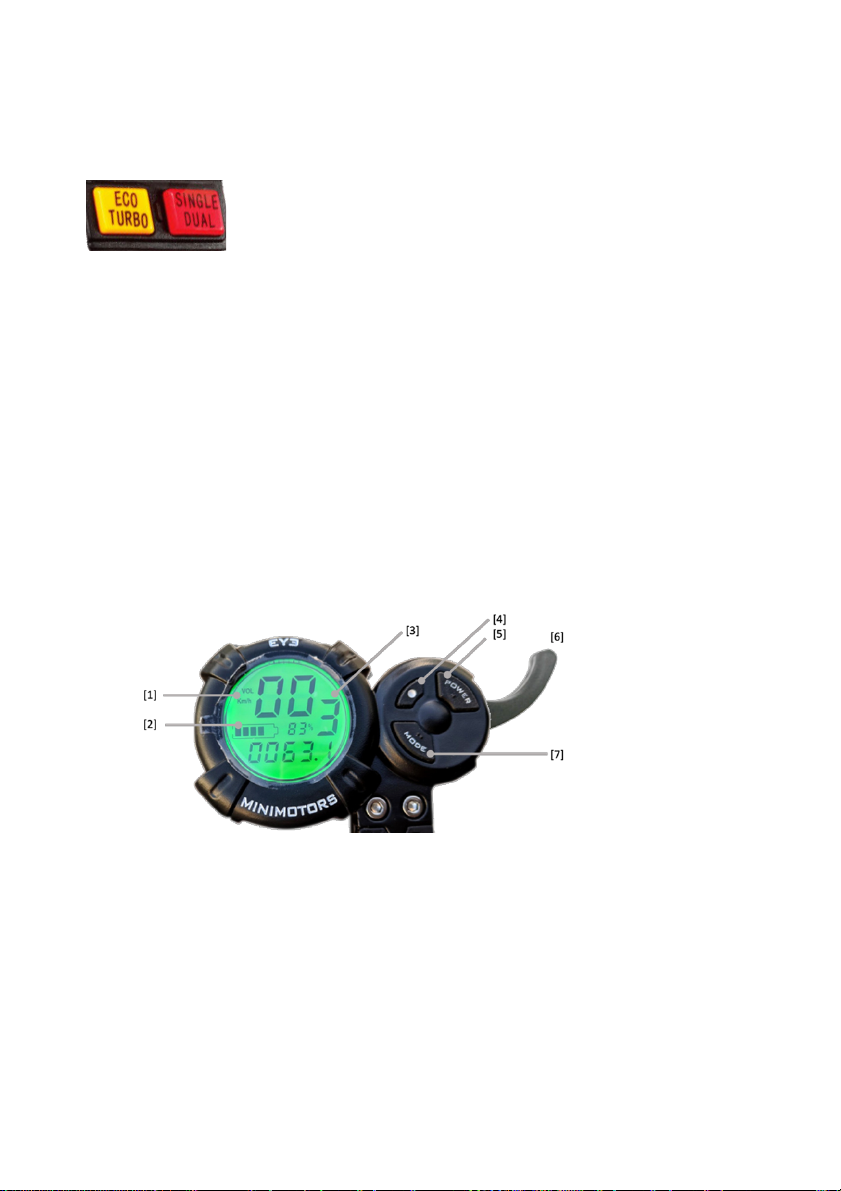
Driving Mode Selection
Located underneath the main display on the right side of
the handlebar you can find two switches to configure
driving modes:
The ECO/TURBO switch regulates the power of your scooter. By pressing
down the button, ECO mode is activated which will reduce torque and top
speed to maximize range. When the button is not pressed, TURBO mode is
activated and there is no restriction of power.
The SINGLE/DUAL switch toggles single or dual motor drive. By pressing
down the button DUAL motor drive is activated. When the button is not
pressed, SINGLE (rear) motor drive is activated.
For Maximum range, select ECO mode and SINGLE motor drive. For
maximum power and speed, select TURBO mode and DUAL motor drive.
Display Settings
The Wolf scooter is equipped with the following display:
1. Speedometer - shows the speed at which you are travelling.
2. Battery Indicator - shows remaining battery charge
3. Gear - shows the selected gear.
4. Gear Selector - press to set gear (1=slow, 2=medium, 3=fast).
5. Power Button - to turn the scooter on or off - press button for 2 seconds.
6. Accelerator - pull to accelerate. The stronger you pull, the faster it
accelerates. The scooter is delivered in “Non-Zero Start” setting (Kick-
And-Go is ON), i.e. the accelerator only works if the scooter is already in
motion.
7. Mode Button. Press to select various display options

14
MODE
COMMENT
TIME
Time since powering on the scooter.
TRIP
Distance travelled since powering on the scooter.
ODO
Total distance travelled.
VOL
Current battery voltage.
CHA
Number of times battery has been charged (inaccurate as only full
discharges are counted)
Detailed P-settings mode. To access P-settings to make various advanced
changes, press MODE [7] for 2-3 seconds. Cycle through the P-settings using
the MODE button [7]. In order to change a P-setting press GEAR button [4].
To return to operating mode, wait a few seconds.
P-SETTINGS
P0
Tire diameter (11 inch). Do not change.
P1
System voltage. Default set to 60V.
P2
Motor magnetic pole setting. Default is 15. Do not change.
P3
Speed signal selection. Default is 0. Do not change.
P4
Distance / speed unit. 0=km, 1=miles
P5
Start setting. 1=non-zero start (Kick-and-Go), accelerator won’t work if scooter
not in motion; 0=immediate start (CAUTION while using this!)
P6
Cruise control. 0=cruise control OFF, 1=cruise control ON.
P7
Soft acceleration. 0=maximum power to start, 5=lowest power to start
P8
Speed limit as % of top speed, i.e. 100=no speed limit.
P9
Motor torque: 1=50% of max torque, 2=75% of max torque, 3=max torque
PA
Electric (regenerative) braking strength (E-ABS).
0=no EBS function, 1=EBS is the weakest, 5=EBS is the strongest
PB
Display brightness (0=off, 5=highest illumination)
PC
Scooter auto-turn off time in minutes (1-30 minutes).
PD
ABS (anti-lock braking system) setting. 0=ABS off, 1=ABS on
We highly recommend you have a look at our video with in-depth
explanations of all settings: go to support.fluidfreeride.com and search
for Wolf display.

15
Cruise Control. Cruise control allows you to maintain your driving speed
automatically without continuing to hold down the accelerator. In order to
use Cruise Control, activate it first in the P-settings [P6].
While driving, keep the accelerator steady for a few seconds until Cruise
Control kicks in and scooter travels at constant speed without driver holding
down the accelerator. When you activate the brakes Cruise Control will be
cancelled. CAUTION: Ride in a position where you can immediately access
the brake to cancel Cruise Control if necessary.
ABS. When enabled, ABS will prevent wheels from blocking by rapidly
engaging and disengaging the brake. It is not automatic, that means ABS will
engage whenever you brake, not just when your wheels are about to block
and skid. Note that electric braking (PA) will be disabled when ABS is
enabled.
WARNING: Due to increased vibration and force on scooter components
when using ABS, do frequently check that all bolts are properly fastened.
Riding
Before using your scooter, make sure to visually inspect it for any signs of
damage or loose parts/screws. Every scooter is individually tested before
shipping from the factory, but we recognize that it has travelled far and in
rare cases, it can get damaged during transport. If something does not feel
right, reach out to your place of purchase.
Pull the brake levers and ensure there is sufficient tension on the brakes
BEFORE your first and any subsequent ride.
1. Set you scooter to ECO mode and single motor mode for your first ride
so you can get slowly used to its power.
2. Ensure you have sufficient runway ahead of you. Do not use the scooter
indoors.
3. Put both of your hands on the handlebar.
4. Step with one foot on the scooter, kick it lightly with your other foot to
bring it slightly in motion.
5. Step with your second foot onto the board, hold on tight and pull the
accelerator. Do prepare for strong acceleration and start slowly.

16
Braking
The Wolf electric scooter has front and rear hydraulic disc brakes.
For braking, use the rear brake first for decelerating (the left braking lever
on the handlebar) before engaging the front brake (the right lever) to come
to a full stop.
When travelling at higher speeds, exercise caution when braking as the
brakes are sensitive. This is especially true for the front brake as you risk
falling over the handlebar if your center of gravity is too high while
performing a hard stop with the front brake alone.
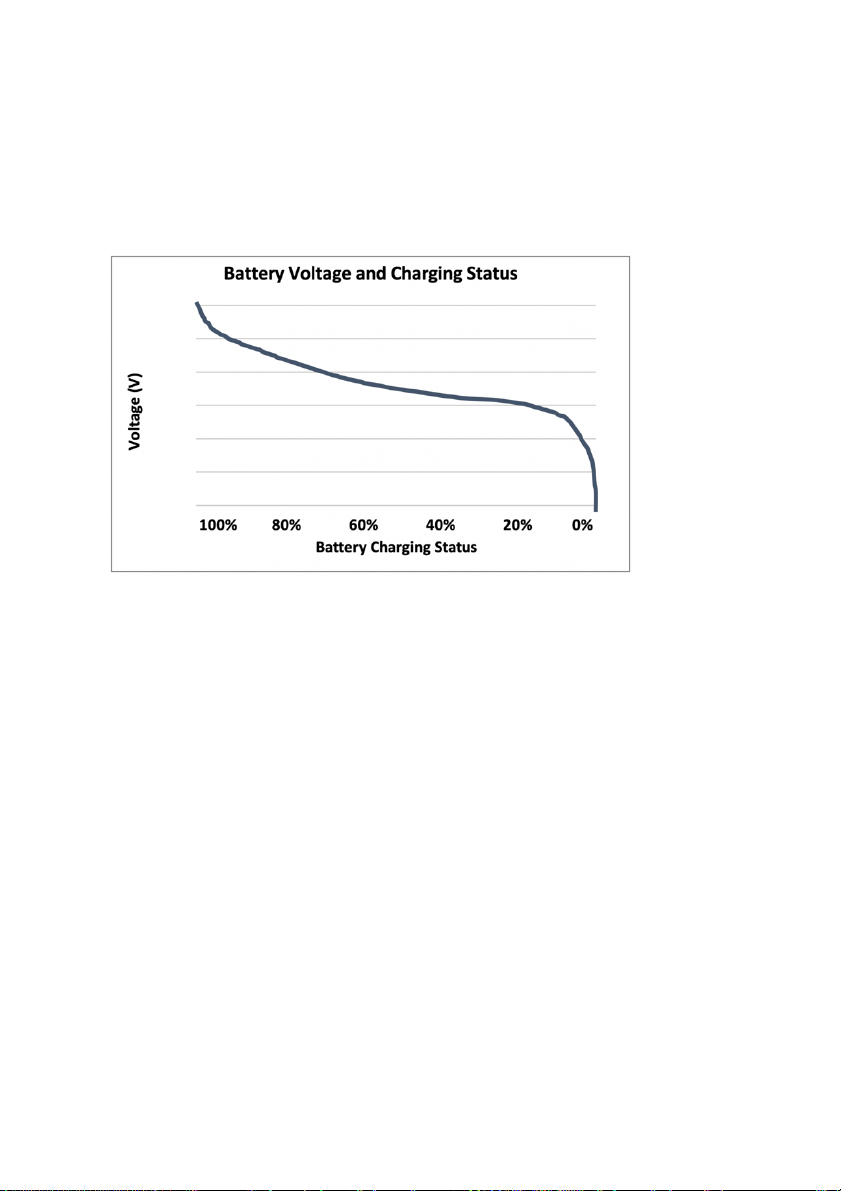
BATTERY VOLTAGE AND CHARGING STATUS
The battery voltage display can be accessed by short pressing the mode
button – it will appear at the bottom of the screen when the VOL symbol is
displayed.
The live reading of battery voltage will greatly improve your understanding
of battery health and charging status vs. just looking at the battery
percentage, which is just a rough translation of battery voltage. You will see
the voltage fluctuating down (when you accelerate) and up (when you idle)
during your ride.
You will learn over time how to interpret your voltage display to make the
right conclusions about the status of battery charge.
The theory is as follows: When your battery is fully charged using the
accompanying 67.2V charger, the display will show 67.2V (+/- 0.5V due to
inaccuracies in measurement). The battery will shut down at 44V as
configured in the controllers.
If you Battery is around 54V and you put lots of load on the motor (e.g.
accelerating uphill for heavy riders), the voltage may drop momentarily
below the controller shut off point set to 44V. This will lead the controllers
to shut down to protect the battery. You will need to connect your scooter
to a charger to reactivate.
We recommend that whenever battery is low, keep an eye on the display to
see how Voltage fluctuates downwards when you draw a lot of power.
17
The display will start blinking whenever you are getting close to empty. If
that happens while are you are still a few miles away from your destination,
you can switch to ECO and single motor mode and cruise along to preserve
battery charge.
The relationship of charge and voltage reading is NOT linear:
This curve shifts downwards the more power you are using. E.g. an
aggressive driving style will reduce your voltage reading at the same battery
charge status. Note that an aggressive driving style will also reduce range
(the distance you can travel at a given charging status).
If you prefer it plain and simple, you can always go with the battery
percentage to check your charge. Be aware that the last 30% will go much
faster than the first 30%.
67.2
53.0
44.0

18
SCOOTER MAINTENANCE & TRANSPORT
• Never perform maintenance on this product while the unit is powered on
or charging. Always power off before performing maintenance. Do not
attempt to perform repairs or modify the scooter but contact your place
of purchase or refer to a professional repair facility.
• Recommended tire pressure: 45-50 PSI. The tires are tubeless and
require special tools for tire replacements. Just like with a car or
motorcycle. Local ATV or motorcycle repair shops should be able to help
you out.
• Materials will stretch over time. If you feel play developing in the folding
mechanism, adjust its tightness by changing the position of the Cylinder
on the Folding Shaft.
• If you have a flat, you can first try to use high strength tire sealant
(available at fluidfreeride.com), before resorting to replacing the tire.
• Clean stains on your scooter’s body with a damp cloth. Do not use
alcohol, gasoline, kerosene or other corrosive and volatile chemicals. Do
not wash with high pressure cleaners. Make sure the scooter is turned off
and unplugged during cleaning and ensure no moisture enters the
charging port.
• When transporting your scooter, please take into account that it contains
lithium-ion batteries that are considered a hazardous material.
• Always exercise caution and follow applicable rules and regulations when
transporting your scooter. It is very likely that you will not be allowed to
take your scooter including battery on a plane.
Disc Brake Maintenance
Check the integrity of hydraulic systems frequently (no leakage of oil) to
ensure brakes are working properly.
If there is insufficient tension when pulling the brake lever (the lever should
fully engage when pulled about halfway to the handlebar), or brakes are
losing tension over time, check for leaks. It is most likely that air bubbles in
the hydraulic tube need to be removed. This can be easily done at home with
a refill kit provided by your place of purchase.

19
If your hydraulic disc brake is rubbing, please first ensure that this is not
caused by a bent rotor. Put your scooter up on a box so the wheels are
spinning freely. Put a light source behind the rotor so you can easily see if
the rotor is bent or if it can be fixed by slightly aligning the brake pads.
Also check the rotor for play and tighten the mounting bolts if necessary.
The position of the caliper can be adjusted as follows:
1. Loosen the two Mounting Bolts until the caliper is able to move freely
side to side
2. Pull the brake lever to center the caliper over the rotor.
3. Re-tighten the two bolts without much force while the brake lever is
held tightly
4. Release the brake lever, spin the wheel to see if it did the job.
5. If it works well, move to step 7.
6. If the brake is still rubbing, loosen 1 bolt at a time (just a quarter to half
a turn following step 4) and manually adjust the caliper with your hands
so the brake does not rub anymore. Once they do not rub
tighten without much force.
7. Tighten the screws all the way (6 Nm force) to finish the job.
CAUTION: BE CAREFUL WITH YOUR FINGERS WHEN OPERATING NEXT TO
THE MOVING ROTOR!
A local bike shop or your place of purchase will be able to help out further
if needed.
Mounting Bolts

20
DECLARATION OF CONFORMITY
This product complies with Part 15 of the FCC Rules. Operation is subject to
the following two conditions:
(1) This product may not cause harmful interference, and (2) this product
must accept any interference received, including interference that may
cause undesired operation.
FCC RELATED INFORMATION:
This product has been tested and found to comply with the limits for a Class
B digital product, pursuant to Part 15 of the FCC Rules. These limits are
designed to provide reasonable protection against harmful interference in a
residential installation. This product generates, uses, and can radiate radio
frequency energy and, if not installed and used in accordance with the
instructions, may cause harmful interference to radio communications.
However, there is no guarantee that interference will not occur in a
particular installation. If this product does cause harmful interference to
radio or television reception, which can be determined by turning the
product off and on, the user is encouraged to try to correct the interference
by one or more of the following measures:
• Reorient or relocate the receiving antenna.
• Increase the separation between the product and receiver.
• Connect the product into an outlet on a circuit different from that to
which the receiver is connected.
• Consult your place of purchase or an experienced radio/TV technician for
assistance.
NOTE: INFORMATION, SPECIFICATIONS, WARNINGS AND ALL OTHER
DETAILS INCLUDED IN THIS MANUAL ARE SUBJECT TO CHANGE AT ANY
TIME, WITHOUT PRIOR WRITTEN NOTICE.
Table of contents
Other Fluid Scooter manuals


