Flying Thingz The Gull Instructions for use

Flying Thingz
“The Gull”
Kit# FT3007
A Sport Scale
Flying Bird
Made In The USA!
About This Construction Manual
This booklet divides the construction into sub-assemblies; wing, fuselage, etc. Please read each section carefully before starting on that particular sub-
assembly. There is a complete description of all parts under “Kit Contents” Please check to make sure your kit is complete. We are human, and occasionally
miss something! If you have trouble identifying a part, or are missing something, please contact us and we can help.
During the construction process the steps will outline what part to use. We have used actual pictures instead of unclear or often inaccurate illustrations to
assist in the building process. This manual was intended for English users, and all measurements are made in standard units. (Inch, foot, etc.)
Customer Service
Should you experience a problem building or flying this kit, we recommend you see your dealer first. If you are unable to solve the problem, feel free to call or
write:
Flying Thingz
P.O. Box 19183
Spokane, WA 99219
support@flyingthingz.com or online at www.flyingthingz.com
This product is sold with exclusion of all warrantee, expressed or implied, statutory or otherwise. Pilot assumes all risk.
Pilot assumes all risk in building and operating this model. Refer to and abide by AMA rules at www.modelaviation.com for regulations on Radio
Control Models.

Page 2
Kit Contents
Part No. QTY. Dimensions Description
1654 2 CNC Cut ply Wing mounting disks
1654 1 1/8” x 3” x 18” Balsa sheet Balsa aileron facing sides
1661 1 CNC Cut Foam Sea Gull body
1655 1 1/16” x 4” x 3” ply Head spar and wing mounting reinforcement
1656 2 CNC Cut Foam Inner wing panels
1657 2 CNC Cut Foam Middle wing panels
1658 2 CNC Cut Foam Outer wing panels
1659 2 1/2” x 2” x 3” Balsa Block Wing tips
1660 3 3/8” x ½” Balsa Balsa Leading edge
1661 1 Glass Cloth Body Glassing
1662 1 Paper Instruction Manual
1663 1 1/32” Balsa Wing skin set
Additional items you will need to build a flyable R/C Gull
This is a list of parts used on the Sea Gull prototype. Consult your hobby shop
for these additional items.
□2 med. DuBro control
horns □White, Black, Yellow
paint
□2- 2-56 threaded
Pushrods □Clear Packing Tape
□foam rubber □2 Ch radio with
elevon mixing and
micro servos.
Page 3
Tools and materials you will need
□Masking tape □#80; #120; #400 sand paper □Steel straight edge
□Sanding blocks □Hobby Knife and extra blades □Scissors
□Razor saw □Pencil and Pen □Needle nose pliers/cutters
□Epoxy and resin glue □Assorted screwdrivers □Paper towels
□Alphaic Resin glue (white glue □Wax paper
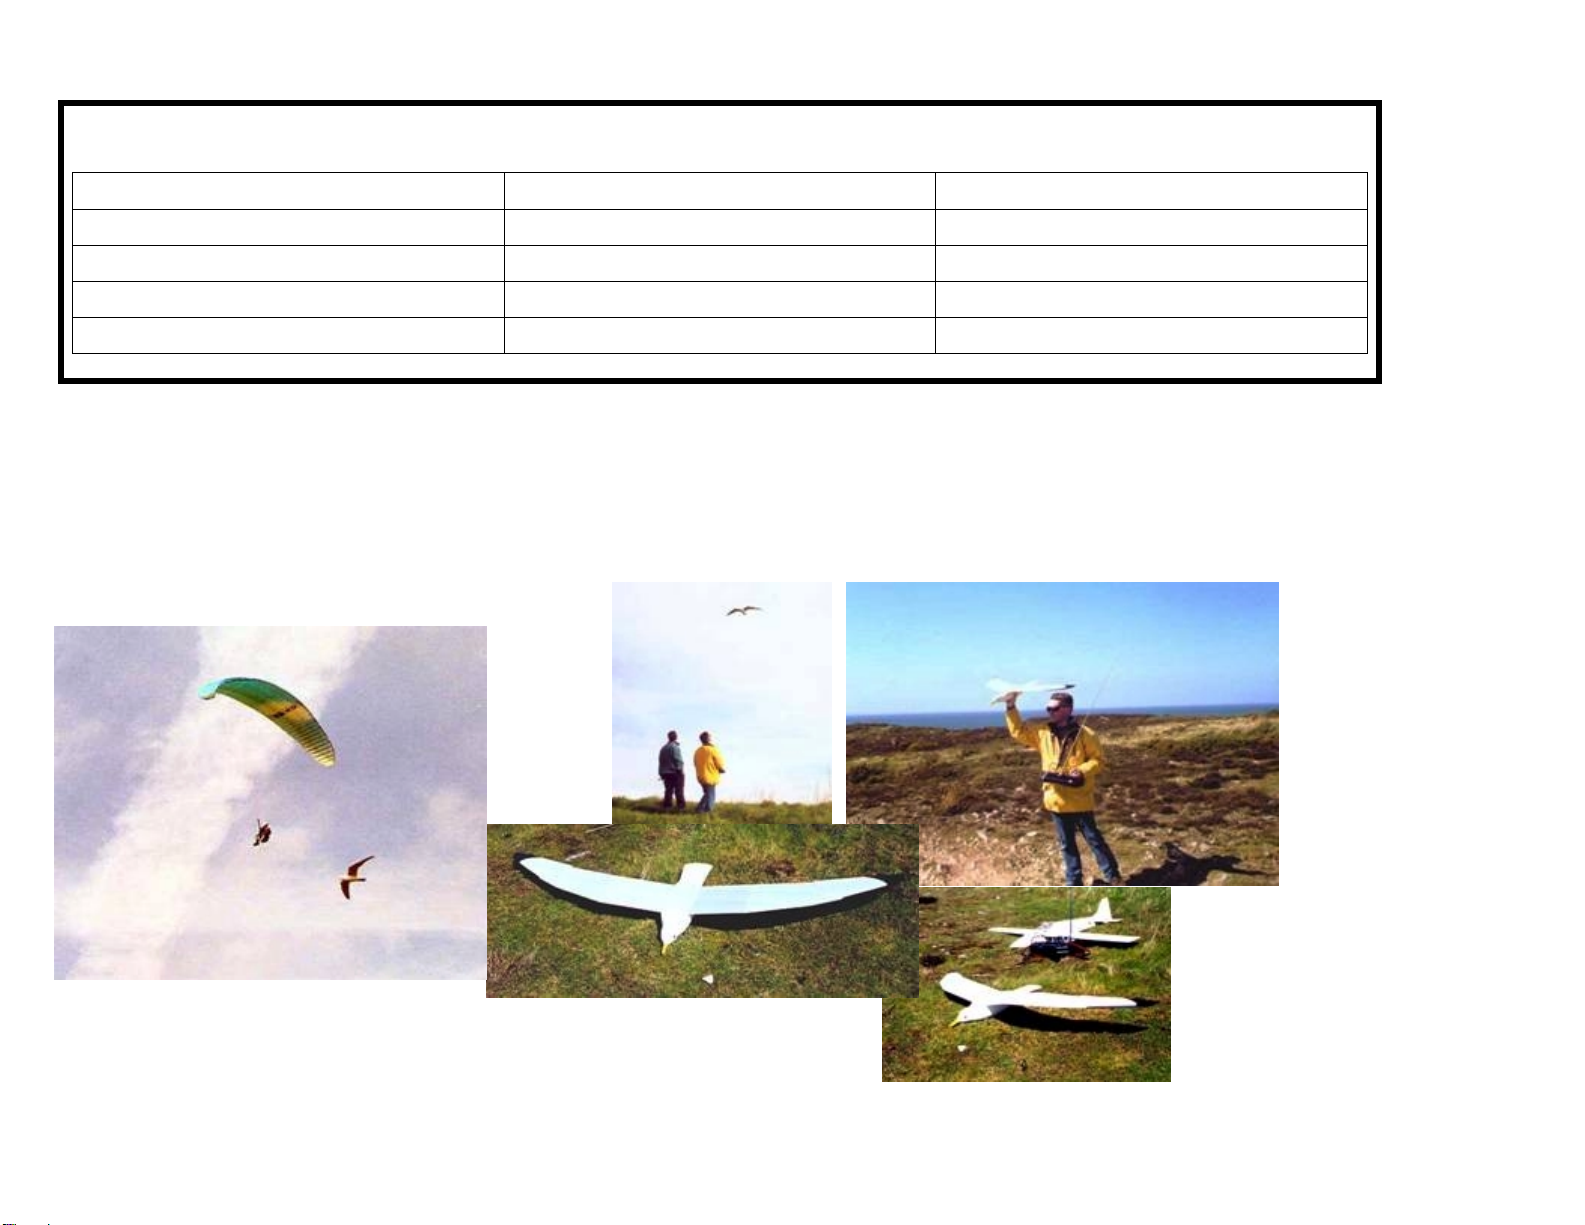
Flight: The main goal for this model is esthetics, but the flight is still very realistic and calm. In the air, realism is very surprising,
some present during first test flights thought it was a prank... The usual comments are: Is that expensive? Did you build it?
Where is the radio? I think that they realized it was not a joke when It flew straight at me, and then turned away from the
slope like all the other sailplanes. (The loops give it away too)
Some photographs of the bird:
Have Fun!!
Page 4
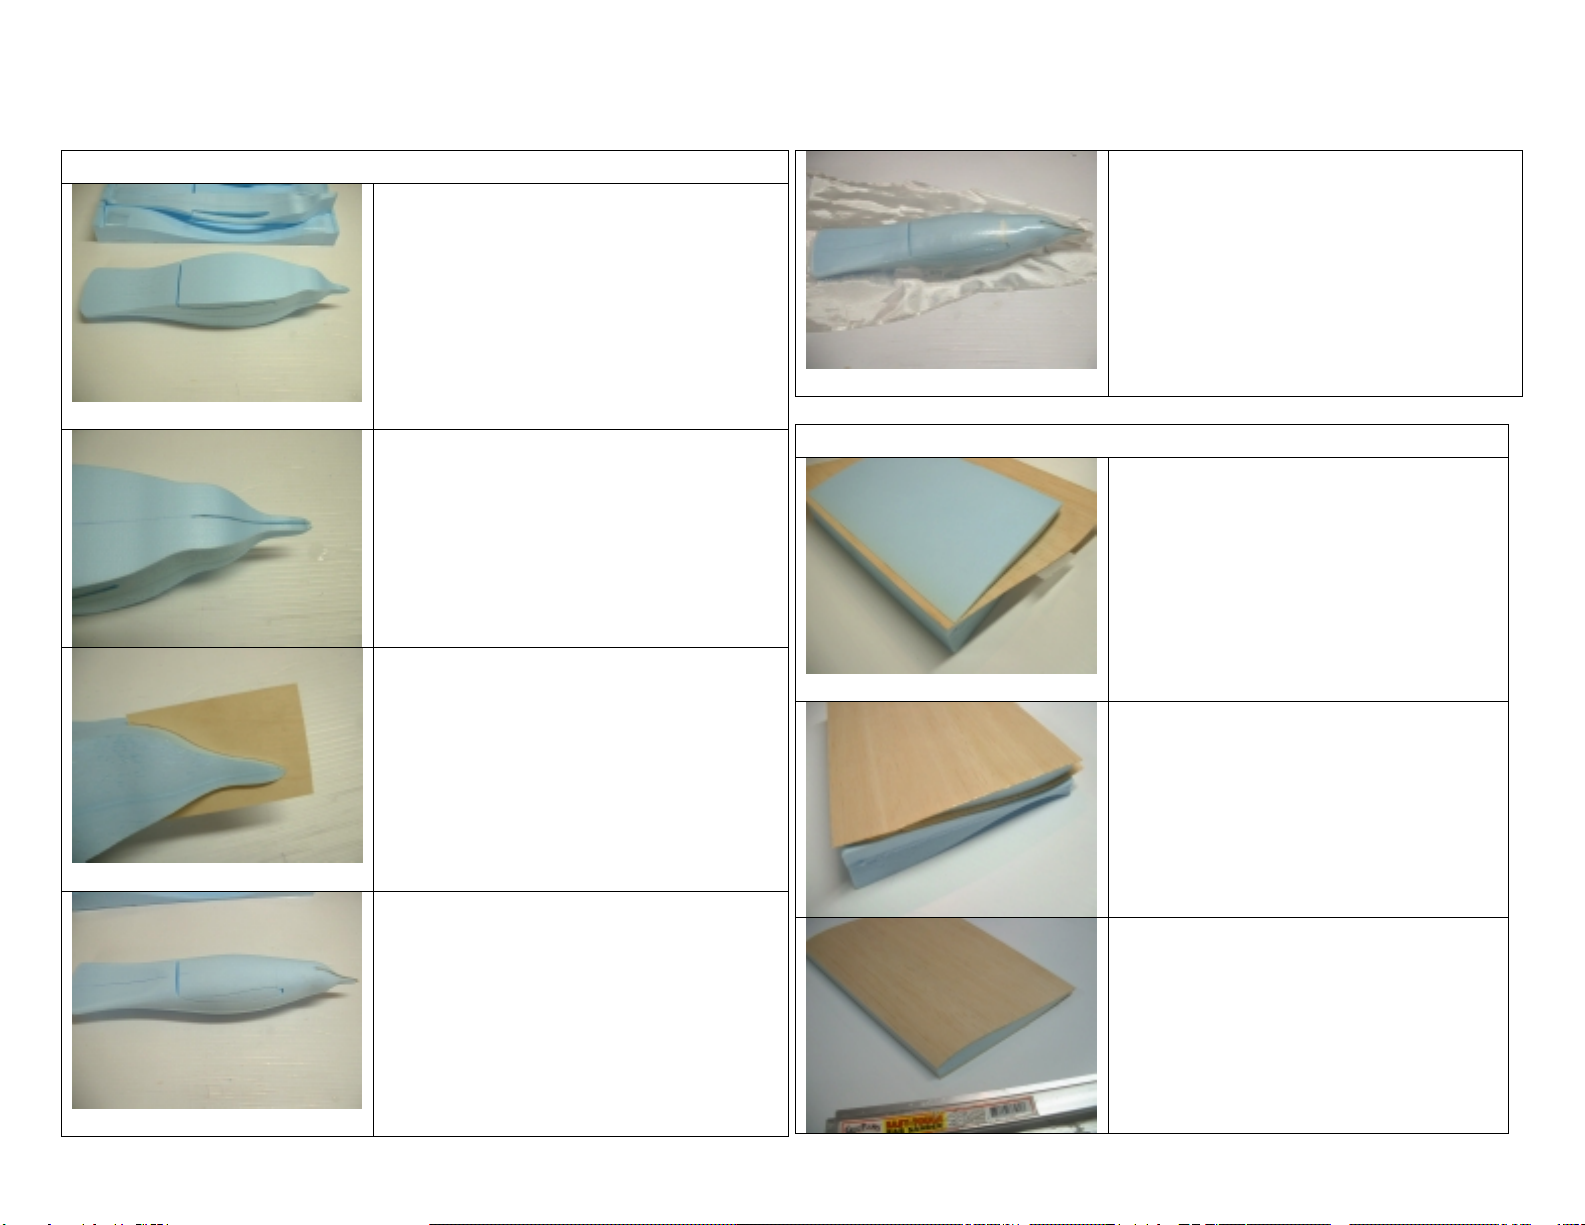
Body Construction:
1.You will start by separating the
foam beds from the body. Leave the
wing cut out in for sanding.
2. Cut through the center of the
beak with a razor saw to allow for
the 4” head spar. This spar will keep
the birds beak from snapping off on
landings
3.Insert the 1/16” ply “head spar”
into place. Trace the outline of the
foam onto the wood with a pen, and
then cut the beak and head out. Use
a bit of white glue or epoxy for
setting this in place.
4.Left is the fuselage after
sandpapering. Use rough grit at first,
and then smooth it out to end up
with a final finish that is smooth for a
light layer of fiberglass. If you need
to fill dings, use lightweight filler,
then re-sand.
5.After you have sanded to
perfection, use the glass cloth to
finish the fuselage. Start at the top
and spread the epoxy out. There
should be no dripping wet spots.
After top is cured, do the bottom,
overlapping the tops edges. Lightly
sand smooth for painting.
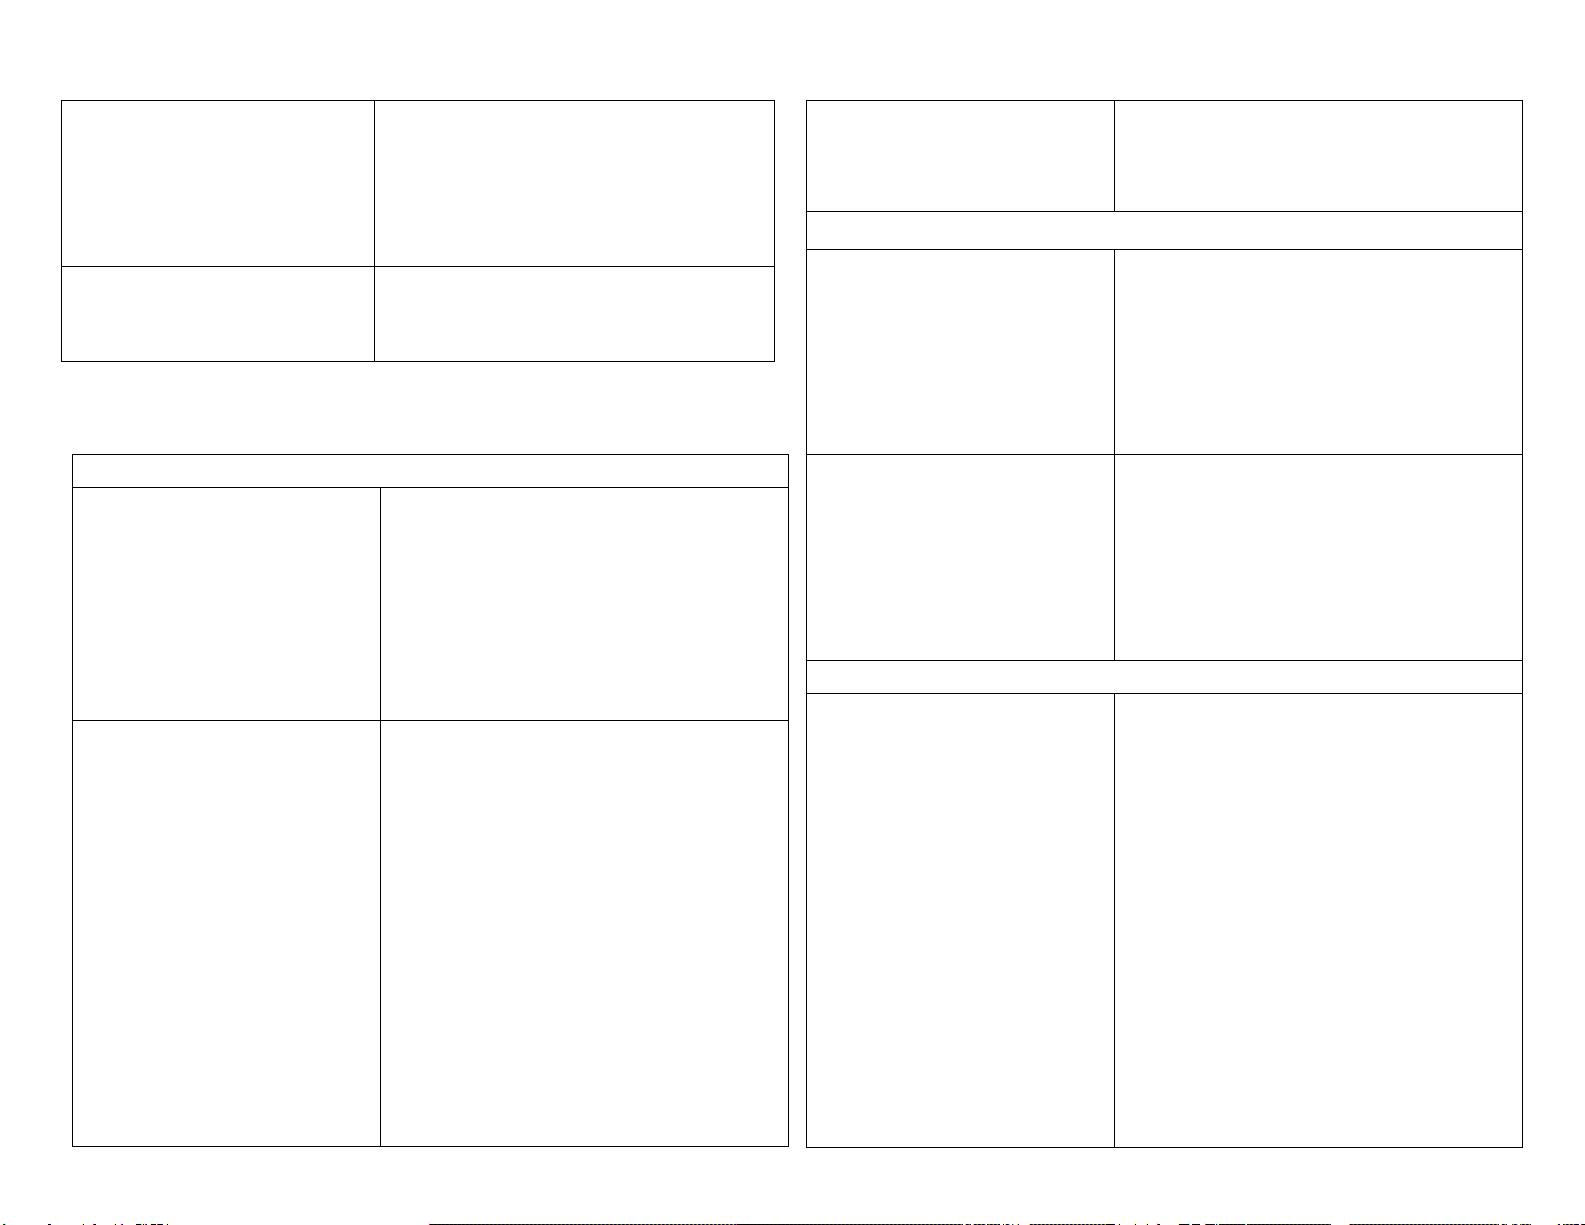
Wing Construction: 6.Use 3M Super 77 Spray
adhesive on the top of the foam
core and also on the wing skin. A
light but thorough coat will do. Let it
dry for at least 10 minutes. Use the
wing saddle for alignment and roll
the skin TE to LE onto the wing
core. Leave a ¼” overlap at the TE.
7.Use the same technique for the
bottom side of the inner panel.
Care should be made to keep
wrinkles and warps out of the thin
sheeting.
8.Use a sanding block to bring the
sheeting flush with the foam core.
Leave the extra balsa on the TE for
now. Be very careful NOT to
change the angle of the dihedral at
the root and tip of the core.

Page 5
9.Tape another set of 12” skins
together for the top and bottom of
the outer panel. Lay both of the
panels on the balsa and cut the
skin in half for each side.
10. Use the same procedure as
the inner panel to sheet the outer
panel. Make sure to leave the extra
balsa at the TE. Note that there is
washout in the outer panel and
care should be taken not to untwist
this during the sheeting process.
11. Use the core beds to align
and apply the top sheeting. This
will maintain the correct wing twist.
Trim away the extra balsa and
sand the sheeting flush with the
cores.
12. Cut 2 sections of sheeting for
the middle wing cores. Tape them
together as before. Use the same
procedure to glue the sheeting to
the cores.
13. Sand the excess balsa down
to the cores. Again, make sure not
to change the angles of the wing tip
and root joints.
14. Now join the outer wing to the
middle wing. This is a 0 deg joint
so simply lay the sections on your
building board and epoxy together.
Align the LE’s and the TE should
be flat on the table. Make sure to
coat both joints good. Use 5 Min
epoxy and tape in place until cured.
15. Flip the wing over so the
dihedral angle is rising up off your
building table. Tape the wing
section securely to the table with
the TE flat along it’s length.
16. Use the foam angle brace to
prop up the inner wing to the outer
section. Check the joint and make
sure you have a good flat mating
surface. Lightly sand to correct any
difference. The Wing is upside
down in this picture…. Remember
we are building a gull wing, so
double check the angle before you
glue. Use 5 min epoxy and tape
securely till cured.

Page 6
17. You should now have a
completed wing half that looks like
the picture. Use a straight edge to
trim the balsa TE to meet at each
panel. LIGHTLY sand the sheeting
for covering, but remember it is
very thin, so do not sand through!
18. The LE balsa needs to be
applied as shown as it adds
tremendous strength to the wing
joints. Epoxy the first panels LE to
the cores. Now sand it to match the
LE angle of the second panel.
19. Epoxy the second LE on the
middle panel, overlapping the first
panels LE. Now sand the LE to
match the angle of the outer panel.
20. Finally epoxy the outer panels
LE to overlap the middle. Sand all
of the LE’s to the airfoils contour.
Use discretion to the final LE
shape. A sharp LE will yield higher
speeds and better penetration, but
will stall abruptly. A more blunt,
round LE will stall gently, but not be
as fast.
21. Glue the balsa block wing tips
in place then sand to match the
shape of the wing.
22. Cut Ailerons out of the TE of
the outer 2 panels. The Ailerons
should be 1.5” at the root and taper
to .75” at the tip.
23. Remove 1/8” of material from
the face of the aileron and TE and
then face with 1/8” balsa for
hinging.
24. Use a sharpened ¼” brass
tube to cut a servo lead hole from
the root to the tip of the inner
panel. It should be located in the
center, at the thickest part of the
wing. Do this to both panels.
25. Use a sharp x-acto blade to
cut a servo bay at the end of the
INNER wing panel. The bay should
be placed over the servo tube hole
you just cut. The bay should be
sized to hold the servo flush and
tight against the foam.
26. Cut a notch on the BOTTOM
of the wing at the center section for
access to the servo wires after
wing joining.
27. Place the two wing alignment
blocks to
p
ro
p
the win
g
into
j
oinin
g
Page 7
position. The TE of both wings
should be resting in the same
position. Check the mating surface
of the two panels to see if it is
aligned. Sand if necessary to get a
good joint.
28. Use epoxy to join the center
section. Hold it firmly in position
until cured.
Final Preparations
29. Carve out a cavity in the
foam body under the wing to place
your battery and receiver. Keep
everything as far forward as
possible. Choose a place for
mounting your switch, or remove
the wing to connect power when
flying.
30. Cover the wings in white and
grey Econocoat or Ultracoat Lite,
and then paint the gull body entirely
white with acrylic paint. The result
looks good, and the finish is also
very light. The birds marking are
then applied: Grey wing tops, white
wing bottoms with black wing tips.
The beak is painted in yellow with
plastic model paint. The eyes can
be painted or glued on using the
pictures below, or purchased at a
craft store. The Gull should be
finished to weigh about 470g.
Attention to the wei
g
ht durin
g
the
Radio Set Up
31. 2 channels are all that is
required, but you will need mixing
because it is elevon control. Refer
to your radio on how to set this up.
You will want 1.00” of travel to start
with, and the elevons will need to be
in raised upward about 3 deg.
32. If you have advanced radio
features, set up aileron differential.
You should set it so that the “down”
aileron in a turn moves about 50%
of the “up” ailerons travel. This will
help yaw the plane in the direction
of the turn.
Flying
33. The model should be
balanced before making any test
flights! Balance the bird by placing
your fingers under the wing at the
first gull panel. The plane should
balance slightly (1/4”) forward of the
highest point of the wing. This is
essentially a flying wing, so the
balance point is important. Start a
bit in front of the point and do test
glides in tall grass. If the model
wants to dive, move the CG back, if
it quickly climbs, add more weight to
the nose. The desired result is a
gradual glide with no pitch changes.
Ex
p
eriment with different settin
g

Page 8
and trim changes on the elevons to
get the flight “feel” that you want. An
aft CG will be extremely pitch
sensitive. Add weight to the nose if
it is twitchy.
Hints:
This plane has no rudder, so if you
are flying in strong wings and desire
more “tracking” add a clear lexan
rudder to the tail of the bird.
Remember to send your
pictures!!
This manual suits for next models
1
Table of contents
Other Flying Thingz Toy manuals


Popular Toy manuals by other brands


wiking
wiking Control87 077426 operating instructions

Auhagen
Auhagen 12 215 Assembly manual

Fisher-Price
Fisher-Price BARBIE Sport Mobile 74558 Owner's manual & assembly instructions

H-KING
H-KING FLYCAT manual

Toys for life
Toys for life SENSIDISC instructions

Eduard
Eduard Tiger I Ausf.E early quick start guide

Black Horse
Black Horse bravo 3d instruction manual

Pichler
Pichler Amethyst II manual

Hasbro
Hasbro TransFormers Energon Quickstrike instructions

roundhouse
roundhouse TALIESIN Owner's handbook

Airigami
Airigami PAPIER AVION Boeing 737-200 quick start guide

Little Tikes
Little Tikes TotSports T-Ball Set quick guide