Focon Showtechnic EXPOLITE LED Profile 750 HD User manual
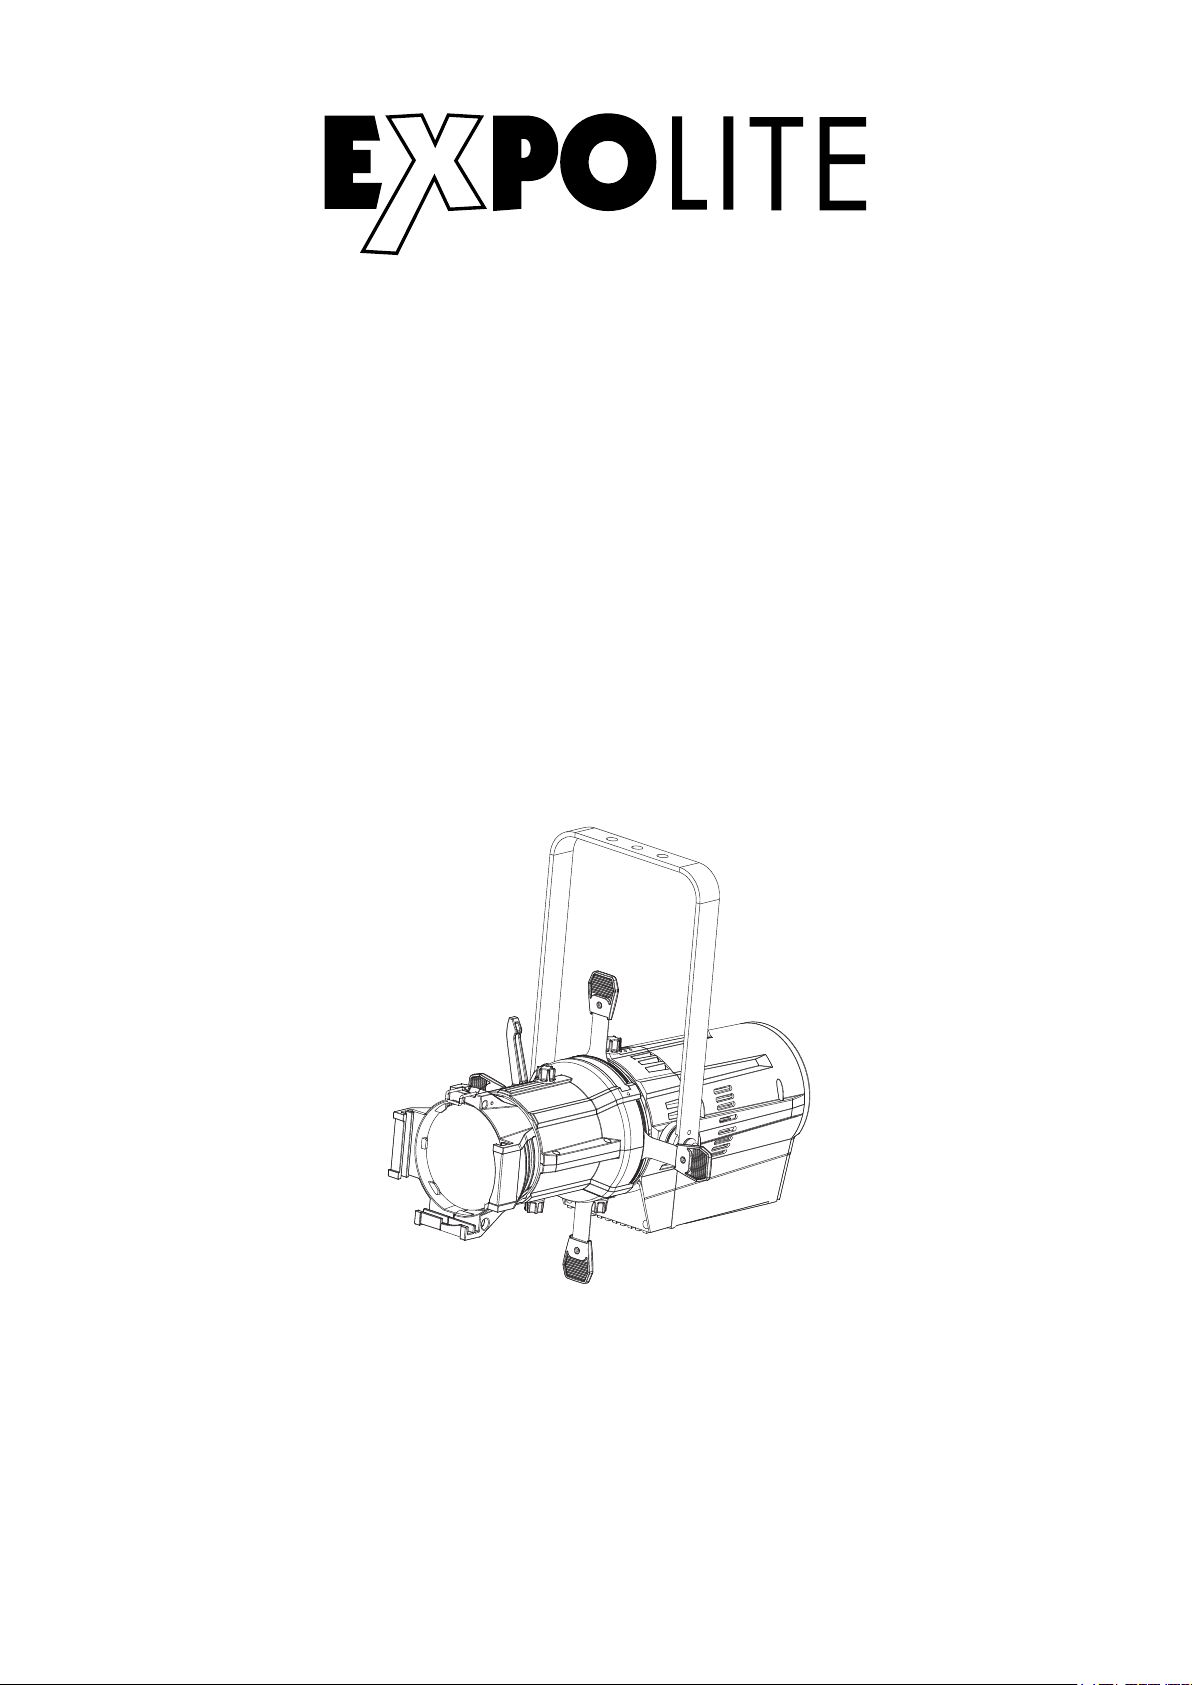
LED Profile 750 HD
Art.Nr.: led22923
Bedienungsanleitung
Bedienungsanleitung bitte aufbewahren
Keep this Manual for later queries
Änderungen sind ohne Ankündigung möglich.
Changes are possible without prior notice.
Rev. 2018-50-11
User Manual
Eigenschaften
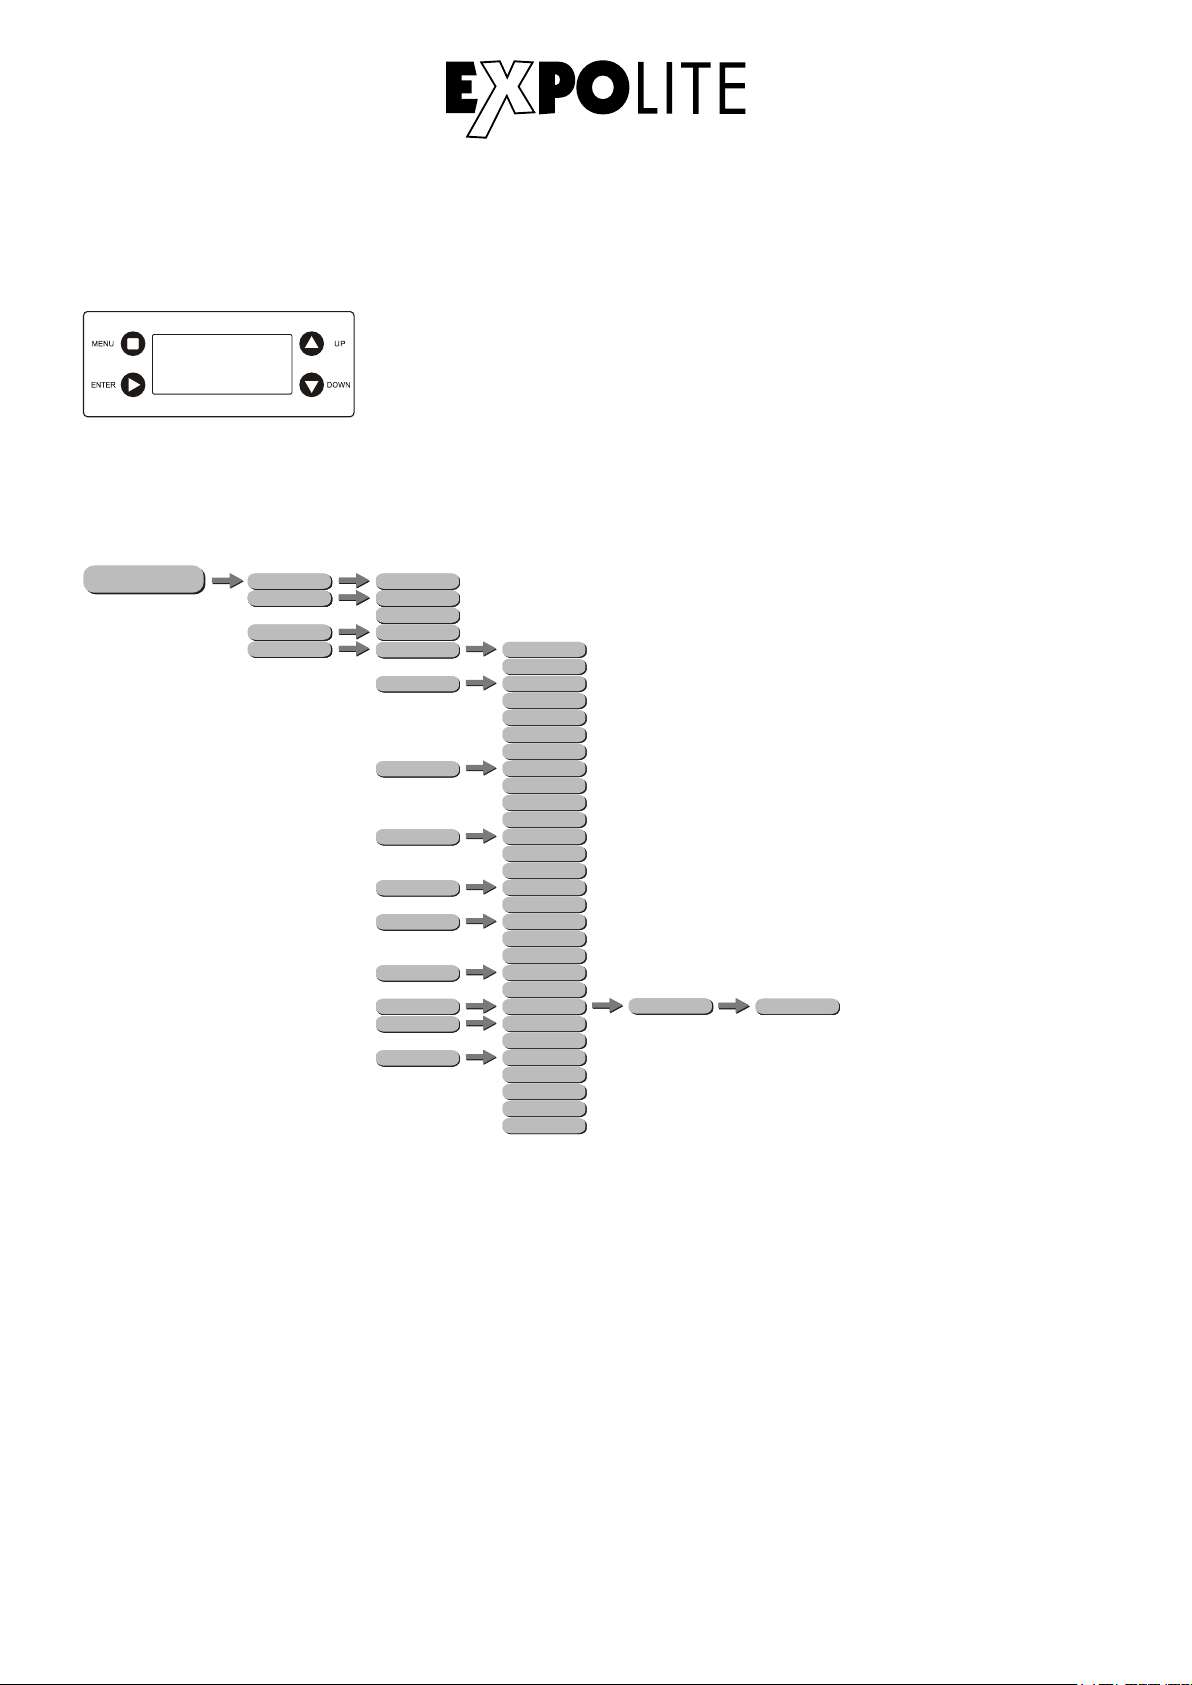
Bedienelemente
Steuerung
Specifications
Menu
Control
FOCON SHOWTECHNIC
Vertriebsgesellschaft mbH
Teichweg 4+6
D-49504 Lotte/Wersen
Telefon: ++49 (0) 541-77095-0
Fax: ++49 (0) 541-77095-27
www.focon-showtechnic.com
by
Die beiliegenden Bedienhinweise für Expolite
Geräte sind Bestandteil dieser Bedienungs-
anleitung. Lesen Sie diese sorgfältig, bevor
Sie das Gerät in Betrieb nehmen.
The enclosed General Information for Expolite
Units are part of these user manual. Read them
carefully before operating the device.
Inhalt - Content
Inhalt - Content
Seite / Page
Lieferumfang
Technische Daten
Abmessungen
Installation
Bedienung
Steuerung mit DMX512
Delivery
Product Information
Dimensions
Installation
Operation
Using DMX512 Controller
DE D-04
ENG
D-05
D-06
D-07
D-08
D-11
E-12
E-13
E-14
E-15
E-16
E-19

Lieferumfang
- Expolite LED Profile 750 HD
Expolite Geräte werden vor dem Versand sorgfältig geprüft. Sollte der
Lieferumfang dennoch nicht vollständig sein, wenden Sie sich bitte umgehend
an Ihren Vertriebspartner.
- Anschlusskabel für Spannungsversorgung
- Bedienhinweise für Expolite Geräte
- Bedienungsanleitung
D-04

Technische Daten
Spannungsversorgung
Maximale Leistungsaufnahme
Gewicht
Betriebstemperatur
Abmessungen
Luftfeuchtigkeit
Schutzklasse
Gehäuse
LEDs
LED Treiberstrom
Abstrahlwinkel
Steuerung
DMX-Kanäle
Anschlüsse
100V - 240V AC 50/60Hz
250W
645 x 222 x 301mm
9,6kg
Power In/Out | DMX In/Out
-0°C - 45°C
< 98%
IP 20
Aluminium-Strangpressprofil
ca. 190W 3200K*
3,3A
5°/10°/19°/36°/50°/15°-30°/25°-50° (optional)
Stand-Alone / DMX512
1 - 3 (1/2/3)
* Toleranzbereich der Farbtemperatur entsprechend Herstellerangabe +/- 10%.
D-05
CRI >90

Abmessungen
D-06
60,32 mm
22,81 mm
30,23 mm
301.00
222.00
645.00

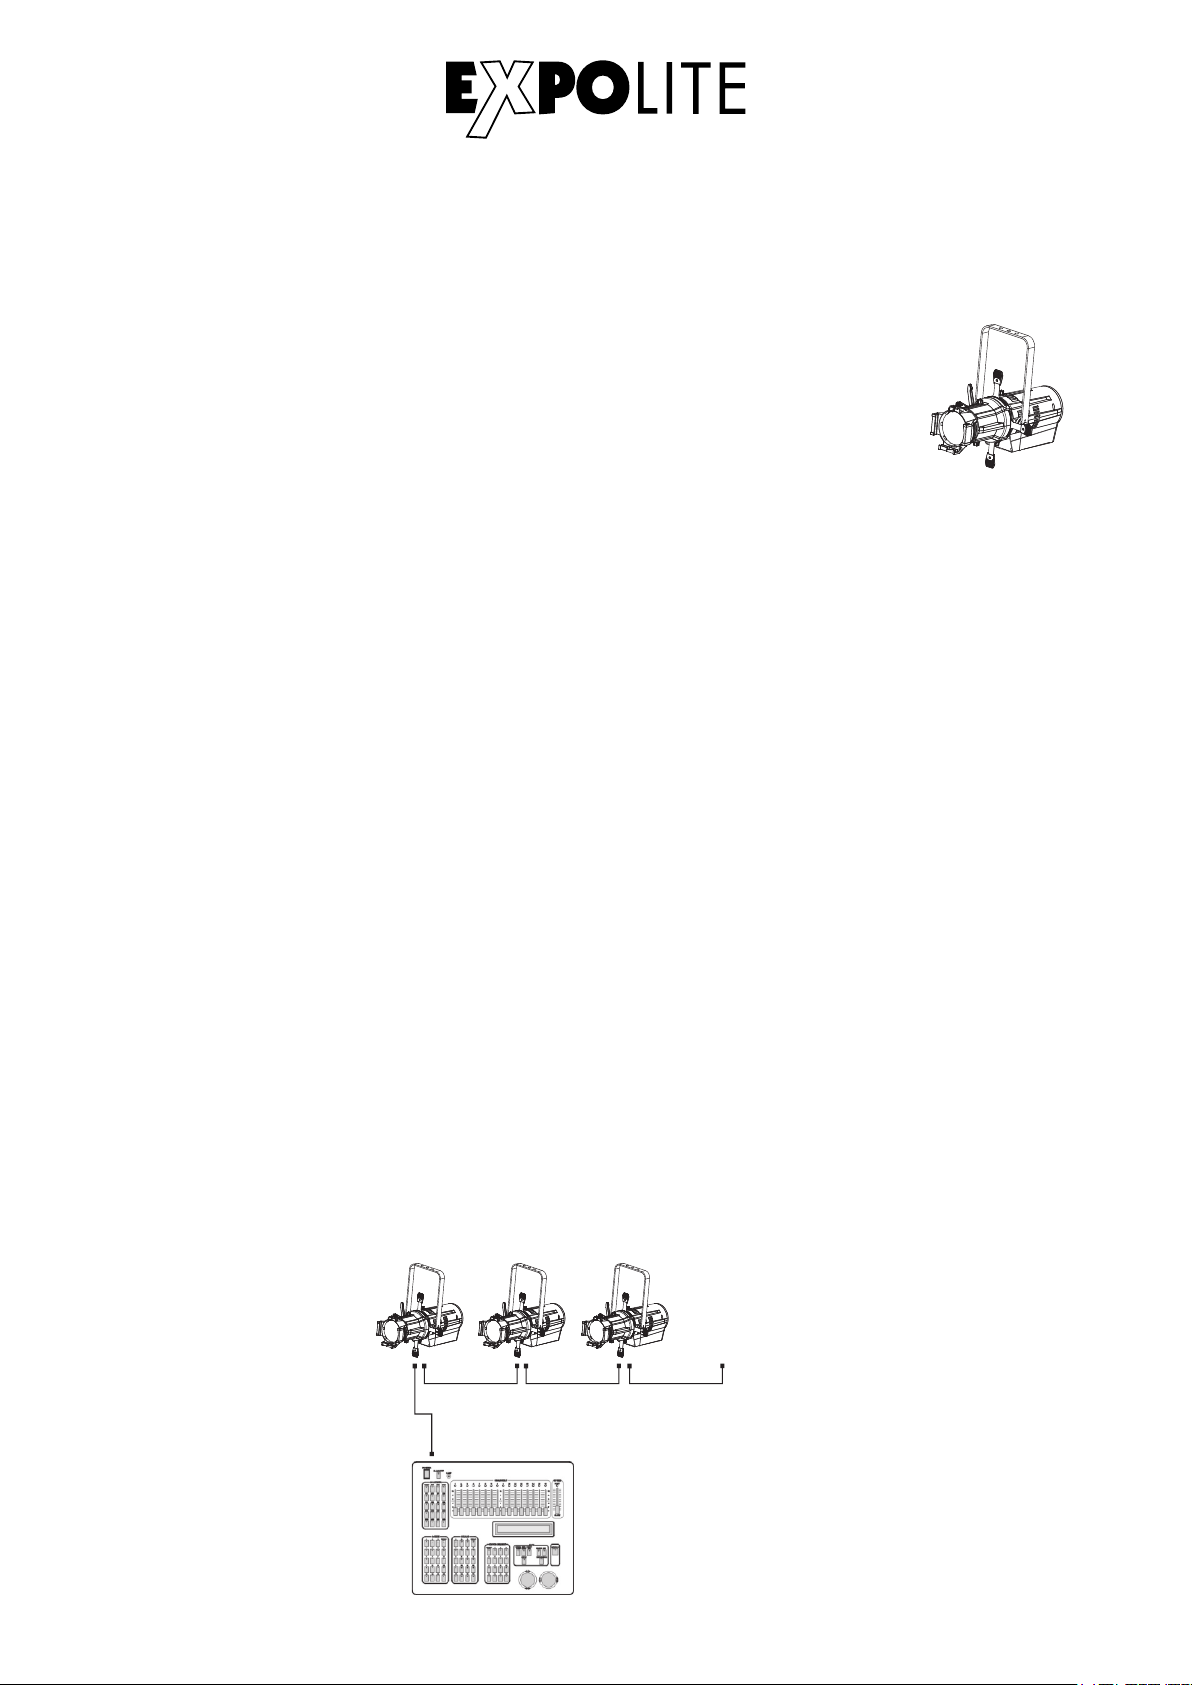
Installation
Montage
DMX512
CONTROLLER
............
DMX Addr.1 DMX Addr.(Nx1)+1 DMX Addr.(Nx2)+1
DMX-Verbindung
Die Geräte mit geeigneten DMX-Kabeln miteinander und mit dem Kontroller verbinden.
Die vorgesehenen DMX-Adressen und Personalities an den Geräten einstellen.
Verbindung der Spannungsversorgung
Bei 230V Netzspannung: maximal 7 Geräte in Reihe.
Bei 120V Netzspannung: maximal 4 Geräte in Reihe.
D-07
Hängend
Das Gerät kann am Haltebügel hängend montiert werden. Geräte müssen
entsprechend der jeweils gültigen Vorschriften sicher montiert und mit einer
zweiten Sicherung gegen Herabfallen versehen werden.
Stehend
Das Gerät kann stehend betrieben werden. Hierfür ist eine entsprechende
Halterung (zum Beispiel ein Bodenstativ) notwendig. Eine sichere und
ausreichend rutschhemmende Standfläche ist sicherzustellen!
HINWEIS
Das LED Modul kann in jeder beliebigen Lage betrieben werden. Die
Neigung im Bügel kann bequem durch Lösen der Arretierungsschraube
verstellt werden.
Bedienung
MENU
PERSON
DIMMING 0 - 100
MENU - Taste:
ENTER-Taste:
UP-Taste:
DOWN-Taste:
Eine Menüebene aufwärts
In gewähltes Menü springen; Eingabe bestätigen
Aufwärts blättern; Wert erhöhen
Abwärts blättern; Wert verringern
Bedienelemente am Gerät
Menüstruktur
SETTING
D-08
PERSON
RUN HSIC
DMX
PERSON
RUN MODE HSIC
DMX 512
PERSON
ADDRESS HSIC
0 - 512
HSICDIMMER
HSIC
CURVE
HSIC
DMX ERROR
HSIC
SLOCK
OFF
DIM1
DIM2
DIM3
OFF
CURV1
CURV2
CURV3
SAVE
BLACK
OFF
ON
HSICKEY OFF
ON
DIM4
HSIC
PERSONALITY UNO
DOS
STD.P
HSIC
RESET **** HSIC
SEND
**** HSIC
****
RESET
HSIC
PERFORM LIVE
STUDIO
POWER
HSIC
PWM_RATE 600Hz
1200Hz
HSIC
DMX
HSIC
SLAVE
HSIC
MODE SETTING SELF
MAST
2000Hz
4000Hz
25000Hz

DMX-Adresse einstellen
Im Menü wird im Punkt ADDRESS die DMX-Startadresse des Gerätes eingestellt. Diese bleibt auch
bei dem Wechsel der Personality erhalten.
MENU
PERSON HSIC
ADDRESS 001 - 512
DMX-Kanalbelegung einstellen
MENU
Im Menü SETTING, Untermenü PERSONALITY wird die Belegung der DMX-Kanäle des Gerätes
festgelegt. Es stehen die Modi UNO (1 Kanal), DOS (2 Kanäle), STD.P (3 Kanäle) zur Verfügung.
Statische Szene einstellen
Im Menü kann im Punkt DIMMING die Helligkeit des Scheinwerfers im Stand-Alone Betrieb
eingestellt werden.
MENU
D-09
PERSON
SETTING HSIC
PERSONALITY UNO
DOS
STD.P
Runmode auswählen
Im Menü RUN MODE wird der Betriebsmodus eingestellt. Für den Betrieb an einem DMX-Kontroller
muss DMX 512 aktiviert werden. Im Modus SLAVE wird das Gerät von einem Master-Gerät
gesteuert.
MENU
PERSON
RUN HSIC
DMX
HSIC
SLAVE
PERSON
RUN MODE HSIC
DMX 512
PERSON
DIMMING 0 - 100

Verschiedene Einstellungen
MENU
SETTING
HSICDIMMER
HSIC
CURVE
HSIC
DMX ERROR
HSIC
SLOCK
OFF
DIM1
DIM2
DIM3
OFF
CURV1
CURV2
CURV3
SAVE
BLACK
OFF
ON
HSICKEY OFF
ON
DIM4
HSIC
PERSONALITY UNO
DOS
STD.P
HSIC
RESET **** HSIC
SEND
**** HSIC
****
RESET
HSIC
PERFORM LIVE
STUDIO
POWER
HSIC
PWM_RATE 600Hz
1200Hz
HSIC
MODE SETTING SELF
MAST
2000Hz
4000Hz
25000Hz
Das Passwort lautet: UP - DOWN - UP - DOWN - ENTER
KEY: aktiviert oder deaktiviert den Passwortschutz des Gerätes bei Gerätestart. Wenn KEY auf
ON gestellt ist, startet das Gerät gesperrt und das Menü wird jeweils 30 Sekunden nach der letzten
Eingabe erneut gesperrt. Für Änderungen im Menü muss dann das Passwort UP - DOWN - UP -
DOWN - ENTER eingegeben werden.
DIMMER: stellt die gewünschte Dimmkurve zur Simulation eines Halogenleuchtmittels ein (OFF/
DIM1/DIM2/DIM3/DIM4).
CURV dimming
1: OFF
2: CURV1
3: CURV2
4: CURV3
1
2
3
4
(100%)
CURVE: Die Dimmerkurve wird, wie auf der Abbildung ersichtlich, eingestellt.
D-10
PERFORM: erlaubt dem User das Verhalten der Lüftergeschwindigkeit des Gerätes zwischen LIVE,
STUDIO und POWER zu unterscheiden. Im Modus STUDIO läuft der Lüfter möglichst geräuschlos,
stattdessen reduziert die Lampe bei Überhitzung die Helligkeit der LED. Im Modus LIVE wird das
Verhältnis zwischen Lüfter und Helligkeit möglichst optimal gesteuert. Im Modus POWER wird die
maximale Helligkeit möglichst lange aufrecht erhalten. Die Geschwindigkeit des Lüfters kann in
diesem Modus bis zum Maximum gefahren werden.

D-11
SLOCK: Settings Lock. In diesem Menüpunkt wird eingestellt, ob das Menü SETTING nur mit
Eingabe der Passwortes erreichbar ist. In diesem Fall (ON) wird das Passwort UP - DOWN - UP -
DOWN - ENTER benötigt, um Einstellungen vorzunehmen.
DMX ERROR: stellt das Verhalten bei Unterbrechung des DMX-Signals ein. SAVE um den letzten
empfangenen Wert zu halten, oder BLACK für Blackout.
RESET: setzt die editierbaren Einstellungen zurück auf die Werkseinstellungen.
MODE SETTING: legt fest, ob das Gerät Daten als Master an andere Geräte sendet (MAST), oder
nicht (SELF).
PWM_RATE: bietet die Möglichkeit die PWM-Frequenz des Gerätes anzupassen (600HZ/1200HZ/
2000HZ/4000HZ/25000HZ).
Installierte Software Version
Während des Bootens des Gerätes wird für ca. 5 Sekunden die aktuell auf dem Gerät installierte
Softwareversion angezeigt.
DMX-Kanalbelegung
Dieses Gerät verfügt über verschiedene DMX-Personalities. Bei diesen werden unterschiedlich
viele DMX-Kanäle belegt und die Reaktion des Gerätes unterscheidet sich entsprechend. Es sind
drei DMX-Personalities (1-/2-/3-Kanäle) wählbar.
Durch Änderungen in der Gerätesoftware kann es zu weiteren oder geänderten Funktionen kommen.
Auf der Website steht das aktuellste Dokument „DMX-Channels“ als PDF zum Download zur Verfügung.
Steuerung mit DMX512
UNO
1 0-255 Master Dimmer
DOS
1 0-255 Master Dimmer
2 0-255 Master Dimmer Fine
STD.P
1 0-255 Master Dimmer
2 0-255 Master Dimmer Fine
Strobe
0-9 No Function
10-99 Strobe (Slow to fast)
100-109 No Function
110-179 Lightning Strobe
180-189 No Function
190-255 Random Strobe
3

Delivery
- Expolite LED Profile 750 HD
Expolite devices are carefully checked before shipment. If the delivery is not complete,
please contact your distributor immediately.
- Power connection cable
- General Information for Expolite Units
- User Manual
E-12

Product Information
* Tolerance in colour temperature according to LED manufacturer +/- 10%.
E-13
Voltage
Power Consumption
Weight
Ambient Temperature
Dimensions
Humidity
Protection
Housing
LEDs
LED Current
Optics
Control
DMX-Channels
Connectors
100V - 240V AC 50/60Hz
250W
645 x 222 x 301mm
9,6kg
Power In/Out | DMX In/Out
-0°C - 45°C
< 98%
IP 20
Extruded Aluminium Housing
ca. 190W 3200K*
3,3A
5°/10°/19°/36°/50°/15°-30°/25°-50° (optional)
Stand-Alone / DMX512
1 - 3 (1/2/3)
CRI >90

Dimensions
E-14
60,32 mm
22,81 mm
30,23 mm
301.00
222.00
645.00
Installation
Mounting
DMX-Connection
Use specified DMX-cables to connect the units to each other and to connect them to the control-
desk. Enter the addresses and personalities to the units.
Powerconnection
230V: max. 7 fixtures in a row.
120V: max. 4 fixtures in a row.
DMX512
CONTROLLER
............
DMX Addr.1 DMX Addr.(Nx1)+1 DMX Addr.(Nx2)+1
Hanging
The fixture can be mounted in a hanging position using the mounting
bracket. Fixture must be safe mounted in accordance with the relevant
regulations and provided with a safetycord to prevent falling.
Standing
The fixture can be mounted in an upright or sitting position. An appropriate
attachment (e.g. floorstand) is necessary. A safe and sufficient anti-slip
ground must be ensured!
NOTE
The LED module can be operated in any position.
E-15

Operation
Menu Map
E-16
MENU:
ENTER:
UP:
DOWN:
Return to previous menu
Enter currently selected menu
Scroll Up: Increase value
Scroll down: Decrease value
Display Operation
MENU
PERSON
DIMMING 0 - 100
SETTING
PERSON
RUN HSIC
DMX
PERSON
RUN MODE HSIC
DMX 512
PERSON
ADDRESS HSIC
0 - 512
HSICDIMMER
HSIC
CURVE
HSIC
DMX ERROR
HSIC
SLOCK
OFF
DIM1
DIM2
DIM3
OFF
CURV1
CURV2
CURV3
SAVE
BLACK
OFF
ON
HSICKEY OFF
ON
DIM4
HSIC
PERSONALITY UNO
DOS
STD.P
HSIC
RESET **** HSIC
SEND
**** HSIC
****
RESET
HSIC
PERFORM LIVE
STUDIO
POWER
HSIC
PWM_RATE 600Hz
1200Hz
HSIC
DMX
HSIC
SLAVE
HSIC
MODE SETTING SELF
MAST
2000Hz
4000Hz
25000Hz
Setting DMX-Address
The DMX start address of the fixture is set in the menu ADDRESS. This is retained even when
changing the personality.
MENU
Setting DMX-Personality
MENU
The personality is set in the menu SETTING, submenu PERSONALITY. There are three different
modes which can be chosen: UNO (1 channel), DOS (2 channels), STD.P (3 channels).
Editing Static Scene
The intensity for stand alone use of the fixture can be set in the menu DIMMING.
MENU
E-17
Choosing Run Mode
The operating mode is set in menu RUN MODE. For operation on a DMX-controller DMX 512 needs
to be set. SLAVE sets the fixture into slave mode.
MENU
PERSON HSIC
ADDRESS 001 - 512
PERSON
SETTING HSIC
PERSONALITY UNO
DOS
STD.P
PERSON
DIMMING 0 - 100
PERSON
RUN HSIC
DMX
HSIC
SLAVE
PERSON
RUN MODE HSIC
DMX 512

Miscellaneous Setting
MENU
SETTING
HSICDIMMER
HSIC
CURVE
HSIC
DMX ERROR
HSIC
SLOCK
OFF
DIM1
DIM2
DIM3
OFF
CURV1
CURV2
CURV3
SAVE
BLACK
OFF
ON
HSICKEY OFF
ON
DIM4
HSIC
PERSONALITY UNO
DOS
STD.P
HSIC
RESET **** HSIC
SEND
**** HSIC
****
RESET
HSIC
PERFORM LIVE
STUDIO
POWER
HSIC
PWM_RATE 600Hz
1200Hz
HSIC
MODE SETTING SELF
MAST
2000Hz
4000Hz
25000Hz
The default password is: UP - DOWN - UP - DOWN - ENTER
KEY: activates or deactivates the password protection of the fixture. If set ON the fixture is password
protected when started. 30 seconds after the last setting the menu is locked again. To be able to
make changes in the menu the password UP - DOWN - UP - DOWN - ENTER needs to be typed in.
DIMMER: controls different dimming speeds to simulate a halogen bulb (OFF/DIM1/DIM2/DIM3/
DIM4).
CURV dimming
1: OFF
2: CURV1
3: CURV2
4: CURV3
1
2
3
4
(100%)
CURVE: In curve menu, the dimmercurves are set as shown below.
PERFORM: gives the user the opportunity to change the performance of the fan between LIVE,
STUDIO and POWER. In STUDIO mode the fan is run on low noise. In case of overheat the intensity
of the led module is regulated down. In LIVE mode, fan speed and the intensity of the led module is
balanced with each other to reach the best output with as low fan speed as possible. In POWER
mode the temperature of the fixture is primary regulated by the fan, to keep a high intensity as long
as possible.
E-18

E-19
SLOCK: Settings Lock. In this menu is set whether the menu SETTING is only accesable after
entering the password (ON) or without a password (OFF). Default password is UP - DOWN - UP -
DOWN - ENTER.
DMX ERROR: sets how the fixture responses if DMX-signal gets lost. Set SAVE to hold the last
received value or BLACK for blackout.
RESET: sets all editable settings back to factory default.
MODE SETTING: sets if the fixture is a master and sends data to other fixtures (MAST), or not
(SELF).
PWM: gives the user the possibility to adjust the PWM-frequency of the leds (600Hz/1200Hz/2000Hz/
4000Hz/25000Hz).
Current Software Version
When the software of the fixture is booting, the current installed software version is shown for about 5
seconds in the display.
DMX-Channel assignment
This device has several DMX personalities. In each personality a different number of DMX channels
is used and the reaction of the device differs accordingly. There are three DMX personalities with 1, 2
and 3 channels selectable.
Because of changes in the firmware of the fixture, functions can be added or changed.
You can find the current version „DMX-Channels“ as PDF-file on the website, ready to download.
Using DMX512 Control
UNO
1 0-255 Master Dimmer
DOS
1 0-255 Master Dimmer
2 0-255 Master Dimmer Fine
STD.P
1 0-255 Master Dimmer
2 0-255 Master Dimmer Fine
Strobe
0-9 No Function
10-99 Strobe (Slow to fast)
100-109 No Function
110-179 Lightning Strobe
180-189 No Function
190-255 Random Strobe
3

© 2018 by Focon Showtechnic Vertriebsgesellschaft mbH
Table of contents
Languages:
Other Focon Showtechnic Lighting Equipment manuals


Popular Lighting Equipment manuals by other brands


Lightolier
Lightolier Lightolier E1 Series Specifications

Lightolier
Lightolier LSB-16 Specification sheet

B-K lighting
B-K lighting MICRO NITE STAR installation instructions

EuroLite
EuroLite EL Wire 2m user manual

Philips
Philips HF3480 Specifications

Aqua Creek Products
Aqua Creek Products Cycle Attachment Quick start manual