focuway M2 User manual


1
Category
REMINDER .......................................................................... 3
PACKAGE INCLUDE ........................................................... 4
Installation guide................................................................ 4
CAMERA INSTALLATION.................................................. 5
PREPARE A COMPATIBLE MEMORY CARD....................... 5
M2 DASH CAM.................................................................... 8
GETTING TO KNOW THE CAMERA BODY ......................... 8
SHORTCUT NAVIGATION (Button Function) .................. 13
SYSTEM............................................................................. 13
Camera Settings Page.................................................... 13
Q&A.................................................................................. 20
λHow to Start Recording? ........................................ 20
λHow to Switch to Photo Mode ............................... 20
λHow to download the videos & photos to PC:........ 21
λHow to turn off the recording sound ..................... 22
λHow to manually lock the recording video ............. 22
λHow to playback/ delete the videos on the dash
cam? ............................................................................ 22
λHow to set the date/time?..................................... 24
λHow the parking monitor function works?............. 25
λHow can makes my dash cam work for 24hrs ........ 26

2
WiFi & APP ....................................................................... 26
Download APP .............................................................. 26
Android ........................................................................ 26
Two ways to download App. ........................................ 26
IOS ............................................................................... 27
Connect phone to M2 ................................................... 27
Export the videos & photos to PC.................................. 46
TROUBLE SHOOTING ........................................................ 47
λAlways switch to WIFI interface of the phone when
connect to App............................................................. 48
Please restart the WIFI function and App to connect it
again. ........................................................................... 48
λM2 dash camera automatically switch on & off
frequently. ................................................................... 48
λWhy the M2 dash cam ask you to ‘format’ the SD
card again after you format the SD card?..................... 48
λThe M2 dash cam auto power off immediately when
you turn off the engine. ............................................... 48
Specifications ................................................................... 49

3
REMINDER
FOCUWAY ®After-sale Support Team E-mail:
support@focuway.com
In hot weather, do not expose the camera directly to the sun
when the car is parked. The working temperature UP to 65°C,
if the working temperature, exceeding the max working
temperature may damage the screen.
We don’t recommend to turn on the motion detection function
when driving, it will affect continuous recording of the dash cam.
The battery of the camera (200mA lithium battery) is only for
emergence file backup. M2 dash cam will shut off within 5
seconds when disconnecting the power, this is to save the battery
power to store important videos. The fully charged battery cannot
support too long continuous recording. So we recommend
connecting an external power supply if you want the dash cam to
keep working after parked. A power bank or hard wire kit will be
ok. But if you want to the dash cam keep working after engine off
without connect any external power, you can set the ‘Delayed
Power Off’ function to OFF or turn on the dash cam manually.
The dash cam will automatically power on and start recording
when you start the engine, please note, if the dash cam doesn't
connect to power supply and you turn it on manually, it will not

4
automatically start recording, you need to press OK button to
start recording.
This is NOT an IP/4G Dash Cam - It does NOT allow you to
view your recording remotely, you can use the WIFI function
within 5 meters). And you need to connect the dash cam
WIFI every single time you want to use the App.
PACKAGE INCLUDE
FOCUWAY M2 Dash Camera USB-C Data Cable
Car Charger with USB-C port Crowbar
Rotating Bracket User Manual
Installation guide
Search “focuway” on YouTube.com to find installation video
guide:
Find and subscribe our channel on YouTube
Step1
Step2
5
Reminder: Please follow the steps bellow to install the suction
mount correctly, it is necessary:
Remove the protective film on the bracket;
Install the bracket on the camera and rotate it to a suitable
position;
Clean the windshield and press the bracket firmly on the
windshield, turn the bracket knob to the specified position
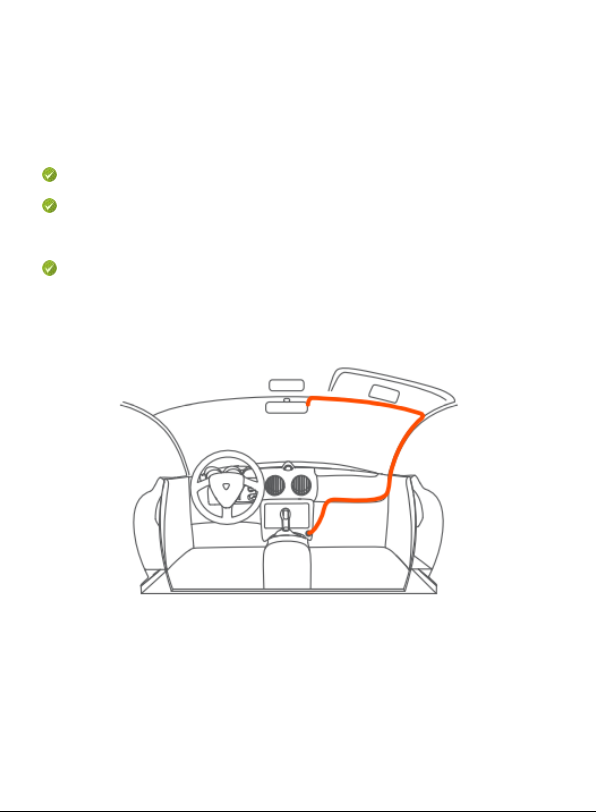
CAMERA INSTALLATION
Carefully rote the power cable around the windscreen and tuck it
under the trim.
PREPARE A COMPATIBLE MEMORY CARD
A. Get a Right SD Card

6
32GB MicroSD card has been installed and formatted in the dash
cam, you can install the dash cam and connect the power to use
directly, if you use a SD card from other brand, please format it follow
the steps below:
Requirements for card specifications:
Type: MicroSD;
Capacity: 32GB – 128GB is recommended;
Speed Class: C10 or above, U3 is necessary.
If you use a new SD card other brand, the M2 will prompt you to
format it when you insert the SD card the first time. Please follow the
below to format the SD card:
1. Short press the MENU button to enter the Camera Settings.
(Please PRESS OK button to stop recording before that if the dash
cam automatically starts recording when you power it).
2. Press DOWN button scroll down the menu until you see the
"Format" option.
3. Press the OK button, then press DOWN button and the OK button
again to select Confirm.

7
NOTE: if the dash cam cannot recognize the SD card after you
format it, please format it again on the computer: 32GB SD card
should be format to FAT32; 64-256GB MicroSD card should be
formatted to exFAT and set the Allocation
Units Size to 32KB or 64KB, depending on
whether your computer operating system is
32-bit or 64-bit.
Follow the instructions below to format the
MicroSD card on your computer.
Windows
1. Insert the MicroSD card into your
computer. You may need a SD card reader
for this.
2. Open File Explorer and locate the drive
letter for your MicroSD card. Right-click the drive and select Format.
3. Set the File System to exFAT (32GB SD card choose FAT
format). Set the Allocation unit size to 32KB OR 64KB. Select Start
to begin.
4. Select OK to begin formatting the card.
MAC
1. Insert the MicroSD card into your computer. You may need a card
reader for this.
2. Open Disk Utility. To do this, click on the magnifying glass in the
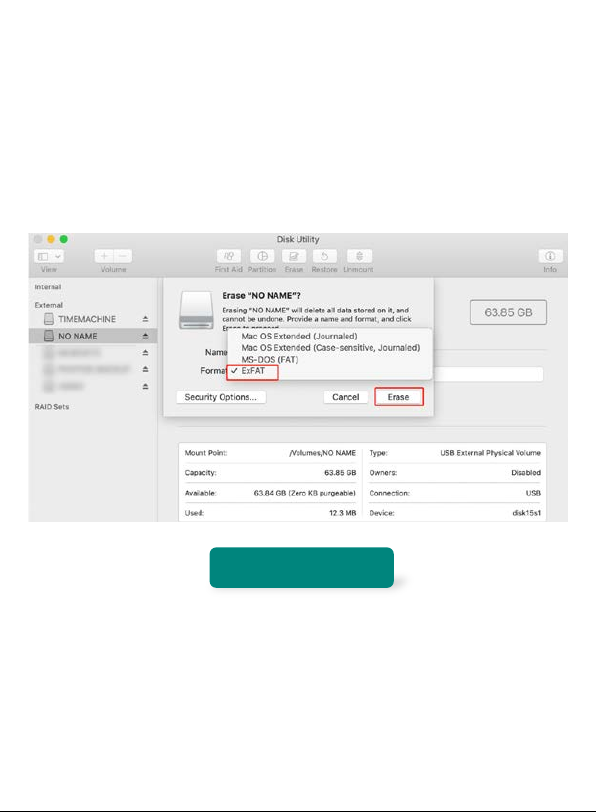
8
top-right corner of your computer screen. Type “disk utility” in the
search box that opens, then click on the “Disk Utility” application that
comes up.
3. Find the card in the left side of the window.
4. Select exFAT (32GB SD card choose MS-OOS FAT) click the
ERASE tab in the middle of the window.
M2 DASH CAM
GETTING TO KNOW THE CAMERA BODY

9
A: Remaining recording time
B: Loop recording
C: Parking monitor
D: WIFI OFF
E: Motion detection
F: SD card installed
G: Microphone
H: Battery charging
I: Video Locked
J: Resolution
INTERFACES

10

11
NO Name Description
1 POWER/OK Long press to turn ON/OFF camera,
short press to START/STOP recording
2 UP Button
Select button; when camera is
recording, press UP Button to Turn
ON/OFF WIFI
3 MENU Button When camera is standby, press MENU
button once to enter the first MENU
setting page, press twice to enter the
second setting page; when the dash
cam is recording, press MENU button
to lock current video manually
4 DOWN Button
Select button; when camera is
recording, press DOWN
button to
switch display mode: ①
picture in
picture ②front and inside ③front only
④inside only
5 MODE Button When camera is standby: short press
MODE button once to switch PHOTO
MODE and RECORD MODE; short
press twice to enter the PLAYBACK
MODE. when camera is recording,

12
press MDE button to turn ON/OFF Mic
6 INTERIOR LENS Inside-facing camera with 4IR LEDs,
IR LED is default set to AUTO
7 POWER Port USB-C port, connect to the car charger
8 MOUNT
CONNECTOR
Connect to the suction mount
9 MICROPHONE Record voice inside
10 CARD SLOT Insert the SD card
11 HARD RESET
HOLE
Use tool need to reset dash cam
Hard Reset Hole: If your camera doesn't turn on or the system
freezedue tosome unexpected problem, you caninsert thetool
needle provided into the pinhole until ‘click’.This will hard reset
the camera.
MicroSD Card Slot: Slide the compatiblecard into the slot in the
right direction until it clicks into place. If you feel the MicroSD
card cannot be inserted into the place, please use your
fingernail to push the card in.
Mic Input: Microphone
USB-C Power Port: This should be connected to the type-c
connector of the car charger cable provided in the package.
The other end of the car charger cable is connected to the

13
cigarette lighter. If you want to check the video on the computer,
you need to use the card reader or connect the dash cam to
computer with USB-C data cable included to export the video
from SD card to the computer.
SHORTCUT NAVIGATION (Button Function)
When the dash cam is Recording Status:
Press OK button will stop recording.
Short press MENU button locks current video.
Short press MODE button turns ON/OFF microphone.
Short press UP button to turn ON/OFF WIFI; short press
DOWN button to switch display mode.
SYSTEM
Camera Settings Page
Turn on the Dash Cam, short press MENU button to enter the setting
page. NOTE: Please confirm that the dash cam stops recording
before you enter the MENU setting page, otherwise you can’t enter
the MENU setting page. (Press OK Button to stop recording)
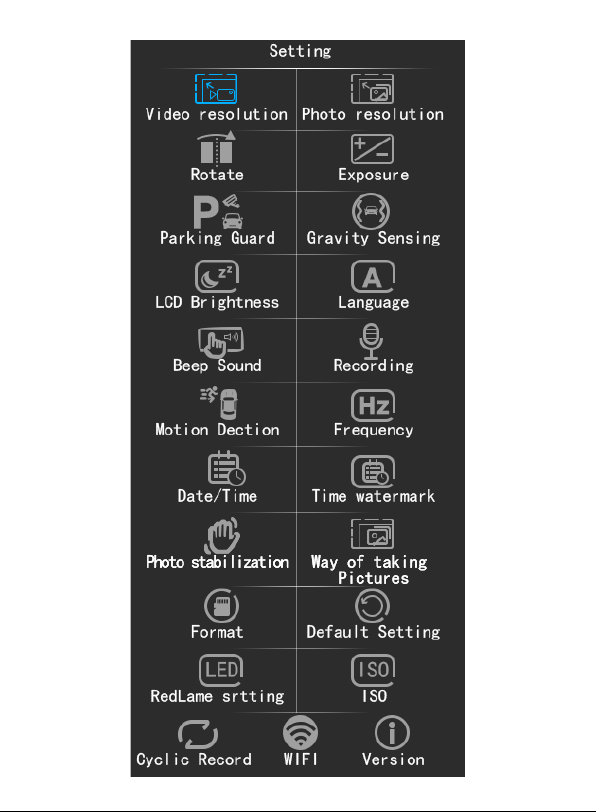
Below is how the Record Settings MENU looks like. You are able to
change the settings for the following functions by entering the
camera menu:
14

15
Video Resolution: The default setting is 1080P+1080P front and
inside. You can change it to 1080P+720P front and inside
The dash cam will record front and inside.
Photo resolution: The default is set to 2592x1952 5M. You can
change it to: 3456x2448 8M, 3648x2736 10M, 4032x3024 12M.
Rotate: Default set to ON. It controls the inside camera reverse or
not.
Exposure: +3,+2,+1,+0,-3,-2, -1. Default is set to +0.0. It represents
the exposure intensity of the lens.
Parking Guard: off/on. Default is set to OFF.
If you set the parking guard to ON, there are two different situations
after the parking guard is triggered:
①If the camera remains connected to the power source even after
turn off the engine (such as you connect it to the power bank
with USB cable or you have hardwired your M2 dash cam), the
dash cam will continue recording under this situation; if you turn
off the dash cam manually (long press the POWER button) after
parked, the dash cam will automatically power on and start to
record a 30s emergency video when it detects collision and
shakes, it will continue recording after the 30s emergency video
recording (Emergency video will be locked).
②If the dash cam does not connect to any external power, it will
automatically shut off within about 30 seconds after you turn off

16
the engine. The dash cam will auto power on and record a 30s
emergency video when it detects collision and shake, then auto
shut off after that. So, we recommend to hard wire your dash
cam if you want to use the Parking monitor function well.
Gravity Sensing: off/ High/ Medium/ Low. Default is set to Low. It is
sensitive enough at the low level. If you set to high level a large
amount of locked videos will be generated to occupy the storage
space of Micro-SD card, the camera will stop recording even auto
power on and off once the Micro-SD card is full, and ask you to
format the Micro-SD card.
LCD Brightness: Default is set to OFF. You can change it to 1
minute/ 3 minute. If you don’t want to the dash cam screen light on
when driving or after parking, but you need to keep the dash cam
recording, you can set it to shut down the screen. If you set it to 1
minute, the screen will shut down within 1 minute if you don’t operate
the dash cam.
Language: 简体中文/English / 日本/ Deutsch ie.
Beep sound: Turn on/off the key sound.
Recording: Turn on/off the microphone. Default is set to ON, if you
don’t want to record the voice, please set it to off.
Motion Detection: off/on. Default is set to OFF. When you turn it on,
dash cam will automatically record when the front camera detects
the movement of object. Three cameras will record at the same time.

17
NOTE: If you want to use this function, you need to keep the dash
cam turning on, since the small battery can't support M2 dash cam
working a long time after engine off (less than 5 minutes), so we
recommend to use hard wire kit to install the dash cam or you can
connect it to a power bank after engine off. The motion sensor is
installed in the main camera, so it only triggered when the front
camera detect movement.
The dash cam will record a 20 seconds videos normally if the motion
detection is triggered. If the front camera does not detect the object
moving during the 20 seconds video recording, the dash cam will
stop recording, otherwise the dash cam will continue to record.
Frequency: 50Hz/ 60Hz. Default is set to 50Hz. UK for 50Hz, US for
60Hz.
Date/Time: Press OK button to enter, press UP/DOWN button to
select right YEAR, press OK button to confirm then it will
automatically switch to MONTH setting, repeat the operation to set
the month and day, time.

18
Time watermark: Default is set to ON.
Photo Stabilization: Default is set to on. It controls the stabilization
of photo taking.
Way of taking pictures: Default is set to 5s. It controls the photo
taking mode and delay setting. 2s/ 5s/ 10s/ Single shot.
Format: Cancel/ OK. Used to format the MicroSD CARD.
Default setting: Restore factory settings
Red-lamp setting: Default is set to AUTO. It controls the front IR
LED. Please note: the inside 4 LEDs is set to AUTO, this is a fixed
setting, cannot be changed.
ISO: Auto/ 100/ 200/ 400. Adjust the light sensitivity.
Cyclic Record: off/ 1 min / 3 min/ 5 min. Default is set to 3 min.
When yousetthe loop recording to 3 minutes, each video is recorded
19
in a loop for 3 minutes.
When the Micro-SD card becomes full, the camera will automatically
overwrite the oldest video to ensure continuous recording. But the
locked video will not be overwritten and kept in the Micro-SD card
until you format the Micro-SD card.
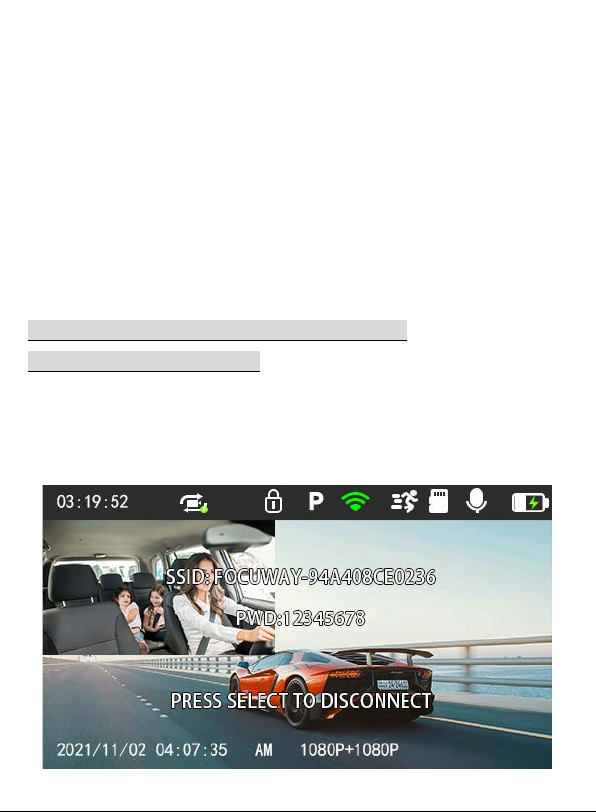
WIFI: Default is set to off. When you want to access the App, please
set it to ON manually. It will show the WIFI name (SSID) and
passwords on the screen.
SSID (WIFI name): FOCUWAY-94A408CE0236
PWD (Pass Word):12345678
After you connect the WIFI, the prompt information will disappear on
the screen. You can press UP button to turn off WIFI.
Table of contents


