Fonax FNX-HDCO User manual

FNX-HDCO
FNX-ST-HDCO
Guía de Instalación Rápida
Terminal SIP Corporativo Avanzado HDCO
Fonax.com
ADVERTENCIA: No apague el FNX-HDCO cuando las luces indicadoras se
encuentren en estado intermitente al momento de iniciar el equipo o
actualizar el rmware. Esto podría ocasionar que la unidad no continúe
funcionando correctamente.
ADVERTENCIA: Solamente utilice la fuente de poder incluida en el
paquete del FNX-HDCO. Utilizar un adaptador de poder alternativo no
certicado podría dañar su unidad.
PRECAUCIONES
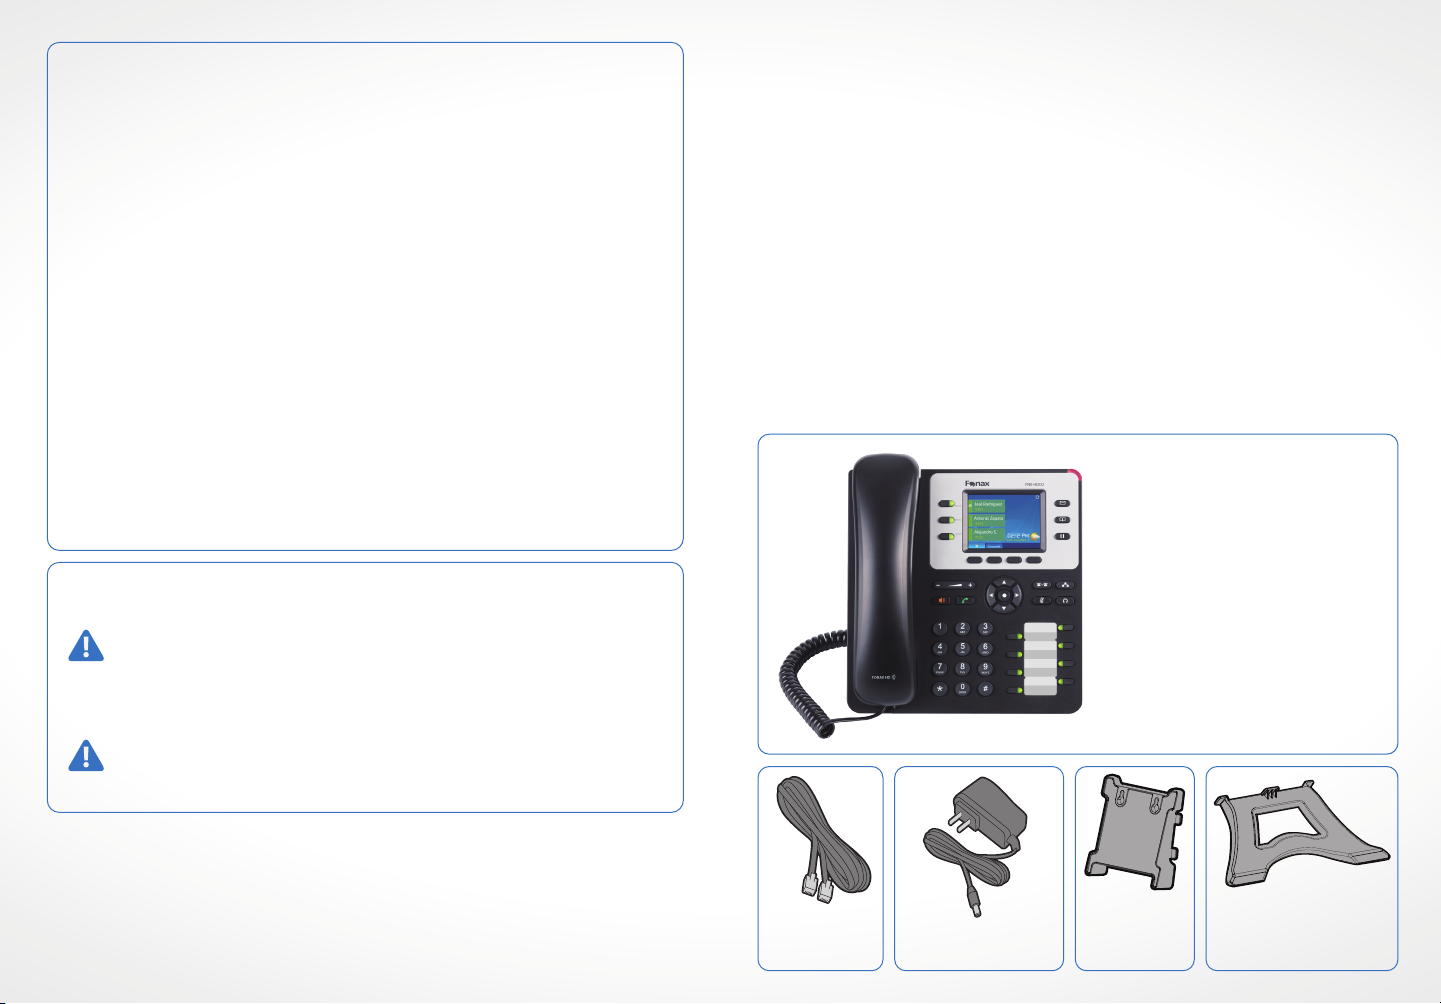
El FNX-HDCO es un avanzado teléfono IP de categoría empresarial con hasta 3
líneas, Patantalla LCD TFT de 2.8 pulgadas a color, 4 teclas XML programables
sensibles al contexto, 8 teclas programables BLF, doble puerto de red Gigabit,
PoE integrado, conferencias de voz de 4 vías y Electronic Hook Switch (EHS).
El FNX-HDCO ofrece calidad de audio en HD tanto en auricular y el altavoz,
cuenta con las principales funcionalidades de telefonía de última generación,
información personalidad y aprovisionamiento automatizado para facilitar su
implementación, protección de seguridad avanzada para mayor privacidad e
interoperabilidad amplia con la mayoría de los dispositivos SIP de terceros y las
principales plataformas SIP/NGN/IMS.
CONTENIDO DEL PAQUETE
INFORMACIÓN GENERAL
El FNX-HDCO no está pre-congurado para soportar o realizar llamadas de
emergencia a ningún tipo de hospital, agencia policial, unidad de cuidado
medico o cualquier otro servicio de emergencia.
Es su responsabilidad contratar un servicio de telefonía de Internet compatible
con el protocolo SIP, congurar el FNX-HDCO para utilizar dicho servicio y
periódicamente probar esta conguración para conrmar que este trabajando
como usted espera.
Si este requisito no es completado, es su responsabilidad contratar un servicio de
telefonía ja o celular para tener acceso a servicios de emergencia.
Fonax no provee conexiones a servicios de emergencia a través del FNX-HDCO.
Ni Fonax ni ninguno de sus accionistas, empleados o aliados son responsables
de ninguna demanda, daño o perdida que esto pueda ocasionar y mediante este
comunicado usted renuncia cualquier reclamo o consecuencia proveniente o
relacionado de la inhabilidad de contactar servicios de emergencias con el
FNX-HDCO y su falta de no haber hecho los arreglos de lugar para accesar estos
servicios de emergencia de acuerdo con el párrafo anterior.
IMPORTANTE
1 x Base Principal
1 x Auricular
1 x Cable Telefónico
1 x Adaptador de
Alimentación 12V DC
1 x Soporte
de Teléfono
1 x Montura
de Pared
1 x Cable
Ethernet
Conecte el auricular a la unidad utilizando el cable telefónico.
Conecte el puerto LAN del teléfono al jack RJ45 de un Hub/switch o
router usando el cable Ethernet.
Conecte la fuente de poder de 12V DC a la salida de alimentación del
teléfono y la salida de electricidad.
La pantalla LCD mostrara un mensaje de aprovisionamiento o de
actualización de rmware. Por favor espere que termine el proceso y la
pantalla muestre la hora y fecha.
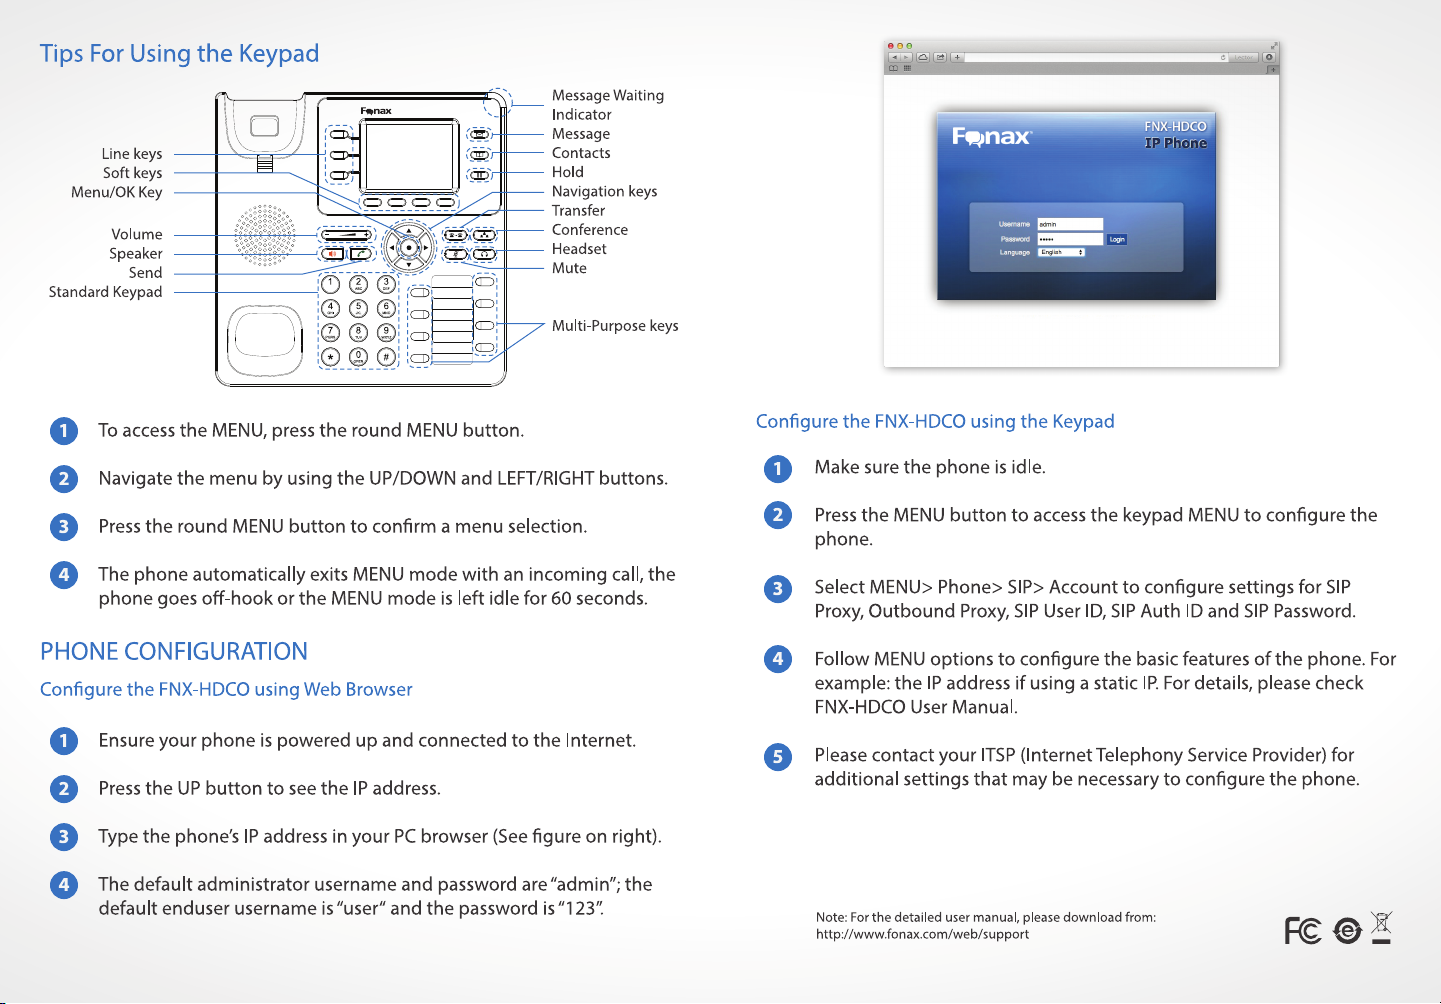
Utilizando la interfaz Web integrada, ingrese la dirección IP del
teléfono en un navegador Web o mediante el teclado del teléfono
congure una dirección IP estática o dinámica con DHCP.
Inserte la montura de pared en la ranura de atrás del teléfono.
Coloque el teléfono en la pared utilizando los oricios.
Hale la lengüeta de la horquilla del auricular. (Ver gura abajo).
Coloque la lengüeta en la misma ranura de tal manera que soporte el
auricular.
Instalando El Teléfono (Montura de Pared)
INSTALACIÓN DEL TELÉFONO
Para instalar el teléfono sobre la mesa con el soporte del teléfono, conecte el
soporte del teléfono en la ranura de la parte inferior para el soporte que esta
detrás del teléfono.
Para congurar el FNX-HDCO, siga los pasos de abajo
CONECTANDO EL TELÉFONO
Instalando el Teléfono (Montura de mesa)
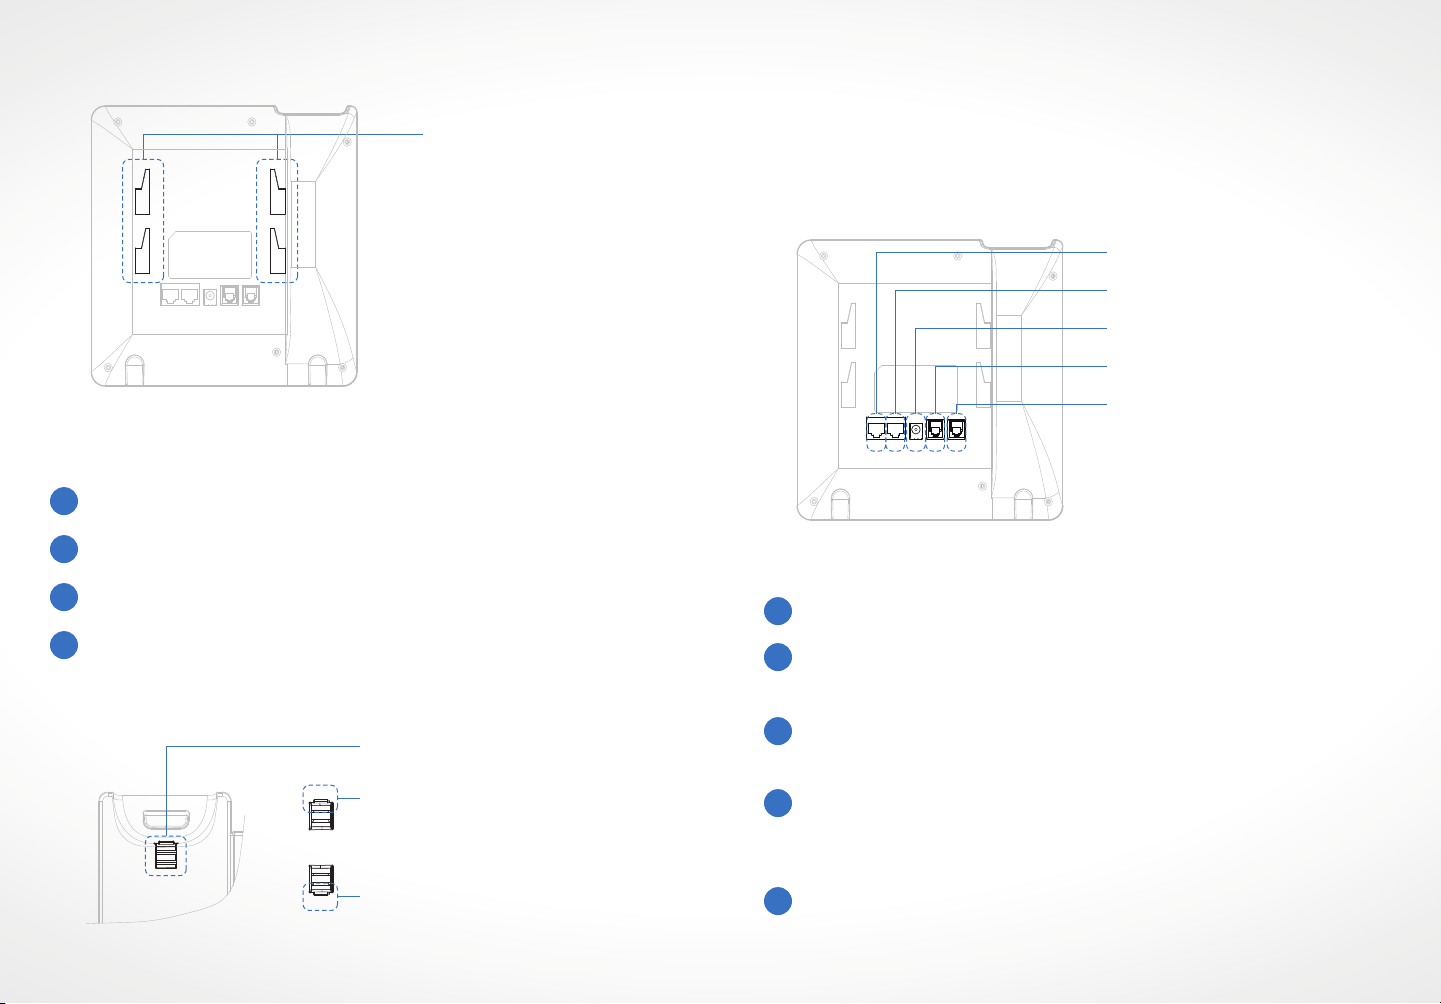
Ranuras para soporte y
montura de pared
21CDPC LAN
HEADSET HANDSET
5
4
3
2
1
4
3
2
1
Lengüeta con extensión
hacia arriba
Soporte de Auricular
Lengüeta con extensión
hacia abajo
21CDPC LAN
HEADSET HANDSET
Puerto PC
Puerto LAN
Alimentación
Puerto de Receptor de Cabeza
Puerto Auricular

FNX-HDCO

WARNING: Please DO NOT power cycle the FNX-HDCO during system
boot up or rmware upgrade.You may corrupt rmware images and cause
the unit to malfunction.
WARNING: Use only the power adapter included in the FNX-HDCO
package. Using an alternative non-qualied power adapter may possibly
damage the unit.
PRECAUTIONS
The FNX-HDCO is a state-of-the-art enterprise grade IP phone that features up
to 3 lines, 2.8 inch TFT Color LCD, 4 XML programmable context-sensitive soft
keys, 8 programmable BLF extension keys, dual Gigabit network ports,
integrated PoE, 4-way voice conferencing, and Electronic Hook Switch (EHS).
The FNX-HDCO delivers superior HD audio quality on the handset and
speakerphone, rich and leading edge telephony features, personalized
information and customizable application service, automated provisioning for
easy deployment, advanced security protection for privacy, and broad
interoperability with most 3rd party SIP devices and leading SIP/NGN/IMS
platforms.
PACKAGE CONTENTS
OVERVIEW
The FNX-HDCO is not pre-congured to support or carry emergency calls to any
type of hospital, law enforcement agency, medical care unit (“Emergency
Service(s)”) or any other kind of Emergency Service.
You must make additional arrangements to access Emergency Services. It is Your
responsibility to purchase SIP-compliant Internet telephone service, properly
congure the FNX-HDCO to use that service, and periodically test your
conguration to conrm that it works as You expect.
If you do not do so, it is your responsibility to purchase traditional wireless or
landline telephone services to access Emergency Services.
Fonax does not provide connections to emergency services via the FNX-HDCO.
Neither Fonax nor its ocers, employees or aliates may be held liable for any
claim, damage, or loss, and you herby waive any and all such claims or causes of
action arising from or relating to your inability to use the FNX-HDCO to contact
emergency services, and your failure to make additional arrangements to access
emergency services in accordance with the immediately preceding paragraph.
IMPORTANT
1 x Main Case
1 x Handset
1 x Phone Cord
1 x 12V Power
adapter
1 x Phone
Stand
1 x Wall
Mount
1 x Ethernet
Cable

Connect the handset and main phone case with the phone cord.
Connect the LAN port of the phone to the RJ-45 socket of a hub/switch
or a router (LAN side of the router) using the Ethernet cable.
Connect the 12V DC output plug to the power jack on the phone; plug
the power adapter into an electrical outlet.
The LCD will display provisioning or rmware upgrade information.
Before continuing, please wait for the date/time display to show up.
Using the phone embedded web server or keypad conguration
menu, you can further congure the phone using either a static IP or
DHCP.
Attach the wall mount to the slot on the back of the phone.
Attach the phone to the wall via the wall mount hole.
Pull out the tab on from the handset cradle (See gure below).
Rotate the tab and plug it back into the slot with the extension up to
hold the handset while the phone is mounted on the wall (See gure
below).
Installing the Phone (Wall Mount)
PHONE SETUP
For installing the phone on the table with the phone stand, attach the phone
stand to the bottom of the phone where there is a slot for the phone stand
(upper part, bottom part).
To setup the FNX-HDCO, follow the steps below
CONNECTING THE PHONE
Installing the Phone (Phone Stand)
Slots for the
wall mount and
phone stand
21CDPC LAN
HEADSET HANDSET
5
4
3
2
1
4
3
2
1
Tab with extension up
Handset rest
Tab with extension down
21CDPC LAN
HEADSET HANDSET
PC Port
LAN Port
Power
Headset Port
Handset Port
FNX-HDCO

FCC Compliance Statement:
This device complies with part 15 of the FCC Rules. Operation is subject to the following
two conditions:(1)This device may not cause harmful interference, and (2) this device
must accept any interference received, including interference that may cause undesired
operation.
Important: Any Changes or modifications not expressly approved by the party responsible
for compliance could void the user's authority to operate the equipment.
Note: This equipment has been tested and found to comply with the limits for a Class B
digital device, pursuant to part 15 of the FCC Rules.
These limits are designed to provide reasonable protection against harmful interference in
a residential installation. This equipment generates, uses and can radiate radio frequency
energy and, if not installed and used in accordance with the instructions, may cause
harmful interference to radio communications. However, there is no guarantee that
interference will not occur in a particular installation.
If this equipment does cause harmful interference to radio or television reception, which
can be determined by turning the equipment off and on, the user is encouraged to try to
correct the interference by one or more of the following measures:
—Reorient or relocate the receiving antenna.
—Increase the separation between the equipment and receiver.
—Connect the equipment into an outlet on a circuit different from that to which the
receiver is connected.
—Consult the dealer or an experienced radio/TV technician for help.
This manual suits for next models
1
Table of contents
Languages:


