Fontanella CWM-01 User manual

Fontanell
AQUA | S PARKLING | CAFÉ
USER MANUAL

2
GENERAL ADVICE
It is important this manual is retained with the appliance for future reference. If
the appliance is sold or transferred to another party, make sure this booklet is
delivered to the new user, so they are made aware of the operation of the
machine and its warnings. Before using the equipment read this manual
carefully.
Knowledge of the information and requirements contained in this manual is
essential for proper installation and proper use of the appliance by the user.
IMPORTANT SAFEGUARDS
Caution: When using Fontanella please follow the basic safety precautions as
below:
General Safety Precaution
Fontanella is a heavy unit. Ensure to move it very carefully to avoid any injury.
Handle the unit with care, making sure to never turn it upside down. If it was placed on
its side or upside down, please wait at least for 1 hour before turning on the machine in
horizontal level. This is to static the refrigerant inside the compressor, otherwise it may
occur damage to the compressor.
Ensure that there is adequate air circulation around the Fontanella unit to avoid
over-heating. For ideal operation of the refrigerator unit, it is necessary to provide good
air circulation of the air vents in the back and right-hand side of the machine, and to
have a room temperature not exceeding 45°C.
It is forbidden to modify or to attempt to modify any features of the Fontanella. Doing so
can result in serious injury and voids the warranty.
The manufacturer declines any responsibility for possible damages caused to people or
objects because of possible modications, accessories or devices of any type installed
on the product and not stated in this user manual.
Fontanella has been developed for household use; therefore, it is not suitable for
intensive commercial use. Please do not use the Fontanella in an open area.
The Fontanella is not intended for use by persons (including children) unless they have
been given supervision or instruction concerning use of the Fontanella by a person
responsible for their safety.

3
Fontanella is NOT a toy. Keep out of reach of children. Close supervision is necessary
when Fontanella is used near children.
Electrical Hazards
Only connect Fontanella to a power outlet with a grounding system. The voltage must
correspond to the value indicated in the technical data section.
If the supplied power cord is damaged, it must be replaced by the manufacturer or its
service agent or a similarly qualied person to avoid a hazard.
Please do not pull the power cord to disconnect the plug from the power outlet.
To prevent electric shock, do not immerse Fontanella unit, plug or power cable into
water.
Water Source Precaution
Fontanella is NOT suitable for the purication of ground water or any other non-potable
(drinkable) water.
The manufacturer is not responsible if non-drinkable water is introduced into the tank,
or if you replace the lter using non-original lters of different composition which may
damage the Fontanella.
In the case of installing the Fontanella and connection to the electric mains, including
any modication to the hydraulic system (if required), must be carried out by qualied
personnel only.
Precautions Against Burns
Caution: When the Fontanella is dispersing hot water or hot coffee, beware of the
danger of burns. Hot steam may be released during the making of hot water or hot
coffee. Hot water, hot coffee or hot steam can cause burns and serious injury.
Caution: Please do not touch the hot parts of the Fontanella, i.e. the Water Spout,
or Coffee Spout.

4
Sparkling Function Precautions
Caution: Please DO NOT expose the Sparkling Plastic Bottle to temperatures
above 49°C (120°F) or below 1 °C (34 °F).
Caution: Please DO NOT wash the Sparkling Plastic Bottle in the dishwasher.
Rinse in hot water. Please DO NOT place the Sparkling Plastic Bottle in the freezer.
Doing so will compromise the integrity of the Sparkling Plastic Bottle material and
may result in serious personal injury.
Caution: Please DO NOT use the Sparkling Plastic Bottle if changes in shape
have occurred. This indicates the Sparkling Plastic Bottle has been damaged.
Caution: The CO2 Canister should be inspected prior to use for any dents,
punctures, or other damage. If any are detected, DO NOT use the CO2 Canister and
contact an authorized service representative.
Caution: A CO2 leak can lead to carbon dioxide poisoning. In the event of a CO2
leak, ventilate the area and seek immediate medical attention.
Caution: Mishandling the CO2 Canister can result in serious personal injury.
Caution: Always keep the CO2 Canister away from any heat source and out of
direct sunlight.
Caution: Please DO NOT transport the Fontanella with the CO2 Canister in place.
Caution: Please DO NOT tamper with the CO2 Canister in any way.
Caution: Please DO NOT attempt to puncture or incinerate the CO2 Canister.
Caution: Please DO NOT throw the CO2 Canister or cause it to fall.
Caution: Please DO NOT handle a CO2 Canister while it is discharging CO2.
5
TECHNICAL DATA
Voltage : 220 ~ 240 V – 50 Hz
Power : 1,250 - 1,600 Watts
Protection Class : I
Operating Temperature : 10 - 45 °C (50 - 104 °F)
DECLARATION OF CONFORMITY
Fontanella complies with the following standards:
For parts that come into contact with food substances, it complies with the prescription
of the EEC directive 89/109 and of the Law by Decree n.108 del 25/01/92;
to what prescribed by the EEC Directives 73/23 (Low Tension), 89/336 CEE
(Electromagnetic Compatibility), including the latest modications introduced
by the EEC Directives 93/68, 90/396 and further modications.
This product complies to GS (Proved Security) and TOV SOD (International
Standards Conformity).
This equipment is tted with components complying with NSF norms (Food
Products)
This product complies to the Australian Standards
CE mark validity is subject to the product integrity and to the respect of the assembly
conditions and use indicated in the installation, use and maintenance manual. Any
unauthorized modications will result in the loss of the CE marking and above
standards.

6
INTENDED USE
Disposal of Packing
Remove any protective sticker, paper, and plastic bag from Fontanella. All
materials are compatible with the environment and can be recycled. We would like to
ask you to contribute the environment protection by using the proper channels for the
correct waste disposal.
Getting Started
Moisture may be kept inside the water tank or surface due to the mechanism test
performed by factory as to ensure proper functioning. Please remove by a damp cloth.
Always remove the power cable from the power outlet in the following situations:
• Before removing or re-installing the water tank.
• To ll the Water Tank or Ice Bank.
• In the event of a malfunction.
• When Fontanella is not being used for long periods of time.
• Before cleaning the machine.
Note: USER MUST FOLLOW STEPS BELOW IN SEQUENCE:
1. Insert the Bio-Filter
Please open the left side door on the Fontanella. Afx the Bio-Filter provided to the
Filter Connector. Please make sure the Bio-Filter is securely locked and rmed with
the Filter Connector.
Caution: Use only the Bio-Filter provided by Fontanella. Use other than
Fontanella Bio-Filter will damage the Fontanella and the warranty will be void.
2. Fill the ICE Bank
Caution: Room temperature tap water MUST be lled into ICE Bank before
operation of Fontanella. The ICE Bank is used for the cooling purpose, otherwise it will
cause damage to Fontanella.
Please follow the instructions to lling tap water into ICE Bank as below:
a) Remove the White Lid and the 3 litres Water Tank located at the back of
Fontanella. You will see a small, white round removable plug.

7
b) Remove this plug by gently pulling.
c) Fill the ICE Bank through the hole with 900mL of water using the Syringe
provided (requires 18 times lling).
d) Place the plug back in to the hole at the top of the ICE Bank.
Caution: Please DO NOT inject more than 900mL of tap water into the ICE Bank.
Overowing the ICE BANK will cause damage to Fontanella.
3. Fill the Water Tank
Fill in the Water Tank with maximum 3 litres of the tap water (room temperature).
Please do not exceed the MAX line marked. Replace the Water Tank and its Lid onto
its original position. Please make sure that the Water Tank Outlet Piston is rmly
connected with the Water Inlet Piston.
Please open the left-hand side door, checking the Control Box. Make sure that the
Water Source Selection Switch is turned down to “Water Tank” position. Therefore,
Fontanella will only input water from the “Water Tank”.
Caution: Please DO NOT ll more than 3 Litres of water into the Water Tank.
Overow of water will damage Fontanella.
Caution: To prevent the pump from working with no load and overheating, the Water
Tank should never be left without water. Otherwise, it will damage Fontanella.
Caution: Although Fontanella can also be connected to mains water, it is NOT
certied and therefore is NOT to be connected to a mains water supply in Australia.
Caution: In places where the Fontanella is approved to be installed to a mains water
supply, always verify that the inlet water is of a controlled origin (drinkable). Installation
must be done strictly by a qualied technician.
Caution: Verify that the mains pressure is between 2,0 and 3,5 bars: in case the
mains pressure is higher than the maximum allowable value, the carbonation
procedure could be compromised (in such a case, install a pressure reducer). Should
the mains pressure be lower than the minimum value, the electrical appliance will
produce an alarm signal indicating insufcient pressure.
4. Insert CO2 Canister
Please open the left side door on the Fontanella and afx the CO2 Canister. Please
make sure the CO2 Canister is securely locked and rmed with the CO2 Canister
Connector.

8
Water Treatment
With Fontanella, the water is ltered and delivered Still Ambient, Cold, Sparkling or Hot.
Caution: Fontanella is designed to use only drinkable water coming from municipal
water supply. The manufacturer declines any responsibility in case of non-drinkable
water or of water not controlled by the water authority. Any warranty will be deemed
void in this case.
The water treatment cycle is divided into three stages:
(1) Pre-Filtration
The inlet water goes through a fabric lter that retains deposits and rougher suspended
solids that could obstruct the second stage of the ltration system.
(2) Filtration
Water coming from the pre-ltration system goes through a composite lter that reduc-
es the bacterial count, eliminates suspended particles, chlorine and organic substanc-
es.
(3) Cooling / Heating / Carbonation
The treated water is then dispensed at either the same inlet temperature (still ambient
water), chilled (cold still water), the addition of CO2 (cold sparkling water), heated (hot
still water), or through the coffee dispenser (hot coffee).
OPERATION OF FONTANELLA
Power On
Plug in Fontanella to mains power inlet. Turn on the Main On / Off Switch at the back
of the Fontanella. Then switch on the unit with the ON/OFF Button located on the top
right of the unit. You will notice that the LED in the Control Scroll will light up Blue or
ash RED according to the symbol on which it is positioned.
Start Up is now complete. Wait at least 15 minutes for the ICE Bank to reach desired
cooling temperature. The Fontanella is now ready for use.

9
Standby Mode
The Fontanella will go into Standby Mode (also referred as Sleep Mode) when
Fontanella is idle for more than 28 minutes. This mode helps conserve and save
power when Fontanella is not in use. To restart, hold down the Push Button of the
Control Scroll for several seconds, and the Fontanella will again be ready for use
(Note: It is not necessary to start Fontanella by pressing the ON/OFF Button).
Bio-Filter Water
Caution: When starting up the unit for the rst time, it is necessary to eliminate
every type of produced water (still, cold, hot and sparkling) for the rst 3 litres of
production in order to eliminate the protective anti-bacterial agent introduced at the end
of the testing cycle during manufacture.
During this stage, the produced water may have an unpleasant smell and / or an
altered colour: this will disappear after the dispensing of 3 litres of water that needs
to be discarded. By pressing the PUSH Button on top of the Control Scroll, begin
dispensing water.
Bio-Filter Periodic Replacement
The Bio-Filter system is tted with components that are subject to periodic
replacement. One of the most important parameters affecting maintenance is the
quality of the water (the higher the quality of the water placed in the water tank, the
longer the average life of the component). The Bio-Filter is provided with the
Fontanella and lters approximately 500 litres of water before needing replacement
(depending on quality of water used).
Bio-Filter Alarm
If the Fontanella unit emits an audible intermittent alarm and the red LED in the left side
panel starts ashing with a softly siren, change the Bio-Filter located directly
underneath. Unscrew the Bio-Filter in the left side compartment and replace.
After replacing, dispense and discard the rst 2 litres of water to eliminate the sanitizer
within the new Bio-Filter.
If it should continue emitting the sound and ashing after new Bio-Filter is placed,
please call Technical Support on 1300 881 693.
10
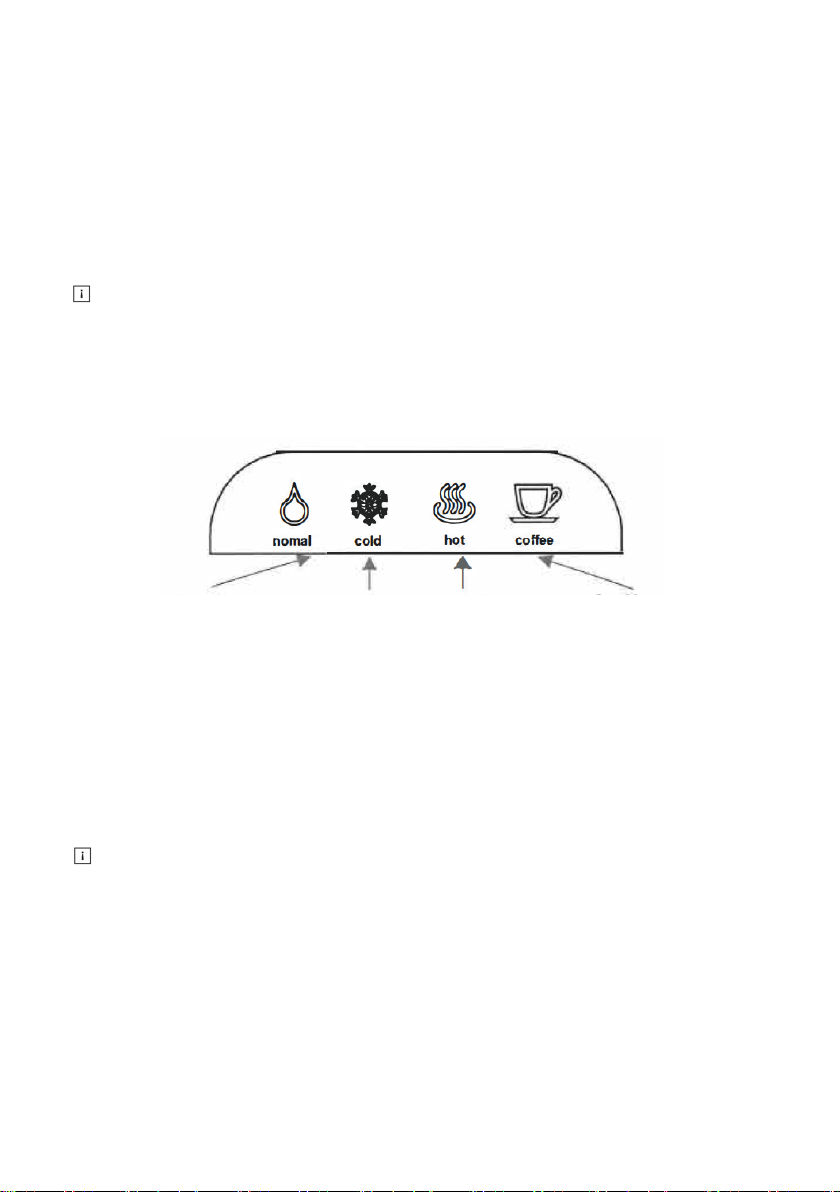
Water or Coffee Selection
The built-in system has 4 possible selections as seen below, with programmable doses
(see paragraph “User Programming”):
To select and activate, turn the Control Scroll until you reach the desired icon of the
desired beverage and press the Push Button once, located over the Control Scroll.
Note: Please press the Push Button continuously for Hot Water supply.
Control Scroll Beverage Icon
Still Ambient Water Chilled Water Hot Water Coffee
User Programming
This section will show how to modify and set some parameters of the dispenser, such
as the quantity of water or coffee to be supplied every time the Push Button on the
Control Scroll is pressed.
Note: For safety reasons, it is not possible to set a desired amount of Hot Water.
To dispense hot water, a continuous pressure on the PUSH Button located over the
Control Scroll is required.
Setting Doses for Still Ambient Water, Cold Water, and Hot Coffee
To adjust and set the amount / dose of Still Ambient Water, Cold Water and Hot
Coffee, select the desired icon / beverage by rotating the Control Scroll, press and
maintain a continuous pressure on the Push Button. Fontanella will commence dis-

11
pensing the selected beverage. Release the Push Button once you reach the desired
quantity and the dose will be set.
Cold Water Temperature Adjustment
The Thermostat Cooling Controller, located in the left side panel at the top next to
the CO2 Canister, regulates the temperature of the water. To make the water cooler,
turn the Thermostat Cooling Controller clockwise. On the contrary, by turning the
Thermostat Cooling Controller anticlockwise, the water will get warmer, until it
reaches its limit and the refrigeration unit shuts down. For optimum setting, leave it set
as far clockwise as possible and turn back slightly.
Note: A maximum of 18 litres of cold water is able to be dispensed over the duration
of one hour.
Hot Water and Coffee
When selecting the Hot Water Icon or Coffee Icon by rotating the Control
Scroll, the Red LED Light on the icons will ash until the ideal temperature is reached.
This usually takes up to 20 seconds to ensure the Fontanella always dispenses the
ideal temperature for coffee and hot water.
Note: Hot Coffee or Hot Water will NOT be dispensed whilst the icons are ashing.
Coffee Instructions
Fontanella uses only *Nespresso® compatible Coffee Capsules. Any other type of
Coffee Capsule is NOT allowed to be used in Fontanella.
(*Disclaimer: All brand names, logos, trademarks and copyrights are property of their
respective owners, and are not intended to imply any endorsement or direct afliation
with “Fontanella”.)
1. Select the Coffee Icon by rotating the Control Scroll.
2. Pull out the Coffee Capsule Holder.
3. Insert the Coffee Capsule into the Coffee Capsule Holder in upright position
4. Re-insert the Coffee Capsule Holder back into its housing.
5. Place a coffee cup onto the Coffee Cup Stand with Coffee Bin.
6. Wait unit the Coffee Icon Light stops ashing.
7. Press once to the Push Button of the Control Scroll to dispense coffee.
8. Coffee will be coming out from the Coffee Spout.
9. Coffee is ready to serve.
If the Coffee Icon Light of the Control Scroll is ashing, it means that the Coffee

12
Brewing Unit pre-heating. This will happen when the hot water inside the Coffee
Brewing Unit has not reached its requested temperature: this normally takes approx-
imately 20 seconds. When the pre-heating progress is complete, the Coffee lcon
Light will stop ashing and the Fontanella is ready to make coffee.
Caution: Please DO NOT pull out the Coffee Capsule Holder when coffee is
brewing. DO NOT touch Coffee Spout whilst making coffee.
Caution: Please DO NOT use the same Coffee Capsule more than once. If the
brewing process repeats on the same Coffee Capsule, then the used Coffee Capsule
may break inside at the Coffee Brewing Unit by the pressure of brewing the coffee.
Hence, the coffee grinds will spread inside the Coffee Brewing Unit and this can
cause damage to the Fontanella.
Caution: When brewing hot coffee, beware of the danger of burns. Hot steam may
occur whilst making hot coffee and can cause burns.
Coffee Brewing Unit - Maintenance
Please note that used Coffee Capsules will drop into the Coffee Cup Stand with
Coffee Bin by only pulling out the Coffee Capsule Holder. Therefore, please pull out
the Coffee Capsule Holder again when the coffee is completely made. The left-over
coffee during the coffee making production will automatic ow into the Waste Water
Tray.
A used Coffee Capsule should never be left inside the Coffee Capsule Holder or the
Coffee Cup Stand with Coffee Bin for too long. Damp coffee that remains in the cof-
fee capsule after use is bound to grow mould just like any ground coffee or foodstuffs.
If a used coffee capsule is inadvertently left in the Fontanella for a certain amount of
time, clean the Coffee Capsule Holder, Coffee Cup Stand with Coffee Bin and
Waste Water Tray in accordance with the instructions given below.
To clean Coffee Capsule Holder, it is recommended at the end of each day: select the
Coffee Icon by rotating the Control Scroll, and press once to the Push Button of
the Control Scroll without any Coffee Capsule into the Coffee Capsule Holder. This
will rinse leftover coffee from the Coffee Brewing Unit.
The used Coffee Capsules are stored in the Coffee Cup Stand with Coffee Bin,
and it can contain approximate 5 to 6 used Coffee Capsules only. It will cause a jam if
used coffee capsules build up in the Coffee Cup Stand with Coffee Bin, hence it may
damage the Fontanella. Slightly take out the Coffee Cup Stand with Coffee Bin at the
front, empty all the used Coffee Capsules and wash it thoroughly by hand.
Leftover coffee or water will ow into the Waste Water Tray. Therefore, please clean
Waste Water Tray more frequently. Slightly take out the Waste Water Tray at the front,
empty all leftover water and wash it thoroughly by hand.

13
Caution: Please DO NOT insert any Coffee Capsule that is broken or pierced, or
any used Coffee Capsule or into Fontanella, otherwise it may jam inside the coffee
brewing system, causing damage to the Fontanella.
Tip: Before inserting a new Coffee Capsule, press the Push Button (on coffee
setting) and dispense and discard one dose (whether there is an existing used Coffee
Capsule in place or not). This will ensure your rst and subsequent coffees are optimal.
Hot Water
Select the Hot Water Icon by rotating the Control Scroll. For safety reasons, it is
not possible to set a desired amount of hot water. To dispense hot water, a continuous
pressure on the PUSH Button located over the Control Scroll is required. Hot Water
will dispense from the Water Output Spout.
If the Hot Water Icon Light of the Control Scroll is ashing, the Hot Water Boiling
Unit is undergoing pre-heating progress. This will happen when the hot water inside
the Boiling Unit has not reached its set temperature. It normally takes approximate 20
seconds. When the pre-heating progress is complete, the Hot Water Icon light will
stop ashing. The Fontanella is now ready to dispense hot water.
Sparkling Water
For Sparkling Water, ll the provided Sparkling Plastic Bottle with cold water to the
1 litre mark or less (Please DO NOT over ll the bottle or exceed the maximum mark),
afx the Sparkling Plastic Bottle into Sparkling Plastic Bottle Knot (inserting over
the white probe or Bubble Infuser) until it is securely locked and rmed. Then
push the Sparkling Button located on the top left of the Fontanella. The CO2 will
be dispensed into the Sparkling Plastic Bottle. Once the desired amount of sparkling
is reached, unscrew the Sparkling Plastic Bottle and your Sparkling Water is ready.
You can add any avour into the sparkling water afterwards (please DO NOT add
before lling water with CO2).
When the CO2 Canister is empty, please return the CO2 Canister to an authorized
agent or distributor in exchange for a new CO2 Canister.
Caution: Please DO NOT carbonate an empty Sparkling Plastic Bottle, doing so
will compromise the integrity of the carbonating Sparkling Plastic Bottle material and
may result in serious personal injury.
Caution: Please DO NOT carbonate with any bottle not specically designed to work
with the Fontanella.
Caution: Please DO NOT use the Sparkling Plastic Bottle if changes in shape

14
occur. This indicates the Sparkling Plastic Bottle is damaged. DO NOT use the
Sparkling Plastic Bottles that are scratched, worn, discoloured, or damaged in
anyway.
Caution: Please DO NOT carbonate any liquids other than plain water. You can only
add avour after carbonation is done.
Caution: Please DO NOT press or hold the Sparkling Button for too long.
Note: Suggested amount of sparkling is 3 presses of approximately 2 seconds each.
To increase the amount of sparkling, do extra presses. The Sparkling Plastic Bottle
comes with an air tight lid to maintain carbonation.
Note: There will be some leftover water ow into the Waste Water Tray during the
sparkling progress. Therefore, please clean Waste Water Tray more frequently.
Slightly remove the Waste Water Tray at the front, empty all the leftover water and
wash it thoroughly by hand.
Cleaning and Maintenance
Caution: Before carrying out any cleaning and maintenance, verify that Fontanella is
not connected to the electric main.
To carry out periodic cleaning, use a soft moistened cloth with water or mild detergent
to clean the housing of Fontanella. Never use wire wools or blades to clean to remove
any possible dirt or scales. Always avoid using abrasive products to clean Fontanella.
Always empty and keep clean “Coffee Capsule Holder”, “Coffee Cup Stand with
Coffee Bin” and “Waste Water Tray”.
Caution: Pay particular attention when using spray cleaning products: always make
sure NOT to spray towards the air intakes vents.
In case of failure, never attempt to repair the Fontanella yourself. Repairs that are
carried out by unqualied personnel could cause damage and accidents. Consult the
content of this manual. Service to Fontanella must be carried out by an authorized
service centre. Do not have the equipment repaired by non-specialized personnel.
Always keep original spare parts. Only the use of original spare parts could guarantee
the reliability and the best performance of the equipment.

15
Trouble Shooting
If there is no water coming out from the Fontanella, please check the Control Box,
make sure that the Water Source Selection Switch is turned down to “Water Tank”
position. Therefore, Fontanella will input water from the “Water Tank.”
If the Cold Water is not cooling adequately, check the Thermostat Cooling Controller
located in the left side panel and follow instructions as outlined above (under “Cold
Water Temperature Adjustment”). This may also be due to dispensing too much cold
water in a short period of time. In this case, wait 15 minutes and the Cold Water shall
now be cold once more.
Note: The Fontanella produces 18 Litres of cold water per hour, approximately 1
Litre every 3 minutes.
If no sparkling is being dispensed, check to ensure the CO2 Canister is not empty. If
so, replace CO2 Canister as per previous instructions.
If any icon ashes continuously, turn the Control Scroll to the Cold Water Icon
setting and then turn off the power for a few minutes, then switch back on and dispense
a glass of cold water. If it continues ashing, call a Fontanella technician as it may be a
thermostat issue.

16
“Fontanella” CWM-01 12 Months Warranty Card
Thank you for selection the Fontanella CWM-01. Fontanella provides a 12 month
replacement warranty covering defects in materials or workmanship from the date of
product purchase (in Australian market only).
Equipment deemed to be defective in parts or workmanship will be repaired or replaced
at the discretion of Novalink Holding Pty Ltd., at no charge, with the following exclu-
sions:
- The product has been damaged due to misuse, abuse or not following the
user manual.
- The product has been altered, modied defaced, or serviced by anyone other
than Novalink Holding Pty Ltd.
Thus, to redeem the warranty service, customers should bring this warranty card and
sales receipt with date of purchase to Australia Sole Distributor: Novalink Holding Pty
Ltd.
-------------------------------------------------------------------------------------------------------------------
Product Name:_________________________________________________________
Model Number:_________________________________________________________
Date of Purchase:_______________________________________________________
Your Name:____________________________________________________________
Your Phone Number / Email:_______________________________________________
Serial Number:_________________________________________________________
Fontanella CWM-01
CWM-01
Table of contents


