for Living 088-1519-4 User manual
Instruction Manual
3-Seat Cushioned
Swing
Model No. 088-1519-4
Toll-free: 1-877-483-6759
IMPORTANT: Please read and understand this manual before any assembly. Before
beginning assembly of product, make sure all parts are present. Compare parts
with packaging contents list. If any part is missing, or if you have any questions,
call our Toll-free number at 1-877-483-6759.
R
MD

Table of Contents 2
Important Safety Instructions 2
Parts List 3
Assembly 4-10
Cleaning and Maintenance 11
11Warranty
IMPORTANT: RETAIN FOR FUTURE REFERENCE, AND READ CAREFULLY.
Table of ContentsImportant Safety Instructions
2
Caution! Always keep children under close supervision while they are using or around this product. Never
leave children unattended.
• This product is intended for domestic outdoor use only.
• The product should be placed on at horizontal ground.
• Ensure enough clearance around the product. Before assembling the product, nd level ground not less
than 6’ (1.8 m) away from any structures or obstructions, such as fences, garages, houses, overhanging
branches, laundry lines, or electrical wires.
• Any assembly or maintenance of the product must be carried out by adults only.
• Arrange necessary manpower when assembling or moving the product.
• Some parts may contain sharp edges. Wear protective gloves if necessary.
• Keep children and pets away while setting up the product.
• Check all nuts and bolts periodically for tightness. When required, tighten them again.
• Reparing and replacing parts should be done by a qualied technician.
• This is not designed to withstand harsh weather, including high winds, rain and snow.
• If the product will not be used for a longer period (e.g. wintertime), it should be stored in a clean, dry
environment.
• Do not light any res on or near the product!
• Stay calm if re breaks out. Do not return to the product before reghters allow you to do so.
• Retain the original packaging to store the product.
Warning! To reduce the risk of serious injury, read the following
safety instructions before assembling and using the product.
R
MD
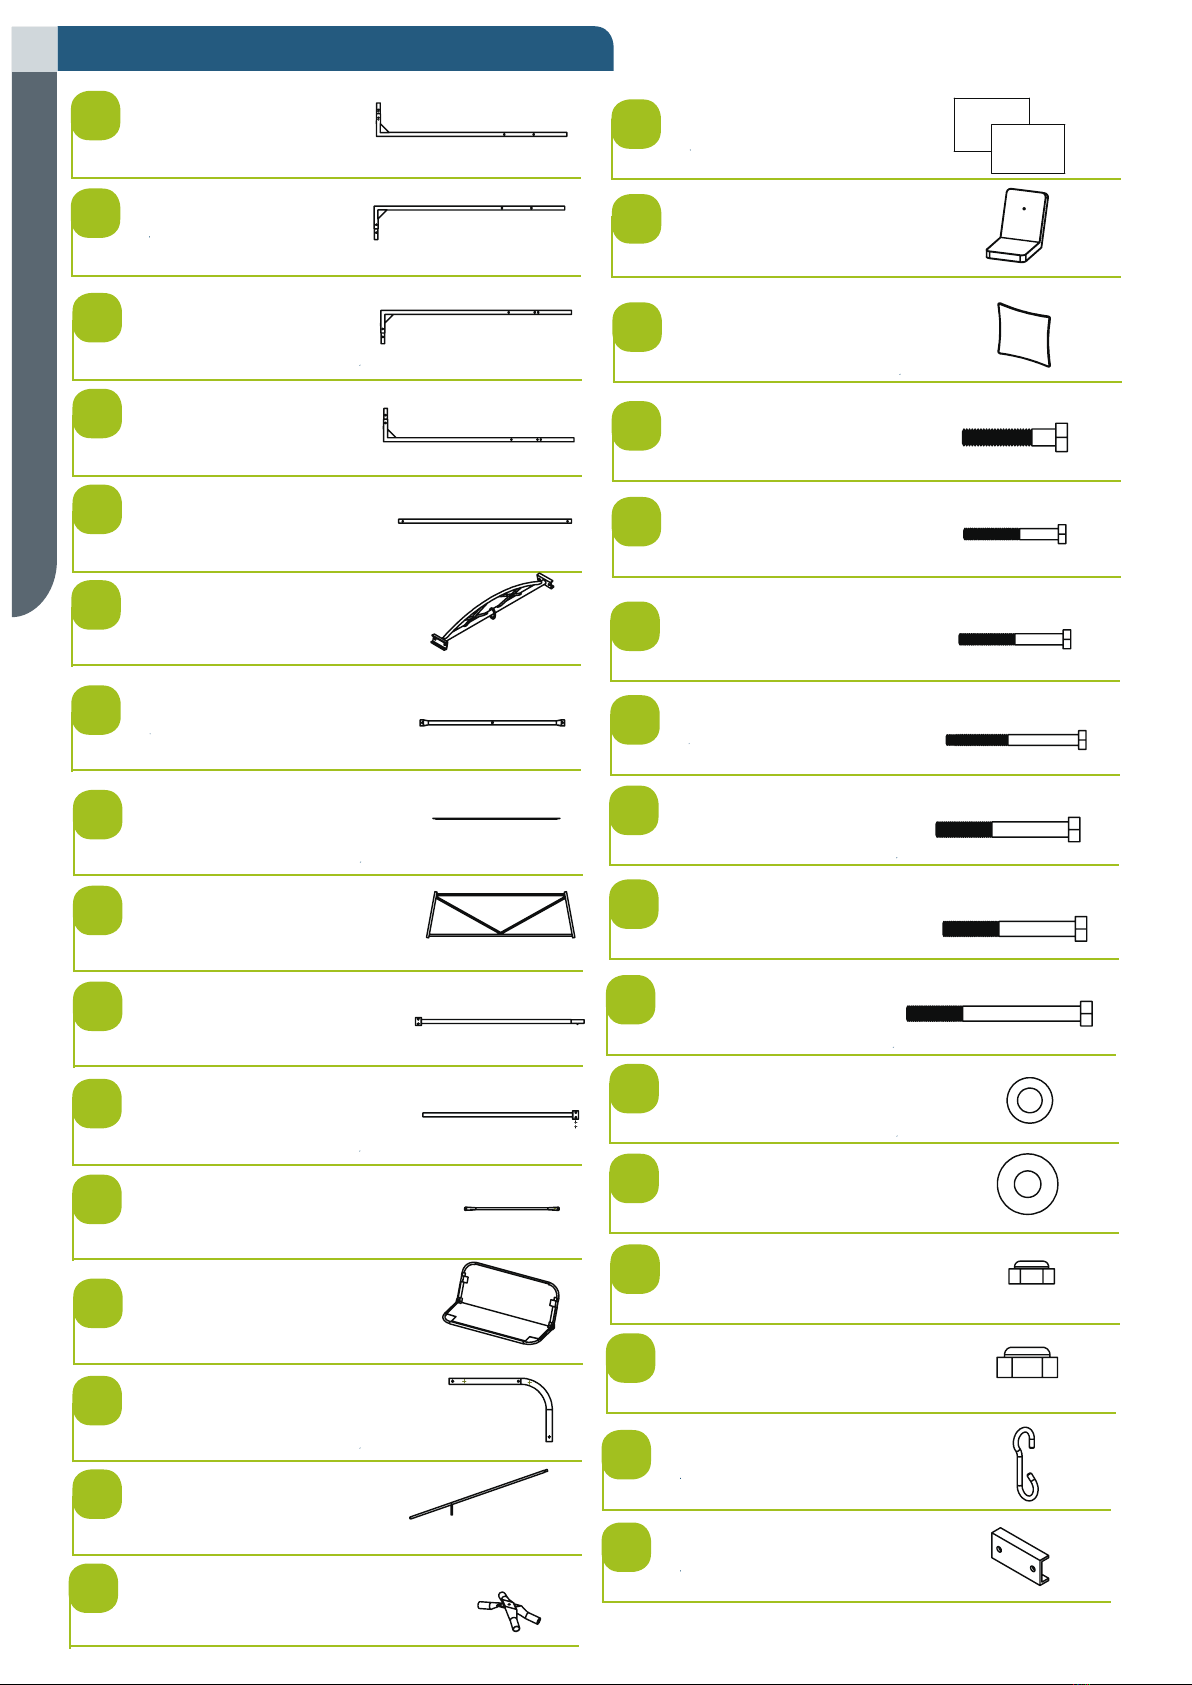
Parts List
3Model No. 088-1519-4
Front leg 1 - 1
Front leg 2 - 1
Rear leg 3 - 1
Rear leg 4 - 1
Top crossbar 5 - 2
1
2
3
4
5
Short top crossbar 6 - 2
Connection Bar 7 - 2
Support bar 8 - 4
Side panel 9 - 2
Rear leg crossbar 10 - 1
6
7
8
9
10
Rear leg crossbar 11 - 1
Hanging bar 12 - 4
11
12
Bolt M6 x 36L - 2
Bolt M6 x 45L - 10 + 1 spare
A
B
Bolt M6 x 55L - 8 + 1 spare
Bolt M6 x 65L - 6
Metal Washer M6 - 48
Metal Washer M8 - 4
Nut M6 - 32
C
D
H
I
J
Nut M8 - 2
"S" Hook - 2
K
L
Bolt M6 x 70L - 4
Bolt M6 x 75L - 2
E
F
Seat and back 13 - 1
13
Arm 14 - 2
Canopy frame bar 15 - 4
14
15
Canopy 17 - 1
Cushion 18 - 3
18
Bolt M8 x 70L - 2
G
Connect plate - 4
P
Canopy frame top centre piece 16 - 1
16
17
19
Pillow 19 - 2

Assembly
4
Place all parts from the box in a cleared area and position them on the oor in front of
you. Remove all packing materials and place them back into the box. Do not dispose
of the packing materials until assembly is complete. Read each step carefully before
beginning any assembly and make sure you understand each step. If you are missing
a part, please call our toll-free number for assistance 1-877-483-6759.
Caution!
• Do not place the product underneath electrical lines.
• Keep children away during assembly. This product contains small
parts which can be swallowed by children.
• Keep ngers away from the places where they can be pinched
or trapped.
• Do not attempt to assemble the product if any parts are missing.
Needed for assembly:
Allen Wrench 2 people
Open Hex Wrench Hex Wrench
Let us help you!
DO NOT RETURN YOUR PRODUCT TO THE STORE. CALL US FIRST!
1-877-483-6759
If you have questions regarding your product, require warranty assistance,
or have damaged or missing parts, please call our customer service toll-free helpline.
Contact us for assistance, we’re here to help.
R
MD

Assembly
5Model No. 088-1519-4
Step 1
Requires: 1, 2, 3, 4, 5
Attach the Top crossbar 5 to the Front leg 1 & 2 and Rear leg 3 & 4.
Step 2
Requires: 6, C, P,J
Attach the Short top crossbar 6 to the assembled top crossbar (1, 2 & 5) & (3, 4 & 5).
Do not tighten completely. Repeat procedure for the other side.
CJ
Not shown at actual size
1
23
4
5
1
2
1
4
1
1
1
23
5
1
2
3
4
6
56
3
5
C
P
6
J
6
2
1
3
3
4
5
56
6
C
J
P
x 8 x 8
Px 4
5
5
5

Assembly
6
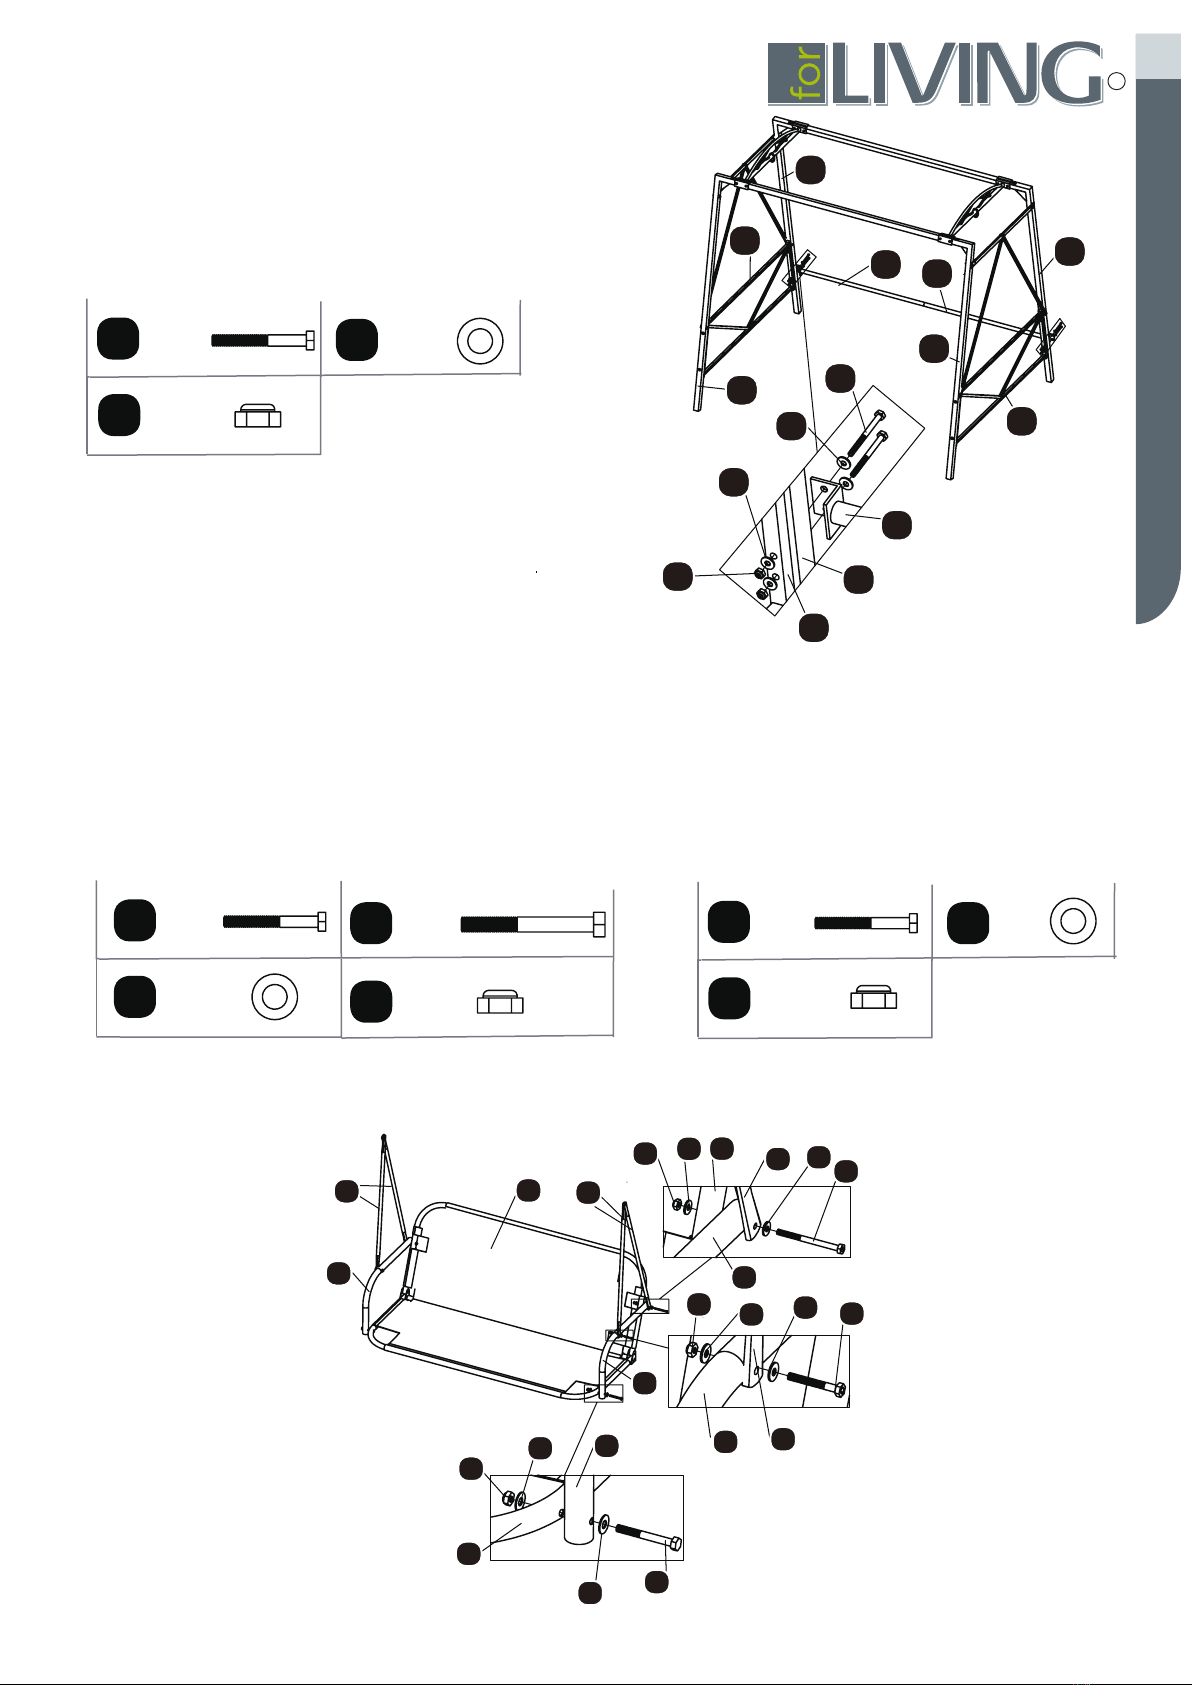
Step 3
Requires: 7, B, H, J
Attach the Connection bar 7 to the Front leg 1 and
Rear leg 3. Do not tighten completely. Repeat procedure
for the other side.
BH
J
Not shown at actual size
Step 4
Requires: 8, A, B, H, J
(4b)
Attach the Support bar 8 to Connection
bar 7. Do not tighten completely. Repeat
procedure for the other side.
BH
J
Not shown at actual size
(4a)
Attach the support bar 8 to leg 1 & 3 .
Do not tighten completely. Repeat
procedure for the other side.
AH
J
Not shown at actual size
1
23
4 7
7
B
H
H
J
37
7
1
23
3
47
7
B
H
H
J
J
8
8
1
2
3
4
(4b)
(4a)
B
H
H
J
1
8
8
1
2
3
3
4
8
8
B
H
J
H
7
78HA
J
H
x 4
x 4
x 8
x 4
x 4
x 8 x 2
x 2
x 4
R
MD

Assembly
7Model No. 088-1519-4
Step 5
Step 6
Requires: 10, 11
Insert the Rear leg crossbar 10 to the Rear leg crossbar 11.
3
4
2
1
9
9
1 9
D
HH
J
9
1
2
1
3
4
9
9
HH
J
D
(5b)
(5a)
3
3
9
Requires: 9, D, H, J
DH
J
Not shown at actual size
(5a)
Attach the Side panel 9 to leg 1 & 3 .
Do not tighten completely. Repeat
procedure for the other side.
Don’t use any bolt
10 11
11
10
10 11
10
10
10
11
11
11
x 6
x 6
x 12
Assembly
8
Step 7
Requires: 10, 11
Attach the rear leg crossbar 10 & 11 to the
assembled frame.
Tighten all bolts and nuts.
Step 8
910
9
3
2
4
11
1
10
4
9
E
H
H
J
1
2
3
4
9
9
9
10
10 11
4
E
H
H
J
EH
J
Not shown at actual size
12 13
14
14
12
12
13
14
F
H
H
J
1214
B
HH
J
14
13
G
I
I
K
13
14
12
13
14
12
13
14 12
12
14 14
(8a)
(8b)
I
B
F
H
H
H
H
J
J
I
K
G
Requires:
12, 13, 14, G, I, K, B, F, H, J
(8a)
Attach the Seat and back 13 to Hanging
bar 12 and Arm 14. Do not tighten completely.
Repeat procedure for the other side.
GI
K
Not shown at actual size
(8b)
Attach the Seat and back 13 to the
Arm 14. Do not tighten completely.
Repeat procedure for the other side.
BF
H
Not shown at actual size
J
x 4
x 4
x 8
x 2
x 8
x 2
x 4
x 2
x 2
x 4
R
MD
1
9
Assembly
9Model No. 088-1519-4
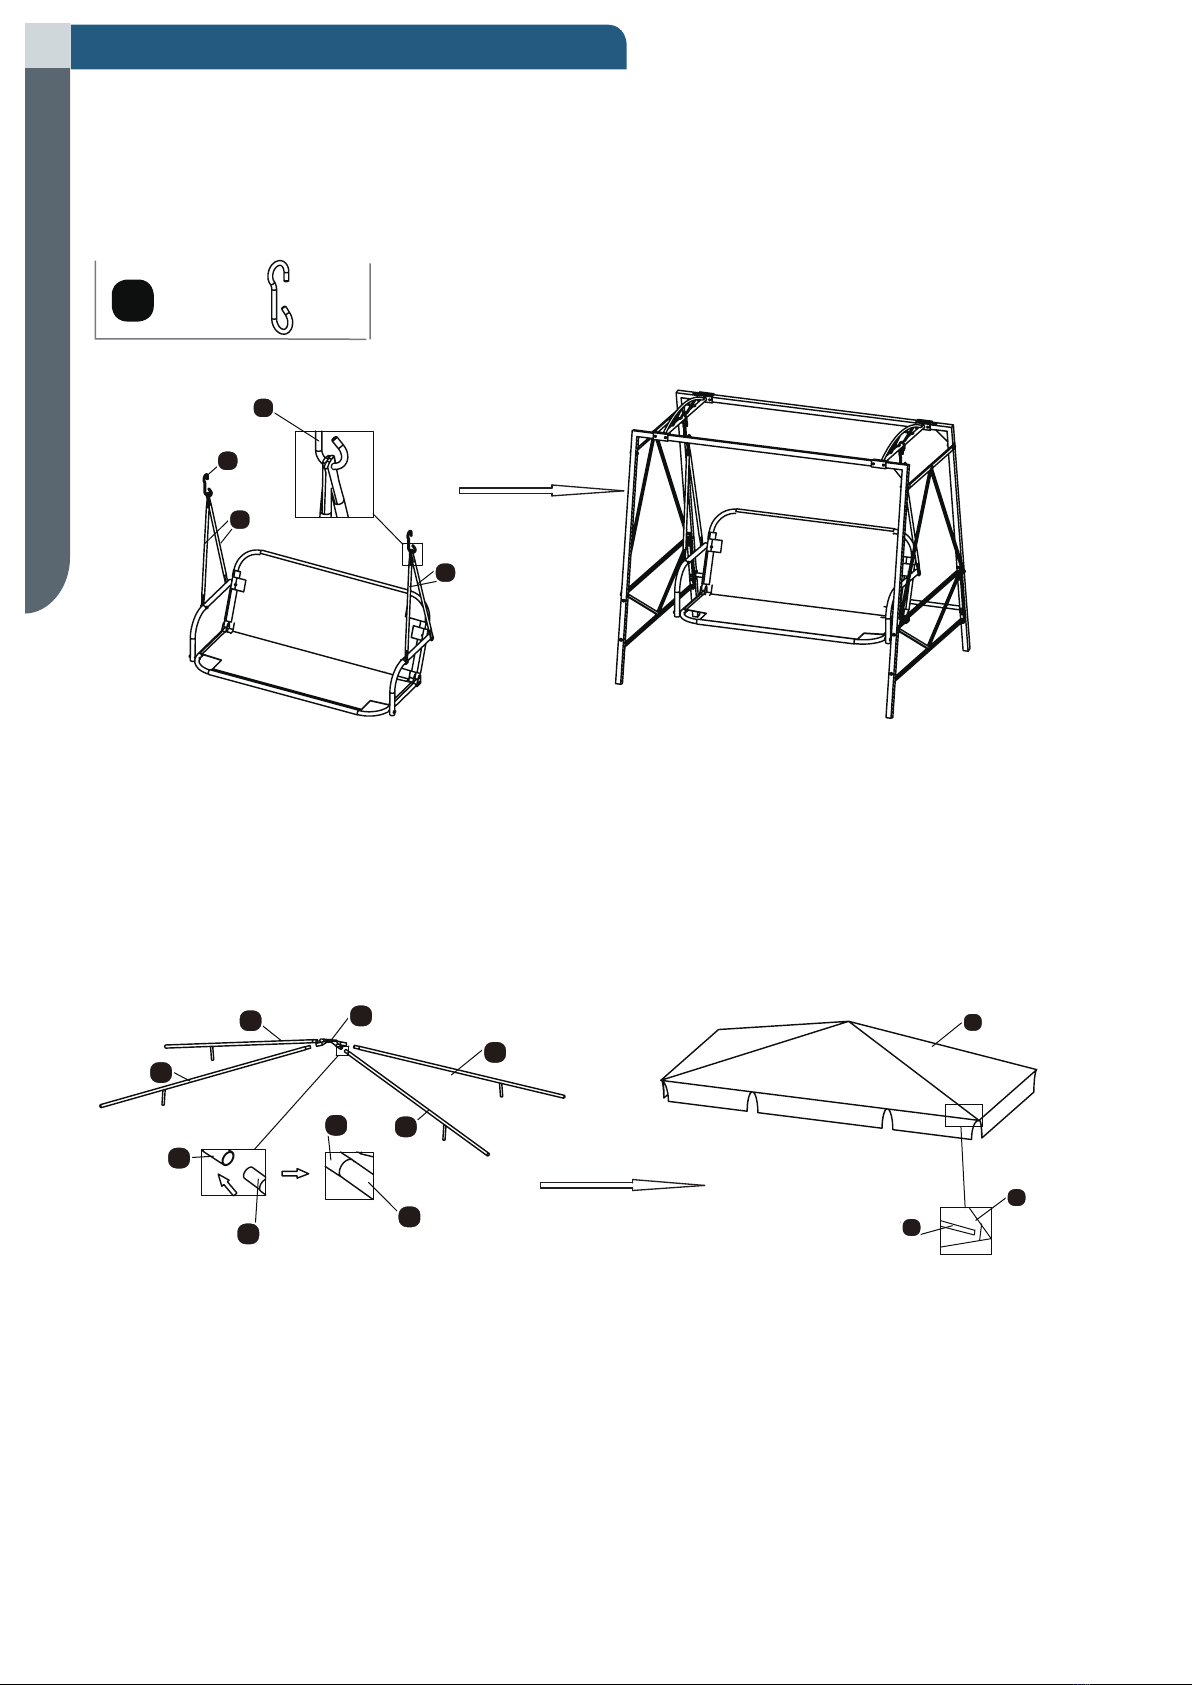
Step 9
Requires: L
Hang the whole seat to short top crossbar.
Make sure all bolts and nuts are securely tightened.
L
Step 10
Requires:
15, 16, 17
Insert the Canopy frame bar 15 to the Canopy frame top centre piece 16, then
cover with the Canopy 17.
Not shown at actual size
12
12
L
L
TOP
12
12
L
L
16
15
15
15
15
16
15 15
16
15
16
15
16
15
16
15
15
15
17
17
15
17
17
15
x 2

Assembly
10
Step 11
Requires: 1, 15, 17
Insert the whole Canopy 15 to the whole Frame leg 1.
Fasten the leg 1, 2, 3 & 4 with lashing.
Step 12
Requires: 18,19
Put the cushion and pillow on the seat and back.
15
1
15
15
15
1
17 15
1
17
18 19
R
MD

For washing the fabric parts: Spread the fabric and use a soft bristle brush to clean;
• Always use a natural soap, never detergent;
• Water should be cold to lukewarm, never more than 25℃;
• Air dry only, do not spin in washing machine nor hand squeeze.
• Do not use bleach, acid, or other abrasive cleaners on the fabric or frame parts.
• Steel components of garden accessories and furniture are treated with rust inhibiting
paint. However, due to the nature of steel, surface oxidation (rusting) will occur if this
protective coating is scratched. This is a natural process. To minimize this condition,
it is recommended that care be taken when assembling and handling the product, in
order to prevent the paint from being scratched.
Caution!
• Check all bolts periodically for tightness, fastening them again as
required.
• Disassemble the product in the reverse order of the assembly
steps. Always disassemble the product completely. A partially
disassembled product is not stable enough to resist wind and bad
weather, and therefore can be damaged and/or cause damage.
• Clean the product with mild soap and water. Rinse thoroughly, and
wait until the product is dry before reassembling it.
Cleaning and Maintenance
11
This For Living product carries a one (1) year warranty against defects in workmanship
and materials. Trileaf Distribution agrees to replace the defective product free of charge
within the stated warranty period, when returned by the original purchaser with proof of
purchase. This product is not guaranteed against wear or breakage due to misuse and/
or abuse.
Model No. 088-1519-4
TECHNICAL SPECIFICATIONS
Dimensions (L x W x H) 144 x 223 x 203.5 cm
56 5/8 x 87 3/4 x 80 1/8 "
Product weight 40.41 kg
88.9 lbs
Warranty
Made in China
Imported by
Trileaf Distribution Trifeuil Toronto, Canada M4S 2B8

Table of contents
Other for Living Baby Swing manuals

Popular Baby Swing manuals by other brands


PLAYTIVE JUNIOR
PLAYTIVE JUNIOR 307540 Instructions for use

Weltevree
Weltevree SWING product manual

Pawleys Island
Pawleys Island COASTAL DURAWOOD DELUXE DOUBLE PORCH SWING instructions

Fisher-Price
Fisher-Price H8905 manual

Fisher-Price
Fisher-Price J6978 user manual

stilum
stilum volucris 2 Maintenance instructions