SJE Rhombus 112 User manual
Model 112
Single Phase Simplex
This control panel must be installed and serviced by a licensed electrician in
accordance with the National Electric Code NFPA-70, state and local electrical codes.
UL Type 4X enclosures are for indoor or outdoor use.
Warranty void if panel is modied.
1
For information regarding operation,
available options, or servicing
questions, please call SJE Rhombus
Technical Support.
SJE Rhombus oers a ve-year limited warranty.
For complete terms and conditions, please visit www.sjerhombus.com.
Products returned must be cleaned, sanitized, or decontaminated as necessary
prior to shipment to ensure that employees will not be exposed to health
hazards in handling said material. All applicable laws and regulations shall apply.
?
Installation and Operation Manual
Model 112
Single Phase Simplex
This control panel must be installed and serviced by a licensed electrician in
accordance with the National Electric Code NFPA-70, state and local electrical codes.
UL Type 4X enclosures are for indoor or outdoor use.
ed.
1
For information regarding operation,
available options, or servicing
questions, please call SJE Rhombus
Technical Support.
ve-year limited warranty.
For complete terms and conditions, please visit www.sjerhombus.com.
Products returned must be cleaned, sanitized, or decontaminated as necessary
prior to shipment to ensure that employees will not be exposed to health
hazards in handling said material. All applicable laws and regulations shall apply.
?
Installation and Operation Manual
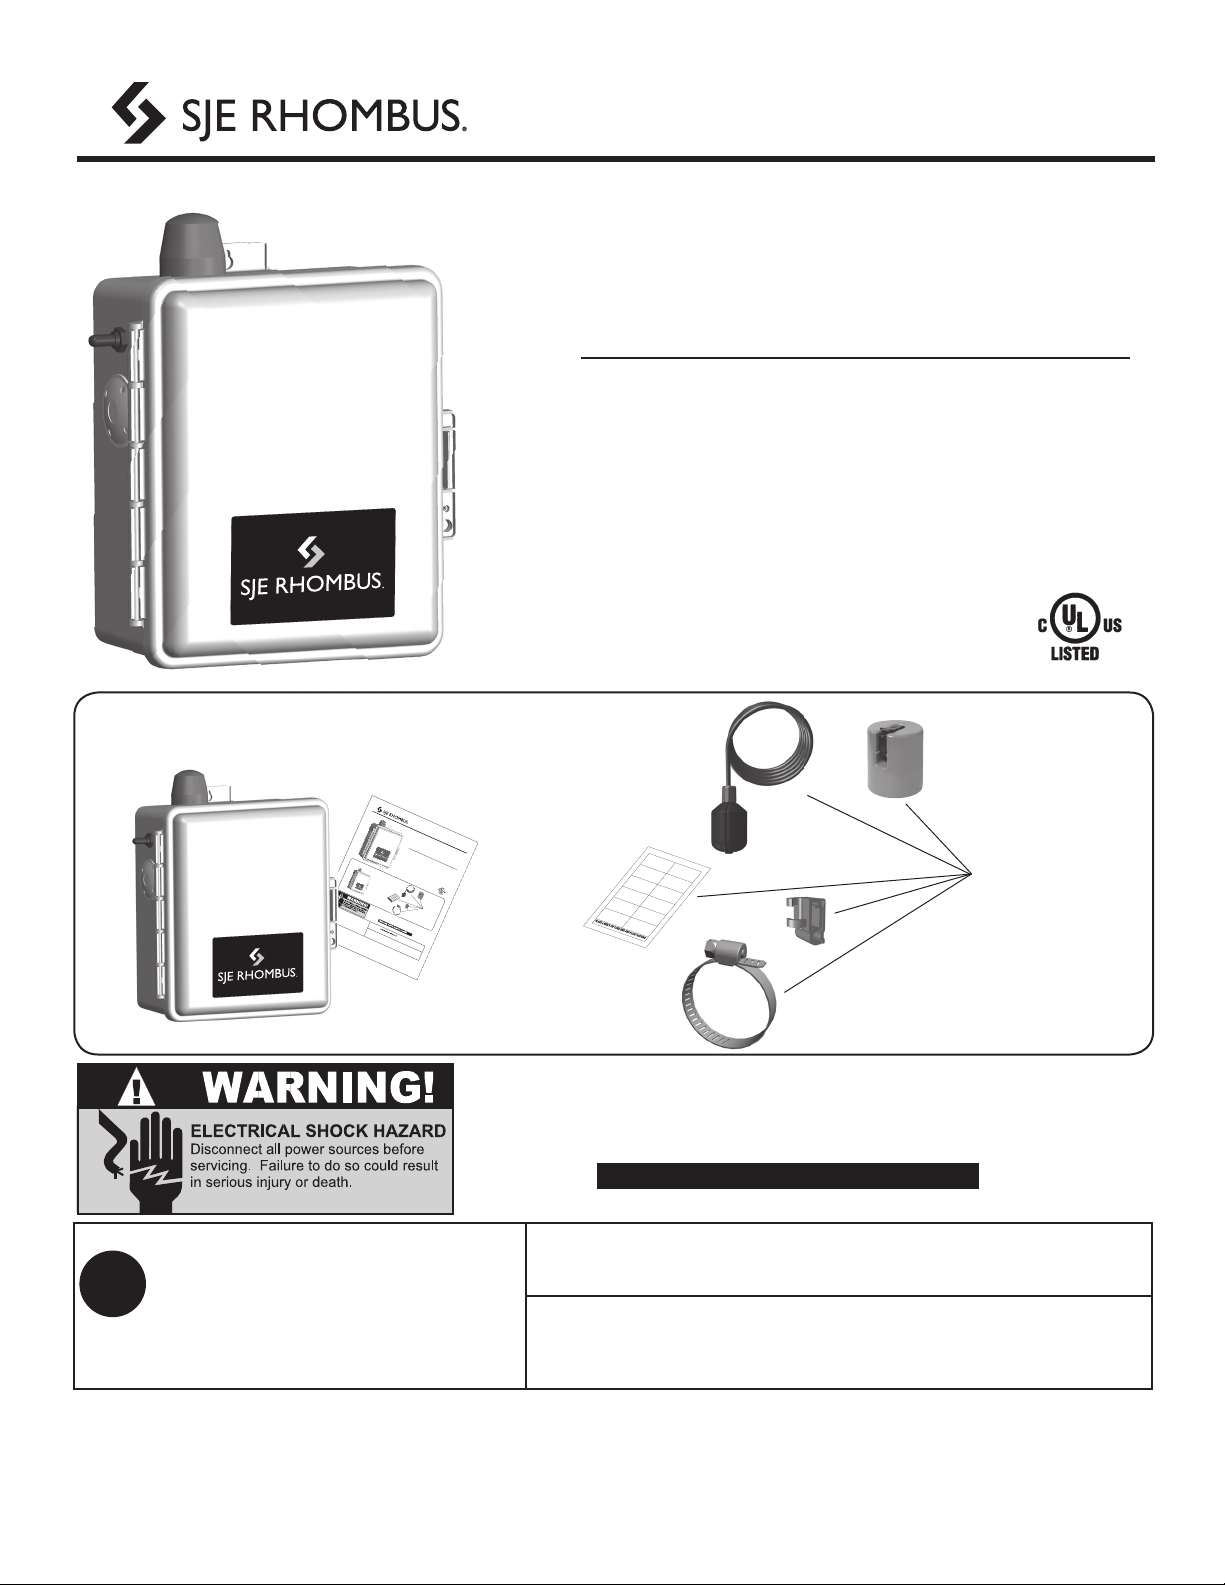
Parts Included
Manufactured by: SJE Rhombus
ALARM
START
STOP
ALARM
START
STOP
RED. OFFRED. OFF
1005136B
x3
Control panel may be
ordered with or
without these items.
Technical Support: +1-800-746-6287
www.sjerhombus.com
Technical Support Hours: Monday-Friday, 7:00 AM to 6:00 PM Central Time
PN 1008704G 04/22
©2022 SJE, Inc. All Rights Reserved.
SJE RHOMBUS is a trademark of SJE, Inc
Parts Included
Manufactured by: SJE Rhombus
ALARM
START
STOP
ALARM
START
STOP
RED. OFFRED. OFF
1005136B
x3
Control panel may be
ordered with or
without these items.
Technical Support: +1-800-746-6287
www.sjerhombus.com
Technical Support Hours: Monday-Friday, 7:00 AM to 6:00 PM Central Time
PN 1074405A 7/22
©2022 SJE, Inc. All Rights Reserved.
SJE RHOMBUS is a trademark of SJE, Inc.
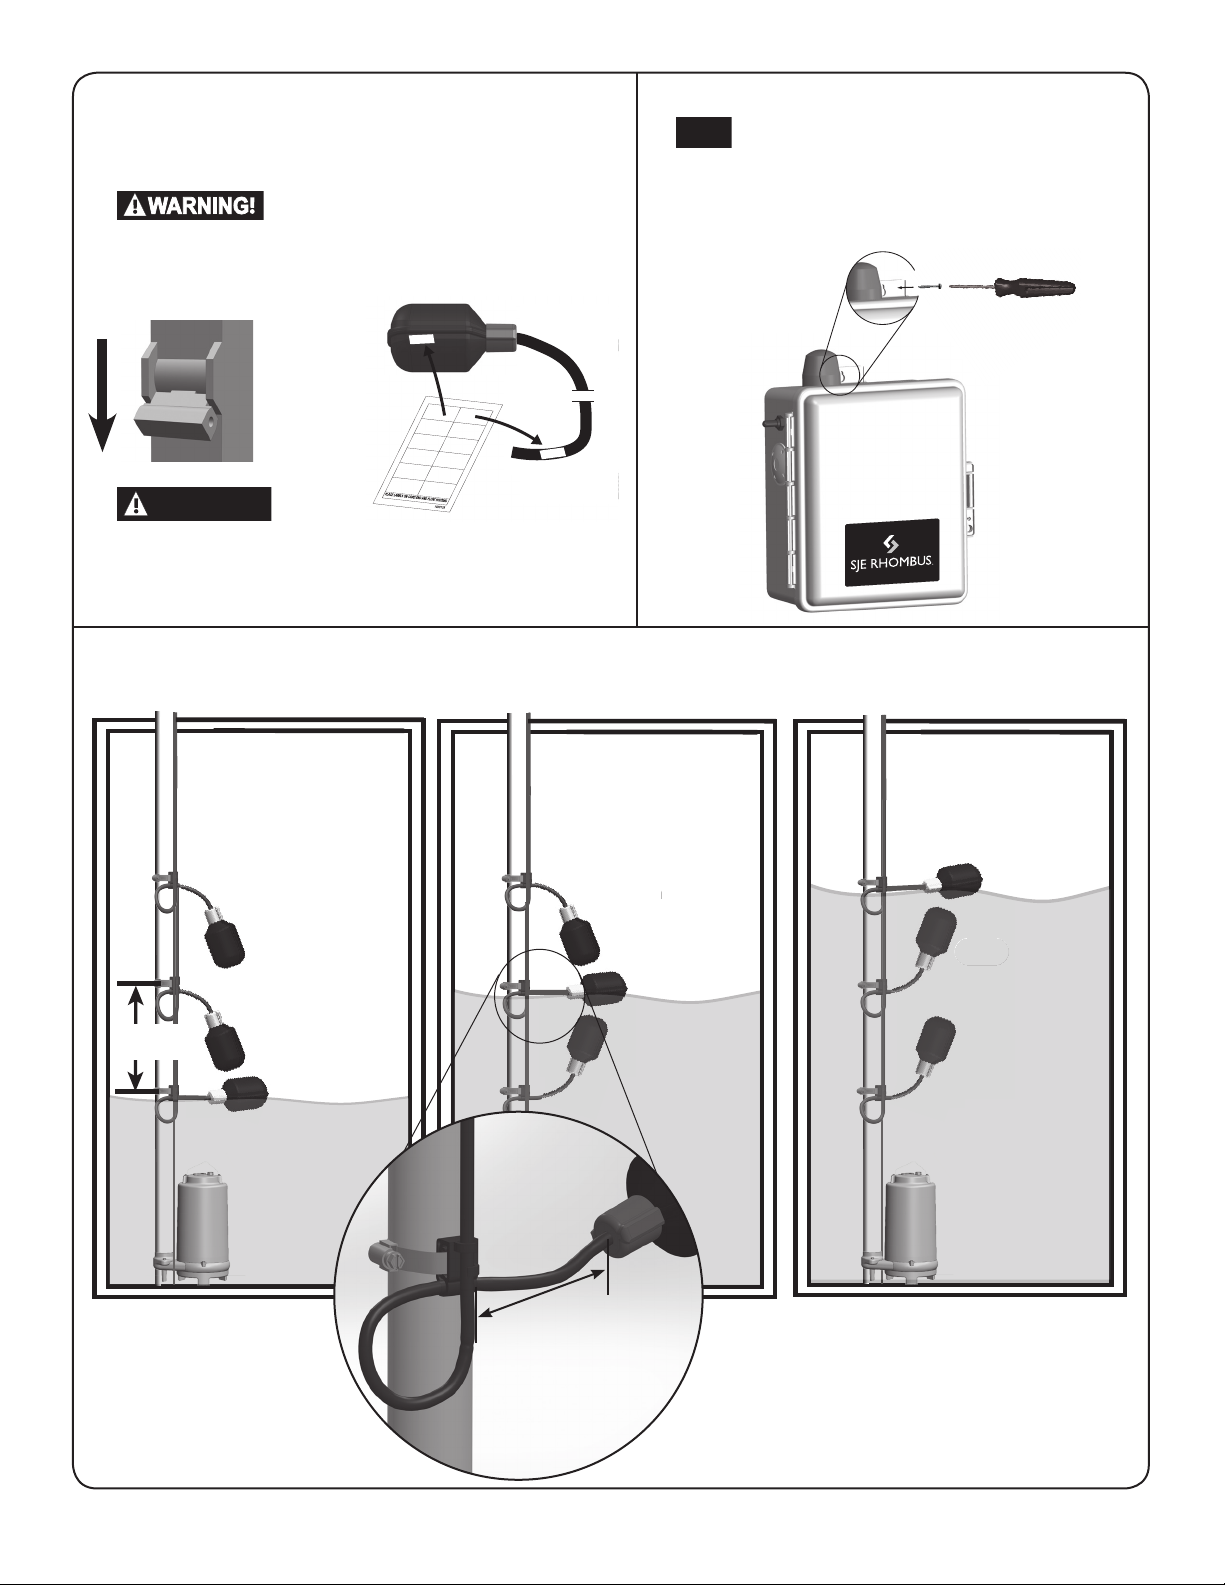
Installing the Float Switches
The Model 112 Single Phase Simplex control panel operates with
3 oat switches to activate pump STOP, START, and high-level
ALARM functions.
Mounting the Control Panel
1 2
3
CAUTION!
NOTE
Ensure all power is turned OFF
before installing oats in tank.
Failure to do so could result in
serious or fatal shock.
Label each oat and cord
end with the provided pairs
of STOP, START, and ALARM
stickers.
If the distance to the control panel exceeds the length of
the oat switch cords or the pump power cord, splicing
in a liquid-tight junction box will be required. For outdoor
or wet installation, we recommend an SJE Rhombus UL
Type 4X junction box.
2
Make sure hose clamp
band does not interfere
with oat operation.
Do not install cord under
hose clamp.
Tighten
the
clamp.
Hose clamp is 18-8
stainless steel.
If the oats are not properly mounted and connected in the correct
order, the pumps will not function properly.
Floats require free range of motion.
They must not touch each other or any equipment in the pump chamber.
START
RED. OFF
STOP
STOP
START
RED. OFF
ALARM ALARM
Lag/Alarm
Stop
Stop Stop
Lag/Alarm
Lead
Lead
Lead
Lag/Alarm
Operating
range
Start
Start
Alarm
Alarm
Alarm
Lag/Alarm
Stop
Stop Stop
Lag/Alarm
Lead
Lead
Lead
Lag/Alarm
Operating
range
Start
Pipe Clamp Mounting - Float Operation
3.5”
(9cm)
Operation
SJE-Rhombus® Model 112 Single Phase Simplex control
panels are designed to operate in a three oat
system as standard. When all oats are in the open or OFF
position, the panel is inactive. As the liquid level changes
and closes the stop oat, the panel remains inactive until
the start oat closes. At this point the pump will start,
providing the HOA switch is in the AUTOMATIC mode and
the power is ON. The pump will remain ON until both the
stop and start oats open (return to the OFF position).
If the liquid level travels beyond both the stop and start
oats and reaches the alarm oat, the alarm will be
activated. The alarm horn can be silenced by pressing and
releasing the test/silence switch.
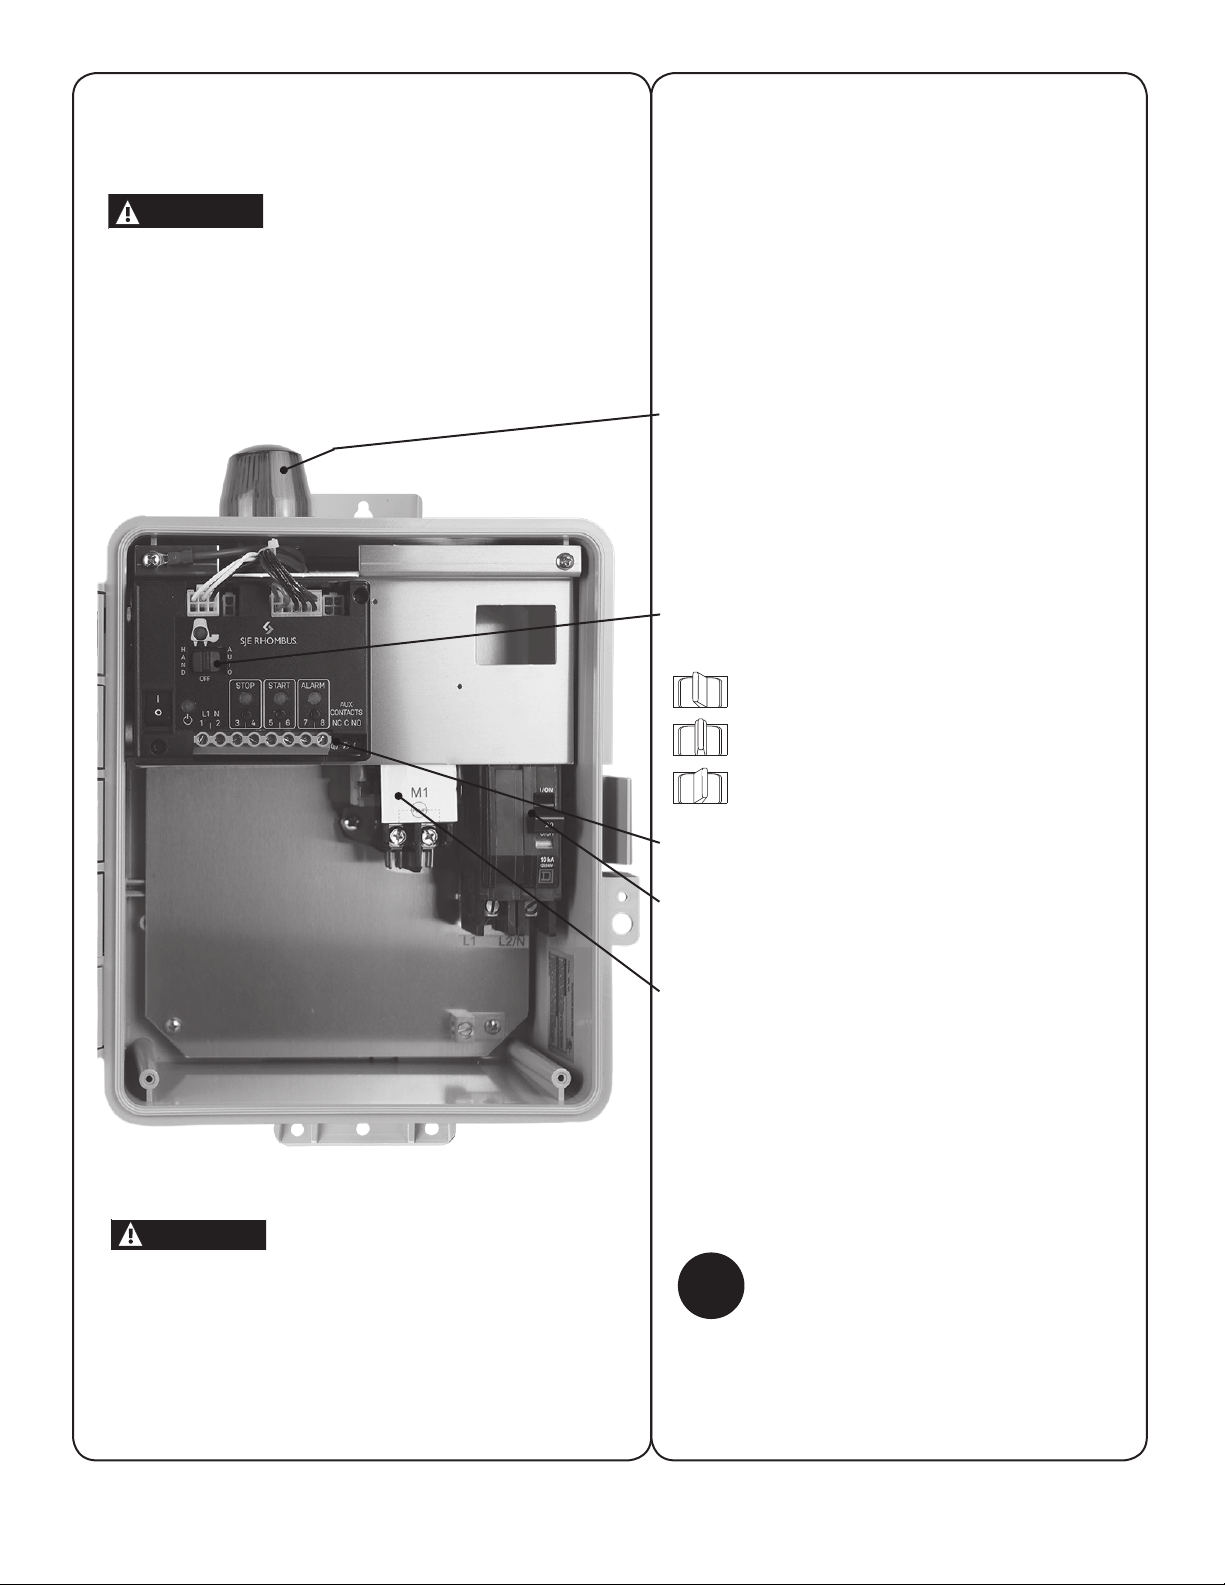
Alarm System (Indicator Light and Horn)
When an alarm condition occurs, the red light and horn will
be activated.
If the TEST/NORMAL/SILENCE switch is moved to the
SILENCE position and released, the horn will be silenced.
When the alarm condition is cleared, the alarm system is
reset.
Hand-O-Auto (HOA) Switch
The HOA 3-way switch controls pump functions.
In HAND mode, the pump will turn ON.
OFF turns the pump OFF.
In AUTO mode, commands from the oat
switches turn the pump ON and OFF.
Auxiliary Contact
Form C - Can be wired normally open or normally closed.
Circuit Breaker (optional)
The circuit breaker provides pump disconnect and branch
circuit protection.
Motor Contactors
The motor contactor controls the pump by switching
electrical lines.
Wiring the Control Panel
1Determine conduit entrance locations on control panel as shown.
Check local codes and schematic inside the panel for the number
of power circuits required.
Be sure the pump power voltage and phase are the same as the
pump motor being installed.
2Connect the following wires to the proper terminal positions:
• incoming power
• pump
• oat switches
See schematic inside control panel for details.
CAUTION!
Technical support,
service questions:
+1-800-746-6287
Monday - Friday
7:00 AM to 6:00 PM Central Time
?
3Verify correct operation of control panel after installation is
complete.
3
Type 4X conduit must be used to maintain a Type 4X rating of
the control panel.
H
A
N
D
H
A
N
D
H
A
N
D
A
U
T
O
A
U
T
O
A
U
T
O
OFF
OFF
OFF
You must use conduit sealant to prevent
moisture or gases from entering the panel.
CAUTION!
Typical Layout (May vary with options ordered).

4
Technical Support: +1-800-746-6287
www.sjerhombus.com
Technical Support Hours: Monday - Friday, 7 A.M. to 6 P.M Central Time
PROGRAMMING INSTRUCTIONS
WITH POWER ON, HOA OFF, FLOATS OFF OR DISCONNECTED, PRESS DESIRED FLOAT BUTTON RAPIDLY 4 TIMES AND HOLD
**PUMP LED WILL FLASH UPON SUCCESSFUL PROGRAMMING**
OPTIONS FLOAT BUTTON DEFAULT OPERATION
MANUAL ALARM RESET STOP OFF LATCHES HIGH ALARM: CLEAR WITH EXTERNAL TEST SWITCH
SEAL FAIL ALARM ACTIVATION START OFF ACTIVATES HORN UPON SEAL FAIL
ALARM FLASHER ALARM OFF FLASHES BEACON UPON HIGH ALARM
ALARM CONDITIONS
ALARM BEACON CONTROLLER LED HORN
PUMP POWER FAIL
FLASHING RED PUMP LIGHT
NO
SEAL FAIL
FLASHING SF1 PROG
FLOAT FAIL
FLASHING BAD FLOAT NOT LIT NO
HIGH ALARM
SOLID ALARM FLOAT YES
COMPONENTS
a. ON/OFF Switch - Control/Alarm Power g. Simulate Float Buttons x3
b. 120V Incoming Power Terminals h. Float Terminals x6
c. Power LED - (Green) i. Seal Fail Pot - (Optional)
d. Pump HOA Switch j. Seal Fail LED - (Red) - (Optional)
e. Float LEDs - (Red) x3 k. Auxiliary Alarm Terminals
f. Pump LED
Pump Run - (Green)
Pump Fail - (Red)
Model shown contains optional Seal Fail circuitry.
START
5 6 7
L1 N
1 2
H
A
N
D
A
U
T
O
OFF
AUX
CONTACTS
STOP
43 NC C NO
ALARM
8
SEAL
250k
200k
150k
100k
35k 15k 5k
NC
a
b
c
h
f
g
k
i
d
j
e
Other SJE Rhombus Baby Swing manuals

Popular Baby Swing manuals by other brands

Nags Head Hammocks
Nags Head Hammocks Deluxe Double Swing Assembly instructions

highwood
highwood Westport Lehigh Assembly guide

Health in motion
Health in motion 421L Assembly and operation manual

Outsunny
Outsunny 84A-081 quick start guide

Moni
Moni CLARISSA instruction manual

baby joy
baby joy BC10089 user manual


Better Homes and Gardens
Better Homes and Gardens DELAHEY PORCH SWING TM013656W Assembly instructions

Fisher-Price
Fisher-Price T2065 user manual

Fisher-Price
Fisher-Price M5598 user manual

LifeSpan Kids
LifeSpan Kids PE49 owner's manual

Graco
Graco Lovin' Hug Plug -in Swing owner's manual

Fisher-Price
Fisher-Price C6410 user manual