for Living 25050 User manual

Battery-Operated
String Lights with Timer
Product No. 052-1608-6
Model No. 25050
Toll free: 1-877-483-6759
IMPORTANT: Please read this manual carefully
before beginning assembly of this product.
Keep this manual for future reference.
Operating Instructions
1. TIMER/MINUTERIE
2. ON/MARCHE
3. OFF/ARRÊT
+
-
-
+
1. TIMER/MINUTERIE
2. ON/MARCHE
3. OFF/ARRÊT

2Product No. 052-1608-6 •Model No. 25050
Important Safety Instructions
IMPORTANT: RETAIN FOR FUTURE REFERENCE AND READ CAREFULLY
For indoor or outdoor use.
10 pc. Battery-Operated Pineapple String Lights
1
Part List
Let us help you!
DO NOT RETURN YOUR PRODUCT TO THE STORE. CALL US FIRST!
1-877-483-6759
If you have questions regarding your product, require warranty assistance,
or have damaged or missing parts, please call our customer service toll-free helpline.
Contact us for assistance, we’re here to help.
IMPORTANT: Please read and understand this manual before any assembly. Before beginning assembly of product,
make sure all parts are present. Compare parts with packaging contents list. If any part is missing, or if you have
any questions, contact the service centre at 1-877-483-6759 (toll free).
1. TIMER/MINUTERIE
2. ON/MARCHE
3. OFF/ARRÊT
+
-
-
+
1. TIMER/MINUTERIE
2. ON/MARCHE
3. OFF/ARRÊT
3
Operation
NOTE: Requires 2 AA batteries
(not included).
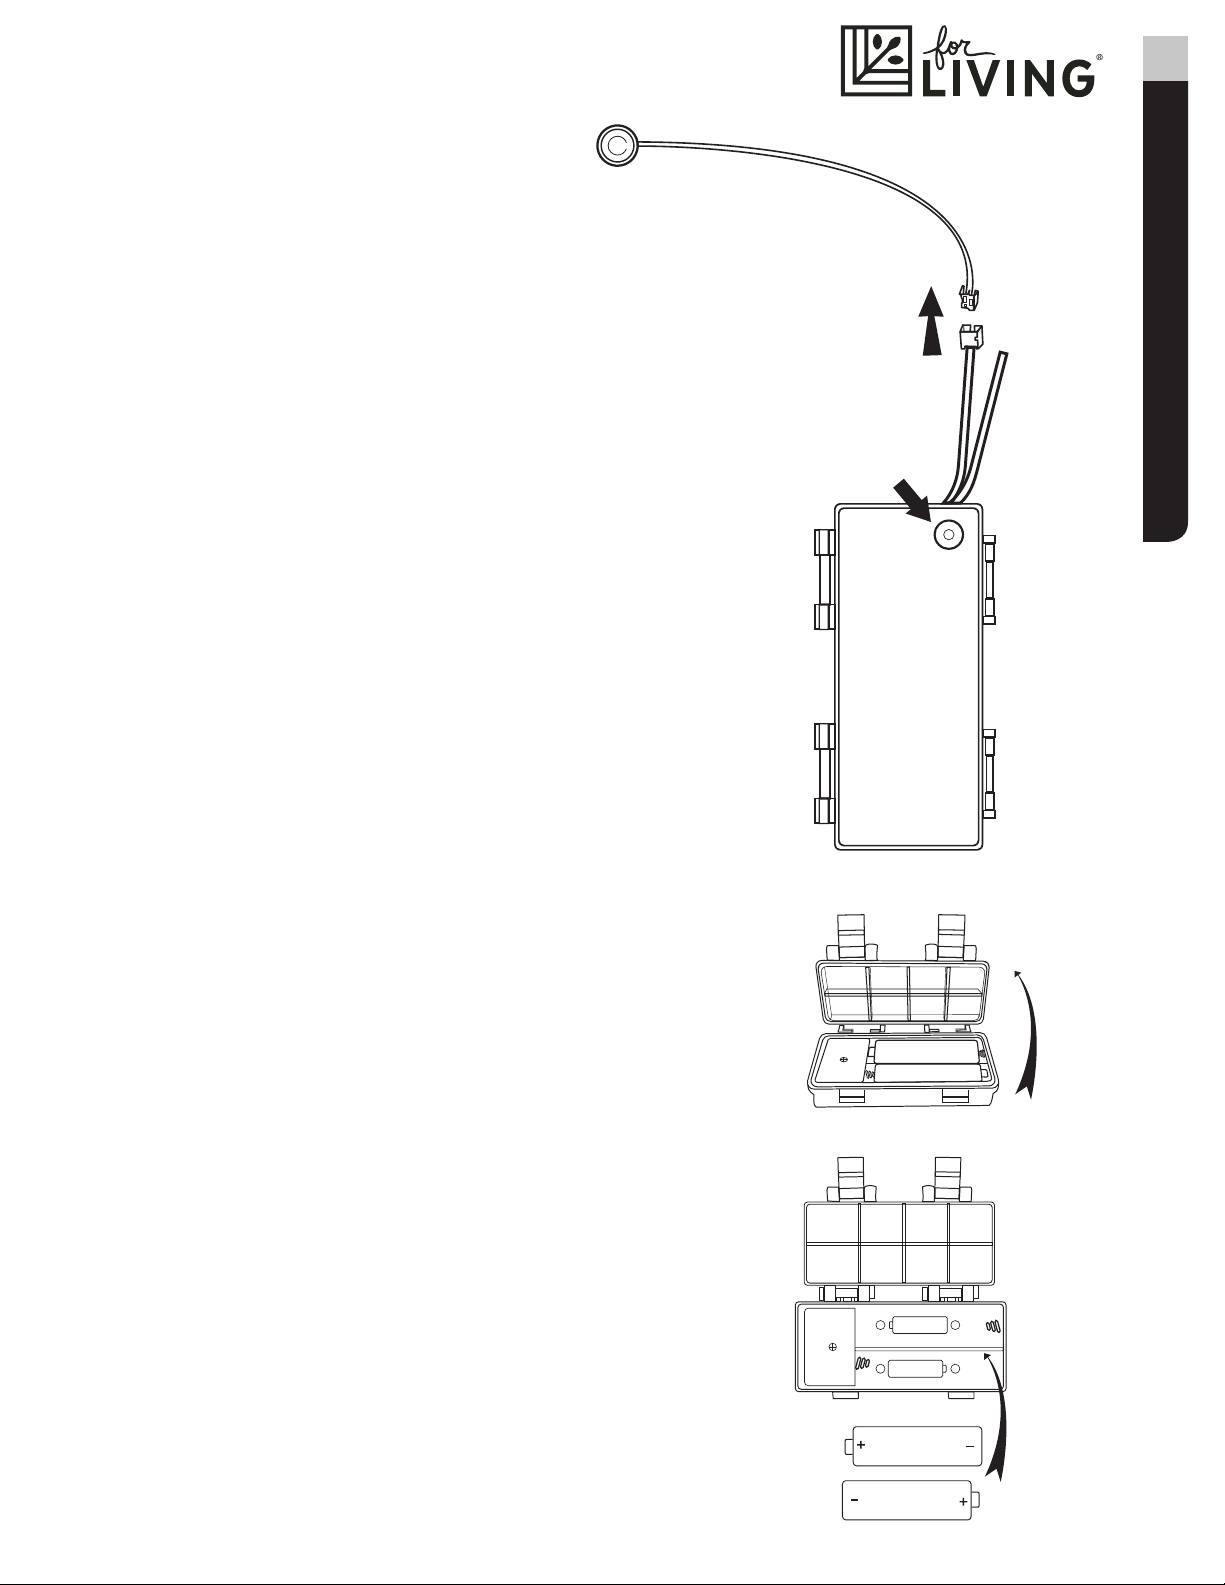
Step 1
Detach the ‘TRY-ME’ wire lead as shown.
Step 2
Unlatch the battery compartment tabs (2). Lift the
battery compartment cover up.
Step 3
Insert 2 new AA batteries (not included) noting the
correct polarity for each.
Step 4
Re-assemble the unit by reversing the above procedure.
Step 5
NOTE: This product features a push button switch
with 3 settings: TIMER, ON, and OFF. Press the
button once for TIMER mode. Press the button
twice for ON (light will remain on until turned
off). Press the button a third time for OFF.
The light features a built-in 6/18 hour timer
(6 hours on, 18 hours off). To set the timer (make
sure light is in OFF position first), press the button
once at the time you want the light to start its
6-hour on cycle. The light will continue to cycle
like this each day (6 hours on, 18 hours off) until
you switch it to the off position.
1. TIMER/MINUTERIE
2. ON/MARCHE
3. OFF/ARRÊT
+
-
-
+
1. TIMER/MINUTERIE
2. ON/MARCHE
3. OFF/ARRÊT
1. TIMER/MINUTERIE
2. ON/MARCHE
3. OFF/ARRÊT
+
-
-
+
1. TIMER/MINUTERIE
2. ON/MARCHE
3. OFF/ARRÊT
1. TIMER/MINUTERIE
2. ON/MARCHE
3. OFF/ARRÊT
+
-
-
+
1. TIMER/MINUTERIE
2. ON/MARCHE
3. OFF/ARRÊT

4Product No. 052-1608-6 •Model No. 25050
Battery Replacement
Dispose of used batteries per municipal or provincial law.
This For Living®product carries a one (1) year warranty against defects in workmanship and materials.
Trileaf Distribution agrees to replace the defective product free of charge within the stated warranty period,
when returned by the original purchaser with proof of purchase. This product is not guaranteed against wear
or breakage due to misuse and/or abuse.
Made in China.
Imported by Trileaf Distribution Trifeuil Toronto, Canada M4S 2B8
Step 1
Unlatch the battery compartment tabs (2). Lift the
battery compartment cover.
Step 2
Carefully remove the old batteries.
Step 3
Insert 2 new AA batteries (not included), noting the
correct polarity for each.
Step 4
Re-assemble the unit by reversing the above
procedure.
Caution! Do not mix alkaline, standard (carbon-zinc), or rechargeable batteries.
Do not dispose of batteries in fire. Batteries may explode or leak.
Warranty
1. TIMER/MINUTERIE
2. ON/MARCHE
3. OFF/ARRÊT
+
-
-
+
1. TIMER/MINUTERIE
2. ON/MARCHE
3. OFF/ARRÊT
1. TIMER/MINUTERIE
2. ON/MARCHE
3. OFF/ARRÊT
+
-
-
+
1. TIMER/MINUTERIE
2. ON/MARCHE
3. OFF/ARRÊT
This manual suits for next models
1
Table of contents
Popular Light Fixture manuals by other brands

Lithonia Lighting
Lithonia Lighting SGLL 24 PIR installation instructions

Chauvet Professional
Chauvet Professional MAVERICK FORCE S PROFILE user manual
Briteq
Briteq BT-Tracker Operation manual

Lightolier
Lightolier SL110B specification

Lightolier
Lightolier 40S20 Instructions for installation

VelLight
VelLight LEDS11SRGB manual


