manuals.online logo
Brands
  1. Home
  2. •
  3. Brands
  4. •
  5. Forest garden
  6. •
  7. Lawn And Garden Equipment
  8. •
  9. Forest garden VICTORIAN WALL GREEN HOUSE User manual

Forest garden VICTORIAN WALL GREEN HOUSE User manual

VICTORIAN
WALL GREEN HOUSE
Fixing Pack (VICTGHFP) Not to Scale
Important :
Assembly of this
product requires a
minimum of two
adults. MUST PRE DRILL
B
VICTGH PARTS LIST
1 2
ACD
H
F
A
K
M
E
J
NO
L
G
I
A
I
I
J
LOCKBLOCK Qty 1
45451400WB Qty 1
BATTEN 45x45x1400mm
with badge
TWGOPWIN Qty 2
(Opening Window)
TWGWIN Qty 2
(Fixed Window)
35121950 Qty 2
STRIP 35x12x1950mm
TWGFOLDSHLFV2 Qty 2
(Folding Shelf)
VICTGHSHLF Qty 4
(Fixed Shelf)
TWGSIDE Qty 2
TWGBACK Qty 2
PROP35120300 Qty 2
STRIP 35x12x300mm
35120793 Qty 3
STRIP 35x12x793mm
35121610 Qty 2
STRIP 35x12x1610mm
35351400 Qty 1
BATTEN 35x35x1400mm notched
35120347 Qty 2
STRIP 35x12x347mm
=
Fix the two battens as shown again using a 60mm screw for each end. Make sure you pre-drill.
The bottom 35x35x1400mm batten must be set back as shown in the square above.
Make sure that the notch in batten ‘N’ is on the inside of the green house.
Make sure that the notch on batten ‘J’ is facing up.
Fix the side panels to each of the back sections, screwing through the outside of
the side panels into the back panel, using 3 x 60mm screws for each.
Fix the two back panel together, screwing at an angle, with the 3 x 70mm screws
through the framework at the back.
Handle
Qty 2
40mm Hinge
Qty 12
30mm Screw Qty 20
IMPORTANT, RETAIN FOR FUTURE REFERENCE; READ
CAREFULLY
- Always pre-drill the timber to avoid splitting.
- The timber in this product is pressure treated to ensure
longevity and protection against rot. This may leave colour
variations, but these will even out as the moisture content
stabilises
.- Timber is a natural material and will shrink and swell as a
result of varying moisture content.
- Please keep all plastic bags and small parts away from
children
- This product must be built on a solid level base.
Technical Help line: 0333 321 3142 8.30 am and 5.00 pm
Monday to Friday.
In line with your statutory rights, please check all parts prior
to assembly, as assembly of damaged parts may be
deemed to be acceptance and this may affect the remedies
you are entitled to. If the product is not constructed in
accordance with the instructions, or is altered in anyway
(e.g. painted), the manufacturer cannot be held liable for
any resulting damage.
POZI DRIVE SCREWDRIVER
DRILL
HAMMER
TAPE MEASURE SPIRIT LEVEL
Latch
Qty 1
70mm Screw Qty 7
60mm Screw Qty 20
5.0 x 25mm Screw Qty 4
40mm Screw Qty 26
issue 0217
Badge on the
outside
35mm
Receiver
Qty 4
25mm Screw Qty 74
Bolt
Qty 6
TWGDOORV2 Qty 4
Notch
E
E
A
PRE-DRILL
PRE-DRILL
68
7
35
4
K
L
B
Place the prop against the inside of the front batten. Position the
screw so that the prop can be turned both ways and offer two
settings for ventilation. Use a single 40mm screw.
Place the two sections that you have just completed in step 3 against the
front of the green house. Fix each in place doing the following.
Screw through the side panel using 2x60mm screws.
Screw through the bottom batten in to the TWGDR using 2x60mm screws.
screw down through the top batten in to the front TWGDR using 2x70mm
screws
Fix a 347mm strip to the bottom of two of the doors using 2x30mm
screws for each.
B
Fix the cover strips to the front and back of each side panel
making sure that each is flush. Fix these in place using 30mm
screws.
Forest Garden Ltd, Unit 288 Hartlebury Trading Estate, Hartlebury, Worcestershire DY10 4JB
N
M
O
D
PRE-DRILL PRE-DRILL PRE-DRILL
PRE-DRILL
PRE-DRILL
PRE-DRILL PRE-DRILL
Frame
Fix two hinges to the back of each opening window using 3x25mm
screws for each hinge. Place the windows on top of the frame making
sure that they are square and in line with the side panels and fix the
other half of the hinges to the back panel using another 3x25mm
screws
From Inside
Place the two (fixed windows) on to the green house. These must be in line with the two outer
opening windows. They must each be placed so that there is a small gap between these and
the outside opening windows to allow them to open freely.
Fix these in place screwing up through the front batten, making sure the screws locate into the
windows framing. Use a single 60mm screw for each.
At the back screw down through the windows framing and into the top of the back panels again
using a 60mm screw for each
Fix a 793mm strip to each of the opening windows so that it overlap the other windows. Fix
using 2x25mm screws. Fix the remaining strip so that it overlaps both of the fixed windows.
Board can be
removed for
painting
911
10
12 13
F
E
G
From underneath the shelf screw through the framing into the framing
of the front, back and side panels using 2x40mm screws for each.
(6 x 40mm screws for each shelf)
Fix two hinges to the underside of each (folding shelf) using 3x25mm screws for
each hinge. Fix a bolt to each end of the opposite batten using the screws provided.
Place the shelf into the green house and fix the other half of the hinge to the
underside of the back 1400mm batten using another 3x25mm screws for each.
Open the shelf and mark the position of the bolt’s receiver on the fixed shelfs before
securing in place.
Fix two hinges to the side of each TWGDR as shown using 3x25mm
screws for each hinge. Place these against the panels you previously
fixed in step 4 so that the hinge is against the inside of the frame and
secure the other half of each hinge using 3x25mm screws.
Fix a handle to each of the doors making sure that these are in line with each other. Fix each in
place using 25mm screws.
Place the latch so that it is in line with central batten of each door and will hold the door securely
when fixed. Fix using the 5.0 x 25mm screws provided.
Close the left hand door which you have just fixed. Place the LOCKBLOCK on the inside of the door so that
it is in line with the framework and sits at least 3mm above the bottom batten. Fix the block in place using
2x30mm screws.
Fix a bolt to the block you have just placed using the 25mm screws provided.
Fix the remaining bolt to the top of the door making sure that the bolt will locate in to the notch on the top
batten.
Forest Garden Ltd, Unit 288 Hartlebury Trading Estate, Hartlebury, Worcestershire DY10 4JB
issue 0217
D
D
PRE-DRILL PRE-DRILL PRE-DRILL
PRE-DRILL
PRE-DRILL PRE-DRILL

Other Forest garden Lawn And Garden Equipment manuals

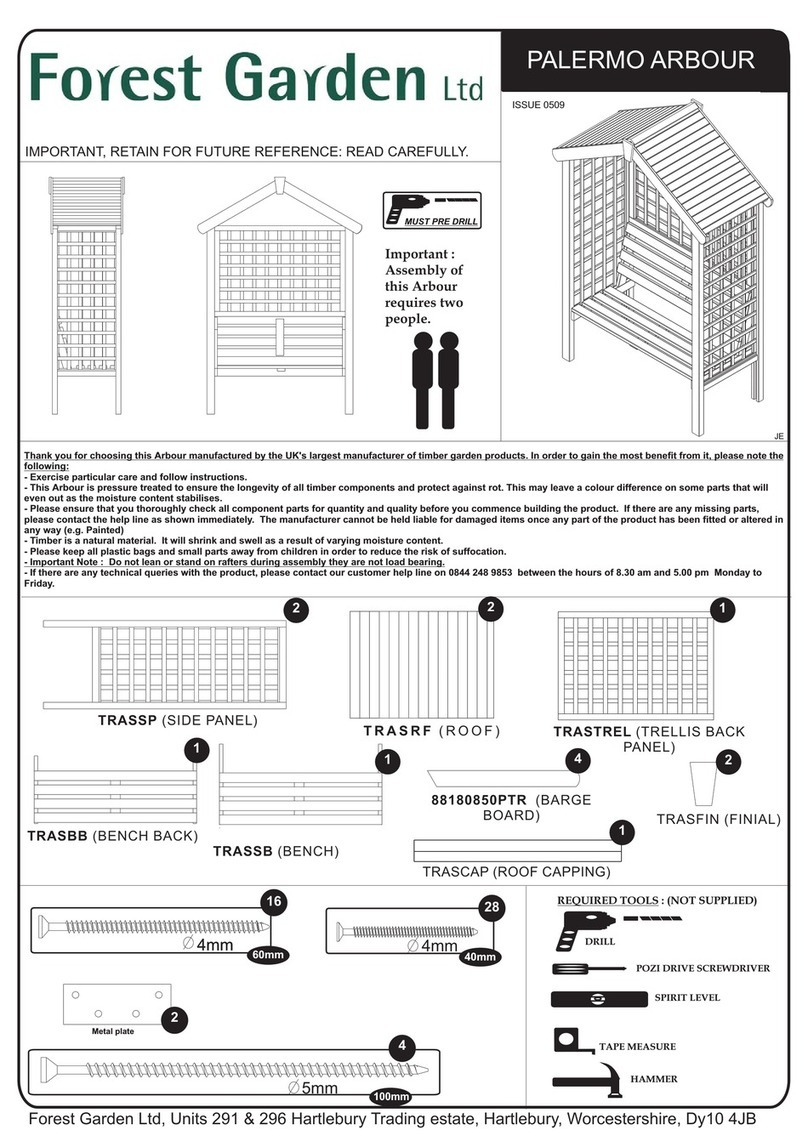
Forest garden PALERMO ARBOUR User manual

Forest garden

Forest garden PALERMO ARBOUR User manual

Forest garden FGFSSCV2 User manual

Forest garden

Forest garden FGFSSCV2 User manual

Popular Lawn And Garden Equipment manuals by other brands

Glasswelt GARLAND SCAR 302 E instruction manual

Glasswelt

Glasswelt GARLAND SCAR 302 E instruction manual

mon PETIT POTAGER Mini Keyhole Garden user manual

mon PETIT POTAGER

mon PETIT POTAGER Mini Keyhole Garden user manual

Ribimex PRA/PB.1386 User and maintenance manual

Ribimex

Ribimex PRA/PB.1386 User and maintenance manual

Outland Living OLVG-332 owner's manual

Outland Living

Outland Living OLVG-332 owner's manual

New England Arbors Heartwood Grande Arbor Assembly guide

New England Arbors

New England Arbors Heartwood Grande Arbor Assembly guide

Autopot AQUAvalve 4Pot system Simple care guidelines

Autopot

Autopot AQUAvalve 4Pot system Simple care guidelines

GreenWorks SS80L01 Operator's manual

GreenWorks

GreenWorks SS80L01 Operator's manual

dobar 58270 Assembly and safety instructions

dobar

dobar 58270 Assembly and safety instructions

RedMax GK-280 Owner's/operator's manual

RedMax

RedMax GK-280 Owner's/operator's manual

Jata hogar mosquitoTRAP MATR0120 Instructions of use

Jata hogar

Jata hogar mosquitoTRAP MATR0120 Instructions of use

Ausonia AGROSIMEX Athena 31821 user manual

Ausonia

Ausonia AGROSIMEX Athena 31821 user manual

Altrad ATIKA VT 40 Z Original instructions

Altrad

Altrad ATIKA VT 40 Z Original instructions

Bosch MSGP3L INFORMATION FOR USE

Bosch

Bosch MSGP3L INFORMATION FOR USE

The Greenhouse People 4 Tier instructions

The Greenhouse People

The Greenhouse People 4 Tier instructions

VFARM VGROW Tower 3.0 user manual

VFARM

VFARM VGROW Tower 3.0 user manual

Digimax Rodent Buster manual

Digimax

Digimax Rodent Buster manual

Gardena WT 1030 operating instructions

Gardena

Gardena WT 1030 operating instructions

AquaCraft TOP SPEED3 manual

AquaCraft

AquaCraft TOP SPEED3 manual

manuals.online logo
manuals.online logoBrands
  • About & Mission
  • Contact us
  • Privacy Policy
  • Terms and Conditions

Copyright 2025 Manuals.Online. All Rights Reserved.