formlabs Form Wash Setup guide

Manual Form Wash

Installation and Usage Instructions
Form Wash
Desktop Stereolithography Print Cleaner
Original English instructions and translations
Please read this manual carefully and keep it for future reference.
November 2019
REV 01
© Formlabs

Table of Contents
1. Preface ..................................................................8
1.1 Read and Retain Instructions................................................8
1.2 Obtaining Documentation and Information ...................................8
2. Introduction .............................................................10
2.1 Intended Use ............................................................10
2.2 Product Elements. . . . . . . . . . . . . . . . . . . . . . . . . . . . . . . . . . . . . . . . . . . . . . . . . . . . . . . . . .11
2.3 Technical Data ...........................................................12
2.4 Form Wash Controls ......................................................12
3. Safety Warnings .........................................................13
3.1 Component and Subsystem Safety .........................................13
3.2 Personal Protective Equipment (PPE) .......................................15
3.3 Specifications of Tools to be Used .........................................15
4. Preparation and Set Up...................................................16
4.1 Arranging the Workspace .................................................16
4.2 Unboxing the Form Wash .................................................16
4.3 Installing the Form Wash ..................................................16
4.4 Transporting the Form Wash ...............................................18
5. Using the Form Wash. . . . . . . . . . . . . . . . . . . . . . . . . . . . . . . . . . . . . . . . . . . . . . . . . . . . 20
5.1 Operational Environment.................................................20
5.2 Washing ................................................................20
5.3 Considerations for Specific Geometries.................................... 22
5.4 Device Management..................................................... 23
5.5 Emergency and Exceptional Situations..................................... 25
6. Maintenance ...........................................................26
6.1 Inspecting the Product ................................................... 26
6.2 Inspection Tasks Between Wash Cycles ................................... 26
6.3 Monthly Inspection and Maintenance Tasks .................................27
6.4 Periodic Inspection and Maintenance Tasks .................................27
6.5 Planned Maintenance Procedures..........................................27

7. Troubleshooting and Repair.............................................. 30
7.1 Restarting with a Power Cycle ............................................ 30
7.2 Troubleshooting......................................................... 30
7.3 Disassembly and Repair.................................................. 30
8. Disposal................................................................ 32
8.1 Guidance for Recycling and Disposal ...................................... 32
9. Index................................................................... 33
10. Glossary. . . . . . . . . . . . . . . . . . . . . . . . . . . . . . . . . . . . . . . . . . . . . . . . . . . . . . . . . . . . . . . . 34

7
Read and understand this manual and its safety instructions before using the Form
Wash. Failure to do so can result in serious injury or death.
DISCLAIMER
Formlabs has made every eort to ensure these instructions are as clear, complete, and correct
as possible. The information provided in this documentation contains general descriptions
and/or technical characteristics of the performance of the products contained herein. This
documentation is not intended as a substitute for, and is not to be used for, determining
suitability or reliability of these products for specific user applications. It is the duty of any
such user or integrator to perform the appropriate and complete risk analysis, evaluation, and
testing of the products with respect to the relevant specific application or use thereof. Neither
Formlabs nor any of its aliates or subsidiaries shall be responsible or liable for misuse of
the information that is contained herein. If you have any suggestions for improvements or
amendments or have found errors in this publication, please notify us.
Copyright © 2019 by Formlabs. All rights reserved.
support.formlabs.com
TRADEMARKS
All product names, logos, and brands are property of their respective owners. All company,
product, and service names used in this manual are for identification purposes only. Use of
these names, logos, or brands does not imply endorsement.
DOCUMENT REVISIONS
Date Version Document Changes
Oct 2015 REV 00 Initial publication of Quick Start Guide and Safety pamphlet
Nov 2019 REV 01 Initial publication
WARNING

8
1. Preface
Congratulations on purchasing the Form Wash. On behalf of the employees who create and
support Formlabs technology, we thank you for your purchase.
The instructions in this manual provide information for skilled persons to understand safety, setup
and installation, operation, and maintenance of the Form Wash. These instructions are intended
for anyone who is installing, operating, maintaining, or otherwise interacting with the Form Wash.
Supervise young or inexperienced users to ensure an enjoyable and safe operation.
1.1 Read and Retain Instructions
Read and understand this manual and its safety instructions before using the Form Wash.
Failure to do so can result in serious injury or death. Keep all safety information and instructions
for future reference and provide them to subsequent users of the product.
Follow all the instructions. This will avoid fire, explosions, electric shocks, or other hazards that
may result in damage to property and/or severe or fatal injuries.
The Form Wash shall only be used by persons who have fully read and understood the
contents of this usage manual. Ensure that each person who uses the Form Wash has read
these warnings and instructions and follows them. Formlabs is not liable for cases of material
damage or personal injury caused by incorrect handling or non-compliance with the safety
instructions. In such cases, the warranty will be voided.
1.2 Obtaining Documentation and Information
Visit support.formlabs.com to:
• Access the latest version of all Formlabs product documentation.
•
Contact Formlabs to request documentation, usage instructions, and technical information.
• Submit any comments or feedback regarding what is good and what can be improved.
• Request additional training.
1.2.1 Support and service
Retain a record of the original purchase to request warranty services. Service options depend
on the status of the specific product’s warranty. Include the serial name of the product when
contacting Formlabs for product support.
Instead of a serial number, all Formlabs machines have a serial name, which is a unique identifier to
track the history of manufacturing, sales, and repair, as well as to distinguish usage when connected
to a network. The serial name is on the back panel of the machine in this format: “AdjectiveAnimal.”
Service providers of Formlabs products also provide support and service. To the extent that
Formlabs or a certified service provider oers other or extended warranties, the terms of the
separate oer may apply. For products purchased from certified service providers, contact
the original service provider for assistance before contacting Formlabs.
For any support or service requests, including product information, technical assistance, or
assistance with instructions, contact Formlabs Services or a certified service provider:
support.formlabs.com USA
Formlabs, Inc.
35 Medford St.
Somerville, MA, USA, 02143
Germany
Formlabs GmbH
Nalepastrasse 18-50
12459 Berlin, Germany

Preface | 9
1.2.2 Returns
Formlabs accepts returns for unopened, unused, and undamaged products within 30 days
of the shipment date. Returns must be authorized by Formlabs. Visit Formlabs.com for more
detailed information about returning your purchase.
1.2.3 Warranty
This product is protected under warranty. Formlabs oers a warranty for all Formlabs-branded
hardware. Unless otherwise expressly stated, the Terms of Service, including the Warranty,
constitute the entire agreement between you and Formlabs with respect to the Service and
any product you purchase from Formlabs and supersedes all prior or contemporaneous
communications, proposals and agreements, whether electronic, oral or written, between you
and Formlabs. Read the warranty for more details on the Formlabs warranty for your region:
US formlabs.com/support/terms-of-service/#Warranty
EU (EN) formlabs.com/support/terms-of-service/eu/
EU (DE) formlabs.com/de/support/terms-of-service/eu/
EU (FR) formlabs.com/fr/support/terms-of-service/eu/

10
2. Introduction
2.1 Intended Use
The Form Wash automatically cleans uncured liquid resin from 3D printed parts’ surfaces. The
final performance characteristics of cured photopolymer resin may vary according to your
compliance with the instructions for use, application, operating conditions, material combined
with, end use, or other factors.
In some cases, the additive manufacturing process may inherently result in variable
performance characteristics between manufacturing runs or within a specific part.
Such variances may not be apparent and may result in unexpected defects in
additively fabricated parts.
You must independently verify the suitability of additive manufacturing, stereolitho-
graphy, Form Wash, and any specific designs or materials employed for the
application and intended purpose before use. In no event shall Formlabs be liable for
any loss, death, or bodily injury that you suer, or that you cause to any third party, in
connection with your use of Formlabs products. To the fullest extent legally permitted
Formlabs EXPRESSLY DISCLAIMS ANY IMPLIED OR EXPLICIT WARRANTY OF
FITNESS for a particular usage, the particular nature and circumstances of said usage
being unforeseen and unforeseeable to Formlabs.
Formlabs is not a manufacturer of medical devices. Formlabs provides tools and
materials that may be used in many applications, but makes no claims as to the safety
or eectiveness of any specific devices made using Formlabs products. Certain
Formlabs products, such as those commonly known in the industry as “biocompatible”
resins, have been engineered to comply with relevant industry standards. The specific
standards and most relevant technical specifications may be identified within the
technical data sheets and have been tested according to relevant testing protocols
for those standards and specifications. Biocompatible resins are a speciality product,
developed for use by medical professionals, and should be used in accordance with
their instructions for use.
Do not modify. The Form Wash is intended for use as-is. Modifying the unit without
explicit approval and directions from Formlabs will invalidate your warranty, and could
potentially ruin the machine and cause you bodily harm.
Never remove the bottom panel of the unit.
NOTICE
WARNING
WARNING
WARNING

Introduction | 11
2.2 Product Elements
Platform Mount Holds the
build platform when washing
parts on the platform.
Basket Removable container
holds parts to wash without the
build platform.
Basket Mount A single hook
secures the basket to raise
and lower.
Outer Lid Limits solvent
evaporation. Keep the lid closed
when not in use.
Inner Lid A hinged, secondary
lid opens and closes to contain
solvent while allowing parts to be
lowered or raised from the bucket.
Wash Bucket Removable container holds a maximum of 8.6 L of solvent. A rotating impeller
at the bottom circulates the solvent.
Display Shows status, time, and options for configuring the Form Wash.
Knob Turn or press to adjust time and to start, pause, or end a wash cycle.
Tool Storage Each side has designated locations for storing each tool.
Power Supply Provides power to the Form Wash. Specifications: 24 V, 2 A.
Solvent Not included. Dissolves liquid resin from printed parts’ surfaces.
The Form Wash includes storage space for commonly used tools during the print cleaning process.
Flush CuttersUse to carefully remove support tips from printed parts.
Removal ToolApply pressure under the base generated by PreForm to release the base
of your parts from the build platform.
Hydrometer If using isopropyl alcohol (IPA) as a solvent (or another solvent with an
equivalent specific gravity), float in IPA to measure the IPA’s resin concentration (based on
previous calibration in fresh IPA). Other solvents may require a dierent hydrometer for a
dierent specific gravity range.
ScraperCan be used to remove parts from the build platform, as well as to carefully clean
and inspect the resin tank for cured material.
TweezersUse to handle small parts or to manipulate supports after printing.
Siphon PumpTransfer solvent between the wash bucket and a solvent storage container.
See 10 Glossary for full product terminology.
1
2
3
4
5
6
7
8
9
10
1 1
A
B
C
D
E
F
1
2
3
4
5
6
7
8
9
10
11
A
B C E
F
D

12
2.3 Technical Data
Shipping Weight 9.0 kg (20 lb)
Product Weight 6.7 kg (14.5 lb)
Shipping Dimensions 33.0 × 35.4 × 45.6 cm (14 × 14 × 18 in)
Product Dimensions 26.2 × 29.3 × 34.0 cm (10.3 × 11.5 × 13.4 in)
Height when open: 64 cm (25.2 in)
Minimum Space Requirement 38.9 × 41.9 × 64.0 cm (15.3 × 16.5 × 25.4 in)
Power Requirements 100–240 V
2.0 A 50/60 Hz
50 W
Electrical Safety Standard 60950-1:2005+A1:2009+A2:2013 (and applicable
national deviations)
Sound Emission Does not exceed 70 dB(A).
Bucket Volume 8.6 L
Maximum Part Size 14.5 × 14.5 × 17.5 cm(5.7 × 5.7 × 6.9 in)
Operating Temperature Suggested 18—28 °C(64—82 °F)
Agitation Method Magnetically coupled impeller
2.4 Form Wash Controls
When connected to power, use the knob to program and operate the Form Wash:
• Rotate the knob counterclockwise or clockwise to move between items in the menu.
• Press the knob to select an option on the display.
The following options are available from the main menu on the Form Wash display:
• Start: Lowers the mount and basket and initiates the washing process.
• Open: Raises the mount and basket.
• Sleep: Lowers the mount and basket. The wash cycle does not start until Start is selected.
•
Time: Press the knob to select and adjust the time, indicated in minutes.Check each
material’s recommended wash time before beginning a cycle.
After beginning a wash cycle, the display shows the remaining time and additional menu options:
•
Pause: Stop the agitation and lift the platform and basket mount, while maintaining the
remaining time in the wash cycle.
• End: Cancel the remaining time in the wash cycle while also stopping the agitation and
lifting the platform and basket mount.

Safety Warnings | 13
3. Safety Warnings
Read and understand this manual and its safety instructions before using the Form 3.
Failure to do so can result in serious injury or death.
Supervise young or inexperienced users to ensure enjoyable and safe operation.
The instructions contain warnings and safety information, as explained below:
Danger indicates a hazard with a high level of risk which, if not avoided, will result in death
or serious injury.
Warning indicates a hazard with a medium level of risk which, if not avoided, could result in
death or serious injury.
Caution indicates a hazard with a low level of risk which, if not avoided, could result in minor
or moderate injury.
Notice indicates information considered important, but not hazard-related.
DANGER: Isopropyl alcohol is a flammable chemical.
3.1 Component and Subsystem Safety
3.1.1 Electronic Components
The Form Wash is a professional appliance that includes electronic components. As with any
such appliance:
• Do not operate the Form Wash with a damaged cord or plug.
• Always disconnect power before cleaning.
• Only use well-maintained equipment.
• Operate on a clear and level surface.
3.1.2 Sharp Tools
The accessories include sharp tools such as: a part removal tool, flush cutters, a scraper,
and tweezers.
Cutting hazard. Using these tools on slippery surfaces (such as a resin-coated build
platform) can result in sudden movement. Orient sharp tools away from yourself,
especially when cutting or scraping.
WARNING
DANGER
WARNING
CAUTION
NOTICE
WARNING
CAUTION

14
3.1.3 Resin
Respect Formlabs resin like any household chemical. Follow standard chemical safety
procedures andFormlabs resin handling instructions.
Wear gloves whenever handling liquid resin or solvents. If swallowed, immediately call
a poison center or medical professional.
In general, Formlabs resin is not approved for use with food, drink, or medical applications on
the human body. However, biocompatible resins, such as Dental SG, are biologically safe for
specific types and lengths of exposure to the human body. Refer to information about each
specific resin for more detail.
Never ingest resin in liquid or solid form.
Always consult theSDS (Safety Data Sheet)as the primary source of information to
understand safety and handling of Formlabs materials. Combinations of resin and
solvent should be handled according to the restrictions of both. For questions, consult
the appropriate SDS(s).
3.1.4 Radio Interference
This equipment has been tested and found to comply with the limits for a Class B digital
device, pursuant to CFR Title 47, Part 15 of FCC Rules. These limits are designed to provide
reasonable protection against harmful interference when the equipment is operated in a
commercial environment. This equipment generates, uses, and can radiate radio frequency
energy and, if not installed and used in accordance with the instruction manual, may cause
harmful interference to radio communications. Operation of this equipment in a residential
area is likely to cause harmful interference in which case the user will be required to correct
the interference at their own expense.
Changes or modifications to this product not authorized by Formlabs could void the
electromagnetic compatibility (EMC) and negate your authority to operate the product.
Use of controls or adjustments or performance of procedures other than those
specified herein may result in hazardous radiation exposure.
3.1.5 Solvents
Formlabs does not manufacture solvents. Always consult the safety data sheet
(SDS) from your solvent supplier as the primary source of information for storage
and handling.
Comply with local or organizational regulations, which may have specific requirements for:
storage, ventilation, personal protective equipment, and disposal of solvents.
WARNING
WARNING
NOTICE
CAUTION
NOTICE

Safety Warnings | 15
Some solvents, such as isopropyl alcohol (IPA) are flammable and should be stored away from
sources of ignition. Handle solvents with gloves in a well-ventilated area. Keep storage container
lid(s) closed whenever possible. More information is available atsupport.formlabs.com.Always
refer to the supplier’s SDS.
Use the included siphon pump to avoid overfilling or spilling solvent. Operate the Form Wash
on a clear and level surface. Always remove the wash bucket or empty alcohol from the wash
bucket before storing or transporting the Form Wash.
3.2 Personal Protective Equipment (PPE)
Resin and solvents may cause skin irritation or an allergic skin reaction. Wear gloves
when handling liquid resin, liquid solvent, or resin-coated surfaces. Wash skin with
plenty of soap and water.
Some methods of support removal may cause small pieces of supports to break away.
Beware of flying debris. Wear eye protection and gloves to protect the skin and eyes.
3.3 Specifications of Tools to be Used
The Form Wash shall only be used with supplied accessories and additional tools recommended
by Formlabs. Third-party accessories and materials may cause damage.
Purchase additional supplies:
• Paper towels. Keep paper towels in stock to ensure a clean work environment for printing
and finishing.
• Solvent. Multiple solvents are suitable for washing SLA printed parts. Choose the solvent
that best meets your needs and fits your workflow. For more information about solvents
and a complete list of compatible solvents, visit support.formlabs.com.
•
Personal Protective Equipment. Powder-free, chemical-resistant, disposable gloves (nitrile
or neoprene)
WARNING
CAUTION

16
4. Preparation and Set Up
Consider the weight and dimension of the product for installation.
For the fastest unboxing and setup experience, purchase 10 liters of your selected solvent in
advance andreview the Form Wash system overviewbefore starting.
4.1 Arranging the Workspace
For best results:
1. Choose a stable, level workspace to install and operate the Form Wash.
2. Reserve the following minimum dimensions for the most convenient access:
° Width: 38.9 cm (15.3 in)
° Depth: 41.9 cm (16.5 in)
° Height: 64 cm (25.2 in)
3. Allow additional space for accessories, such as the Formlabs SLA printer, Finish Kit, and
Form Cure.
4. Ensure either the wall outlet or power supply for the Form Wash is easily accessible. To
disconnect the equipment from mains electricity and power o the unit, unplug the power
cable from the wall outlet, or the power supply.
4.2 Unboxing the Form Wash
The Form Wash ships in a cardboard carton, protected by foam inserts above and below the
machine. The upper foam insert also contains the accessories. During unboxing, inspect the
Form Wash for any damage or missing items. In the case of damage or missing items, contact
Formlabs or the certified service provider.
To unbox the Form Wash:
1. Open the box from the top.
2. Lift and remove the foam insert containing the accessories.
3. Use the provided handles on each side of the unit to lift the Form Wash out of the box.
4. Remove internal packaging.
5. Raise the mount to access and remove any twist ties that secure the bottom of the basket
to the basket mount.
6. Remove the siphon pump from the wash bucket.
Remove all packaging material before connecting power. Retain all packaging and
inserts for warranty service.
4.3 Installing the Form Wash
To prepare to use the Form Wash, follow the steps below to fill the wash bucket with solvent.
If you are using isopropyl alcohol, calibrate the included hydrometer. The hydrometer can
only be calibrated in fresh IPA (or another solvent with an equivalent specific gravity) with a
concentration of 90% or higher.
NOTICE
NOTICE

Preparation and Set Up | 17
4.3.1 Assemble Siphon Pump
To assemble the siphon pump, screw the handle into the rigid tube of the siphon pump.
Use the siphon pump to avoid overfilling or spilling solvent. The siphon pump is designed
to transfer liquid without splashing. This includes transferring both used solvent into empty
containers as well as fresh solvent into the wash bucket.
4.3.2 Fill Wash Bucket with Solvent
To fill the Form Wash:
1. Open the outer lid.
2. Pour or siphon solvent into the wash bucket to fill to a level between the minimum (7.8L)
and maximum (8.6 L) fill lines. For more information about using the siphon pump, visit
support.formlabs.com.
4.3.3 Connect Power Supply
Connect the power cable and external supply to the Form Wash and a power source.
The Form Wash includes a USB port to allow forfirmware updates.
A B
NOTICE
A
B

18
4.3.4 Calibrate the Hydrometer (IPA Only)
If you have filled your Form Wash with IPA (or another solvent with
an equivalent specific gravity), calibrate the included hydrometer.
Once calibrated, the hydrometer can be used to determine when
the solvent should be changed.
To calibrate the hydrometer:
1. Hold the handle and release the tool in the wash bucket’s
fresh IPA.
2.
Slide the O-ring along the ribbed stem until the O-ring aligns
with the short wings at the top of the float.
3. Leave the O-ring in this position. The alignment of the wings
and O-ring is used to check the resin concentration of IPA
between washes.
4. Store the hydrometer in the tool storage area at the back
of the unit.
The Form Wash is ready for use once the wash bucket has
been filled between the minimum and maximum fill lines and the
hydrometer is calibrated. Choose whether to wash the part on
the build platform or in the basket.
4.4 Transporting the Form Wash
Refer to 2.2 Technical Specifications for product weight and dimensions. Keep the packaging
for transportation or shipping.
The Form Wash complete packaging kit consists of:
• 1 outer cardboard carton
• 1 foam bottom insert
• 1 foam upper insert, which holds the small accessory boxes
• 1 protective plastic bag
• Plastic wrap
Original packaging may be required for warranty service. Do not ship with solvent
inside the bucket. Solvent left inside the Form Wash can damage the unit in transit,
which may lead to additional fees or void the warranty.
To prepare to transport the Form Wash:
1. Remove solvent.
2. Wipe residual solvent from the wash bucket and inner lid.
3. Remove tools from tool storage.
4. Insert the wash bucket.
5. Insert the wash basket.
6. Lower the basket mount.
7. Close the outer lid.
8. Wrap the unit with plastic wrap to secure the tool storage and lids.
A
B
C
NOTICE
A
C
B

Preparation and Set Up | 19
9. Reassemble the box.
10. Place the bottom foam insert in the box.
11. Place the Form Wash on top of the bottom foam insert.
12. Place the upper foam insert on top of the Form Wash.
13. Seal the box with tape.
When shipping a machine to Formlabs for service, do not ship the accessory tools
or the power supply. Accessories will not be returned after service. The product’s
original packaging is required for warranty service. Contact other authorized resellers
for unique guidance on shipping requirements.
NOTICE
20
5. Using the Form Wash
5.1 Operational Environment
Operate the Form Wash in a well-ventilated room with a temperature of 18–28 °C (64–82 °F).
For optimal performance, do not exceed this range.
5.2 Washing
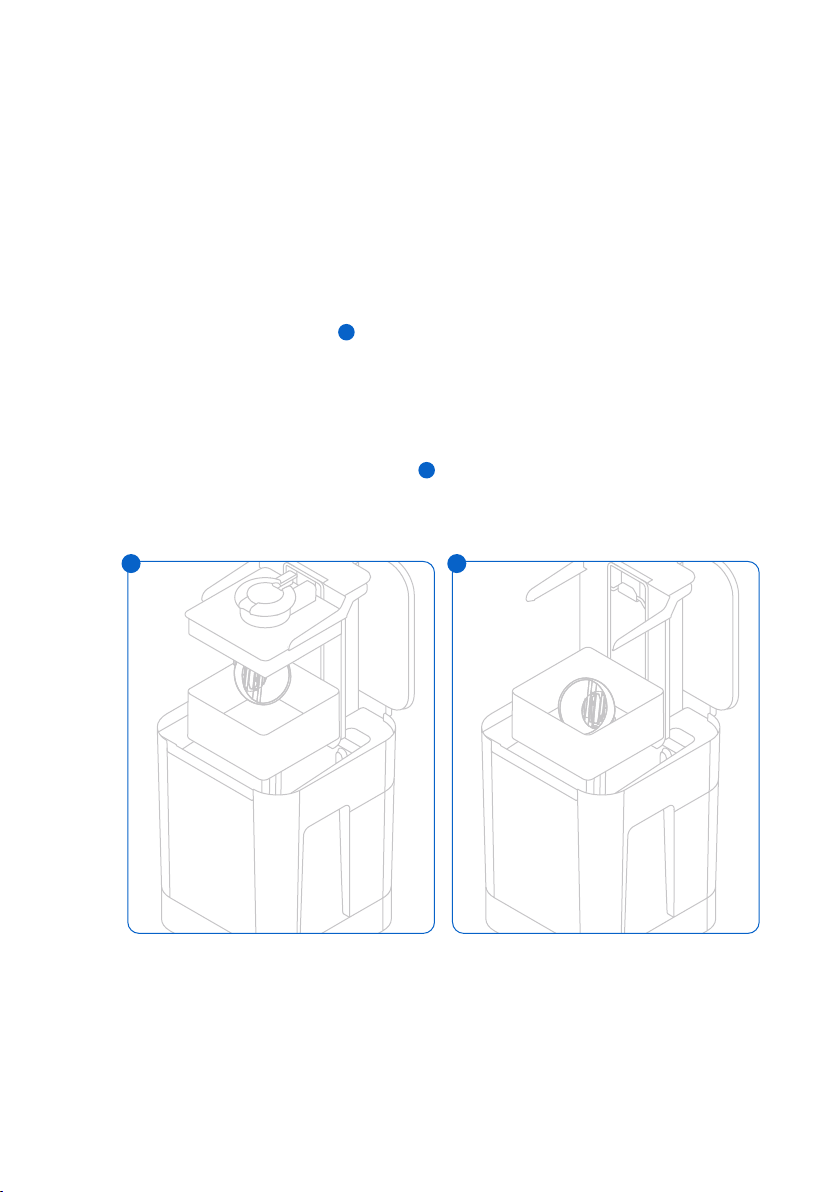
5.2.1 Insert Print
To wash a printed part:
1. Use the display and knob to raise the platform and basket mounts.
2. For convenience, install the build platform with printed parts directly in the Form Wash to
clean parts before removal . Align the top lip of the build platform with the arms of the
Form Wash platform mount, and fully insert to touch the back.
Parts must be washed on the build platform or in the basket. Ensure parts are fully secured
to the build platform when washing parts without the basket installed. Washing loose parts
directly in the wash bucket—whether intentionally or accidentally—may damage printed parts,
create noise, and interfere with solvent agitation.
Parts can also be washed in the basket , either as an alternative or in addition to the
platform mount. Place parts directly in the basket after removing them from the build
platform using the removal tool, scraper, or flush cutters. The basket comes installed in
the Form Wash.
To remove the basket from the Form Wash:
1. Remove the build platform from the platform mount.
2. Lift the basket vertically out of the basket mount.
1
2
1 2
Using the Form Wash | 21
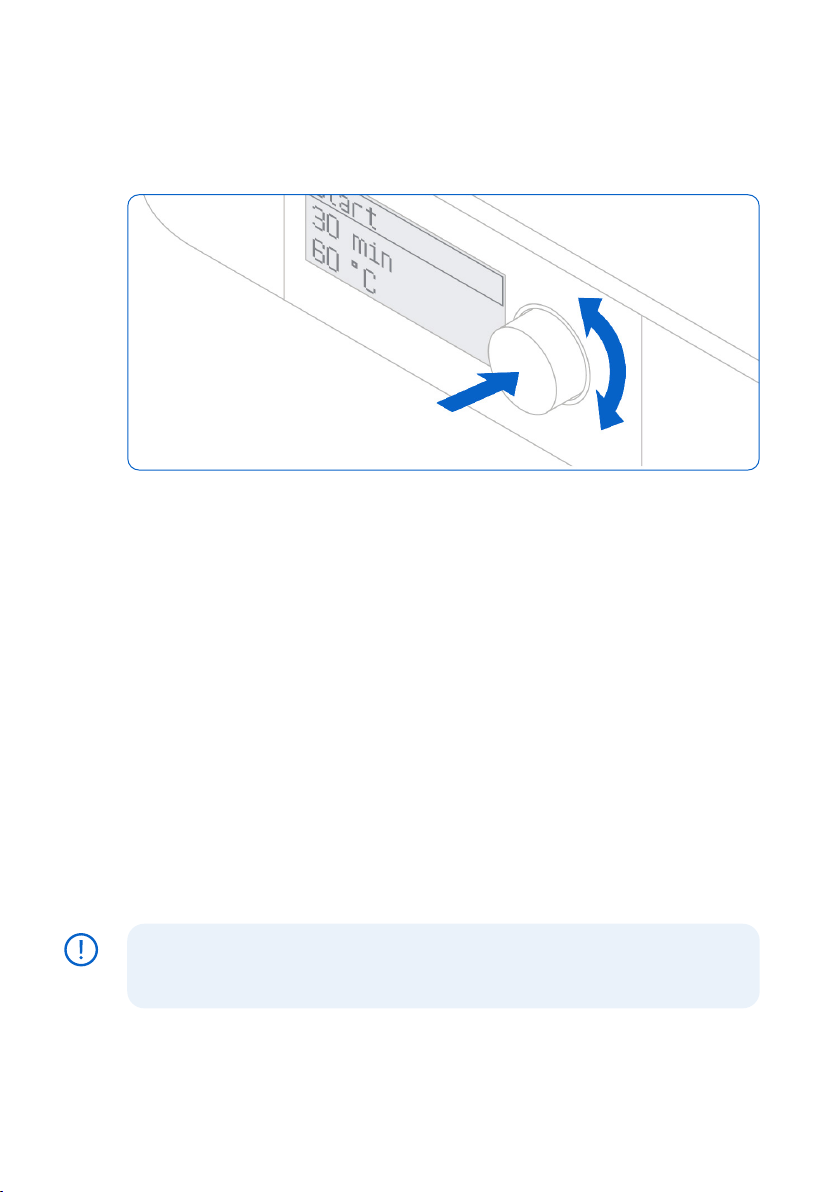
5.2.2 Set Wash Time
To wash parts for a specific amount of time:
1. Turn the knob to navigate the display menu and adjust the wash time.
2. Press the knob to select or confirm.
3. Once the wash cycle begins, select Pause to raise the platform and basket.
Part washing time depends on the resin and solvent used. Check support.formlabs.com for
specific wash time recommendations. Wash for additional time when using partially resin-
concentrated solvent. The wash cycle begins when the platform and basket lower. Ensure
that the outer lid closes and is not obstructed.
To adjust the wash cycle time:
1. Press the knob to access the display menu.
2. Select Pause to raise the platform and basket.
5.2.3 Drain and Dry Prints
The platform mount and basket raise automatically at the end of the wash cycle. Solvent drains into
the wash bucket as parts dry and drips onto the inner lid. Thoroughly drain solvent from printed
parts; carefully check and drain concave or hollow geometries that may hold additional solvent.
Allow parts that have been washed in any solvent that evaporates readily to air dry for at least 30
minutes after washing and draining. Solvents that do not evaporate readily, such as tripropylene
monomethyl ether (TPM), should be washed o the parts with a secondary water rinse. Consult
support.formlabs.com for additional information about working with specific solvents.
Ensure appropriate ventilation while the solvent evaporates. Observe necessary safety
precautions, according to the solvent supplier’s SDS. Options for drying include air drying
or forced air. Forced air, such as a fan or clean compressed air, may dry parts more quickly.
Check inside cavities and channels for uncured resin or liquid solvent. Remove
residual liquid before drying to avoid fully or partially cured resin in unwanted areas.
Compressed air may be helpful to empty internal channels before drying.
To begin the next wash immediately, dry the parts outside of the Form Wash. Take extra care
with sharp objects and slippery surfaces when removing wet parts from the build platform.
NOTICE

22
5.2.4 Collect Prints
Remove the build platform or parts from basket, depending on the wash method used in 5.2.1
Insert Print.
5.2.5 Finish Your Print
After washing parts on the build platform, remove parts from the build platform with the removal
tool, scraper, or flush cutters.
Once each part is washed and dried, check the specific material’spost-curing settings on
support.formlabs.com. Post-curing is optional for Standard Resins and required for many other
materials to achieve their optimal properties.
After post-curing (if necessary), use the flush cutters that come in your Finish Kit to carefully
cut the supports attached to the part(s). Supports can also be removed before post-curing, but
parts may warp under exposure to light and heat without structural support.
Wear safety glasses to protect eyes from dislodged fragments of supports.
You can sand support marks and polish your parts for a smooth finish.
5.3 Considerations for Specific Geometries
Consider the specific geometry of each part when choosing a method to wash the part and the
sequence of steps. Take special care when washing parts that are large, hollow, concave or cup
shaped, or have internal chambers or channels that hold solvent, air, or uncured resin inside.
5.3.1 Hollow Geometries
Design hollow parts with drainage holes for successful printing. During the washing process,
the drainage hole allows the solvent to flow inside and clean the internal surfaces. Take care
when removing hollow parts from the alcohol bath. Check to ensure that all solvent drains out
of the chamber before transferring the part to another surface.
5.3.2 Internal Channels
Thin channels, such as those used in micro-fluidic designs, may not drain entirely on their
own. Use a syringe filled with clean solvent to flush out internal channels. After cleaning, use
compressed air to fully drain and dry the channel.
5.3.3 Large Parts
Parts move around the basket with the circulation of alcohol in the wash bucket. Check the
path of the basket and inner lid to ensure that all parts can safely raise out of the bucket when
the wash cycle completes and the basket raises. Parts that hang outside the basket perimeter
may dislodge the inner lid when the wash cycle completes.
Whether using the build platform or basket as a wash method, the maximum single part size
that can be washed in the Form Wash is 14.5 × 14.5 × 17.5 cm (5.7 × 5.7 × 6.9 in).
5.3.4 Concave Surfaces, Printed and Washed on the Build Platform
Hollowed parts—such as hollowed dental models—printed directly on the build platform can
trap resin inside during the wash cycle, when they are washed still attached to the build
platform. Consider washing these parts in the Form Wash basket or adding a second wash
cycle after removing them from the build platform to remove uncured resin that is not removed
when washing on the build platform alone.
CAUTION
Other manuals for Form Wash
1
Table of contents
Popular Ultrasonic Jewelry Cleaner manuals by other brands

Graymills
Graymills HANDI-KLEEN PL364 Operation and maintenance instructions

TYROLIT Hydrostress
TYROLIT Hydrostress VCE2500D Series operating instructions

Makita
Makita DCL284F instruction manual

Nilfisk-Euroclean
Nilfisk-Euroclean Compact Patio operating instructions

Ultrawave
Ultrawave Q Series quick guide

Kärcher
Kärcher WV 1 Plus Operator's manual


