Fornelli PIA 60 MERIDIANA User manual

HOBS
PIA 60
MERIDIANA
INDUCTION
HOB
COMPANY SPECIALIZING IN BUILT-IN OVENS
AND HOBS
ENG
USER’S MANUAL
Installation and Operating ManualInstallation and Operating Manual
HOBS
Dear Customer!
Thank you for purchasing FORNELLI appliance. We hope that this product will meet your
expectations and become an excellent assistant in your kitchen. To ensure proper and
safe operation of the product, please, carefully read all the provisions of this Manual.
Furthermore, please, keep this Manual for the entire service life of the unit.
First part of the Manual contains certain important preconditions for safe operation of the
appliance. To ensure that your product will remain in perfect condition for a long time, we
provided lots of useful and valuable tips concerning the appliance’s care and cleaning.
Additionally, this Manual provides some tips and tricks on energy saving.
In the event that some faults will encounter during the operation of the device, the last
pages of the Manual contain useful troubleshooting advises.
Your appliance is made of high quality materials and fully conforms with all EEC standards.
The household appliances that we offer are being constantly improved. This includes
better functionality and features, updated appearance, so the pictures and designations
used in the Manual may slightly differ from the model you have purchased.
Bon appetite!
The manufacturer reserves the right to make changes to the design of the appliance in order to
improve its performance.
This product conforms with European standards and has valid CE, TUV, ISO 9001 and EAC
conformity certificates.
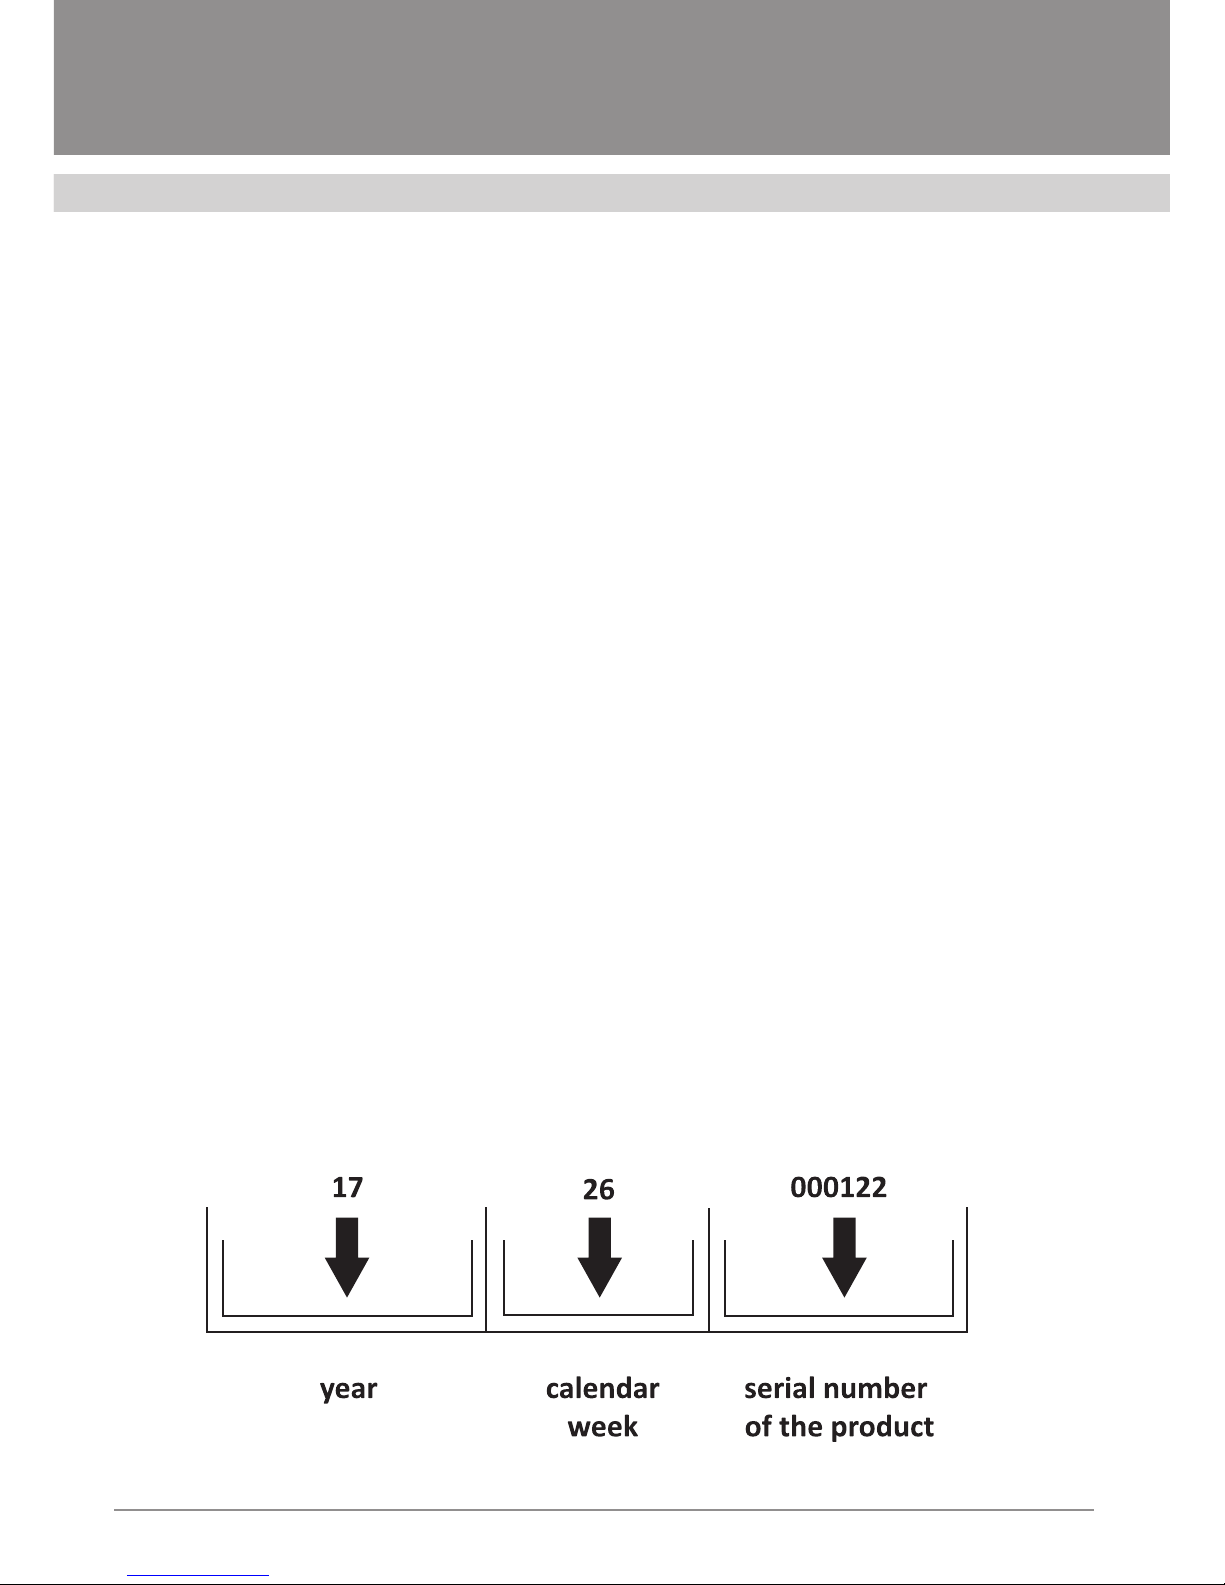
Date of manufacture of your appliance is encoded in its serial number.
You will find the serial number of your product on the label, attached to exhaust. Here is the
explanation of designations used in the serial number.
In this example the product was manufactured during 26th week of 2017.

Installation and Operating Manual Installation and Operating Manual
HOBS
1
Installation and Operating Manual
Content
Induction Principle ...........................................................................................................2
SAFETY INSTRUCTIONS AND ADVISES
Before you switch the new hob for the first time .................................................................3
Safety requirements .........................................................................................................3
How to prevent damage of the hob ....................................................................................5
Recomendations on Disposal ...........................................................................................5
Scope of delivery .............................................................................................................6
Storage, trasportation and selling regulations ...................................................................6
Technical specifications ...................................................................................................7
YOUR NEW GLASS CERAMIC HOB
Control panel ...................................................................................................................8
How to use your induction hob ......................................................................................... 9
Starting cooking ............................................................................................................. 9
After you have finished cooking ....................................................................................... 9
Using Booster function ................................................................................................. 10
Locking the controls ...................................................................................................... 11
Overheat protection ..................................................................................................... 10
Uutomatic switch off ..................................................................................................... 11
Timer function .............................................................................................................. 11
Basic cooking recomendations ..................................................................................... 14
Sutable coockware ........................................................................................................ 16
Maintenance and cleaning .............................................................................................. 17
Helpfull hints ................................................................................................................. 18
Displayed errors and recomendations ............................................................................. 20
INSTALLING THE GLASS-CERAMIC HOB
Installation ..................................................................................................................... 21
Connection to electric mains .......................................................................................... 24
Maintanance and repair ..................................................................................................25
Warranty service conditions ...................................................................................... 27
ТМ FORNELLI

Installation and Operating Manual
HOBS
2
INDUCTION PRINCIPLE
The induction cooking technology is based on the
physical principle of magnetic induction.
Key feature of this technology is a direct transfer of
energy from its generator to a cookware (unlike in the
case of conventional burners – see Figure 1).
Advantages
As compared to electric hobs, your hob is:
– Safer: the glass surface heats up less.
– Faster: less time for heating the foods.
– More accurate: the hob instantly responses to your
commands.
- More eective: 90% of consumed energy is converted
into heat.
Moreover, immediately after removing the cookware from
the hob surface the heat transfer stops, thus avoiding
unnecessary dissipation of heat.
The system automatically recognizes the other diameter
of each individual cookware and applies the power
appropriate to the particular size of the cookware.
This allows the use of cookware of dierent sizes,
provided that the diameter of a specific item corresponds
to maximum 10% and minimum 40% of the size of the
serigraphy on the surface of cooking hob (Figure 4)
WARNING: when using cookware with a diameter less
than 40% of the size of the serigraphy on the hob surface,
the cooking zone may not turn on.
Suitable cookware
Induction cooking is based on the use of magnetism to
generate heat. Therefore, the cookware must be made of
materials containing iron. You can check the material of
your cookware with a simple magnet.
Important:
To avoid irreparable damage to the surface of the hob,
do not use:
– cookware with uneven bottom
– metal cookware with enameled bottom
– cookware with rough. abrasive bottom to avoid
scratching the surface of the hob.
Fig. 1

Installation and Operating Manual Installation and Operating Manual
HOBS
3
BEFORE YOU SWITCH THE NEW HOB
FOR THE FIRST TIME
After the hob packing is removed, make sure,
that both the hob and the power cord are in
good and proper condition and have no dam-
ages, Otherwise do not try to connect the hob
to mains and contact your seller.
Please, keep in mind, that any modifications
and/or attempts to make any modifications to
the design of the product are risky. Do not dis-
assemble and make any modifications to the
hob. If necessary, contact technical service.
The hob must be installed and connected to
mains by qualified and certified electrician
from the service center in strict compliance
with the installation manual and applicable
safety regulations and standards.
SAFETY REQUIREMENTS
User of the glass-ceramic hob must know
and comply with the safety rules on handling
consumer electric appliances.
The hob must be connected to reliable and
proper grounding system in conformity with
applicable electrical safety regulations. In the
event of any interventions into the hob’s de-
sign the electric supply must be OFF. Manu-
facturer disclaims any and all liability whatso-
ever for any and all damages, which may be
caused to people and property as a result of
inappropriate grounding of the appliance.
The appliance must not be used by children
and/or incapable people.
Never allow children to play with the hob. Be-
fore starting operation with the hob, people
with implanted cardiac pacemakers shall
make sure, that the hob does not cause inter-
ference with the cardiac pacemaker.
IMPORTANT!
– Never put on the hob any metal items, in-
cluding spoons, knives, caps. etc., since
they may get hot;
– after completion of the use, please, switch
o the hob using s special command: do
not rely on the cookware detector;
– avoid spilling of liquids. Never leave liquids
on the hob unattended, or at least reduce
power for their warming up and boiling;
– never leave operating induction burners of
the hob with empty cookware or without
cookware installed on top.
– Upon completion of cooking, turn o the
corresponding induction burner with the
command described below;
– Never use for cooking any aluminum foil
sheets, never put on the hob any foods
wrapped in foil. Aluminum can melt and
irreparably damage your hob;
– Never warm up closed tin cans with foods:
tin cans may explode! This rule applies to
all other types of hobs.
When using electrical outlets located close
to the hob, make sure that the power cords of
the household appliances that you may use do
not touch hot parts of the ceramic glass hob;
make sure, that the power cords are laid suf-
ficiently away from the hot part of the hob. The
WARNING! To avoid damage of the
glass-ceramic hob in the cold season,
please, keep the unpacked hob at room
temperature for at least 2 hours before
the first switching-on.
SAFETY INSTRUCTIONS AND ADVISES

Installation and Operating Manual
HOBS
4
power cords must be attached to the kitchen
countertops so that they do not come in con-
tact with hot parts of the glass ceramic hob.
Periodically (at least once every six months),
check the condition of the electrical power
cord. If any defects are found, such as cracks,
melted insulation, hardening of insulation,
please, immediately contact the service cen-
ter. To avoid danger, the power cord must be
replaced by a service center or similar quali-
fied personnel.
In the event of overheating, fats and oils easily
flammable. Therefore, it is absolutely required
to cook food using an oil, for example, when
cooking French fries, under continuous con-
trol only.
Always keep the hob clean. Remains of food
can cause fire.
Chips and cracks on the ceramic glass hob
may result in electric shock. In case of find-
ing thereof, immediately turn o the hob and
disconnect it from electrical mains.
In the event of a breakdown, immediately dis-
connect the ceramic hob from electric mains.
Never operate faulty equipment, this is
dangerous!
Do not attempt to repair the glass ceramic
hob by yourself. Repairs performed by un-
qualified persons can result in equipment
damage and accidents. First of all, refer to
these instructions. If it contains no informa-
tion that you need, please, contact the near-
est service center. This appliance must be
repaired by authorized service center only.
Always demand the use of original spare
parts for repairs.
ALWAYS REMEMBER! Never use
water to extinguish burning oil or fat.
Cookware with easily flammable oil or
fat should be tightly covered with a lid
or a dense material to prevent access of
oxygen to the flame.

Installation and Operating Manual Installation and Operating Manual
HOBS
5
HOW TO PREVENT DAMAGE
OF THE HOB
Glass ceramics is resistant to drastic tem-
perature changes, being a very strong mate-
rial in relation to such temperature variations.
However, in the course of operation glass ce-
ramic hob is subjected to other impacts, for
example, mechanical, in respect of which its
strength is much lesser.
Never use the ceramic hob as a stand for
various items or as a work table.
Never use cast iron cookware or cookware
with a damaged bottom, having rough, abra-
sive bottom surface or burrs. Moving such
cookware on the hob may result in scratch-
ing on the hob surface.
Never place empty cookware, especially
enamel and aluminum ones, on the induction
burner when it is ON. This can damage the
hob and the bottom of the cookware.
Never store hard and sharp items over the
ceramic hob. If they fall on the hob, the hob
will most likely be damaged.
If sugar or other sugar-containing food fall
onto the hot induction burner and get melt-
ed, immediately remove them with a cleaning
scraper while they are still hot. When the hot
mass cools down, it can damage the surface
when being removed.
When getting in contact with hot induction
burners, synthetic materials, aluminum or cu-
linary foil or plastic utensils can get melted.
Therefore, store these materials and items at
safe distance from the glass ceramic hob. If,
despite your eorts, some material has melt-
ed on the hob surface, immediately remove it
with a scraper.
Always make sure, that acidic liquids, such
as vinegar, lemon or lime scale dissolution
agents, do not fall on the glass ceramic hob
surface, since these substances leave matte
stains on the surface.
Never put pans or frying pans on the hob
frame, this may cause scratches and other
damage.
Recommendations on Disposal
All the materials, used in the glass ceramic
hob, are ecologically friendly and recyclable.
Please, observe environment protection rules
and regulations, use proper separate waste
collection practices.
Used or damaged appliances are not useless
wastes. Dierent materials, used in your hob,
can be used repeatedly.
For more details on the hob disposal meth-
ods, please, contact your dealer or local ad-
ministrative authorities.
When you hand over your hob for disposal,
please, remember, having fallen into chil-
dren’s hands it may cause a serious accident.
Make sure, that the hob you are about to dis-
pose is as safe, as it is technically possible.
For example, cut o its electric power cord,
make the hob disables in any other way.
Follow the instructions contained in this
Manual.

Installation and Operating Manual
HOBS
6
SCOPE OF DELIVERY
Your glass ceramic hob is a built-in kitchen
appliance. Nameplate containing the model
of the hob is attached to the rear side of the
built-in part of the hob.
The scope of delivery includes:
– Glass ceramic hob – 1 pc.;
– Adhesive sealing plate – 1 pc.;
– User’s Manual.
STORAGE
Store the hob in a dry place, away from
sources of heat and direct sunlight. When
storing an oven, avoid rapid temperature
changes. Storing of the oven with the trans-
portation packing removed is prohibited.
TRANSPORTATION
Falls and/or any mechanical impacts on the
packaging during transportation of the prod-
uct must be excluded.
SELLING REGULATIONS
Manufacturer does not implement any spe-
cial rules and conditions regarding the sell-
ing of the product; the product must be
marketed and sold in accordance with the
national and/or local legislation of the coun-
try of destination.

Installation and Operating Manual Installation and Operating Manual
HOBS
7
Dimensions of the Hob and the Opening for Building-in of the Hob
Dimensions of the Hob’s Built-in Part, mm Height Width Depth
(length)
Dimensions of the Visible Part 4 590 520
Dimensions of the built-in part of the hob 56 557 487
Niche dimensions 35–45* 560 490
* When the countertop thickness is less than 35 mm, use the additional sealing tape (to be
purchased separately).
Total power of the glass ceramic hob, W – 7200.
Hob power supply: 220-240 V AC 50/60 Hz.
Ingress Protection: 1.
Weight, net, kg: 8,3.
Size and power of induction burners
Burner Dimensions, mm Power, W
Front left 210 2300/3000 + twin Booster
Rear left 160 1200/1500
Rear right 180 1800/2100
Front left 160 1200/1500
TECHNICAL SPECIFICATIONS

Installation and Operating Manual
HOBS
8
1. Front left burner
2. Rear left burner
3. Rear right burner
4. Front right burner
5. Sensor control panel.
YOUR NEW GLASS CERAMIC HOB
Fig. 2
Fig. 3
1. Timer
2. Induction burner selector
3. Power control
4. Booster function control
5. Locking control
6. ON/OFF.
CONTROL PANEL
1
2
4
3
5
1
2 2 4 5 63

Installation and Operating Manual Installation and Operating Manual
HOBS
9
HOW TO USE YOUR INDUCTION HOB
Starting Cooking
1. Touch button.
After the appliance is switched-on, you will hear a single audio
signal. Symbols “–“ or “––“ will be displayed on all displays. This
means, that the induction hob has enter a standby mode.
2. Put suitable cookware on the induction burner, that you want to
use. Make sure, that the bottom of this cookware and the surface
of the induction burner are clean and dry.
3. Touch the induction burner selector button – an indicator will
light up next to the button.
4. Adjust the desired temperature using slider control.
• If you do not set the desired temperature within 1 minute, the
induction hob will automatically switch o. In this case start
with the point 1.
• You can change the selected temperature later at any time in
the process of cooking.
In the event that the symbol is blinking alternatively with
the selected power level, this means, that:
• You did not put a cookware on the corresponding induction
burner;
• The cookware that you use, is not suitable for cooking using
an induction hob, or
• The cookware that you use is too small or is not aligned in
the center of the induction hob.
The induction hob will not be heating up until a suitable cook-
ware is put on the burner.
Display will automatically switch o after 1 minute, if a suitable
cookware will not be placed on the burner.
After You Have Finished Cooking
1. Touch the selector button, corresponding to the induction burner
you want to switch o.

Installation and Operating Manual
HOBS
10
2. Switch o the burner by sliding ginger to “0” position on the
slider control. Make sure, that “0” is show on the display.
3. Switch o the entire hob by touching button.
4. Please, be aware of hot surfaces. When an induction burner is
hot, symbol will be displayed. When the induction hob
will have cooled down to safe temperature, the symbol will dis-
appear from the display. You may also use this function as an
energy saving method. The residual heat of the induction hob
can be used to warm up other cookware.
Using Booster Function
1. Touch the induction burner selector button.
2. Touch Booster function control button . Symbol “P” will
be displayed, the power will be set to a maximum. Touch the
Booster function control button again; “d” symbol will be dis-
played, which means, that the Twin Booster function is active.
Switching O Booster Function
1. Touch the induction burner selector button.
2. Touch the Booster function control button to switch o the
function. The burner will return to its initial settings.
• This function is available for all burners; however, the Twin
Booster function is available for the front left burner only.
• The burner will automatically return to the “9th” level of
heating after 5 minutes.
• The Twin Booster Mode can remain active within 10 min-
utes.

Installation and Operating Manual Installation and Operating Manual
HOBS
11
LOCKING THE CONTROLS
You can lock the controls of the hob to avoid
accidental use of the appliance (such as
accidental switching on a burner).
When the controls are locked, all buttons
except ВON/OFF are inactive.
To lock the controls, touch the controls lock
button . The timer indicator will display
“Lo” symbol.
UNLOCKING THE CONTROLS
1. Make sure, that the induction hob is ON.
2. Touch and hold the controls lock button
.
3. Now you can keep using your induction
hob.
WARNING:
When the controls are locked, all but-
tons except ON/OFF button will be inac-
tive, therefore you always able to switch
off your induction hob (for example, in
emergency), but to continue operation
of the hob you will first need to unlock
the controls.
OVERHEAT PROTECTION
Temperature sensor of your induction hob
is capable of monitoring temperature in-
side of the cooking top. When the sensor
detect a temperature in excess of certain
value, the induction hob will automatically
stop operation.
SMALL COOKWARE
RECOGNITION
In the event that an improper-size cook-
ware, or non-magnetic cookware (for ex-
ample, aluminum cookware), or some small
item (such as a knife, fork, key, etc.) have
been left on-top of the hob, the hob will
automatically enter standby mode after 1
minute.
AUTOMATIC SWITCH OFF
Automatic switch off function ensures
safety of your hob. This function will au-
tomatically switch off the induction hob in
the event you forgot to do this yourself. The
default duration of operation for different
power/heating levels is given in the Tale be-
low:
Power/Heating
Level 123456789
Duration of
operation by
default, hours
888444222
After a cookware is removed from the in-
duction hob surface, the hob will stop heat-
ing and switch off after 2 minutes.
TIMER
You may use Timer in the following two
ways:
1. As a countdown timer. In the case the
timer will not switch off a selected in-
duction burner upon elapsing of a set
time.
Installation and Operating Manual
HOBS
12
2. You may elect to set the timer to switch o one or several in-
duction burners upon expiry of a certain time period.
3. You may set timer on 99 minutes.
Using a Countdown Timer
When selecting one of the induction burners
1. make sure that the hob is OFF.
NOTE: You can set the countdown timer either before, or after
the selecting and setting of power/heating mode for an induction
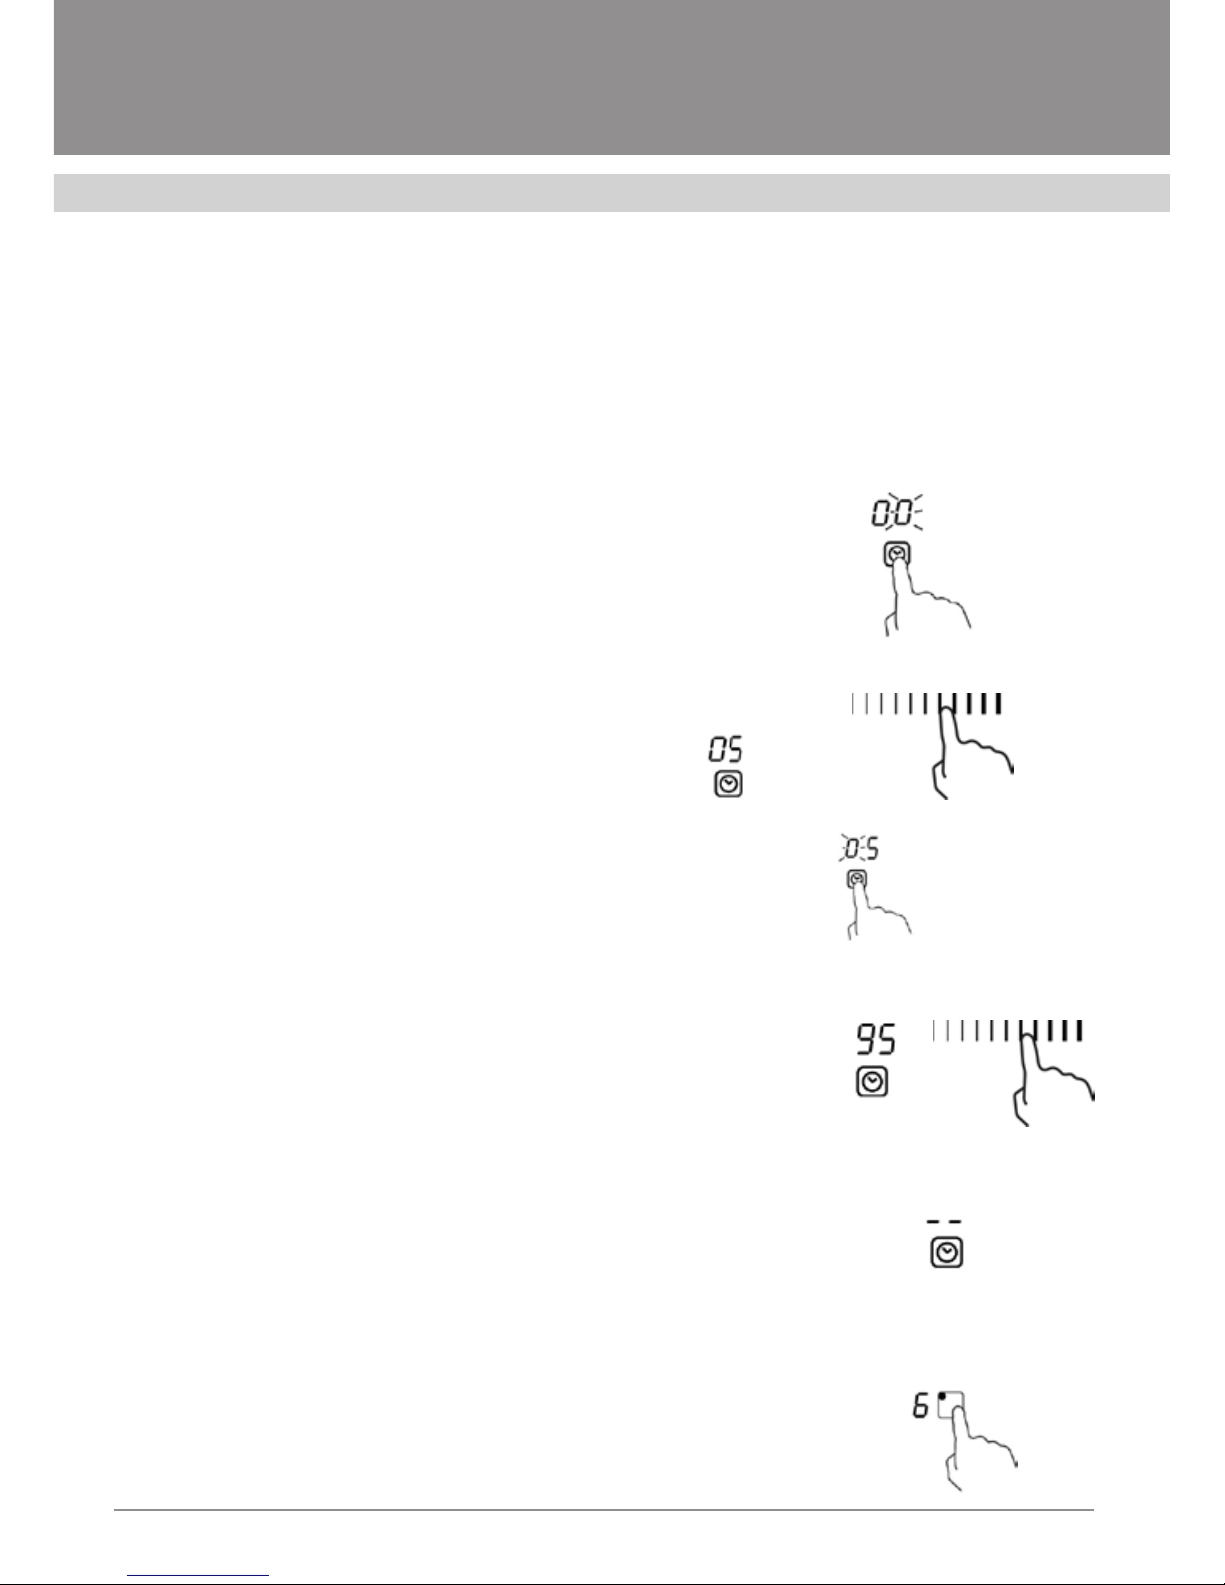
burner. Touch the timer button, figure “00” will be displayed in the
timer display, while figure “0” will be blinking.
2. Set the timer using slider control (for example, to “5”)
3. Figure “05:” will be displayed on the timer display
4. Now, touch the timer button again: figure “0” will be blinking
5. Set the timer using slider control (for example, to “9”); now we
have set the timer to 95 minutes.
6. As soon as the time is set, the timer will start its countdown.
The remaining time will be displayed on the display.
7. Upon expiry of the set time You will hear an audio alarm which
will be sounding for 30 seconds; at the same time symbol “––“
will be displayed on the corresponding display.
The Use of the Timer To Switch O One or Several Induction
Burners Upon Expiry of a Set Time
If you need to set the time for a single induction burner:
1. Touch the induction burner selector button to select the burn-
er, for which you need to set the timer.
Installation and Operating Manual Installation and Operating Manual
HOBS
13
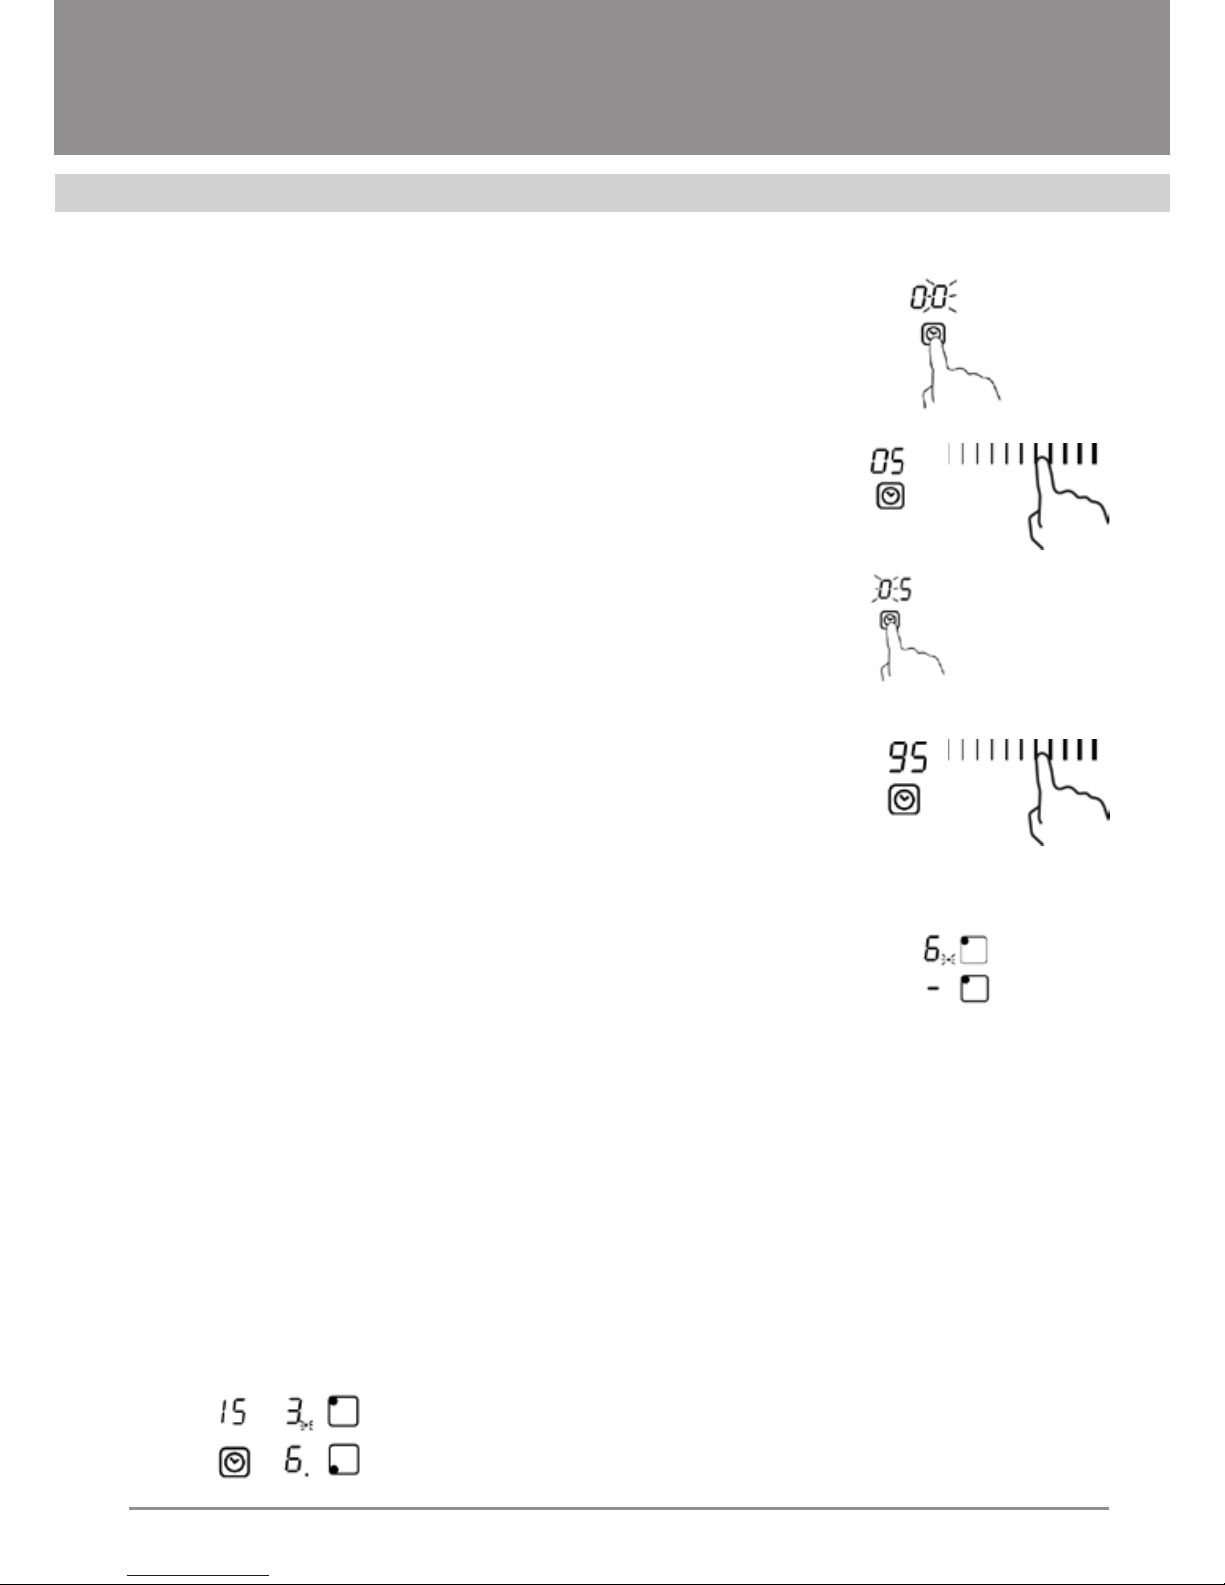
2. Touch the timer button, figure “10” will be displayed in the tim-
er display, while figure “0” will be blinking.
3. Set the timer using slider control (for example, to “5”).
4. Touch the timer button again; figure “1” will start blinking.
5. After the time is set, the countdown will start. The remaining
time will be displayed on the timer display.
NOTE: Red dot will light up near the power level indicator, thus
indicating that this heating zone is selected.
7. Upon expiry of the set time corresponding induction burner
will be switched o. Other induction burners, which have been
switched on earlier, will keep working.
If You Need to Set the Timer
for Several Induction Burners
1. When you set the timer for several induction burners at one
and the same time, several red dot lights will lit near the cor-
responding power/heating level indicators. The minute display
will be showing the minimum set time. The red dot indicator of
the corresponding heating zone will be blinking.
(timer on 15 minutes)
(timer on 45 minutes)

Installation and Operating Manual
HOBS
14
2. Upon expiry of the set time corresponding induction burner
will be switched o.
The minute display will display the next minimal set time and
the red dot of the corresponding heating zone will start blink-
ing.
Touch the induction burner selector, the then current timer
value will be shown on the minute display.
Deactivating Timer Function
1. Touch the selector of the induction burner, for which you want
to deactivate the timer.
2. Touch the timer button – the timer indicator will start blinking.
3. Using slider control, set timer on “00”. Now the timer if OFF.
Be careful while frying, as oil and fat heat up
very quickly, especially if you use the Booster
mode. At excessively high temperatures oil
and grease can spontaneously ignite and
pose a serious hazard.
Helpful information
− When the dish that you are cooking starts
boiling, decrease the power/heating level
of the burner.
− Using cookware with lids reduces cook-
ing time and saves energy by keeping
heat.
− To reduce cooking time, reduce the
amount of liquid or fat.
− Start cooking at a high power/heating
level and decrease it as the food warms
up.
Boiling over a slow fire/slow boiling,
cooking rice
− The so-called slow boiling is a state
when air bubbles periodically rise to the
surface of liquid; this state takes place at
the temperature from about 85 °C up to
the boiling point. Cooking over low heat
is the secret of delicious soups and deli-
cate stews, as the best taste is revealed
when a dish is not excessively boiled.
BASIC COOKING RECOMMENDATIONS

Installation and Operating Manual Installation and Operating Manual
HOBS
15
− Additionally, it is not recommended to
boil sauces based on eggs or with the
addition of flour.
− Some cooking methods, including cook-
ing of rice with the full water absorption,
may require a heating level higher than
the lowest value to ensure cooking of
foods properly and at the recommended
time.
Roasting Meat/Steak
To cook toothsome, tasty steak:
1.
Take the steak out of the refrigerator 20
minutes before the frying, so that it can
warm up to room temperature.
2.
Preheat the frying pan with a thick bottom.
3.
Apply oil on both sides of the steak. Sprin-
kle a hot frying pan with a small amount of
oil and put the steak into the frying pan.
4.
While the steak is being cooked, you may
turn over the steak just once. The exact
cooking time depends on the thickness of
the steak and the desired degree of roast-
ing. This time may vary from 2 to 8 minutes
for each of the sides. Push on the steak to
check whether it is roasted thoroughly –
the harder is the steak, the more thoroughly
it is roasted.
5.
Leave the steak on a hot plate for a few
minutes before serving it to let it to be fi-
nally cooked and become more tender.
Stir-Fry
(Cooking technique in which ingredients are
fried in a small amount of very hot oil while
being stirred in a wok)
1.
Choose a flat bottom wok or frying pan,
suitable for cooking on an induction hob.
2.
Prepare all the ingredients and cook-
ing outfits. Stir-fry is a very fast cooking
method, so if you need to stir-fry a large
amount of food, you better cook it in
small portions.
3.
Slightly warm up the frying pan and add
two tablespoons of oil.
4.
First cook the meat; when it is cooked,
take it out and leave aside for a while;
keep it warm.
5.
Fry vegetables. When they will become
hot, but still solid, decrease power/heat-
ing of the induction burner and add meat
to the vegetables.
6.
Now quickly fry all the ingredients, hav-
ing made sure, that all of them are well
heated.
7.
Serve the dish immediately after the meat
and the vegetables are cooked.
Setting the heating power
Heating/power data, set forth in the Table
below, are just approximate. Precise heating
mode will always depend on several factors,
including the cookware that you are using,
amount of food you are cooking. Don’t hesi-
tate to experiment with your induction hob to
get the results, best matching you tastes and
cooking preferences.

Installation and Operating Manual
HOBS
16
Fig. 4
Induction cooking is based on the use of
magnetism to generate heat. Therefore, the
cookware must be made of materials con-
taining iron. You can check the material of
your cookware with a simple magnet.
Important (Fig. 4):
To avoid irreparable damage to the surface
of the hob, do not use:
– cookware with uneven bottom;
– metal cookware with enameled bot-
tom;
– cookware with rough. abrasive bottom
to avoid scratching the surface of the
hob.
Power/Heating Level Suitable for:
1–2 • Warming up small amounts of food, melting chocolate, but-
ter and easily burning foods
• Slow boiling at low temperatures
• Slow warming up
3–4 • Repeated warming up
• Intensive boiling ta low temperatures
• Rice cooking
5–6 • Pancakes, fritters
7-8 • Sauteing
• Pasta
9 • Stir-fry
• Roasting (meat)
• Bring a soup to a boil
• Water boiling
SUITABLE COOKWARE

Installation and Operating Manual Installation and Operating Manual
HOBS
17
What? How? Warning!
Usual contamination
glass (fingerprints,
traces of food, non-
sugar stains on the
glass)
1.
Switch o power supply of the hob.
2.
Apply a hob cleaner while the
glass is still warm (but not hot!).
3.
Rinse the surface with water and
wipe dry with a clean cloth or
paper towel.
4.
Switch on power supply of the hob
again.
– When the hob power supply is o,
the residual heat indicator will not
lit, but the induction burner still
may be hot! Be careful.
– Metal, certain nylon and sponges
and abrasive cleaners may
scratch the glass. Always read the
sponge’s instruction to under-
stand, whether it is suitable clean-
ing the hob, or not.
– Never leave residuals of a cleaner
on the hob surface, since this may
cause formation of stains on the
glass.
Stains left by boiled
out liquids, melted
foods and hot spots
left by burnt sugar
Immediately remove these types of
contamination with a kitchen scraper
or cooking blade suitable for glass-
ceramic induction hobs, in so doing
be careful of hot burners:
1.
Turn o power supply of the hob
using mains breaker.
2.
While holding the scraper or cook-
ing blade at the angle of 30°, clean
away the dirt from the non-heated
part of the hob.
3.
Remove the contamination with a
cloth or paper towel.
4.
Follow the steps 2-4 from the rec-
ommendations on removing usual
contaminants in the table above.
-
Remove stains left by melted and
sugar-containing foods, as well as
the stains left by boiled away liquid
as soon as possible. If you leave
these stains on the glass until com-
pletely cooled, they will be extremely
diicult to remove, and in some
cases they will permanently damage
the surface of the glass.
-
Danger of injury: the blade of the
scraper, which is under the protective
cap, is sharp as a razor. Be extremely
careful while using it and always
store it in a safe place, inaccessible
for children.
MAINTENANCE AND CLEANING

Installation and Operating Manual
HOBS
18
What? How? Warning!
Spilling of liquids
onto the control
panel
1.
Turn o power supply of the hob.
2.
Sop up the spilled liquid.
3.
Wipe the control panel with a
clean sponge or cloths.
4.
Wipe dry the control panel with a
paper towel.
5.
Turn on power supply of the hob.
The hob may generate audio signal
and switch o.; control panel may
remain inoperable, while there’s a
spilled liquid on it. Before switching
on power of the hob, make sure, that
the control panel is wiped dry.
HELPFUL HINTS
Fault Possible reasons Recommendations
Induction hob does not
switch on
No power supply from mains Make sure, that the induction hob
is connected to proper source
if power supply. Make sure, that
there is no power outage in your
house and/or neighborhood. If
the problem persists, please,
contact qualified service center.
No response from the hob
when you touch its controls
The controls are locked Unlock the control panel.
For the unlock process see sec-
tion “Use of Induction Hob” above
Control panel does not work
as intended
Control panel may be coated with
a thin water film, or you touch the
controls with you fingertip only
Make sure, that the control panel
is dry, and use your finger cushion
when touching the controls.
MAINTENANCE AND CLEANING
Table of contents
Other Fornelli Hob manuals


