Fornelli PIA 60 INDUZIONE User manual

HOBS
PIA 60
INDUZIONE
INDUCTION
HOB
COMPANY SPECIALIZING IN BUILT-IN OVENS
AND HOBS
EN
User’s manual

Installation and Operating ManualInstallation and Operating Manual
HOBS
Dear Customer!
Thank you for purchasing FORNELLI appliance. We hope that this product will meet your
expectations and become an excellent assistant in your kitchen. To ensure proper and
safe operation of the product, please, carefully read all the provisions of this Manual.
Furthermore, please, keep this Manual for the entire service life of the unit.
First part of the Manual contains certain important preconditions for safe operation of the
appliance. To ensure that your product will remain in perfect condition for a long time, we
provided lots of useful and valuable tips concerning the appliance’s care and cleaning.
Additionally, this Manual provides some tips and tricks on energy saving.
In the event that some faults will encounter during the operation of the device, the last
pages of the Manual contain useful troubleshooting advises.
Your appliance is made of high quality materials and fully conforms with all EEC standards.
The household appliances that we offer are being constantly improved. This includes
better functionality and features, updated appearance, so the pictures and designations
used in the Manual may slightly differ from the model you have purchased.
Bon appetite!
The manufacturer reserves the right to make changes to the design of the appliance in order to
improve its performance.
This product conforms with European standards and has valid CE, TUV, ISO 9001 and EAC
conformity certificates.
Date of manufacture of your appliance is encoded in its serial number.
You will find the serial number of your product on the label, attached to exhaust. Here is the
explanation of designations used in the serial number.
In this example the product was manufactured during 26th week of 2017.

Installation and Operating Manual Installation and Operating Manual
HOBS
1
Installation and Operating Manual
Content
Induction Principle ................................................................................................................................................2
SAFETY INSTRUCTIONS AND ADVISES
Before you switch the new hob for the first time ................................................................................6
Safety requirements ...........................................................................................................................................6
How to prevent damage of the hob ............................................................................................................8
Recomendations on disposal ........................................................................................................................8
Scope of delivery ..................................................................................................................................................9
Product certification details ...........................................................................................................................9
Storage .......................................................................................................................................................................9
Transportation .......................................................................................................................................................9
Technical specifications .................................................................................................................................10
YOUR NEW INDUCTION HOB
Control panel..........................................................................................................................................................11
Hb peration ...........................................................................................................................................................12
Power/Temperature adjustment ................................................................................................................12
Timer..........................................................................................................................................................................12
Child lock ................................................................................................................................................................12
Small item recognition ....................................................................................................................................12
Atomatic cockware recognition .................................................................................................................13
Voltage surge protection ................................................................................................................................13
Faulty temperature sensor protection ....................................................................................................13
Overheating protection ...................................................................................................................................13
Overvoltage protection ....................................................................................................................................13
Automatic switch-o.........................................................................................................................................13
Suitable cookware ..............................................................................................................................................14
MAINTENANCE AND CLEANING........................................................................................................ 14
Slight contaminations.......................................................................................................................................15
Severe contaminations.....................................................................................................................................15
INSTALLING THE GLASS-CERAMIC HOB........................................................................................ 16
Fastenning to the countertop ......................................................................................................................16
Connection to electric mains........................................................................................................................18
Maintenance and repairs ................................................................................................................................19
Troubleshouting .................................................................................................................................................20
TM FORNELLI

Installation and Operating Manual
HOBS
2
INDUCTION PRINCIPLE
The induction cooking technology is based on the
physical principle of magnetic induction.
Key feature of this technology is a direct transfer of
energy from its generator to a cookware (unlike in the
case of conventional burners – see Figure 1).
Advantages
As compared to electric hobs, your hob is:
– Safer: the glass surface heats up less.
– Faster: less time for heating the foods.
– More accurate: the hob instantly responses to your
commands.
- More eective: 90% of consumed energy is converted
into heat.
Moreover, immediately after removing the cookware from
the hob surface the heat transfer stops, thus avoiding
unnecessary dissipation of heat.
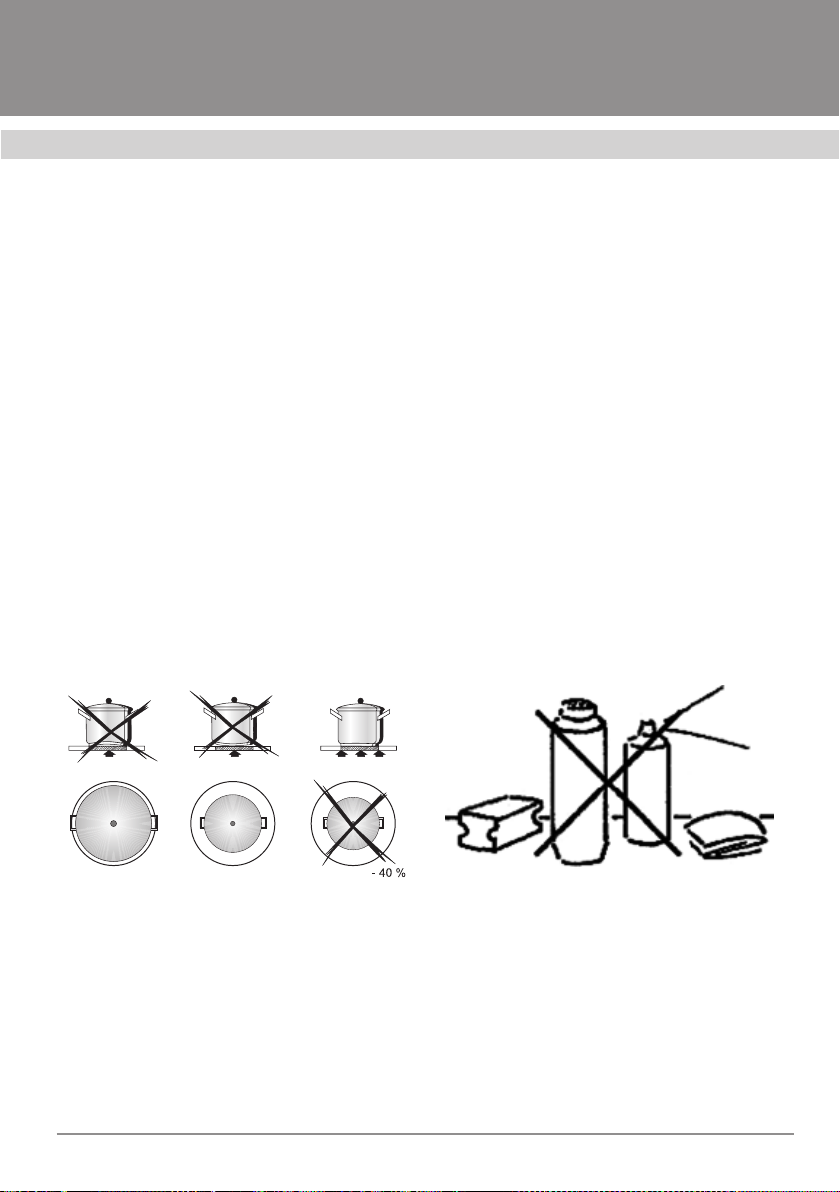
The system automatically recognizes the other diameter
of each individual cookware and applies the power
appropriate to the particular size of the cookware.
This allows the use of cookware of dierent sizes,
provided that the diameter of a specific item corresponds
to maximum 10% and minimum 40% of the size of the
serigraphy on the surface of cooking hob (Figure 4)
WARNING: when using cookware with a diameter less
than 40% of the size of the serigraphy on the hob surface,
the cooking zone may not turn on.
Suitable cookware
Induction cooking is based on the use of magnetism to
generate heat. Therefore, the cookware must be made of
materials containing iron. You can check the material of
your cookware with a simple magnet.
Important:
To avoid irreparable damage to the surface of the hob,
do not use:
– cookware with uneven bottom
– metal cookware with enameled bottom
– cookware with rough. abrasive bottom to avoid
scratching the surface of the hob.
Fig. 1

Installation and Operating Manual Installation and Operating Manual
HOBS
3
BEFORE YOU SWITCH THE NEW HOB
FOR THE FIRST TIME
After the hob packing is removed, make sure,
that both the hob and the power cord are in
good and proper condition and have no dam-
ages, Otherwise do not try to connect the hob
to mains and contact your seller.
Please, keep in mind, that any modifications
and/or attempts to make any modifications to
the design of the product are risky. Do not dis-
assemble and make any modifications to the
hob. If necessary, contact technical service.
The hob must be installed and connected to
mains by qualified and certified electrician
from the service center in strict compliance
with the installation manual and applicable
safety regulations and standards.
SAFETY REQUIREMENTS
User of the glass-ceramic hob must know
and comply with the safety rules on handling
consumer electric appliances.
The hob must be connected to reliable and
proper grounding system in conformity with
applicable electrical safety regulations. In the
event of any interventions into the hob’s de-
sign the electric supply must be OFF. Manu-
facturer disclaims any and all liability whatso-
ever for any and all damages, which may be
caused to people and property as a result of
inappropriate grounding of the appliance.
The appliance must not be used by children
and/or incapable people.
Never allow children to play with the hob. Be-
fore starting operation with the hob, people
with implanted cardiac pacemakers shall
make sure, that the hob does not cause inter-
ference with the cardiac pacemaker.
IMPORTANT!
– Never put on the hob any metal items, in-
cluding spoons, knives, caps. etc., since
they may get hot;
– after completion of the use, please, switch
o the hob using s special command: do
not rely on the cookware detector;
– avoid spilling of liquids. Never leave liquids
on the hob unattended, or at least reduce
power for their warming up and boiling;
– never leave operating induction burners of
the hob with empty cookware or without
cookware installed on top.
– Upon completion of cooking, turn o the
corresponding induction burner with the
command described below;
– Never use for cooking any aluminum foil
sheets, never put on the hob any foods
wrapped in foil. Aluminum can melt and
irreparably damage your hob;
– Never warm up closed tin cans with foods:
tin cans may explode! This rule applies to
all other types of hobs.
When using electrical outlets located close
to the hob, make sure that the power cords of
the household appliances that you may use do
not touch hot parts of the ceramic glass hob;
make sure, that the power cords are laid suf-
WARNING! To avoid damage of the
glass-ceramic hob in the cold season,
please, keep the unpacked hob at room
temperature for at least 2 hours before
the first switching-on.
SAFETY INSTRUCTIONS AND ADVISES

Installation and Operating Manual
HOBS
4
ficiently away from the hot part of the hob. The
power cords must be attached to the kitchen
countertops so that they do not come in con-
tact with hot parts of the glass ceramic hob.
Periodically (at least once every six months),
check the condition of the electrical power
cord. If any defects are found, such as cracks,
melted insulation, hardening of insulation,
please, immediately contact the service cen-
ter. To avoid danger, the power cord must be
replaced by a service center or similar quali-
fied personnel.
In the event of overheating, fats and oils easily
flammable. Therefore, it is absolutely required
to cook food using an oil, for example, when
cooking French fries, under continuous con-
trol only.
ALWAYS REMEMBER! Never use
water to extinguish burning oil or fat.
Cookware with easily flammable oil or
fat should be tightly covered with a lid
or a dense material to prevent access of
oxygen to the flame.
Always keep the hob clean. Remains of food
can cause fire.
Chips and cracks on the ceramic glass hob
may result in electric shock. In case of find-
ing thereof, immediately turn o the hob and
disconnect it from electrical mains.
In the event of a breakdown, immediately dis-
connect the ceramic hob from electric mains.
Never operate faulty equipment, this is
dangerous!
Do not attempt to repair the glass ceramic
hob by yourself. Repairs performed by un-
qualified persons can result in equipment
damage and accidents. First of all, refer to
these instructions. If it contains no informa-
tion that you need, please, contact the near-
est service center. This appliance must be
repaired by authorized service center only.
Always demand the use of original spare
parts for repairs.
Installation and Operating Manual Installation and Operating Manual
HOBS
5
HOW TO PREVENT DAMAGE
OF THE HOB
Glass ceramics is resistant to drastic tem-
perature changes, being a very strong mate-
rial in relation to such temperature variations.
However, in the course of operation glass ce-
ramic hob is subjected to other impacts, for
example, mechanical, in respect of which its
strength is much lesser.
Never use the ceramic hob as a stand for
various items or as a work table.
Never use cast iron cookware or cookware
with a damaged bottom, having rough, abra-
sive bottom surface or burrs. Moving such
cookware on the hob may result in scratch-
ing on the hob surface.
Never place empty cookware, especially
enamel and aluminum ones, on the induction
burner when it is ON. This can damage the
hob and the bottom of the cookware.
Never store hard and sharp items over the
ceramic hob. If they fall on the hob, the hob
will most likely be damaged.
If sugar or other sugar-containing food fall
onto the hot induction burner and get melt-
ed, immediately remove them with a cleaning
scraper while they are still hot. When the hot
mass cools down, it can damage the surface
when being removed.
When getting in contact with hot induction
burners, synthetic materials, aluminum or cu-
linary foil or plastic utensils can get melted.
Therefore, store these materials and items at
safe distance from the glass ceramic hob. If,
despite your eorts, some material has melt-
ed on the hob surface, immediately remove it
with a scraper.
Always make sure, that acidic liquids, such
as vinegar, lemon or lime scale dissolution
agents, do not fall on the glass ceramic hob
surface, since these substances leave matte
stains on the surface.
Never put pans or frying pans on the hob
frame, this may cause scratches and other
damage.
Recommendations on Disposal
All the materials, used in the glass ceramic
hob, are ecologically friendly and recyclable.
Please, observe environment protection rules
and regulations, use proper separate waste
collection practices.
Used or damaged appliances are not useless
wastes. Dierent materials, used in your hob,
can be used repeatedly.
For more details on the hob disposal meth-
ods, please, contact your dealer or local ad-
ministrative authorities.
When you hand over your hob for disposal,
please, remember, having fallen into chil-
dren’s hands it may cause a serious accident.
Make sure, that the hob you are about to dis-
pose is as safe, as it is technically possible.
For example, cut o its electric power cord,
make the hob disables in any other way.
Follow the instructions contained in this
Manual.

Installation and Operating Manual
HOBS
6
SCOPE OF DELIVERY
Your glass ceramic hob is a built-in kitchen
appliance. Nameplate containing the model
of the hob is attached to the rear side of the
built-in part of the hob.
The scope of delivery includes:
– Glass ceramic hob – 1 pc.;
– Adhesive sealing plate – 1 pc.;
– User’s Manual.
STORAGE
Store the hob in a dry place, away from
sources of heat and direct sunlight. When
storing an oven, avoid rapid temperature
changes. Storing of the oven with the trans-
portation packing removed is prohibited.
TRANSPORTATION
Falls and/or any mechanical impacts on the
packaging during transportation of the prod-
uct must be excluded.
SELLING REGULATIONS
Manufacturer does not implement any spe-
cial rules and conditions regarding the sell-
ing of the product; the product must be
marketed and sold in accordance with the
national and/or local legislation of the coun-
try of destination.

Installation and Operating Manual Installation and Operating Manual
HOBS
7
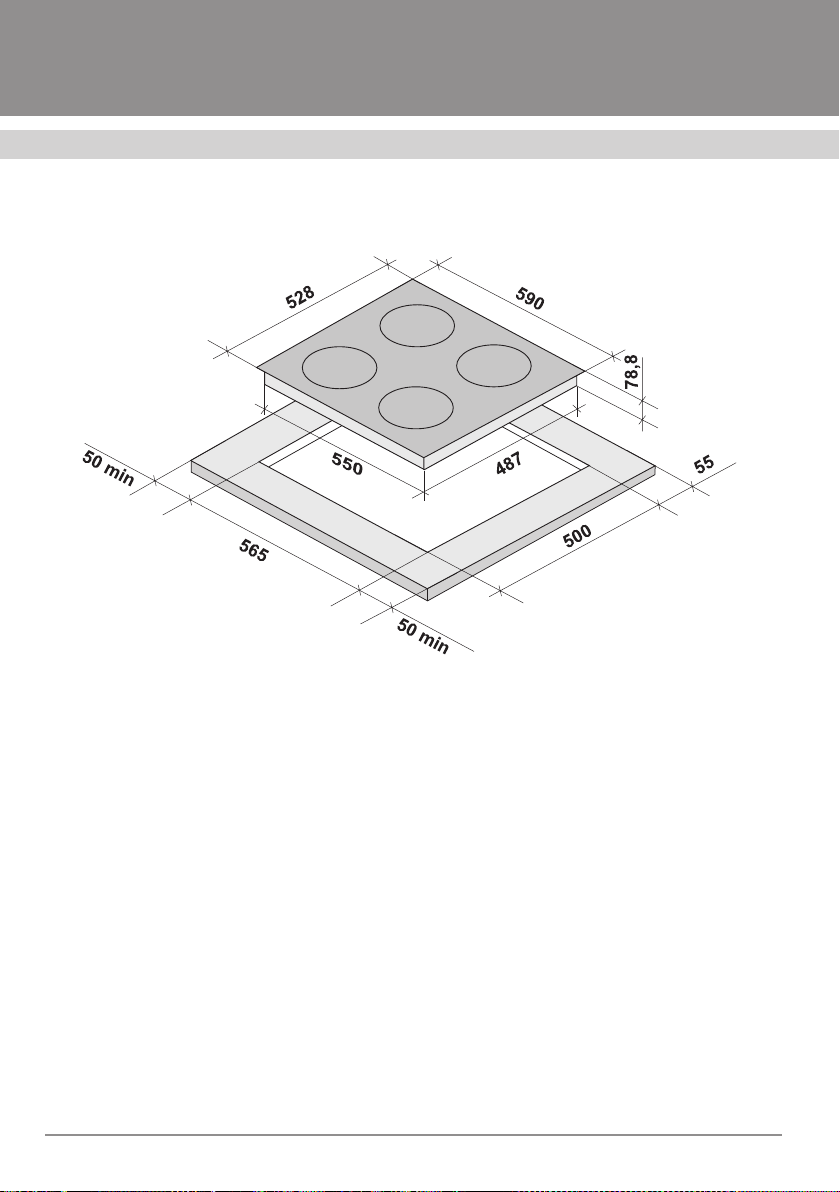
Dimensions of the Hob and the Opening for Building-in of the Hob
Dimensions of the Hob’s Built-in Part, mm Height Width Depth
(length)
Dimensions of the Visible Part 7 590 528
Dimensions of the built-in part of the hob 78,8 550 487
Niche dimensions 35–45* 565 500
* When the countertop thickness is less than 35 mm, use the additional sealing tape (to be purchased
separately).
Total power of the glass ceramic hob, W – 6400.
Hob power supply: 220–240 V AC 50/60 Hz.
Ingress Protection: 1.
Size and power of induction burners
Burner Dimensions, mm Power, W
Front left 165 1200
Rear left 200 2000
Rear right 200 2000
Front left 165 1200
TECHNICAL SPECIFICATIONS

Installation and Operating Manual
HOBS
8
1. Power cord
2. Glass ceramic hob
3. Rear left burner
4. Front left burner
5. Rear right burner
6. Front right burner
7. Sensor control panel
8. LED indicator.
YOUR NEW GLASS CERAMIC HOB
INDUCTION INDUCTION
INDUCTION INDUCTION
Fig. 2
Fig. 3
Front left burner functions:
1. Child Lock for left (rear and front) burn-
ers
2. Timer
3. Power/temperature adjustment (“-”)
4. Display.
5. Power/temperature adjustment (“+”)
6. ON/OFF
Rear left burner functions:
7. Timer
8. Power/temperature adjustment (“-”)
9. Display
10. Power/temperature adjustment (“+”)
11. ON/OFF .
CONTROL PANEL
INDUCTION INDUCTION
INDUCTION INDUCTION
1 2 3 4 5 6 7 8 9 10 11 12 13 14 15 16 17 18 19 20 21 22

Installation and Operating Manual Installation and Operating Manual
HOBS
9
Front right burner functions:
12. Child Lock
13. Timer
14. Power/temperature adjustment (“-”)
15. Display
16. Power/temperature adjustment (“+”)
17. ON/OFF.
Rear right burner functions:
18. Timer
19. Power/temperature adjustment (“-”)
20. Display
21. Power/temperature adjustment (“+”)
22. ON/OFF.
HOB OPERATION
a) Push ON/OFF button. The hob will enter
operating mode.
b) Press ON/OFF button during operation.
The hob will stop operation. Child Lock
will be activated automatically after 1 min-
ute.
c) While the hob is operating, press Child
Lock button and then press ON/OFF but-
ton. If the hob is locked. “- -“ symbol will
be displayed.
POWER/TEMPERATURE
ADJUSTMENT
The induction hob oers 9 power levels: 1st
level is the lowest and 9th is the highest. You
can adjust power/temperature using “+” and
“-“ buttons. Each time you press these but-
tons, sound alarm (“beep”) is generated.
TIMER
Timer settings range is from 0 to 99. While
the hob is operating, press Timer button.
“Beep” sound alarm will be generated, “00”
figures will be displayed. Press “+” or “-“ but-
tons to adjust time. Time count will start 5
seconds after the time is set. Upon expiry of
the set time the hob will generate a sound
signal.
CHILD LOCK
While the4 hob is operating, press and hold
for 3 seconds the Child Lock button to lock
the controls. The hob will generate a sound
signal and “LO” will be displayed on the dis-
play. While the Child Lock is ON, all other
buttons except ON/OFF button and Lock
button will be locked.
SMALL ITEM RECOGNITION
In the event that small-size items (such as a
knife, fork, key, etc.) have been left on-top of
the hob, the hob will generate an audio sig-
nal and pause operation. If after 1 minute the
item will not be removed, the hob will turn o
to avoid damage.
AUTOMATIC COOKWARE
RECOGNITION
In the event that cookware has been re-
moved from the burner during the hob op-
eration, or if inappropriate cookware is used,
the induction hob will generate an audio sig-
nal and pause operation. If after 30 seconds
the cookware will not be put back onto the
burner/replaced with the proper cookware,
the hob will turn o to avoid damage.
VOLTAGE SURGE PROTECTION
In the event of voltage surge the hob will au-
tomatically switch o.

Installation and Operating Manual
HOBS
10
FAULTY TEMPERATURE
SENSOR PROTECTION
In the event of temperature sensor failure
the induction hob will switch o and resume
operation only after the temperature sensor
fault will ha have been fixed.
OVERHEATING PROTECTION
In the event that the temperature either in-
side or on the surface of the hob becomes
excessively high, the hob will automatically
switch o and resume operation only after
the temperature will reduce to rated values.
OVERVOLTAGE PROTECTION
In the event that the mains voltage becomes
too high or too low, the induction hob will
switch o and resume operation on after the
voltage will return to rated values.
AUTOMATIC SWITCH OFF
In the event that within 2 hours no actions
have been performed with the hob , it will au-
tomatically switch o.
Installation and Operating Manual Installation and Operating Manual
HOBS
11
MAINTENANCE AND CLEANING
The ceramic hob remains clean for a long time,
it is simple to take care of, provided it is main-
tained in right manner and on a regular basis.
Clean the hob after each cooking, when the
hob will has cooled down to normal tempera-
ture (when you will be able to touch it without
hurting yourself). Otherwise, even the smallest
remains of food will be burnt after the hob is be
switched on next time.
We recommend that you use only special non-
abrasive cleaning agents to clean the glass-ce-
ramics surface of your hob.
Never clean the glass-ceramic hob with steel
brushes, coarse sponges or powder cleaners,
as they scratch the surface of the hob. Sprays
for grills and ovens also should not be used, be-
cause due to their high aggressiveness they can
damage the hob (see Figure 5). Avoid the use of
chemically active cleaning agents, such as, for
example, stain remover.
Fig. 5
Fig. 4
SUITABLE COOKWARE
Induction cooking is based on the use of
magnetism to generate heat. Therefore, the
cookware must be made of materials con-
taining iron. You can check the material of
your cookware with a simple magnet.
Important (see Figure 4):
To avoid irreparable damage to the surface
of the hob, do not use:
– cookware with uneven bottom;
– metal cookware with enameled bottom;
– cookware with rough. abrasive bottom to
avoid scratching the surface of the hob.
Installation and Operating Manual
HOBS
12
SLIGHT CONTAMINATIONS
Small stains and slight dirt should be removed
with a damp cloth with a small amount of de-
tergent for manual dishwashing, or a bleach
for laundry. The remaining detergent should
be washed o with cold water, and then the
surface must be wiped dry.
Stains left by boiled out water should be re-
moved with vinegar, or lemon juice, or with
solutions intended for the dissolution of lime.
If any of these chemicals has accidentally
fallen on the metal frame (if any, depending
on the model), it should be immediately re-
moved with a damp cloth, otherwise matte
spots will be left on the frame.
SEVERE CONTAMINATIONS
Cleaning agents should be applied neat us-
ing paper towel and then rubbed into the
surface. Leave the cleaning agent for a while,
so that it react with the dirt, then wash it out
with cold water and wipe dry the surface of
the hob. If the cleaner was not wiped out
from the hob completely, it may damage the
surface when it is heated up.
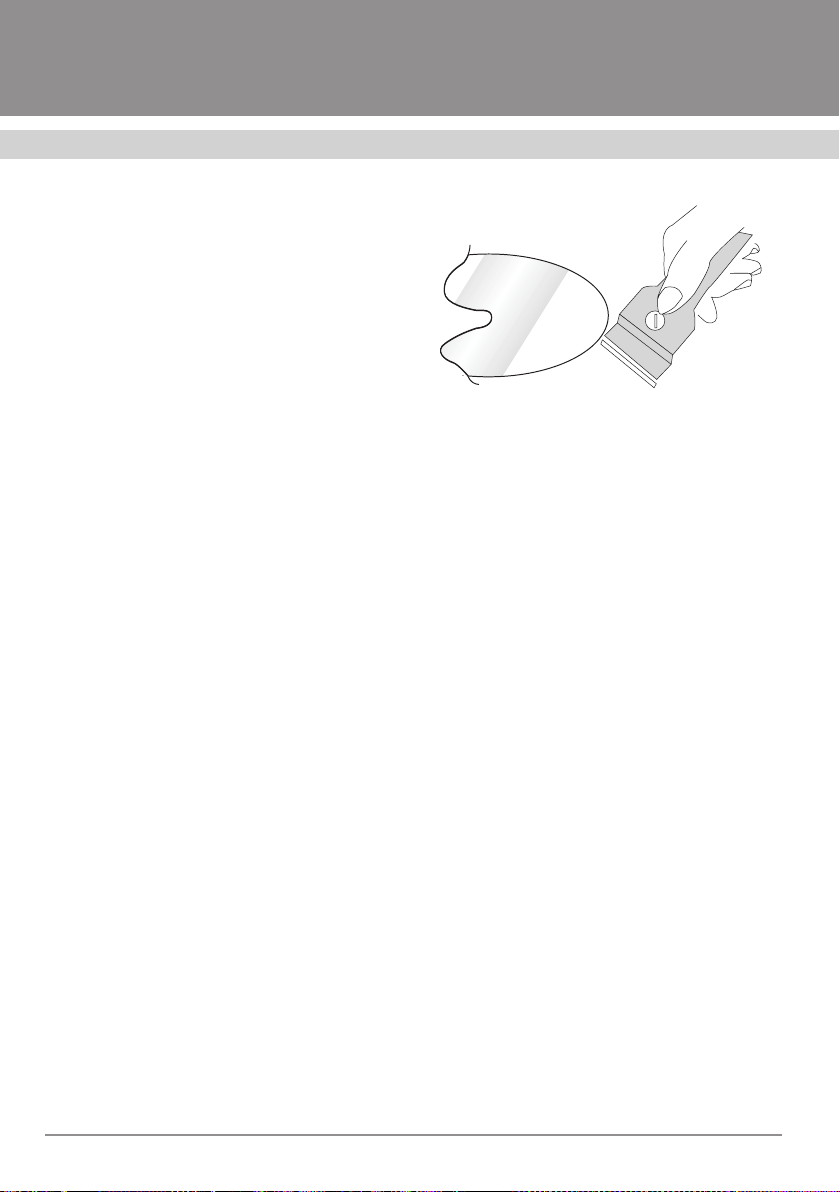
Extremely severe, heavy contaminations
should be removed with a glass cleaning
scrapper (see Figure 6). These scrappers are
commercially available in the market. When
purchasing the scrapper, pay attention to
its handle. The handle must not be made of
plastic, since the plastic can melt when the
scrapper is used for cleaning hot surface.
Even if the hob color has changed, it doesn’t
aect its functionality and service life. This
discoloration doesn’t aect the structure of
the hob material, being just a residues of the
burnt out foods, which haven’t been cleaned
or removed in time.
Fig. 6
Discoloration coupled with metal shimmer-
ing is caused by the friction between cook-
ware bottoms and glass-ceramic hob, or
the use of inappropriate cleaning tools. This
discoloration still can be removed by using
proper cleaners, although it will take lots of
eorts and time. Cleaning can be repeated
several times, until a contamination is com-
pletely removed.
In the event that lemon juice or vinegar, or
lime scale removal agents get in contact with
the metal frame around the glass-ceramic
surface, this may result in damaging of the
frame, as well as to the creation of discolored
or other stains on the surface.

Installation and Operating Manual Installation and Operating Manual
HOBS
13
INSTALLING
THE GLASS-CERAMIC HOB
WARNING!
The hob must be installed by qualified
personnel only.
The hob must be installed in proper man-
ner in strict conformity with the regulati-
ons of local electricity supplier and appli-
cable standards.
During the entire process of installation
the hob must be disconnected from mains.
The hob must be installed so as to ensu-
re protection against accidental contact
with the details under voltage.
The surface used for building in the hob,
must withstand 100°C.
In the event that a built-in oven or any ot-
her appliance, which becomes hot during
operation, are installed beneath the hob
and its control panel, it is required to en-
sure, that the temperature in close proxi-
mity to the control panel of the hob will not
exceed 60°C. Failure to comply with the
requirement may result in improper ope-
ration if the sensor control panel. To this
end it is required to provide 40 mm gap
between this appliance and the bottom of
the hob (see Figure 8). Failure to comply
with this requirement may adversely af-
fect operation of the control panel.
The gap between the bottom of the hob and
the shelf of the kitchen furniture, which is the
closest to the hob, must be at least 25 mm.
FASTENING TO THE COUNTERTOP
Cut out an opening with the dimensions,
as shown in Table below, in the countertop,
into which you are going to install the hob.
The countertop material te3nd to get wet
relatively fast. Therefore the edges of the
opening cut out in the countertop must be
protected with special glue or sealant to
protect it against the eects of condensed
vapor, which may appear on the reverse
side of the countertop.
Before proceeding with the installation of
the hob into the opening in the countertop
(see Figure 7), attach the adhesive sealing
tape Gto the bottom edge of the hob. At-
tach the sealant evenly along the entire
perimeter of the hob. Avoid gaps and over-
laps.
Now install the hob into the opening in the
countertop. Alight it right in the center of
the opening. In so doing, hold the hob by
its bottom part. Then press the hob against
the countertop, so that the hos is steadily
supported by the countertop. It is recom-
mended to perform this operation with an
assistant to avoid displacements of the
sealing tape G.
If the sealing tape Gis installed in correct
and proper manner, it will provide reliable
protection against spills of liquids. This is
especially relevant from the standpoint of
maintaining and cleaning the hob.

Installation and Operating Manual
HOBS
14
Fig. 9
Fig. 8
Fig. 7
Larger scale diagram
is given on Page 21
Installation and Operating Manual Installation and Operating Manual
HOBS
15
CONNECTION TO ELECTRIC MAINS
Before proceeding with connection of the hob
to electric mains, please, make sure, that:
– specifications of the electric mains corre-
spond to the figures specified on the na-
meplate of the hob, attached in the lower
part of the hob;
– the electric mains is equipped with reliable
and proper grounding system in conformi-
ty with applicable standards and regulati-
ons.
WARNING!
Since this device consumes significant
power (7,2 kW), it MUST BE connected
to a dedicated power supply line, having
conductor cross-section of at least
4 mm2.
The appliance must be connected to the elec-
tric mains in strict compliance with current
standards and regulations.
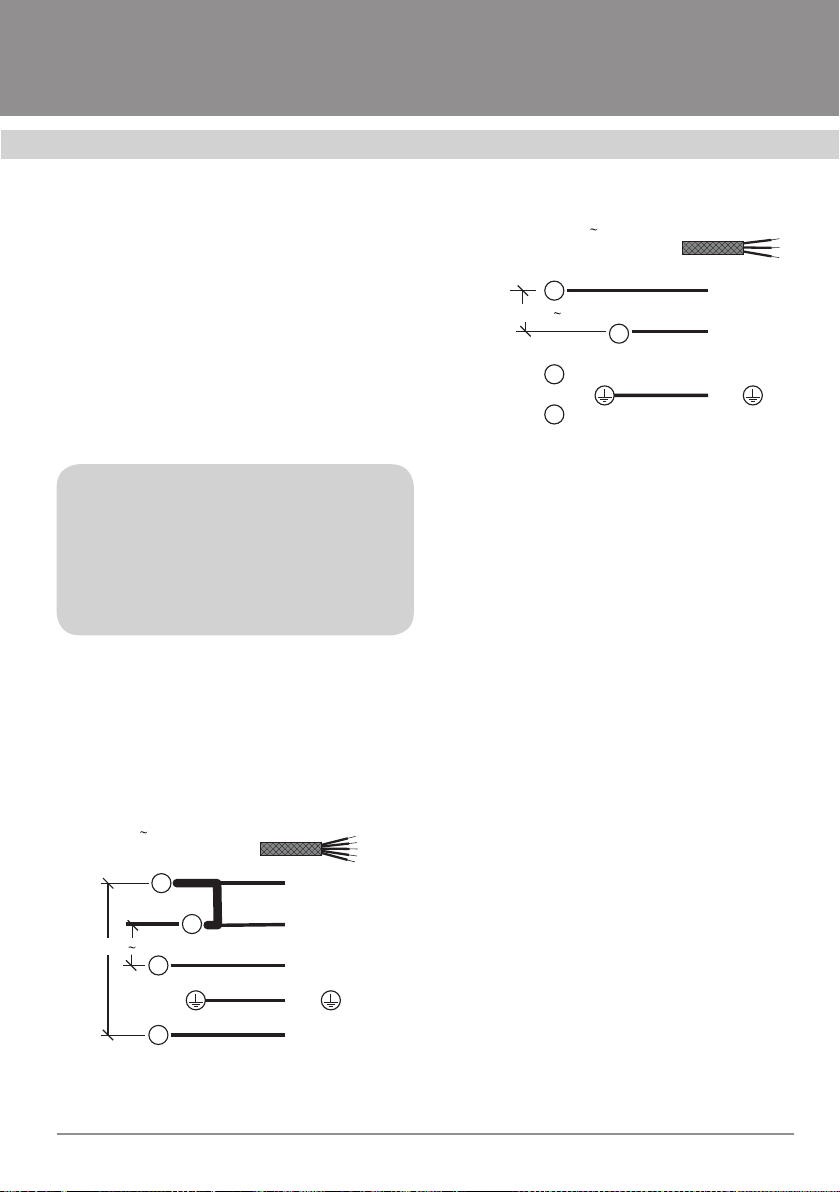
Wiring diagram is given on Figure 10 below:
Fig. 10
380V 2N H07RN-F 5G1. 5mm2
3
4
2
220V
white
1
blue
brown
green-yellow
black
N
N
L2
PE
LI
1
2
3brown
blue
green-yellow
220-240V 1N
220-240V
H07RN-F 3G4 . 0mm2
4
L
N
PE
380V 2N H07RN-F 5G1. 5mm2
3
4
2
220V
white
1
blue
brown
green-yellow
black
N
N
L2
PE
LI
1
2
3brown
blue
green-yellow
220-240V 1N
220-240V
H07RN-F 3G4 . 0mm2
4
L
N
PE
When the hob is connected directly to
the mains, the connection must be made
through the circuit breaker, which ensures
at least 3 mm gap between open contacts.
This is not required in the event that the hob is
connected to mains using wall outlet and plug,
in which case these wall outlet and plug must
be easily accessible in order to be quickly di-
sengaged.
The plug and the cable used for connection
of the hob, must meet all the applicable stan-
dards and be able to withstand the electric
power consumed by the hob (see Max. Con-
sumed Power, kW section).
Grounding wire (yellow-green) shall not be di-
sconnected by the circuit breaker.
In any event power cord of the hob must be
laid so that in none of its points the temperatu-
re would higher than the ambient temperature
by more than 50 °C.
In the event that the power cord needs to be
replaced, the replacement power cord must
ensure safe operation of the hob in view of the
given electric power consumption and opera-
ting temperature.

Installation and Operating Manual
HOBS
16
WARNING!
Never use household extension cords,
since they may get overheated and flare
up.
The hob must be grounded. Manufacturer
disclaims any and all liability for any da-
mage whatsoever, if this requirement is
not met.
If the power cord is damaged, it must be
replaced with the new one by qualified
service center personnel.
Before switching on the hob for the first
time make sure, that it is free from any and
all foil, stickers or metal frames (if any).
WARNING!
Manufacturer disclaims any and all lia-
bility for any damage whatsoever, if the
above and/or any other usual electrical
safety rules and regulations are not ob-
served.
MAINTENANCE AND REPAIRS
This appliance does not require any special
technical maintenance in excess of normal
cleaning.
Prior to the shipment from the manufactu-
rer’s plant, this appliance has been tested
and accepted by qualified and experienced
quality control personnel so as to ensure, that
the appliance is in proper and good working
condition. Any repairs, which may become
necessary in the future, must be performed
with the maximum care and diligence.
It is strongly recommended to contact the
nearest FORNELLI service center or the shop
where you bought the product.
If your product is still covered by the manufac-
turer’s warranty, then while calling service cen-
ter advise the following information: warranty
certificate number, defect description, model
and serial number specified on the nameplate
attached to the lower part of your hob.
If your hob is not covered by the manufactu-
rer’s warranty anymore, then while calling ser-
vice center notify them the model and describe
the defect. This will be suicient.
WARNING!
Never try to make any repairs of this
hob by yourself. In the event you found
any defects of the glass ceramic hob,
disconnect it from power mains. Never
allow random people, other than qua-
lified service personnel, to repair your
hob.

Installation and Operating Manual Installation and Operating Manual
HOBS
17
TROUBLESHOOTING
If you faced troubles when operating the hob, please, read the table below before proceeding
with the actual repairs.
Fault Recommendation
After the hob is switched on, “beep”
sound is missing and the display is o.
Make sure, that:
- power cord and its plug have no damages;
- mains circuit breaker is in good and proper condition;
- there is no power outage in your house.
“Beep Beep” sounds within 30 se-
conds, symbol “E1” is displayed
Make sure, that:
- the you are using is suitable cookware;
- the cookware is correctly aligned with respect to the induc-
tion burner;
The hob has suddenly switched o
with “Beep Beep” sound, symbol “E2”
is displayed
Make sure, that the hob is not overheated.
If the fault is caused by overheating, switch o the hob, let it
cool down and switch it on again. Fan sensor may be dama-
ges, If so, contact service center.
The hob suddenly switches o, heats
up from time to time
Heating up from time to time may occur as part of the war-
ming-up function, certain low-power operating modes, frying
mode, some other modes. This is normal.
The hob has suddenly switched o
with “Beep Beep” sound, symbol “E3”
is displayed
Power surge: voltage increased above 275 V
The hob has suddenly switched o
with “Beep Beep” sound, symbol “E4”
is displayed
Power surge: voltage dropped below 100 V
The hob has suddenly switched o
with “Beep Beep” sound, symbol “E5”
is displayed
E5 error indicates glass surface temperature sensor defect,
Please, contact service center.
The hob has suddenly switched o
with “Beep Beep” sound, symbol “E6”
is displayed
Wrong button has been pushed, liquid has boiled away/insuf-
ficient amount of liquid
The hob has suddenly switched o
with “Beep Beep” sound, symbol “E0”
is displayed
Internal component failure, Please, contact service center.
Installation and Operating Manual
HOBS
18
PIA 60 INDUZIONE Installation Diagram
Table of contents
Other Fornelli Hob manuals


