manuals.online logo
Brands
  1. Home
  2. •
  3. Brands
  4. •
  5. Fortinet
  6. •
  7. Firewall
  8. •
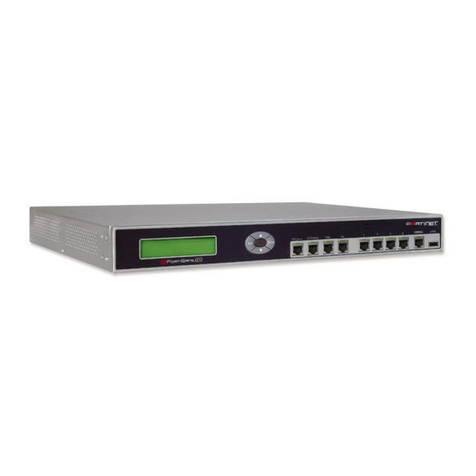
  9. Fortinet FortiGate-1240B User manual

Fortinet FortiGate-1240B User manual

© Copyright 2009 Fortinet Incorporated. All rights reserved.
Products mentioned in this document are trademarks or registered trademarks
of their respective holders.
Regulatory Compliance
FCC Class A Part 15 CSA/CUS
17 November 2009

CONSOLE
USB
FSM5
ASM
FSM1
FSM2
FSM3
FSM4
1
2
3
6
4
5
8
7
10
9
12
11 13
14
15
16
17
18
19
20
21
22
23
24
25
26
27
28
29
30
31
32
33
34
35
36
37
38
39
40
STATUS
ALARM
HA
POWER
SHUT DOWN
FSM6
FortiGate 1240B
POWER 1 POWER 2
FAN FAN FAN FAN FAN FAN
Front
FSM slots
SFP ports Copper 10/100/100 ports ASM slot USB
ports
Console
port
Shutdown
button
Fan LEDS AC power
Ground
Back
CONSOLE
USB
FSM5
ASM
FSM1
FSM2
FSM3
FSM4
1
2
3
6
4
5
8
7
10
9
12
11 13
14
15
16
17
18
19
20
21
22
23
24
25
26
27
28
29
30
31
32
33
34
35
36
37
38
39
40
STATUS
ALARM
HA
POWER
SHUT DOWN
FSM6
FortiGate 1240B
Straight-through
Ethernet cables
Power Cable x2
FortiGa te-30 B
FortiGate
Tools and Documenation
Copyright 2009 Fortinet Incorporated. All rights reserved.
Trademarks
Products mentioned in this document are trademarks.
Quick Start G uide
Rack-Mount Brackets
CONSOLE
USB
FSM5
ASM
FSM1
FSM2
FSM3
FSM4
1
2
3
6
4
5
8
7
10
9
12
11 13
14
15
16
17
18
19
20
21
22
23
24
25
26
27
28
29
30
31
32
33
34
35
36
37
38
39
40
STATUS
ALARM
HA
POWER
SHUT DOWN
FSM6
FortiGate 1240B
REGISTER
SFP Transceiver x2
Rubber feet x6
RJ-45 to
DB-9 Serial Cable
HDD Dummy Card x5 AMC Filler Plate
64 GB SSD with Tray
(FS2-064)
Straight-through Ethernet cables
connect to the Internet or
other networks
RJ-45 to DB-9 cable connects
to serial port on management
computer
CONSOLE
USB
FSM5
ASM
FSM1
FSM2
FSM3
FSM4
1
2
3
6
4
5
8
7
10
9
12
11 13
14
15
16
17
18
19
20
21
22
23
24
25
26
27
28
29
30
31
32
33
34
35
36
37
38
39
40
STATUS
ALARM
HA
POWER
SHUT DOWN
FSM6
FortiGate 1240B
Power cable
connects to
power supply
POWER 1 POWER 2
FAN FAN FAN FAN FAN FAN

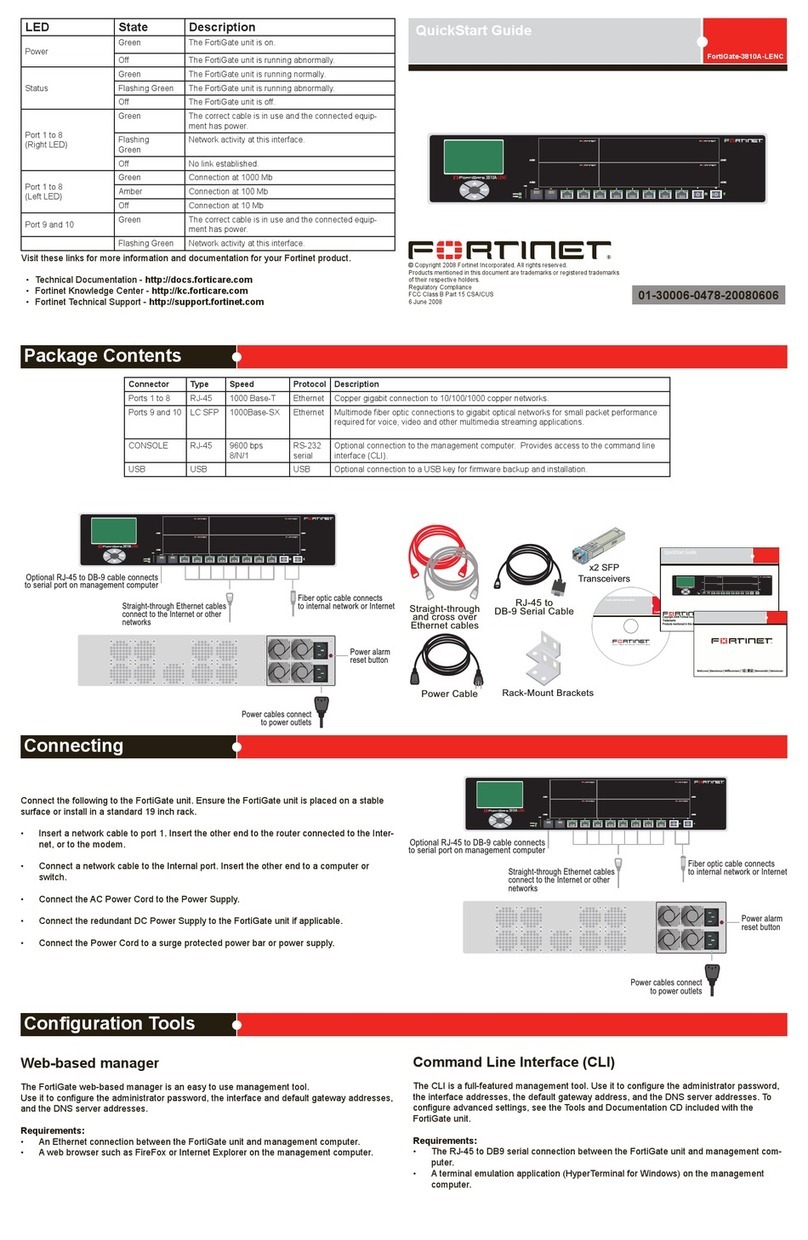
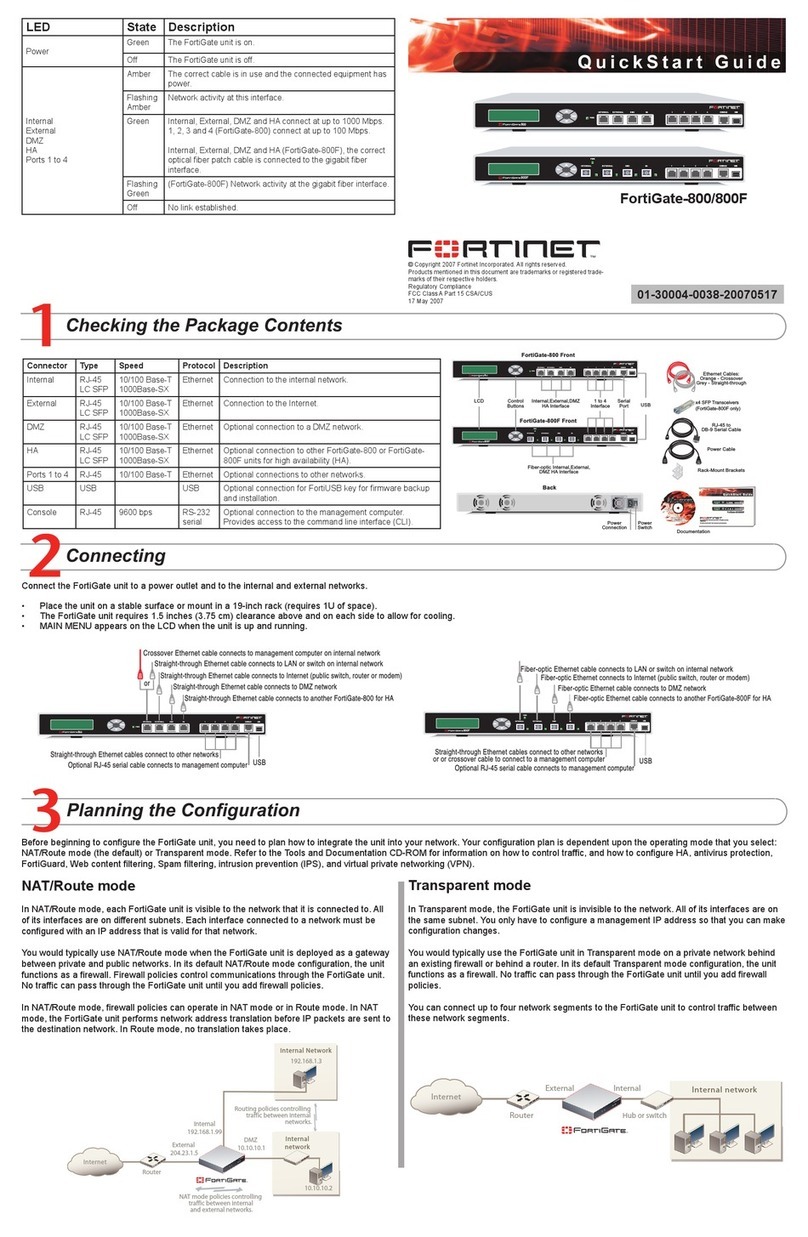
Connect the following to the FortiGate unit. Ensure the FortiGate unit is placed on a stable
surface or install in a standard 19 inch rack.
• Connect the RJ-45 to DB-9 serial cable into the Console port on the unit. Insert the
other end into the management computer.
• Insert the ethernet cable into a port. Insert the other end to the router connected to the
Internet.
• Connect the AC power cable to the power supplies.
• Connect the AC power cords to a surge protected power bar or power supply.
 Do not force the SFP transceivers into the cage slots. You can damage the con-
nector if handling the SFP transceivers by holding the release Latch. If the transceiver does
not easily slide in and click into place, it may not be aligned correctly or may be upside
down. If this happens, remove the SFP transceiver, realign it or rotate it and slide it in again.

1. Remove the caps from SFP cage sockets on the front panel.
2. Hold the sides of the SFP transceiver and slide the SFP transceiver into the cage socket
until it clicks into place.




    
Ports 1 to 24 SFP 1 Gbps/auto Ethernet Small form-factor pluggable transceiver (SX-SFP) supports 1 Gbps for SERDES and auto mode for SGMII modes (NP
Accelerated).
Ports 25 to 38 RJ-45 10/100/1000 Ethernet Copper gigabit connection to 10/100/1000 copper networks (NP accelerated).
Ports 39 to 40 RJ-45 10/100/1000 Ethernet Two management ports.
CONSOLE RJ-45 9600 bps RS-232 serial Optional connection to the management computer. Provides access to the command line interface (CLI).
USB USB Two USB ports for optional connection to a USB key for rmware backup and installation.
FSM slot FSM Six SATA hard disk drive slots supports 2.5 inch solid state drives.
AMC slot AMC One single-width AMC slot supports all Fortinet ASM modules.
Shutdown button When pressed, the RAID system shuts down.
  
Power Green The unit is on.
Off The unit is off.
Status Green ashing The unit is starting up.
Green The unit is running normally.
HA Yellow The unit being used in an HA cluster.
Alarm To be supported in a future release.
Ports 1 to 24
Link Green Port is online.
Off Port is ofine.
Activity Green blinking Port is receiving or sending data.
Off Port might be on but is not receiving or sending data.
Ports 25 to 40
Link Green Port is online.
Flashing Port is receiving or sending data.
Activity
Green Connected at 1000Mbps.
Amber Connected at 100 Mbps.
Off Connected at 10 Mbps.
AC power
Green AC cable is connected and has power.
Amber AC cable is not connected or does not have power.
Fan
Green The fan is running and the speed is within proper
range.
Off The fan is not running or the speed is over threshold.
Once you have installed the Fortinet solid state drive, you may need to format the hard disk
drives using the CLI (if it has not been previously formatted).

• Type the following command in the CLI:
exec formatlogdisk
When installing the FSM module, ensure that the  and/or “
” labels are orientated upwards when inserting the module into the unit.

1. Insert the module into the FSM slot on the unit with the  and/or “”
labels facing upwards.
2. Close the latch.

Port IP: ____.____.____.____
Netmask: ____.____.____.____
Port IP: ____.____.____.____
Netmask: ____.____.____.____
Port IP: ____.____.____.____
Netmask: ____.____.____.____
Port IP: ____.____.____.____
Netmask: ____.____.____.____
Port IP: ____.____.____.____
Netmask: ____.____.____.____
The internal interface IP address and netmask must be valid for the internal network.

Management IP: IP: ____.____.____.____
Netmask: ____.____.____.____
The management IP address and netmask must be valid for the network from which you will
manage the FortiGate unit.

Administrator password:
Network Settings: Default Gateway: ____.____.____.____
Primary DNS Server: ____.____.____.____
Secondary DNS Server: ____.____.____.____
A default gateway is required for the FortiGate unit to route connections to the Internet.

 
Port 1 interface 192.168.1.99 User name admin
Port 2 interface 192.168.100.99 Password (none)
Port 39 interface 192.168.2.99
Port 40 interface 192.168.101.99
To reset the FortiGate unit to the factory defaults, in the CLI type the command
execute factory reset

1. Connect the FortiGate internal interface to a management computer Ethernet interface.
Use a cross-over Ethernet cable to connect the devices directly. Use straight-through
Ethernet cables to connect the devices through a hub or switch.
2. Congure the management computer to be on the same subnet as the internal interface
of the FortiGate unit. To do this, change the IP address of the management computer to
192.168.1.2 and the netmask to 255.255.255.0.
3. To access the FortiGate web-based manager, start Internet Explorer and browse to
https://192.168.1.99 (remember to include the “s” in https://).
4. Type admin in the Name eld and select Login.


1. Go to .
2. Select Change Password for the admin administrator and enter a new password.

1. Go to .
2. Select the edit icon for each interface to congure.
3. Set the addressing mode for the interface. (See the online help for information.)
• For manual addressing, enter the IP address and netmask for the interface.
• For DHCP addressing, select DHCP and any required settings.
• For PPPoE addressing, select PPPoE, and enter the username and password and
any other required settings.

1. Go to , enter the Primary and Secondary DNS IP ad-
dresses that you recorded above and select Apply.

1. Go to  and select Edit icon for the static route.
2. Set Gateway to the Default Gateway IP address you recorded above and select OK.


1. Go to  and select Transparent.
2. Set the Management IP/Netmask to 192.168.1.99/24.
3. Set a default Gateway and select Apply.

1. Go to .
2. Select Change Password for the admin administrator and enter a new password.

1. Go to .
2. Enter the Management IP address and netmask that you recorded above and select
Apply.

1. Go to , enter the Primary and Secondary DNS IP ad-
dresses that you recorded above and select Apply.

1. Use the RJ-45 to DB9 serial cable to connect the FortiGate Console port to the man-
agement computer serial port.
2. Start a terminal emulation program (HyperTerminal) on the management computer. Use
these settings:
3. Baud Rate (bps) 9600, Data bits 8, Parity None, Stop bits 1, and Flow Control None.
4. At the Login: prompt, type admin and press Enter twice (no password required).

1. Congure the FortiGate internal interface.
cong system interface
edit internal
set ip <intf_ip>/<netmask_ip>
end
2. Repeat to congure each interface, for example, to congure the Port 1 interface.
cong system interface
edit port1
...
3. Congure the primary and secondary DNS server IP addresses.
cong system dns
set primary <dns-server_ip>
set secondary <dns-server_ip>
end
4. Congure the default gateway.
cong router static
edit 1
set gateway <gateway_ip>
end

1. Change from NAT/Route mode to Transparent mode and congure the Management IP
address.
cong system settings
set opmode transparent
set manageip <mng_ip>/<netmask>
set gateway <gateway_ip>
end
2. Congure the DNS server IP address.
cong system dns
set primary <dns-server_ip>
set secondary <dns-server_ip>
end



You would typically use NAT/Route mode when the FortiGate unit is deployed as a gateway
between private and public networks. In its default NAT/Route mode conguration, the unit
functions as a rewall. Firewall policies control communications through the FortiGate unit.

You would typically use the FortiGate unit in Transparent mode on a private network behind
an existing rewall or behind a router. In its default Transparent mode conguration, the unit
functions as a rewall.






The FortiGate Web Cong is an easy to use management tool. Use it to congure the
administrator password, the interface and default gateway addresses, and the DNS server
addresses.

• An Ethernet connection between the FortiGate unit and management computer.
• A web browser such as FireFox or Internet Explorer on the management computer.

The CLI is a full-featured management tool. Use it to congure the administrator password,
the interface addresses, the default gateway address, and the DNS server addresses. To
congure advanced settings, see the Tools and Documentation CD included with the
FortiGate unit.

• The RJ-45 to DB9 serial connection between the FortiGate unit and management com-
puter.
• A terminal emulation application (HyperTerminal for Windows) on the management
computer.


Other Fortinet Firewall manuals

Fortinet FortiGate 800/800F User manual

Fortinet

Fortinet FortiGate 800/800F User manual

Fortinet FortiGate 50A Operator's manual

Fortinet

Fortinet FortiGate 50A Operator's manual

Fortinet FortiManager-100 User manual

Fortinet

Fortinet FortiManager-100 User manual

Fortinet FortiGate FortiGate-5001SX User guide

Fortinet

Fortinet FortiGate FortiGate-5001SX User guide

Fortinet FortiGate FortiGate-1000 Instruction Manual

Fortinet

Fortinet FortiGate FortiGate-1000 Instruction Manual

Fortinet FortiTester 2000E User manual

Fortinet

Fortinet FortiTester 2000E User manual

Fortinet FortiGate-200A User manual

Fortinet

Fortinet FortiGate-200A User manual

Fortinet FortiManager-3000B User manual

Fortinet

Fortinet FortiManager-3000B User manual

Fortinet FortiScan-1000C User manual

Fortinet

Fortinet FortiScan-1000C User manual

Fortinet FortiGate FortiGate-5005FA2 User guide

Fortinet

Fortinet FortiGate FortiGate-5005FA2 User guide

Fortinet FortiGate FortiGate-100A User manual

Fortinet

Fortinet FortiGate FortiGate-100A User manual

Fortinet FortiGate FortiGate-3810A User manual

Fortinet

Fortinet FortiGate FortiGate-3810A User manual

Fortinet FortiGate Voice Series Instruction Manual

Fortinet

Fortinet FortiGate Voice Series Instruction Manual

Fortinet FortiGate FortiGate-50B User manual

Fortinet

Fortinet FortiGate FortiGate-50B User manual

Fortinet FortiDB-1000B User manual

Fortinet

Fortinet FortiDB-1000B User manual

Fortinet FortiWiFi FortiWiFi-60B User manual

Fortinet

Fortinet FortiWiFi FortiWiFi-60B User manual

Fortinet FortiGate FortiGate-60M User manual

Fortinet

Fortinet FortiGate FortiGate-60M User manual

Fortinet FortiGate 224B User manual

Fortinet

Fortinet FortiGate 224B User manual

Fortinet FortiGate 3016B User manual

Fortinet

Fortinet FortiGate 3016B User manual

Fortinet FortiGate-200A User manual

Fortinet

Fortinet FortiGate-200A User manual

Fortinet FortiGate-3016B User manual

Fortinet

Fortinet FortiGate-3016B User manual

Fortinet FortiGate-50A User manual

Fortinet

Fortinet FortiGate-50A User manual

Fortinet FortiGate-100 Instruction Manual

Fortinet

Fortinet FortiGate-100 Instruction Manual

Fortinet FortiGate Voice Series User manual

Fortinet

Fortinet FortiGate Voice Series User manual

Popular Firewall manuals by other brands

NETGEAR FVS318 - ProSafe VPN Firewall Router installation guide

NETGEAR

NETGEAR FVS318 - ProSafe VPN Firewall Router installation guide

H3C SecPath M9000-S NSQM2FWDFG0 manual

H3C

H3C SecPath M9000-S NSQM2FWDFG0 manual

Cisco Firepower 1010 Getting started guide

Cisco

Cisco Firepower 1010 Getting started guide

NETGEAR FVS338 - ProSafe VPN Firewall 50 Router installation guide

NETGEAR

NETGEAR FVS338 - ProSafe VPN Firewall 50 Router installation guide

H3C SecPath F100-C-EI quick start

H3C

H3C SecPath F100-C-EI quick start

One Identity Safeguard 2000 Setup guide

One Identity

One Identity Safeguard 2000 Setup guide

3Com SECPATH U200-CS installation manual

3Com

3Com SECPATH U200-CS installation manual

Sophos SG 310 Mounting instructions

Sophos

Sophos SG 310 Mounting instructions

NETGEAR SRXN3205 - ProSafe Wireless-N VPN Firewall Wireless... datasheet
NETGEAR

NETGEAR SRXN3205 - ProSafe Wireless-N VPN Firewall Wireless... datasheet

Moxa Technologies NPort 6150 Series Quick installation guide

Moxa Technologies

Moxa Technologies NPort 6150 Series Quick installation guide

M86 Security M86 Web Filter user guide

M86 Security

M86 Security M86 Web Filter user guide

Lanner FW-7551SE user manual

Lanner

Lanner FW-7551SE user manual

Lanner NCA-5220 user manual

Lanner

Lanner NCA-5220 user manual

Asus AAEON FWS-2276 user manual

Asus

Asus AAEON FWS-2276 user manual

Tosibox Lock 100 quick start guide

Tosibox

Tosibox Lock 100 quick start guide

D-Link NetDefend DFL-260E Log Reference Guide

D-Link

D-Link NetDefend DFL-260E Log Reference Guide

PaloAlto Networks PA-7000 Series Hardware reference

PaloAlto Networks

PaloAlto Networks PA-7000 Series Hardware reference

AXIOMTEK NA130 series user manual

AXIOMTEK

AXIOMTEK NA130 series user manual

manuals.online logo
manuals.online logoBrands
  • About & Mission
  • Contact us
  • Privacy Policy
  • Terms and Conditions

Copyright 2025 Manuals.Online. All Rights Reserved.