Fortinet FortiToken 200BCD User manual

QuickStart Guide
FortiToken 200BCD
The FortiToken 200B is a small hardware token generator that fits on a
key-chain. Simply press the button and the FortiToken 200B generates
and displays a secure one-time password (OTP) that you enter along with
your regular password for secure authentication and access to critical
applica-tions and sensitive data.
The time remaining is shown on a circular time in 10-second increments.
After the 60 seconds is up, the password expires and the FortiToken
display turns off.
Step 1. Unpacking
Open the shipping carton and carefully unpack its contents. The carton should contain the following items:
•FortiToken 200B units
•QuickStart Guide
•Activation CD
If any item is found missing or damaged, please contact your local reseller for replacement.
Package Contents:
Step 2. Activating the FortiToken unit
Before you can successfully use the FortiToken 200BCD token, it must first be installed and activated on the FortiGate or FortiAuthenticator
platform, depending on which platform you are using as your token validation server.
Important: The FortiGate or FortiAuthenticator unit’s clock must be accurate to work properly with the FortiToken devices. It is strongly
recommended to synchronize the clock with a Network Time Protocol (NTP) server.
To activate the tokens on FortiGate units
1. Log in to the Web-based Manager of your FortiGate unit from your computer.
2. Insert the CD labeled
FortiToken 200B Activation File
.
3. Go to Authentication > Two Factor Authentication > FortiToken, select
Hard Token
as the Token Type, and click
Import
.
4. Select
Seed File
, browse to the .FTK file on the CD, and click
OK
. The loaded serial numbers will appear in the list and the user can
choose to cancel the import if desired. You can then cancel the import or continue by clicking
OK
.
5. Each FortiToken 200B will be installed and activated, and shown as
Available
in the FortiToken UI
To activate the tokens on FortiAuthenticator units
1. Log in to the Web-based Manager of your FortiAuthenticator unit from your computer.
2. Insert the CD labeled
FortiToken 200B Activation File
.
3. Go to
Authentication > Local User Management > FortiTokens
, select
Import
, and check the
Seed File
option.
4. Browse to the .FTK file on the CD and click
OK
. The loaded serial numbers will appear in the token list.
5. Each FortiToken 200B is now installed and activated, and shown as
Available
in the FortiToken UI.
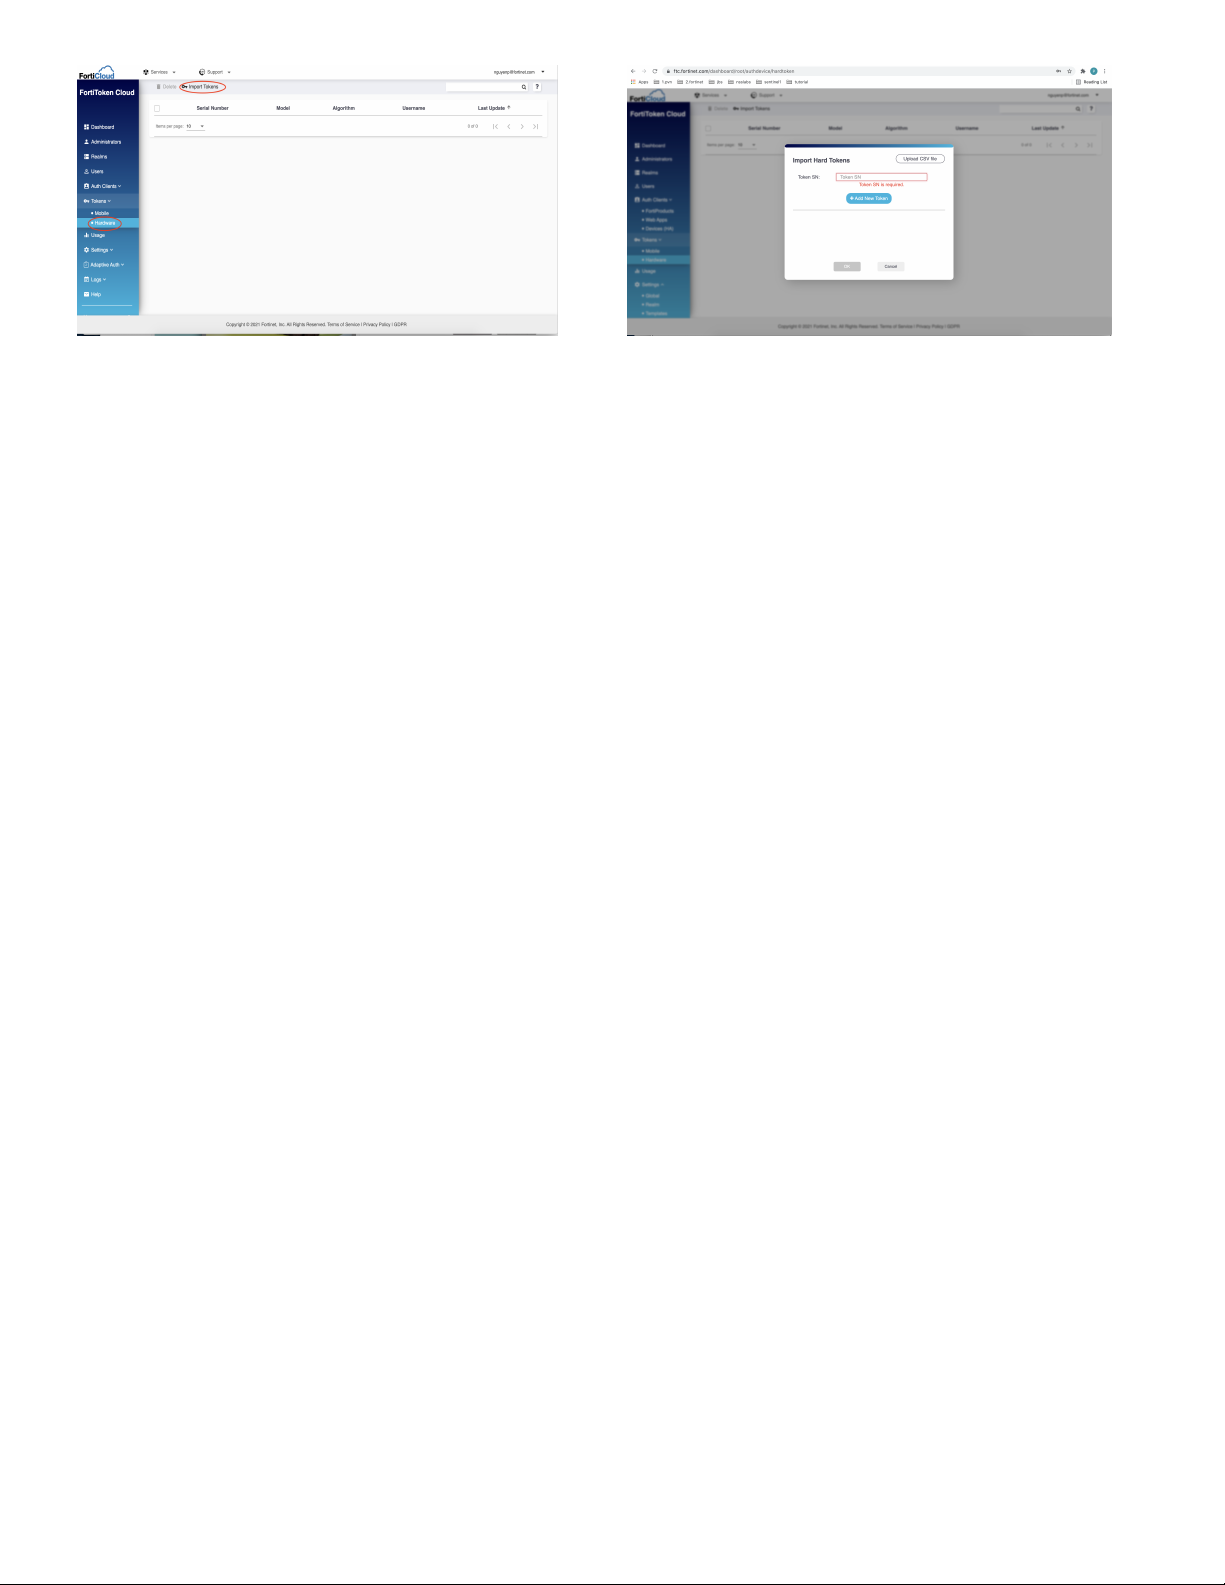
To activate one or more FortiToken units with FortiToken Cloud (FTC).
1. Open your web browser, point to https://ftc.fortinet.com, and press
Enter
key on your keyboard:
The FTC page opens as shown in Figure 1
2. Use the upper right corner to login to FTC
3. From Figure 1, click on
Hardware > Import Tokens
4. From Figure 2, "Import Hard Tokens" window pops up. Follow the steps shown on https://docs.fortinet.com/
document/fortitoken-cloud/latest/admin-guide/506312/hardware-tokens to activate tokens.
Batch-upload hard tokens
You can also batch-upload all the hard tokens you want to add at once if you have access to a .csv file that contains the serial
numbers of the hard tokens to be added.
Be sure to have the .csv file ready before starting the following procedures.
To batch-upload hard tokens:
To add hard tokens manually:
On the Hard Tokens page, click the
Import Tokens
button. The Import Hard Tokens dialog opens.
Click where it says "Token SN*", and enter the serial number of a hard token.
Click the Add New Token button (if you want to add more than one hard tokens).
Repeat Steps 2 through 3 above to add as many hard tokens as you have available.
Click OK. The Import Hard Token dialog closes, and a message pops up in the upper-right corner of the Hard Tokens page, informing you
how many hard tokens have been successfully added and how many have failed (if any) to be added. You can either click OK to dismiss the
message, or wait for a few seconds to let it automatically close itself. The serial numbers of the hard tokens that are successfully added now
appear on the Hard Tokens page.
On the
Tokens > Hardware
page, click the
Import Tokens
button. The Import Hard Tokens dialog opens.
In the upper-right corner of the dialog, click the Upload CSV file button. The typical Windows File Upload dialog opens.
Locate the .csv file in your file system, and click Open. The Windows Upload File dialog closes, and all the serial numbers of the hard tokens in
the .csv file are now added to the Import Hard Tokens dialog.
Click
OK
. The Import Hard Token dialog closes, and a message pops up in the upper-right corner of the Hard Tokens page, informing you
how many hard tokens have been successfully added and how many have failed (if any) to be added. You can either click
OK
to dismiss the
message, or wait for it to automatically close itself in a few seconds. The serial numbers of the hard tokens that are successfully added now
appear on the Hardware page.
Figure 1 - FTC Dashboard Figure 2 - Import Hard Token
Step 3. Assigning FortiTokens to Users
To assign a FortiToken unit to a user
1. Do one of the following:
•To assign a FortiToken to an administrator (super-users only), go to
System > Admin > Administrator
and select the check box for the
administrator account you want to configure, then select
Edit
from the toolbar.
•To assign a FortiToken to a regular user, go to
User > User > User
and select the check box for the user account you want to configure,
then select
Edit
from the toolbar.
2. In the dialog box, select the
Enable Two-factor Authentication
check box. Under
Deliver Token Code
by, select the FortiToken option and then
select the FortiToken serial number you want to assign to the selected user account. Select
OK
.

1. Open your web browser, point to https://ftc.fortinet.com, and press
Enter
key on your keyboard: The FTC page
opens
2. Use the upper right corner to login to FTC
Assign a hard token to a user
A hardware token shown on the Hard Tokens page without a username means that it is free or has not been assigned to any user yet. You can
assign it to any user in your FTC account.
To assign a free hard token to a user:
1. On the main menu, click
Users
. The Users page opens. See Users.
2. Identify the user of interest and click the
MFA Method
column. A pop-up list appears showing all the MFA methods that FTC supports.
3. Select
FTK
.
Delete hard tokens
The Hard Tokens page provides tools to delete hard tokens that are no longer needed. You can delete one, multiple, or all the hardware tokens at
once.
Only free (unassigned) FTK tokens can be deleted.
To delete individual hardware tokens:
1. Identify the hard token(s).
2. Select the corresponding checkbox(es).
3. Click the
Delete
button. The Delete Hard Tokens warning message appears.
4. Click
Yes
.
To delete all hardware tokens:
1. Select the checkbox in the header of the checkbox column.
2. Click the
Delete Hard Tokens
button. The Delete Hard Tokens warning message appears.
3. Click
Yes
.
To assign a FortiToken unit to a user when use with FortiToken Cloud
To log in using the FortiGate Captive Web Portal (Firewall Identity Check)
1. Connect to the captive web portal.
2. In the
Authentication Required
dialog box, enter your user name and password, then select
Continue
. The
FortiToken Required
dialog box appears.
3. Press the Start button of your FortiToken unit, type the generated token password into the
Token Code
field, and select
Continue
. You must do this
within 60 seconds while the token password is still valid.
Step 4. Logging In with FortiToken
After they have been activated and assigned to users, the FortiToken units can be used to log in securely to your network through the SSL-VPN client,
the standalone FortiClient SSL-VPN tunnel client, the FortiClient console, or the FortiGate Web-based Manager. This section explains the login proce-
dure for each method.
To log in using the SSL-VPN Client
1. In the SSL-VPN web login page, enter your user name and password and select Sign In. The login page refreshes and the FortiToken Code field
appears.
2. Press the Start button of your FortiToken unit, type the generated token password into the FortiToken Code field on the login page and then select
Login. You must do this within the 60 seconds while the token password is still valid.
To log in using the standalone FortiClient SSL-VPN tunnel client
1. Go to Start > All Programs > FortiClient > FortiClient SSL-VPN.
2. In the FortiClient SSL-VPN client, select the Connection Name from the list.
3. Enter your user name, then press the Start button of your FortiToken unit.
4. In the Password field, type your password concatenated with the generated token password. For example, if your password is
password and your token code is 123456, you would enter password123456.
5. Select Connect to initiate the connection. You must do this within 60 seconds while the token password is still valid.
To log in using the FortiClient console (IPsec VPN)
1. In the FortiClient console, go to VPN > Connections, select the connection you want to start and select Connect.
2. In the VPN Login dialog box, enter your user name and password and select OK. The login page refreshes and the FortiToken Code field appears.
3. Press the Start button of your FortiToken unit, type the generated token password into the FortiToken Code field and select OK. You must do this
within 60 seconds while the token password is still valid.

Visit these links for more information and documentation for your Fortinet product:
• Technical Documentation: http://docs.fortinet.com
• Knowledge Base: http://kb.fortinet.com
• Customer Service & Support: https://support.fortinet.com
• Training Services: http://training.fortinet.com
Copyright© 2022 Fortinet, Inc. All rights reserved. Fortinet®, FortiGate®, and FortiGuard®, are registered
trademarks of Fortinet, Inc., and other Fortinet names herein may also be trademarks of Fortinet. All other product
or company names may be trademarks of their respective owners. Performance metrics contained herein were
attained in internal lab tests under ideal conditions, and performance may vary. Network variables, different
network environments and other conditions may affect performance results. Nothing herein represents any binding
commitment by Fortinet, and Fortinet disclaims all warranties, whether express or implied, except to the extent
Fortinet enters a binding written contract, signed by Fortinet’s General Counsel, with a purchaser that expressly
warrants that the identified product will perform according to the performance metrics herein. For absolute clarity,
any such warranty will be limited to performance in the same ideal conditions as in Fortinet’s internal lab tests.
Fortinet disclaims in full any guarantees. Fortinet reserves the right to change, modify, transfer, or otherwise revise
this publication without notice, and the most current version of the publication shall be applicable.
Regulatory Compliance: FCC Class A Part 15, / CE Mark
January 20, 2022
00-000-749097-20220120
To log in using the FortiGate Web-based Manager (super-user administrators only)
1. In your web browser, enter the URL (using https) of the FortiGate unit you want to access.
2. In the
Login
dialog box, enter your user name and password and then select
Login
. The login page refreshes and the
Token Code
field
appears.
3. Press the Start button of your FortiToken unit, type the generated token password into the
Token Code
field and select
Login
. You must do this
within 60 seconds while the token password is still valid.
Note: The installed FTK200BCD tokens will have the SN prefix 'FTK211B'
Table of contents
Other Fortinet Portable Generator manuals

Popular Portable Generator manuals by other brands


Busch-Jaeger
Busch-Jaeger Busch-Infoline 1561 U operating instructions

A2Z Ozone
A2Z Ozone A-3500 operating manual

Peak Scientific
Peak Scientific Infinity XE 60 Series user manual

Westinghouse
Westinghouse iGen5000DFc quick start guide

Tektronix
Tektronix DTG5078 user manual

AA Portable Power Corp
AA Portable Power Corp MSK 320B2 user manual