Fröling FBR User manual

Installation and operating instructions
Spring blade agitator FBR
Translation of original German version of installation and operating instructions for technicians and
operators.
Read and follow all instructions and safety instructions.
All errors and omissions excepted.
M0741021_en | Edition 18/10/2021

Table of Contents
ii M0741021_en | Installation and operating instructions Spring blade agitator FBR
1 General ......................................................................................................................................................... 4
1.1 Functional description........................................................................................................................... 5
2 Safety............................................................................................................................................................ 6
2.1 Hazard levels of warnings..................................................................................................................... 6
2.2 Permitted uses...................................................................................................................................... 7
2.2.1 Permitted fuels........................................................................................................................... 8
2.3 Qualification of staff .............................................................................................................................. 9
2.3.1 Qualification of assembly staff ................................................................................................... 9
2.3.2 Personal protective equipment for assembly staff ..................................................................... 9
2.3.3 Qualification of operating staff ................................................................................................... 9
2.3.4 Protective equipment for operating staff .................................................................................... 10
2.4 Design information................................................................................................................................ 10
2.4.1 Standards................................................................................................................................... 10
2.4.2 Requirements at the installation site.......................................................................................... 11
2.5 Safety devices ...................................................................................................................................... 12
2.6 Residual risks ....................................................................................................................................... 13
3 Technology .................................................................................................................................................. 15
3.1 Dimensions ........................................................................................................................................... 15
3.2 Store sizes ............................................................................................................................................ 16
3.3 Technical specifications........................................................................................................................ 17
4 Installation.................................................................................................................................................... 18
4.1 Transport and handling......................................................................................................................... 18
4.1.1 Temporary storage..................................................................................................................... 18
4.2 Installation site ...................................................................................................................................... 18
4.2.1 Wall penetration......................................................................................................................... 19
4.3 Installing the spring blade agitator ........................................................................................................ 20
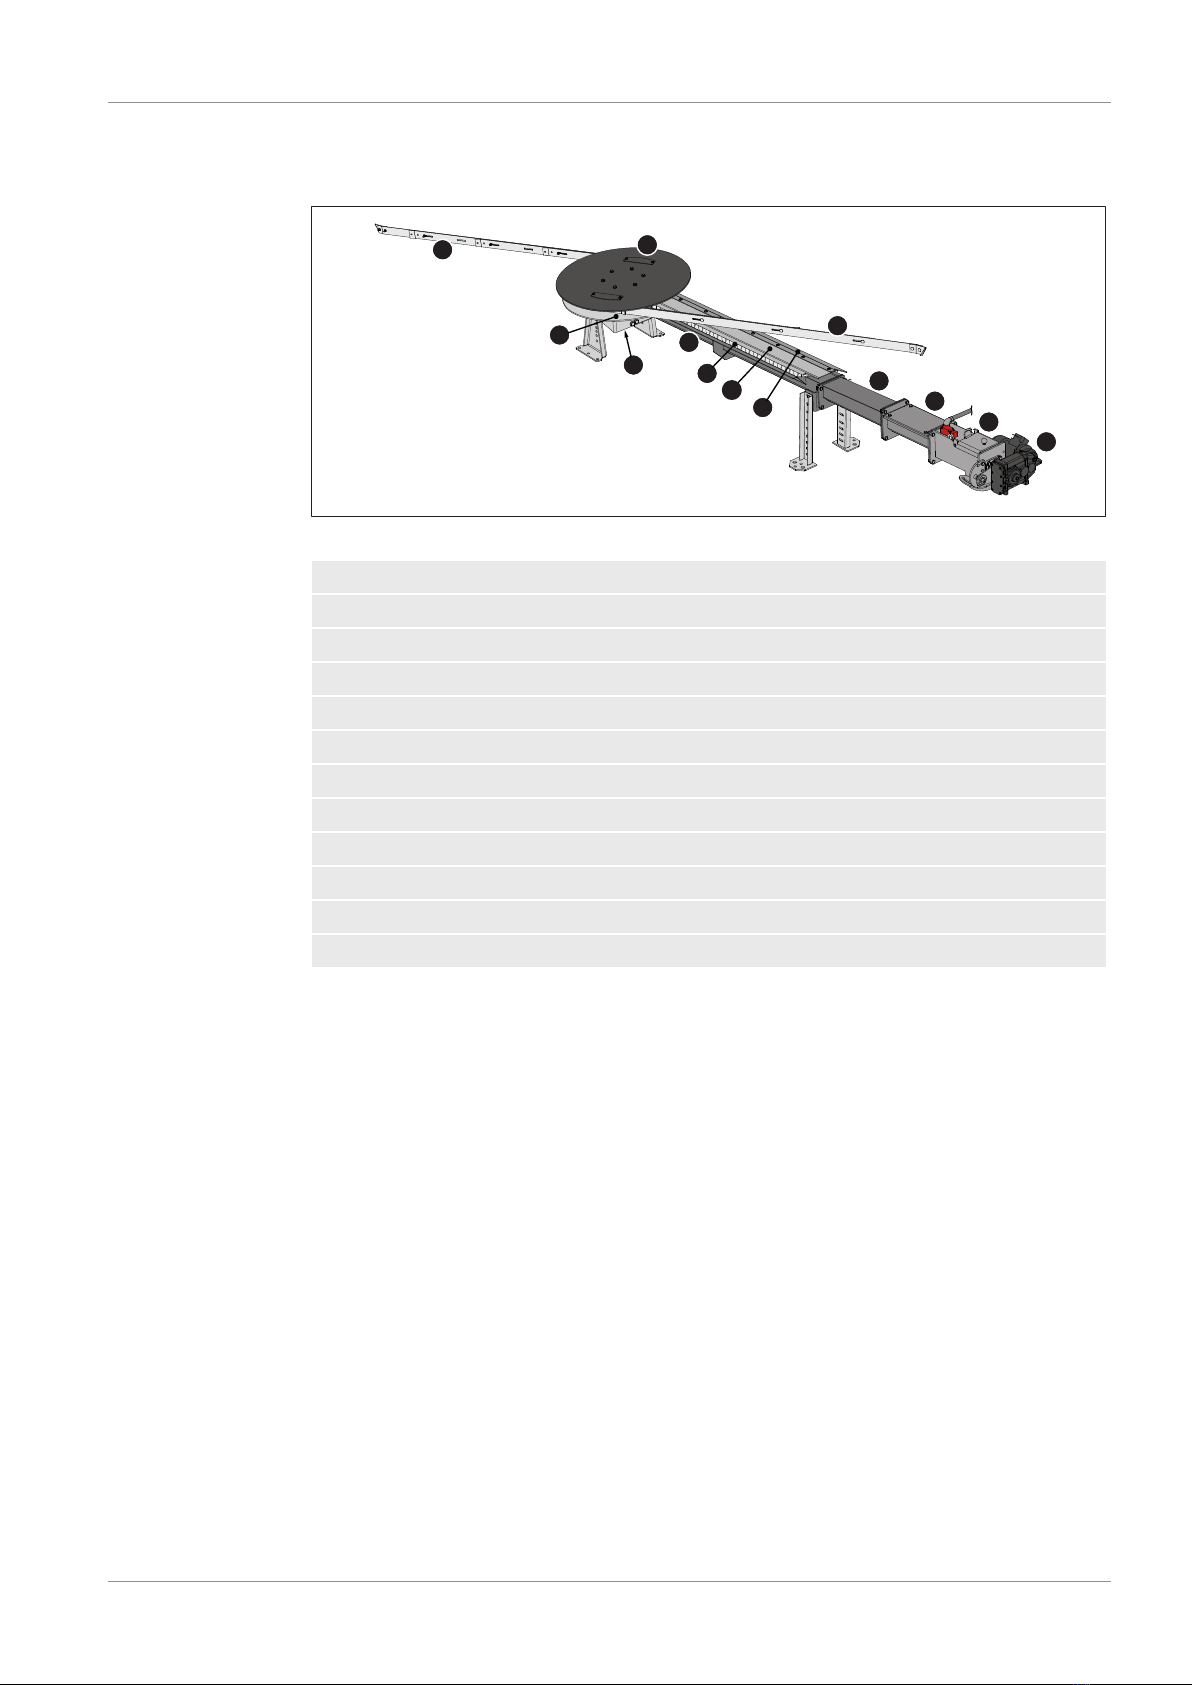
4.3.1 Materials supplied ...................................................................................................................... 20
4.3.2 Assembling the gears and feeder trough................................................................................... 21
4.3.3 Fitting the rotary agitator head................................................................................................... 24
4.3.4 Mounting the fibre shredder (optional)....................................................................................... 25
4.3.5 Fitting the upper part of gravity shaft and drive unit................................................................... 26
4.3.6 Fitting attachments..................................................................................................................... 29
4.3.7 Fitting the spring blades............................................................................................................. 30
4.3.8 Fitting adjustable feet in boiler room (optional).......................................................................... 31
4.3.9 Closing the wall penetration....................................................................................................... 31
4.3.10 Temperature monitoring device in the fuel store (TMD): ........................................................... 32
4.4 Connecting the system ......................................................................................................................... 33
4.4.1 Electrical connection.................................................................................................................. 33
4.4.2 Connecting the sprinkler system................................................................................................ 33
5 Operating the system.................................................................................................................................. 34
5.1 General information .............................................................................................................................. 34
5.2 Initial startup ......................................................................................................................................... 34
5.3 Filling/refilling the store with fuel........................................................................................................... 35
5.3.1 Loading of fuel for a partially emptied store with rotary agitator ................................................ 35
5.3.2 Loading fuel into an empty fuel store with a rotary agitator ....................................................... 36
5.3.3 Blowing in fuel for a partially emptied store with rotary agitator................................................. 36
5.3.4 Blowing in fuel for an empty store with rotary agitator ............................................................... 37
5.3.5 Drainage of fuel store................................................................................................................. 38
5.4 During operation ................................................................................................................................... 38
5.5 Decommissioning ................................................................................................................................. 39
5.5.1 Disassembly............................................................................................................................... 39

Table of Contents
M0741021_en | Installation and operating instructions Spring blade agitator FBR iii
5.5.2 Disposal ..................................................................................................................................... 39
6 Servicing the system................................................................................................................................... 40
6.1 Maintenance work by the operator ....................................................................................................... 41
6.2 Maintenance work by technicians......................................................................................................... 43
6.3 Replacement parts................................................................................................................................ 43
7 Troubleshooting .......................................................................................................................................... 44

1 | General
4 M0741021_en | Installation and operating instructions Spring blade agitator FBR
1 General
Thank you for choosing a quality product from Froling. The product features a state-of-
the-art design and conforms to all currently applicable standards and testing guidelines.
Please read and observe the documentation provided and always keep it close to the
system for reference. Observing the requirements and safety information in the
documentation makes a significant contribution to safe, appropriate, environmentally
friendly and economical operation of the system.
The constant further development of our products means that there may be minor
differences from the pictures and content. If you discover any errors, please let us know:
Subject to technical change.
Issuing a delivery
certificate This is an incomplete machine as defined by the Machinery Directive. The incomplete
machine must only be started up when it has been confirmed that the machine, in which
the incomplete machine has been installed, conforms to the provisions of Directive
2006/42/EC.
Compliance with the open provisions and verification of the correct installation must be
confirmed in the delivery certificate of the declaration of installation (included in
documentation).

General | 1
M0741021_en | Installation and operating instructions Spring blade agitator FBR 5
1.1 Functional description
The Froling discharge system “Spring blade agitator (FBR)“ consists of:
1
1
2
3
4
5
6
8
9
12
710
11
1Spring piles
2Rotary agitator head
3Intermediate plate for connecting the raised floor to the rotary agitator head
4Mitre gear
5Trough channel, open
6Discharge screw
7Cover plate for wood chips or pellets
8Raising plate for fuel store without raised floor
9Transfer channel from open to closed trough channel
10 Trough channel, closed
11 Top part of gravity shaft with gravity shaft cover and water sprinkler system
12 Geared motor
When the store is full, the rotary agitator arms are positioned at the rotary agitator plate,
reducing resistance during system operation due to the smaller diameter.
If fuel is requested using the boiler controller, the system starts and the material is
loosened by the pre-tensioned rotary agitator arms, and fed to the trough of the discharge
screw. The discharge screw feeds the material to the transfer position, where it falls
through the burn back protection system (burn back flap/rotary valve) into the stoker
screw of the boiler that is positioned below or into another feed screw.

2 | Safety
6 M0741021_en | Installation and operating instructions Spring blade agitator FBR
2 Safety
2.1 Hazard levels of warnings
This documentation uses warnings with the following hazard levels to indicate direct
hazards and important safety instructions:
DANGER
The dangerous situation is imminent and if measures are not observed it will lead
to serious injury or death. You must follow the instructions!
WARNING
The dangerous situation may occur and if measures are not observed it will lead to
serious injury or death. Work with extreme care.
CAUTION
The dangerous situation may occur and if measures are not observed it will lead to
minor injuries.
NOTICE
The dangerous situation may occur and if measures are not observed it will lead to
damage to property or pollution.

Safety | 2
M0741021_en | Installation and operating instructions Spring blade agitator FBR 7
2.2 Permitted uses
Froling’s “Spring blade agitator (FBR)” discharge system is only designed to discharge
fuels from suitable stores. Only use fuels specified in the “Permitted fuels” section.
The unit should only be operated when it is in full working order. It must be operated in
accordance with the instructions, observing safety precautions, and you should ensure
you are aware of the potential hazards. The inspection and cleaning intervals in the
operating instructions must be observed. Ensure that any faults which might impair safety
are rectified immediately.
The manufacturer or supplier is not liable for any damage resulting from non-permitted
uses.
Only original spare parts or specific alternative spare parts authorised by the
manufacturer may be used. Any kind of change or modification made to the product will
invalidate the manufacturer’s conformity with the applicable guideline(s). In such cases,
the product will need to undergo new hazard evaluation procedures by the operator. The
operator will then be fully responsible for the declaration of conformity according to the
valid guideline(s) for the product and will need to issue a corresponding declaration for
the device. This person will then assume all of the rights and responsibilities of a
manufacturer.
DANGER
If the device is used incorrectly:
Incorrect use of the system can cause severe injury and damage.
When operating the system:
rObserve the instructions and information in the manuals
rObserve the details on procedures for operation, maintenance and cleaning, as well
as troubleshooting in the respective manuals.
rAny work above and beyond this (e.g. servicing) must be carried out by a heating
engineer approved by Fröling Heizkessel- und Behälterbau GesmbH or by Froling
customer services

2 | Safety
8 M0741021_en | Installation and operating instructions Spring blade agitator FBR
2.2.1 Permitted fuels
Wood chips
Designation as per
EN ISO 17225-4
Description
M20 Water content max. 20%
M30 Water content max. 30%
M35 Water content max. 35%
P16S Main proportion (at least 60% mass portion): 3.15–16 mm, max.
length of 45 mm, used to be fine wood chips G30
P31S Main proportion (at least 60% mass portion): 3.15–31.5 mm, max.
length of 150 mm, used to be medium-sized wood chips G50
Note on standards EU: Fuel acc. to EN ISO 17225 - Part 4: Wood chips class A2 / P16S-P31S M35
Additional for
Germany:
Fuel class 4 (§3 of the First Federal Emissions Protection Ordinance
(BimSchV) in the last amended version)
Wood pellets
Wood pellets made from natural wood with a diameter of 6mm
Note on standards EU: Fuel acc. to EN ISO 17225 - Part 2: Wood pellets class A1 / D06
and/or: ENplus / DINplus certification scheme
General note:
Before refilling the store, check for pellet dust and clean if necessary.

Safety | 2
M0741021_en | Installation and operating instructions Spring blade agitator FBR 9
2.3 Qualification of staff
2.3.1 Qualification of assembly staff
CAUTION
Assembly and installation by unqualified persons:
Risk of personal injury and damage to property
During assembly and installation:
rObserve the instructions and information in the manuals
rOnly allow appropriately qualified personnel to work on the system
Assembly, installation, initial startup and servicing must only be carried out by qualified
personnel:
▪ Heating technicians/building technicians
▪ Electrical installation technicians
▪ Froling customer services
The assembly staff must have read and understood the instructions in the documentation.
2.3.2 Personal protective equipment for assembly staff
You must ensure that staff have the protective equipment specified by accident
prevention regulations!
▪ During transport, erection and installation:
- wear suitable work wear
- wear protective gloves
- wear safety shoes (min. protection class S1P)
2.3.3 Qualification of operating staff
CAUTION
If unauthorised persons enter the Storeroom:
Risk of personal injury and damage to property
rThe operator is responsible for keeping unauthorised persons, in particular children,
away from the system.
Only trained operators are permitted to operate the unit. The operator must also have
read and understood the instructions in the documentation.

2 | Safety
10 M0741021_en | Installation and operating instructions Spring blade agitator FBR
2.3.4 Protective equipment for operating staff
You must ensure that staff have the protective equipment specified by accident
prevention regulations!
▪ For operation, inspection and cleaning:
- suitable work wear
- protective gloves
- sturdy shoes
2.4 Design information
Carrying out modifications to the system and changing or disabling safety equipment is
prohibited.
Always comply with all fire, building and electrical regulations when installing and
operating the system, in addition to following the assembly and operating instructions and
mandatory regulations that apply in the country of use.
2.4.1 Standards
The system must be installed and commissioned in accordance with the local fire and
building regulations. The following standards and regulations should be observed in any
case:
ÖNORM / DIN EN 60204 Safety of machines; Electrical equipment of machines, Part 1:
General requirements
TRVB H 118 Technical directives for fire protection/prevention (Austria)
ÖNORM H 5170 Construction and fire protection requirements (Austria)
ÖNORM H 5190 Heating systems - Acoustic insulation
EN ISO 13857 Safety of machines; Safety distances for maintaining a safe distance
from hazardous areas

Safety | 2
M0741021_en | Installation and operating instructions Spring blade agitator FBR 11
2.4.2 Requirements at the installation site
▪ Protect the store against all weather conditions.
▪ Protective structures must be designed in accordance with the applicable standards
and regulations
Information about the fuel store
NOTICE!The fuel store plate provided must be affixed in a conspicuous place in
the access area of the store
When FILLING the fuel store, observe the system DOCUMENTATION.
The filling procedures may vary depending on the discharge system, type of fuel and fill
level of the fuel store. Only use fuels permitted according to the boiler’s operating
instructions.
SWITCH OFF the HEATING AND FEED SYSTEM before ENTERING the fuel store.
Risk of injury due to moving parts and automatic startup. Shut off the feeder unit before
entering the fuel store and secure it so that it cannot be switched on again. There is a
further risk of injury from the uncontrolled rotation of spring-loaded components. These
must be secured during work.
There is a risk of carbon monoxide poisoning in the pellet stores. Adequately ventilate the
store before entering (at least 15 mins.). Only enter the store under the supervision of a
second person. While in the store, keep the door open and use a dust mask! There is a
risk of collapse and being buried alive as a result of cavity formation in the store.
Therefore, do not enter the fuel area!
Slick surfaces in the fuel store present a slipping hazard and fuel supply points present a
risk of falling.
As a rule, personal protective equipment (work clothing, protective gloves, sturdy shoes)
should be worn when working in the store and on the conveyor.
Unauthorized access prohibited! Keep children away! Design the fuel store in such a way
that it is safe to access and keep it locked. Keep the key in a safe place. No fire, open
flames or smoking! Protect the fuel from moisture.
Affix this notice in a conspicuous place in the access area of the fuel store.

2 | Safety
12 M0741021_en | Installation and operating instructions Spring blade agitator FBR
2.5 Safety devices
Safety equipment Safety function
Limit switch for top of gravity
shaft:
Protection against access to the danger area of the feed/
discharge screw when the system is switched on
rIf the inspection cover is opened, the system is switched off
via the limit switch
ÄThe power supply remains switched on
Burn back flap: The burn back protection system (BPS) is part of the boiler and
is located directly below the top part of the gravity shaft. During
the heating up phase, after loading has taken place and in the
event of a fault, it reliably disconnects the discharge and infeed
devices, preventing fire from spreading to the fuel store.
rDepending on the design of the system, a burn back flap or a
rotary valve is fitted.
Rotary valve:
Water sprinkler system: Self-activating extinguisher system to limit burn back around the
top of the gravity shaft.
If the temperature in the top of the gravity shaft rises above
95°C, the valve of the sprinkler system opens, water flows out
and prevents the fire from spreading to the fuel store.
TMF: Temperature monitoring device in the fuel store (as per TRVB
H118, Austria only) which activates the customer’s alarm(s)
when the temperature in the fuel store exceeds 70°C.

Safety | 2
M0741021_en | Installation and operating instructions Spring blade agitator FBR 13
2.6 Residual risks
DANGER
When working on rotary agitator arms:
Serious injuries possible from pre-tensioned rotary agitator arms!
When working on the rotary agitator arms, you must therefore:
rLoosen the tension in the rotary agitator arms, or secure them so they cannot spring
back in an uncontrolled way before dismantling them
DANGER
When working on the unit with a live power supply:
Serious injury possible due to automatic startup!
When working on the system or in the store, it is essential that the five safety directives
are followed:
rDisconnect all poles on all sides
rSecure so that it cannot be switched on again
rCheck that there is no power
rEarth and short circuit
rCover any adjacent live parts and limit area of risk
NOTICE
Filling the store when the discharge system is switched off
Equipment damage hazard.
Due to the high resistance from the weight of the fuel on the rotary agitator arms, the
system cannot be started. The drive would be overloaded
rTake the following precautions:
ÄThe discharge system must be switched on during filling
Filling the store with fuel
NOTICE
If the rotary agitator arms touch the fuel store wall:
damage to equipment may occur
If the structural layout means that the rotary agitator arms come into contact with the fuel
store wall:
rrotary agitator arms can dislodge pieces of plaster
rPieces of wall or plaster that have broken off can block the discharge system or
disrupt the material feed into the boiler, causing a system failure.
ÄIf this happens:

2 | Safety
14 M0741021_en | Installation and operating instructions Spring blade agitator FBR
rFit an approx. 300 mm high covering made of sheet metal or hardwood to the fuel
store wall.
ÄFroling offers a ready-made wall protection pack for this purpose.
The staff at Froling will be happy to advise you.
NOTICE
If non-permitted fuel types are used:
Non-standard fuels can cause stiffness and block the system, resulting in the
failure/breakage of components.
Therefore:
rOnly use fuels specified in the “Permitted uses” section of this manual.

Technology | 3
M0741021_en | Installation and operating instructions Spring blade agitator FBR 15
3 Technology
3.1 Dimensions
Item Description FBR 110 FBR 150
WWidth – trough channel 140mm 200 mm
Diameter – screw 110 mm 150 mm
DDiameter - Spring blade Ü "Store sizes" [}16]
L1 Length – open trough
L2 Length – closed trough Transfer channel (L = 600 mm) + connected channels,
which are available in variable lengths from 100 mm
L3 Length – dosing screw Determined during planning of the store
αGradient angle 0 – 15° (wood chips)
0 – 5° (pellets)
NOTICE
Operating the discharge system with a gradient angle > 15°
The mitre gear can break due to insufficient lubrication!
When installing the discharge system, you should therefore ensure:
rWhen operating with wood chips do not exceed a gradient angle α of 15°
rWhen operating with pellets do not exceed a gradient angle α of 5°
ÄThe rotary agitator should always be fitted as flat as the place of installation
allows

3 | Technology
16 M0741021_en | Installation and operating instructions Spring blade agitator FBR
3.2 Store sizes
The spring blade diameter and the length of the open trough vary depending on the
size of the store. The following table shows the relevant dimensions:
Store length in screw direction
≤ 2.0 m ≤ 2.5 m ≤ 3.0 m ≤3.5 m ≤ 4.0 m ≤ 4.5 m ≤ 5.0 m
Nominal diameter [mm] 2000 2500 3000 3500 4000 4500 5000
Spring blade diameter (D)1)
[mm]
2400 2950 3450 4000 4500 5050 5600
Open trough (L1) [mm] 795 1045 1295 1545 1795 2045 2295
1. The spring blades have a certain excess to ensure optimum use of the fuel store.
A
rThe nominal diameter of the discharge must be selected according to the lateral
length (A) of the space that runs parallel to the feed screw.
rThe discharge must be positioned so that the shear edge (transition from open to
closed trough) is at least 200 mm away from the wall.

Technology | 3
M0741021_en | Installation and operating instructions Spring blade agitator FBR 17
3.3 Technical specifications
Description T4e 20-60 T4e 80-110 T4e 130-180 T4e 200-350
Screw diameter 110 mm 150 mm
Drive motor -
feed screw
Power
supply
400 VAC / 50 Hz
Power 0.25 kW 0.37 kW 0.25 kW 0.55 kW
Output speed, gears 4-5 rpm 10-11 rpm 4-5 rpm 10-11 rpm
Safety switch 24 VDC
Description TM 150-320
TI 350
(pellets)
TM 150
(wood chips)
TM 220-320
TI 350
(wood chips)
Screw diameter 110 mm 150 mm
Drive motor -
feed screw
Power
supply
400 VAC / 50 Hz
Power 0.25 kW 0.55 kW
Output speed, gears 4-5 rpm 10-11 rpm
Safety switch 24 VDC

4 | Installation
18 M0741021_en | Installation and operating instructions Spring blade agitator FBR
4 Installation
4.1 Transport and handling
The discharge system is part-assembled and comes packed on a pallet.
rFollow the transport instructions on the packaging!
A door should be provided in the store or a ceiling opening in the silo for bringing in the
unit
rObserve the stirring head diameter of 900 mm!
To prevent damage:
rTransport components, particularly drive components, with care
4.1.1 Temporary storage
If the system is not going to be assembled immediately:
rStore components at a protected location, which is dry and free from dust
ÄDamp can lead to damage to individual parts, particularly in the motor!
4.2 Installation site
When planning the fuel store, you should observe the following design information:
1
2
34
5
6

Installation | 4
M0741021_en | Installation and operating instructions Spring blade agitator FBR 19
Store detail Design information
1Walls and
ceilings
The walls and ceilings of the store and the boiler room must be fire-proof (REI
90) in compliance with local regulations
2Hole in
wall
Do not fix or cement the transfer trough and rotary agitator duct to the
brickwork as this can create a bridge transferring all mechanical noise and
vibrations to the brickwork. For this reason, fill any gaps around holes made in
walls with insulating material as per EN 1366-3 and EN 13501-2.
For dimensions of the opening see “Hole in wall”
3Boarding the
store door
The store door must be a fire door with an EI230-C fire resistance rating; it
must have a seal. Wooden boards should also be fitted on the interior of the
store so that the fuel does not press against the door.
4Inspection
opening
Maintenance opening with class EI290-C fire resistance rating (e.g. chimney
door) immediately over the hole in the wall for easy clearance of any
blockages from oversized material around the shear edge of the discharge
screw. The inspection opening must be designed in such a way that it can only
be opened with a tool. The operator must highlight residual risks at the
inspection opening.
5Side wall
protection
If the structure of the store means that the arms come into contact with the
wall (rectangular room), we recommend that you fit an approx. 300 mm high
covering made of sheet metal or hardwood to the wall of the store. This
prevents pieces of the wall and plaster from breaking off and blocking the
discharge system.
6Raised
floor
This prevents material from remaining below the rotary agitator arms. This
material would decay, and this could affect the heating value. For this reason,
we recommend that the customer installs a raised floor. The construction
should be dimensioned so that the raised floor is not deformed under the static
load of the fuel. The raised floor must also be self-supporting, and it should not
be supported by the screw channel.
4.2.1 Wall penetration
αβ
s
Section - Side view: Section - Top view
Before installing the rotary agitator, the customer must provide a wall penetration for the
trough. The dimensions of the opening are calculated from the wall thickness (s) and the
angle of the trough to the wall (β) or the angle of inclination (α) of the entire system.
Experience indicates that an opening of 500 mm x 500 mm is sufficient. You should also
note that the trough must not be connected to the wall, and that it should be cladded in
elastic at the end.

4 | Installation
20 M0741021_en | Installation and operating instructions Spring blade agitator FBR
4.3 Installing the spring blade agitator
4.3.1 Materials supplied
12x spring piles 13 Intermediate plate
2Top part of gravity shaft 13a 2x cover plates
(for FBR 150)
3Torque support 14 Support in the boiler room (option)
4Geared motor 15 Adjustable feet
5Feed screw 15a Shorter adjustable feet
(optional for horizontal installation)
6Trough cover - wood chips
(standard)
16 Gear supports
7Trough cover - pellets (optional) 16a Shorter gear supports
(optional for horizontal installation)
8Raising plate for discharge without
raised floor
17 Extensions for gear supports (optional)
9Trough open (store side) 18 Mitre gear
10 Transfer channel (hole in wall) 19 Spacer for rotary agitator head (for FBR
150)
11 Trough closed (boiler room side) 20 Accessories package
12 Rotary agitator head
Table of contents
Other Fröling DC Drive manuals
Popular DC Drive manuals by other brands

Emerson EMC
Emerson EMC DX-202 manual

Grundfos
Grundfos MGE 71 Series Installation and operating instructions

Danfoss
Danfoss VLT HVAC Drive FC 102 instructions

Danfoss
Danfoss VLT FC51 Design guide

TOX PRESSOTECHNIK
TOX PRESSOTECHNIK Powerpackage Q Series Original operating instructions

Lenze
Lenze EPL10200 Mounting instructions