DALI DT8, CCT : DALI Device type 8
Dieses Produkt verfügt über eine DALI-Adresse und einen 2-Kanal-Ausgang mit
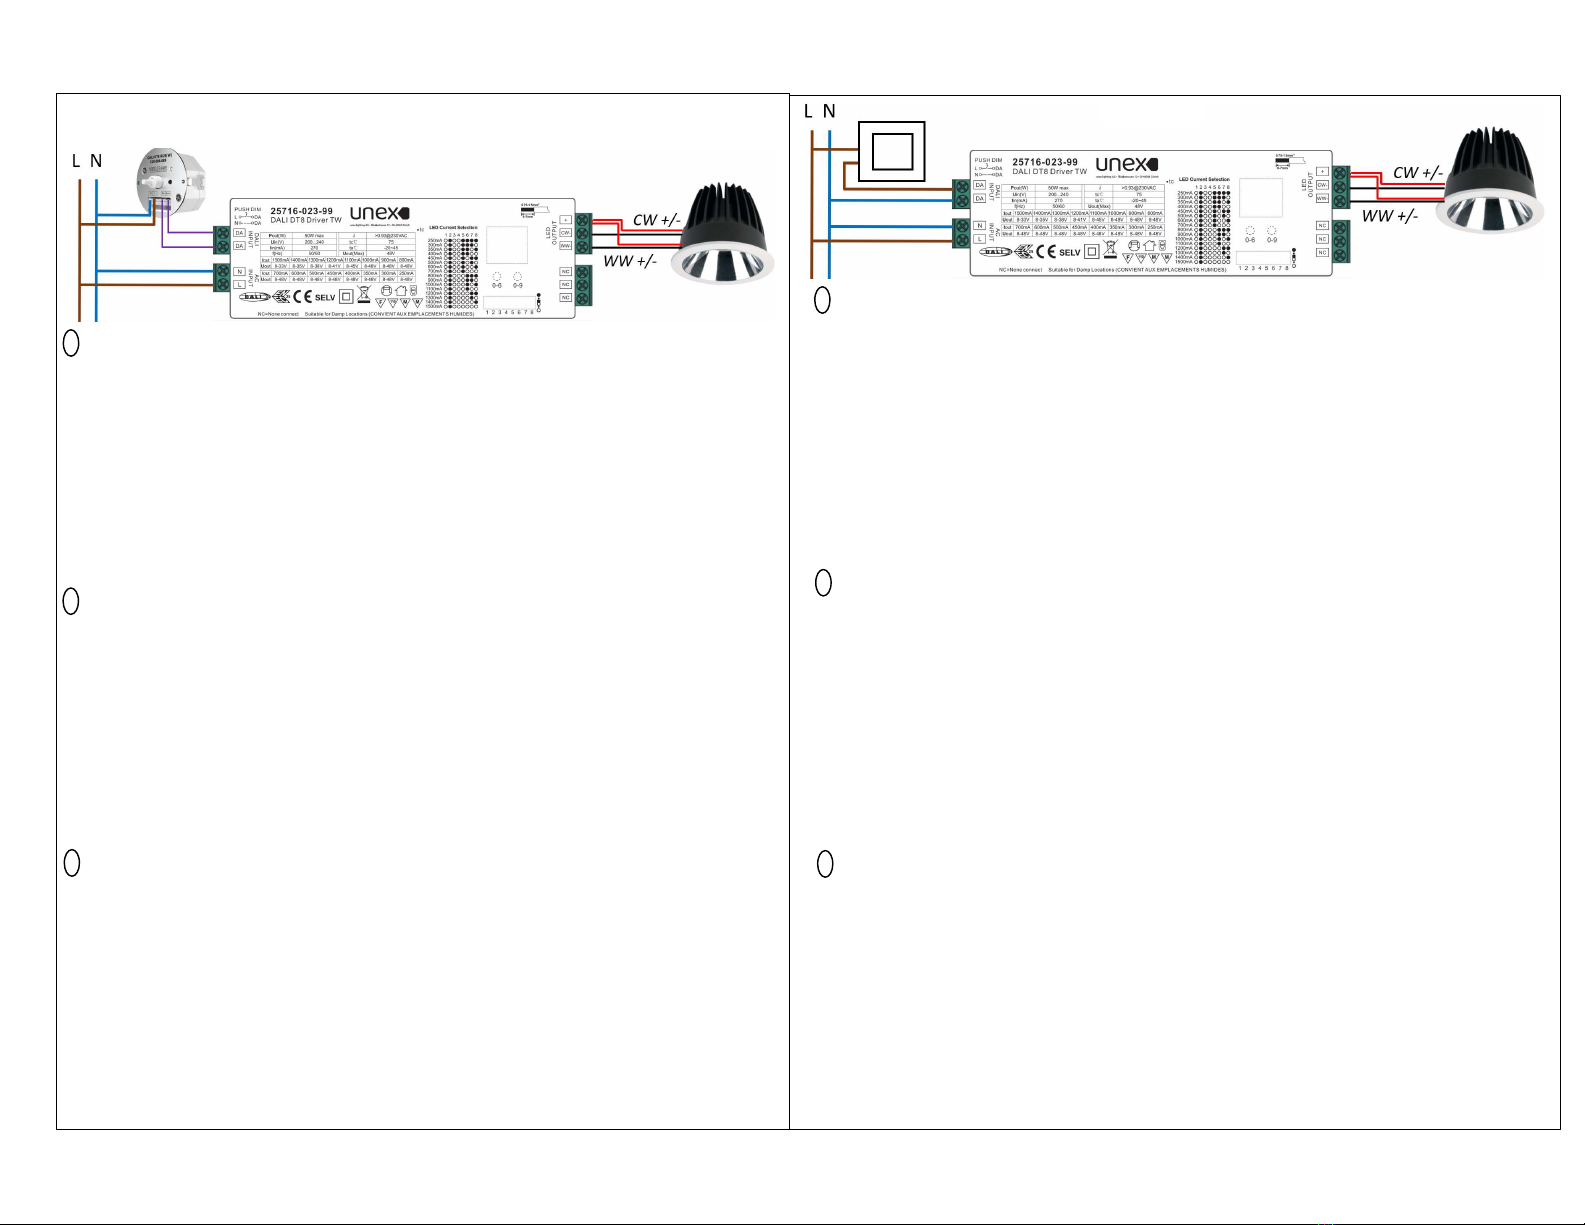
max. gesamt 50W.
Die Bestromung kann eingestellt werden mittels DIP Switchs von 250mA bis zu
1500mA. Bitte die DIP switch im ausgeschalteten Zustand einstellen.
Adressierung:
1. Halten Sie eine Taste gedrückt, bis die Nummer blinken
2. Drücken Sie eine der beiden Tasten, um ein Digit auszuwählen.
Eine Adresse von 0 bis 63 kann gesetzt werden.
3. Halten Sie eine Taste gedrückt, um die Adresse zu speichern.
4. Wenn der Treiber durch einen Master angesteuert wird, eine Adresse wird
automatisch angegeben und der Treiber zeigt “AU” auf dem Display an.
This product is designed with one DALI address and 2-channels output with a
max of total 50W.
Output current can be selected from 250mA to 1500mA by DIP switches,
please manipulate the DIP switches only when the power is off.
Address set up:
1. Press and hold any of the two buttons until numbers on the display flash.
2. Press any of the two buttons to change a number.
An address from 0 to 63 can be set.
3. Press and hold any of the two buttons to set save the address.
4. If the unit is controlled by a DALI Master, an address will be automatically
given and the unit will display “AU”.
Ce produit fonctionne avec une adresse DALI et 2 canaux de sortie pour
une puissance totale max de 50W.
Le courant peut être sélectionné de 250 à 1500mA via des DIP switches
qu’il convient de manipuler hors tension.
Adressage:
1. Maintenir un des deux boutons appuyé jusqu’à ce que l’écran clignote
2. Appuyer sur un bouton pour changer un nombre.
Une adresse de 0 à 63 peut être choisie.
3. Appuyer et maintenir un des deux boutons enfoncés pour sauvegarder.
4. Si l’alimentation est pilotée par un contrôleur DALI de type Master,
une adresse sera automatiquement assignée et l’alimentation indiquera “AU”.
Maximaler Abstand zwischen dem Taster und dem Treiber sind 15m.
Klicken Sie auf den Taster, um das Licht ein- oder auszuschalten.
Halten Sie die Taste gedrückt, um das Licht zu dimmen.
Drücken Sie zweimal, um in Farbwechseln Modus zu wechseln.
Halten Sie die Taste gedrückt, um die Lichtfarbe zu andern.
Drücken Sie zweimal, um wieder in den Dimm-Modus zu wechseln, wenn nötig.
Speicherfunktion vor dem Ausschalten (immer der letzte Status ist gespeichert).
Es können bis zu 10 Treiber synchronisiert werden:
1. Drücken Sie lange auf den Taster (alle Leuchten sollten eingeschaltet sein).
2. Anschliessend einen Kurzdruck (alle Leuchten sollten sich ausschalten).
3. Drücken Sie nochmals lange auf den Taster, (bis alle Leuchten auf 100% sind).
4. Die Treiber laufen jetzt synchron.
Max distance between the push button and the driver 15m.
Short press the button to switch on/off the light.
Press and hold the button to dim the light.
Double press on the button to switch into colour change mode.
Press &hold the button to change colours.
Double press on the button to switch into dim mode again if required.
Memory function before power off (memorize always the last status).
Up to 10 LED Driver can be synchronised:
1. Please long press on the push button (make sure all lights are on).
2. Then short press on the push button (to switch all off).
3. Long press until lights are all at 100%.
4. All drivers are now synchronised.
Distance maximum entre le bouton poussoir et le convertisseur LED : 15m.
Appuyez brièvement sur le bouton pour allumer / éteindre.
Appuyez et maintenez enfoncé le bouton pour réguler l’intensité.
Appuyez deux fois pour passer en mode changement de couleurs.
Appuyez et maintenez enfoncé le bouton pour changer la couleur.
Appuyez deux fois pour revenir en mode changement d’intensité si besoin.
Fonction mémoire avant la mise hors tension (garde toujours le dernier état).
Il est possible de synchroniser jusqu'à 10 convertisseurs :
1. Appui long sur le bouton (assurez-vous que toutes les lumières sont allumées)
2. Appui bref (pour tout éteindre)
3. Appui long jusqu’à ce que tout soit à 100%.
D
E
F
E
F


