2
REPAIR
MAINTENANCE
OPERATION - PRIMING THE PUMP
WARNING: DO NOT RUN THE PUMP BEFORE PRIMING IT, SINCE THE SEAL AND IMPELLER COULD BE
PERMANENTLY DAMAGED.
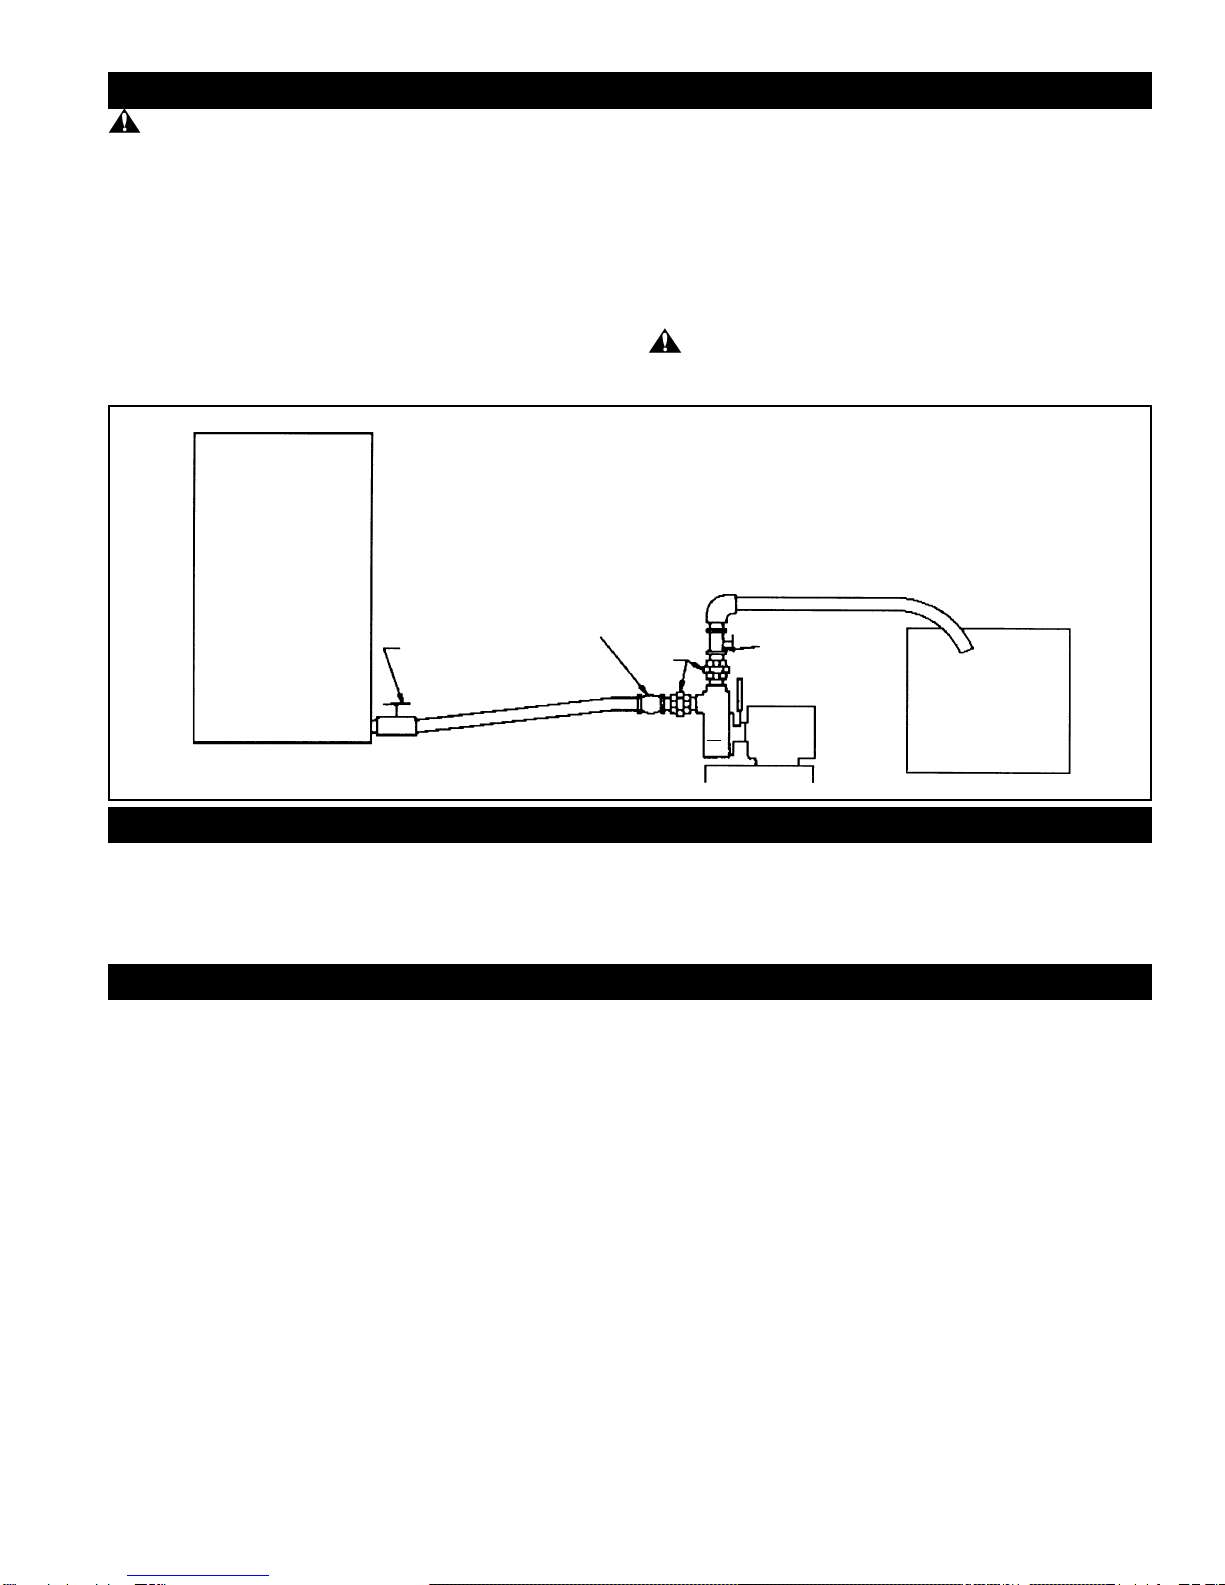
Refer to Fig. 1.
a) PREPARINGTHEENGINE:Followtheenginemanufacturer's
instructions before operating.
b) PRIMING THE PUMP: Remove the priming plug and fill the
casing with the same liquid that you will be pumping and
replace plug. If the pump is below the level of the liquid that
willbepumped(floodedsuction),thepumpwillautomatically
fill up when the valves are open. Then start the pump.
NOTE: DO NOT OPERATE THIS PUMP DRY!
c) START-UP: In a 'flooded suction' situation, the pump will
discharge the liquid almost immediately. If the suction line is
abovetheliquidlevelbeingpumped,itwilltakeafewminutes
to lift the water to the casing and then to discharge it. If the
suction line is quite long, the pump may overheat before the
liquid in the suction line reaches the pump. In this case, turn
the pump off and drain the casing. Wait a few minutes for
the seal in the pump casing to cool down.Then replace the
drainplugandrefillthecasingwiththesameliquidthatwillbe
pumped. Replace the priming plug and restart the pump.
WARNING
If the overheated casing is filled while hot, damage to the seal
will occur.
Fig. 1
Liquid Fertilizer
Storage Tank
Liquid Fertilizer
Sprayer Tank
Tank Gate Valve Check Valve
Discharge Line
Gate Valve
Union
Pump
&
Engine
TYPICAL INSTALLATION (transferring liquid fertilizer)
These pumps can also be used for basic dewatering purposes.
Suction Line
(Upwards Slope)
a) ENGINE:Referto the enginemanufacturer'sinstructionsfor
any maintenance requirements.
b) FLUSHING:Ifyouarepumpingchemicals,fertilizersorcorrosive
liquids, flush the pump after each use. Remove the drain and
priming plugs and fill the casing several times with clean water.
c) DRAINING: If the pump is subject to freezing temperatures,
drainthe pump byremoving the drainplug and primingplug.
After liquid has drained, run the pump for a few seconds to
get the last liquid out of the impeller. Make sure the suction
and discharge lines are free of liquid.
Refer to Fig. 2.
DISASSEMBLY:
1) Drain the pump (see Draining under Maintenance).
2) Disconnect the pipes/hoses.
3) To remove the casing (1) remove the 4 bolts from the
adapter.
4) Toremovetheimpeller(2),usea rubber mallet to tap it loose
and unscrew the impeller in a counter-clockwise direction.
5) To remove the seal (8), simply pull it off of the shaft. The
sleeve (10) will slide off with it.
6) Remove the adapter (6), by removing the 4 bolts.
7) Toremovetheceramicseat(9),pressitoutfromthebackside
of the adapter with your thumbs.
8) Remove the rubber cup (4) from the adapter.
9) DO NOT REMOVE THE FLINGER (11) unless it needs to
be replaced.
REASSEMBLY:
1) Clean all parts thoroughly before reassembly.
2) Apply liquid soap to the outer surface of the rubber cup (4)
on the stationary seat (9). Insert the stationary seal seat into
thesealadapter plate.Makesurethatthe smooth faceofthe
ceramic seat is facing towards the front of the pump. Push
this assembly into the adapter, using hand pressure only.
3) Assemble the adapter (6) and handle (5) onto the engine
using the bolts and washers. Make sure that the flinger (11)
is on the shaft.
NOTE: There may be more than one position that the
adapter can be bolted to the engine but only one
position is correct (refer to Fig. 3).
IMPORTANT: Be careful not to damage the ceramic seat or
shaft, when assembling the adapter to the engine.
4) Replace the Seal:
-Thesleeve(10)mayhaveachamferontheinsidediameter
at one end only, or at both ends. If the chamfer is only on
oneend,thechamferendmustbetowardstheengine.Slide
it onto the shaft.
- Make sure both faces of the seal are clean, then slide seal
(8) onto the sleeve.
5) Screw on the impeller (2), clockwise.6) Replacethegasket
(3) and the washers. Then assemble the casing onto the
adapter. Use thread locking / sealing compound on casing
bolts to prevent leaks.
PRECAUTION: Checktoseethattheimpellerrotatesfreely
in the casing.
7) Reconnect the suction and discharge lines. Use a thread
compound and make sure that the connections are tight.


