Freemie Single or Double User manual

IMPORTANT
Read this manual prior to use
User Manual
Breast Pump Collection System
Hands-free, Concealable
Pump anytime, anywhere, around anyone.
This Freemie Breast Pump Collection System is a single user, reusable system that you may use
throughout the first year of your baby’s life, and beyond. This manual contains important information
for the proper sanitization, use and care of your Freemie system. Please visit our website,
www.Freemie.com, for customer service and all your spare parts needs.
Single or Double
Use only with
an approved
compatible pump
Compatible
*pump not included

Table of Contents
Important Safety Instructions
Do’s And Don’ts ………………………………………………………………………… 2
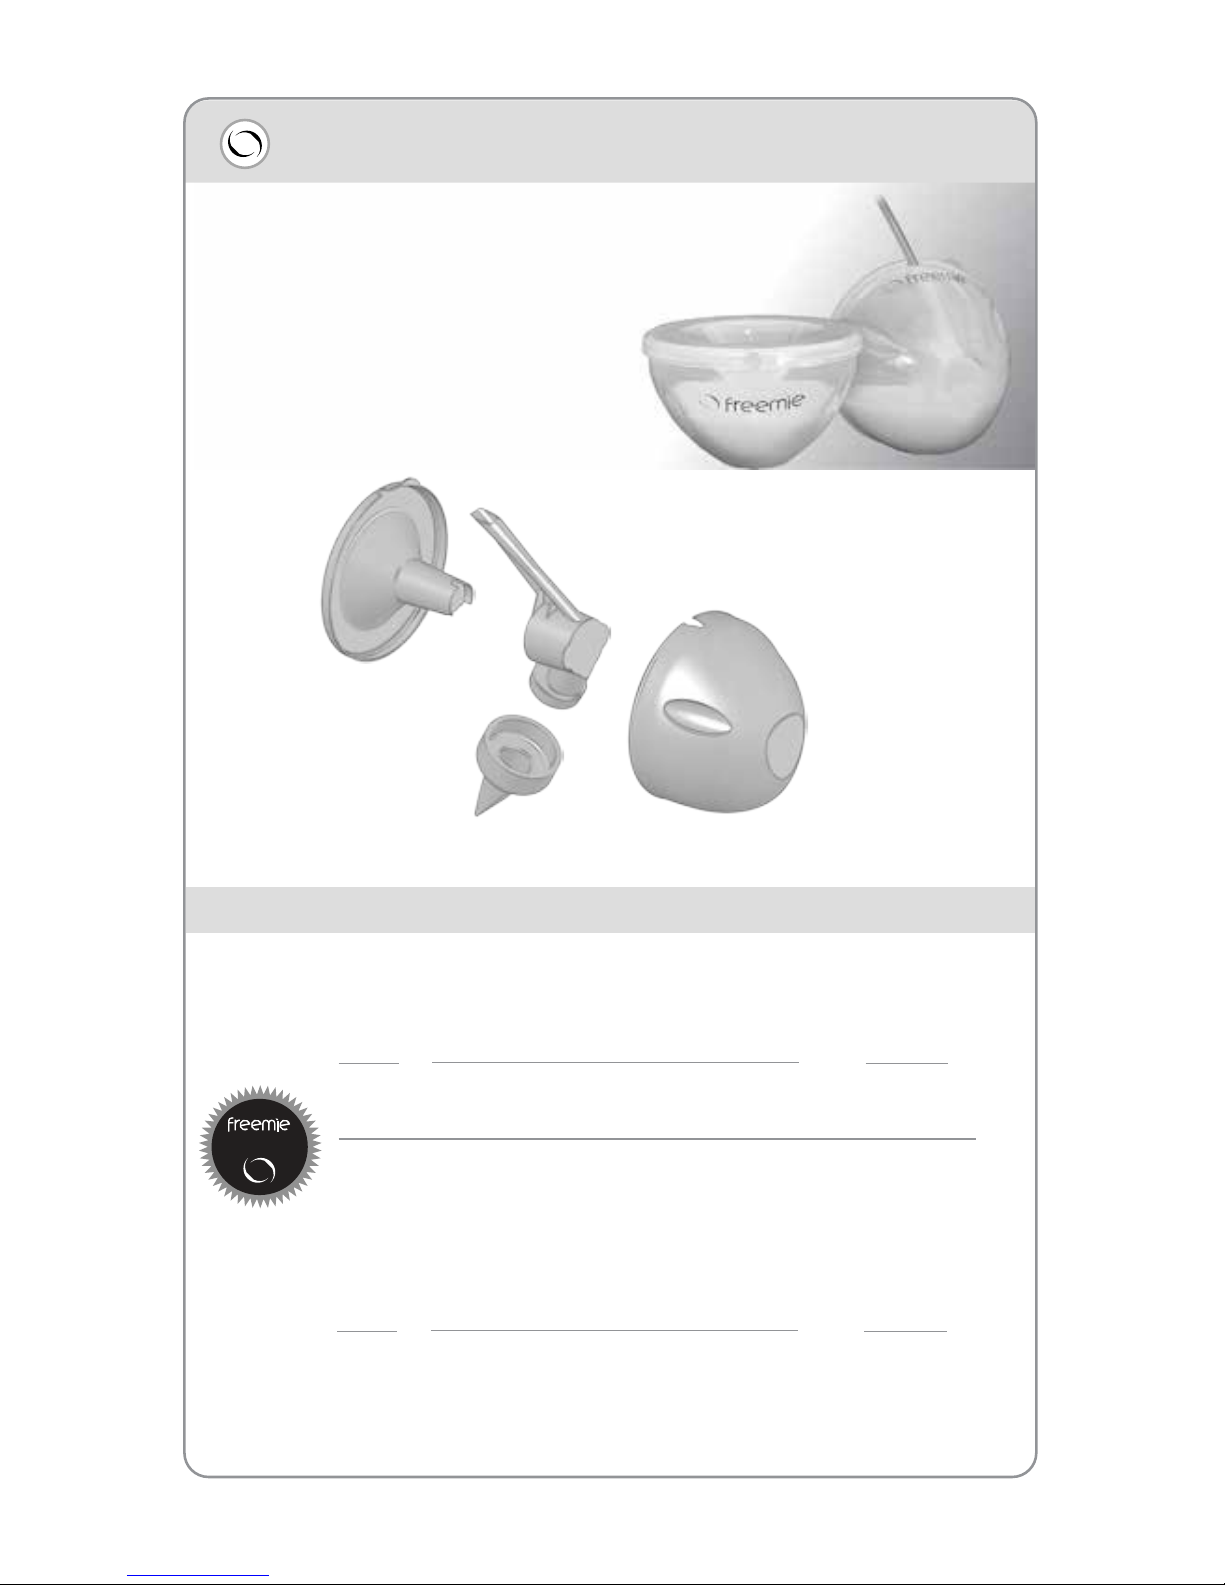
Freemie Collection System
Parts Included……………………………………………………………………………… 3
Preparing Freemie For First Use ………………………………………………………… 4
Assembling Freemie Cups ……………………………………………………………… 5
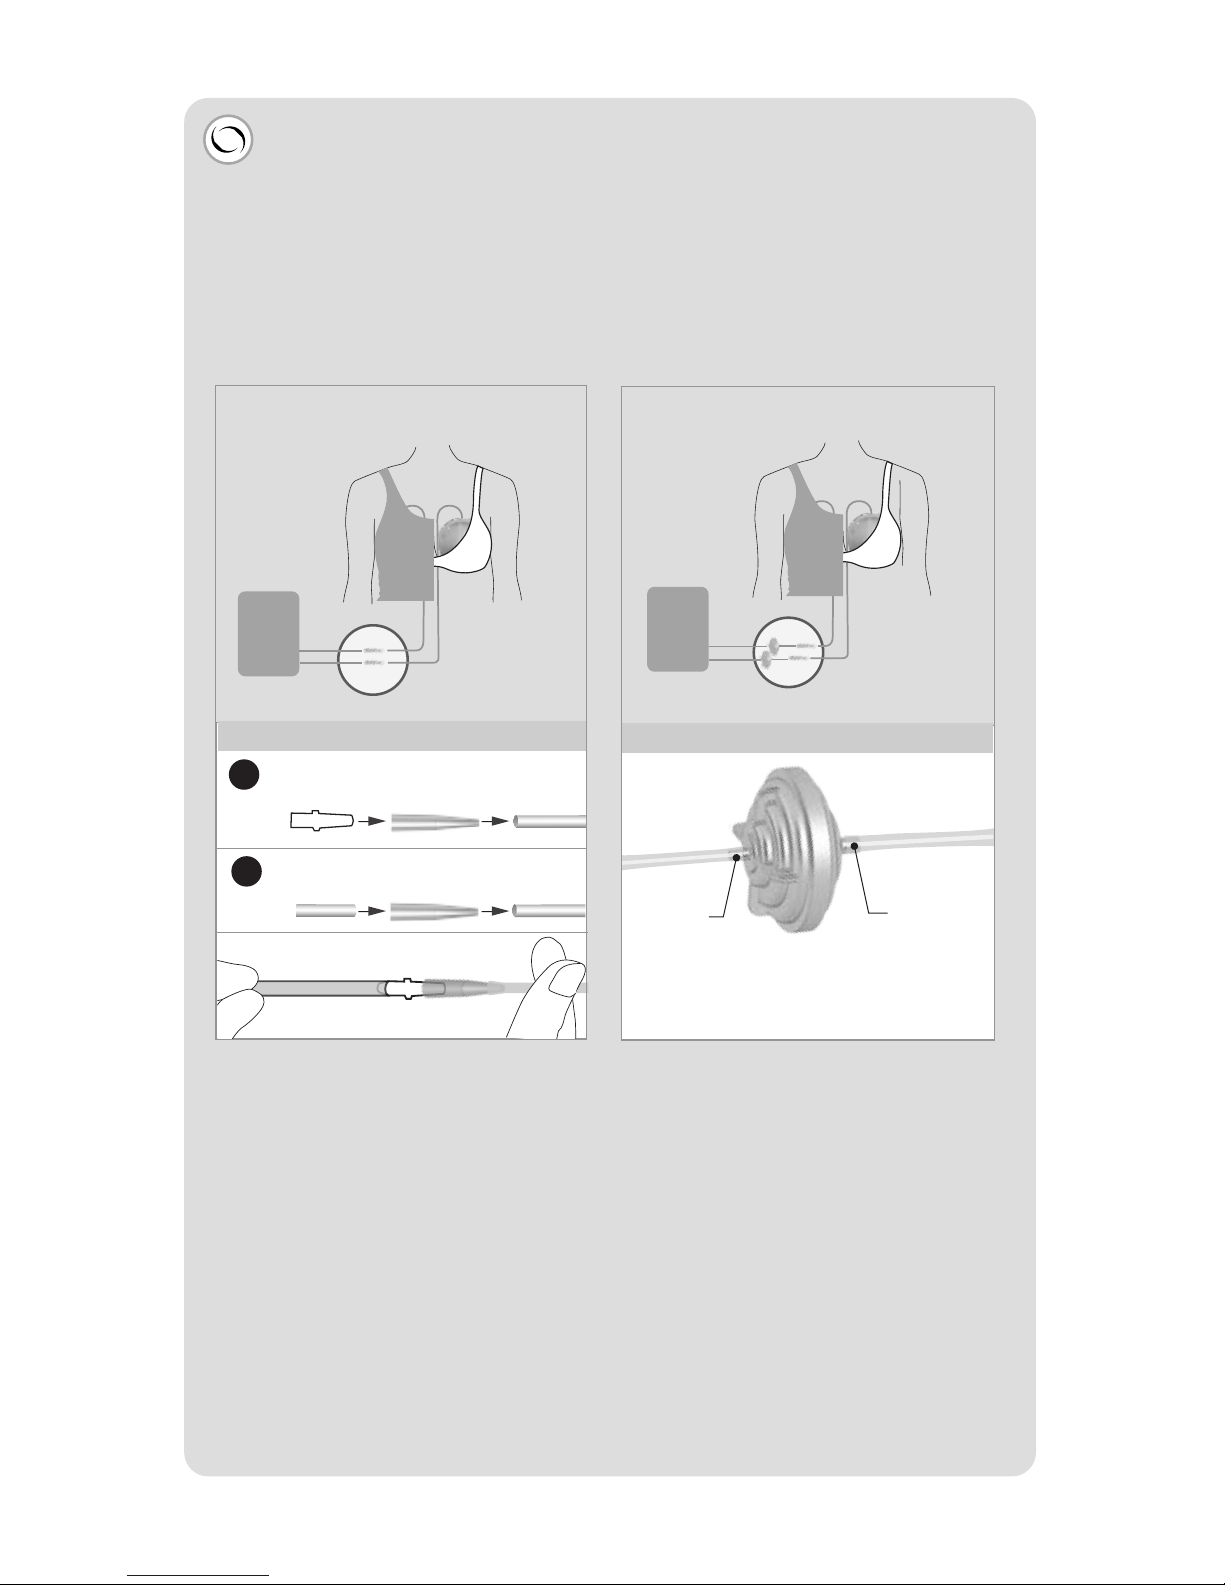
Positioning within Your Bra
Connecting To Your Compatible Pump ……………………………………………… 6
The Perfect Bra Fit………………………………………………………………………… 7
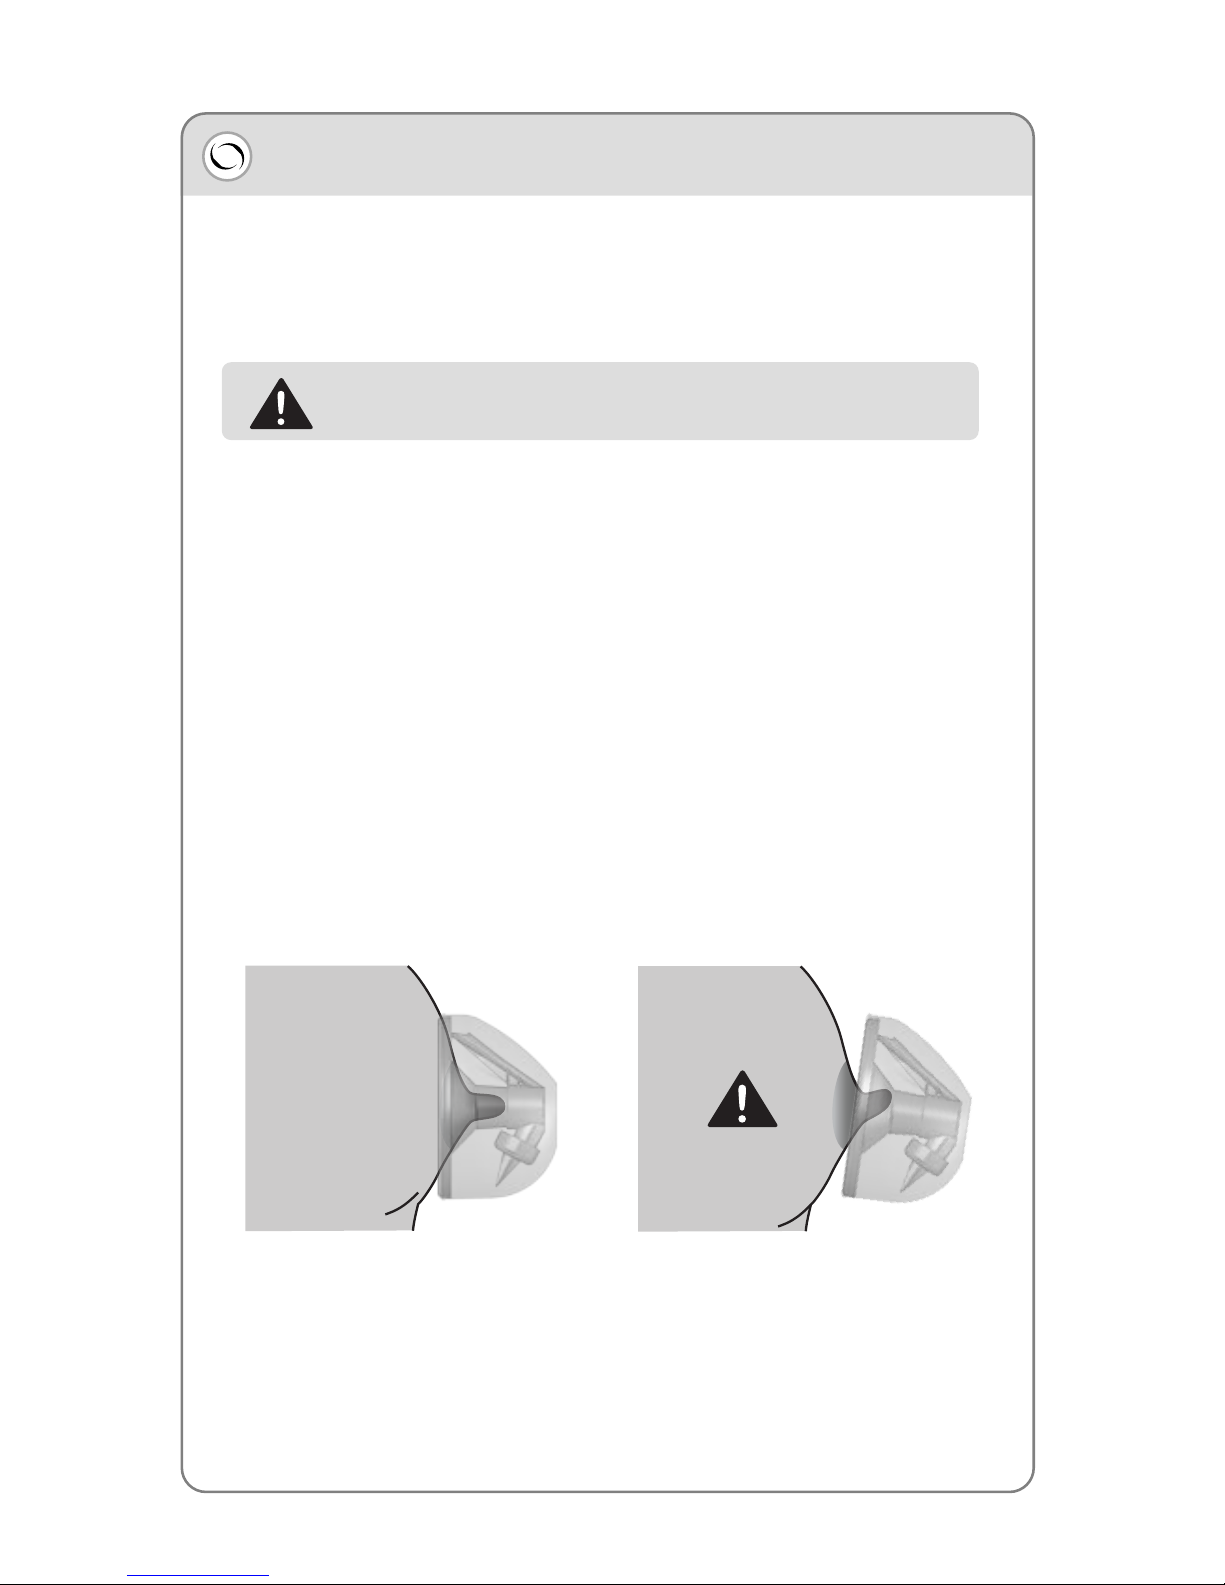
The 12 O’clock Position ……………………………………………………………… 8
Pumping with Freemie
Adjusting Your Pump And Sitting Upright ……………………………………………… 9
When You Are Interrupted ……………………………………………………………… 10
Disconnecting and Transferring Milk
When You Are Done Pumping ………………………………………………………… 11
Pouring Milk Into A Container ………………………………………………………… 12
Cleaning …………………………………………………………………………………… 12
Caring for Your Freemie System
Tubing Care ……………………………………………………………………………… 13
Troubleshooting Tips
Breasts Not Emptying …………………………………………………………………… 14
Loss of Suction ………………………………………………………………………… 14
Milk In Tubing ……………………………………………………………………………… 14
Need To Stop Or Break Suction ………………………………………………………… 14
Compatible Pump Connection Diagrams
Freemie Freedom ………………………………………………………………………… 15
Freemie Equality ………………………………………………………………………… 16
Medela …………………………………………………………………………………… 17
Philips Avent ……………………………………………………………………………… 18
Ameda …………………………………………………………………………………… 19
Spare Parts & Customer Service ………………………………………………………… 20
Indications for use:
The Freemie Breast Pump Collection System is intended to be used in conjunction with an
approved powered breast pump for the purpose of expressing human milk.
This is a single user product. Use by more than one person may present
a health risk and void the warranty.
READ ALL INSTRUCTIONS

pump efficiently
Single or double pumping
Freemie can be used for single
or double pumping as desired.
pump and relax
Home
Simultaneously pump or passively
collect milk while breastfeeding to
catch and store every precious drop.
Work
Pump discreetly at your work
station without ever undressing.
Travel
Travel with Freemie to express milk
on the go whenever a private place
can’t be found.
Important Notice
If you have any concerns about your health, or experience any pain while nursing or
using any breast pump, consult your health care or lactation professional immediately.
Dr. Dao, Dao Health and Freemie User Manual do not give medical or lactation advice,
or make diagnoses.
Not made with BPA,
DEHP, or natural
rubber latex
Spill Guard
Flat Base
8 Ounce Capacity
Spill Guard
Finger Grip
Easy Pour
Spout
Comfortable
Breast Funnel
Quick Connector
pump while bonding
Freemie can be used to pump
milk while breastfeeding. Place
baby on one breast and
Freemie on the other.
pump the freemie way

• Use Freemie only with compatible pumps.
• Keep Freemie in an upright position while pumping.
• Transfer milk to a proper storage container right after pumping.
• Use Freemie when you must express milk discreetly and hands-free underneath normal clothing.
• Use Freemie only as often and only as long as you normally breastfeed your baby. Consult a
lactation professional if you have questions about your milk supply.
• Use with a bra or manually hold in place.
• Keep out of reach of infants and children. Freemie has small parts that can be a choking hazards.
• Consult your lactation professional if you have questions about whether Freemie is appropriate
for you or to help determine the correct funnel size for you.
Do
Do Not
WARNING:
USE ONLY WITH FREEMIE COMPATIBLE PUMPS. USE WITH UNAPPROVED PUMPS MAY
CAUSE INJURY TO YOU OR DAMAGE YOUR PUMP. MISUSE MAY VOID WARRANTY.
SEE COMPATIBLE PUMPS ON PAGES 15 - 19.
Important Safety Instructions
• Do not bend forward or recline while using Freemie, and avoid excessive movement. This could
cause leakage, loss of suction, and milk to flow into tubing.
• Do not overfill Freemie cups, as this may cause milk to flow into the tubing. You may hear a faint
bubbling sound as the Freemie is filling. There is a risk of overfilling if you are hearing impaired or
use Freemie in a noisy environment.
• Do not use Freemie if you must watch your milk ejection reflex or manually massage your breasts
while pumping to ensure that they are completely empty.
• Do not share. Freemie is a personal use item.
• Do not use Freemie in any situation that may be unsafe should you become drowsy or distracted
during milk expression.
• Do not use Freemie for simultaneous breastfeeding and pumping with compromised infants
without first consulting your healthcare or lactation professional.
• Do not continue to use Freemie if you experience pain or discomfort in the breast or
nipple while pumping.
2

Breast Funnel
(2)
25mm - FG024
28mm - FG025
32mm - FG026
Valve Base
(2)
FG029
Two cup assemblies included with each
Freemie Breast Pump Collection System.
Natural Shape Cup
(2)
FG027
Valve
(3)
FG030
Freemie Breast Pump Collection System
Additional funnel sizes available
at www.Freemie.com.
Parts included:
Pump Connection Kits
For connecting to other approved compatible pumps, use proper Connection
Kits. For further information on connecting to your pump, see the Pump
Connection Diagrams.
Medela Pumps
FG022 Freemie Freedom Double Electric Pump Page 15
FG023 Freemie Equality Manual Pump Page 16
FG020 Philips Avent Page 18
FG020 Ameda Page 19
Other Compatible Pumps
Compatible
Kit # Compatible Pump Diagram
FG021 Lactina, Symphony, Pump in Style Page 17
Kit # Medela Pumps Diagram
Connection kit for Medela pumps included in box.
3

Sanitize Parts
Disassemble and clean Freemie prior to first use. Some parts must be boiled initially.
Unsnap cup from funnel Pull valve base off funnel Remove valve from
valve base
Boil these parts
for 10 minutes
to sanitize
Do NOT boil
these parts
• Do not let parts sit on the bottom of the boiling pot.
Parts should float freely.
• Remove from water and allow to dry completely.
Parts must be thoroughly dry before use.
• Hand wash valve in hot, soapy water and rinse.
Allow parts to cool and dry completely before use.
Do not boil or steam sterilize tubing, valves,
or connectors.
• Quick Connector can be washed by hand when necessary.
Preparing Freemie for First Use
4

5
Always wash hands prior to assembling Freemie. All parts must be completely dry,
correctly positioned, and secure.
Place Valve
onto Valve
Base
Inspect the device before each use for signs of wear or damage and replace parts if
signs of wear are noted.
Make sure Valve
is straight
Correct Incorrect
Keep stem aligned
with tubing port
Push Breast Funnel and
Valve Base firmly together
Align ports and
snap together
Gently tug on
Valve to ensure
it is secure
12
3
5 6
Insert Tubing
into Valve Base Push to ensure
tubing is securely
in port
78
4
Push
together
Assembling Freemie Cups

Quick
Connector
1. Place the Quick Connector onto the
adapter on the end of your pump’s hose.
Or connect directly to tubing.
2. Make sure the Quick Connector is
securely attached to both the
pump’s hose and the Freemie tubing.
3. Attach the Freemie cups to the
other end of the tubing.
See Compatible Pump Diagrams section for further information on how to connect your
Freemie Breast Pump Collection System to your approved compatible pump.
Additionally, review your pump’s User Manual.
Connecting to Your Compatible Pump
Pump
Fitting
Pump
Tubing
Philips Avent & Ameda:
Medela:
Large
Port
Small
Port
This side towards
the pump
1. The large port side (with white
membrane inside) of the barrier connects
to the Freemie cup tubing.
The small port side of the barrier
connects to the pump tubing.
2. Make sure the barrier is
securely attached to both the
pump’s tubing and the cup tubing.
3. Attach the Freemie cups to the
other end of the cup tubing.
Pump Pump
Two ways to connect
1
2
Proper orientation of barrier
This side towards
Freemie cups
6

Positioning Within Your Bra
The Perfect Bra Fit
1. Before choosing a bra, pump with the Freemie using your hands to hold in place.
Consider how much pressure you normally apply against your breasts to pump. This
pressure may be different when your breasts are engorged versus when they are empty.
To achieve the same pressure and sensation with the Freemie in your bra, it may be
necessary to adjust your bra or try different bras to get the best fit for you. A sports bra
works well for some women.
2. Your bra must keep the Freemie cups in an upright position and not allow the device to
slip around, sag downward, or tilt off to the side during use.
3. Place Freemie inside your bra with the Breast Funnel opening centered over the nipple.
4. Make sure you achieve a good seal between Freemie and your skin.
Bra fit is critical to the proper use of this device.
Correct Position Incorrect Position
Ensure nipple is centered in the Breast Funnel and not bent
or pinched off.
7

When connected to a
pump, tubing must be
in the 12 o’clock position.
Incorrect
Let tubing hang down
underneath your shirt.
Tubing may be cut to a
desired length in order
to conceal it under
normal clothing.
Milk in tubing
Placement at any other
position can cause milk
to flow into tubing
12
12
When filling with
milk, keep in the
upright position
Correct Tubing in
12 o’clock
position
12
The 12 O’clock Position
8
Pump

As with any new pump, expect a period of adjustment to the
hands-free and fully concealed pumping experience.
Adjust pump to low, turn power on, and slowly increase vacuum until you feel
a comfortable suction.
You may need to turn up the vacuum setting on your
pump slightly higher than normal. If you need to turn up
your pump more than 10%, stop pumping and check all
connections to ensure they are secure. MIN MAX
Pump with Freemie in an upright position, such as sitting or standing.
1
2
3
4
Pumping with Freemie
Adjusting your pump and sitting upright
5Each Freemie holds 8 ounces of milk.
NOTE: When device is full, turn off pump immediately and pull tubing from
Freemie while still wearing in bra. (see page 11, When Your Are Done Pumping)
6If you regularly produce more than 8 ounces at a time, stop pumping when
Freemie is full and empty device. (See page 11, When Your Are Done Pumping)
Alternatively, if you have a second Freemie set, switch out full Freemie cups with
empty cups to minimize pumping interruptions.
9
Do sit or
stand upright
Do not
bend forward
Do not
recline
Correct Incorrect Incorrect

1. Turn off pump.
2. Disconnect from pump using the
Quick Connector or directly from
the Freemie tubing.
(See insets for your compatible pump)
3. Leave Freemie cups temporarily
in your bra, and maintain an
upright position.
4. When ready to resume pumping
reconnect via Quick Connector or
Freemie tubing and turn on pump.
Important
• Bending over or reclining during use, or overfilling may cause leaking, loss of suction,
or milk to flow into tubing.
• Empty Freemie when full and remove immediately after pumping.
• If milk flows into tubing immediately turn off pump and disconnect from pump. See
tubing care on page 13 for cleaning instructions. Check your pump’s manual for pump
cleaning instructions.
• See Troubleshooting sections on page 14 for additional tips.
if you experience pain in your breast or nipple, even if you think the
pump is not the source of the pain.
Stop the pump
by shutting it off or breaking the suction
When you are interrupted
Medela, Philips Avent, Ameda
Freedom & Equality
10

When you are done pumping
Disconnecting and Transferring Milk
1. Turn off pump.
2. Leave Freemie in your bra and gently
pull the tubing from the device.
3. Carefully remove cups from your bra.
4. Freemie cups may be set flat
on a table until ready to transfer
to a storage container.
Pull tubing
from cup
5. When Freemie cups are full, do not lay flat on back unless tubing is disconnected.
Milk in tubing Tubing removed
Correct
Incorrect
11

Pouring milk into a container
Pour quickly with Breast Funnel side up
as pictured.
Fully disassemble and clean after each use.
Removal of tubing creates pour
spout for transferring milk into
storage containers.
Cleaning
1. Disassemble and wash all components that come into contact with breast milk
(cup, breast funnel, valve, valve base).
2. Handwashing in hot soapy water is recommended. Rinse thoroughly.
Do not steam or boil tubing or valves, as it will cause damage.
3. Treat all parts with special care. Avoid abrasives and excessive heat.
4. Clean as soon as possible after each use.
5. When not in use, store parts out of reach from infants and children.
6. Dry parts completely before safely storing.
Practice with water first to achieve successful transfers.
Handle a full Freemie cup with care. Milk can spill out of the Breast Funnel.
Spout
12

Tubing Care
Inspect tubing for breast milk after each pumping session. Soiled tubing that cannot be
cleaned should be replaced. Tubing cleaning options are listed below:
1. If breast milk gets into tubing, rinse thoroughly in hot water. Shake excess water from
tubing. Wipe with a clean, soft towel and allow to air dry completely while hanging
vertically.
2. Rinse tubing with isopropyl alcohol. Hang tubing vertically. Air dry completely.
Caution: Be certain alcohol has completely evaporated before using.
3. If unable to thoroughly clean tubing, cut off any soiled portion of the tubing, or replace
it. (see Spare Parts, page 20)
4. Do not clean tubing in dishwasher, microwave steam bag, or
by boiling.
Caring for Your Freemie System
13

Troubleshooting Tips
• Always center Breast Funnel over nipple. If the Breast Funnel is off the center of the nipple
you may impede milk release, experience loss of suction, or prevent the complete emptying
of the breast. (see page 7)
• Try adjusting the position of Freemie. Comfortably position your body to help create the best
seal between Freemie and your skin. Experiment with your body position by sitting up
straighter, leaning forward a little, or pulling your shoulders back.
• The Breast Funnels come in the standard 25mm, 28mm, and 32mm funnels. If you need a
larger or smaller Breast Funnel, visit Freemie.com to order the right size Freemie for you.
• Each Freemie holds up to 8 ounces of milk. If you pump more than this at one time, you need
to empty and clean the device to continue pumping. (see page 12)
• If problems emptying your breasts persist, consult your lactation professional.
Loss of Suction
• Make sure all parts are completely dry before assembling.
• Make sure that parts are correctly assembled and fit together as snugly as possible, and that
connections to the pump are secure. (see pages 5 & 6 and 15 - 19)
• Make sure tubing is not kinked or pinched. Make sure tubing is pushed securely into its port
on the valve base. (see page 5)
• Make sure Breast Funnel is securely pressed against breast creating a seal around nipple,
and is properly seated in bra. Check that no bra material or tubing is between the device and
your skin. The device should not be tilting upward, downward, or to the side. (see pages 8 & 9)
• Make sure nipple is not bent or pinched inside the Breast Funnel. (see page 7)
• Try a tighter fitting bra to ensure that the bra is able to support and maintain an adequate seal
and hold Freemie in an upright position. Consider trying a sports bra. (see page 7)
• For Philips Avent & Ameda Only: Check that barrier is properly oriented. (see page 6)
Milk in Tubing
• Always make sure device is placed in bra with tubing and pour spout at the 12 o’clock position.
(see page 8)
• Avoid overfilling, empty when full, and remove immediately after pumping.
• Avoid excessive movement while pumping and only use in an upright position. (see page 9)
• Never place full device on flat surface without first removing tubing. (see page 11)
• If milk gets in tubing, see cleaning instructions. Replace tubing if you are unable to clean
completely.
• Review your pump manual for pump cleaning instructions.
Need to Stop or Break Suction
• Suction can be broken by stopping the pump or by inserting a finger between the breast and
the breast funnel.
• Stop suction if you experience pain in your breast or nipple even if you think the pump is not
the source of the pain.
Breast Not Emptying
14

An approved
compatible pump
Filter
(2)
Single Pumping
Compatible
Double Pumping
Freedom
Pump
T Connector
(2)
Pressure Reducer
(1)
Freedom
Pump
Short tube
(1)
Freemie Tubing
(4) 24”
Freedom Double Electric Pump
Pump
Pump
Includes:
#FG022: Freedom Connection Kit
Pump Tubing
(1) 32” (80cm)
Compatible Pump Connection Diagrams
Freemie
15

An approved
compatible pump
Single Pumping
Compatible
Equality
Pump
T Connector
(2)
Pressure Reducer
(1)
Freemie Tubing
(4) 24”
Equality Manual Pump
Pump
Pump
Includes:
#FG023: Equality Connection Kit
Equality
Pump
Double Pumping
Pump
Pump Tubing
(1) 32” (80cm)
Freemie
16

An approved
compatible pump
Compatible
Quick Connector
(3)
Freemie Tubing
(4) 24”
Lactina
Symphony
Pump in Style Advance
Includes:
#FG021 Medela Connection Kit
Double Pumping
Single Pumping
Medela
Pump
Pump
Medela, Lactina, Symphony and Pump in Style are trademarks of Medela AG Corporation Switzerland.
Medela does not endorse and is not affiliated with the Freemie Breast Pump Collection System or
Dao Health.
17

An approved
compatible pump
Compatible
Quick Connector
(4)
Freemie Tubing
(2) 24”
Philips Avent
Twin Electric Breast Pump
Includes:
#FG020 Philips Avent Connection Kit
Double Pumping
Single Pumping
Philips
Pump
Philips and Avent are trademarks of Royal Philips Electronics of the Netherlands. Philips does not endorse
and is not affiliated with the Freemie Breast Pump Collection System or Dao Health.
Pump
Short tube
(4)
Barrier
(2)
18
This manual suits for next models
1
Table of contents
Other Freemie Breast Pump manuals

Freemie
Freemie SlimFit5 FG084 User manual

Freemie
Freemie Freedom User manual

Freemie
Freemie Closed System Collection Cup User manual

Freemie
Freemie Freedom User manual

Freemie
Freemie Collection Cups FG041 User manual

Freemie
Freemie ROSE User manual

Freemie
Freemie Independence II User manual

Freemie
Freemie Liberty II User manual