Freemie SlimFit5 FG084 User manual


Congratulations on your purchase and thank you
for choosing Freemie SlimFit5 Collection Cups!

Your Freemie SlimFit5 Cups are designed to
help make your pumping experience compatible
with your life, allowing you greater flexibility to
pump whenever and wherever necessary.

PAGE 4 Contents
User Manual for Freemie
SlimFit5 Collection Cups
Intended Use 5
Important Safety Instructions 6
Freemie SlimFit5 Collection Cup Parts 7
Pump Easily with Freemie 8
Freemie Cup Features 9
Preparing Cups for First Use 10
Regular Cleaning After Each Use 11
Assembling Freemie Cups 12
Add SlimFit Fitmie Inserts 13
Connecting to Your Compatible Freemie Pump 14
Cup Test and Tubing Tips 15
Finding Your Ideal Bra Fit 16
Positioning Within Your Bra 17
Finding Your Best Flange Fit 18
Pumping Positions 19
After Pumping 20
Proper Storage of Breast Milk 21
Troubleshooting Tips 22
Warranty & Specifications 23

PAGE 5 Intended Use
Intended Use
Freemie SlimFit5 Collection Cups are designed to be used
with portable Freemie Pumps by lactating women to express
and collect milk from their breasts. All Freemie products are
for a single user only and should never be shared.
Contraindications For Use
There are no known contraindications for use of this product.
Product Description
The Freemie SlimFit5 Collection Cups are capable of single
and double pumping. The operating life of the Freemie Cups
is defined as 60 days.
Important Notice
If you have any concerns about your health, or experience
any pain while nursing or using any breast pump, stop
pumping immediately and consult your health care or
lactation professional immediately. DAO Health does not
give medical advice or lactation advice, make diagnoses
or recommend treatment.
WARNING: Never use your Freemie SlimFit5 Collection
Cups in any location, situation or circumstance that is unsafe
for you, your infant or others.

PAGE 6 Important Safety Instructions
IMPORTANT — To reduce risk of damage, use error or injury:
• Do not put any components in the dishwasher or a steam sterilizer.
• Do not use solvents, abrasives or brushes on any components.
• Never use a damaged device. Replace damaged or worn parts.
• Never use if moisture or liquid is detected in Tubing.
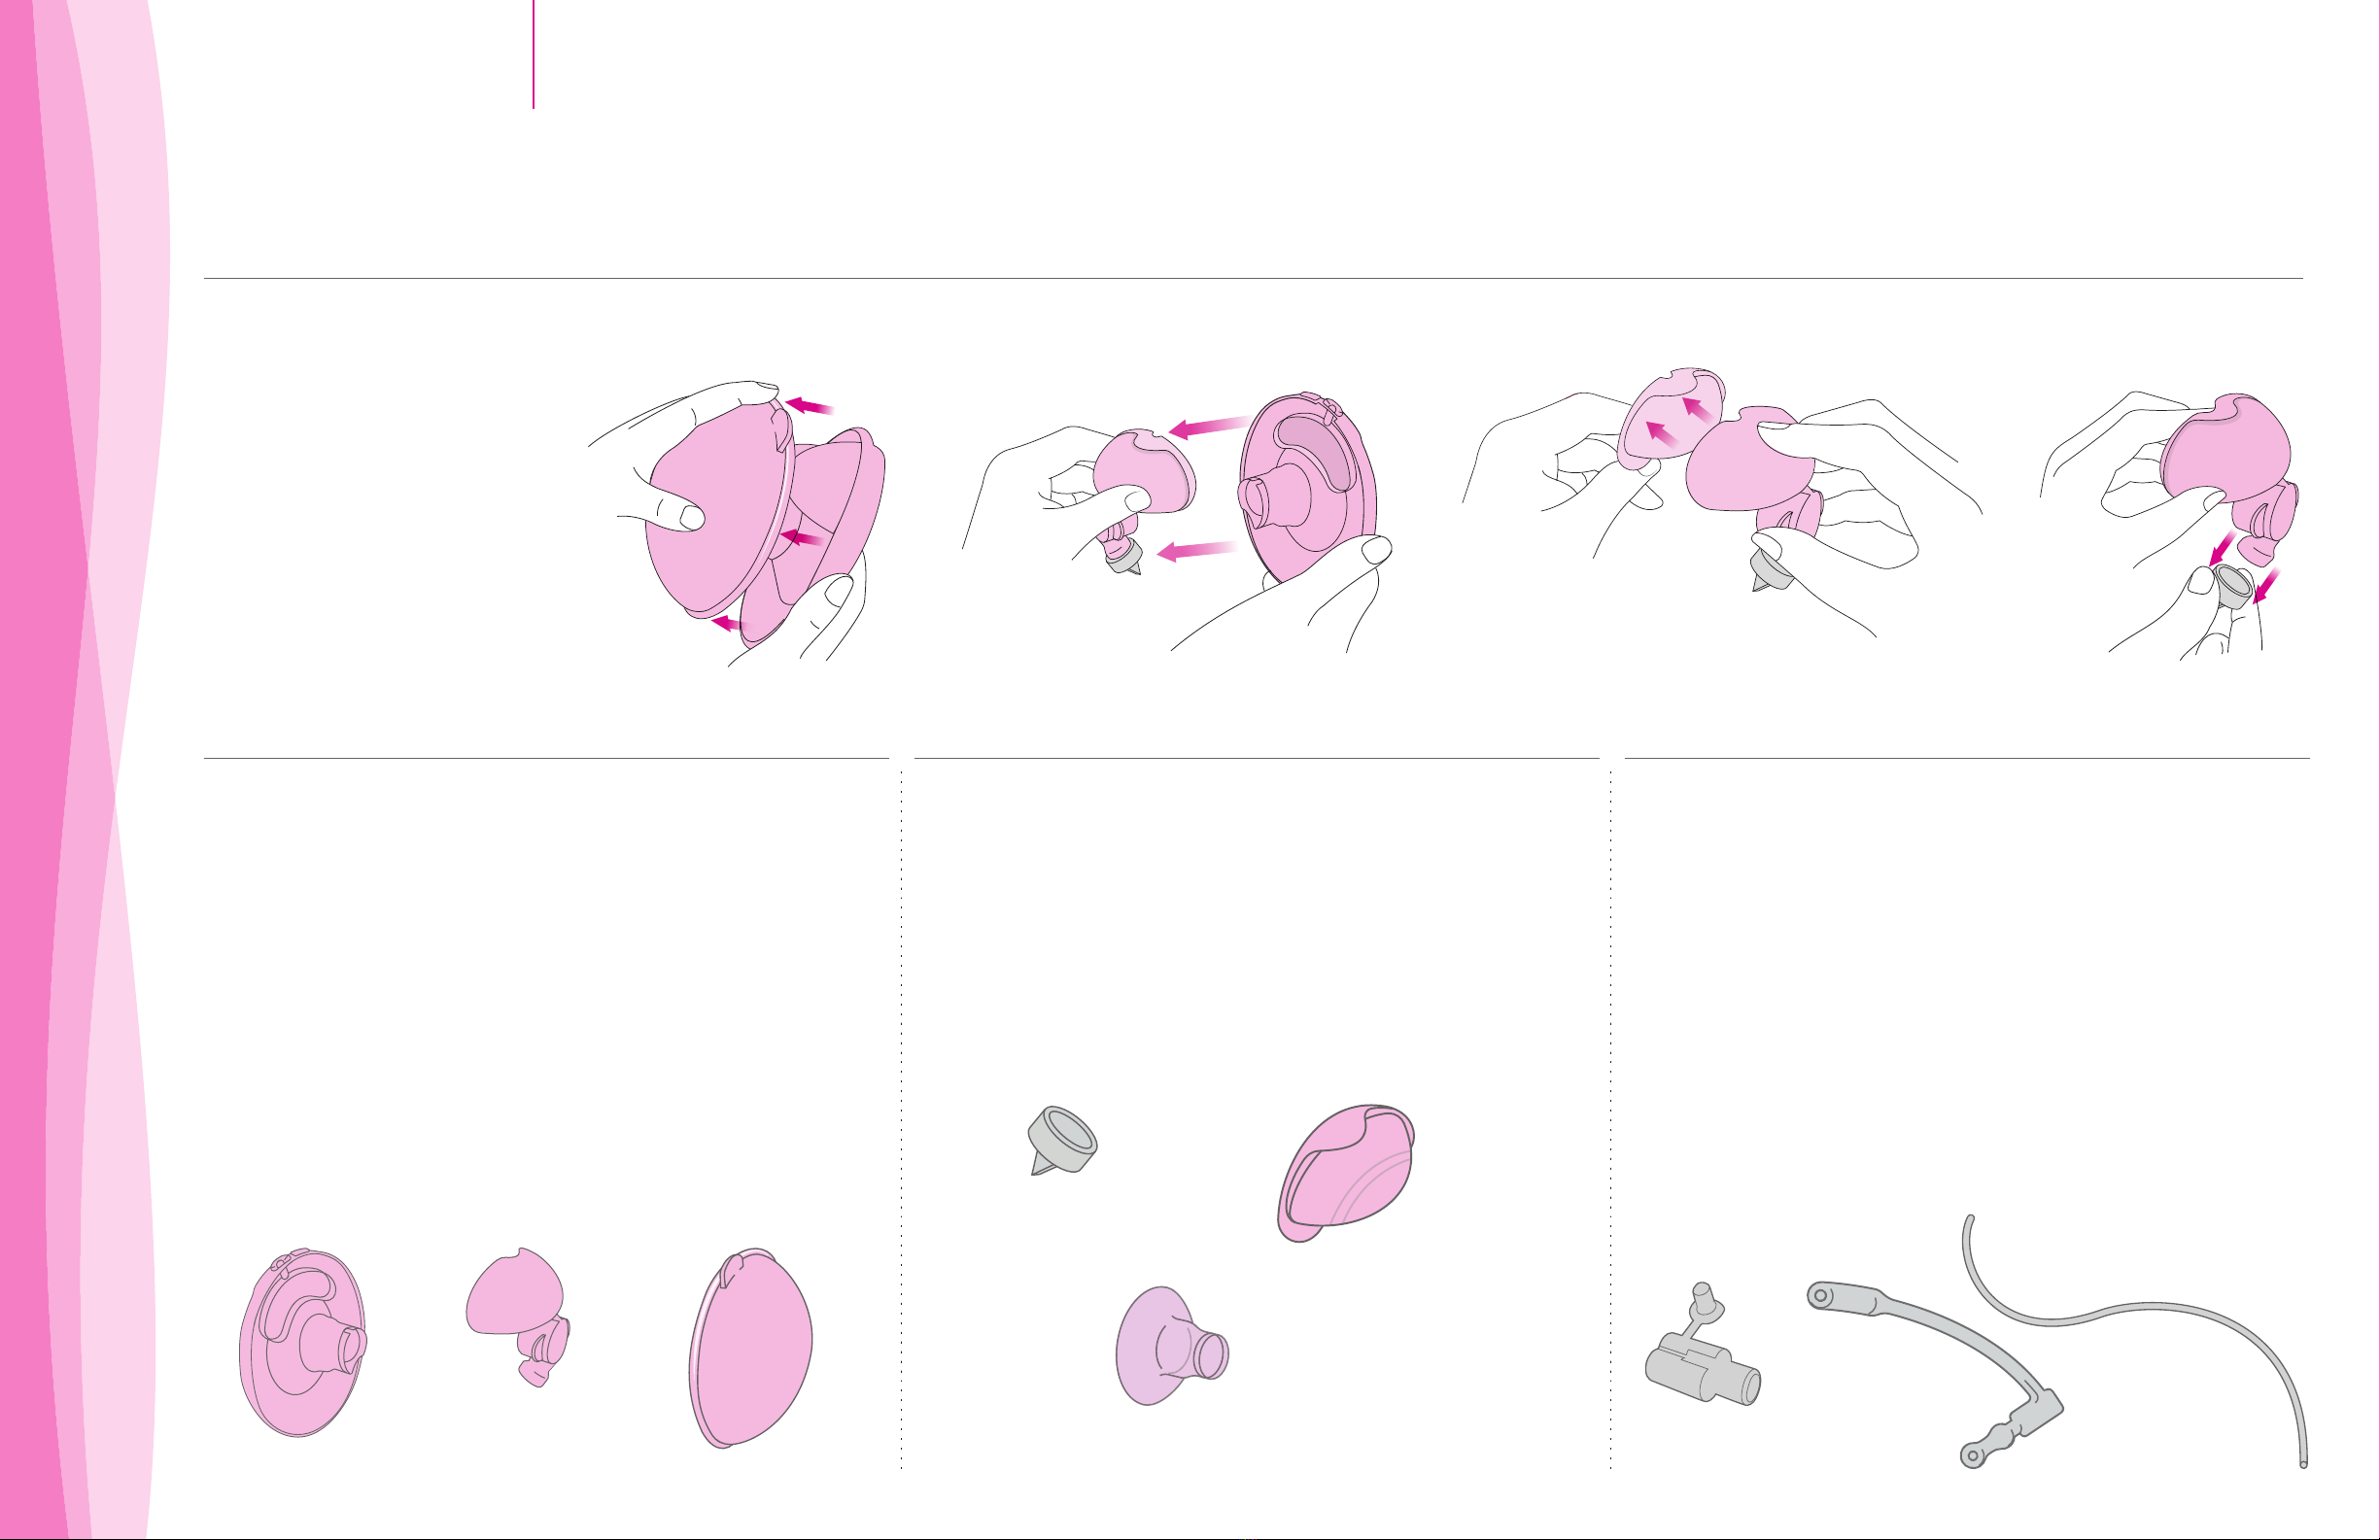
• Always inspect the flexible tongue-shaped Barriers for damage (cuts,
tears, or holes) before and after each pump session. Use of a damaged
Barrier will cause milk to flow into the Tubing and/or pump motor.
This can compromise hygiene and damage the pump motor.
• If pumping is uncomfortable or causing pain, turn the pump off and
if necessary break the seal between the breast and Breast Flange
immediately with your finger and remove the device from your breast.
• Do not try to express with vacuum that is too high and uncomfortable
(painful).Ifallbreastpumpsare painfulfor you, evenon theirlowest suction
settings, consider consulting with your lactation or health care professional.
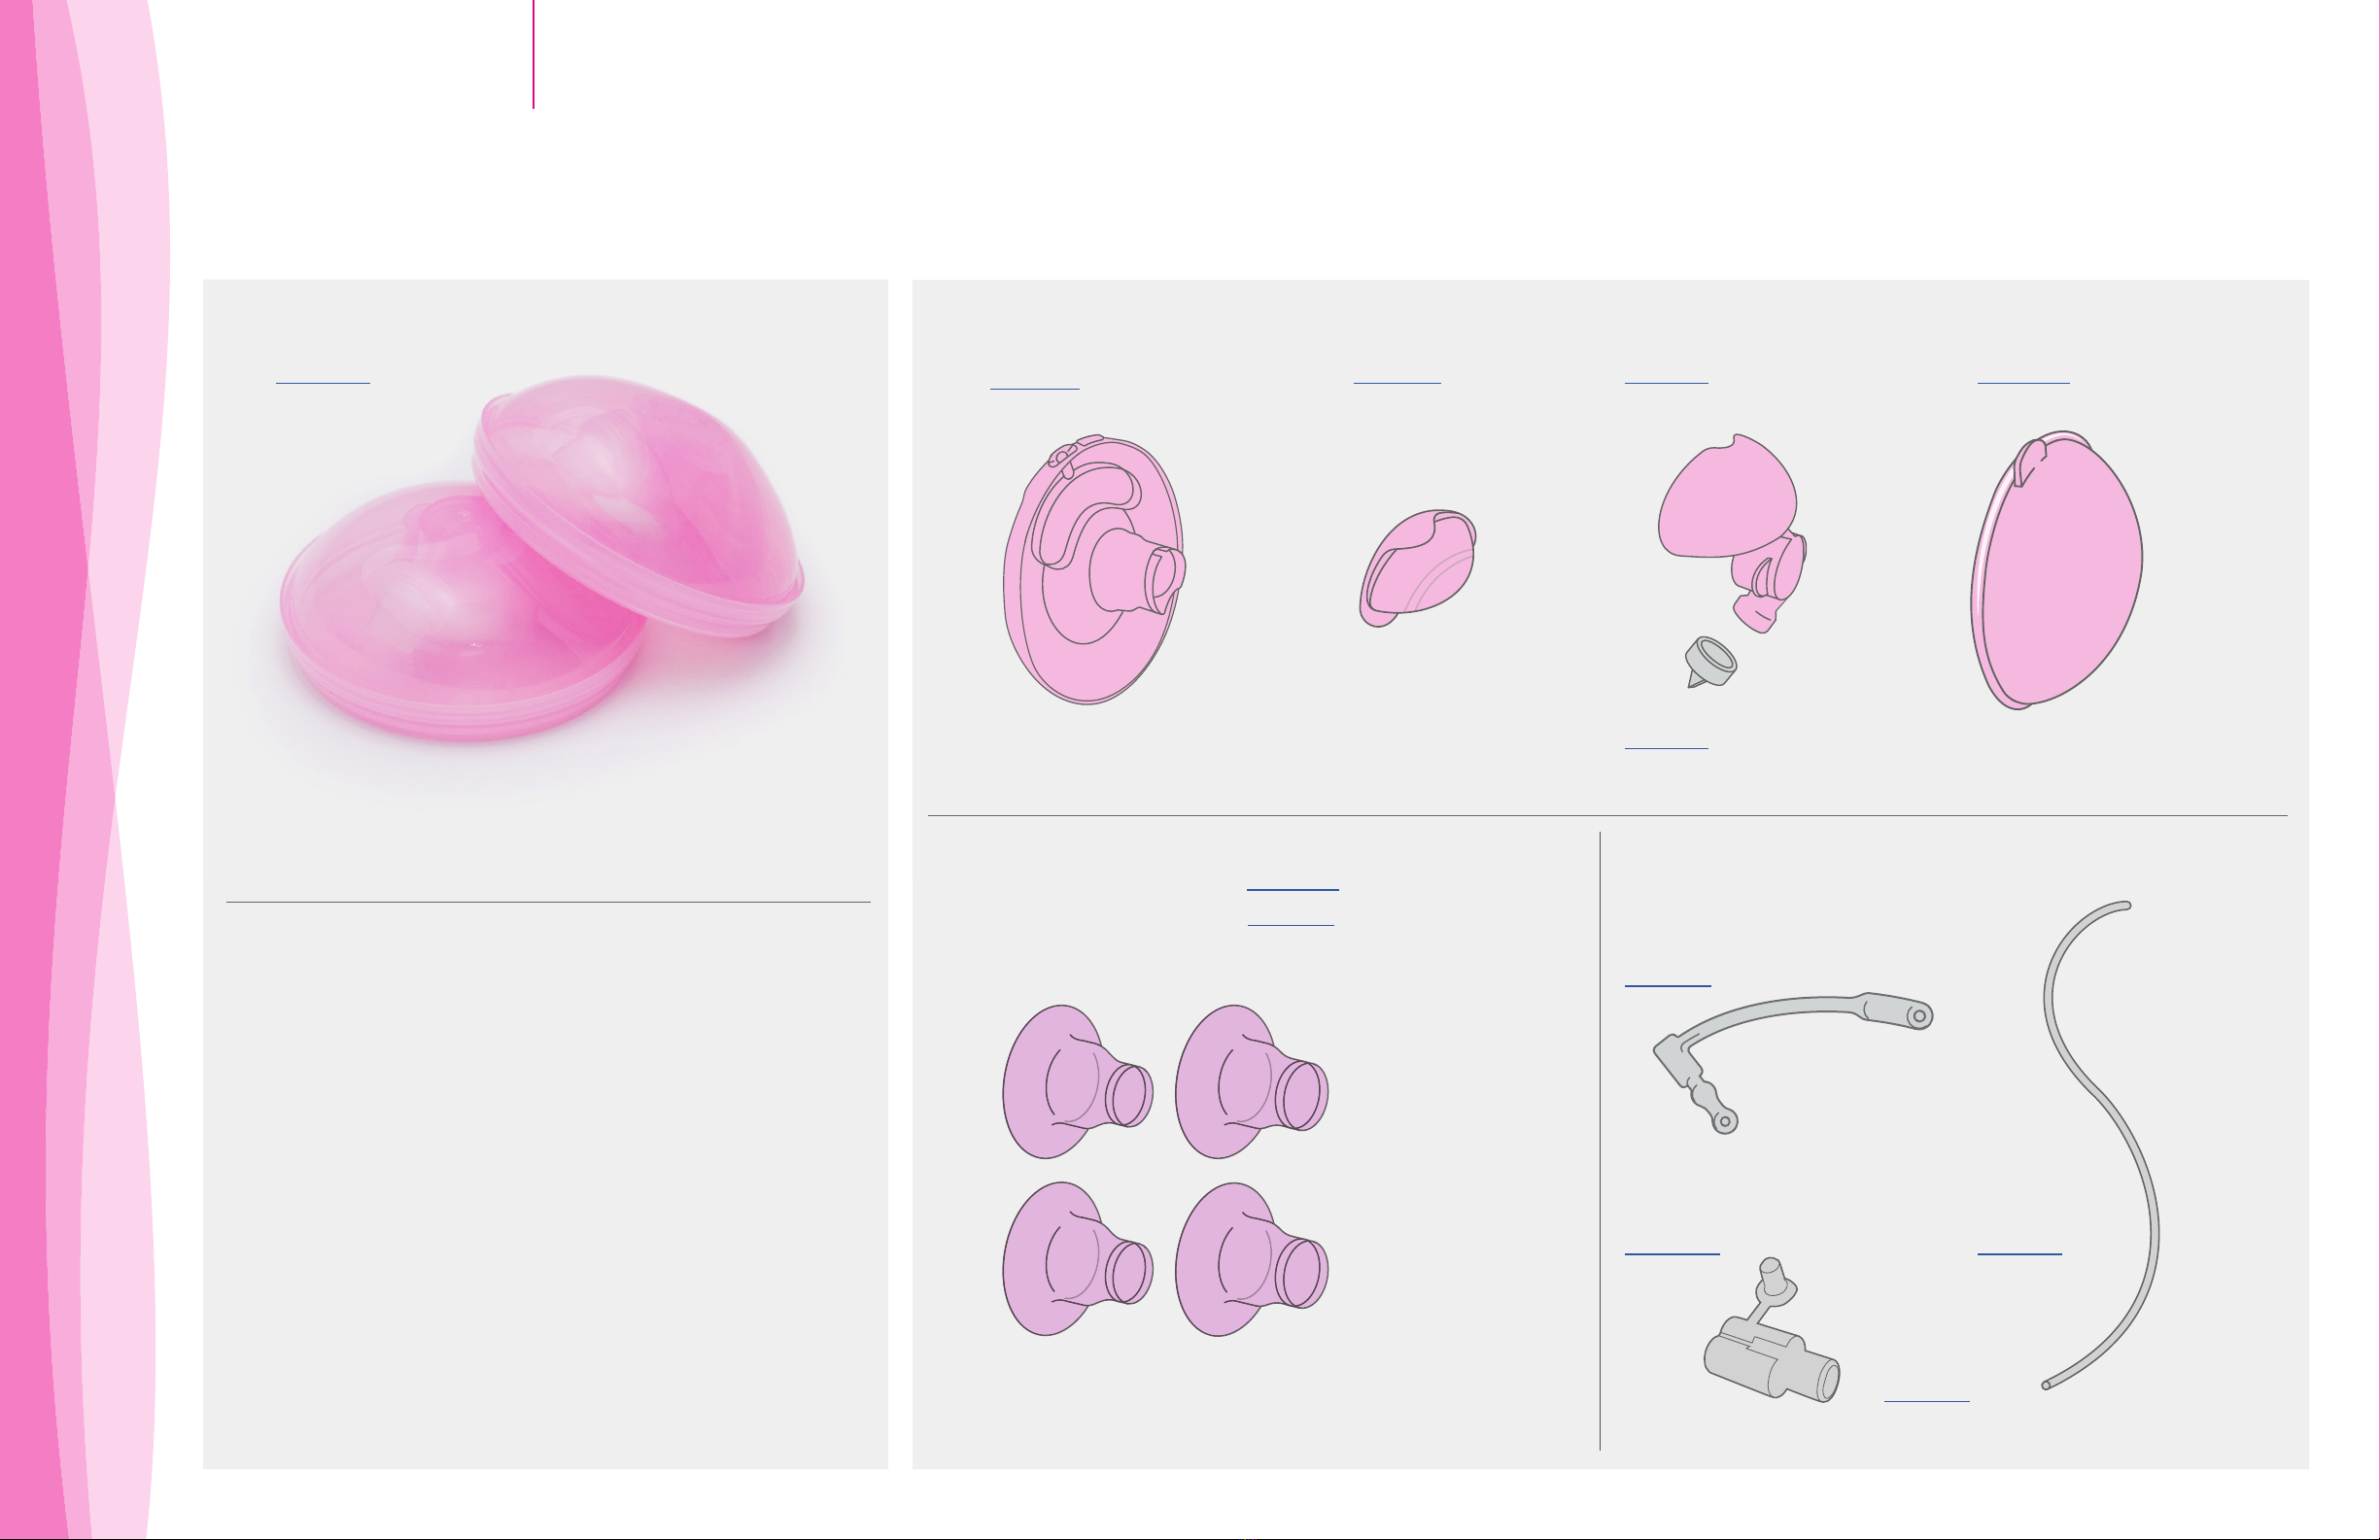
• Always inspect Flanges, Cups, Valve Bases, Valves, Barriers, and Tubing
prior to use for cleanliness.
• Clean, sanitize and dry all parts that come into contact with your breast
and breast milk prior to first use.
• Disassemble, clean and dry all parts that come into contact with your
breast and breast milk after every use.
• Do notstore wetor dampparts wheremold maydevelop.
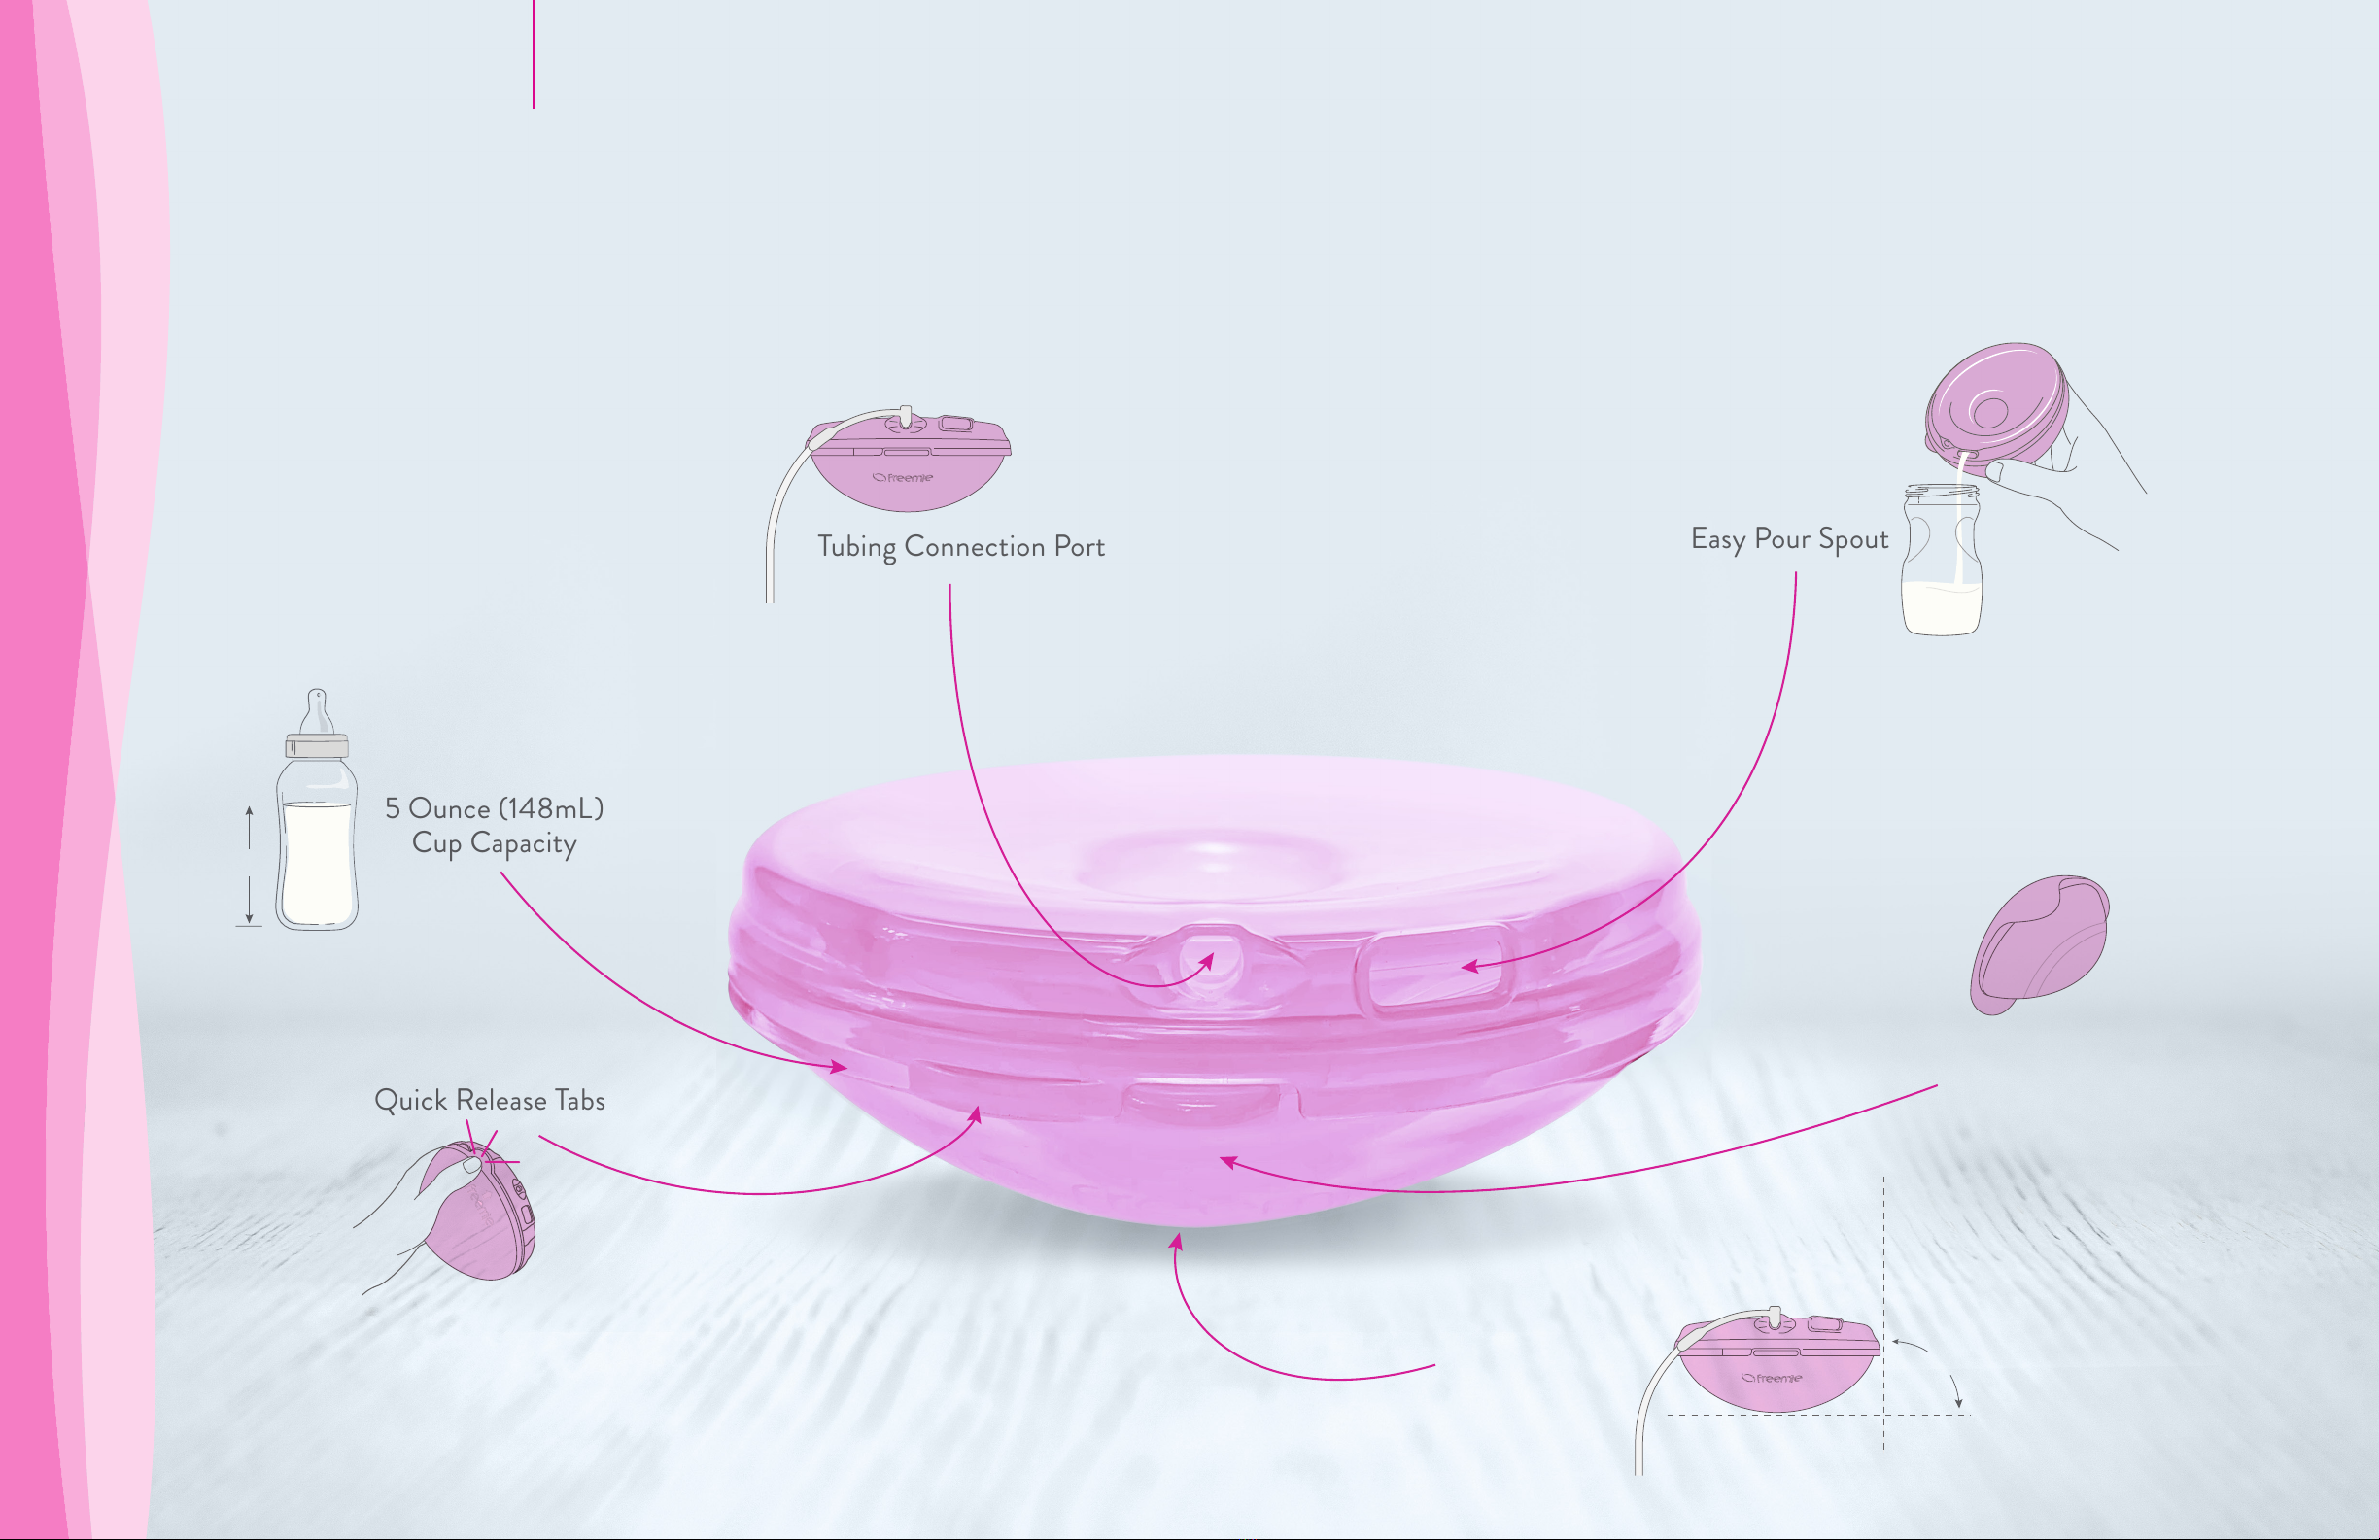
• FreemieSlimFit5Cupsarecompatible withwearable FreemiePumps.
Use with non-compatible products may cause injury to you or damage
your pump or component parts.
• As a general rule, use Freemie only as often and only as long as you
normally breastfeed your baby. Consult a lactation professional if you
have questions about your milk supply.
• Consult your lactation professional if you have questions about whether
Freemie is appropriate for you or to help determine the correct Flange
size for you.
• Freemie is not recommended if we do not have your Flange size.
• Freemie is not recommended if you must watch your milk ejection reflex
or aggressively massage your breasts while pumping to ensure that they
are completely emptying.
• Do not share. Freemie is a personal use item.
• Do not use Freemie for simultaneous breastfeeding and pumping
with compromised infants without first consulting your healthcare or
lactation professional.
• Do not continue to use Freemie if you experience pain or discomfort in
the breast or nipple while pumping. Do not pump or pump and nurse in
situations or places that may present any risk to you or your infant.
• Keep out of reach of infants and children. Freemie has small parts that
can be choking hazards.
• If you are a mother who is infected with Hepatitis B, Hepatitis C or
Human Immunodeficiency Virus (HIV), pumping breast milk will not
reduce or remove the risk of transmitting the virus to your baby through
your breast milk.
READ ALL INSTRUCTIONS BEFORE USING THIS PRODUCT.
This is a single user product. Use by more than one person may present a
health risk and will void the warranty.

PAGE 7 Freemie SlimFit5 Collection Cup Parts
2 Breast Flanges (Size 30mm)
2 SlimFit Fitmie Inserts (Size 25mm)
2 SlimFit Fitmie Inserts (Size 28mm)
2 Cup Parts
2 Barriers
2 Valve Bases
2 Valves
2 Cup L-Connectors
1 Y-Connector
3 Trimmable Tubing Pieces
Contents
THE FREEMIE SLIMFIT5 COLLECTION CUPS INCLUDES: (2) Barriers
(FG102) (2) Valve Bases
(FG101)
(2) Valves
(FG073)
(2) Cups
(FG099)
(2) 30mm Breast Flanges
(FG100)
(FG084)
(2) 25mm SlimFit Fitmie (FG093)
(2) 28mm SlimFit Fitmie (FG107)
COLLECTION COMPONENTS
SIZE INSERTS CONNECTION COMPONENTS
(2) Cup L-Connectors
(FG124)
(3) 12" Tubing
(FG125)
See also:
(FG126)
(1) Y-Connector
(FG080)

Pump and Feed |Pump and Relax |Pump and Work
Milk contacting components not made with BPA, BPS, DEHP or natural rubber latex.
PAGE 8 Pump Easily with Freemie

Tubing Connection Port
5 Ounce (148mL)
Cup Capacity
Quick Release Tabs
Natural Balance Base
Easy Pour Spout
5 Oz.
90º
Barrier Backflow
Protection
PAGE 9 Freemie Cup Features

PAGE 10 Preparing Cups for First Use
BOIL THESE PARTS DO NOT BOIL THESE PARTS ADDITIONAL INSTRUCTIONS
A: Remove Cup from Flange B: Remove Valve Base
from Flange C: Remove Barrier from
Valve Base D:Remove Valve from
Valve Base
DISASSEMBLE
Disassemble and clean
Freemie Cups prior to first
use. Follow the instructions
below to sanitize these parts.
• DO NOT boil or steam these parts. Hand wash only.
• Hand wash Valve, Barrier and Insert parts using plenty
of hot water and liquid dishwashing soap, then rinse clean
with hot water for 10– 15 seconds.
These parts do not come into contact with breast milk and
need not be washed unless they become soiled. If soiled, take
immediate care steps:
• The Y-Connector can be washed in hot soapy water, and
rinsed well.
• The Tubing or L-Connector can be rinsed with hot water.
Shake o excess water.
• Let parts dry thoroughly before use.
• Visually inspect parts to ensure they are clean and repeat
steps or replace part if cleaning was not successful.
Breast Flange Valve Base
Valve
Cup
L-Connector
Barrier
TubingY-Connector
• Boil only these hard parts for 10 minutes in large uncovered
pots while stirring constantly. (Covered pots or steam
sanitizer systems can damage parts.)
• Do not let parts sit on the bottom of the boiling pots.
• Parts should have enough room to float freely.
• Carefully remove parts from water with a non-metal
spoon and let cool completely.
• Wash parts after boiling and let dry completely
before assembling.
Insert

PAGE 11 Regular Cleaning After Each Use
Do not steam or boil Tubing, Barriers or Valves, as it may
cause damage. Do not put any Freemie components in
dishwasherorsteam sterilizeras it cancause parts towarp
and leak. Before and after each use, visually inspect the
individual components for cracks, chips, scratches, tears,
discoloration or deterioration. In the event that damage is
observed, discontinue use until the damaged part/s have
been replaced.
Damaged Barriers will cause malfunction and can
damage your pump.
1. Disassemble and wash all components that come into
contact with breast milk (Cup, Breast Flange, Valve,
Valve Base, Insert, Barrier).
2. Hand wash parts using plenty of hot water and liquid
dishwashing soap, then rinse clean with hot water for
10 to 15 seconds. Use a dedicated dish bin, and avoid
washing parts with other dishes.
3. Treat all parts with special care. Avoid scratching
and excessive heat.
4. Clean and dry parts as soon as possible after each use.
5. When not in use, store parts disassembled and out of
reach of infants and children.
6. Do not store assembled Freemie Cups in refrigerator;
parts may become loose, malfunction or leak.

Snap
Tubing Port (round hole)
Cup Tab
... and press together firmly. Align Cup Tab with Flange Tubing Port and press together until you hear the Cup “snap” closed.
PAGE 12 Assembling Freemie Cups
STEP 1
STEP 3 CONTINUED STEP 4
STEP 2 STEP 3
Place Valve onto Valve Base Insert Barrier into Valve Base. Press assembled Valve Base onto Flange...
Always wash hands prior to assembling Freemie Cups.
Assemble clean, dry parts just before use.
Inspect Cup and Tubing parts before and after each use.
Replace Valve parts every 2-3 months.
After time and use, you may not always hear a crisp “snap” sound, and this is normal.
Incorrect assembly may cause poor suction or malfunction.Note: Barrier flaps must overlap edges of Valve Base.

PAGE 13 Add SlimFit Fitmie Inserts
INSERT SLIMFIT FITMIE INTO ASSEMBLED CUPS
SlimFit5 Cups come with 2 sets of Inserts to add to the
30mm hard Breast Flange. Size down with the 25mm or
28mm purple SlimFit Fitmie Inserts. Review Flange Fit
section to make sure you are using the correct size.
SlimFit Fitmie work only with SlimFit Cups and come in sizes 15mm – 28mm.
SlimFit Fitmie
30mm
Breast Flange
Push Insert down
until it is seated
flat against Flange.
To remove Insert, gently lift
edge and pull out.

Cap one side closed.
Y-Connector
123
Suction Cycle
Liberty
®
II
M1
1
40:00
40:00
10
10
5
5
95%
95%
123
Suction Cycle
Turbo
Independence
®
II
123
Suction Cycle
03:53
03:53
5
5
TURBO
TURBO
95%
95%
123
Suction Cycle
Liberty
®
II
M1
1
40:00
40:00
10
10
5
5
95%
95%
123
Suction Cycle
Turbo
Independence
®
II
123
SuctionCycle
03:53
03:53
5
5
TURBO
TURBO
95%
95%
PAGE 14 Connecting to Your Compatible Freemie Pump
SINGLE PUMPING DOUBLE PUMPING
For all tubing connections, press in firmly
until you get a secure connection.
NOTE: Do not attempt to connect the Y-Connector to the pump.
SlimFit5 Cups work with Freemie Independence, Independence II,
Liberty, Liberty II, and Rose Pumps.

PAGE 15 Cup Test and Tubing Tips
TRIM TUBING
Once you have tried on your Freemie SlimFit5 Cups,
you may want to alter the Tubing length to fit your
body. Before trimming, consider the ways or places
you may use your Freemie. Then, measure twice and
cut once using clean scissors.
TEST BEFORE USE
Prior to placing Cups in your bra:
1. Turn on pump.
2. Set pump to strongest setting.
3. Barrier inside Cup collapses and releases
when assembly is correct.
TUBING NOTES
Tubing can be worn inside your clothing so that it
does not show at all. Or, you may choose to wear it
outside your clothing if that is more comfortable.
Tubing can also be worn under the center front
(cleavage) area of the bra, so long as it is not
pinched, kinked, or being pulled o.
The soft silicone Tubing can
be used with or without the
special L-Connector part.
Tubing should always be used with
the Y-Connector part whether single
or double pumping. Do not attach
the Y-Connector to the pump.
Resting Barrier Collapsed Barrier

PAGE 16 Finding Your Ideal Bra Fit
CORRECT NIPPLE POSITION &FLANGE SIZING
Ensure nipple is centered in the Breast Flange
and not bent or pinched o. If the tip of the nipple
hurts while expressing, check that the nipple is in
the center of the Flange.
CORRECT POSITION INCORRECT POSITION
FINDING THE IDEAL BRA FIT FOR YOU
Brafit iscritical totheproperuseof thisdevice because
yourbramust do the job that your hands would be
required to do with a traditional pump.
1. Before choosing a bra, pump by holding the SlimFit5 Cups
in place with your hands. Consider how much pressure you
normally apply against your breasts to pump and observe
the optimal position and orientation of the Cups on each
of your breasts.
Most moms are not perfectly symmetrical, and improper
positioning or pressure on one or both breasts may result
in low output. It is important to practice and experiment
with different bras to figure out how to make the Cups
work well and effectively for you. The pressure needs to
be consistent throughout your pump session such that
no gaps occur.
Be aware that the pressure needed may be different
when your breasts are full versus when they are emptying.
A sports bra works well for many women.
2. Be sure your bra keeps the SlimFit5 Cups in an upright
position and does not allow the devices to slip around,
sag downward, or tilt off to the side during use as a loss
of suction may occur.
3. Make sure you achieve a good consistent seal between
the Breast Flanges and your skin.
4. Make sure the Breast Flange opening is centered over
the nipple when placed inside your bra.

INCORRECT
Placementatanyotherposition
cancausemilktoflowoutwhile
youarepumping.
CORRECT
Whenfillingwithmilk,keepin
theuprightposition .
Tubing in 12 o’clock position.
Milk leaking from cups.
Tubing and pour spout should be
upright at the 12 o'clock position.
Flange opening should be
centered over the nipple.
PAGE 17 Positioning Within Your Bra
As with any new pumping tool, expect a period of adjustment toAs with any new pumping tool, expect a period of adjustment to
the hands-free and fully concealed pumping experience. Afterthe hands-free and fully concealed pumping experience. After
a few days of use, review the instructions for bra and Breasta few days of use, review the instructions for bra and Breast
Flange fit to evaluate any needed adjustments. Consider whatFlange fit to evaluate any needed adjustments. Consider what
items in your wardrobe work well and make you comfortableitems in your wardrobe work well and make you comfortable
while pumping. In preparation for more public use, practicewhile pumping. In preparation for more public use, practice
placing and removing the SlimFit5 Cups at home with differentplacing and removing the SlimFit5 Cups at home with different
clothing. Jackets, cardigans, scarves, and nipple pads can alsoclothing. Jackets, cardigans, scarves, and nipple pads can also
help make Freemie even more discreet.help make Freemie even more discreet.

30mm
Dime
17.91 mm
Half Dollar
30.61mm
Quarter
24.26mm
Nipple Base
Nipple
Areola
Measure
PAGE 18 Finding Your Best Flange FitFinding Your Best Flange Fit
Finding the best Breast Flange fit cannot simply be done
by measuring your nipples because some nipples stretch
more than others under suction. You can estimate your
size, but some trial and error may be needed for you to
optimize your comfort and milk output. Experiment to
find the right fit and keep in mind:
• You may need a dierent size than the Flanges provided.
• You may need a dierent size for each nipple because
no one is perfectly symmetrical.
• You may prefer higher suction, making Flange
comfort crucial.
• Yournipple mayexpand indiameter andlength whilepumping
and may change over time, so keep all of your sizes. Flange is too small for the
nipple to move freely in and
out of Flange. May cause
rubbing or chafing.
Comfort is key! It may take a
few tries to find what works. The
Breast Flange size is measured
across the opening that your
nipple fits into.
Flange is too big allowing
too much breast and areola
tissue to be drawn into Flange.
May cause bruising.
Flange is correct size when
the nipple moves in and out
of the Flange freely.
ChoosingAnother Size
Use a ruler or coin diameters
to estimate your erect nipple
base size. Choose the nearest
size Flanges or Fitmie inserts
that are slightly larger than
your nipples.
InternalDiameteris measured across the opening.
SlimFit Fitmie soft inserts for pumping comfort
are available in sizes 15mm – 28mm and sold
separately at www.freemie.com.
Need more milk capacity or a deeper Flange?
Try SlimFit6 (6 oz.) or Standard (8 oz.) Freemie Cups.

GOOD PUMPING POSITIONS
POOR PUMPING POSITIONS
Freedom of movement with Freemie depends on:
• How Cups are oriented on your breasts
• Securityof Cups in your bra
• Amount of milk in Cups
• How much Cups are jostled
Advanced Technique: Requires
re-orientation of cups inside bra.
PAGE 19 Pumping Positions
A range of pumping positions are possible with Freemie.
Mind the pour spout!

20:00
46
Tips:
• Tap Cup gently to dislodge
any milk trapped in Valve.
• Practice transfers with
water first.
Flange
Barrier
Valve Base
Valve Insert
Cup
Pour Spout
PAGE 20 After Pumping
4.Cups may be set flat.
1. Stop the pump.
Pour milk quickly and confidently into a storage
bag or bottle of your choice.
Use Pour Spout to transfer milk
to storage.
NOTE: If you experience
pain in your breast or nipple,
even if you think the pump
is not the source of the
pain, consult your health
care or lactation specialist.
Fully disassemble and clean these parts immediately after use.
2. Pull Tubing from the tops
of the Cups to disconnect. 3. Carefully remove Cups
from your bra.
When you are done pumping
Transferring milk
This manual suits for next models
1
Table of contents
Other Freemie Breast Pump manuals

Freemie
Freemie Collection Cups FG041 User manual

Freemie
Freemie Closed System Collection Cup User manual

Freemie
Freemie Independence II User manual

Freemie
Freemie Single or Double User manual

Freemie
Freemie Freedom User manual

Freemie
Freemie ROSE User manual

Freemie
Freemie Liberty II User manual

Freemie
Freemie Freedom User manual