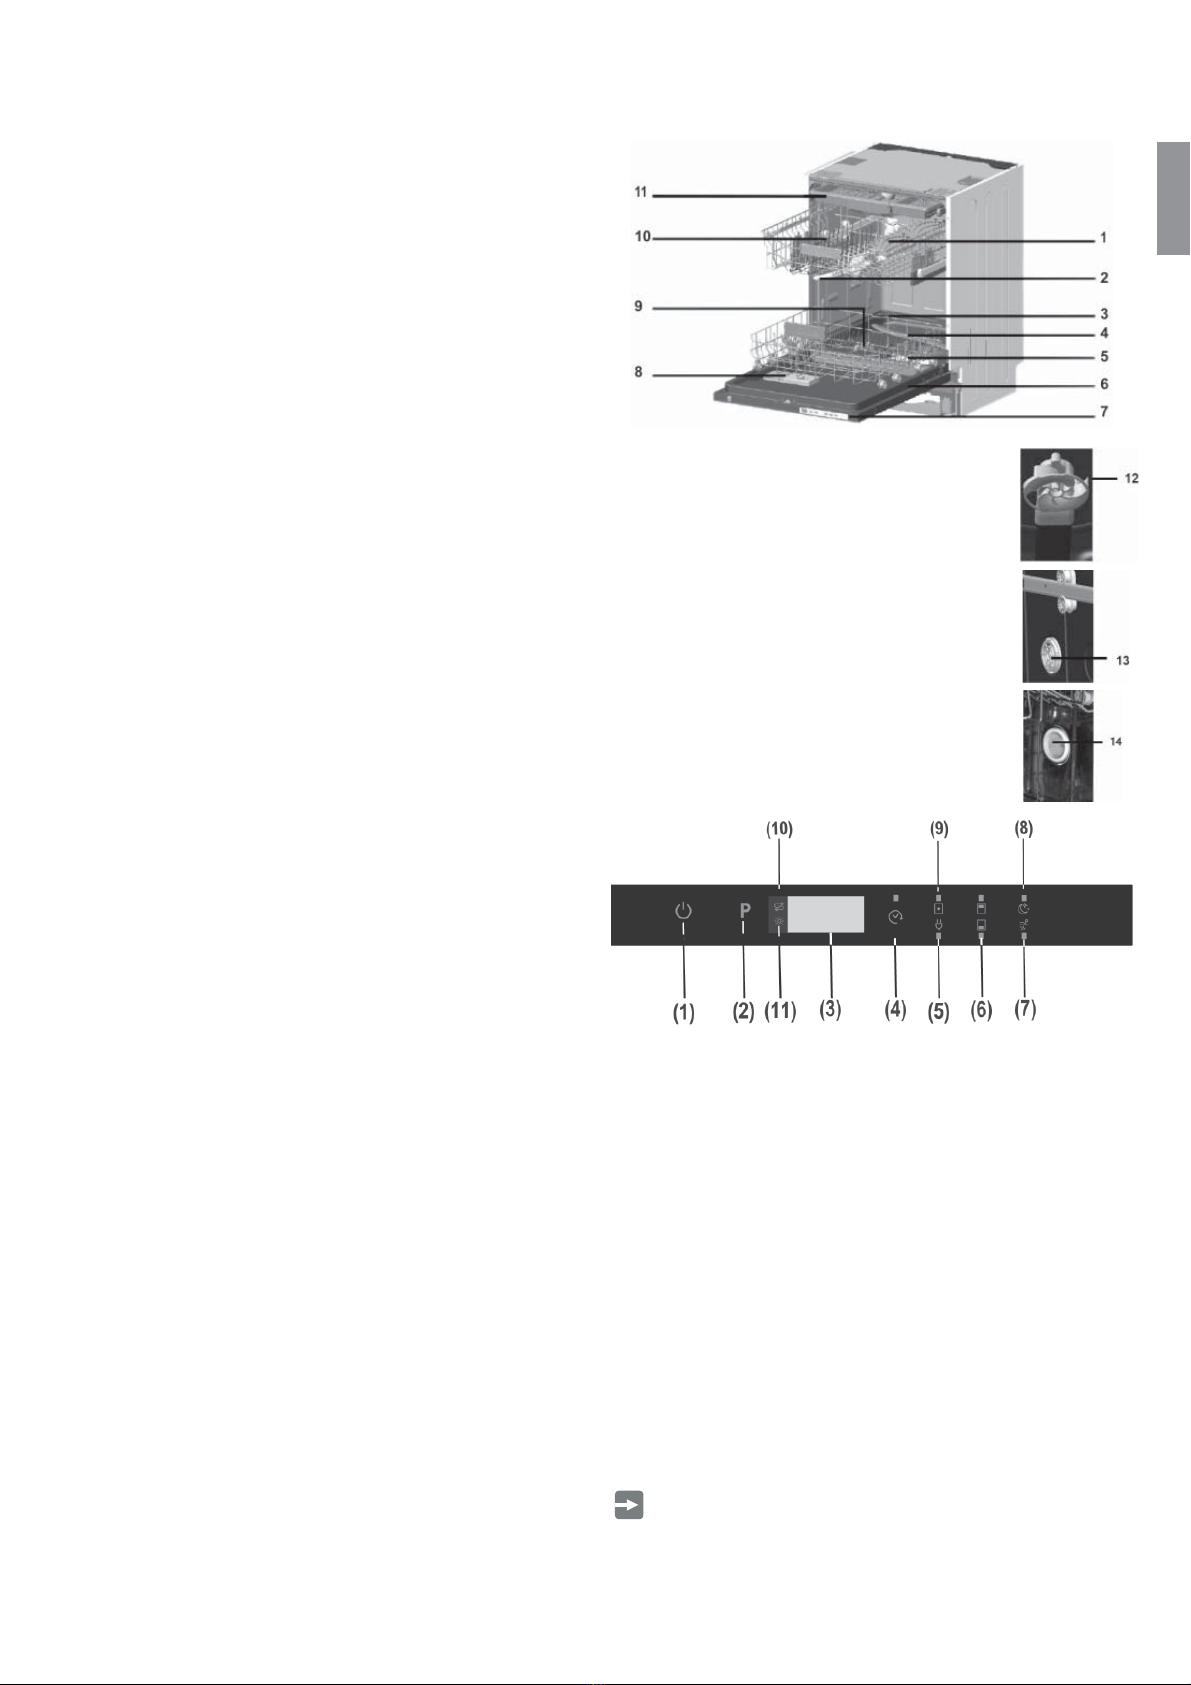
10 PREPARING THE MACHINE FOR USE
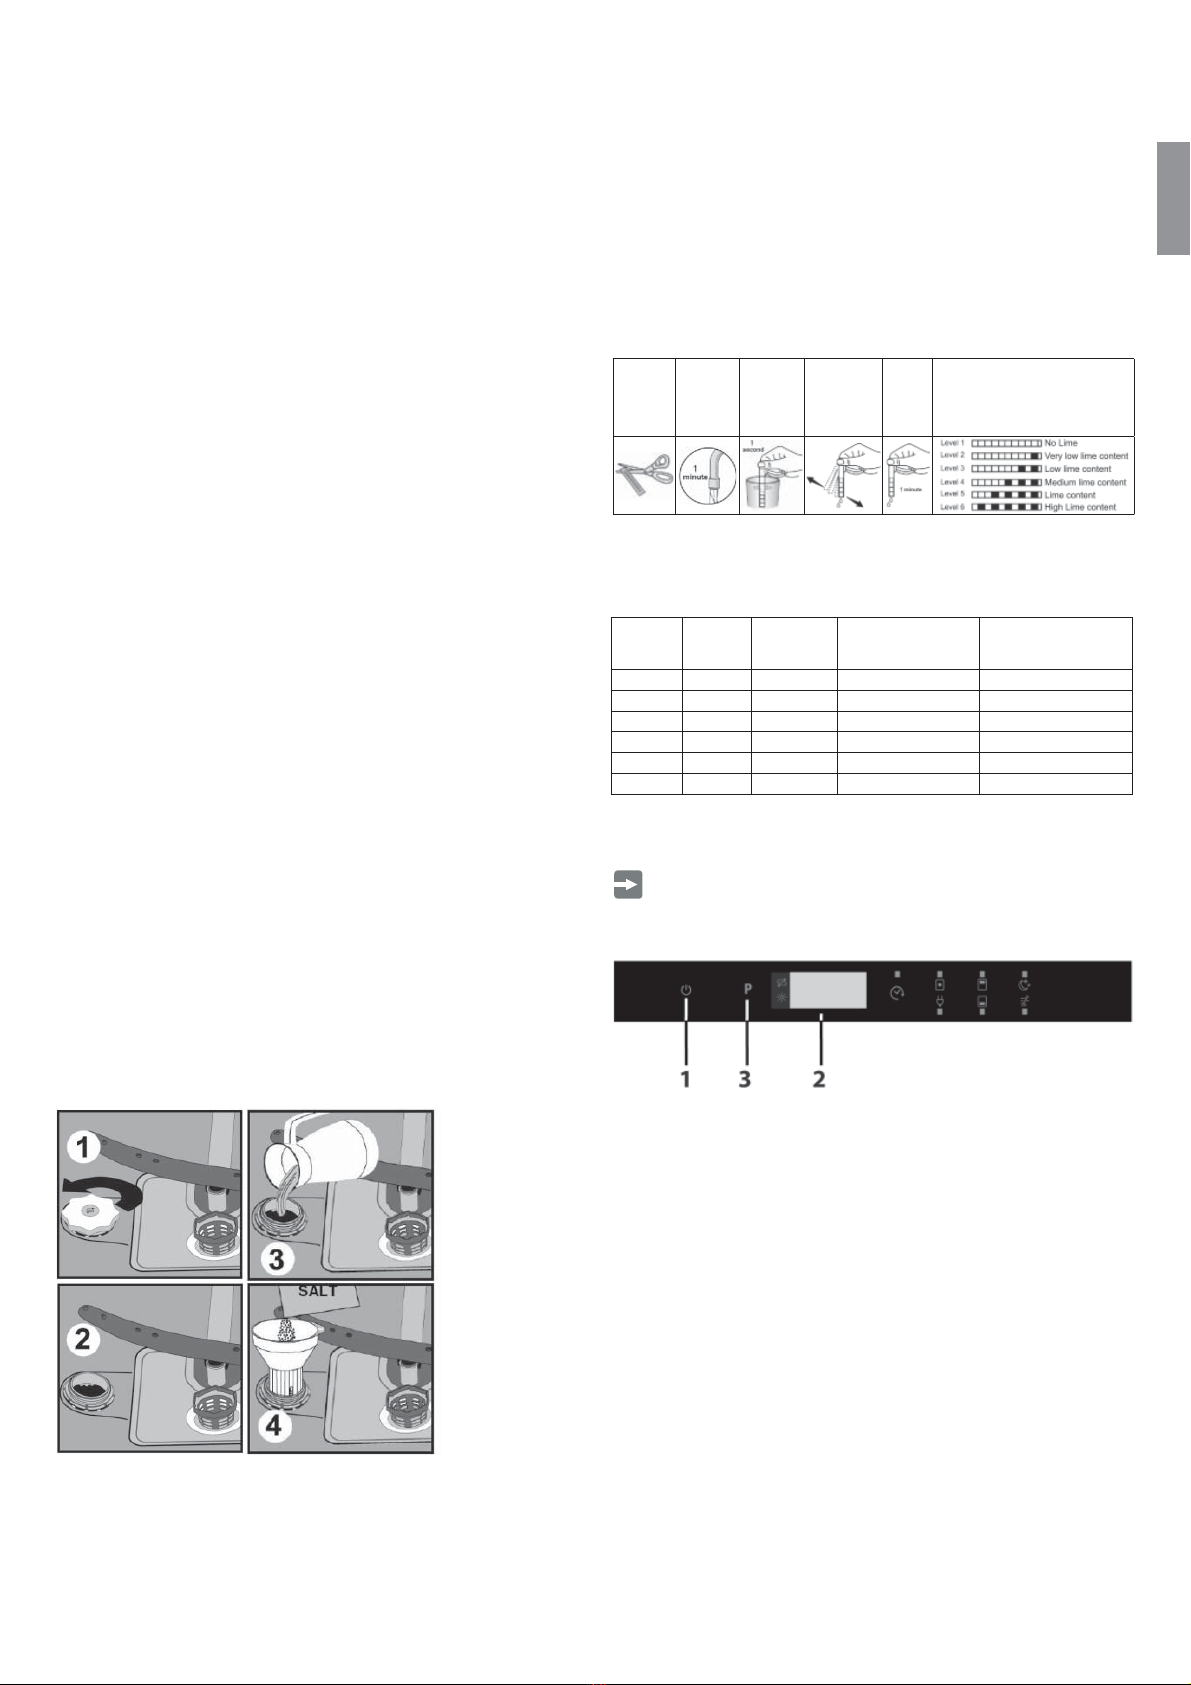
The rinse aid level adjuster can be set to a position between 1 and 6. Factory setting for
rinse aid is the position (3).
You need to increase the degree of the adjuster if water stains form on your
dishes after a wash, whereas you need to decrease the degree if a blue stain is
left when wiped by hand. (3)
Warning: Use only those rinse aid materials which are allowed for use in
the machine. As rinse aid residues left as a result of overowing will create
extremely high amounts of foam and thus reduce the washing performance,
remove the excess amount of rinse aid by wiping it with a rag.
LOADING YOUR DISHWASHER
If you properly place your dishes into the machine, you will be using it in the best way
in terms of energy consumption, washing and drying performance.
There are two separate baskets for you to load your dishes into your machine. You
can load into the lower basket such round and deep items as pots with long handles,
pot lids, plates, salad plates, cutlery sets.
The upper basket has been designed for tea plates, dessert plates, salad bowls,
cups and glasses. When placing long-stem glasses and goblets, lean them against
the basket edge, rack or glass supporter wire and not against other items. Do not
lean long glasses against one another or they cannot remain steady and may receive
damage.
It is more appropriate to locate the thin narrow parts into the middle sections of
baskets. You can place spoons among the other cutlery sets in order to prevent them
from sticking to one another. You are recommended to use the cutlery grid in order
to obtain the best result.
To avoid any possible injuries, always place such long-handle and sharp-pointed
dishes as serving fork, bread knife etc. with their sharp points facing down or
horizontally on the baskets.
WARNING! Place your dishes into your machine in a way that they will not
prevent the upper and lower spray arms from spinning.
TOP BASKET
• HEIGHT ADJUSTABLE RACK
These racks are designed to increase the
capacity of the top basket. You can place your
glasses and cups on the racks. You can adjust
the height of these racks 1 2. Thanks to this
feature, you can place dierent sizes of glasses
under these racks.
Thanks to height adjustment plastics mounted
on the basket, you can use your racks in 2
dierent heights. In addition, you can place
long forks, knives and spoons on these
racks laterally, so that they do not block the
revolution of propeller.
Foldable racks on the upper basket are
designed in order to let you place big items
easier such as pots, pans, etc. If requested,
each part can be folded separately, or all of
them can be folded and larger spaces can
be obtained. You can use foldable racks by
raising them upwards,or by folding down.
• TOP BASKET HEIGHT ADJUSTMENT WHILE IT IS FULL
Basket height adjustment mechanism on the top basket of your machine is designed
to let you adjust the height of your top basket upwards or downwards, without
removing it from your machine when it is full, and create large spaces at the top
or bottom area of your machine as needed. Basket of your machine is set to upper
position in factory settings.
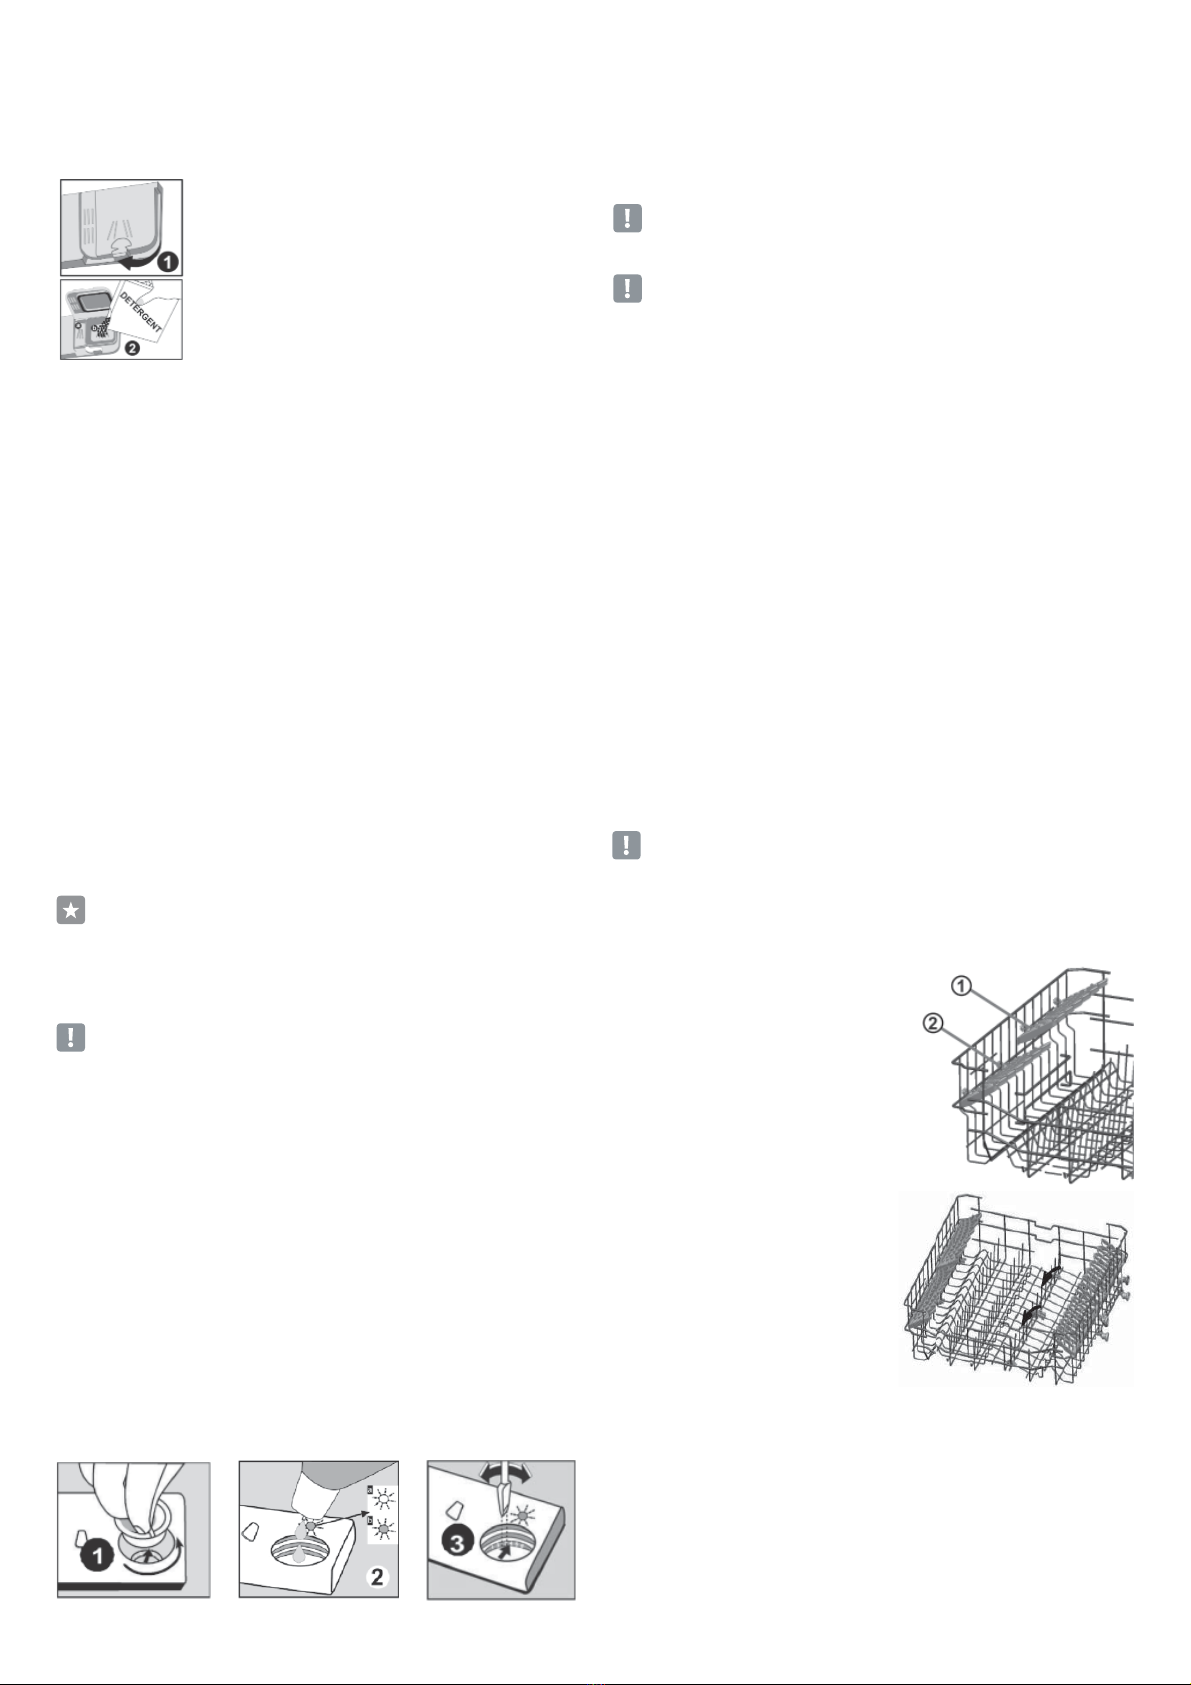
FILLING THE DETERGENT COMPARTMENT
Push the latch to open the detergent container as shown in
the image. (1) The detergent pod has level lines inside. The
detergent pod can take totally 40 cm3detergent. Open the
dishwasher detergent and pour into the larger compartment
b25 cm3if dishes are heavily soiled or less 15 cm3.
(2) If dishes have been kept dirty for a very long time , dried
food wastes on them or overly loaded the dishwasher, pour
a5cm3detergent into the prewash compartment and start
machine. You may have to add more detergent into your
machine, depending on the degree of soil and on the water
hardness level in your area.
COMBINED DETERGENT
Combined detergents may include various properties. Before using the detergent,
read the instructions carefully. Generally combined detergents produce sucent
results under certain conditions only.
• POINTS TO CONSIDER WHEN USING THIS TYPE OF PRODUCTS:
• Always make sure to check the specications of the product you will use
or whether or not it is a combined product.
• Check if the detergent used is appropriate for the hardness of mains water
that machine is appertaining to.
• Observe the instructions on packagings when using such products.
• If such detergents are in the form of tablets, never put them into the
interior section or the cutlery basket of the dishwasher. Always put the
tablets into the detergent compartment in the detergent dispenser.
• They produce good results for certain types of usage only. If you are using
this type of detergents, you need to contact the manufacturers and nd
out about the suitable conditions of use.
• When the conditions of use of such products and the machine settings
are appropriate, they ensure savings in salt and/or rinse aid consumption.
• Contact the detergent manufacturers if you are not obtaining good wash
results (if your dishes stay calcareous and wet) after having used 2 in 1 or
3 in 1 detergents. The scope of warranty for your machine does not cover
any complaints caused by the use of these types of detergents.
Recommended usage: If you are using a combined detergent, then add
rinse agent into your machine ,switch the rinse agent settings into its lowest
(1) position and active the tablet detergent button in order to obtain better
results.If the water hardness level is above level 4,then it is necessary to ll in
the salt container with salt.t is not recommended to use combined detergents
in fast programs.
WARNING: Should any problem, which you have not encountered before,
arise with the use of this type of detergents, contact the detergent
manufacturers directly.
• WHEN YOU GIVE UP USING COMBINED DETERGENTS
• Fill the salt and rinse aid compartments.
• Adjust the water hardness setting to the highest position ( 6 ) and run an
empty-wash.
• Adjust the water hardness level.
• Make the suitable rinse aid setting.
FILLING WITH RINSE AID AND MAKING THE SETTING
Adequate amount of rinse aid prevents white water drops, lime stains, white lm
stripshaped. It also increases drying performance.
To put rinse aid, remove the rinse aid compartment cap by turning it (1).Fill the rinse
aid compartment with rinse to add rinse aid level indicator becomes dark; (2) ret the
cap and close it by turning it in a way that the nails, correspond to one another. By
checking the rinse aid level indicator on the detergent dispenser, you can understand
whether or not your machine needs rinse aid. A dark indicator b means that there is
rinse aid in the compartment, while a light indicator a shows that you need to ll the
compartment with rinse aid.
PREPARINGTHE MACHINE FOR USE