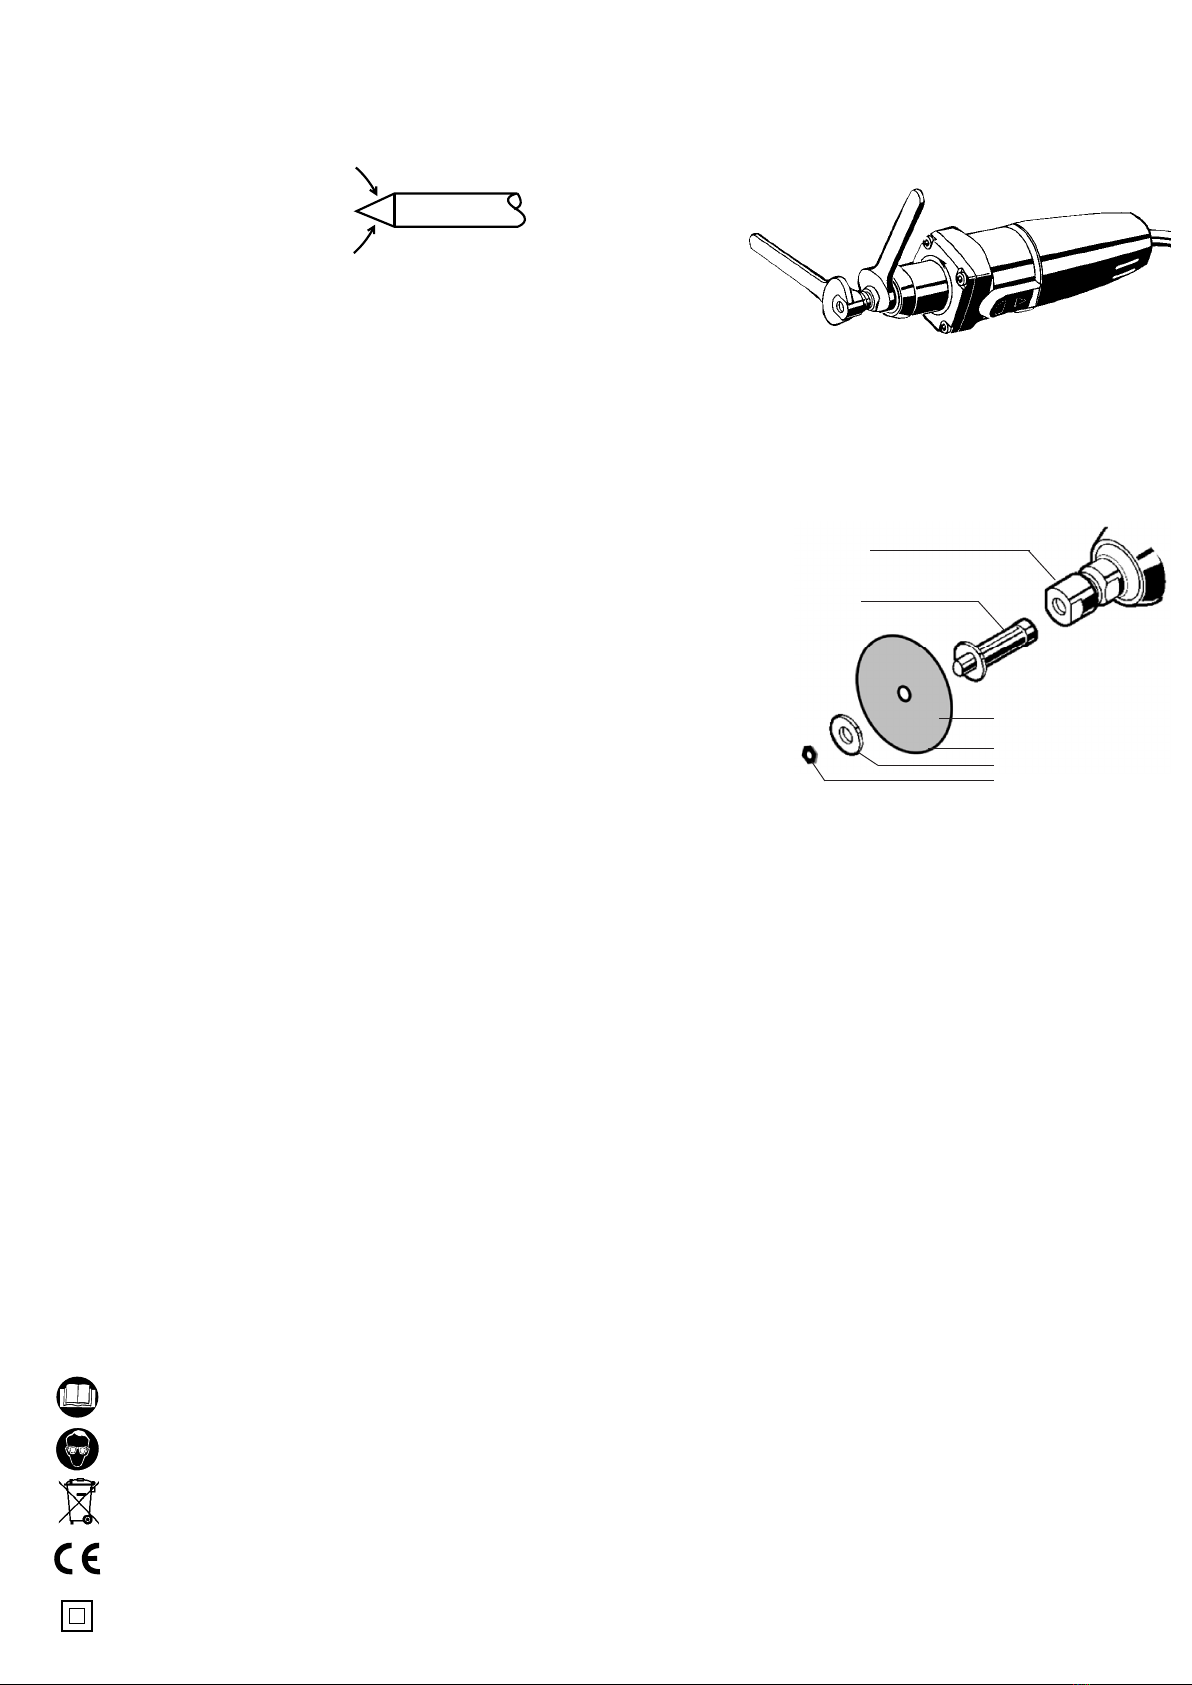
Spindle + Nut
Wheel take-off shaft
Coated side
of wheel
Wheel
Washer
Nut
GENERAL SAFETY INSTRUCTIONS
USEFUL TIPS
SYMBOLS
Read the instructions before
using this equipment.
Protect your eyes ! Wear safety goggles when using this equip-
ment.
Removal of used equipment, this tool can be disposed, free of
charge , at indicated local agencies.
ThisequipmenthasbeentestedaccordingtoEN60745,98/37/
EG(28.12.09,2006/42/EG(29.12.09,2004/108/EG.
Safety class II, safety insulation
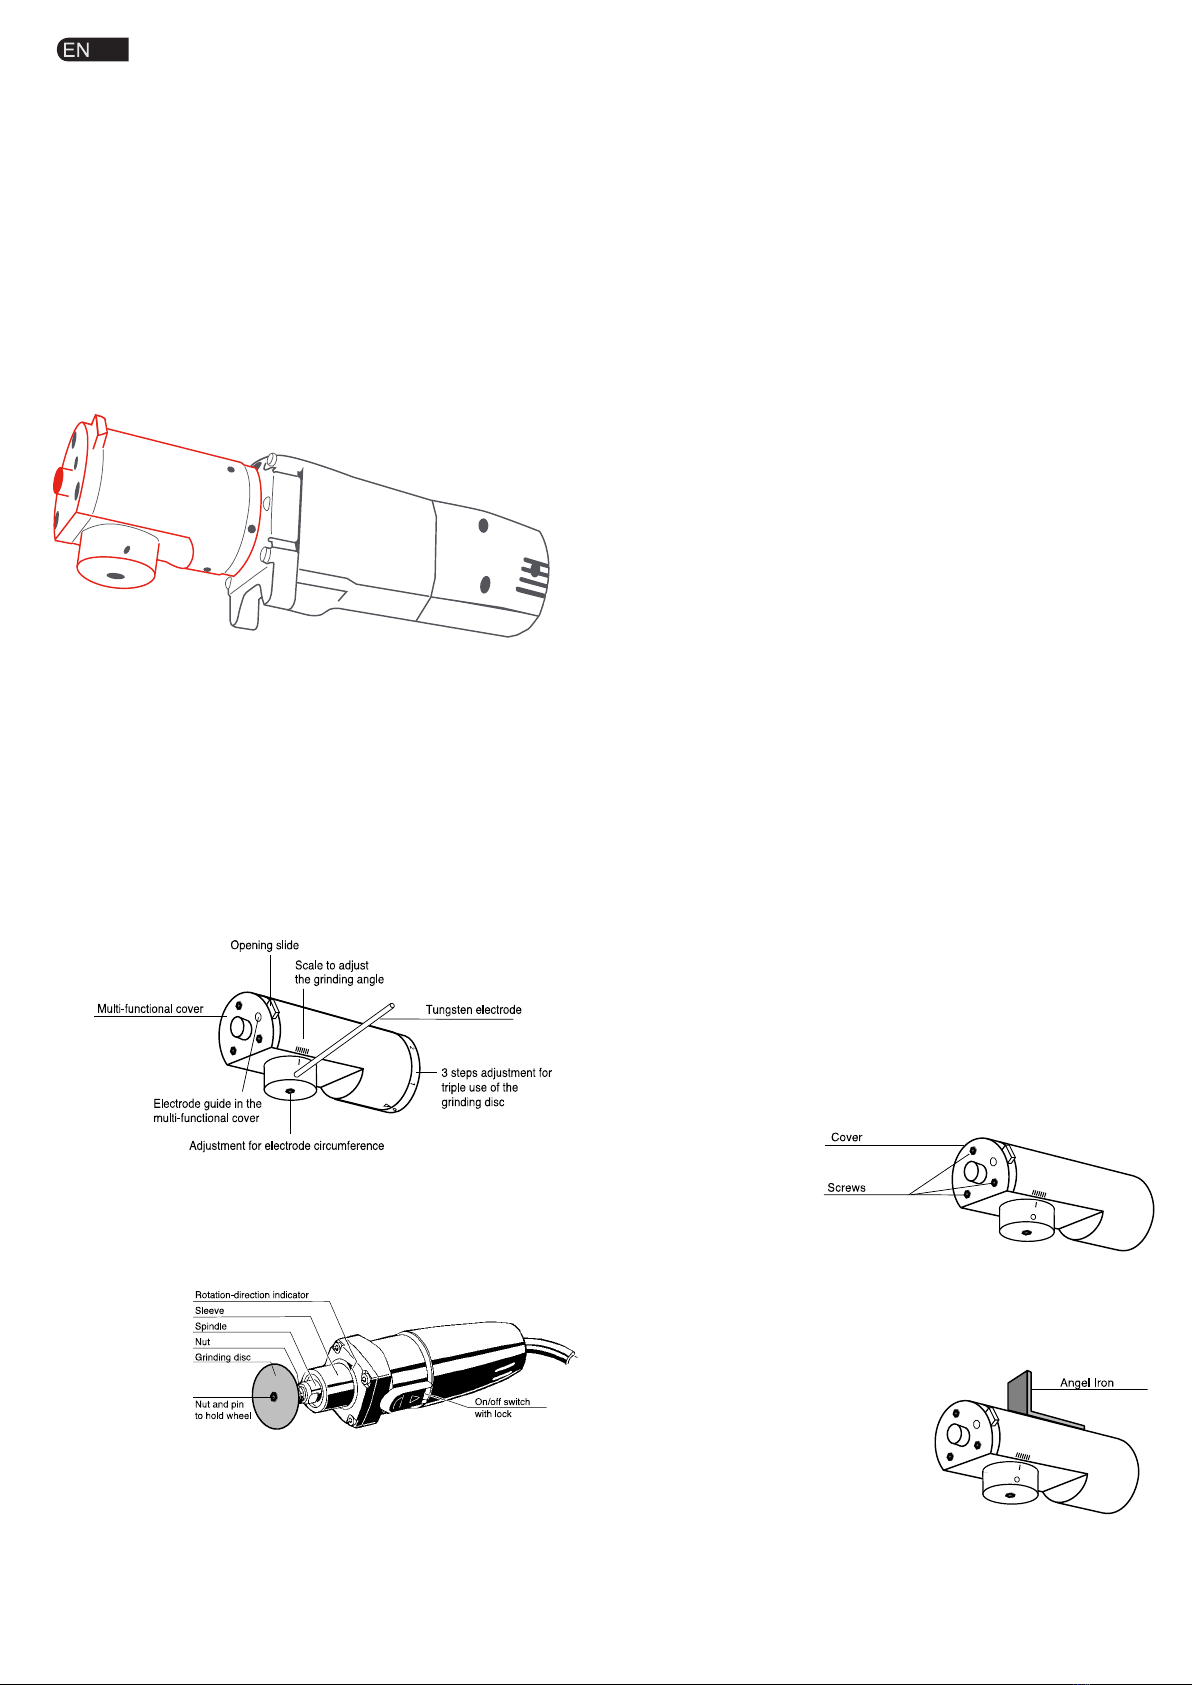
7. How to Use :
Makeadjustmentsfortheangleofthepoint(indegrees
and the electrode diameter
- Loosen the central screw on the head
- Set the degree and the electrode
diameter by turning the head
- Tighten the central screw
The number of degrees equals the angle
of the point on the sharpened electrode:
Guide the tungsten electrode through the opening that coincides with its
diameter;
TurnontheTIGGRINDERMOBILE
Carefully press the tungsten electrode onto the revolving disc, while at the
same time rotating it with light pressure;
Continue to rotate the electrode as it is removed from the disc until there is
no longer any contact;
Inspect the results and, if necessary, repeat the process;
The multi-functional cover with integrated opening slide makes it possible to
surface grind electrodes that have welding deposits due to the welding
process. In addition, ground electrodes can be optimised for aluminium
welding by being given a truncate cone.
3stepsadjustmentfortripleuseofthegrindingdiscbyturningthegrindingin
position 1,2 or 3.
Warning ! Do not sharpen bent or burnt electrodes. Remove any drops on the point
of the electrode before it is sharpened. Use the electrode holder for short electrodes.
x
BRIEF DESCRIPTION
CHANGING THE GRINDING WHEEL
Remove the plug from the electrical socket before doing any maintenance on
this machine !
LoosentheM6screwsandremovethemcompletely
Removeheadshowingtheangleadjustment
Loosen the stud bolts on the sides
Remove the house
Loosen and unscrew the tension nut
Change the wheel
Warning ! Ensure that the wheel is mounted correctly
Replace the washer
Screw the nut back on and tighten it
CHANGING THE WHEEL MOUNT
Remove the plug from the electrical socket before doing any maintenance on
this machine !
Position spanner SW 13 on the spindle
PositionspannerS19onthenut
Loosen the nut
Replace the wheel mount
Tighten the nut
Followthesame
procedure to change
thespringcollet,except
that the nut must be completely
unscrewed in order for the spring to be changed.
Theseproceduresmustbefollowedexactlyastheyareexplainedandillustrated.
Remove the plug from the electrical socket before doing any maintenance on
this machine !
The tension rod must have the same diameter
as the take-off shaft; otherwise the tension
rod will be damaged.
Fitthetake-offshaftinto
the tension rod.
The take-off shaft must rest
on the nut.
Very important !!!
Position spanner SW 13
on the spindle and tighten
thenutwithS19.
Place the wheel on
thetake-offshaft.Ensure
that it is properly mounted
and not crooked. Put on the
washer, screw on the nut and
tighten with spanner SW 10.
PAYATTENTION.Pleaseobservethesesafetyguideli-
nes.Notfollowingthemcancauseelectricalshock,re
and/orheavyinjuiries.Thefollowingconceptelectrical
toolconcernstoolswithelectricalexasalsotools
with build-in batteries.
PLEASEGUARDTHESEINSTRUCTIONSCARE-
FULLY
1. Working place.
a Keepittidyandclean.Disorderandlowlightcan
occur accidents.
b Dontusethetoolinandangerousexplosiveen-
vironment,whereammableproducts,gasesand
dustarepresent.Electricaltoolsproducesparkles,
that can ignite the dust or gases.
c Keepchildrenandotherpersonsawaywhenusing
anelectricaltool.ithanunexpecteddeviationone
can loose control on the tool.
2.Electrical safety.
a Theplugandsocketmustbeappropriate.Dont
changethepluganddontuseanadaptertogether
with an earthed tool. Unchanged plug and socket
decrease the risk of electrical shocks.
b avoidbodycontactwithearthedsurfaces,suchas
pipes,radiators,stoves and refrigerators. There is a
high risk of electrical shock if your body is earthed..
c Protectthetoolfromrainandhumidity.ater
penetration can cause electrical shock.
d Dontusetheexasahandletocarrythetool,for
hanging it on the wall or to pull out the plug from
thesocket.Keeptheexfarfromheat,oil,sharp
edges or revolving parts of equipment. Damaged
ortwistedexesincreasestheriskofelectrical
shocks.
e henworkingoutsideonlyuseextensionexes
that has been approved for outdoor use. Doing so
one decreases the risk of electrical shock.
3. Safety of people.
a Beattentive,lookwhatyouaredoing,andbe
ingenious when working with an electrical tool.
Dontusethetoolwhenyouaretiredorunderthe
inuenceofdrugs,alcoholormedicine.Oneshort
momentofinattentioncanleadtosevereinjuries.
b Alwayswearpersonalprotectionequipment,such
as safety goggles,anti slip shoes,safety helmet
orearmufes,dependingonthetypeofelectrical
toolsinuse.Doingsoreducestherisksofinjuries.
c Preventtheequipmentfromstartingunexpectedly.
Makesurethattheswitchisonoffbeforeplug-
ging in. Never carry equipment that is connected
withyourngeronthepowerswitch.
The best results will be obtained by applying light pressure to the electrode while
at the same time rotating it on the disc. Remove the electrode before turning off
the grinder.
Using too much pressure while grinding will damage the grinder and require more
grinding discs; performance will suffer.
Warning : Always keep the air-intake vents clean.
Accessories :OnlyuseFRONIUSaccessoriesandspareparts.
Spare parts :
Order No.
Grinding wheel 42,0411,0012
PleaserefertotheFRONIUSProductCatalogueforotherreplacementparts,or
ask your dealer.
d Checkbeforestartingthatthekeyandadjustment
tools have been removed.
e Dontoverestimateyourself.Makesuretohavea
secure posture and balance. Doing so ,you are in
better position to control the tool.
f earthecorrectclothing.Dontwearlooseclothing
orjewellery.Keeplonghair,clothesandgloves
away from revolving parts.
g Ifmountingfume-andordust-extractorsmake
sure that they are connected and used the right
way. Doing so is avoiding dust-problems.
4. Carefully handling and use of electrical tools.
a Dontoverloadthetool.Foreveryjobusethe
appropriate electrical tool. Doing so you will obtain
a better and safer result .
b Dontuseanelectricaltoolwithadefectswitch.A
toolwithadefectswitchcannotbeswitchedoff
oron,isdangerousandmustberepaired.
c Pullouttheplugfromthesocketbeforeyouwish
tochangetheadjustments,changesomeparts
or putting away the tool. These measures prevent
unexpectedstartofthetool.
d Keepunemployedelectricaltoolsoutofreachof
childrenDontleavethistoolinhandsofpeoplenot
usedtohandleitorhaventnotreadtheseinstruc-
tions.Electricaltoolsaredangerouswhenusedby
inexperiencedpersons.
e Takecareofyourtool.Pleasecontrolifeverytur-
ningpartcanworkfreelyandisntblocked,orthat
some parts are broken or damaged. Let the tool
berepairedbeforeuse.Manyaccidentsaredueto
badly maintenance of electrical tools.
f Keepcuttingtoolscleanandsharp.Doingsoone
getsabettergripandeasierjobdone.
g Onlyuseelectricaltools,sparesaso,conformthese
instructions for this tool .Take also into conside-
rationtheenvironmentandthejobthathastobe
done. The use of electrical tools for inadequate
jobscanleadtodangeroussituations.
5. Service.
Haveyourtoolservicedbyqualiedpersonaland
repaired only with original spare parts. Than you will be
sure that the safety of the tool is guaranteed.
- 3 -