Frontpoint Smoke and Heat Sensor User manual

SMOKE AND HEAT SENSOR
Instruction Manual
ATTENTION: Please read this manual to ensure proper
installation and usage.

Frontpoint Smoke and Heat Sensor is a fire-protection device that detects both
smoke and temperatures above 135°F (57°C). Regardless of the arming state of
your Frontpoint system, an alarm will sound when sensing smoke, fire, or heat,
and a red LED indicator will flash rapidly.
In the case of alarm, evacuate the building immediately.
OUICK START GUIDE
1. Enroll your sensor into your Frontpoint system
For new Frontpoint users:
Please follow the Set-up Wizard.
For existing Frontpoint users adding equipment:
a. Open the Frontpoint app and tap on the left hamburger menu.
b. Tap on “Equipment Setup”, and then “Sensors”.
c. Select the “Smoke and Heat Sensor”and follow the steps provided.
2. Test the alarm to verify proper functionality
a. Put your system into TEST mode (only necessary for existing Frontpoint users;
new users’systems begin in TEST mode automatically). The absence of this
step will result in emergency responders calling you and a dispatch.
1. Log onto your account at Myfrontpoint.com
2. On the left-hand menu, select “My Account”
3. Under “My Account” click on “Emergency Settings” and scroll
down to “Monitoring Status”
4. Click the pencil icon and toggle “Non-emergency Response Mode”
to “On”and set the duration of time you require to perform your
test
b. Press and hold the big test button in the center of the sensor; verify that the
red LED flashes rapidly and that the alarm ramps up to full sound.
c. Pressing and holding the test button for six beeps will cause fire alarm to be
sent to panel; verify that your Frontpoint panel has also alarmed.
d. You can now release the button; the Smoke and Heat Sensor will stop
sounding shortly.
e. Disarm your panel by pressing your PIN code into either your Keypad or
Touchscreen, followed by “Disarm”.
3. Determine Placement
a. Understanding proper positioning
Hot smoke rises and spreads out, so a central ceiling position is the
recommended location. The air is “dead” and does not move in corners,
therefore Smoke and Heat Sensors must be mounted away from corners.

•CEILING MOUNTING (Recommended)
Keep at least 12”from walls and corners. Additionally, mount the unit at
least 12”from any light fitting or decorative object which might prevent
smoke entering the Smoke Alarm.
•WALL MOUNTING
Only when ceiling mounting is impractical, smoke sensors may be mounted on
a wall, provided that both:
a) the top of the detection element is between 6”and 12”below the ceiling
b) the bottom of the detection element is above the level of any door
openings.
•ON A SLOPING CEILING
With a sloping or peaked ceiling, install a Smoke and Heat Sensor within 24”
of the peak (measured vertically). If this height is less than 610mm (24”) the
ceiling is regarded as being flat.

a. Understanding locations to AVOID:
• Bathrooms, kitchens, shower rooms, garages or other rooms where the
Smoke and Heat Sensor may be triggered by steam, condensation, normal
smoke or fumes.
• Insect-infested, dusty, or dirty areas. Small insects or particles getting into
the smoke detector chamber can cause intermittent alarms.
• Places where the normal temperature can exceed 100°F (38.7°C) or be
below 40°F (4.4°C) (e.g. attics, furnace rooms, directly above ovens or kettles
etc.) as the steam could cause nuisance alarms.
• Near a decorative object, door, light fitting, window molding etc., that may
prevent smoke from entering the Sensor.
• Surfaces that are normally warmer or colder than the rest of the room (e.g.
attic hatches).
• Next to or directly above heaters or air conditioning vents, windows, wall
vents etc. that can change the direction of airflow.
•In very high or awkward areas (e.g. over stairwells) where it may be difficult
to reach the Sensor (for testing, hushing, or battery replacement).
• Locate Sensor at least 1m (39”) from dimmer controlled lights and wiring as
some dimmers can cause interference.
• Locate Sensor at least 1.5m (59”) and route wiring at least 1m away from
fluorescent light fittings as electrical “noise” and/or flickering may affect the
unit.
4. Mount the Sensor
a. Using adhesives:
Apply the four pieces of adhesive to the center of the back of the mounting
plate. Be sure to apply pressure and hold for 30 seconds, when applying to
first the mounting plate and then the ceiling.
OR

b. Using screws:
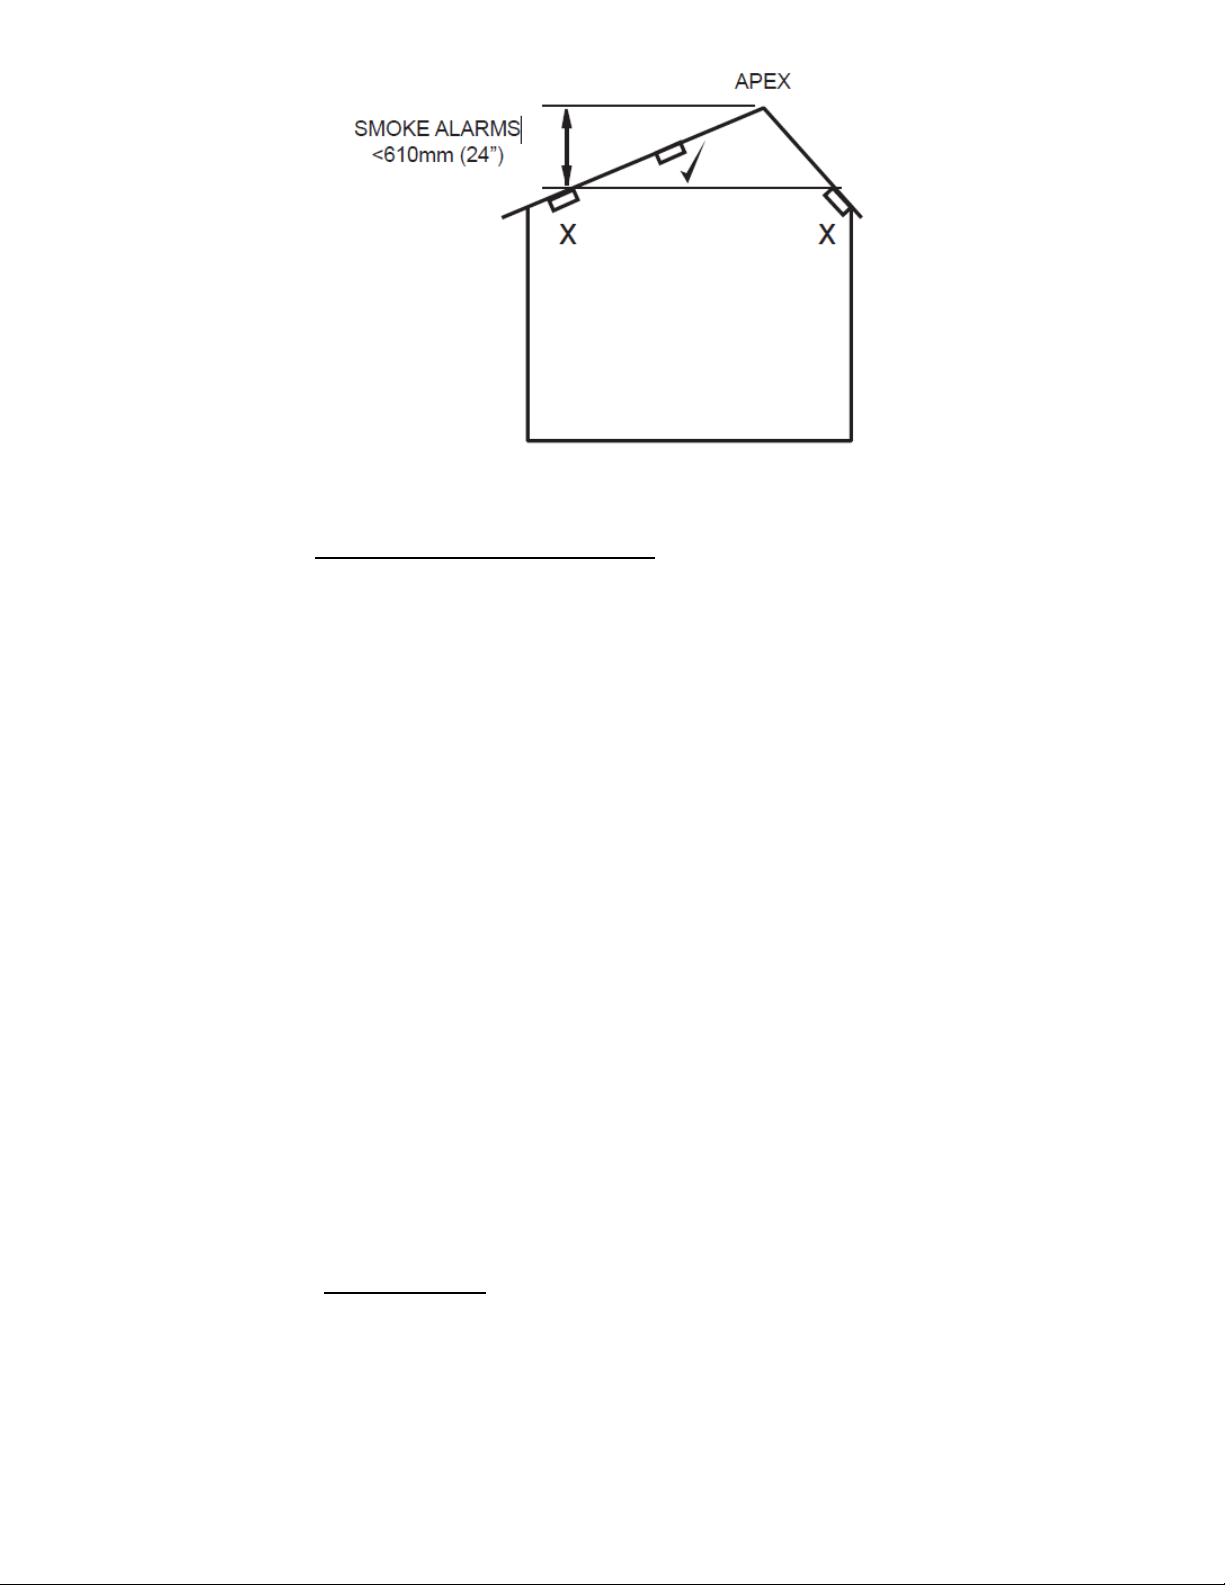
1. Lift off the mounting plate from the Smoke Alarm by twisting the sensor
counterclockwise.
2. Place the mounting plate on the ceiling exactly where you want to mount
the Alarm. With a pencil, mark the location of the two screw holes.
3. Taking care to avoid any electrical wiring in the ceiling, drill holes using a
5.0mm drill bit through the center of the marked locations.
4. Push the plastic screw anchors provided into the drilled holes.
5. Screw the mounting plate to the ceiling.
TROUBLE SHOOTING
If the alarm sounds without the presence of smoke or fire:
1. Ensure that the Smoke and Heat Sensor has been placed in an appropriate location (see
section #3 in the Quick Start Guide, “Determine Placement”).
2. Occasionally smoke alarms can be activated by phenomena other than fire, e.g. dust or
insects. Once you are sure it is a nuisance alarm, press the large test button in the
middle of the sensor to silence the sensor. Use a soft bristle brush or the brush
attachment of your vacuum cleaner to remove dust and cobwebs from the side slots
where the smoke enters. To clean the cover, wipe with a damp cloth and dry
thoroughly.
3. If the Sensor sounds again after the Test button has been pushed, your sensor may be
contaminated. Pressing the test button again, within 4 minutes of the Sensor re-
sounding, will get the Sensor to compensate for chamber contamination. This will
normally resolve the problem. If the Sensor re-sounds for a third time, you may need to
replace your Smoke and Heat Sensor and should call Frontpoint to investigate the issue.
Please call 1-877-602-5276.
If you cannot solve the problem immediately, pressing the test button within 4 minutes of it
going into alarm (for the third time) will silence the Alarm for 8 hours –however it will give two
short beeps (second apart) every 10 minutes to remind the user it has been disabled. If the
contamination clears the sensor will return to normal operation.
If you’ve accidentally set off the alarm while cooking:
Press the large test button in the middle of the sensor to silence the sensor.
If you hear one beep every 48 seconds with the yellow light flashing at the same time:
Replace the batteries with Panasonic CR123A only- use of another
battery may present a risk of fire, explosion, or other detrimental effect on Sensor operation.
After replacing the battery, you should re-test the sensor (please refer to step #2 in the Quick
Start Guide section).
If the Sensor does not sound when the Test Button is pressed:

Replace the battery. After replacing the battery, you should re-test the alarm (please refer to
step #2 in the Quick Start Guide section).
If you hear two short beeps with 2 yellow LED flashes every 48 sensors:
Clean the unit. Use a soft bristle brush or the brush attachment of your vacuum cleaner
to remove dust and cobwebs from the side slots where the smoke enters. To clean the
cover, wipe with a damp cloth and dry thoroughly.
If the beeping persists and the beep does not coincide with a yellow light flash, please call
Frontpoint at 1-877-602-5276.
The Sensor must be replaced if:
The unit is installed for over 10 years (check the “replace by” date marked on
the side of the unit). Before the Sensor is safely discarded, remove from the mounting plate &
disconnect the batteries. The Sensor should be disposed in a safe and environmentally sound
manner at your local recycle center.
8. Troubleshooting
Use the below LED Indicator Summary to diagnose any visual cues from your sensor:

RECOMMENDED BEST PRACTICES
Positioning
•NATIONAL FIRE PROTECTION ASSOCIATION REQUIRED PROTECTION: Where required
by applicable laws, codes, or standards for the specified occupancy, approved single-
and multiple-station Smoke Alarms shall be installed as follows:
(1) In all sleeping rooms, guest rooms, and living areas of a guest suite
(2) Outside of each separate dwelling unit sleeping area within 6.4 m (21 ft) of any door to a
sleeping room, the distance measured along a path of travel
(3) On every level of a dwelling unit,
including basements
(4) On every level of a residential board and care occupancy (small facility),
including basements, excluding crawl spaces and unfinished attics
•Rehearse emergency escape plans so everyone at home knows what to do in case the
alarm sounds. Use the Alarm Test Button to familiarize your family with the Alarm
sound and to practice fire drills regularly with all family members. Draw up a floor plan
that will show each member at least 2 escape routes from each room in the house.
Children tend to hide when they don’t know what to do. Teach children how to escape,
open windows, and use roll up fire ladders and stools without adult help. Make sure
they know what to do if the alarm goes off.
•Routine Button Test
It is recommended to re-test any/all smoke alarms on a weekly basis, regardless of
manufacturer (please refer to step #2 in the Quick Start Guide section). Safety
OTHER SAFETY TIPS
•WARNING: Do not paint your Alarm.
•Repairs, when needed, must be performed by the manufacturer.
•Do not attempt to recharge or burn the battery, as it may explode.
• If it is necessary to remove the battery for separate disposal, handle carefully to avoid
possible eye damage or skin irritation if battery has leaked or corroded.
• To maintain sensitivity to smoke, do not paint or cover the Alarm in any manner; do not
permit any accumulation of cobwebs, dust or grease.
• If Alarm has been damaged in any way or does not function properly, do
not attempt to repair your device yourself.
1. 4. Alarm Limitations
5. Getting Your Alarm Serviced

Table of contents