manuals.online logo
Brands
  1. Home
  2. •
  3. Brands
  4. •
  5. FUNAIR
  6. •
  7. Boat
  8. •
  9. FUNAIR SUPER SWEET SLIDE User manual

FUNAIR SUPER SWEET SLIDE User manual

Other manuals for SUPER SWEET SLIDE

1

Popular Boat manuals by other brands

Windworks 38' Catalina Reference notes

Windworks

Windworks 38' Catalina Reference notes

J 105 owner's manual

J

J 105 owner's manual

GELEX G500 light user manual

GELEX

GELEX G500 light user manual

Monterey Boats Sport Yacht 330 owner's manual

Monterey Boats

Monterey Boats Sport Yacht 330 owner's manual

PURSUIT OS 335 owner's manual

PURSUIT

PURSUIT OS 335 owner's manual

Boston Whaler CONQUEST 345 owner's manual

Boston Whaler

Boston Whaler CONQUEST 345 owner's manual

Jeanneau SUN ODYSSEY 41 DS owner's manual

Jeanneau

Jeanneau SUN ODYSSEY 41 DS owner's manual

Meridian 490 Pilothouse owner's manual

Meridian

Meridian 490 Pilothouse owner's manual

Advanced Elements AdvancedFrame Expedition AE1009 owner's manual

Advanced Elements

Advanced Elements AdvancedFrame Expedition AE1009 owner's manual

Robo Marine Indonesia GEOMAR user manual

Robo Marine Indonesia

Robo Marine Indonesia GEOMAR user manual

Swallow Boats BayRaider owner's manual

Swallow Boats

Swallow Boats BayRaider owner's manual

X SHORE EELEX 8000 owner's manual

X SHORE

X SHORE EELEX 8000 owner's manual

Crivit DINGHY Instructions for use

Crivit

Crivit DINGHY Instructions for use

Mercury Sport 220/240 manual

Mercury

Mercury Sport 220/240 manual

Marquis 720 FLY owner's guide

Marquis

Marquis 720 FLY owner's guide

Sportime Seestürmer user manual

Sportime

Sportime Seestürmer user manual

Sportime Seestürmer user manual

Sportime

Sportime Seestürmer user manual

Raymarine ST70 Instrument User reference handbook

Raymarine

Raymarine ST70 Instrument User reference handbook

manuals.online logo
manuals.online logoBrands
  • About & Mission
  • Contact us
  • Privacy Policy
  • Terms and Conditions

Copyright 2025 Manuals.Online. All Rights Reserved.

instruction manual
INFLATE THE FUN WITH THINGS YOU NEED TO KNOW ABOUT THE SUPER SWEET SLIDE.
1.512.270.4900 | 800.928.4042 | FUNAIR.COM | INF[email protected]OM
SLIP
SLIDE
SPLASH
Super Sweet
SLIDE
ALWAYS read, understand and follow
all warnings and instructions before
use. Keep for future reference.
•Super Sweet Slide
•Strap
•Water Spray Tube
•Set of (8) Plastic Stakes
with Mallet
•Pressure Guage
•Repair Kit
•FunAirHand Pump
ITEMS INCLUDED
IN THIS BOX
instruction manual
Please read this instruction manual carefully before using the
Super Sweet Slide so you will be thoroughly familiar with
the proper way to use your Super Sweet Slideand
understand its limitations. To ensure years of fun with your
Super Sweet Slide, you will need to provide the proper care
and maintenance as described in this manual. Of course, it is
not practical or possible to warn you about all the
hazards associated with using or maintaining your Super
Sweet Slide. You must use your own good judgment.
This manual should be considered a permanent part of the
slide and should remain with the slide for the life of the slide.
Manufactured for FunAir
Austin, TX 78704
Call (512) 270-4900 or go to FunAir.com, if you have any
questions regarding the use of your Super Sweet Slide.
© 2016 FunAir– All rights reserved.
YOU ARE ABOUT TO INFLATE THE FUN!
TABLE OF CONTENTS
3 SAFETY RULES
4 BEFORE USE
5 SET-UP
8 DURING USE
9 AFTER USE
10 STORAGE
10 REPAIRING YOUR SLIDE
Treat it right and the FunAir Super Sweet Slide®
will last for years. Treat it wrong, and it won’t.
Here’s how you treat it right:
2
Super Sweet
SLIDE
instruction manual
IMPORTANT SAFETY RULES
Before Use
• Read instruction manual thoroughly. Use only according to instructions.
• ALWAYS inspect for holes, tears or other damage. If damaged, DO NOT use.
• Proper set up by an adult is required.
• Use on a soft, flat or very gently sloping lawn only, not on pavement or other hard
surfaces.
• DO NOT use on pavement, other hard surfaces, or near rocks, bumps,
depressions, sticks or other sharp objects
• Slide should be a minimum of 10 feet (3 meters) away from any obstruction
including: houses, garages, fences, trees, playground equipment, pools or large rocks.
• Make sure slide and children are completely wet before use.
During Use
• ONLY use with mature, knowledgeable adult supervision. Enforce all safety rules.
• ALWAYS slide so arms and stomach contact slide first. NEVER DIVE HEAD FIRST
onto this slide. Have your arms extended and head up to see what is ahead of you.
• ALWAYS slide on stomach only. DO NOT slide on knees, while standing or feet first.
• DO NOT stand, walk, or run on slide. If needed, scoot o slide and stand up in the grass.
• DO NOT intentionally rebound o side tubes.
• NO pushing or shoving persons while on slide.
• ONLY one child at a time if using a single slide.
• ALWAYS maintain a safe distance between children if using multiple slides.
To prevent SERIOUS INJURY or DEATH:
NOT FOR ADULT USE. NOT FOR CHILDREN OVER 12 OR UNDER 5 YEARS OF AGE.
NOT FOR USE BY ANYONE OVER 5 FEET (1.5 METERS) TALL OR WEIGHING OVER
110 POUNDS (50 KILOGRAMS).
Because of their larger size, older children and adults risk spine, neck, head or other life
threatening injuries from using this slide. Reckless use, misuse or abuse of this slide may
cause serious, even fatal injury.
The safety rules above are provided as a warning
label on the entrance to your Super Sweet Slide.
3
WARNING!
instruction manual
BEFORE USE
Determine the best position for slide.
Locate a flat or very gently sloping soft, grassy area. The lawn
should be free of debris and any objects that could cause injury
such as sticks, roots, rocks, fences, sprinkler heads, playground
equipment ground depressions, etc.
Make sure the Super Sweet Slideis positioned with at least 10’ of
clear space around all sides. That way everyone has room to slide.
• Use on a soft, flat or very
gently sloping lawn only.
• DO NOT use on pavement,
other hard surfaces, or near
rocks, bumps, depressions,
sticks or other sharp objects.
• Slide should be a minimum
of 10 feet (3 meters) away
from any obstructions includ-
ing: houses, garages, fences,
trees, “playground equip-
ment”, pools or large rocks.
10 ft (3 m)
10 ft (3 m)
4
10 ft
(3 m)
10 ft
(3 m)
Super Sweet
SLIDE
WARNING!
instruction manual
SET-UP
Position the Super Sweet
Slidein the area where it will
be used.
Place the slide with the strap
(the one wrapped around the
rolled slide) running the same
direction that the slide will
run. This allows the slide
to unroll from the slide entry
towards the slide exit.
Unroll the Super Sweet
Slide™ completely. All the
Unfold the width of the slide,
exposing the blue side arms
and the FunAirlogo.
Pull the slide straight and
taught, so it is free from wrinkles.
Inspect for rips and tears.
NEVER use a damaged slide.
NOTE:
If connecting multiple Super
Sweet Slides, then repeat steps
1 through 5 until all of the slides
are laid out in a straight run.
1
2
3
4
5
Remove inflation valve caps.
The inflation valves are
located on the end tubes at
slide entry.
6
5
Ensure the air valve is in the
closed position by pushing on
the stem to see if it depresses
about 1/4 inch. If it does not
depress 1/4 of an inch, then
rotate the stem 1/4 turn left
and it should pop out. The
valve is now closed. If the
valve is open during inflation,
then it will release air from
the tube when the pump is
removed.
7
way. Don’t hold back! The 12”
tongue-looking part of the
slide is where you enter.
Unroll the slide in the
direction you have selected
for the exit.
• ALWAYS inspect the slide for holes, tears or other damage. If damaged, DO NOT use.
• Proper set up by an adult is required.
• Set up is the end user’s responsibility and beyond the control of FunAir. Therefore, FunAirexclusively
limits its Warranty to the repair or replacement of a defective product.
• ONLY connect FunAir Super Sweet Slideswith other similar model Super Sweet Slides. NEVER
attempt to connect other slides or tarps to extend the length of the slide.
WARNING!
at the last slide first so you
can determine your ending
spot. Secure this slide to the
ground. Next use the hook
and loop fasteners to connect
the first Super Sweet Slide® to
the next Super Sweet Slide®,
and then secure the second
Super Sweet Slide® to the
ground. Repeat until all Super
Sweet Slide® segments are
secured to the ground and to
each other in series and in a
straight run.
instruction manual
Connect hose from either the
hand pump or the optional
electric pump by inserting
the adaptor into the inflation
valve, twisting 1/4 turn to the
right until it stops.
Use an air pump to inflate
both side tubes on the slide.
Use the pressure gauge
included in the box to
measure the pounds per
square inch (PSI). Continue to
inflate using pump until
pressure reaches about 2 PSI.
When fully inflated, the side
arm will be firm to the touch.
Locate the 4 anchor straps
along each side of the slide
(8 total) and pull them in a
perpendicular direction from
the side tubes until slide
surface is firm.
8
9
10
Insert one stake through
each of the 8 anchor
straps and use the mallet
(included) to hammer stakes
into ground. Use those
muscles! The straps should
pull the slide surface firm and
straight.
11
NOTE:
When fully inflated, the side
arm may be slightly curved
until staked to the ground.
repeat steps 6 through 9 until
all of the side tubes have
been inflated to about 2 PSI.
• The anchor straps on this
product present a potential
strangulation hazard.
• NEVER place anchor straps
around head or neck. Keep
children away from anchor
straps when not in use.
• ALWAYS use all eight (8)
stakes to secure each
Super Sweet Slideto the
ground.
Install the black Water Spray
Tube using the hook and loop
fasteners on the white velcro
strip located on the left side
of the slide surface against
the side tube making sure the
hose connection is
accessible for connecting the
water hose.
12
BEFORE connecting the
water hose to the black Water
Spray Tube, use the water
hose to wet the entire Super
Sweet Slide® surface.
13
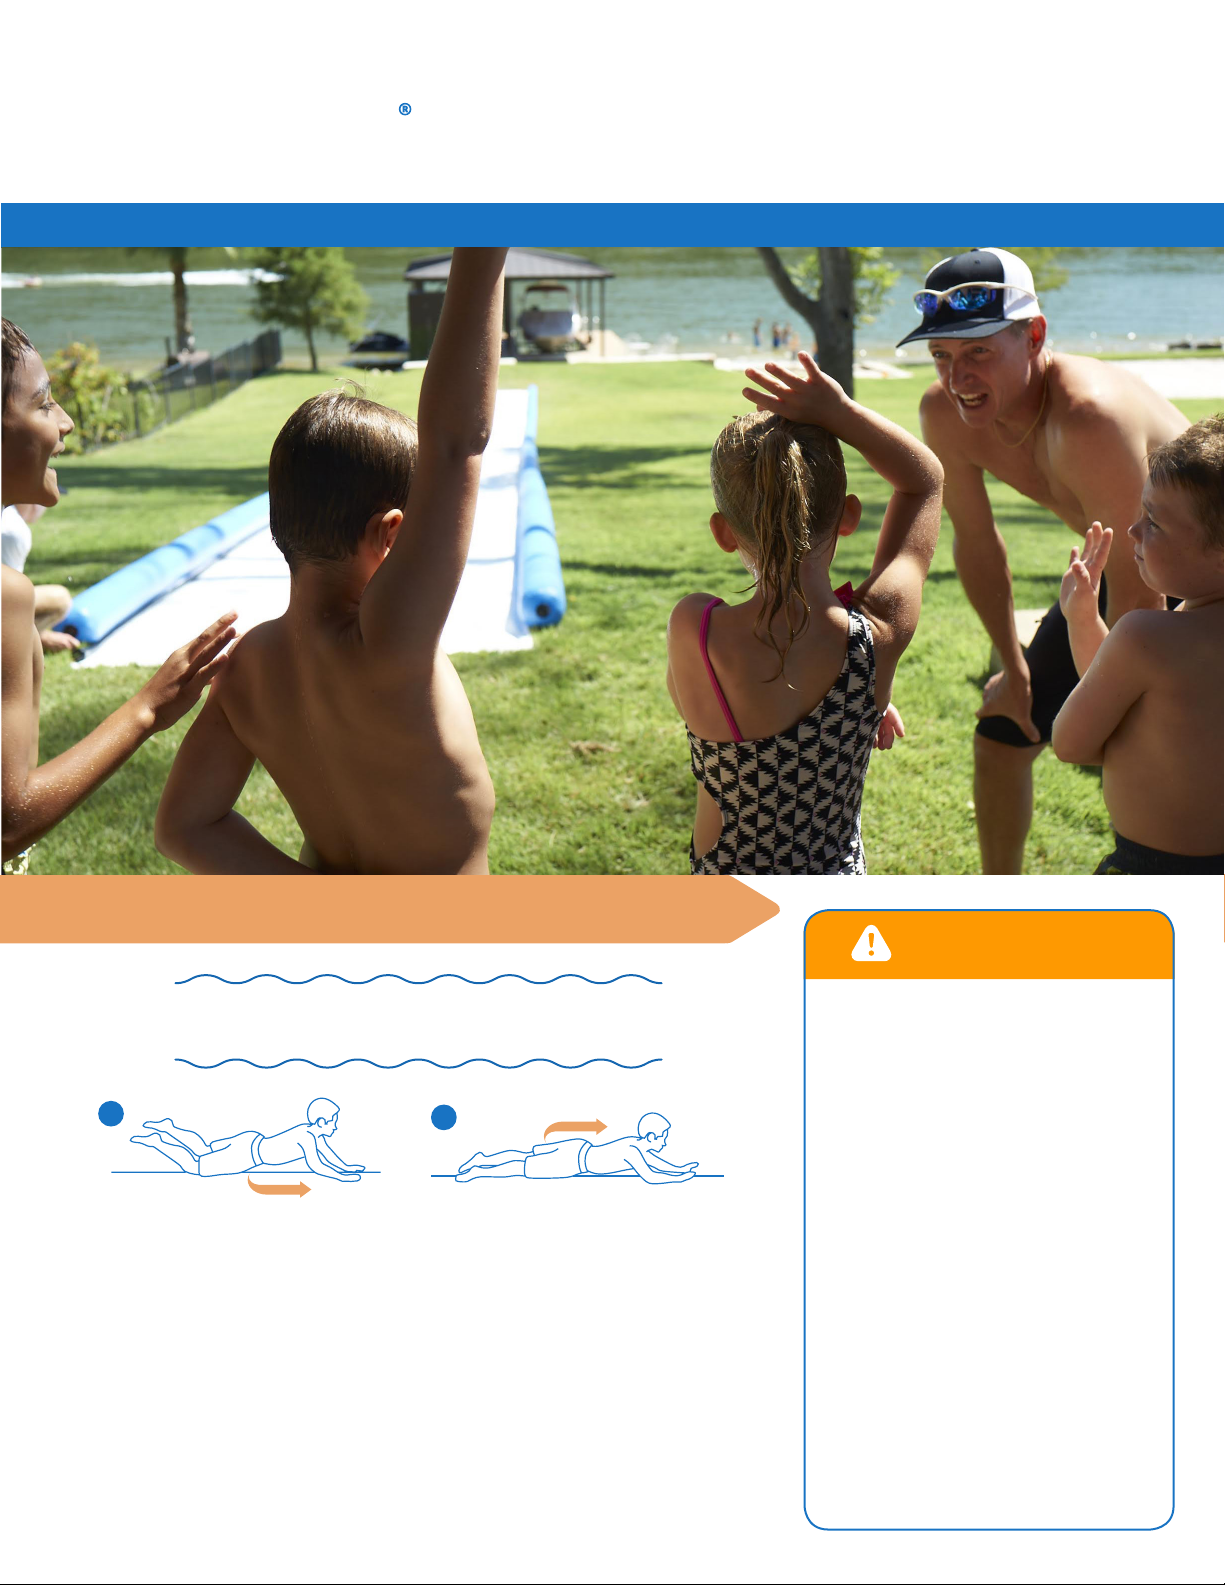
Make sure children are
completely wet before use.
14
Save the best step for last -
HAVE A BLAST!
15
6
Super Sweet
SLIDE
DO NOT overinflate side tubes
or damage may occur.
NOTE:
If connecting multiple Super
Sweet Slides in series, then
WARNING!
NOTE:
If connecting multiple
Super Sweet Slides®, start
WATER PRESSURE
MAY BE AN ISSUE
If you have low water pressure:
• Make sure you are using a
5/8 inch (1.6 cm) diameter
hose.
• Check the water supply
valve is fully open.
• Try a shorter hose. Long
hoses further reduce the
water pressure.
If the water pressure is too high:
• Adjust the Water Spray
Tube to allow the water
spray to cover the slide
surface OR partially close
the water supply valve to
reduce the water pressure.
instruction manual
SLIP
SLIDE
SPLASH
7
instruction manual
DURING USE
• ONLY use with mature, knowl-
edgeable adult supervision.
Enforce all safety rules.
• DO NOT stand, walk or run on
slide. If needed, scoot o slide
and stand up in the grass.
• To avoid possible collision with
other children, ALWAYS move
away from the slide exit area as
quickly as possible.
• DO NOT intentionally rebound
o side tubes.
• NO pushing or shoving persons
while on slide.
• ONLY one child at a time if
using a single slide.
HOW TO SLIDE
12
8
• ALWAYS make sure children are completely wet
before use.
• ALWAYS slide so arms and stomach contact slide
surface first. NEVER DIVE HEAD FIRST onto this
slide. Have your arms extended and head up to see
what is ahead of you.
• ALWAYS slide on stomach only. DO NOT slide on
knees, while standing or feet first.
Super Sweet
SLIDE
WARNING!
WARNING!
instruction manual
AFTER USE
Disconnect water hose from
your Super Sweet Slide.
Remove the black Water
Spray Tube.
Pull slide as needed so it lays
flat and free of wrinkles.
1
2
6
Open the inflation valve on
both side tubes by removing
the inflation valve cap. Then
push the pin in and turn left
1/4 turn. The valves will stay
open to allow air to escape
from the side tubes as you
roll up slide. (see above right)
8
Keep both side tubes fully inflated until slide is dry and you have rolled the inflated
tubes towards the middle of your slide.
Remove stakes from the
anchor straps.
3
If multiple Super Sweet Slides
are connected together,
separate slides.
4
Wipe any dirt, water or debris
o the slide. Use towels to dry
both sides completely prior to
rolling. To avoid mildew, make
sure the slide is completely
dry before storing.
5
Roll side tubes towards
center, so they meet in the
middle of the slide like a scroll.
7
Starting at the slide exit, or
side opposite the valve end,
roll the slide tightly, like a
sleeping bag, towards the
slide entry, or valve end.
Allow the remaining air to
escape from the side tubes as
you roll. Take care to roll the
slide neatly to ensure smallest
storage size.
9
DO NOT use abrasives,
solvents, strong detergents
or household cleaners to
clean your slide. This will
damage the slide and void
the warranty.
After the slide has been rolled
and the side tubes are fully
deflated, close the inflation
valve cap stem by turning 1/4
turn to the left. Put inflation
valve cap back into place so
they do not become
detached or get lost. The
caps also protect the valves
during storage.
10
Place the grey webbing strap
around the slide and cinch it
down to make the roll tighter.
11
9
• The anchor straps on this
product present a potential
strangulation hazard.
• NEVER place anchor straps
around head or neck. Keep
children away from anchor
straps when not in use.
instruction manual
STORAGE
Store slide in a secure location out of sunlight and away from
children to prevent suocation. The storage area should be cool,
dry and rodent free. (Rodents can chew on slide and ruin it.)
REPAIRING YOUR SLIDE
To repair a hole in the
inflatable side tubes, first
locate the hole by performing
a soap test
To perform a soap test, mix 3
parts of water to 1 part soap
in a spray bottle and spray
the mixture liberally onto the
side tubes. Small bubbles will
appear where there is a leak.
1
Clean the area to be repaired
using a cloth and rubbing
alcohol.
2
Brush PVC glue on both the
side tube and the back of the
patch. Allow to dry to a matte
finish.
5
Use hair dryer to activate
glue on both the area to be
repaired and the side patch.
Both should be warm to the
touch, but not hot.
6
Remove any air bubbles using
the edge of a credit card.
8
Allow to dry for 24 hours, then
inflate to about 2 PSI and check
for leaks using the soap test.
9
Cut a patch to cover at least
1” beyond the area on all sides.
NOTE:
Rounding the corners of the
repair patch is highly
recommended to help
ensure a lasting repair.
3
Mark the area to be
repaired using a marker,
crayon or wax pencil, and
then deflate the side tube
that is being repaired.
4
1
2
10
Super Sweet
SLIDE
Apply the patch to the
damaged area on the slide.
7
ONLY use the repair
patches for the inflatable
tubes. DO NOT use the
repair patches for holes or
rips on the slide surface.