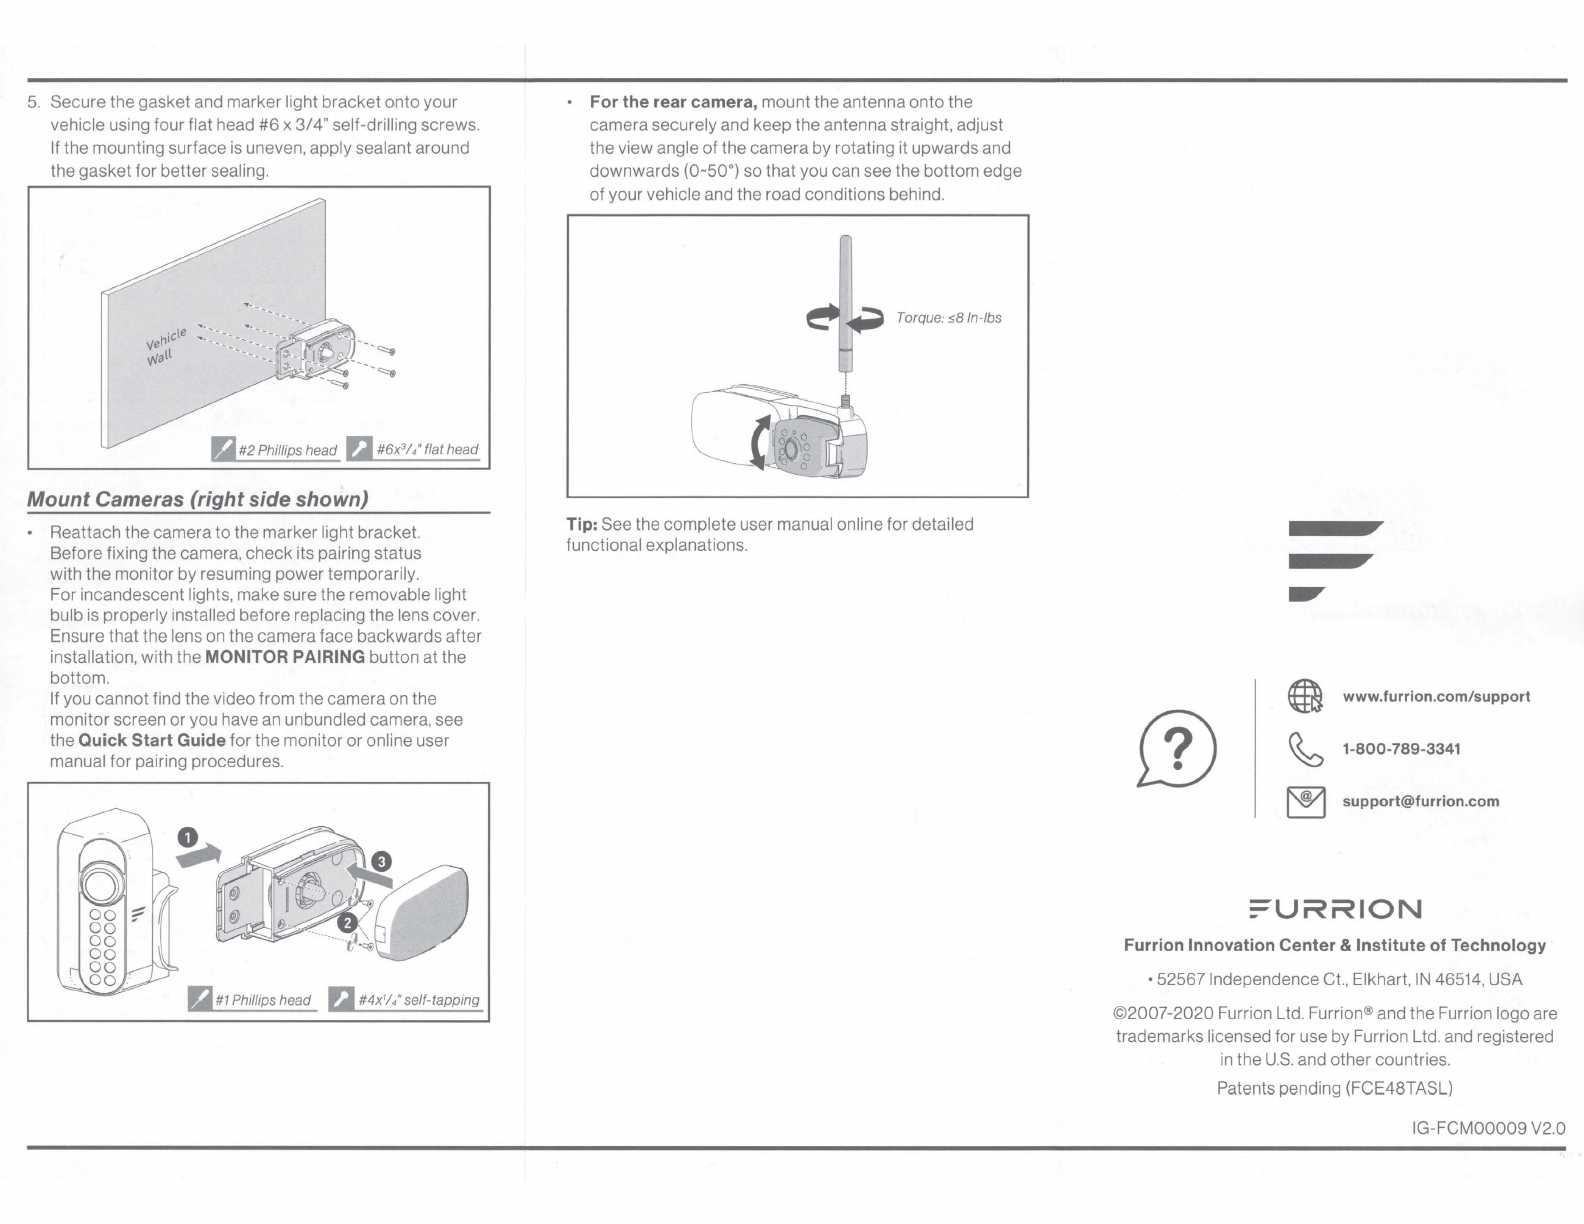
Furrion Vision S User manual

:=UR
RION
VISIONS™
Side Cameras & Rear Camera
with Marker Light
Installation Guide
Models: FCE48TASL
FCN48TASK
FCE48TASH (LED)
This Installation Guide will help
you
install
and
adjust the camera
properly.
Please
visit:
https://furrion.
com/
collections/cameras/
products/vision-s-7-four-
camera-observation-system
and
find
out
more
on
the
How
to
Video
section.
How
to
Video
For
further support
and
to
download
the
complete
user
manual
please
visit:
https://furrion.com/pages/
download-navigation
Full
Manual
Download
Prepare
1.
Ensure that
all
items
in
your package match those shown
in
the 'What's
in
the box' section on the packaging box.
2.
Before installation, please read and understand
all
the
important safety-related instructions from the online user
manual.
3.
Prepare tools you may need,
including#
1and #2 Phillips
head screwdrivers, sealant, insulation tape, pencil
and/or
a
5/8"
hole saw (needed only when drilling a new hole).
Mount Marker Light
Note:
Skip this section if your
RV
is
pre-installed with a
bracket for camera installation.
IMPORTANT:
Before any installation and wiring operation,
remove the key from the ignition and isolate the
12V
/ 24V
power source.
Always seek professional assistance if you are unsure about
the installation and wiring operation.
1.
Determine the mounting location on your
RV.
Ensure that
there
is
no obstacle blocking the camera view.
To
avoid
drilling new holes, you are recommended to replace the
original marker lights with Furrion products directly as
shown below:
-For rear
camera
position: Location of the original
rear marker light at the
top
center on the rear of your
RV.
To
accommodate the camera, ensure that there
is
at least
7.5"
space between the central points of the
two
adjacent marker lights.
-For side
camera
position: Location of the original
side marker lights (as front as possible &the height
from ground to the middle of the trailer).
Note:
The fifth-wheel shown below is for reference only.
You can mount Furrion Vision S products onto
various types of long vehicles such as travel trailer
or
Class
A/B/C
motorhomes.
Rear camera
position Side camera
..
position
2.
Remove the lens cover and detach the camera from the
marker light bracket (right side camera shown).
e
II,il
#1
Phillips head
fl
#4x¼"self-tapping
3.
Remove the original marker light from the corresponding
location.
4.
Connect the bare ends of the power cable on the back
of
the bracket to the nearest
12V
/ 24V power supply:
Red (V+_Camera): to the positive wire of the running light
circuit;
Black (GND): to ground;
Yellow (Trigger): to
left/right
turn signal [only available
for LED versions];
Brown (V+_Lamp):
to
positive wire
of
the running light
circuit;
Example
of
a typical
7-way
connection
FEMALE CONNECTOR, MALE PINS
Tail lights/running lights
(Brown)
Lett turn signal &
CiD
brake light
(Yellow)
Ground
(White)
1-J----~
Trigger Signal Backup lights
Auxiliary 12v+/charging
(Red)
Right turn signal &
brake light
CiD
(Green)
Trailer brake control
(Blue)
Trigger Signal
Note: This image is only for identifying the color code
of
the signal
wires and the user does not have to route the trigger wires to 7-way.
Note:
Ensure that the fuse on the connected power line
provides additional
1A
fusing current for the camera.
Ensure proper cable isolation for all bare ends
(e.g.,
by using
insulation tape).

5.
Secure the gasket and marker light bracket onto your
vehicle using four flat head #6 x
3/4
"self-drilling screws.
If
the mounting surface
is
uneven,apply sealant around
the gasket for better sealing.
lljl
#2
Phillips
head
P,l
#6
x¾
"flat head
Mount Cameras (right side shown)
• Reattach the camera to the marker light bracket.
Before fixing the camera, check its pairing status
with the monitor by resuming power temporarily.
For incandescent lights,make sure the removable light
bulb
is
properly installed before replacing the lens cover.
Ensure that the lens
on
the camera face backwards after
installation, with the MONITOR PAIRING button at the
bottom.
If you cannot find the video from the camera
on
the
monitorscreen or you have
an
unbundled camera, see
the Quick Start Guide for the monitororonline user
manual for pairing procedures.
lljl
#/
Phillips
head
P,l
#4
x¼"
self-tapping
• For the rear camera, mount the antenna onto the
camera securely and keep the antenna straight, adjust
the view angle of the camera by rotating it upwards and
downwards (0-50°) so that you can see the bottom edge
of your vehicle and the road conditions behind.
Torque: 58
In
-lbs
Tip: See the complete user manual online for detailed
functional explanations.
ill
Q.
www.furrion.com/support
~
1-800-789-3341
~
Furrion Innovation Center & Institute of Technology
•52567 Independence
Ct.,
Elkhart,
IN
46514,USA
©2007-2020
Furrion Ltd. Furrion®and the Furrion logo are
trademarks licensed for use by Furrion Ltd. and registered
in
the
U.S.
and other countries.
Patents pending (FCE48TASL)
IG-FCM00009
V2
.0

Main Features
Vehicle Obervation System
Furrion Vision S™ Side Camera with Maker Light
FCE48TASL
CAMERA
RESOLUTION
WATERPROOF
MOTION
DETECT
CMOS °
VIEW ANGLE
INFRARED
NIGHT VISION INTELLIGENT
IR CUT FILTER
720x480
BLIND SPOT
TURN SIGNAL
OPTIONAL BUILT IN
RUNNING LIGHT
IP65
65˚

Specifications
Night Vision Distance
CMOS Size
Optical Lens
IR Cut Filter
View Angle/Degree
Working Current (IR ON)
Working Current (IR OFF)
Camera Pixel
Waterproof
<39ft (12m)
1/3”
F2.5
850nm Automatic
65°
<500mA @12V
<250mA @12V
720 x 480
IP65
1 ”(41mm)
5 ”(141.3mm)
5 ”(144.7mm)
1”(24mm)
1”(42.1mm)
1”(34.8mm)
3 ”(81.5mm)
2”(50.5mm)
2”(53.8mm)
Furrion® and the Furrion logo are trademarks licensed for use by Furrion Ltd. and registered in the U.S. and other countries. © 2007-2019 Furrion Ltd.
FCN48TASL-V1.2

-
URRION
WARRANTY LEAFLET....................................... ENGLISH (EN)
LIVRET DE GARANTIE....................................... FRAN~AIS (FR)
FOLLETO
DE
LA GARANTfA ............................ ESPANOL (ES)
FCE48TASH
\
11
l I\lI
II\
I
\I
Ill
Ill
llllll
l\11\
11111111
\I
\II
Serial
No
.
:2011900766112001671

Congratulations on purchasing your new
Fu
rrion product. All Furrion
products are made to strict quality standards. If used properly for its
intended purpose, your product should provide many years
of
use.
The
details
of
this warranty are set out
in
the terms and conditions (see
reverse) which supplement the authorized reseller
or
dealer's Terms and Conditions
of
Sale. This warranty
is
given
in
addition toyour other rights underthe laws
of
the country
where you purchased this product. Please visit www.furrion.com
LIMITED WARRANTY TERMS AND CONDITIONS
1.
Furrion warrants that this product will be free from defects
in
workmanship and
materials for a period
of
12
months with parts and labor, except the products
in
the following table, from date
of
retail purchase, by the original end-use purchaser
("you") when delivered to you
in
new condition,
in
original packaging, from a
Furrion authorized reseller or dealer and used
in
normal conditions. If a valid claim
is made under warranty, then you will only be entitled to claim
in
accordance with
paragraph 6 below.
Air Conditioning 24 months
Gas Water Heater 24 months
Solar 24 months
AC/DC PowerCenters 24 months
Cordsets &Adapters, Power Inlets
(RV,
and Marine)
60
months
2.
The warranty only applies to Furrion products: with a valid serial number: used for
consumer, private use and not for commercial or industrial use: and where you have
validated the warranty
in
accordance with paragraph4 below.
3. The warranty does not cover damage or loss: caused by poor, faulty or incorrect
use,
installation or maintenance; caused by accident (including force majeure
or
natural forces). misuse. negligence, abrasion, improper storage following delivery,
rot and/orinfestation following delivery, leaks (orsimilar incidents): occurring during
shipment (even when Furrion arranged or paid for shipping): caused by failure to
follow instructions
in
the owner's guide, damaged;caused by normal wear and tear:
caused bymaintenance, repairs or modifications other than those carried out by an
authorized dealer: caused to the decorative surface
of
the product; caused to any
data. software or information. This warranty also excludes claims based on any
misrepresentations by the seller: or if this product's serial number has been altered,
defaced, removed or rendered unidentifiable. This warranty is only valid
in
the
country
of
purchase.Please see section
14
for specific product details
4. To validate the warranty, you must:
(a)
completethe registration via
www.furrion.com,or by call center:and
(b)
register the warranty covering this
productwithin 6 months
of
the date
of
the bill
of
sale:and (c) have theoriginal bill
of sale to validate warranty
of
this product.

5.
If you require warrantyservice on this product. please cease using the product when
a fault arises and contact us directly. You will have
to
present your original bill of
sale
to
establish warrantycoverage. Furrion'scustomerservicecanbereached at:
(i)
For USA/Canada customers:
www.furrion.com
Recreational Vehicleproducts
Email: [email protected]
Toll-free Number: +1800789
3341
Non-Recreational Vehicle products
Toll-free Number:
+1
877
8531900
6.
Following the filing
of
a claim, Furrion will investigate the claim. If we believe there is
1 a defect covered by the warranty, we will at our option either repair or replace the
defective product (or part) It is Furrion's right
to
replace with new or refurbished
product. If the product is part
of
an advanced exchange program. you may be
required to providea credit authorization during the claiming process.
7.
Pleasenote
in
the eventthatno defectcanbe found, it is yourresponsibility topayfor
the re-delivery
of
the replacement items. If a defect is found, Furrion will pay for the
re-delivery
of
the replacement items.
8.
Installation
of
any repaired or replaced product will notbe Furrion
's
responsibility.
9.
If you do notallowthe authorizeddealertoinspect the productwhich isthesubject
of
the warrantyclaim, you will invalidate the warranty
in
respect
of
that claim.
10.
Any repaired or replaced Fumon product parts shall be guaranteed on the terms
of
this warrantyfor the unexpired portion
of
the warranty period only.
11.
This warranty is non-transferrable and is personal to the original end-use purchaser
as shown on the original dated bill
of
sale. Any attempt to transfer this warranty shall
immediately render it void.
12.
This warranty is subject to the jurisdiction
of
the courts
of
the State where you
purchased this product, and any dispute
or
claim arising
out
of,
or
in
connection with
it or its subject matter, shall be governed by, and construed
in
accordance with the
laws
of
that State.
13.
In
the event
of
any difference between this warranty and the provisions
in
any
owner's manuals. warranty leaflets, or packaging cartons, the terms
of
this warranty
shall prevail tothe fullest extentallowed by law.
14.
THIS WARRANTY AND REMEDIES SET FORTH ABOVE ARE EXCLUSIVE AND
IN
LIEU OF ALL OTHER WARRANTIES, REMEDIES AND CONDITIONS, WHETHER
ORALOR WRITTEN, EXPRESS
OR
IMPLIED.FURRION SPECIFICALLYDISCLAIMS
ANY AND ALL IMPLIED WARRANTIES, INCLUDING, WITHOUT LIMITATION,
WARRANTIES OF MERCHANTABILITY AND FITNESS FOR A PARTICULAR
PURPOSE. IF FURRION CANNOT LAWFULLY DISCLAIM IMPLIED WARRANTIES
UNDER THIS LIMITED WARRANTY, ALL SUCH WARRANTIES, INCLUDING
WARRANTIES OF MERCHANTABILITY AND FITNESS FOR A PARTICULAR
PURPOSE ARE LIMITED
IN
DURATION TO THE DURATION OF THIS WARRANTY.
NO FURRION RESELLER, AGENT,
OR
EMPLOYEE IS AUTHORIZED TO MAKE
ANY MODIFICATION, EXTENSION,
OR
ADDITION TOTHIS WARRANTY. FURRION
IS
NOT RESPONSIBLE FOR DIRECT. INDIRECT. SPECIAL, INCIDENTAL
OR
CONSEQUENTIAL DAMAGES RESULTING FROM ANY BREACH OF WARRANTY

www.furrion.com
Other manuals for Vision S
4
This manual suits for next models
3
Table of contents
Other Furrion Digital Camera manuals