Furstein DP 300 User manual

1
ITALIANO
USER’S MANUAL
DP 300
GB/USA - READ AND KEEP THIS MANUAL FOR FUTURE REFERENCE.
F - LIRE ET CONSERVER CE MANUEL POUR LE RENDRE ACCESSIBLE POUR DE FUTURES CONSULTATIONS.
D- DIESES HANDBUCH AUFMERKSAM DURCHLESEN UND ZUM NACHSCHLAGEN AUFBEWAHREN.
E- LEA Y CONSERVE EL PRESENTE MANUAL PARA FUTURAS CONSULTAS.
I- LEGGERE E CONSERVARE IL PRESENTE MANUALE PER FUTURE CONSULTAZIONI.
BONTEMPI S.p.A. Viale Don Bosco, 35 - 62018 Potenza Picena (MC) - Italy • www.farfisa.eu • e-mail: info@farfisa.eu

2

3
ITALIANO
Table of Contents
1. TECHNICAL FEATURES.............................................4
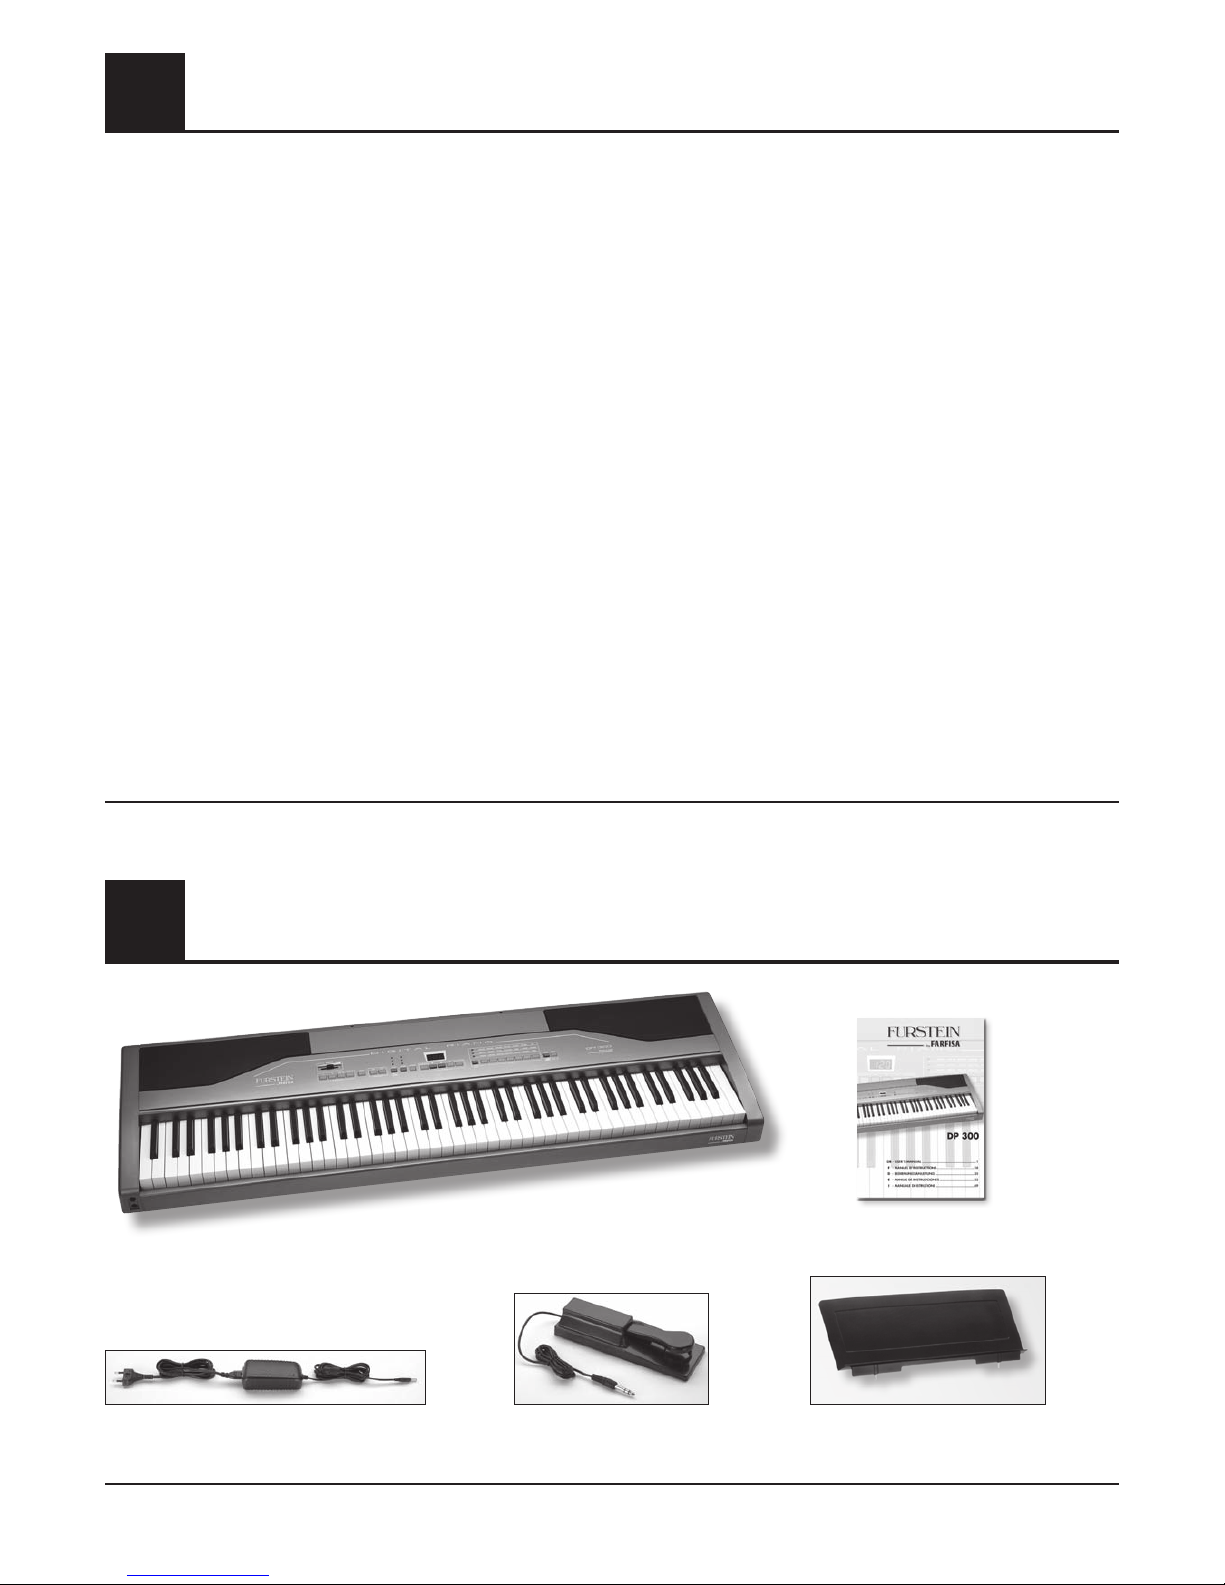
2. PACKING CONTENT ...............................................4
3. ACCESSORY UPON REQUEST..................................5
4. MUSIC STAND........................................................5
5. WARNINGS ...........................................................6
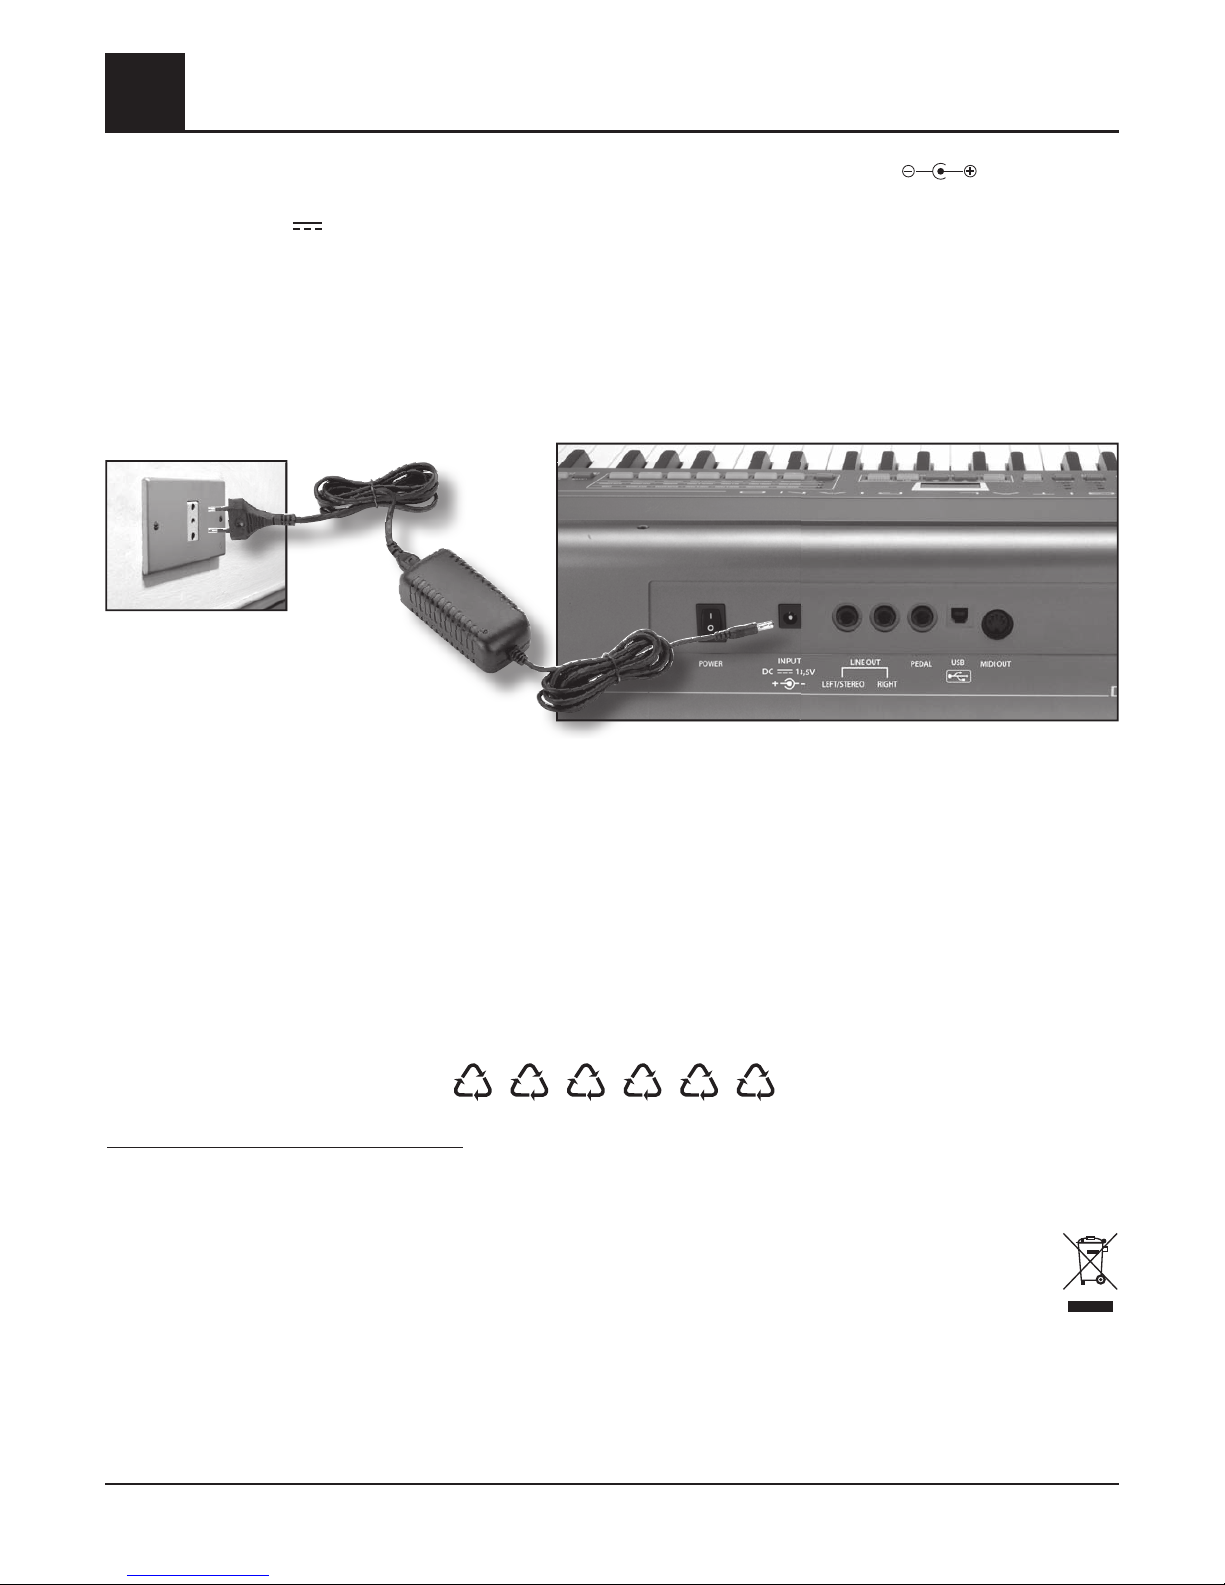
6. POWER SUPPLY......................................................7
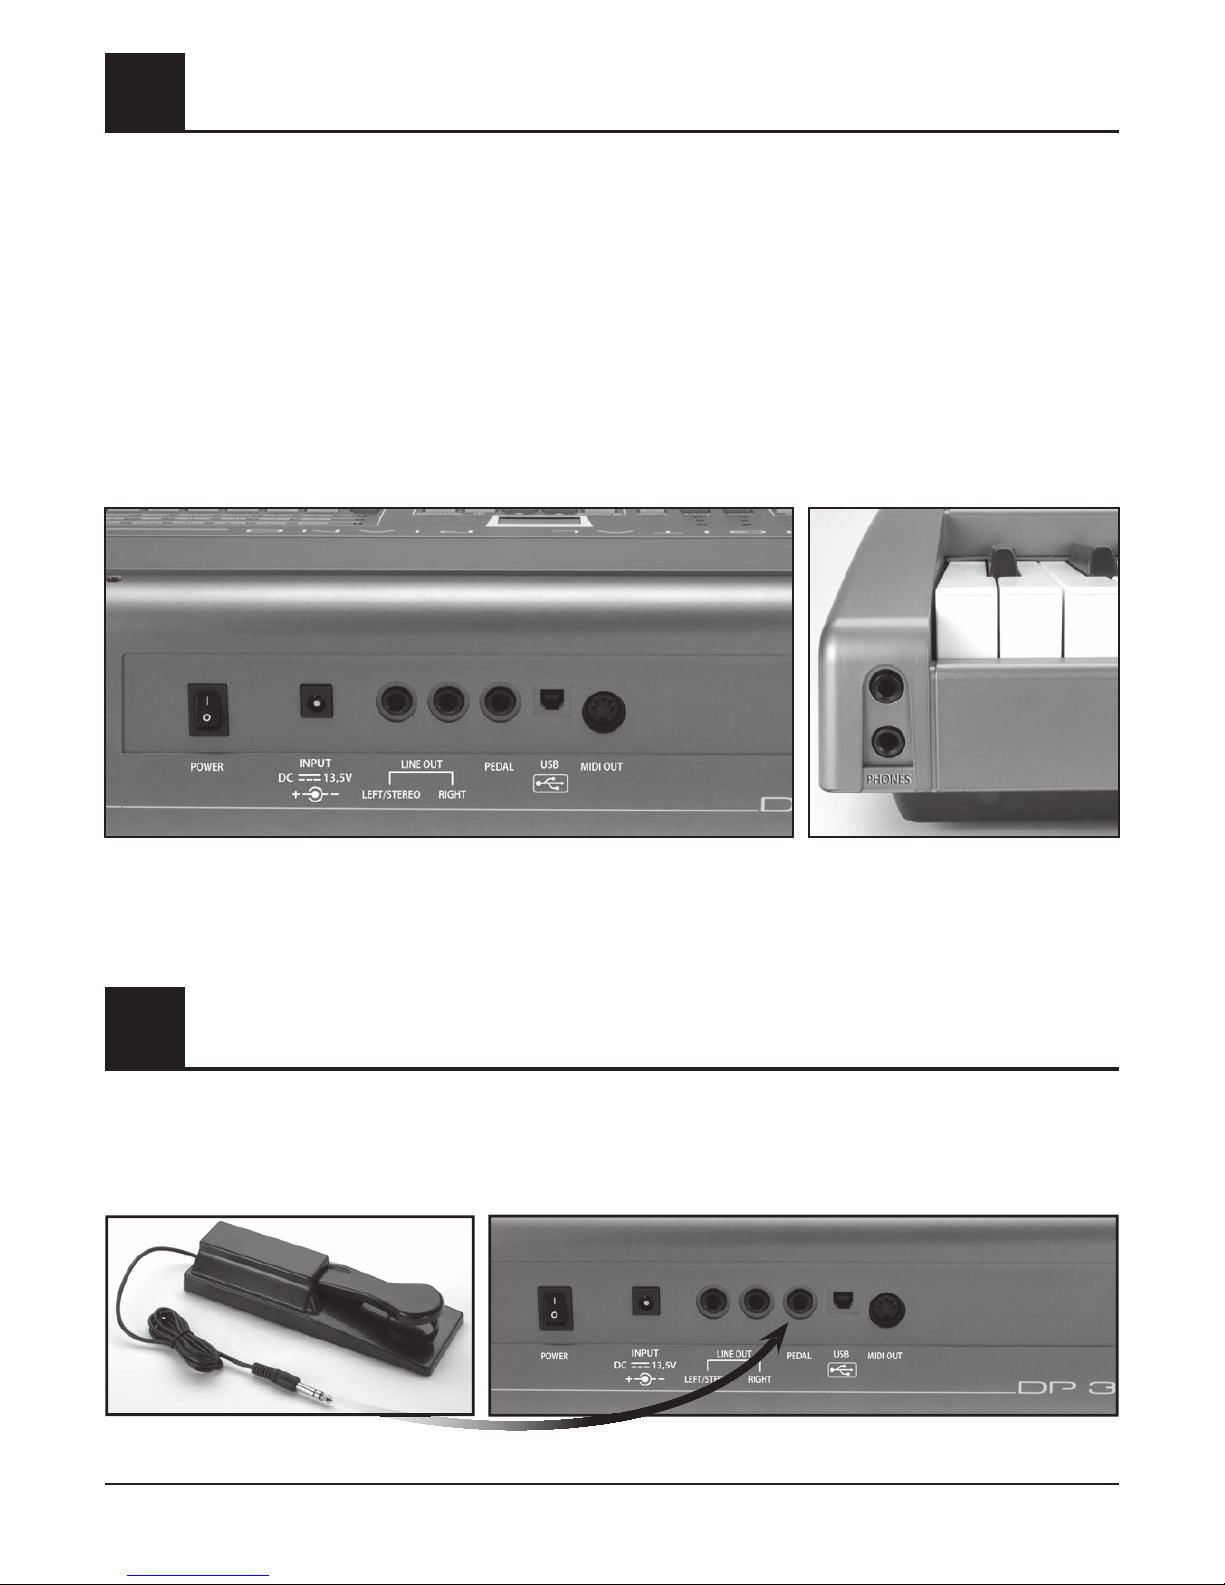
7. SOCKETS................................................................8
8. THE SUSTAIN PEDAL ...............................................8
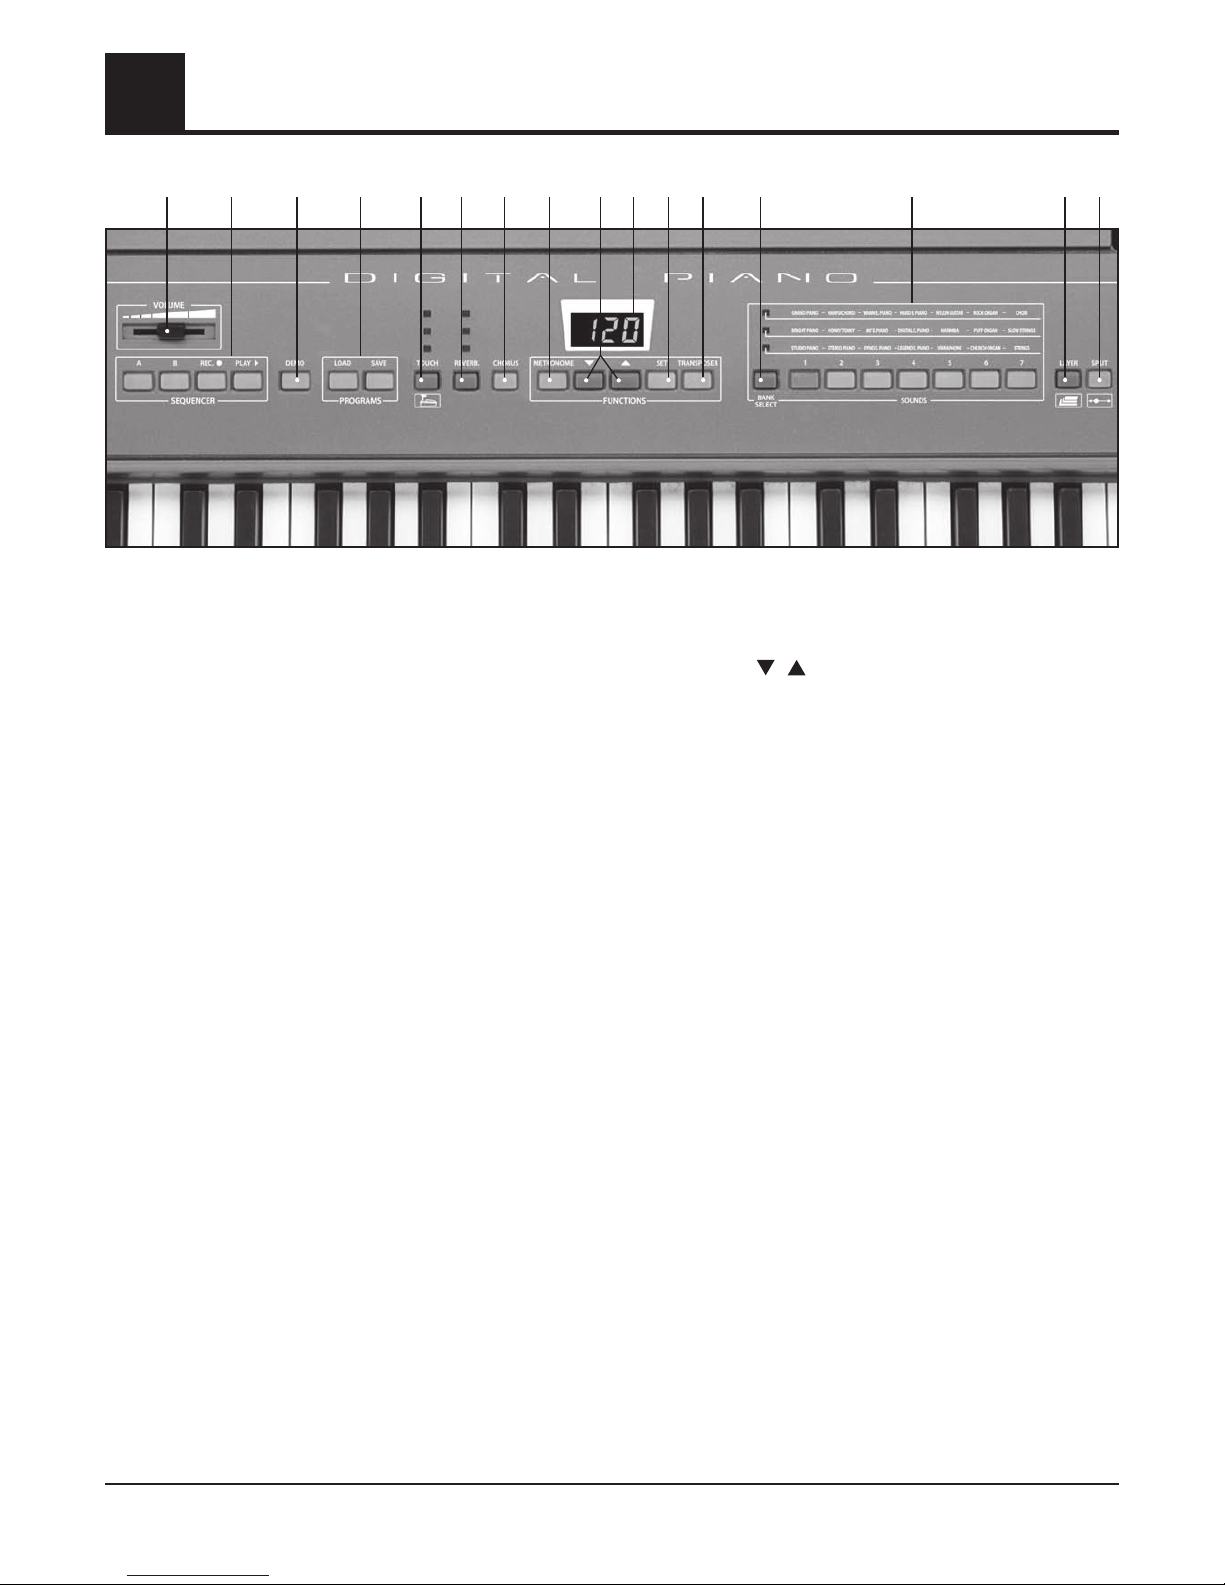
9. CONTROL PANEL....................................................9
10. USE INSTRUCTIONS..............................................10
SWITCH ON/OFF.................................................10
GENERAL VOLUME...............................................10
DEMONSTRATIVE SONGS (DEMO) ......................10
SOUNDS..............................................................10
DIVISION OF THE KEYBOARD (SPLIT).....................10
COMBINATION OF TWO SOUNDS (DUAL)...........12
TRANSPOSITION OF THE NOTES (TRANSPOSER)
.....12
THE EFFECTS .......................................................13
REVERBERATION................................................................. 13
CHORUS .............................................................................13
DYNAMIC OR TOUCH-SENSITIVITY.......................13
METRONOME ......................................................13
HOW TO ADJUST THE SPEED OF THE METRONOME............ 13
HOW TO SET THE DIVISIONS OF THE METRONOME............ 14
HOW TO SET THE VOLUME OF THE METRONOME .............. 14
THE RECORDER (SEQUENCER)..............................14
HOW TO RECORD THE 1st TRACK ....................................... 14
HOW TO RECORD THE 2st TRACK ....................................... 14
HOW TO RECORD ANOTHER TWO SONGS........................ 15
THE PROGRAMMES ............................................15
HOW TO RECALL A PROGRAM ........................................... 15
HOW TO SAVE A PROGRAM .............................................. 15
SPECIAL FUNCTIONS (SET) ...................................16
SELECTION OF THE 3 SONGS OF THE SEQUENCER............. 16
SELECTION OF THE FUNCTIONS ......................................... 16
MOVING OF THE OCTAVE OF THE LOWER SOUND...................... 16
ASSIGNING OF PEDAL ................................................................. 16
TUNING RANGE........................................................................... 16
SELECTION OF MIDI SETTINGS ............................................ 16
TRANSMIT CHANNEL.................................................................... 16
(LOCAL CONTROL ON/OFF.......................................................... 16
PROGRAM CHANGE ON/OFF...................................................... 16
11. CONNECTION TO A COMPUTER ...........................17
MINIMUM SYSTEM REQUISITES ........................................... 17
PROCEDURE FOR COMPUTER CONNECTION ...................... 17
FREE MUSICAL SOFTWARE DOWNLOADABLE FROM INTERNET
..... 17
12. MIDI CONNECTION ..............................................18
WHAT IS MIDI ..................................................................... 18
13.
CONNECTION TO AN EXTERNAL AMPLIFIER
.................18
14. PROBLEM SOLVING..............................................19
15.
TABLE OF SOUNDS AND RELATIVE PROGRAM CHANGE
...19
16. MIDI IMPLEMENTATION CHART.............................20
WELCOME,
Thank you and congratulations for having chosen this Digital Piano. For its correct use, please read this guide before
use and keep the manual for future consultation.
Instrument identification
For any communication, always quote the model (DP 300) reported at the bottom
of the instrument.
MODEL
DP 300
RATING
13.5V
25W
SER. N°.
H425 0160

4
DEMO: 7 Demonstrative songs
AMPLIFICATION: Stereo 15 + 15 watt (RMS) - Two
high-efficiency Ø 100 mm loud
speakers - Sound system: Bass Reflex
AC/DC ADAPTER: Input Vdc= 13,5 V / I = 3,25 A
(central positive – 6.3 and 3 mm)
13.5 V DC INPUT: Socket for connecting mains adapter
LINE OUT RIGHT
AND LEFT/STEREO: Sockets for connection to external
amplifier
PEDAL: Socket for “sustain” pedal
USB TO HOST: Connection to a computer for data
reception and transmission.
MIDI OUT: Socket to transmit MIDI data to other
instruments.
PHONES: 2 Sockets for STEREO headphones
DIMENSIONI: 1312 x 390 x 143 mm
PESO: 18,5 Kg
KEYBOARD: 88 keys with “hammer action”
TOUCH: immediate exclusion and restoration
of touch-sensitivity (Dynamic) on 4
levels
POLYPHONY: 64 notes at most
DISPLAY: 3 digits
BASIC SOUNDS: 21 polyphonic tones
MIXED SOUNDS: mix of two sounds
TRANSPOSER: shifting of +/– 12 semitones
TUNING RANGE: A3 (from 427Hz to 453Hz step 0.5Hz)
EFFECTS: CHORUS, 3 editable REVERBER
METRONOME: immediate control with 6 signatures:
1/4, 2/4, 3/4, 4/4, 6/8 and 12/8
and volume adjustment
PROGRAMMES: 7 programmes for the configuration of
the keyboard
SEQUENCER: REC and PLAY to record and listen.
Memorising of 3 songs or Song with
2 tracks each. The recording data
permanently remains in the memory.
1.Technical features
Sustain pedal
2.Packing content
BONTEMPI S.p.A. reserves the right to amend, without prior notice, the product features
Digital piano
Adapter ADS 1332 Music stand
User’s Manual

5
ITALIANO
4.Music stand
Insert the music stand in the appropriate holes.
3.Accessory upon request
CN 230: Console

6
5.Warnings
When using electric products, it is necessary to follow certain basic precautions, including:
1. Carefully read the manual before using the instrument.
2. The presence of an adult is required when the instrument is used by children.
3. Do not use the instrument near water like, for example, near a washbasin, a swimming pool, on a wet surface, etc.
4. The instrument is able to generate such sound level to cause permanent damaged to hearing. Do not use for long periods
with high volume.
If you notice a hearing loss immediately consult a doctor.
5. The instrument must be displaced in order to allow its adequate ventilation.
6. The instrument must be displaced away from heat sources like radiators, stoves, solar ray, etc.
7. Do not obstruct the air inlets of the power supplier with objects like curtains, clothes, etc.
8. Do not place objects with naked flames on the keyboard like for example ignited candles.
9. Ensure objects or liquids do not fall inside the cabinet.
10. Ensure there is sufficient ventilation to the adapter: the ventilation slots must not be covered with objects like newspapers, table
cloths, curtains, etc...
11. The instrument must be taken to an after-sales assistance centre if:
a) It has been exposed to rain.
b) It does not seem to work normally or shows an evident decrease in performance.
c) It has fallen or the cabinet is damaged.
d) Objects or liquid has fallen inside.
e) The adapter AC/DC socket is damaged.
12. Do not attempt to repair the instrument yourself; all operations must be carried out by authorised staff penalty the voiding of
the warranty rules.
13. Do not clean using alcohol, solvents or similar chemical substances. Clean the instrument using a soft cloth dampened in a
mild solution of water and neutral detergent. Soak the cloth in the solution and wring out until almost dry.
ADAPTER WARNINGS
1. When connecting the plug to the mains ensure:
a) not to have wet hands (danger of electric shock);
b) not to pull it from the cable, but from the same plug.
2. The instrument must be connected to the mains only using the AC/DC adapter envisioned by the manufacturer. Alternatively,
another AC/DC adapter can be used, as long as it has the same nominal values of those of the adapter supplied with
the equipment, with the same or better features. The identification and power supply data are on the bottom of the same
product.
3. When the instrument is not used for long periods, the AC/DC adapter must be disconnected from the mains.
4. The AC/DC adapter must be directly connected to the mains: do not interpose other plugs.
5. Do not expose the adapter to drops or squirts of water.
6. Do not position the adapter behind furniture or in hidden positions.

7
ITALIANO
6.Power supply
The power supply is supplied by the provided AC/DC ADS 1332 adapter (V = 13.5Vdc / I = 3.25 A) central positive.
Such equipment is compliance with the national and international Standards on electrical safety.
Insert the jack in the DC 13,5V socket. Alternatively, another AC/DC adapter can be used, as long as it has the same nominal
values of those of the adapter supplied with the equipment, with the same or better features.
RECOMMENDATION: The network socket must be easily accessible to be able to connect the adapter’s plug.
ATTENTION: Every adapter, even if equipped with safety insulation, must be regularly examined to avoid possible risks due to
damages to the cable, to the plug, to the casing or to other parts. In case of faults, only contact qualified staff.
WASTE DISPOSAL STANDARDS
For information regarding the disposal of the items mentioned here below, please refer to Council Administration office regarding
specialised waste collection centres.
1 - PACKAGING DISPOSAL
Take the paper, cardboard and corrugated board to the appropriate waste collection centres. Plastic material must be placed in
the relevant collection containers.
The symbols indicating the various types of plastic are:
Key for the different types of plastic materials:
PET = Polyethylene terephtalate • PE= Polyethylene, code 02 for PE-HD, 04 for PE-LD • PVC =Polyvinyl chloride • PP= Polypropylene
• PS= Polystyrene, Polystyrene foam • O= Other polymers (ABS, Laminates, etc.)
2 - WASTE DISPOSAL OF USED ELECTRICAL AND ELECTRONIC APPLIANCES
All articles displaying this symbol on the body, packaging or instruction manual of same, must not be thrown away into
normal disposal bins but brought to specialised waste disposal centres. Here, the various materials will be divided by
characteristics and recycled, thus making an important contribution to environmental protection.
01
PET
02
PE
03
PVC
05
PP
06
PS
07
O

8
7.Sockets
POWER - To switch the instrument on and off.
INPUT DC 13.5 V - Allows powering the instrument by means of an AC/DC adapter.
LINE OUT (LEFT/STEREO - RIGHT)
- Mono audio output of the left and right channels for connection to an external amplification.
The LEFT/STEREO output, by inserting a STEREO connector, allows detecting both LEFT and RIGHT signals.
PEDAL - Socket for sustain pedal.
USB - Socket for connecting the digital piano to a computer using a USB cable (not included).
MIDI OUT - Socket for connecting the digital piano, using an appropriate cable (not included), to a MIDI unit and transmit data.
PHONES - There are 2 sockets present for headphones placed on the left front side of the instrument. The upper excludes the
internal amplifier upon insertion of the headphone’s jack, whereas the lower one does not. We recommend using headphones
with 16-32 Ohm impedance
8.The Sustain Pedal
A normally-open pedal switch can be connected to the PEDAL socket.
It is used to lengthen the sound of the notes.

9
ITALIANO
9.Control panel
1. VOLUME for the adjustment of the general
volume
2. SEQUENCER A/B to select the A and/or B track of the
Sequencer (recorder)
2.
SEQUENCER REC
to record what is playing
2.
SEQUENCER PLAY
to listen to the recording
3. DEMO to listen to the demonstrative songs
4.
PROGRAMS LOAD
to select the programmes
4. PROGRAMS SAVE to save the programmes
5. TOUCH to deactivate or re-activate the touch-
sensitivity of the keyboard (dynamic)
6. REVERB to select the effects of the Reverb
7. CHORUS to activate or deactivate the Chorus
effect
8. METRONOME to activate or deactivate the time
tapped by the Metronome
9.
FUNCTIONS /
to select or set the various parameters
10. DISPLAY to display the selection of sounds,
volumes and functions
11. FUNCTIONS SET to select the special functions
12. TRANSPOSER to activate or deactivate the
Transposer
13. BANK SELECT to select the banks of the sounds
14. SOUNDS to select sounds
15. LAYER to set the sound, the bank and the
volume
16. SPLIT to divide the keyboard between UPPER
(right part) and LOWER (left part)
1 2 4 10 1493 5 6 7 8 11 12 13 15 16

10
10.Use instructions
Switch on/off
The instrument is switched on by moving the switch to “ I“ and
is switched off by moving it to “ O“.
The switch is on the back of the instrument.
The 3 digit display indicates which is the speed of the
METRONOME.
The switched on warning light on the 1st row of the SOUNDS
section and switched on button 1, indicate that the GRAND
PIANO sound is active.
Master volume
To adjust the general volume, act on the VOLUME control.
Demonstrative songs (Demosongs)
To select the demonstrative songs, press the DEMO control and
then press one of the 7 flashing buttons from the SOUNDS
section.
To interrupt the execution, press DEMO again.
Sounds
There are 21 sounds contained in the instrument.
To select a sound, press a key from 1to 7from the SOUNDS
section and choose one of the 3 banks using the BANK SELECT
button.
The active sound is identified by the corresponding of the
line of BANK SELECT (LED light on) with the 1 to 7 column of
SOUNDS (LED light on). Shown in the example figure at the
side, the active sound is PUFF ORGAN.
To select other sounds from the same family, repeatedly press
the BANK SELECT button.
Division of the keyboard - Split
By dividing the keyboard, it is possible to set a sound in the
right part and another one in the left part of the keyboard.
The SPLIT control divides the keyboard in two parts, the right
one Upper and the left one Lower.

11
ITALIANO
Press the SPLIT button; LED light on.
The division point upon switch-on is G3 (Sol3).
The Split or division point of the keyboard can be amended
as follows:
keep the SPLIT button pressed and, simultaneously, press a
key on the keyboard. The pressed key becomes the lowest
note for the Upper sound.
The number shown by the display indicates the midi code of
the pressed key.
To return to the “joint” keyboard mode, press SPLIT, the LED light switches off.
The LAYER control allows changing the sound, bank and the volume for the Upper and Lower sounds:
• Press the LAYER button once;
the display temporarily shows “ ” :
“ “ stands for Upper meaning the sound on the
right part, and “ ” is the volume of the Upper
sound that can vary from 7 to 99.
• Press one of the SOUNDS buttons to select a sound
for the Upper
• Press the or key to amend the volume of the
Upper sound; by keeping the or key pres-
sed, the numbers quickly change (autorepeat).
• Press the BANK SELECT key to select other sounds
from the same family.
• Press the LAYER button again to select the sound for
the Lower;
the display shows “”:
“”stands for Lower meaning the sound on the left
part, and “”is the volume of the Lower sound.
• Press one of the SOUNDS buttons to select a sound
for the Lower.
• Press the or key to amend the volume of the
Lower sound; by keeping the or key pres-
sed, the numbers quickly change (autorepeat).
• Press the BANK SELECT key to select other sounds
from the same family.
Pressing the LAYER button again, it returns to the “TEMPO” mode, the display indicates which is the speed of the
METRONOME upon switch-on.
SPLIT POINT UPON SWITCH-ON OF THE PIANO
L O W E R U P P E R
Use instructions

12
Sound combination - Dual Mode
It is possible to simultaneously play two sounds on the entire keyboard range. In this way, it is possible to simulate a “dual melody”
or combine two similar voices to create an acoustically deeper sound.
• With the SPLIT control off, press the LAYER button
once;
the display temporarily shows “ ” : “ “ indi-
cates the first sound of the mix and “ ” is the
volume.
• To change sound, press one of the SOUNDS and
BANK SELECT buttons.
• Press the or key to amend the volume.
• Press the LAYER button again;
the display temporarily shows “ ”: “ ” indicates
the second sound of the mix and “ ” is the vo-
lume.
• To change sound, press one of the SOUNDS and
BANK SELECT buttons.
• Press the or to amend the volume.
• Pressing the LAYER button again, returns to the “Mix”
mode.
The two controls of the SOUNDS section switched on
indicate the families that have been selected for the 1st and
2nd sound. If only one control is switched on, it means that
two sounds from the same family have been selected.
The display indicates which is the speed of the
METRONOME upon switch-on.
To exit the “Mix” mode, press the button of a single
sound.
To create a combination of two sound in immediate
mode, keep a button of the SOUNDS section pressed
(1st sound), and simultaneously press another (2nd
sound).
By pressing SPLIT in “Mix” mode, the two sounds will be distributed, one for the Upper, right part, and one for the Lower, left
part, of the keyboard. The sounds will be automatically set with pre-defined octave.
Transposition of the notes - Transposer
The transposition of the keyboard is available in the interval –12 / +12 semitones.
By pressing the TRANSPOSER control, the display indicates the current
transposition value which upon switch-on is “ “.
To activate a transposition, keep the TRANSPOSER button pressed, and act
on the or keys to set the wanted value.
The TRANSPOSER key switched on, indicates that the set value is different
from “ “.
The Transposition is active only when the TRANSPOSER key is switched
on.
To cancel the transposition, select the value “ “ or press the TRANSPOSER
button again to switch-off the LED.
The value of the Transposition remains memorised until switch-off.
Use instructions

13
ITALIANO
The effects
The sounds can be enhanced by adding Reverb and Chorus effects.
Reverberation
It is possible to select 3 types of reverberation: Room 1, Room 2 and Hall
and also set the depth that can vary from 0 to 20.
Upon switch-on the central LED comes on and the Room 2 effect with depth
10 is active; by pressing the REVERB. control, the highest LED switches on
and the Hall effect is active,
by pressing the REVERB. control again, the lowest LED switches on and the
Room 1 effect is active,
by pressing the REVER.B control again, all LED are switched off therefore
the Reverb effect is excluded.
How to display and set the depth of the reverb:
To display the depth value, keep the REVERB. key pressed, the display indicates the current value.
To set the depth, select an effect (Room 1, Room 2 or Hall), keep the REVERB. control pressed and then act on the and
controls to choose the depth that can vary from 0 to 20. The display indicates the selected value. By keeping the or key
pressed, the numbers quickly change (autorepeat).
Chorus
Upon switch-on the Chorus is not active.
To activate the effect, press the CHORUS control, the LED light switches on.
To adjust the depth, keep the CHORUS control pressed for a few seconds (the LED light switches on) and then act on the and
control; the interval varies from 0 to 20. The standard value is 10.
The Dynamic or touch-sensitivity
The instrument is able to issue sounds with more or less high volume, depending on the pressure exercised on the keys like in a
traditional piano.
It is possible to choose between dynamic: Light, Normal or Hard.
Upon switch-on, the Normal type touch-sensitivity is active.
To select the other types of dynamic, repeatedly press the TOUCH control:
the Light type of dynamic activates when the lowest LED is switched on,
Normal with the central LED and Hard with the top LED.
When the LED light are switched off, the touch-sensitivity is excluded. It is
possible to adjust the Volume of the sound by keeping the TOUCH control
pressed and then act on the and controls; the interval varies from 0
to 127; it is usually 64.
The Metronome
The metronome helps learn music, tapping time during the exercises and
simulates the classic instrument that beats the time.
To activate the metronome, press the METRONOME control, the LED light is
switched on.
How to adjust the metronome speed
To adjust the speed, act on the and controls; the interval varies from
a minimum of 32 to a maximum of 250.
To set the standard value of , press and together.
Use instructions

14
Table of the TIMES
indicative for the
METRONOME
How to set the divisions of the metronome
The divisions available are 1/4, 2/4, 3/4, 4/4, 6/4, 6/8, 12/8 .
To set a division, keep the METRONOME control pressed for a few seconds,
the display indicates which is the division set upon switch-on; using the
and controls , choose the wanted division.
How to set the volume of the metronome
To adjust the volume of the metronome, keep the METRONOME pressed for
a few seconds, act on the SET control, the display indicates which is the
value upon switch-on; using the and controls, choose the wanted
volume. The volume of the METRONOME varies from 0 to 20.
The Recorder – Sequencer
With the Sequencer section it is possible to record and then to listen to all that played.
The Sequencer allows you to test your musical learning level.
It is possible to record three musical songs with two tracks.
Upon switch-on, the Sequencer controls are switched off.
How to record the 1st track (for example A)
• Press the REC control, the Aand Bbuttons flash.
• Press the Abutton which continues flashing (B
switches off), therefore, two initial metronome beats
are sounded to indicate it is possible to start recor-
ding by playing the keyboard.
• Press REC to stop recording and then PLAY to listed
to what was played.
• To stop execution, press PLAY.
How to record the 2nd track (for example B)
• Press the REC control, the Aand Bbuttons flash.
• Press the Bbutton (ATTENTION, if the previously re-
corded track is chose, track A, the content will be
deleted by the new recording), the A LED light remains switched on to indicate that it is in execution or PLAY and that of B
flashes, initial beats of the metronome are sounded to indicate recording has started for track B, it is therefore possible to start
recording by playing the keyboard.
• Press REC to stop recording, the A and B LED light remain switched on. By pressing PLAY, the two recorded tracks can be
listened to simultaneously.
N.B.: During recording of the 2nd track, if not wanting to listen to the 1st recorded track, switch-off the LED light of the 1st track
before recording on the 2nd track.
Use instructions
32 - 60
60 - 66
66 - 76
76 - 108
108 - 120
120 - 168
168 - 200
200 - 250

15
ITALIANO
How to recall a program
To recall a program, press the LOAD control from the PROGRAMS section, the LED light switches on, then press one of the seven
flashing controls from the SOUNDS section.
How to save a program
Set sounds and functions.
To save, press the SAVE control from the PROGRAMS section, the LED light switches on, then press one of the seven flashing
controls from the SOUNDS section.
The data is kept on the internal memory even when the power supply is disconnected.
N.B.: By pressing SAVE and then BANK SELECT the original programs will be restored.
How to record another two songs
Act on the SET control, the display indicates
which is the song recorded first.
Using the and control, it is possible to select
, or meaning Song 1, Song 2 and
Song 3.
To record another two songs and listed to them, select
or and follow the above described
procedure.
How to delete a recording
To delete a recording, keep the REC control pressed,
and also press the PLAY control, the two A and B LED light will switch-off.
The Sequencer also records any sound changes. The recording carried out on the three songs permanently remains in the memory
even if the instrument is switched off. If upon instrument switch-on, the warning lights LED of tracks A or B are switched on, it means
there is previously recorded data present.
The Programs
A program is a function that allows setting certain keyboard parameters.
It is possible to memorise and recall 7 programmes in the controls from 1 to 7 from the SOUNDS section.
The following functions can be programmed:
1 Upper Sound
2 Upper Sound Bank
3 Upper Sound Volume
4 Lower Sound
5 Lower Sound Bank
6 Lower Sound Volume
7 Split Yes or No
8 Dual Yes or No
Use instructions

16
Special Functions (SET)
It is possible to configure certain special functions by repeatedly pressing the SET control.
1. Selection of the three songs of the Sequencer
Upon first pressing of the SET control the LED light switches on and the display show to indicate that the first song of
the Sequencer is selected.
By pressing the and controls, it is possible to choose the other songs or .
2. Selection of the functions
Upon subsequently pressing the SET control, the LED light switches on and the display shows .
Moving of the octave of the Lower sound
By pressing the 1control from the SOUNDS section, the display shows to indicate the moving of the octave for the
Lower sound.
By pressing the and controls, it is possible to choose the moving of the octave for the Lower, from 0, 1 or 2.
The standard value is .
Assigning of pedal
By pressing the 2control from the SOUNDS section, the display indicates meaning the assigning of the “sustain”
effect activated by acting on the pedal.
The “sustain” effect can be assigned to the Upper or Lower sound or to both.
By pressing the and controls, it is possible to assign the “sustain” effect only to the Upper sound when the display
indicates
, or only to the Lower sound when the display indicates
, or to both with
. The standard value
.
Tuning range
By pressing the 3control from the SOUNDS section, the display shows indicating the tuning range.
By pressing the and controls, it is possible to set the tuning range with values of 0.5 from a minimum of 427.0
Hz ( on the display) to a maximum of 453.0 Hz ( on the display). The standard value is 440 Hz ( on
the display) .
3. Selection of the MIDI settings
Upon third pressing of the SET control, LED light on, the display shows to indicate certain settings for the MIDI.
MIDI transmit channel
It is possible to set the MIDI transmission channel for the note of the Upper sound.
The Lower sound will be automatically transmitted on the subsequent channel.
By pressing the 1 control from the SOUNDS section, the display shows indicating the MIDI transmission channel.
By pressing the and controls, it is possible to select the MIDI transmission channel from 1 to 16.
Channel 1 is active upon switch-on.
Local Control On / Off
By pressing the 2control, the display shows indicating the “Local Control” function.
The “Local Control” function allows connecting or not the sound generator to the keyboard.
If “Local Control” is enabled ( ), the keyboard will play and send the MIDI information.
If “Local Control” is deactivated ( ), the keyboard will no longer play, but will continue to send information of the
notes via MIDI.
By pressing the and controls, it can be configured at (enabled) or (disabled).
The standard value is .
Program Change On / Off
By pressing the 3control, the display shows indicating the Program Change (sound change) received and transmitted
by the instrument.
By pressing the and controls, the transmission and receipt can be configured at (enabled) or (disabled).
The standard value is .
Use instructions

17
ITALIANO
The DP 300 Digital piano is equipped with a USB-MIDI socket for connection to a personal computer. Connection is carried out
using a USB cable (not included) as shown in the figure:
Minimum system requisites
Personal Computer with Pentium3 processor at 800Mhz equipped with USB socket. Windows XP, Windows VISTA or
Windows 7 operational system.
Procedure for computer connection
Before connecting the keyboard, ensure that the computer is switched on and the keyboard is switched off.
Once the connection with the USB cable (not included) is carried out, switch-on the instrument.
After a few seconds, a series of messages will appear on the computer:
Now the keyboard is correctly connected and recognised by the computer.
Notes:
The recognition of the keyboard by the computer happens upon first connection; no message will appear on subsequent
connections, but a characteristic acoustic signal will be heard made by the computer to indicate the insertion of a USB
device.
Should the keyboard not be recognised by the computer and an error of unrecognised peripheral appears, repeat the operation;
if the problem persists, check if the minimum requisites have been complied with.
Free musical software downloadable from internet
A free musical software is available from www.farfisa.eu, with instructions in various languages, to be downloaded from your
computer to record, amend and listen to the MIDI musical songs using the keyboard.
New hardware found
The new hardware has been installed and is read for use
New hardware found
USB Speakers
11.Connection to a computer
USB Port USB Port
USB Cable
(not supplied)

18
What is MIDI
The initials MIDI is the abbreviation of “Musical Instrument Digital Interface” and represents a standard for the transmission
of data via cable to another electronic musical instrument.
Connect a MIDI cable (not included) between the MIDI OUT socket of the DP 300 and the MIDI IN socket of another musical
equipment.
12.MIDI connection
13.Connection to an external amplifier
To further amplify a sound, connect using an
appropriate cable (not included) the LINE OUT (LEFT/
STEREO - RIGHT) sockets to the input of an external
amplification. The LEFT/STEREO output, by inserting
a STEREO connector, allows detecting both LEFT and
RIGHT signals.
AUDIO Cable (not supplied)
external amplification
MIDI Cable (not supplied)
external amplification

19
ITALIANO
2
1
0
5
4
3
8
7
6
11
10
9
14
13
12
17
16
15
20
19
18
SOUND PrCn PrCn PrCn PrCn PrCn PrCn PrCnSOUND SOUND SOUND SOUND SOUND SOUND
14.Trouble shooting guide
Problem
When it is switched on, no sounds are heard when the keys
are pressed
Noise when using the mobile telephone
The external unit connected via MIDI to the piano does
not play
The sound is distorted and/or the LED light show an
anomalous brightness
Cause/Corrective action
Check the main volume and if the headphones are
connected The headphones are inserted in the Phones
socket: disconnect it.
Avoid having the mobile telephone near the piano.
The instrument transmits on MIDI channels different from
those of receipt of the external unit.
Check that the network adapter is that provided or another
with the same features
15.Table of sounds and relative Program Change (PrCn)

20
16.Midi implementation chart
MIDI
MESSAGE APMOCDESCRIPTIONEDOCXEH TIBI-
LITY
)51-0(nlennahcidiMvvkkHn9NOETON note ON #kk(1-127), velocity vv(1-127). vv=0
means NOTE OFF MIDI
,)721-1(kk#FFOeton)51-0(nlennahcidiMvvkkHn8FFOETON vv is don’t care. MIDI
)stib41(lb|hbybdeificepssadnebhctiPhblbHnEDNEBHCTIP Maximum swing is +/- 1 tone (power-up). Can be changed using
« pitch bend sensitivity ». Center position is 00H 40H.
GM
PROGRAM
CHANGE Midi channel n (0-15).egnahc)hctap(margorPppHnC Program change pp (0-20) GM/GS
CHANNEL
AFTERTOUCH IDIMH62-H02Hn2H04.xE.sySgnisutestceffE.eulaverusserpvvvvHnD
noitidnocpu-rewopotteseRHFFTESERIDIM dnaetaR.leehwnoitaludoMccH10HnB10LRTC maximum depth can be set using SYSEX MIDI
IDIM.emitotnematroPccH50HnB50LRTC ivorp:yrtneataDccH60HnB60LRTC IDIMNPRNdnaNPRotatadsed IDIM)001=tluafed(emuloVccH70HnB70LRTC IDIM)retnec46=tluafed(naPccHA0HnB01LRTC MG/IDIM)721=tluafed(noisserpxEccHB0HnB11LRTC IDIMladep)repmad(niatsuSccH04HnB46LRTC IDIMFFO/NOotnematroPccH14HnB56LRTC IDIMladepotunetsoSccH24HnB66LRTC IDIMladeptfoSccH34HnB76LRTC )H40tluafed(H70otH00=vvmargorpbreveRvvH05HnB08LRTC
00H : Room1 01H : Room2
02H : Room3 03H : Hall1
04H : Hall2 05H : Plate
06H : Delay 07H : Pan delay
FARFISA
)H20tluafed(H70otH00=vvmargorpsurohCvvH15HnB18LRTC
00H : Chorus1 01H : Chorus2
02H : Chorus3 03H : Chorus4
04H : Feedback 05H : Flanger
06H : Short delay 07H : FB delay
FARFISA
SGHF7otH00=vvleveldnesbreveRvvHB5HnB19LRTC SGHF7otH00=vvleveldnessurohCvvHD5HnB39LRTC tpurba(ffodnuosllAH00H87HnB021LRTC stop of sound on channel n) MIDI
IDIMsrellortnocllateseRH00H97HnB121LRTC IDIMffosetonllAH00HB7HnB321LRTC IDIMnoonoMH00HE7HnB621LRTC IDIM)pu-rewoptluafed(noyloPH00HF7HnB721LRTC .1rellortnoCelbangissAHvvHccHnB1CCLRTC cc=Controller number (0-5Fh), vv=Control
value (0-7Fh). Control number (ccH) can be set on CC1
CONTROLLER NUMBER (Sys. Ex 40 1x 1F). The resulting effect is
determined by CC1 controller function (Sys.Ex. 40 2x 40-4A)
GS
.2rellortnoCelbangissAHvvHccHnB2CCLRTC cc=Controller number (00h-5Fh), vv=control
value (0-7Fh). Control number can be set on CC2 CONTROLLER
NUMBER (Sys.Ex. 40 1x 20). The resulting effect is determined by
CC2 controller function (Sys.Ex.40 2x 50-5A).
Table of contents