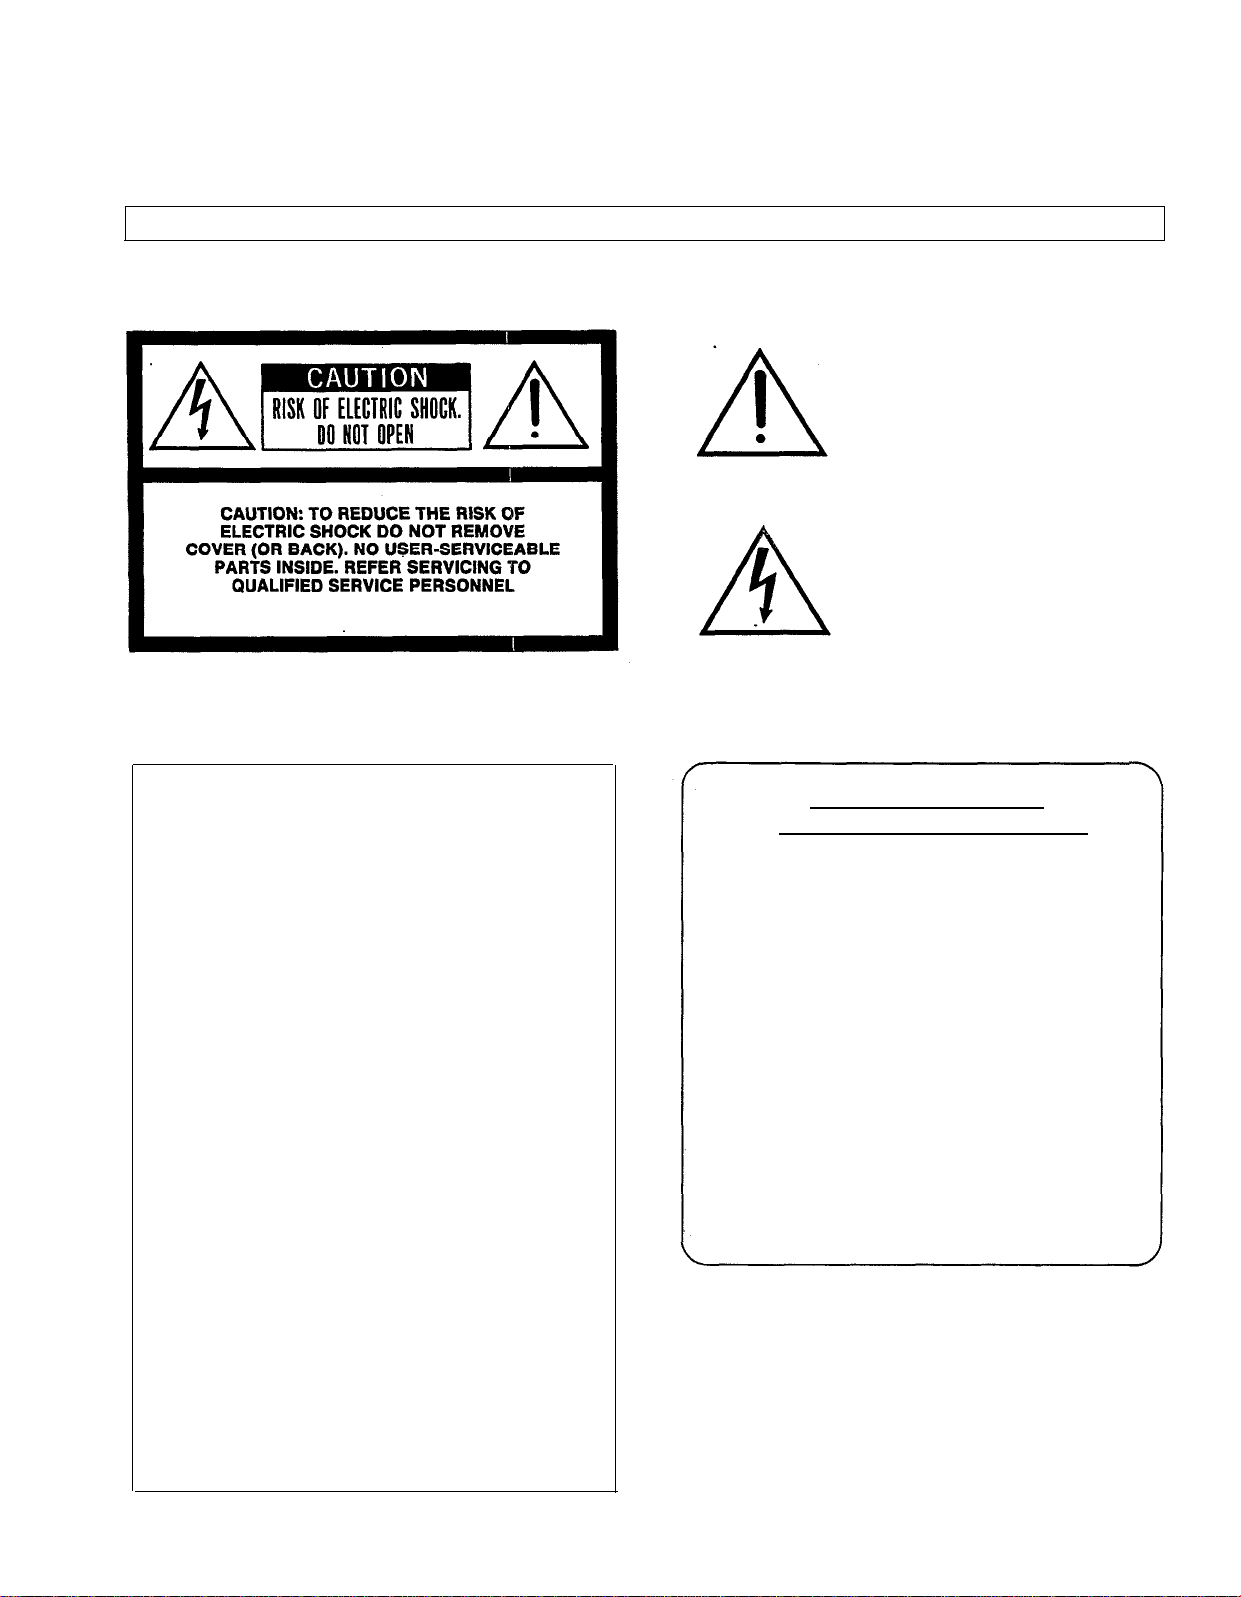
Yamaha V50 User manual

YAMAHA
®
AUTHORIZED
PRODUCT MANUAL
DIGITAL SYNTHESIZER

DIGITAL SYNTHESIZER
Operating Manual
YAMAHA

SUPPLEMENTAL MARKING INFORMATION
This information on safety is provided to comply with U.S.A. laws, but should be observed by users in all countries.
Yamaha Digital Musical Instrument Products will have either a label similar to the graphic shown below or a molded/stamped
facsimile of the graphic on its enclosure. The explanation of these graphics appears on this page. Please observe all cautions
indicated.
FCC INFORMATION
While the following statements are provided to comply with FCC
Regulations in the United States, the corrective measures listed
below are applicable worldwide.
This series of Yamaha professional music equipment uses frequencies
that appear in the radio frequency range and if installed in the im-
mediate proximity of some types of audio or video devices (within
three meters), interference may occur. This series of Yamaha pro-
fessional music equipment has been type tested and found to comply
with the specifications set for a class B computing device in ac-
cordance with those specifications listed in subpart J of part 15 of
the FCC rules. These rules are designed to provide a reasonable
measure of protection against such interference. However, this does
not guarantee that interference will not occur. If your professional
music equipment should be suspected of causing interference with
other electronic devices, verification can be made by turning your
professional music equipment off and on. If the interference con-
tinues when your equipment is off, the equipment is not the source
of interference. If your equipment does appear to be the source of
the interference, you should try to correct the situation by using one
or more of the following measures:
IMPORTANT NOTICE
FOR THE UNITED KINGDOM
Relocate either the equipment or the electronic device that is being
affected by the interference. Utilize power outlets for the professional
music equipment and the device being affected that are on different
branch (circuit breaker or fuse) circuits, or install AC line filters.
In the case of radio or TV interference, relocate the antenna or, if
the antenna lead-in is 300 ohm ribbon lead, change the lead-in to
a co-axial type cable.
If these corrective measures do not produce satisfactory results,
please contact your authorized Yamaha professional products dealer
for suggestions and/or corrective measures.
If you cannot locate a franchised Yamaha professional products
dealer in your general area contact the Electronic Service Department,
Yamaha Corporation of America, 6600 Orangethorpe Ave., Buena
Park, CA 90620, U.S.A.
If for any reason, you should need additional information relating
to radio or TV interference, you may find a booklet prepared by the
Federal Communications Commission helpful:
“How to Identify and Resolve Radio – TV Interference Problems”.
This booklet is available from the U.S. Government Printing Office,
Washington D.C. 20402 – Stock No. 004-000-00345-4.
The exclamation point within an equila-
teral triangle is intended to alert the user
to the presence of important operating
and maintenance (servicing) instructions
in the literature accompanying the pro-
duct.
The lightning flash with arrowhead sym-
bol, within an equilateral triangle, is in-
tended to alert the user to the presence
of uninsulated “dangerous voltage”
within the product’s enclosure that may
be of sufficient magnitude to constitute
a risk of electric shock to persons.
Connecting the Plug and Cord
IMPORTANT. The wires in this mains lead are
coloured in accordance with the following code:
BLUE
:
NEUTRAL
BROWN
:
LIVE
As the colours of the wires in the mains lead of
this apparatus may not correspond with the
coloured markings identifying the terminals in
your plug proceed as follows:
The wire which is coloured BLUE must be
connected to the terminal which is marked with
the letter N or coloured BLACK.

DIGITAL SYNTHESIZER

INTRODUCTION
Thank you for purchasing the Yamaha V50 Digital Synthesizer. The V50 is a MIDI-
equipped synthesizer utilizing FM tone generation.In addition to its synthesizer
functions, the V50 features a built-in sequencer and rhythm machine, and can act
as an all-in- one music production system.
In order to make full use of the V50’s capabilities and enjoy long and trouble-free
use, please read this manual carefully before use.
FEATURES
Some of the V50’s many features are:
FM tone generation
Sound is produced using Yamaha’s unique FM tone
generation technology (4 operator, 8 algorithm).
One of 8 waveforms can be selected for the output
of each operator, for a wide variety of sounds.
16-note/8-timbre simultaneous notes
In single play mode a single voice can be played
with up to 16 simultaneous notes, and in perform-
ance play mode the 16 notes can be distributed
among up to eight different voices. In addition, DVA
(dynamic voice allocation) mode will automatically
determine the maximum number of simultaneous
notes for each voice, allowing you to concentrate
on your playing.
100 preset voices and performances
100 voices and 100 performances are built into the
permanent memory of the V50 covering a wide
variety of sounds from piano to brass to special
effects.
100 voice and performance memories
100 voice memories and 100 performance memo-
ries are provided for you to store your own cre-
ations.
8-track 16000-note (approximate) sequencer
In addition to the rhythm tracks, an 8-track se-
quencer is built into the V50. By recording musical
parts track by track you can build up an ensemble
of up to 8 instruments using just a single V50. Up
to 8 songs (within a total of approximately 16000
notes) can occupy the V50’s memory and be played
back in succession.
Rhythm machine with PCM-recorded sounds
A rhythm machine with 61 PCM-recorded sounds
is built in. In addition to traditional drum kit in-
struments, the 61 sounds include ethnic instru-
ments and synthesized percussion. These sounds
can be used in synchronization with the sequencer
playback.
Card slot, disk drive
Voice and performance data, and data for the se-
quencer and rhythm machine can be stored on card
or floppy disk. (However, sequencer data cannot
be stored on card.) An MDR function is provided,.
allowing you to store system exclusive data from
external MIDI devices on a V50 disk.
Micro tuning
Tunings other than the conventional equal tem-
perament can be used. Tunings such as Werk-
meister and 1/4 tone are built in, and you can
program the pitch of each key to create your own
tunings.
Performance effects
Three performance effects are built in; delay, pan,
and chord. Four settings of each effect can be
memorized.
Digital effects
A digital effects unit is built in, providing effects such
as digital reverb and digital delay. An effect can be
specified for each voice or performance, allowing
you to use a digital effect as part of the voice or
performance data.
User-editable power-on character display
You can specify a greeting message to be displayed
whenever the power is turned on.

CONTENTS
Precautions
................................................................
4
How to use this manual............................................
5
Chapter
1
lntroducing the
V50
.....................
6
Front and rear panels...............................................
6
Connections
.............................................................
10
Using a single amp
............................................
10
Using twoamps
.................................................
10
Connecting other equipment via MIDI
...........
10
Making sound
.......................................................
11
Turn the power on
........................................
11
Any sound?.
........................................................
11
Try out the
sounds
.............................................
12
100 preset performances
................................
12
100 preset voices
................................................
12
Demonstration playback..........................................
14
Playing the internal demo
...............................
14
Playing the disk demo
.....................................
14
Basic concepts of the V50
......................................
15
Internal structure of the V50
...........................
15
Four play modes
............................................
15
Basic operation of the V50
...................................
16
Switching modes
.............................................
16
Using the function keys to select operations
......
16
Setting numerical values
.................................
17
Inputting characters
.......................................
17
Voices and performances
.....................................
18
Voices
............................................................
18
Single play mode and maximum
simultaneous notes
.........................................
18
Single play mode display
.................................
18
Single play mode LEDs
...................................
18
Performances
...................................................
19
Performance play mode and maximum
simultaneous notes
..........................................
19
Performanceplaymodedisplay
......................
20
Performance play mode LEDs
........................
20
Switching instruments
on/off
...........................
20
When to use single play or performance
play mode
....................................................
20
Effects
....................................................................
21
Changingthepower-ondisplay
.............................
22
Compatibility with other devices
...........................
22
Data
compatibility with other devices..
...........
22
Cartridges
........................................................
22
Chapter2Performance
Edit
.......................
23
About performance editing
....................................
23
Performance edit
....................................................
24
Assign mode, performance name..
...................
24
Notes
................................................................
24
Voice number
..................................................
25
Receive channel
................................................
25
Note limit (low)
...............................................
25
Note limit
(high)
..............................................
26
Detune
.............................................................
26
Note shift
........................................................
27
Volume
............................................................
27
Output assign
..................................................
27
LFO select
.......................................................
28
Micro tuning on/off
.........................................
28
Micro tuning select
........................................
29
Performance effect select
.................................
30
Effect on/off
....................................................
30
Effect select, effect balance
..............................
30
Effect output level, stereo mix
.........................
31
Effect parameters
............................................
32
Chapter 3 Voice Edit
.................................
36
The basics of FM tone generation
.........................
36
Operators
......................................................
36
Combinations of operators
.............................
36
Carrier and modulator
.....................................
36
Algorithm
........................................................
37
Factors determining the tone of a voice
..........
37
About voice
editing
................................................
38
Operator on/off......................................................
38
Voice editing
..........................................................
39
About quick edit
.............................................
39
Quick edit (attack)
...........................................
39
Quick edit (release)
...........................................
39
Quick edit (volume)
..........................................
39
Quick edit (brilliance)
.......................................
40
Algorithm, feedback
.........................................
40
LFO (wave, speed, delay, key sync, PMD,
AMD)
..............................................................
41
Sensitivity (PMS, AMS, AME, EBS, KVS)
.....
43
Oscillator (mode, coarse, fine, wave, detune,
shift, range)
.....................................................
44
Envelope generator (AR, D1R, D2L, D2R,
RR, shift)
........................................................
45
Pitch envelope generator (PR1, PL1, PR2,
PL2, PR3, PL3)
...............................................
47
Output level
.....................................................
48
Keyboard scaling (rate)
...................................
48
Keyboard scaling (level)
..................................
48
Transpose
........................................................
49
Poly/mono mode select, pitch bend wheel range,
foot
switch..
.....................................................
49
Portamento (mode, time)
................................
50
Foot controller (volume, pitch, amplitude)......
50
Modulation wheel (pitch,amplitude)
...............
51
Breath controller (pitch, amplitude, pitch bias,
EG bias)
.........................................................
52
1

Aftertouch (pitch, amplitude, pitch bias,
EG bias)
..........................................................
53
Reverb
............................................................
54
Voice name
......................................................
54
Effect select, effect balance
...............................
54
Effect output level, stereo
mix
.........................
55
Effect parameters
............................................
56
Chapter 4 Using the rhythm machine
......
57
About the rhythm machine
....................................
57
The rhythm machine tone generator
..............
57
Rhythmpatternsandrhythm
songs
...............
57
Rhythm patterns
..............................................
58
Rhythm songs
..................................................
58
Therhythm machineand
sequencer..
..............
58
Playing rhythm patterns
.........................................
58
Creating rhythm patterns
.......................................
60
Realtime recording and step recording
...........
60
Before you begin recording
.............................
60
Realtime recording
.................................................
61
Step recording
........................................................
62
Using the bar graph
...............................................
63
Pattern job functions
.............................................
66
Copy
...............................................................
66
Clear
................................................................
67
Setup
...............................................................
67
Inst settings
.....................................................
68
Rhythm assign
.................................................
69
Playing rhythm songs
.............................................
71
Creating rhythm songs
...........................................
72
Parts and patterns
..........................................
72
Special non-pattern functions
..........................
72
Creating a rhythm song
.........................................
74
Editing a rhythm song
...........................................
75
Jump
................................................................
75
Insert
..............................................................
75
Delete
.............................................................
75
Copy
...............................................................
75
Search
.............................................................
75
Song name
......................................................
76
Song job functions
.................................................
76
Song edit
.........................................................
76
Song copy
........................................................
76
Song clear
.......................................................
77
Setup
..............................................................
77
Inst settings
...................................................
77
Rhythm assign
.................................................
77
Search
.............................................................
77
Chapter
5
Using the sequencer
................
78
About the sequencer
.............................................
78
What is a sequencer?
........................................
78
Tracks
.............................................................
78
Realtime recording and step recording
..........
78
2
Songs
.........................................................
78
Sequencer Data..........................................................
79
The sequencer and the synthesizer
...............
79
Synthesizer preparations
.......................................
80
Rhythm machine preparations
...............................
81
Realtime recording procedure
................................
82
Select the sequencer function
...........................
82
Select a song to record
....................................
82
Select realtime recording
.................................
82
Set recording conditions
..................................
83
Start and Stop recording
..............................
83
Step recording procedure
......................................
84
Select the sequencer function
...........................
84
Select a song to record
...................................
84
Select step recording
........................................
84
Set recording conditions
..................................
84
Start and Stop recording
.................................
85
Playing a
song,
........................................................
87
Punch-in recording
.................................................
88
Setup functions
......................................................
88
Setting transmit channels
.......................................
90
Song job functions
................................................
90
Edit functions
........................................................
91
Track mixdown
..............................................
91
Quantize
.........................................................
91
Delete
.............................................................
92
Insert
..............................................................
92
Copy
...............................................................
92
Erase
...............................................................
93
Remove
.........................................................
93
Setting recording conditions
.................................
94
Storing setup data
..................................................
94
Chapter 6 Utility functions
...........................
95
Card operations
....................................................
95
Type of memory card
......................................
95
About Card formatting
..................................
95
About Card banks
..........................................
95
Card format
.............................................
95
Data
saved
and
loadedfrom
card..
................
96
Save
................................................................
97
Load................................................................
98
MIDI functions......................................................
99
Channel information (MIDI on/off, basic
receive channel, transmit channel, local on/off .
99
Switch (MIDI control change, MIDI
aftertouch, MIDI pitch bend)
..........................
100
Condition (note on/off, data entry assign)
......
101
Program change
..............................................
101
Program
changetable
initialize
......................
102
Program change tableedit
...............................
103
Exclusive
message
(device
number)
................
103
Exclusivemessage
(bulkdump)
.....................
103
Disk functions
........................................................
105

About the
disk
................................................
105
Save
................................................................
105
Load
...............................................................
105
Delete
.......................................................
106
Rename
..........................................................
107
MDR..............................................................
107
Directory
........................................................
108
Format ...........................................................
108
Backup..............................................................
108
status
.............................................................
109
Memory protect
....................................................
109
Memoryprotect
(internal,
card)
......................
109
Setup functions
....................................................
110
Master
tuning,synthesizervolume
.................
110
Combine
.........................................................
110
Controller reset
..............................................
110
Performance
effect(delay)
.............................
111
Performance effect (pan)
................................
112
Performance
effect(chord)
.............................
113
About microtuning
........................................
114
Microtuning (octave edit)
...............................
114
Microtuning (octave initialize)
.......................
114
Microtuning
(full
keyboardedit)
...................
115
Microtuning
(full
keyboard
initialize)
............
115
Velocity(fixed
velocity, velocity curve)
.........
115
Damp(EG forced damp,
volume
damp)
........
116
Other functions
.....................................................
117
Voice initialize
................................................
117
Performance
initialize
...................................
117
Voice recall
.....................................................
117
Performance
recall
..........................................
117
Preset load
......................................................
118
Voice edit
......................................................
118
Store functions
......................................................
119
Voice store
.....................................................
119
Performance
store
.........................................
119
Voicestorewhenusingvoice
edit
................
119
Copy functions
...............................................
120
Effect copy
..................................................
120
Performanceeffect
copy
................................
120
Envelope generator copy
................................
120
Compare
functions
................................................
121
Voice
compare
..............................................
121
Performance compare
.....................................
121
Appendix
...........................................................
122
Troubleshooting
..................................................
122
Preset voices
........................................................
124
Preset
performances
.............................................
124
Initialized
performance
settings
...........................
125
Initialized voice settings
........................................
126
Specifications
........................................................
127
MIDI data format
..................................................
128
MIDI Implementation Chart
.................................
145
Performance data blank chart
................................
148
Voice data blank chart...........................................
149
IMPORTANT SAFETY AND INSTALLATION
INSTRUCTIONS
.................................................
150
SPECIAL MESSAGE SECTION
........................
151
Index
...............................................................
152
3

PRECAUTIONS
The V50 is a precision electronic instrument. To ensure long and trouble-free use,
please
read
the following precautions.
Location
Avoid placing the V50 in direct sunlight, or in locations
where it will be subjected to temperature extremes,
moisture, excessive dust, or heavy vibration.
Handling
Avoid applying excessive force to the switches,
dropping or rough handling of the unit. While the
circuitry is of reliable integrated circuit design, the V50
should be treated with care.
Power cable
Always grip the plug directly when removing it from
an AC outlet. Removing the plug from the AC outlet
by pulling the cable can result in damage to the cable,
and possibly a short circuit. It is also a good idea to
disconnect the V50 from the AC outlet if you don’t
plan to use it for an extended period of time.
Turning the power on
If one or more devices are connected to the V50 via
MIDI cable, turn on the power switches starting with
the transmitting devices (keyboards, sequencers, etc.)
Connections
To avoid damage to speakers, make all audio con-
nections with the power of the V50 and other units
turned off.
MIDI cables
Use cables specifically intended for MIDI. Using MIDI
cables longer than 15 meters (45 feet) can result in data
errors.
Cleaning
Use only a mild detergent on a cloth, and dry with a
soft cloth. Never use solvents (such as benzine or
thinner) since they can melt or discolor the finish.
Electrical storms (lightning)
Computer circuitry, including that in the V50, is sen-
sitive to voltage spikes. For this reason, the V50 should
be turned off and unplugged from the AC receptacle
in the event of an electrical storm. This precaution
will minimize the chance that a high voltage spike
caused by lightning will damage the unit.
4
Electromagnetic fields
Computer circuitry is also sensitive to electromagnetic
radiation. Television sets, radio receivers, transmitters
and transceivers, and wireless microphone or intercom
systems are all potential sources of such radiation. The
V50 should not be placed too close to such devices.
Backup battery
The V50 has a backup battery that allows it to retain
its voice and performance data even when discon-
nected from the AC outlet. The life of this battery is
approximately 5 years. When the backup battery runs
low, the first line of the LCD will show "Change int
battery!". When the backup battery runs completely
out, the voice and performance data will be lost, so
immediately save the data to an optional RAM card
or to disk. Contact the dealer where you purchased
your V50 or a Yamaha service center to have the
battery replaced. When the battery is replaced, the
voice and performance data will be lost, so be sure to
store the data to RAM card or disk.
Floppy disk drive
When moving the V50, be sure to insert the included
dummy disk or an ordinary floppy disk (only if the data
is not essential) into the disk drive to protect the floppy
disk drive heads.
Floppy disks
Use 3.5” 2DD (double sided double density) disks.
NEVER remove the disk while the drive is accessing
the disk (when the disk LED is on). Do not leave disks
where there is a strong magnetic field (near speakers
or video monitors), or in direct sunlight. Do not bend
or put pressure on disks. Do not open the disk shutter
and touch the disk surface. We recommend that you
copy (backup) important data on one or more disks.

HOW TO USE THIS MANUAL
This manual is divided into chapters 1—6 and an appendix.
If you are using the V50 for the first time, we suggest you read chapter 1. This
will give you a basic understanding of all operations. You can refer to the remaining
chapters as necessary, when you want to take full advantage of the V50’s functions.
Chapter
1. Introducing the
V50
2. Performance Edit
3. Voice Edit
4. Using the rhythm
machine
5. Using the
sequencer
6. Utility functions
Appendix
MIDI format
Subject
First-time users Experienced FM users
Experienced V50 users
Important points to know Please read this section Not absolutely nec-
when using the V50, and basic essary to read
operation
Explains how to edit a per-
formance Read when you want to edit a performance Read when necessary
Explains how to edit a voice Read when you want Skim through Read when necessary
to edit a voice
Explains how to use the
rhythm machine Read when you want to use the rhythm machine
Explains how to use the se-
quencer Read when you want to use
the sequencer
Explains how to store, use the Read when necessary
disk and card, and make MIDI
settings
Explains the preset voices
Explains the MIDI data for-
mat of the V50
Read when necessary
Read when necessary
5

CHAPTER 1. INTRODUCING THE V50
This chapter begins with explaining the parts of the V50, and then tells how to make
connections and play the sounds. To take full advantage of the V50, please be sure
to read this chapter.
FRONT AND REAR PANELS
We begin by explaining the various parts of the V50. The use of each section will be
explained in chapter 2 and later chapters. Here we will give simple explanations of
what each part does.
The keyboard
Pitch bend wheel (PITCH)
This raises or lowers the pitch while playing. When
you release the wheel, it will return to the center
position (the normal pitch). Rotating the wheel away
from you will raise the pitch, and rotating the wheel
toward you will lower the pitch.
Modulation wheel (MODULATION)
This regulates the amount of cyclic change in tone
(wah-wah), cyclic change in volume (tremolo), or
cyclic change in pitch (vibrato). Rotating the wheel
away from you will cause a deeper effect, and ro-
tating it all the way towards you will result in no
effect.
This is where you insert a 3.5” floppy disk to store
Floppy disk drive
voice or performance data, or data from the se-
quencer or rhythm machine. Insert the disk with
the label facing up, from the end with the metal
shutter. To remove the disk, press the button at the
lower right of the drive.
Volume slider (VOLUME)
This slider regulates the volume. Moving the slider
all the way towards you results in a volume of 0,
and moving it all the way away from you will result
in full volume.
6
Introducing the V50

Data entry slider (DATA ENTRY/TEMPO)
This slider is used when setting various data to enter
larger or smaller numbers or turn settings off or on.
While the rhythm machine or sequencer is playing,
this slider regulates the tempo.
Card slot (CARD)
This is the slot in which to insert a RAM or ROM
card. Cards can be used to save voice, performance,
Display
This displays the names of selected voices or per-
formances, data values, on/off settings, etc.
C3 key mark
Each key of the keyboard has a name consisting
of an alphabetical character A–G and a number
–2
— 8 indicating the octave. (For example G-1,
C#1, E4, G5, A6, etc.) This mark indicates the po-
sition of C3.or rhythm data. Turn the power off before inserting
or removing a card.
Key panel (the keys below the display)
Function keys
These keys have various functions when editing
voices or performances, or editing sequencer or
rhythm machine data. The display will indicate the
current function of each key.
System keys
These are used with the sequencer or rhythm ma-
chine, or when editing sequencer or rhythm machine
data. When you press you will enter sequencer
play mode. When you press
you will
enter rhythm play mode (pattern play mode or song
play mode). In sequencer or rhythm machine mode,
pressing
will display menus of various settings
for each mode.
Sequencer, rhythm machine keys
In sequencer or rhythm machine mode, these
keys
start, stop, backward, or fast forward, just as the
controls on a cassette recorder. Pressing
and
together will move to the beginning of the
song. In rhythm pattern mode, this will move to the
beginning of the pattern. When editing a voice, the
and
keys will switch
operators 1, 2, 3, and 4 off or on.
selects the
operator to be edited.
Numeric keys
Use these keys to specify voice or performance
numbers, or values for various settings. They are
also used to enter characters for a voice name, etc.,
and to specify the note length when recording a
sequence. The keys are also used when
replying to prompts in the display.
Introducing the V50
7

Key panel (the keys to theright of the display)
Play keys
8
Introducing the V50
These keys are used to switch between performance
play and single play modes.
Press to change to performance
play mode. Press
to change to single
play mode.
Memory keys
These keys select between “Preset”, “Card”, or
“Internal” voices, performances, and rhythm pat-
terns. (However, there are no “Card” rhythm pat-
terns.)
Edit keys
When editing voices or performances, these keys
specify the parameter to be edited. During sequencer
playback, these keys switch each track on/off. They
are also used to select tracks for recording.
Utility keys
These keys are used when making various settings
or for various operations affecting the entire V50.
Demo key
Use this key to play the preset V50 demo.

Rear panel
Power cable
Insert this plug into an AC outlet of the correct
voltage.
Power
switch
(POWER)
This is the power switch. The power is on when this
switch is pressed in. The front panel display will light
when the power is turned on.
MIDI terminals (IN, OUT, THRU)
Connect MIDI cables to these terminals. IN receives
MIDI signals, OUT transmits MIDI signals, and
THRU re-transmits the MIDI signals that were re-
ceived at the IN terminal.
Audio Outputs (L/MONO, R)
These jacks output the sound. If you have two
amplifiers, connect the left channel to L/MONO
and the right channel to R. If you have only one
amplifier, connect it to L/MONO.
Volume pedal jack (VOLUME)
An optional volume pedal can be connected here.
Foot controller jack (FC)
An optional foot controller (FC7, FC9, etc.) can
be connected here to regulate tone, pitch, or volume.
Foot switch jack
(FS)
An optional foot switch (FC4, FC5, etc.) can be
connected here to turn sustain (sustaining notes) the
portamento (smoothly changing pitch) on/off.
Sequencer switch jack
(PLAY/STOP)
An optional foot switch (FC4, FC5, etc.) can be
connected here to start or stop sequencer playback.
(This will function in the same way as the front panel
keys and
)
Front side
Headphone output (PHONES)
A pair of stereo headphones can be connected here.
The connector is a standard stereo headphone output
jack, and corresponds to the rear panel L and R
output jacks. (Use headphones of 8 – 150 ohms
impedance.)
Breath controller jack (BREATH CONT)
An optional breath controller (BC1, BC2) can be
connected here to affect volume or tone according
to the force of your breath.
Introducing the V50 9

CONNECTIONS
To produce sound, you must connect the V50 to an external amp/speaker systemTo produce sound, you must connect the V50 to an external amp/speaker system
or use a pair of headphones. This section shows some typical setups. (The “amps”or use a pair of headphones. This section shows some typical setups. (The “amps”
in the diagram refer to a keyboard amp that has a speaker built in.)in the diagram refer to a keyboard amp that has a speaker built in.)
Note:
Be sure to turn the power of both units off before connecting the V50 to the amp. Failing to do
so can damage the amp.
Using a single amp
When using just one amp, connect the L/MONO jack
to the input of the amp as shown in the figure.
Using two amps
When using two amps, connect the L/MONO output
jack to the amp for the left channel, and the R output
jack to the amp for
the right channel.
Equipment that can be connected to the V50 outputs
The example above uses keyboard amps (speakers
with built-in amps), but other types of equipment can
be connected to the V50 outputs, as follows.
Combination amp/speaker units
Multitrack recorders or cassette decks. However,
be sure to use the line inputs. Connecting the output
of the V50 to the mic inputs could damage the
equipment.
When connecting to a cassette deck
etc., you will need an adaptor to convert the phone
plug into the pin plug that is found on most cassette
decks.
Mixers (e.g., the MV802 or DMP7). Be sure to
use the line inputs.
Connecting other equipment via MIDI
Here are some ways to connect other equipment to the
V50 using the MIDI terminals.
l
Controlling the V50 from another MIDI device (a
keyboard or synthesizer such as the KX or DX series).
l
Controlling another MIDI device (a synthesizer or
tone generator module such as the DX or TX series)
from the V50.
Note:
This is also how you will make connections when using
the V50 sequencer to control external synthesizers
or tone generator modules.
l
Connecting an external sequencer (such as the QX
series) and using it to record and playback.
There are many other ways to make MIDI connections,
depending on your equipment and needs.
The MIDI THRU terminal re-transmits the MIDI
signals received at MIDI IN. This makes it possible for
more than one MIDI device to be controlled at once.
10
Introducing the V50

MAKING SOUND
Now that connections are complete, we will explain how to make some sounds.
Turn the power on
Turn on each device in your setup in the following order.
(1) Check the following four items.
(1) Are all power cables correctly inserted into an
AC outlet?
(2)
Are all connections correct?
(3)
Are the amplifiers set to minimum volume?
Any sound?
Now we will produce some sound.
(1)
Raise the volume of the amp. (The manual for your
amp will give details.)
(2)Gradually raise the volume slider to increase the
V50 volume.
(3)
Press
a key.
(4)
Is the V50 volume slider set to MIN? Is the V50 sounding? If not, check the following.
(2)
The round button on the right side of the rear panel
(1)
Is the power of the V50 and the amp turned
is the power switch. Press it in to turn the V50 power
on?
on.
(2)
Are the V50 and the amp correctly connected?
(3)
Are the volumes of V50 and amp raised?
If after checking these three items you still hear no
sound, try the steps given on the following page. If
you still hear no sound, see page 122.
The display will light up, and show the following
message. (You can modify the message in the lower
line of the display as explained on page 22.)
Now let’s try out the various sounds of the V50.
In a short time this will change to a display similar
to the following.
This display will be whatever was displayed when the V50
was last turned off, so details may be slightly different.
(3) Turn the amp (keyboard amp, etc.) power on. (The
amp power is turned on last to protect the speakers
from possible damage.)
Note:
When several MIDI devices are connected, turn
them on beginning with the transmitting device.
When turning the power off, reverse this order.
Turn off the amp, and then turn off the V50.
Introducing the V50
11

TRY OUT THE SOUNDS
When you purchase the V50, the following 200 sounds are available for you to play.
(1) 100 preset performances
(2) 100 preset voices
Later, we will explain what a “voice” and “performance” is.
the sounds. For now, just try playing
Note:
In addition to these presets, there are 100 internal performances and 100 internal voices. At the
time of purchase, these contain the same sounds as the preset voices and performances.
100 preset performances
(1)
Press
, located at the right of the
display. If the display already. shows something
similiar to the following, there is no need to press
, and you can move on to step
(2).
If "PF..." is already displayed
(2) Press
The display will show "PF??".
(3) Use the numeric keys to enter a two-digit number.
The 100 preset performances are numbered 00 – 99.
For example if you press the display
will indicate that preset performance 00 has been
selected, as follows.
Play the keyboard and you will hear the sound
of preset performance 00.
(4) Using the same proceedure as in step (3), use the
numeric keys to enter a different two-digit number
to select another performance. Play the keyboard
and you will hear a different sound.
100 preset voices
12
Introducing the V50
(5) This time press
Pressing will select the performance of the
next number.
Pressing will select the performance of the
previous number.
For instance if preset performance 12 is selected,
pressing
will select preset performance 13.
As you have learned, there are two ways to select
numbers; by directly entering the number using the
numeric keys, or by incrementing or decrementing
the currently selected number using
Preset performances from 94–99 are intended for
multi-timbral playback using the V50 sequencer.
When playing the keyboard with these performances
selected, some of the sounds may be identical to other
performances, and not all of the instruments shown
in the lower line of the display will sound in response
to the V50 keyboard.
The polyphony of each performance will depend on
how voices are combined, and the performance effects
that are used.
(1)
Press
located at the right of the display.
If the display already shows something similiar to
the following, there is no need to press
and you can move on to step (2).
If “PLAY SINGLE” is already displayed

(2) Press The lower left of the display will
show “P??“, as follows.
Select a preset voice number (00 – 99) in the same
way as you selected a preset performance. Use
the numeric keys to directly enter a two-digit
number, or use to step through preset
performances one by one.
This should give you an idea of the types of sounds
the V50 can produce. Using the simple procedures
you have just learned, you will be able to select and
play a variety of sounds. Those who want to take
full advantage of the V50 can continue reading to
learn more.
Pressing
when already in per-
formance play mode, or pressing
when
already in single play mode will make the display show
"Sending PC No.---".
The display will return to
normal when you release the button. This function
allows you to transmit a “Program Change” message
from MIDI OUT. This function is meaningless when
using the V50 by itself. For details, see page 103.
Note:
Since voice and performance memories are numbered
from 00 to 99, selecting a memory usually requires
you to enter a two-digit number. However, the “Bank
Hold” feature allows you to select memories by
pressing a single button. While holding
, press
to turn Bank Hold on. When Bank Hold is
on, pressing a single numeric key will immediately
select the memory in the group of 10’s that is currently
selected. For example if memory 23 was selected
when you turned Bank Hold on, pressing
would
immediately select 29, and pressing 4 would imme-
diately select 24. While holding
press
to turn Bank Hold off.
Introducing the V50
13

DEMONSTRATION PLAYBACK
Playing interesting sounds is not all you can do with the V50. Next we will explain
how to hear a demo playback that uses the V50 sequencer and rhythm machine,
which should give you an idea of the possibilities of the V50.
There are two types of demo: demos stored in the memory of the V50 and demos
stored on disk. We will give separate explainations how to load each type.
When you load demo data, the data already in the V50 will be replaced by the
demo data.When you select “Demo Disk”, “Chain Play”, or “V.Edit”, the internal voice
and performance data will also be replaced. If V50 memory already contains data that
you don’t want to loose, save the data to card or disk.
Playing the internal demo
Here’s how to playback the internal demo.
(1) Press
to get the following display.
(2) Press the (function key) located under
“ > ROM Play” in the display.
The upper line of the display will ask "Are you
sure?".
(3) Press the function key
below
After
displaying
“*** BUSY ***” for a short time, the
following display will appear.
(4) Use
to select the demo song. The song
titles will be shown in the lower line of the display.
(5) Press to begin playing the demo song. To stop
playback, press
To resume playback, press
again. Press
and
together to re-
turn to the beginning of the song.
Playing the disk demo
Here’s how to playback the disk demo. (Not only the
demo data included with the V50, but any data you save
to disk by selecting “ALL” can be loaded and played
using the procedures explained here.)
(1) Press
to get the following display.
(2) Insert the demo disk into the disk drive. (Making
sure that the label is facing up, and the metal shutter
is pointing toward the drive, push the disk in until
you hear it click into place.)
(3)
Press the (function key) located under “ > Disk
Play” in the display.
The upper line of the display will ask "Are you
sure?".
(4) Press the function key
below
After displaying “*** BUSY ***” for a short time,
you will get the following display.
(5) Use
to select the song. The song titles
will be shown in the lower line of the display.
(6) Press to begin playing the demo song. To stop
playback, press
To resume playback, press
14
Introducing the V50

again.Press
and together
to re-
turn to the beginning of the song.
In step (3), pressing the (function key) located
under “Chain Play”
will
make all the demo songs
play sucessively, starting with the first. Also, if this
data has been saved by selecting “ALL” when saving
sequencer data, as later explained, you can use the
same steps with disks other than the included demo
disks. However only the “ALL” files at the beginning
of the disk can be selected by this “Disk Play”
function.
Voice edit demo
Here’s how to execute the voice edit demo.
As already explained above, press , and then
press the
(function key) located under “V.Edit”
in the display.
The display will show "Are you sure?".
Press the (function key) located under “Yes”.
The voice edit demo will begin.
Use the data entry slider to adjust the speed of the
voice edit demo.
BASIC CONCEPTS OF THE V50
By now you probably have a basic idea of the possibilities of the
V50.
Reading this section will give you more detailed knowledge.
Internal structure of the V50
Four play modes
The V50 contains three devices; a synthesizer, rhythm
machine, and sequencer. In general, you may think of
them as being independent of each other.
Synthesizer
...
A
device that produces various sounds
using an FM tone generator. The synthesizer can be
thought of as consisting of the “keyboard” on which
you play, and the “tone generator” which actually
produces the sounds.
Rhythm machine
...
A device that contains PCM re-
cordings of actual rhythm instrument sounds. The
wide variety of sounds include traditional drum kit
instruments, synthesized drums, and ethnic instru-
ments.
Just as the internal structure of the V50 can be divided
into synthesizer, rhythm machine, and sequencer, the
play modes of the V50 can be divided into the following
four modes.
(1)
Performance play mode
Play performances (combinations of more than one
voice). Details of
“voices”
and “performances” are
given on page 18.
(2)
Single play mode
Play just one voice at a time.
Sequencer
...
A
device to record an actual musical per-
formance. A musical performance recorded in this
way can be played back at any time.
(3)
Rhythm machine play mode
Play rhythm patterns or songs (combinations of
rhythm patterns). Chapter 4 has details of rhythm
machine operation.
(4)
Sequencer play mode
Play back a recorded musical performance. Chapter
5 has details of sequencer operation.
Introducing the V50 15
Other manuals for V50
5
Table of contents
Other Yamaha Synthesizer manuals

Yamaha
Yamaha SY99 Service manual

Yamaha
Yamaha MOTIF 6 Instruction Manual

Yamaha
Yamaha ARIUS YDP-181 User manual

Yamaha
Yamaha MM8 User manual

Yamaha
Yamaha YS100 User manual

Yamaha
Yamaha Symphonic Ensemble SK10 User manual

Yamaha
Yamaha PortaTone PSR-260 User manual

Yamaha
Yamaha P-65 User manual

Yamaha
Yamaha PortaTone PSR-8000 User manual

Yamaha
Yamaha SY-1 User manual