manuals.online logo
Brands
  1. Home
  2. •
  3. Brands
  4. •
  5. Fysic
  6. •
  7. Cordless Telephone
  8. •
  9. Fysic FX-5500 User manual

Fysic FX-5500 User manual

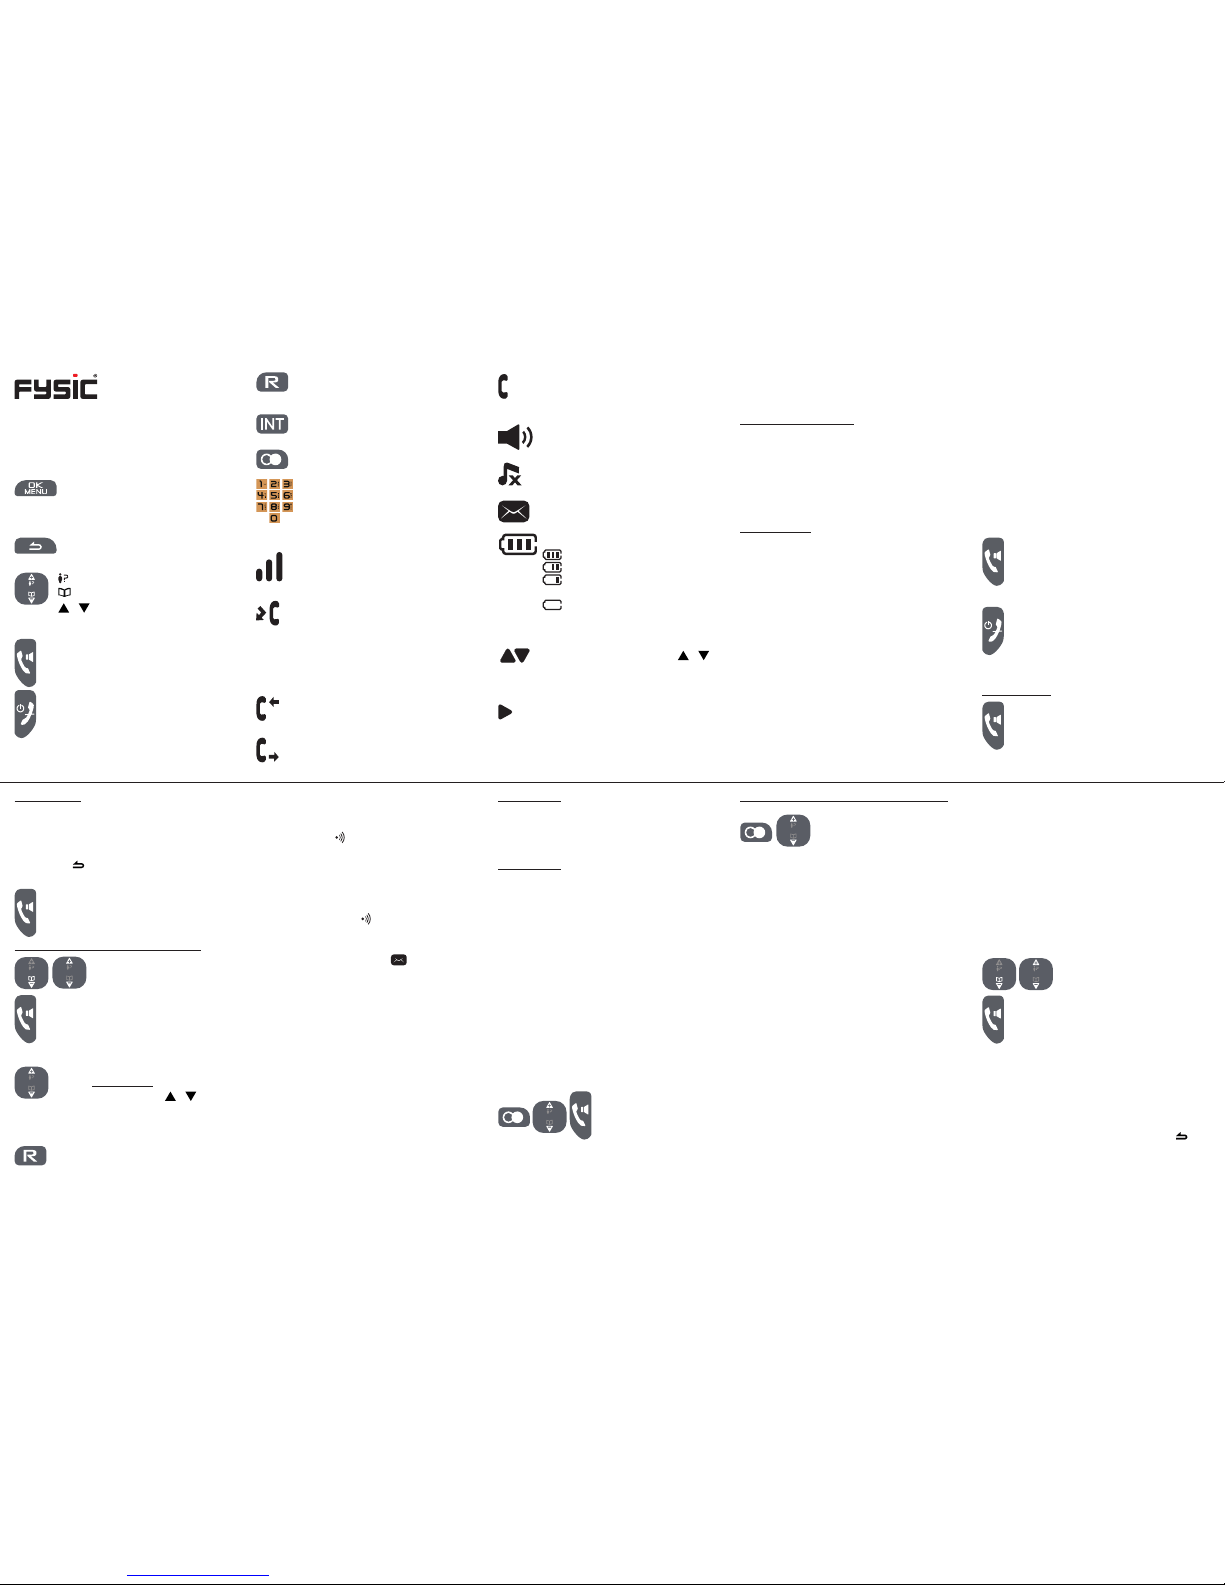
R/Flash function button, see para-
graph 4.6
Intercom button (only functional with
multiple handsets)
Redial button
Keypad
2 DISPLAY OVERVIEW
remains lit when within range from
the base; is off when out of range
from the base
ashes when you’ve received new
calls; disappears when the Caller-ID
memory of the concerned handset
has been fully checked
keep in mind that when using the
FX-5220, each handset must be
checked separately
illuminates while reading the Cal-
ler-ID memory
illuminates when reading the last
dialled number memory
2. insert the supplied batteries into the bat-
tery compartment according to the mark-
ings.
3. Slide the battery cover back onto the
handset and place the handset on the
base/charger station.
4. Leave the handset continuously during
15 hours on the base station, to cradle/
charge the batteries properly.
4 CALLING
4.1Answering calls:
Press the key phone-on to accept a call
press the Call button again to enable
the speaker function
4.2 End the call:
press the key phone-off to end a call
To end a call, you can also place the
handset back on the base station or the
cradle/charger.
4.3 Dialing numbers:
Direct dialing:
Press the phone-on key and enter
the phone number through the key-
board; this number will be dialed
directly.
Block dialing:
Enter the phone number through the key-
board.
• press and hold the # button for at least 2
seconds to insert a dialing pause
• press the button to delete any incorrect
input
press the phone-on key; the number
will be dialed
dialing from the phonebook memory:
press the Phonebook button
and search for the desired
contact
press the phone-on key; the number
will be dialed
4.4 Speaker volume:
You can only adjust the speaker
volume during a call. You can choose
from 5 levels. Use the / but-
tons to increase or decrease the volume.
4.5 R/Flash:
During the call, shortly press the key
R to give a FLASH pulse.
The interruption time of the FLASH pulse is
adjustable; for this, see in paragraph 11.2.
4.6 Handset search function:
In case you’ve misplaced the handset, you
can easily nd it again as follows:
briey press the button at the bottom of the
base.
The handset will start ringing for 30 seconds
while the text ‘PAGING’ appears in the display.
The handset will stop ringing after 30 seconds
or after pressing a random button (handset)
or when pressing the button (base) again to
manually stop the signal earlier.
4.7 Voicemail notication: ( )(*)
In case the carrier left a Voicemail message for
you, a notication symbol ashes in the display
of the handset.
This symbol goes off as soon as you have
listened to this message. This symbol also
disappears after resetting the phone (see
paragraph 11.2).
*: This function is only available on the FSK
system and when this is supported by the
carrier.
4.8 To switch off the handset:
You can completely switch off the handset to
save battery power or in case you don’t want
to be disturbed:
to switch off:
pick up the handset from the base or charger
and press and hold the End button for 2 sec-
onds to completely switch off the handset
to switch on:
press and hold the End button for 2 seconds
to switch the handset on again
The handset also switches on when replac-
ing it onto the base or charger.
4.9 Call duration:
During the phone call, the elapsed call dura-
tion is displayed on the handset display.
10 seconds after disconnecting the call, the
call duration timer will disappear from the
display.
5 REDIALLING
Each handset memorizes the 10 last num-
bers you’ve dialed with the handset. You can
redial these numbers as follows:
press the Redial button,
search for the desired re-
cently dialed number and
press the phone-on
key; the number will be dialed
copy to the phonebook memory / deleting
press the Redial button and
search for the desired number
press the MENU button and select:
• SAVE NUMBER to save the selected
number
• EDIT ENTRY to edit the selected number
• DELETE to delete the selected number
• DELETE ALL to delete all last dialed
numbers
press the OK button and follow the on-screen
instructions
6 PHONEBOOK
6.1 Introduction:
The handset is provided with a phonebook
memory with a capacity of 50 contacts, each
with a phonenumber of up to 24 digits and a
name of up to 14 characters.
The phonebook memory in the handset is
connected to the function Caller Identica-
tion. When you are called by somebody,
whose name and number you have pro-
grammed in the memory, the name of this
person is also displayed beside the number
on the display of your handset.
6.2 Programming:
1. press the MENU button and then the OK
button
2. press the OK button and enter the name
using the keypad
3. press the OK button and use the keypad
to enter the phone number
press and hold the # button for 2 sec-
onds to insert a dialing pause
4. press the OK button
6.3 Dialing memory contacts:
press the honebook button
and search for the desired
contact
press the phone-on key; the number
will be dialed
6.4 Correcting:
1. press the MENU button
2. press the OK button and select EDIT
ENTRY
3. press the OK button and search for the
desired contact
4. press the OK button and press the
button to delete the name
5. use the keypad to enter the new name
and press the OK button
6. repeat this for the number and press the
OK button
USER MANUAL
1 OVERVIEW HANDSETBUTTONS
OK / MENU button
to open the menu and to conrm a
selection
Correction button, to delete the last
input;
: to open the Caller-ID memory
: to open the phonebook memory
/ : buttons: to scroll settings
and memories
Call button: to answer incoming calls
press the Call button again to ena-
ble the speaker function
End button: briey press to end a
call; press and hold to switch off the
handset
3 INSTALLATION
3.1 Base station:
Telephone connection:
1.
insert the small plug of the telephone cable
into the TEL.LINE input at the rear of the
base (depress the plug until you hear a
click)
2. Plug the phone connector into the phone
socket.
Power supply:
1. insert the adaptor plug into the DC 6V
input at the bottom of the base
2. plug the adaptor into a 230 Volts wall
socket
3.2 Cradle/charger:
If your phone has been delivered with multi-
ple handsets, 2 batteries and a cradle/char-
ger with adapter will be included for every
handset. Plug the adapter of these chargers
in a 230 Volt mains socket.
3.3 Handset:
1. Open the battery compartment of the
handset, by sliding the battery cover
down.
ashes during an incoming call;
remains lit during a phone conver-
sation
illuminates when the speaker functi-
on is enabled
illuminates when the ringtone of the
handset is disabled
ashes when you’ve received a new
voicemail message
battery indication:
: battery is full
: battery still 2/3 full
: battery only 1/3 full, recharging
is recommended
: battery almost empty, the
handset may switch off at any mo-
ment
illuminates when using the /
buttons to show additional options or
memories in the display
illuminates when the number is too
long to be shown in the display,
press the # button to view the rest of
the number
FX-5500
FX-5520
7.4 Copying / deleting:
open the Caller-ID memory
and search for the desired call
press the MENU button and select:
• SAVE NUMBER to save the selected
number
• DELETE to delete the call
• DELETE ALL to delete all last incoming
calls
press the OK button and follow the on-screen
instructions
8 TIME & DATE
8.1 Time and date setup:
1. open the menu and select CLOCK &
ALARM
2. press the OK button and select DATE/TIME
3. press the OK button and use the keypad
to enter the following in order:
- the last 2 digits of the year
- the month (use 2 digits)
- the date (use 2 digits)
4. press the OK button and use the keypad
to enter the following in order:
- the hours (use 2 digits)
- the minutes (use 2 digits)
5. press the OK button and the End button
to return the handset to standby mode
conference:
as soon as the call is answered, briey
press and hold the INT button to start the
conference call
10.3
Registering (additional) handsets:
base:
1. press and hold the button on the base
for 8 seconds
handset:
1. open the menu and select the option
[ ADVANCED SET ]
2. press the OK button and select the option
[ REGISTER ]
3. press the OK button and use the keypad
to enter the PIN code (factory code 0000
or your personal code)
4. press the OK button, the handset will now
start searching for the base
After several seconds, the handset will
have found the base and the internal
handset number will appear at the right
side in the display
10.4 De-registering handsets:
To de-register, select the option [ UNREGIS-
TER ] in the menu [ ADVANCED SET ].
11 TELEPHONE SETUP
11.1 HANDSET SETUP:
1. press the MENU button to open the menu
2. select the option [ PERSONAL SET ] and
press the OK button
3. select the desired option and press the
OK button
[ HANDSET NAME ]
You can assign a personal name to the hand-
set. When the handset is in standby mode,
this name will be shown in the display of the
handset.
[ MELODY ]
Use this option to set the ringtone and ring
volume and whether a sound must be emit-
ted when pressing one of the buttons
[ LANGUAGE ]
The various instructions in the display can
be shown in different languages. This option
allows you to set the desired language.
In case you’ve set an unknown language and
don’t know how to restore the English lan-
guage, please see below:
1. Press the key ‘phone-off’ 3 times.
2. Press the key MENU once.
3. Press key once.
4. Press the key OK once.
5. Press key twice.
6. Press the key OK once.
7. use the / buttons to select the
English language and press the OK
button to conrm this language
8. press the End button once.
11.2 BASE SETUP:
1. press the MENU button to open the menu
2. select the option [ ADVANCED SET ] and
press the OK button
3. select the desired option and press the
OK button
[ CHANGE PIN ]
A PIN code is required for registering or
de-registering additional handsets and for
certain other functions. The default PIN code
set in the factory is 0000, but you can use
this menu option to change the code into a
personal code.
See item [ RESET ] if you’ve forgotten your
PIN code.
[ REGISTER ]
This function is described in detail in chapter
10.3.
[ UNREGISTER ]
This option allows you to unregister lost or
faulty handsets.
[ RESET ]
In case you’ve forgotten your personal set-
tings or the PIN code, you can use this option
to restore the default factory settings.
Keep in mind that in addition to resetting your
settings, the PIN code will be 0000 again and
the Caller-ID memory and last dialed number
memory will be empty again. The phonebook
memory will not be deleted.
[ RECALL TIME ]
You can set the interruption time of the R/
FLASH pulse on SHORT (100 ms), MEDIUM
(270 ms) or LONG (600 ms).
Refer to the user manual of your home or
ofce switchboard or consult your carrier
concerning the desired interruption time.
100 ms is the standardized interruption time,
and this time is set at the factory.
12 SPECIFICATIONS
Protocol: DECT / GAP
4 handsets
Caller-ID: DTMF & FSK
auto selection
20 memories
Dialing: TONE
FLASH: 100, 270 & 600mS
Phonebook memory: 50 memories
Power supply charger: 2x 1.2V 300mAh
NiMH battery
format AAA
Power supply base station:
Power adapter
6VDC, 500mA,
Power supply charger pod:
Power adapter
6VDC, 150mA
Range: 50 m indoors
300 m outdoors
Operational life (with full batteries):
standby:> 100 hours
use:> 10 hours
Connection factor: ETSI 50
Operational temperature:0°C to 40°C
Storage temperature: -20°C to 60°C
6.5 Deleting:
1. press the MENU button
2. press the OK button and select DELETE
(to only delete the selected number) or
DELETE ALL
3. press the OK button and search for the
desired contact
4. press 2x the OK button to delete the se-
lected or all contacts
7 CALLER IDENTIFICATION
7.1 Indication new calls ( )
indicates you’ve received one or more new
calls you haven’t checked yet
7.2 View memory:
the last received call appears in the
display
scroll through the memory
7.3 Callback:
the last received call appears on the
display
search for the desired call and
press the phone-on key; the
number will be dialed
9.3 Operation:
• At the preset time, the alarm signal will
sound for 60 seconds or until you press a
random button to stop the alarm before-
hand.
• The alarm signal has a xed volume.
• When you’re currently on a call when the
alarm sounds, the receiver will emit three
short notication tones. After disconnect-
ing the call, the alarm signal will continue.
10 MULTIPLE HANDSETS
10.1 Intercom:
1. Press the key INT
as soon as the dialed device
answers, you can start the internal
conversation
2. press the End button to disconnect the
call
10.2 Forwarding / conference:
1. During the call with the outside line, press
the key INT
Call transfer:
after the call is answered, press the End
button to transfer the call
9 ALARM (WAKE-UP) FUNCTION
9.1 Alarm time setup:
1. open the menu and select CLOCK &
ALARM
2. press the OK button and select ALARM
3. press the OK button and select:
‘OFF’ to disable the alarm function
‘ON ONCE’ to have the alarm sound
only once
‘ON DAILY’ to have the alarm sound
every day
after selecting ‘ON ONCE’ or ‘ON DAI-
LY’: press the OK button and enter the
alarm time
4. press the OK button and the End button
to return the handset to standby mode
9.2 Alarm signal setup:
1. open the menu and select CLOCK &
ALARM
2. press the OK button and select ALARM
TONE
3. press the OK button to select the desired
tone
4. press the OK button and the End button
to return the handset to standby mode
v1.0

This manual suits for next models

1

Other Fysic Cordless Telephone manuals

Fysic FX-9000 User manual

Fysic

Fysic FX-9000 User manual

Fysic FX-5700 User manual

Fysic

Fysic FX-5700 User manual

Fysic FX-6000 User manual

Fysic

Fysic FX-6000 User manual

Popular Cordless Telephone manuals by other brands

GE 26980 user guide

GE

GE 26980 user guide

V-tech IS7256-3 user manual

V-tech

V-tech IS7256-3 user manual

Xact XD6401 owner's manual

Xact

Xact XD6401 owner's manual

Aastra DT390 user guide

Aastra

Aastra DT390 user guide

Panasonic KX-TG5561 operating instructions

Panasonic

Panasonic KX-TG5561 operating instructions

Aristel AN105 user guide

Aristel

Aristel AN105 user guide

Medion MD 5909 instruction manual

Medion

Medion MD 5909 instruction manual

Grundig D1110 manual

Grundig

Grundig D1110 manual

Motorola MA351SYS user guide

Motorola

Motorola MA351SYS user guide

Radio Shack 43-3817 owner's manual

Radio Shack

Radio Shack 43-3817 owner's manual

Philips D161 quick start guide

Philips

Philips D161 quick start guide

Panasonic KX-TCD965EC operating instructions

Panasonic

Panasonic KX-TCD965EC operating instructions

Gigaset Gigaset CX150 isdn instructions

Gigaset

Gigaset Gigaset CX150 isdn instructions

Gigaset 3070 isdn user guide

Gigaset

Gigaset 3070 isdn user guide

BT FREESTYLE 250 user guide

BT

BT FREESTYLE 250 user guide

ALcom SYMPHONY 2200 user guide

ALcom

ALcom SYMPHONY 2200 user guide

BT ON-AIR 1100 CLASSIC user guide

BT

BT ON-AIR 1100 CLASSIC user guide

BellSouth GH9640 owner's manual

BellSouth

BellSouth GH9640 owner's manual

manuals.online logo
manuals.online logoBrands
  • About & Mission
  • Contact us
  • Privacy Policy
  • Terms and Conditions

Copyright 2025 Manuals.Online. All Rights Reserved.